Strawberry Pots de Creme

Strawberry Pots de Creme

Here’s a beautifully simple dessert that is silky and rich and bright with the last memories of summer strawberries.  Fresh is always best if you can find good ones, but if they’re out, or have already sky-rocketed in price, frozen would work just fine.  It’s a custard kind of week here on the Family Meal blog.  I get good use out of my cute little ramekins and I have really embraced them as they are a perfect little size for toddler hands.  Oh yeah, and that spoon is part of this set, which I really just couldn’t resist.  I love them for Olive and for dips and jams and even my morning coffee.  Plus, what little girl wouldn’t feel excited to get to eat her oatmeal in the morning with a gold glitter spoon?  Olive couldn’t really care less.  It’s for me.  🙂

Strawberry Cream Pots


Strawberry Pots de Creme (pronounced: poh-duh-crem)
makes 4-6 depending on your vessels

  • 8 ounces strawberries (7 or 8 large berries), hulled
  • 3 tablespoons superfine sugar
  • 4 large egg yolks
  • 1 1/2 cups heavy cream
  • 1 tsp vanilla bean paste (or extract)
  • 1 tsp Cointreau (I left this out for Ollie)

Preheat oven to 275 degrees. In a tall cup or blender, combine strawberries, sugar and egg yolks. Process with your handy immersion blender (or regular blender) until pureed.

Bring a kettle of water to a boil. Pour the strawberry mixture into a large bowl.  Add 1 cup cream and the vanilla and Cointreau if using. Mix well. Divide mixture evenly among four 1-cup ramekins. Place ramekins in a baking dish, and add enough boiling water to come halfway up the sides of ramekins.

Place baking dish in the oven, and bake until the custard is just set, about 1 hour. Check by jiggling the pan – if they still look pretty liquidy in the center, rotate the pan and let it go another 15-20 minutes. Remove from the oven; place ramekins on a rack, and cool. Cover with foil or plastic wrap, and refrigerate at least 6 hours. To serve, top with diced strawberries or whipped cream and enjoy with your sparkle spoons!  🙂


Greek Yogurt and Almond Butter Cheesecake

yogurt cheesecake002
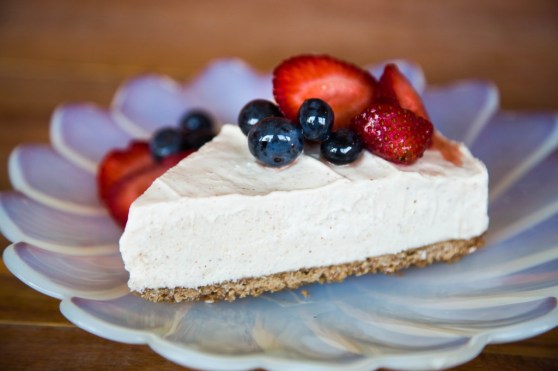
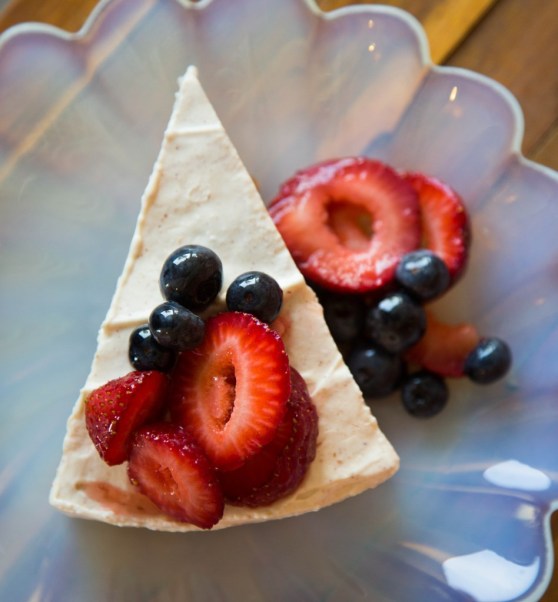
I made this cheesecake last weekend for the 4th of July festivities.  By festivities, I mean meals.  Olive has been consuming a lot of yogurt lately (plain, full fat awesome stuff sweetened with a little bit of honey) and I did one of those “I thought we were out” mistakes and bought a huge container to come home and realize we already had a huge container.  I hate wasting and so I have been putting Greek yogurt in a lot of stuff , lately.  This morning I made yogurt and oatmeal waffles (really good, I’ll post about those, soon) and when I ran across a recipe that called for 2 cups of yogurt in a cheesecake, I knew I’d found my way to not waste!  Oh, how humble of me to eat a cheesecake in order to not waste yogurt.  It’s a hard life.

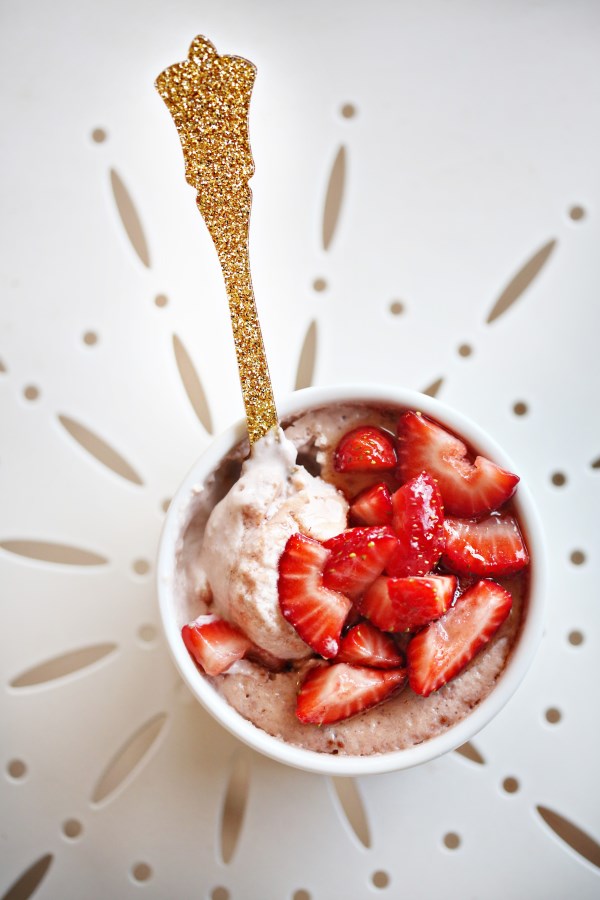
This is the no-bake type of cheesecake I grew up eating.  I love the kind you bake and there’s a place for that (that place is anywhere) but for these super hot summer days, a lighter, fluffier, doesn’t-heat-up-your-kitchen dessert is the way to go.  And using those strawberries I almost ALWAYS let rot on my counter is a plus, too!  For the topping, I chopped up almost-bad strawberries, a few blueberries and mixed them up with a bit of honey and let it sit out while I made the cheesecake.  By the time everything was ready, the topping was perfect.

The addition of almond butter adds such a wonderful flavor.  I think if I make this again, I’d try using peanut butter, just to see what it would be like!  The original blogger of this recipe said that it was “healthy” and could be eaten for breakfast because it has yogurt and granola in the crust.  I think that’s a marvelous way to feel like taking a nap at about 10:30, so I wouldn’t recommend it (this is based on experience).  Just because something has granola and yogurt doesn’t make it healthy.  This is perhaps lighter than most cheesecakes, but it also has cream cheese and whipping cream, so you do the math.  Or don’t do math.  Just enjoy dessert and stop thinking about whether it’s healthy or not. Of course you shouldn’t eat it every day.  If you want to, then sure, obsess over calories.  If you only eat stuff like this on weekends, then by all means, go for the gold.

photo (1)
This little hand loved every bite.

yogurt cheesecake003

Greek Yogurt and Almond Butter Cheesecake*

For the Granola:
1 cup rolled or old-fashioned oats
1/4 cup finely shredded coconut
1/4 cup chopped cashews
1/8 tsp kosher salt
1 tbsp coconut oil (or butter would work fine – just make sure it’s soft and at room temp)
1/4 cup honey

Crust:
1 1/2 cups granola you just made
4 whole grain honey graham crackers
4 tbsp unsalted butter, melted

Cheesecake Filling:
8 oz cream cheese, room temp
3/4 cup + 1/4 cup sugar, divided
1 tsp vanilla extract
1/4 cup almond butter
2 cups plain greek yogurt – full fat, y’all
1/2 cup heavy whipping cream

Preheat oven to 350 degrees. In a mixing bowl, combine the oats, coconut, and nuts. In a measuring cup or separate bowl, whisk together the salt, coconut oil, and honey. Pour this mixture over the oats, and stir to completely coat the ingredients. Spread the mixture into an even layer on a baking sheet, and bake at 350 degrees for 12-15 minutes. Flip granola around with a spatula every 3-4 minutes to prevent burning and to get an even golden-brown crisp. After baking, set granola aside to cool.

Once the granola is cool to the touch, combine the granola and graham crackers in a food processor. Puree for 60-90 seconds, until a very fine and crumb-like texture. Pour in melted butter, and stir to combine evenly. Next, spread the crust mixture into the bottom of an 9-in round springform pan. Press down to compact into an even layer. Bake at 350 degrees for 3-4 minutes. (Do not let it burn!) Set aside to cool.

To make the filling, add the cream cheese and 3/4 of a cup of sugar to the bowl of a mixer fitted with the whisk attachment. Beat the cheese and sugar together until smooth and fluffy. Add the vanilla and almond butter, and beat until incorporated. Then, remove the bowl from the mixer, and fold in the Greek yogurt with a spatula. (Scrape the sides and bottom of the bowl!)

In a separate bowl, whisk the heavy cream with the remaining 1/4 cup of sugar until stiff peaks form. Fold the whipped cream into the cheesecake filling. Finally, pour the filling into the cooled granola crust, and spread into an even layer with a spatula. Cover with foil or plastic wrap, and freeze overnight.

To serve, run a paring knife around the edges of the cheesecake to loosen the sides from the pan. Then, unlatch the springform pan. Transfer the cheesecake to a cake stand or serving platter and garnish with fresh fruit.

*adapted from the adorable Mangoes and Palm Trees blog

Champagne Mangoes and a Glorious Mango Curd

mango curd macaron dish

When we were in Mexico City last year with our friends, Cali and Alex, we were introduced to the ultimate mango.  Small, lemon yellow and sweeter than a peach.  Cali showed us that there was a specific mango fork that you need to peel it properly, and then she went on to show the proper way to peel and dice up these golden nuggets of wonder. She is my unofficial mango-expert.  I will forever associate her with this wonderful fruit and every time I peel one, I always think, “Is this how Cali would do it?”   I had never experienced a mango like the ones in Mexico, before, and when we got back home, I was on the look out.  I was so excited to see one that looked very similar at the grocery store called Champagne mangoes, and the next time Cali came over, I had her confirm its validity.  We had a winner!  So now, whenever I see that they are in abundance at the store, I get a half dozen.  The last time I did, I let them go too long before eating them, and faced the fear of letting them go bad.

So, I decided that I wanted to make a mango curd.  I looked up a recipe and it called for 15 ounces of mango and that’s exactly how much I had.  The recipe turned out so well, I filled macarons with it and also filled citrus cupcakes with the curd and topped them in coconut cream cheese frosting.  Epic win for the cupcakes, epic fail on the macarons.  The macarons tasted great, but the cookie itself didn’t turn out very well.  They all went hollow!  I have made macaron cookies before and the best I can describe them is that they are the croissant of cookies.  Every batch is different, every recipe is different and their success depends on so many factors, it’s a little maddening. The quality of the ingredients, the humidity in your kitchen, the exact temp of your oven, etc, etc, etc.  I surprised myself and didn’t FREAK OUT when the first batch of cookies EXPLODED, the second batch was pretty perfect, and the third batch baked like the first.  A true testament to how baking is a fickle beast.  They at least looked pretty:

mango curd macarons

The cupcakes, on the other hand, were a no-brainer.  I took a basic yellow cake recipe and added in Fiori di Sicilia, then made a cream cheese frosting, added a bit of coconut extract and topped each with toasted coconut after filling the cupcakes with the mango curd.  Such a wonderful combination, that I wanted to share those recipes with you, today, but mainly, this mango curd is the winner.  A week later, I still had some in a jar so they were put on some buttermilk pancakes this morning with fresh blueberries and slices of Champagne mangoes, of course.

mango curd cupcakes

mango cupcakes

Champagne Mango Curd*

Makes 1 to 1.5 cups

15-ounces ripe mango, peeled, pitted, cut into 1/2-inch pieces (It took 5 Champagne mangoes)
1/3 cup sugar
3 tablespoons fresh lime juice
Pinch of salt
4 large egg yolks
1/4 cup (1/2 stick) unsalted butter, cut into small pieces

Puree mango, sugar, lime juice and salt in processor, scraping down sides of work bowl occasionally. Add yolks; puree 15 seconds longer. Strain through sieve set over large metal bowl, pressing on solids with back of spatula to release as much puree as possible. Discard solids in sieve.

Set metal bowl over saucepan of simmering water (do not allow bottom of bowl to touch water); whisk puree until thickened and thermometer registers 170°F., about 10 minutes. Remove from over water. Whisk in butter 1 piece at a time. Cover and refrigerate overnight.

*taken from Smitten Kitchen, who took it from Bon Appetit

Citrus Cupcakes*

1 stick unsalted butter, softened
2 cups all-purpose flour
1 tablespoon baking powder
1/2 teaspoon fine salt
1 1/2 cups granulated sugar
3 large eggs, room temperature
1 cup whole milk
1 teaspoon Fiori di Sicilia, or 1/2 tsp orange extract + 1/2 tsp vanilla

Preheat oven to 350 degrees. Butter and flour 12-16 muffin tins, or just line with cupcake liners and spray those with non-stick spray.  Whisk together flour, baking powder, and salt. Beat together butter and granulated sugar with a mixer on medium speed until combined, 1 to 2 minutes. Add eggs and beat well, scraping down sides of bowl as necessary. Reduce speed to low and gradually add flour mixture, beating until combined. Add milk and extracts and beat until just combined.
Divide batter among cups; smooth tops with an offset spatula. Bake until golden and a toothpick inserted into centers comes out clean, 25-30 minutes. Let cakes cool in pans on wire racks 15 minutes. Turn out cakes onto racks to cool completely before filling.

*adapted from Martha Stewart Living

Coconut Frosting*

1 stick unsalted butter, softened
4 ounces cream cheese, room temperature
5 cups confectioner’s sugar
1/4 teaspoon fine salt
1/4 cup whole milk
1/2 teaspoon pure vanilla extract
1/4 tsp coconut extract

1/2 cup coconut, toasted, for topping cupcakes

Beat together butter and cream cheese with a mixer on medium-high speed until pale and creamy, about 1 minute. Reduce speed to medium. Add confectioner’s sugar, 1 cup at a time, beating well after each addition. Add salt, milk, and vanilla, coconut extract and beat until fluffy, about 3 minutes. If not using immediately, cover surface of frosting with plastic wrap. Frosting can be refrigerated in an airtight container up to 1 week. Before using, bring to room temperature, then beat on low speed until smooth.

*adapted from Martha Stewart Living

To Assemble:

I used the large tip from my piping bag to cut out the centers of my cupcakes and I really went pretty much to the bottom of each cupcake with the cut.  The curd is pretty runny out of the piping bag, so I had to hold it up in the air between fillings.  I inserted the tip of the piping bag and slowly squeezed until the sides of the cupcake bulged a bit.  I like filling.  Then, I just smoothed the frosting on top of each cupcake and sprinkled with toasted coconut.

mango cupcake with coconut frosting