Green Chile and Corn Chowder

green chile and corn chowder
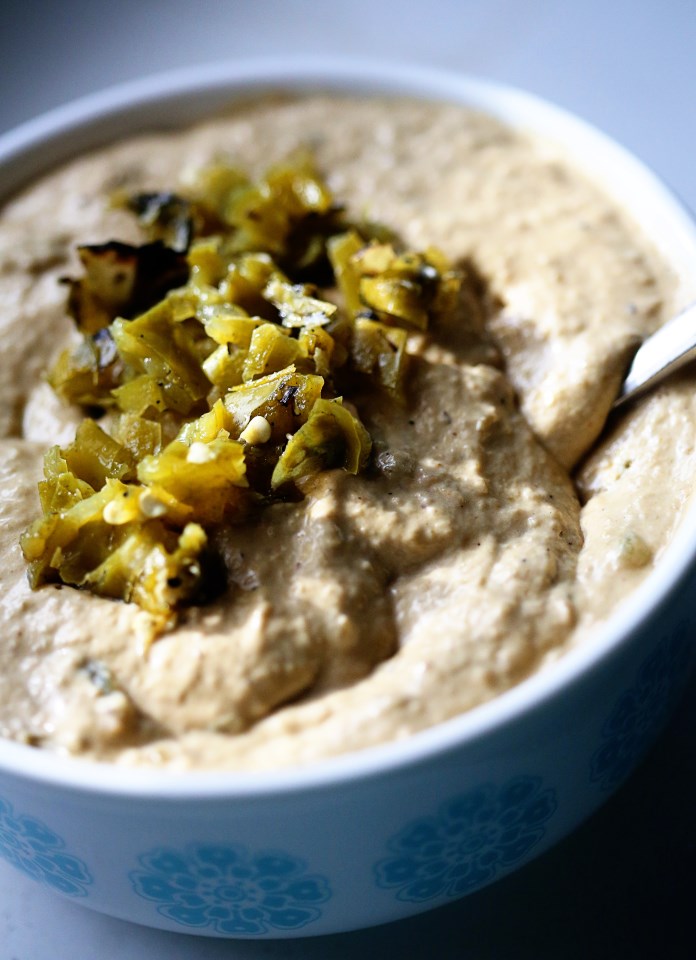
Matt’s been talking for a few weeks, now, about the corn chowder I made around this time last year.  I made a curried corn chowder when we lived in our apartment a few years ago and it was definitely something to write home about, although no one wrote about it and we just enjoyed it, as people tended to do before Facebook.  Last year, the chowder was more traditional, but nonetheless delicious, and for some reason, so summery, despite its warmth and chowdery-ness.  Sweet summer corn, smoked bacon, and this year: the addition of roasted green chiles.

The joys of making a soup or stew, for me, are in the slow development of flavors, and figuring out the best way to go about that process.  This time, I knew I wanted to really preserve that sweet corn flavor while at the same time, bring in a little heat and umami that a roasted green chile can provide.  So,  at the beginning of cooking, I let the chilies and half the corn roast together and I let the trimmed corn cobs boil in the broth the entire time, to draw out the sweet milkiness that is left after you trim the corn off the cobs.  I pureed half the ingredients to blend up the chile skins, which I left on for flavor, and then added more chilies and fresh corn at the end, along with super smoky bacon to round everything out.  The results were pretty balanced;  just enough heat from the chilies, sweetness from the corn, and perfect with a crusty piece of bread to soak up all those flavors.

Summer is winding down and even if you miss out on making this soup while everything is still fresh, the method of cooking will give you wonderful flavors well into the winter soup months.  Enjoy!

green chile corn chowder
Roasted Green Chile and Corn Chowder
serves 6-8

4 strips of thick cut bacon, cut into 1/4″ strips
1 small onion, diced (about 1 cup)
2 ribs celery, diced (about a cup)
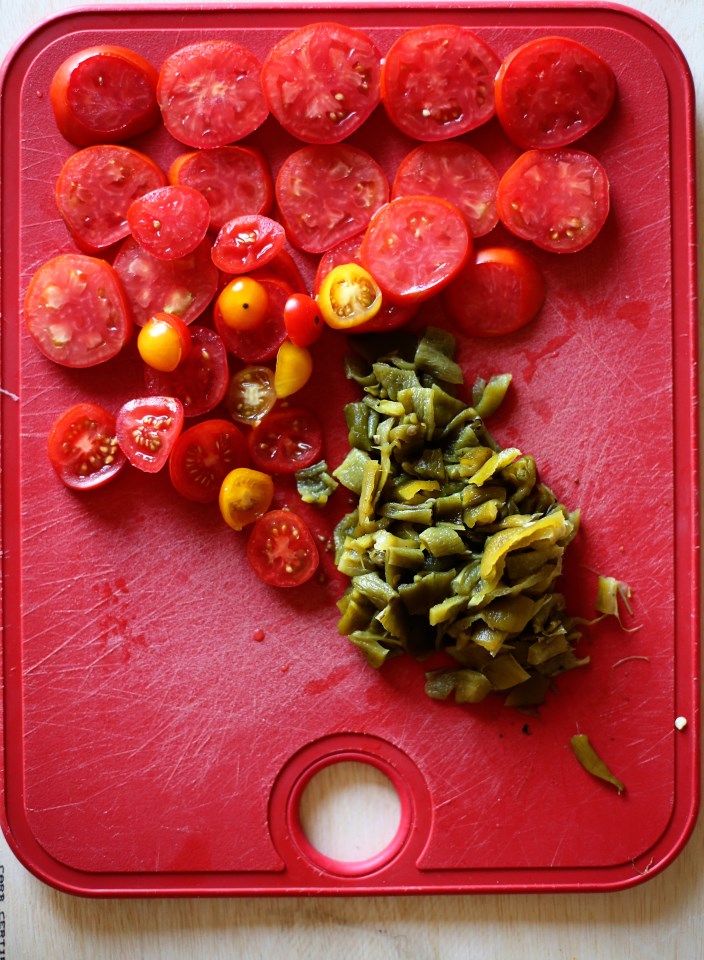
4 roasted green chilies (two whole, two peeled, seeded and diced)
4 ears of corn, kernels removed and cobs reserved
4 cups low-sodium chicken stock
5 ounces small, fingerling potatoes, cut into 1/2″ slices
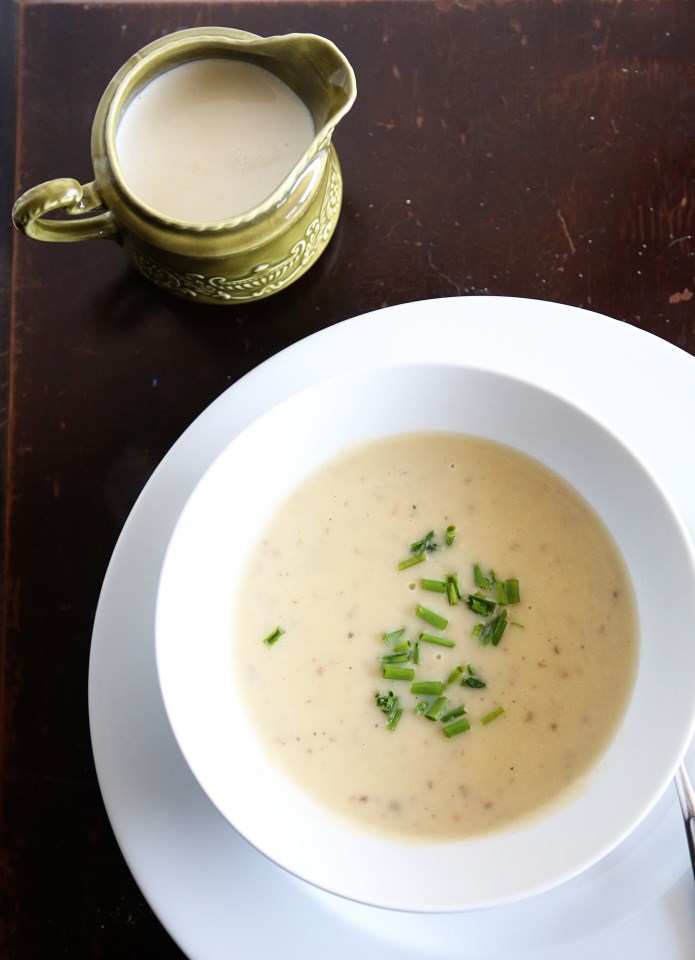
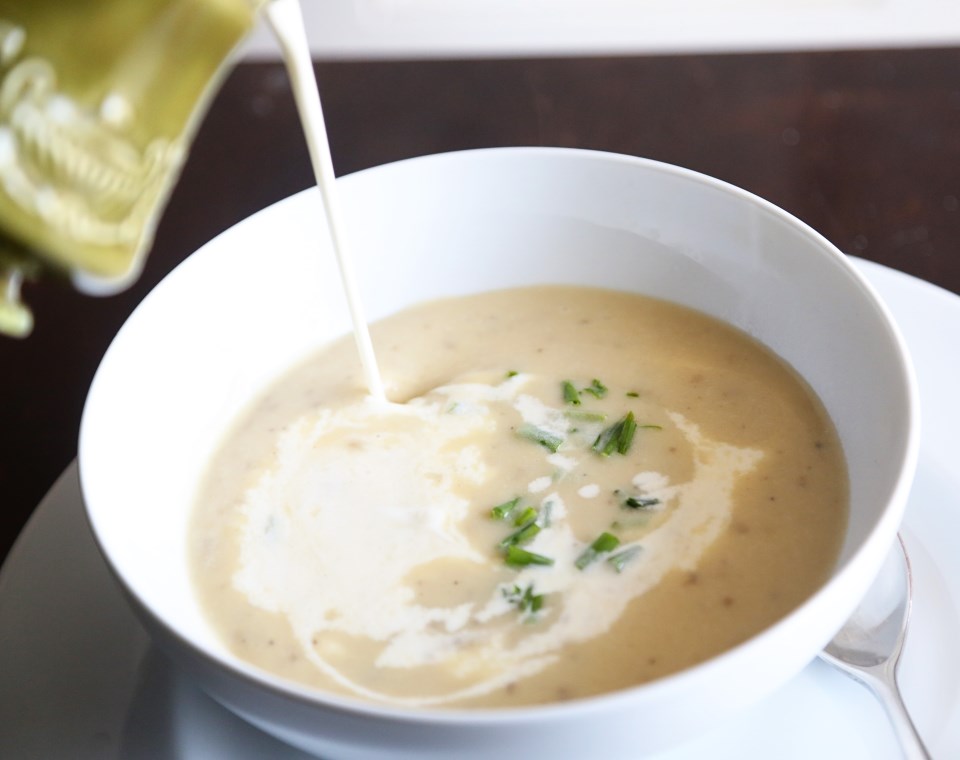
1 1/2 cups half and half

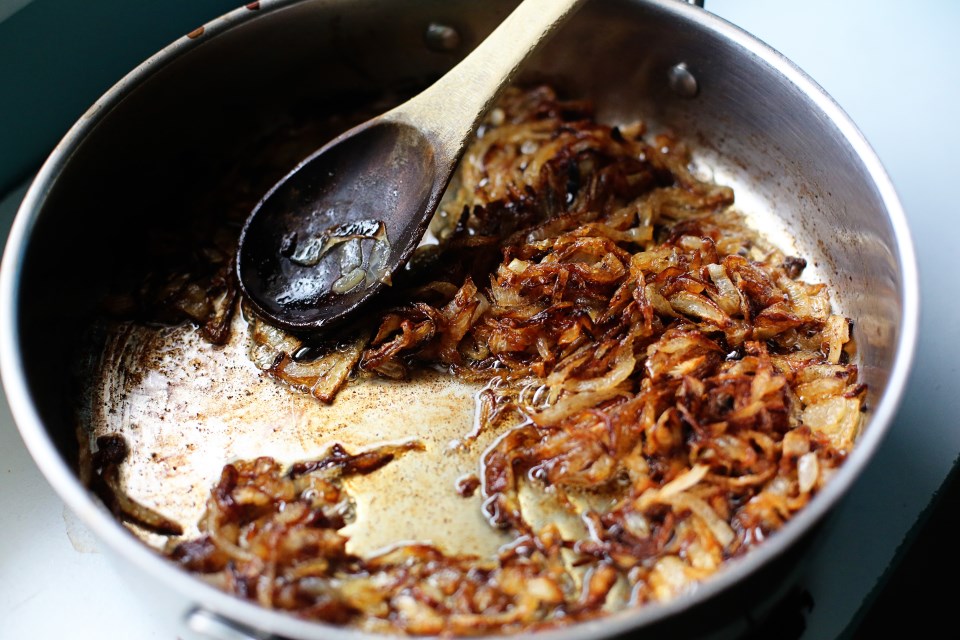
Cook bacon in a large stock pot over medium-high heat until fat renders and bacon crisps.  Remove bacon with a slotted spoon and set aside on a paper towel to drain.

Add onions, celery, two whole green chilies (stems removed) and half the corn kernels to the pan and cook, stirring, until the onions are translucent.  Add chicken stock and corn cobs and bring to a boil.  Let simmer for 15-20 minutes.

Remove the cobs from the broth and discard.  Puree the soup with an immersion blender or in batches in a blender until very smooth.   If you used a blender, return the pureed soup back to the pot and add the remaining corn, potatoes and chilies and cook until the potatoes are tender, about 15-20 minutes.  Add half and half and adjust seasoning with salt and pepper.  Stir in the bacon and bring the soup back up to a simmer. You can also just use the bacon as a garnish if you want it to remain crispy. Serve with crusty, buttery bread and enjoy!


Roasted Green Chile and Tomato Tart

Summer Tomato and Roasted Green Chile Tart
I am not a farmer.  I’m pretty crap at knowing why things die, what I’m doing wrong, why half my plant is brown and the other half is green, etc.  Last year, I all but neglected my tomatoes and they became like sea monsters in size and yielded dozens and dozens (if not with a little end-rot) of tomatoes.  This year, I switched where they were planted and am taking better care of them and they have all tapped out at about 4 feet tall, haven’t continued to grow in height in the last month and we’ve gotten maybe four, medium-sized tomatoes and a handful of cherry tomatoes, and all of them are split down the sides (too much watering).  Sigh.  It’s hard to win at tomatoes.  I’m sure some of you feel my pain.  I want that innate sense of what these plants need, but I am afraid I’ve learned that this instinct is no instinct at all, but trial and error.

The tomatoes pictured were, indeed, from our yard.  And they were, as all backyard tomatoes are, outstanding in flavor, despite their faults.  I will never know how a tomato that claims to be “field grown” at the store can STILL taste like NOTHING, and a tomato you go out and pick from your yard tastes like concentrated tomato paste, x 1,000,000,000.  Maybe it’s what Alton Brown said last week, that a tomato put in the fridge, even for a short time, loses a chemical designed especially for taste.  Whatever the reason, tasting just ONE perfect summer tomato will leave you satisfied for the rest of the year.  I don’t think I can be that enthusiastic about any other produce.  Especially since I’m such a crappy farmer.

Enter: the tomato tart.  Garnished with fresh, roasted, green chilies and a bit of cheddar and Parm, all baked on top of The Crust and a good slathering of green chile and caramelized onion dip.  It was just about as perfect as you can get.  And even if you don’t have a home-grown tomato, just go get one at a farmer’s market this weekend and DON’T refrigerate it and use that.  Or, since we’re baking these tomatoes, go ahead and use a supermarket tomato.  Roasting a tomato brings out great flavor in even the weakest, most genetically modified tomato.  Happy baking!

pre-baked tomato and green chile tart
Roasted Green Chile and Tomato Tart

1 recipe of The Ultimate Pie Crust
1/4 cup corn meal
1 cup green chile and caramelized onion dip
3-4 medium sized tomatoes (such as a Roma-size)
4 fresh roasted green chilies
salt and pepper
cheddar or Parmesan cheese, if desired

Get your pie crust rolled out and pressed into a 13×9″ tart pan, or like I did here, a half sheet pan.  Trim off the excess (and you will have some) and refrigerate the pan for about 30 minutes, while you get on with everything else.  Preheat oven to 450.  Line the crust with parchment paper and fill with pie weights – I use a bag of dried beans over and over for this purpose.  I even keep them in a bag labeled “Pie Beans.”  Bake the empty pie shell for 20 minutes, remove the weights and parchment and bake for another 5-10 minutes until the crust is golden on the bottom.  Set aside to cool.

Whip up a quick onion/chile dip if you don’t have time to make the full recipe by pureeing 4 ounces of cream cheese, two tablespoons of olive oil, a large garlic clove, two roasted green chilies and a tsp of salt in a food processor until smooth. Spread this mixture onto the bottom of the tart.  Then, sprinkle the 1/4 cup of cornmeal over the dip.  This will help absorb the juices from the tomatoes and chilies so you don’t have a soggy crust.

ingredients
Slice the tomatoes and chilies thin and layer onto your crust.  Drizzle with olive oil and sprinkle with salt and pepper.  I shredded up a tiny bit of leftover cheddar and Parmesan on top of mine and loved the result.  I think it’d be good without it.  Reduce your oven to 375 and bake for 25-30 minutes, until the tomatoes look slightly shriveled and bubbly.

Serve with a dollop of sour cream (really – it’s awesome) and enjoy!

Green Chile Tomato Tart


Roasted Green Chile and Caramelized Onion Dip

Green Chili and Caramelized Onion Dip
Here in the West Texas/Eastern New Mexico region, we have a summertime tradition.  We wait all year for it and when the weekend comes, we can smell it in the air.  On every supermarket corner, there they are: green chiles, rotating in a huge, iron roaster over a fire, filling the air with the sweet and savory charred smell of heaven on earth.  A couple weekends ago, it was Chile Roasting Day.  It only happens for a couple weekends at the end of the summer or the beginning of the fall season, so there’s a sense of urgency to buy as many bags as we can before they’re gone.  There’s just one problem: letting them go to waste (they’ll mold within a couple weeks in your fridge) or freezing them, which takes away some of their magic, if you ask me.

So this year, we bought two bags like this:
bag of roasted green chilies
…and we promised we wouldn’t let them go to waste OR freeze them.  Maybe we should store up for winter, but there’s something pretty special about waiting all year for something.  Like a summer tomato.  It’s worth the wait and any other time of the year, it just isn’t the same. (blog post coming soon…)

So all week, I’m going to be posting green chile recipes!  If you happen to live in this region, go stock up because I fear this weekend will be the last.  If you don’t live in this region, I’m sorry.  It’s really the only thing we have on you because we have to deal with dirt storms for a third of our year and 100 degree heat for another third.  Let us revel in this, our only leg up on the competition.  (mostly kidding – I’d send you a bag, but I don’t want to freeze them). 🙂

Today your recipe is a roasted green chile dip with caramelized onions.  I posted about a caramelized onion dip last summer and I thought it would be the perfect base for adding some green chile magic.  So here you go, my friends.  Enjoy the first green chile recipe of the best week of the summer.

Roasted Green Chili Dip
Roasted Green Chile and Caramelized Onion Dip

makes about two cups

1/4 cup vegetable oil
3 TBS unsalted butter
2 large, yellow onions, sliced thin
8 oz cream cheese
1/2 cup sour cream
1/2 cup mayo
7-10 roasted, mild green chiles, seeded or not, it’s up to you.
1 TBS red wine vinegar
kosher salt to taste – I used about 2 teaspoons

In a large, deep sided skillet, add the oil and butter over medium-medium high heat until the butter starts to bubble.  Add the sliced onions and spread out into one layer and let them sizzle for about 5 minutes until they start to color.  Stir them around and repeat this process, not stirring too much to let them caramelize.  This process takes about 30 minutes and you want to err on the side of too caramelized than not enough.  Mine looked like this:
Caramelized Onions
Meanwhile, in a food processor, add the cream cheese, sour cream, mayo and vinegar and a teaspoon of salt.  Pulse until blended.  When the onions are done, scoop them into the food processor and add the green chiles.  I added just three at first, two seeded and peeled, and one whole, minus the stem.  It wasn’t enough green chile flavor for me, so I just kept adding them.  There are LOTS of amazing flavors in the roasted skins and since you are blending them up, it’s completely recommended to not peel the skins from your chiles when you add them.  So!  Add a few, pulse, and see how you like it.  Add some salt, pulse some more.  Add a few more chiles.  Really, it’s up to your taste and what you like.  We ended up adding 7 green chiles, 3 peeled and seeded and 4 whole (minus stem).  It was a perfect heat level for us AND we were using mild chiles, so obviously, with the hot variety, you might want to seed all of them.  I bought mild because I wanted LOTS AND LOTS of flavor without killer heat.  This is a fun game of taste testing, so have some chips ready.  Enjoy!


Baked Chilaquiles – an amazing breakfast on a beach in Mexico or in your own kitchen

chilaquiles with egg
I remember this one year, my friend Cali, actually paid me to go to Acapulco, Mexico and shoot her wedding.  We had moments like this:IMG_8371bridegroom
It was also the hottest I’ve ever been in my life, so I went ahead and cashed her check. 🙂  However, there were extremely enjoyable moments, and one of them was having chilaquiles for breakfast, along with various fresh-squeezed juices.  I had never had chilaquiles before (pronounced: chee-lay-quee-les) and it was a bit of a revelation.  Tortilla chips softened with a rich tomato or chili or black bean sauce, mixed with tender bits of chicken and plenty of cheese.  This is actually a pretty typical breakfast for Mexico.  That may be ignorant of me to say, as I’m sure they have cereal, too, but when we got to go back with Cali and Alex to visit  Alex’s home in Mexico City a few years later, (um, yeah, we’re lucky to know them) it was pretty common to see things we’d associate with dinner, served for breakfast.  Like enchiladas or tostadas.  Not everything had to have an egg on it like we feel compelled to do, here.  Case in point: our version of chilaquiles sure enough had eggs on it.  However, it’s a delicious addition!  Matt made us this breakfast and I shot the picture, so once again, this is a true Family Meal kinda post.  We all contribute in different ways throughout the week and I’m always so happy when he has a plan for Saturday breakfast!

chilaquiles topped with scrambled eggs

chilaquiles
Baked Chilaquiles*
serves 6

10 oz thick tortilla chips
1 – 28 oz can whole tomatoes, drained
3 serrano peppers, seeded and roasted
1 1/2 tablespoons olive oil
1 small white onion, sliced 1/4 inch thick
2 garlic cloves, peeled and finely chopped
1 1/2  cups chicken or vegetable broth
Salt to taste,about 1/2 teaspoon
1/4 cup chopped fresh cilantro
5 eggs, lightly beaten

1 cup shredded cheese, such as Monterey Jack or Mexican Chihuahua cheese

Heat the oven to 400 degrees. Scoop tortilla chips into 13 x 9-inch baking dish.

In the oven, place seeded serrano peppers, cut-side down on a baking sheet and roast until blistered.  We did this under the broiler.  Take out and let cool.
Coarsely puree tomatoes and serrano peppers in a food processor or blender. Heat oil in large saucepan; add onion and sauté until golden, about 7 minutes. Stir in garlic, cook 1 minute, then stir in broth, tomato puree and salt. Heat to boil. Stir in cilantro. Set mixture aside.  In a separate pan, heat 2 tablespoons of butter over medium heat and scramble the eggs and a half teaspoon of salt till they’re almost done.  Remove from heat.  Pour the sauce over the chips; coating them evenly with the sauce.  Layer the almost-done scrambled eggs on top of the sauce.  Sprinkle with cheese and bake until lightly browned on top and bubbling, about 15 minutes.

Garnish with extra cilantro and a few extra chips on the side.

*adapted from Rick Bayless’ recipe, Chipotle-Baked Tortilla Casserole

The Best Fresh Blueberry Muffins

Fresh Blueberry Muffins 3
Sorry for the delay in posts.  I can’t really blame it on anything except feeling bloated, it’s 100 degrees outside, I don’t feel like cooking anything that’s picture-worthy and I’m rearranging my entire house to make room for a little human that will only weigh about 7 pounds.  So here’s another indulgent baked goods recipe that both me and my little growing baby demand in spades these days (hey, I passed my glucose test almost too well.  This kid needs sugar!)
Blueberries are $1.30 for a pint at our local supermarket!  I bought a couple pints and plan on freezing some for those lonely winter months without a fresh berry in sight.  Plus, I need to start thinking about literally storing up for winter as we will have a brand new baby to feed around the clock during the holidays, on top of everything else that will need to be done!  I’m thinking these muffins will be perfect to freeze and gently warm in the oven when we need breakfast, yet don’t have the brain capacity to read a recipe.
Fresh Blueberry Muffins 2
I made these last week  from the New Best Recipe cookbook and they turned out magically perfect.  I used fresh instead of frozen, as the recipe suggests, and I indeed had “explosions of tart berries throughout the muffins” but I certainly didn’t mind.  Because the recipe was testing in the winter when blueberries were out of season.  The blueberries in the store now taste like…blueberries!  So grab them while you can and whip these up for breakfast tomorrow morning!  I brushed these with melted butter and sprinkled them with cinnamon sugar for a little extra love.  Fresh Blueberry Muffins with Cinnamon Sugar

The Best Fresh Blueberry Muffins*
makes a dozen

10 ounces (2 cups) unbleached AP flour (Gold Medal makes a softer muffin because it doesn’t have as much protein as King Arthur.)
1 TBS baking powder
1/2 tsp salt
1 large egg
7 ounces (1 cup) sugar
4 TBS unsalted butter, melted and cooled slightly
10 ounces (1 1/4 cups) sour cream
7-8 ounces (1 1/2 cups) frozen or fresh blueberries

Adjust oven rack to the middle position and heat the oven to 350 degrees.  Grease a 12 cup muffin tin or line with papers, like I do, because I live in terror of baked goods sticking.

Whisk the flour, baking powder, and salt in a medium bowl.  Whisk the egg in a separate medium bowl until well combined and light colored, about 20 seconds.  Add the sugar and whisk vigorously until thick and homogenous, about 30 seconds; add the melted butter in 2 or 3 additions, whisking to combine after each addition. Add the sour cream in 2 additions, whisking just to combine.

Add the berries to the dry ingredients and gently toss until they’re all coated.  Add the sour cream mixture and fold with a rubber spatula until the batter comes together and the berries are evenly distributed, 25-30 seconds.  Don’t overmix, some spots of flour will remain.

Scoop into the muffin cups about 3/4 of the way full.  Bake until muffins are light golden brown and a toothpick comes out clean, about 25-30 minutes, rotating the pan about halfway through baking time.  Dump the muffins onto a wire rack, stand the muffins upright and let them cool 5 minutes.  Serve as is, or brushed with butter and dipped into cinnamon sugar.  You win either way.

*taken from The Best New Recipe.  This cookbook will make you look so, so smart.

Rustic Vichyssoise (potato and leek soup)

Vichyssoise 2
Too hot outside for another soup recipe?  What if I told you it was a cold soup?  Would that change your mind or keep you further away?  We are okay with gazpacho so why not potato and leek?  Maybe if it had a fancy French name?  Vichyssoise (pronounced vishy-swah) is a silky potato soup, cooled down with cream and it might just become your new favorite soup.

A French chef at the Ritz in the 1950s, Louis Diat, was credited with this soup’s [cold] invention.  He said as a boy, he and his brother would cool off the potato and leek soup his grandmother would make, by pouring milk or cream into the hot soup.  He loved the experience so much, he wanted to create a soup for his patrons at the Ritz similar to the soup he had as a boy.

I haven’t quite gotten behind the cold version, yet.  I think the silky potato soup is amazing hot and it has so much depth.  For a dish that has so few ingredients, it tastes like it has a dozen. The potato/leek combination is rather magical in and of itself.  Matt loves the cold version (chill the soup first, then add cream, or you’ll just end up with lukewarm soup if you add cream to hot soup) I love it hot, Olive loves it somewhere in between and once again, this is a great way to provide vegetables for a great little eater who is otherwise distracted by the experience of being two 🙂

I, of course, defaulted to my favorite French cookbook for the recipe – Winnie never steers me wrong!

Vichyssoise 1
Rustic Vichyssoise* (rustic because I forgot to peel the potatoes first)

2 TBS unsalted butter
2 medium-size leeks (or one Texas size – white and pale green parts only, halved lengthwise, rinsed and chopped, about 1 cup)
6 cups low-sodium chicken broth (I had beef broth on hand and it turned out great)
1.5 lbs yellow or white potatoes, peeled and roughly chopped(or unpeeled if you forget and want to call it rustic :))
Salt and fresh ground pepper to taste
1 TBS heavy cream
1/4 cup snipped fresh chives for garnish

Melt the butter in a 4 quart saucepan over medium heat.  Add the leeks and cook, stirring, until tender but not brown, 4 to 5 minutes.  Pour in the broth slowly and then add the potatoes and salt and pepper.  Bring to a boil.  Reduce the heat, cover the pan, and cook at an active simmer until the potatoes are tender, about 30 minutes.

Blend in the pot with an immersion blender until no chunks of potato remain (or, working in batches, puree in a blender).  Stir in the cream and season with extra salt and pepper, if needed.  Garnish with fresh chives and add extra cream to your liking.  For making traditional Vichyssoise, chill the soup for a few hours and then add about 1/4 cup cold cream or half and half to each serving.  Re-season as needed.

*slightly adapted from the Bonne Femme Cookbook

Hot Chicken!

Hot Chicken
Guest Post from The Bread Man, today:

When we went to Nashville to visit my family this summer I knew I had to try some hot chicken. I asked my brother and my cousin if they had been to Prince’s, and both replied that they would like to, but hadn’t found anyone willing to visit that part of town with them. Problem solved. We took my grandparents’ Buick to a little strip mall in east Nashville, and after a quick trip to the ATM (Prince’s is cash only) we ordered a bunch of chicken in heat levels ranging from mild to extra hot. We waited for our order for something close to an hour, with the kitchen constantly calling out orders. The room was always crowded, even on a weeknight, but I think I only saw one table where people were eating – everyone seems to order carry out. You can call ahead, but I got nothing but a busy signal whenever I tried.

When we got home everyone dug in. The chicken isn’t saucy like Buffalo chicken, the heat comes from a mix of oil and spices (notably cayenne) that is brushed on the chicken after frying. The bread each piece was packed with had soaked up the excess oil, making the chicken a relatively clean meal. Bread is a good idea too – or potato salad, or anything else you can find to tame the heat! I love it when I get something with just the right amount of heat – it builds until it seems too much, but a couple of minutes later I’m reaching for another piece. The crust on Prince’s chicken is super crunchy despite the oil, the chicken was juicy, and the spice is great – garlicky with a hint of sweetness. The “hot” chicken was about perfect for me, but even the medium is respectably hot. The mild was tame enough that my notoriously heat-averse grandfather enjoyed it. The extra hot? Too much for me. I know a couple of people that would probably enjoy it, but I couldn’t handle more than a couple of bites.
I loved making hot chicken at home. The oil and spice mix is a great technique – we made some cayenne-free pieces for Olive and the flavor of the brown sugar and garlic stands out so much more when brushed on after frying than it does when the spice is in the flour. Even if you aren’t making hot chicken, this trick is worth stealing. I encourage you though to be brave and mix entire tablespoons of cayenne into the oil – when do you ever get to put even a single tablespoon of cayenne in anything?. Get a jar of pickles, a side of potato salad, a stack of soft white bread, and find that sweet spot.

Hot Chicken Dinner
Seen here with a side of corn slaw and sweet pickles.  Perfect!

Hot Chicken*

2 – 3.5-4 lb chicken, each cut into 10 pieces (breasts halved)
1 TBS fresh ground black pepper
2 TBS  plus 4 tsp kosher salt
4 eggs
2 cups buttermilk or whole milk
2 TBS vinegar-based hot sauce
4 cups AP flour
Vegetable oil (for frying – about 10 cups)
6 TBS cayenne pepper
2 TBS dark brown sugar
1 tsp chili powder
1 tsp garlic powder
1 tsp paprika

Toss chicken with black pepper and 2 TBS salt in a large bowl.  Cover and chill for at least 3 hours.

Whisk eggs, buttermilk and hot sauce in a large bowl.  Whisk flour and remaining 4 tsp salt in another large bowl.

Fit a Dutch oven with a thermometer; pour in oil to measure 2 inches up the side.  Heat over medium-high heat until thermometer registers 325F. Pat chicken dry.  Working with 1 piece at a time, dredge in flour mixture, shaking off excess, then dip in buttermilk mixture, letting excess drip back into bowl.  Dredge again in flour mixture and place on a baking sheet.

Working in 4 batches and returning oil to 325F between batches, fry chicken, turning occasionally, until skin is deep golden borwn and crisp and an instant-read thermometer inserted into the thickest part registers 160F for white meat and 165 for dark, 15-18 minutes.  Transfer to a clean wire rack set inside a baking sheet.  Let oil cool slightly.

Whisk cayenne, brown sugar, chili powder, garlic powder and paprika in a medium bowl; carefully whisk in 1 cup frying oil.  Brush fried chicken with spicy oil.  Serve with bread and pickles.

*taken from the July issue of Bon Appetit magazine


Homemade Banana Meringue Pudding

Banana Meringue Pudding
I’ve had a long-standing love for banana pudding.  Between it and Bananas Foster, I have a hard time choosing my favorite.  At one point, it was my favorite dessert on earth.  I bounce back and forth, now, between Sticky Toffee Pudding or Bananas Foster.  Or anything with lemon.  Or chocolate.

My favorite type of banana pudding, however, is the one that has the sweetened condensed milk and sour cream and extra Nilla wafers and all that awesome goodness, but I’m always up for trying a new version. (Matt made this version pictured, by the way).  I’ve seen pastry chefs putting meringue on more than just pies for a while.  So when we saw a meringue on top of a banana pudding in the latest issue of Bon Appetit, we knew it had to be a winner.  And it was!  However, I immediately knew a few tweaks I wanted to do to it once we tasted it.  First, the base custard just wasn’t banana-y enough.  We always keep a few black bananas in our freezer – when you want banana flavor, nothing beats an over-ripe banana.  It’s so concentrated that just one will do to amp up the flavor in a vanilla pudding to make it burst with sweet banana flavor.  Also, I would use a cooked meringue or a brown sugar meringue instead of the one from this recipe because the meringue wept too much, filling the leftovers up with water.  Ick.  Cooking your egg whites and sugar before whipping takes care of this problem.

However, for a eat-in-one-sitting recipe, the Bon Appetit version was great (but not banana-y enough, and leftovers got weird).  So as long as you have a crowd, this dessert will impress and satisfy!  (for the recipe below, I’ve included my favorite meringue and I’ve added a super-ripe banana, pureed into the base).

Banana Pudding with Meringue
Banana Meringue Pudding

4 large eggs
cup sugar
¼ cup cornstarch
4 cups whole milk
2 tablespoons unsalted butter
2 teaspoons vanilla extract
1 super ripe (black) banana
Pinch of kosher salt


Lightly whisk eggs in a large bowl just to blend. Whisk sugar and cornstarch in a medium saucepan. Gradually whisk milk into sugar mixture and heat over medium heat, whisking often, until very warm to the touch. Gradually whisk half of hot milk mixture into eggs, then whisk egg mixture back into milk mixture in saucepan.

Cook, whisking constantly, until thickened and whisk leaves a trail in pudding (it should be the consistency of mayonnaise), about 4 minutes. Remove from heat, add butter, vanilla, a super-duper ripe banana and salt and puree with an immersion blender until butter is melted and mixture is smooth.


Cover pudding with plastic wrap, pressing directly onto the surface. Chill until cool, about 2 hours.
For the meringue:

3 large egg whites (room temp)
1/8 teaspoon cream of tartar
3/4 cups firmly packed brown sugar

Place the egg whites and cream of tartar in an electric mixer fitted with the whip attachment. Place the brown sugar in a medium, heavy saucepan with high sides (that sugar will boil up and scare the meringue right out of you if you have a small pan), add water to cover, attach a candy thermometer to the pan, and turn the heat on high. When the sugar is at about 240 degrees, start whipping the whites on high speed (they should be foamy and starting to thicken before you add the sugar). When the sugar is at the high soft-ball stage (245 degrees), remove the thermometer from the sugar and, with the mixer still running, carefully avoiding the whip, pour the sugar into the egg whites in a thin stream. When steam starts to come off the whites, add the sugar more quickly. When all sugar has been added, continue whipping until firm but soft peaks form.

For Assembly:

1 box Nilla wafers
3 ripe bananas, sliced

Spread one third of the banana pudding into a casserole dish (9×9 or 9×13 will do fine).  Top with a layer of alternating bananas and cookies, then more pudding and repeat until most or all of your ingredients are used up.  Top with meringue and torch with a blow torch if that’s how you roll, or under a broiler with a very watchful eye (as in, don’t take your eyes off it).