Chicken in a Biskit Fried Chicken on a Biscuit

fried chicken and cream biscuits with maple butter
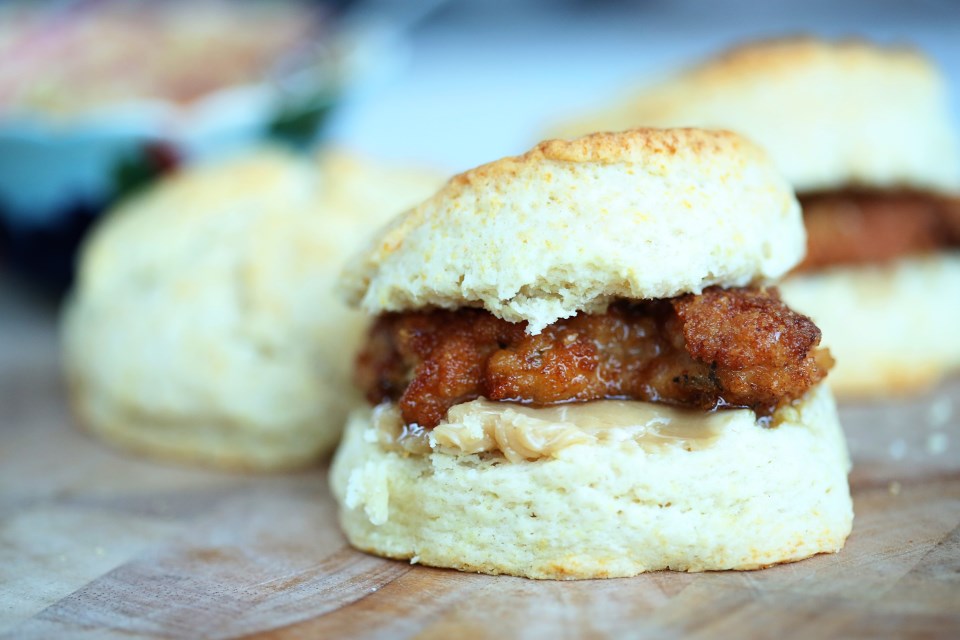
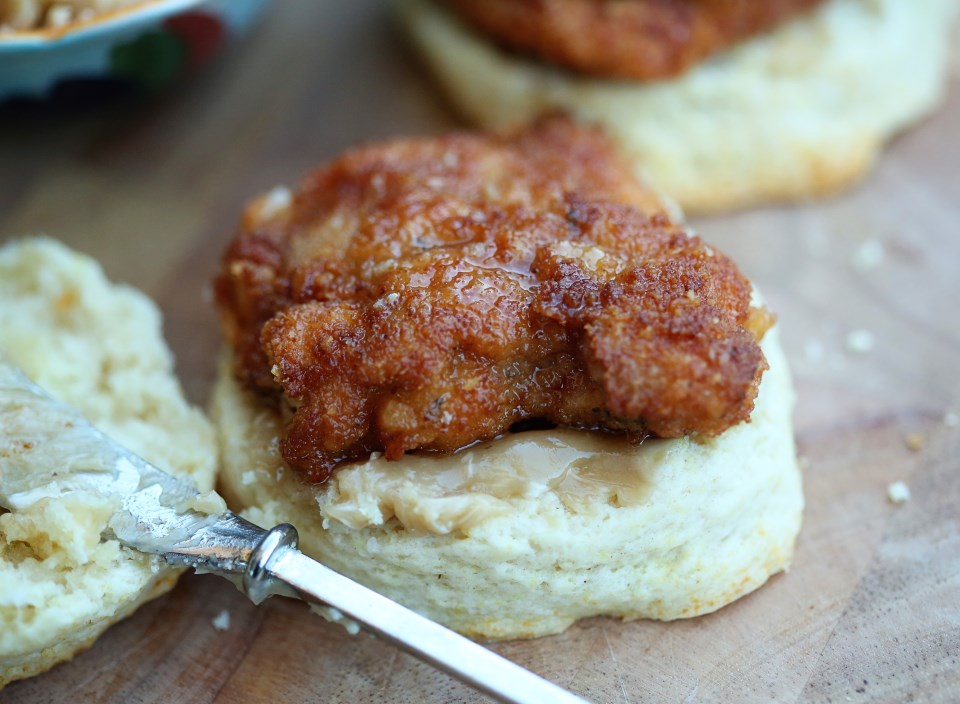
You read that right. Buttermilk-brined chicken thighs, breaded in ground up Chicken in a Biskit crackers and fried. Served on top of a fluffy cream biscuit and finished off with a spread of salted maple butter.
I make no apologies. For any of it. It was one of the best little chicken sandwiches I’ve ever had. And it really wasn’t that difficult! We had the idea a while back and thought it was too good of a play on words to not do it. So we did it! Matt put the chicken thighs in the brine the night before but the meal itself took less than an hour from start to finish. And a made a side of carrot “fries” to go along with everything.
Have you ever had Chicken in a Biskit crackers? If you haven’t, you should try them. Oddly addicting. They have a sweet/savory flavor combo that I’ve tasted in other crackers, but this one, in my opinion, was the first of its kind and remains the best. It’s an old cracker (well, not literally, but the brand is old!) I can remember these crackers as a kid and I honestly hadn’t bought a box since, but for this little project, it’s well worth it.

Start this the night before you want to eat it so that you can get your chicken in the brine. The rest doesn’t take that long – about an hour from baking the biscuits through frying the chicken.  Enjoy and let me know if you love it as much as we did!

Chicken in a Biskit Fried Chicken and Biscuits with Maple Butter

Chicken in a Biskit Fried Chicken on a Biscuit

  • Servings: 6-8 sandwiches
  • Print


For the Biscuits* (taken from Smitten Kitchen – which looks a lot like the scone recipe I use from America’s Test Kitchen – both are awesome and yield similar results):
3 tablespoons (45 grams) melted butter
2 cups (250 grams) all-purpose flour, plus more for dusting the surface
1 tablespoon (15 grams) baking powder
1/2 teaspoon salt
1 tablespoon (15 grams) sugar (optional)
1 1/2 cups (355 ml) heavy cream

Preheat the oven to 425°F. Line a baking sheet with parchment paper. Melt butter in a small pot or microwave dish, and set aside. Sift two cups flour, the baking powder, salt and (if using) sugar into a large bowl. Fold in 1 1/4 cups cream. If the dough is not soft or easily handled, fold in the remaining 1/4 cup cream, little by little. (I ended up using two additional tablespoons, or half the unused cream.)

Turn dough onto a floured surface, mound it into a ball and, using your hands, press it to a thickness of about 3/4 inch. Cut into rounds, 2 1/2 inches in diameter. Gather dough scraps and continue to make rounds. Dip the top of each round in melted butter and arrange on the baking sheet. Bake until golden, 12 to 15 minutes.

chicken in a biskit fried chicken on a cream biscuit

For the Chicken:

1 pound boneless, skinless chicken thighs; trimmed and cut in half
Buttermilk brine (we use Serious Eat’s Southern Fried Chicken for nearly every fried chicken recipe we do):
2 tablespoons paprika
2 tablespoons freshly ground black pepper
2 teaspoons garlic powder
2 teaspoons dried oregano
1/2 teaspoon cayenne pepper
1 cup buttermilk
1 large egg

For the Dredge:
1 cup flour
1 egg + 1/4 cup buttermilk
1 box Chicken in a Biskit crackers, pulsed fine in a food processor

vegetable oil for frying
Combine the paprika, black pepper, garlic powder, oregano, and cayenne in a small bowl and mix thoroughly with a fork.Whisk the buttermilk, egg, 1 tablespoon salt, and 2 tablespoons of the spice mixture in a large bowl. Add the chicken pieces and toss and turn to coat. Transfer the contents of the bowl to a gallon-sized zipper-lock freezer bag and refrigerate for at least 4 hours, and up to overnight, flipping the bag occasionally to redistribute the contents and coat the chicken evenly.

Take the chicken out and pat dry with paper towels. Dip the thighs in the flour first, then the egg/buttermilk mixture, then the cracker crumbs. I double dipped each piece to get lots of crunch (so dip once more in the egg and then the crackers.) Set aside till you’re done with all the pieces before frying.

Preheat your oven to 200F. (Your oven should still be hot from the biscuits! You’ll keep your fried chicken pieces in the oven to stay warm and crispy while you finish setting your table or wiping kids’ butts or whatever it is you have to do while you try to make dinner.)

Heat about an inch of oil in a skillet over medium high heat until it’s shimmering. Fry each piece of chicken for about 4-5 minutes per side, until the chicken is golden brown and registers 170F on an instant-read thermometer. If you’re thinking you’re about to burn the breading, transfer the chicken pieces to a baking sheet and finish cooking in the oven.

maple butter

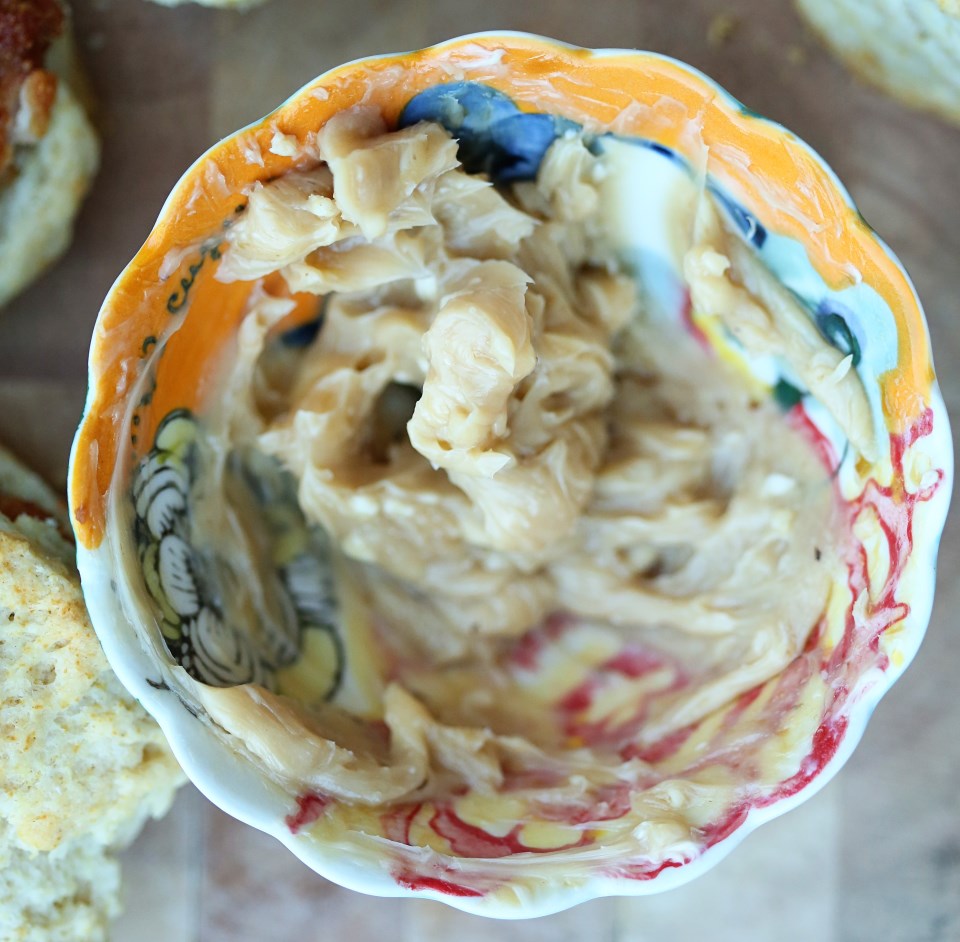
For the Maple Butter:
4 tablespoons unsalted butter, room temp
1/4 teaspoon salt
2 tablespoons pure maple syrup

Combine all ingredients until thoroughly incorporated. Spread on biscuits and top with chicken pieces. We also doctored the sandwiches up with a bit of mustard, hot sauce and candied jalapenos, but just the chicken, biscuit and butter are enough.

Advertisement

Hot Chicken!

Hot Chicken
Guest Post from The Bread Man, today:

When we went to Nashville to visit my family this summer I knew I had to try some hot chicken. I asked my brother and my cousin if they had been to Prince’s, and both replied that they would like to, but hadn’t found anyone willing to visit that part of town with them. Problem solved. We took my grandparents’ Buick to a little strip mall in east Nashville, and after a quick trip to the ATM (Prince’s is cash only) we ordered a bunch of chicken in heat levels ranging from mild to extra hot. We waited for our order for something close to an hour, with the kitchen constantly calling out orders. The room was always crowded, even on a weeknight, but I think I only saw one table where people were eating – everyone seems to order carry out. You can call ahead, but I got nothing but a busy signal whenever I tried.

When we got home everyone dug in. The chicken isn’t saucy like Buffalo chicken, the heat comes from a mix of oil and spices (notably cayenne) that is brushed on the chicken after frying. The bread each piece was packed with had soaked up the excess oil, making the chicken a relatively clean meal. Bread is a good idea too – or potato salad, or anything else you can find to tame the heat! I love it when I get something with just the right amount of heat – it builds until it seems too much, but a couple of minutes later I’m reaching for another piece. The crust on Prince’s chicken is super crunchy despite the oil, the chicken was juicy, and the spice is great – garlicky with a hint of sweetness. The “hot” chicken was about perfect for me, but even the medium is respectably hot. The mild was tame enough that my notoriously heat-averse grandfather enjoyed it. The extra hot? Too much for me. I know a couple of people that would probably enjoy it, but I couldn’t handle more than a couple of bites.
I loved making hot chicken at home. The oil and spice mix is a great technique – we made some cayenne-free pieces for Olive and the flavor of the brown sugar and garlic stands out so much more when brushed on after frying than it does when the spice is in the flour. Even if you aren’t making hot chicken, this trick is worth stealing. I encourage you though to be brave and mix entire tablespoons of cayenne into the oil – when do you ever get to put even a single tablespoon of cayenne in anything?. Get a jar of pickles, a side of potato salad, a stack of soft white bread, and find that sweet spot.

Hot Chicken Dinner
Seen here with a side of corn slaw and sweet pickles.  Perfect!

Hot Chicken*

2 – 3.5-4 lb chicken, each cut into 10 pieces (breasts halved)
1 TBS fresh ground black pepper
2 TBS  plus 4 tsp kosher salt
4 eggs
2 cups buttermilk or whole milk
2 TBS vinegar-based hot sauce
4 cups AP flour
Vegetable oil (for frying – about 10 cups)
6 TBS cayenne pepper
2 TBS dark brown sugar
1 tsp chili powder
1 tsp garlic powder
1 tsp paprika

Toss chicken with black pepper and 2 TBS salt in a large bowl.  Cover and chill for at least 3 hours.

Whisk eggs, buttermilk and hot sauce in a large bowl.  Whisk flour and remaining 4 tsp salt in another large bowl.

Fit a Dutch oven with a thermometer; pour in oil to measure 2 inches up the side.  Heat over medium-high heat until thermometer registers 325F. Pat chicken dry.  Working with 1 piece at a time, dredge in flour mixture, shaking off excess, then dip in buttermilk mixture, letting excess drip back into bowl.  Dredge again in flour mixture and place on a baking sheet.

Working in 4 batches and returning oil to 325F between batches, fry chicken, turning occasionally, until skin is deep golden borwn and crisp and an instant-read thermometer inserted into the thickest part registers 160F for white meat and 165 for dark, 15-18 minutes.  Transfer to a clean wire rack set inside a baking sheet.  Let oil cool slightly.

Whisk cayenne, brown sugar, chili powder, garlic powder and paprika in a medium bowl; carefully whisk in 1 cup frying oil.  Brush fried chicken with spicy oil.  Serve with bread and pickles.

*taken from the July issue of Bon Appetit magazine


Chicken and Waffles with Molasses Butter

chicken_waffles010
Easter Sunday was a bit low-key for us this year.  I had a wedding to shoot on Saturday so we couldn’t go out of town to be with family and we didn’t have time to prepare the feast we normally do.  We typically like to have brunch-type foods when we know it’s going to be just us because breakfast is usually easy to throw together in less than an hour after church and, well, who doesn’t like breakfast for lunch?!

A few months ago I ran across a wonderful yeast waffle recipe that you mix up the night before and let it sit out on your counter to get all bubbly.  Sounds strange, but it imparts such an amazing sourdough, yeasty flavor to the waffles which helps balance the pure sugar you typically use to drown the waffle.  Matt and I have had a slight obsession with the Southern dish of chicken and waffles and every where we go where it’s on the menu, we always feel the dish falls a little short of the expectations in our mind.  The chicken should be juicy, super crispy, salty and flavorful on its own and the waffle shouldn’t be too heavy – it should be light, airy and buttery with just enough sweetness to give that perfect balance of flavors.  A lot of waffles are too heavy, too bland, too sweet or the chicken is an after-thought – dry or not seasoned.  So, taking matters into our own hands, we used the amazing recipe for Korean fried chicken that we did at the Super Bowl and paired it with a yeast waffle recipe and the combination was juuuuuust right.
chicken_waffles008
I added my own sentimental flair to the dish.  Growing up, I distinctly remember at family gatherings, often at Sunday lunches, my Pappaw would request molasses and then he’d take a large chunk of soft butter and whip the two together into a smooth paste for his biscuits.  I thought it was odd, but as far back as I can remember, there has never been a food strange enough that I wouldn’t try it.  I immediately began to imitate his method and loved the tangy sweetness of the molasses butter on my biscuits, too.

This Sunday as I was thinking about Easter and family, I had my Pappaw on my mind because just a few days ago, he underwent extremely intense cancer surgery and was, up until yesterday, still in pretty critical condition in ICU.  I thought about our family get-togethers when I was young and Pappaw’s love of biscuits, molasses and black coffee and thought for our brunch, what better accompaniment to our waffles, which beg for that salty/sweet balance, than his molasses butter?  It was an amazing addition to the waffles and it may be my new favorite topping instead of maple syrup.  Matt wasn’t convinced, but then again, he doesn’t have the memory to go along with it.  And food is so much more than just ingredients on a plate.  If you have a story or a face or a memory of light streaming in from the window across a little dinette set in your grandparents’ kitchen as you slather biscuits with creamy molasses, it’s bound to become your new favorite thing. 🙂

chicken_waffles006

Korean Fried Chicken Strips

Kosher salt
3/4 cups corn starch
1 teaspoon baking powder
2 pounds chicken strip tenders
2 quarts peanut oil or vegetable shortening
1/2 cup all-purpose flour
1/2 cup cold water
1/2 cup vodka

Combine 2 teaspoons kosher salt, 1/4 cup cornstarch, and 1/2 teaspoon baking powder in a large bowl and whisk until homogeneous. Add chicken strips and toss until every surface is coated. Transfer chicken to a wire rack set in a rimmed baking sheet, shaking vigorously as you go to get rid if excess coating. Transfer to refrigerator and let rest, uncovered, for at least 15 minutes and up to overnight.

When ready to fry, preheat oil to 350°F in a large wok, Dutch oven, or deep fryer.  We used a wok on the stove.

Combine remaining 1/2 cup cornstarch, 1/2 teaspoon baking powder, flour, and 2 teaspoons kosher salt in a large bowl and whisk until homogeneous. Add water and vodka and whisk until a smooth batter is formed, adding up to 2 tablespoons additional water if batter is too thick. It should have the consistency of thin paint and fall off of the whisk in thin ribbons that instantly disappear as they hit the surface of the batter in the bowl.

Add half of the chicken strips to the batter. Working one at a time, lift one strip and allow excess batter to drip off, using your finger to get rid of any large pockets or slicks of batter. Carefully lower chicken into hot oil. Repeat with remaining strips in the first batch. Fry, using a metal spider or slotted spatula to rotate and agitate strips as they cook until evenly golden brown and crisp all over, about 8 minutes. Transfer to a paper towel-lined plate and season immediately with kosher salt. Keep warm in a 175F oven while you fry the remaining chicken.

Yeast Waffles*

1 3/4 cups whole milk, at room temperature
1/2 cup unsalted butter, melted, plus more melted butter for the waffle iron
2 1/2 cups sifted all-purpose flour
1 tablespoon active dry yeast (from 2 envelopes)
2 large eggs, at room temperature
2 teaspoons agave nectar or honey
1 teaspoon salt

In a large bowl, combine the milk, 1/2 cup melted butter, flour, yeast, eggs, agave and salt and whisk until smooth. Cover with plastic wrap and let stand until the batter is very puffy, about 2 hours at room temperature (or refrigerate overnight, which is what we did since we wouldn’t be using it first thing in the morning).

Preheat the oven to 250°. Preheat a waffle iron and brush it with melted butter. Gently stir the batter to deflate it. For each batch, fill the waffle iron about two-thirds full (the batter will spread and rise); brush the waffle iron with melted butter as needed.

Cook the waffles until golden crisp.  Keep the waffles directly on your oven racks to keep warm and crispy until you’re done cooking them.  I find that using a traditional sized waffle iron works best than a Belgian waffle maker because sometimes the Belgian waffle irons are too deep for the batter to rise into every crevice. Also, from the two different yeast waffle recipes we’ve tried, I prefer cooking them from room temp if you leave the batter out on your counter, as opposed to keeping it in the fridge.  The batter seems lighter at room temp than cold, so you may want to test that out for yourself.  Both are delicious, but I felt the batter at room temp was thinner and more of that super crisp, light texture I wanted.

*from Food and Wine magazine but I think I prefer the recipe from Smitten Kitchen better.  They’re almost the same, but she uses a little less flour.

Molasses Butter

Dark Molasses
Unsalted Butter – room temp

Use equal parts butter and molasses and whip together until completely mixed.  Spread on waffles before topping with chicken strips.  I added a drizzle of maple syrup on the chicken and then salted it to make the salt stick better.

Superbowl Food – Korean Fried Chicken Wings with a Celery and Blue Cheese Slaw

celery blue cheese slaw and korean fried chicken

This is the best fried chicken I’ve ever had.  We only  make fried chicken about twice a year and when we do, it has to be this recipe.  Crispy, light batter doesn’t overwhelm the chicken and it’s SO crunchy, you’d think it was double coated.  Koreans know what they’re doing with fried chicken, and I think if you did this preparation to some chicken wings on Game Day, you would definitely be the hero of the hour.  The blue cheese celery salad is an amazing side for the chicken.  Crunchy and tangy and creamy – the perfect slaw/salad for fried chicken!

korean fried chicken

Korean Fried Chicken*

Kosher salt
3/4 cups corn starch
1 teaspoon baking powder
2 pounds chicken wings (about 12 whole wings)
2 quarts peanut oil or vegetable shortening
1/2 cup all-purpose flour
1/2 cup cold water
1/2 cup vodka

Combine 2 teaspoons kosher salt, 1/4 cup cornstarch, and 1/2 teaspoon baking powder in a large bowl and whisk until homogenous. Add chicken wings and toss until every surface is coated. Transfer wings to a wire rack set in a rimmed baking sheet, shaking vigorously as you go to get rid if excess coating. Transfer to refrigerator and let rest, uncovered, for at least 30 minutes and up to overnight.

When ready to fry, preheat oil to 350°F in a large wok, Dutch oven, or deep fryer.  We used a wok on the stove.

Combine remaining 1/2 cup cornstarch, 1/2 teaspoon baking powder, flour, and 2 teaspoons kosher salt in a large bowl and whisk until homogenous. Add water and vodka and whisk until a smooth batter is formed, adding up to 2 tablespoons additional water if batter is too thick. It should have the consistency of thin paint and fall off of the whisk in thin ribbons that instantly disappear as they hit the surface of the batter in the bowl.

Add half of the wings to the batter. Working one at a time, lift one wing and allow excess batter to drip off, using your finger to get rid of any large pockets or slicks of batter. Carefully lower wing into hot oil. Repeat with remaining wings in first batch. Fry, using a metal spider or slotted spatula to rotate and agitate wings as they cook until evenly golden brown and crisp all over, about 8 minutes. Transfer to a paper towel-lined plate and season immediately with salt. Keep warm while you fry the remaining wings.

We dipped ours into traditional buffalo sauce, which we love.  The chicken is so gloriously crispy that we didn’t want to totally coat it in sauce.  Do as you please.  The original recipe calls for a mighty fine sweet soy sauce that I highly recommend.

*absolutely did not mess with this perfect recipe from Serious Eats

slaw

Celery and Blue Cheese Slaw*

Celery Ribs (thinly sliced at an angle)
1/2 Red Onion (very thinly sliced; 1/2 cup)
1/2 cup fresh Flat-Leaf Parsley leaves (chopped)
1 tablespoon Sherry Vinegar
1 tablespoon plus 1 teaspoon Extra Virgin Olive Oil
1/2 teaspoon freshly grated Lemon Zest
1/4 teaspoon Kosher Salt
1/8 teaspoon freshly ground Black Pepper
1/4 cup crumbled Blue Cheese

In a large skillet, add one tablespoon of butter and saute the celery and onion until just beginning to soften, but still crunchy, about 5 minutes.  In a large bowl, toss the parsley, vinegar, olive oil, lemon zest, salt, and pepper and whisk to combine.  Fold in the celery, onion and blue cheese and serve!

*adapted from Carla Hall’s recipe