Poached Egg Salad with Bacon and Sherry Dijon Vinaigrette

Poached Egg Salad with Bacon and Sherry Dijon Vinaigrette

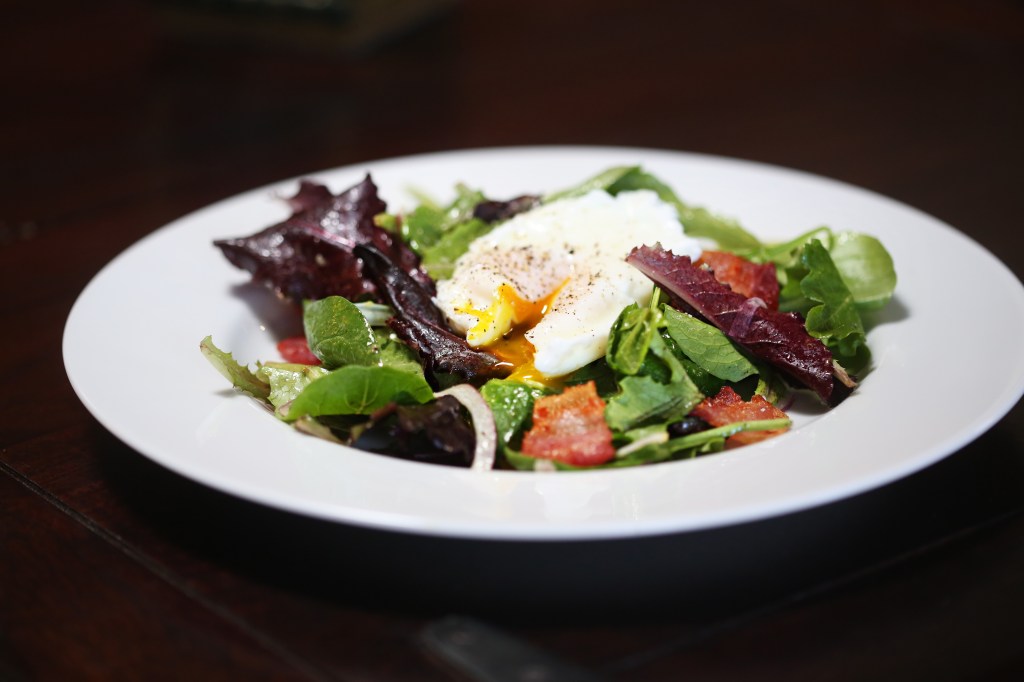
Everything about this salad is good.  The vinaigrette is simple to make and extremely satisfying to me, a reformed cream-based dressings only kind of person.  I’m from Portales, NM – we like ranch dressing more than we should.  Any time Matt would order a vinaigrette at a restaurant, I would scoff as if he were simply trying to make a point that I should choose a healthier option because how could he really prefer a vinaigrette?  Well, I think you could easily prefer this one.  This salad has enough richness from the bacon (just one strip per person) and the poached egg that when it’s all combined, everything balances out perfectly.  This recipe is again, from the genius and simple, Bonne Femme Cookbook.  I think I’m unintentionally cooking my way through this book.  I made a diversion last week and cooked out of the Everyday Food magazine and while all the recipes were good, once I started this week cooking out of Bonne Femme again, I think Matt and I were both secretly relieved.  I can’t quite put my finger on why all the recipes work so well – I haven’t screwed up one, yet, and I’ve made nearly a dozen different recipes!  Maybe the mystery is that the French like everything to have a sauce?  It certainly creates a warmth for every meal that would be lacking otherwise.  And even with all these sauces, I’m still losing weight (down two more last week)  Woohoo!

So here’s to a salad with a sauce all its own when the yolk combines with the vinaigrette.  I made it a bit heartier by roasting some asparagus to have along side.  Asparagus and runny egg yolks are best friends, by the way.

Scared to poach an egg?  Well, you can buy one of those insert things that you put into a pot on your stove, or what I did was bring a medium saucepan to an active simmer (not boiling – I left my burner on medium heat), crack your egg into a small bowl first and then get your water swirling in a tornado fashion and then dump your egg into the middle of the swirling water.  It will look like a walleyed mess at first, but after 3-4 minutes, you can check the egg with a slotted spoon and if your whites are done and your yolk still feels jiggly to the touch, then it’s good to go.  The recipe suggests putting two tablespoons of white wine vinegar into your water to keep the whites from scattering so much. I forgot to do this, but am anxious to try again, soon.

Poached Egg Salad with Bacon and Sherry-Dijon Vinaigrette
serves 4

4 slices thick cut bacon, but into 1-inch pieces
3 cups torn mixed greens
1/2 cup sliced red onion
4 large eggs
1 recipe Sherry Mustard Vinaigrette (recipe follows)
Salt and pepper to taste

Cook the bacon in a skillet over medium heat until crisp; remove from the skillet and drain on paper towels.
Toss the greens and red onion in a medium sized salad bowl.
Poach your eggs to desired done-ness, adding 2 tbs of vinegar to the water before adding the eggs.  Here’s another tutorial on how to poach an egg.
When the eggs are almost done, toss the bacon in the bowl with the greens and add enough vinaigrette to coat the leaves well – you may not need the whole recipe and less is more – an over dressed salad gets soggy  and gross really quick.
Arrange the salad among four serving plates and top each with a poached egg.  Season the egg with salt and pepper and serve immediately.  If you want to serve it with the asparagus, I’ve got the recipe for you below.

Sherry-Mustard Vinaigrette

In a small bowl, combine 1 clove of minced garlic with salt and freshly ground black pepper to taste.  Mash them together with the back of a spoon to make a rough paste.  Add 1 tablespoon sherry vinegar; whisk with a fork until the salt is dissolved.  Whisk in 2 teaspoons Dijon mustard.  Slowly add 3 tablespoons extra-virgin olive oil, whisking until incorporated.

Simple Roasted Asparagus

Wash and trim your asparagus.  Coat all the stalks in 2 tablespoons of olive oil.  Sprinkle evenly with salt and pepper.  Roast in a preheated 400F oven for 15 minutes.  Squeeze a few drops of lemon juice over and serve!

Advertisement

Snow Ice Cream

Snow Ice Cream

It snowed more today than it has in years, and nearly all of my Facebook feed filled up with my friends excitedly making snowmen, snow angels and snow ice cream!  I rhetorically asked Matt, “You’ve had snow ice cream, right?” And he said no!  I must have had it a dozen times growing up.  He even grew up in a place that got more snow than me!  Bent on fixing this incredible flaw, I strapped on my rain boots and went out gathering snow.  If you’ve never made snow ice cream before – stick to the tall drifts.  If there are no drifts, be careful scooping.  Dirt, stuff from trees, dog “things” can be lurking – stick to the tippy top of the snow.  I’ve also heard that you shouldn’t eat the first snow fall of the year.  If it never snows where you are and you have an opportunity – throw caution to the wind, my friends.

Snow Ice Cream – kinda fancy

8 cups of fresh snow
1 can sweetened condensed milk
2 tsp of vanilla bean paste (that’s vanilla bean flecks in my ice cream, not dirt!)
1 tsp almond extract

Clothe yourself in cute rain boots, gloves and if you have a metal bowl, bring that and a two cup measure.  Scoop up 8 cups of snow into your bowl, watching for sticks, poo, yellow snow, etc.  March in place at your door step to get all the snow off your boots.  Maybe even do a little dance.  Once warmly inside, drizzle a can of sweetened condensed milk all over the snow.  Mix well, smashing the clods of snow against the side of the bowl until it’s all worked throughout.  Mix in your vanilla paste and almond extract (use regular vanilla extract in equal amounts if you don’t have the paste.  The paste is fun – buy some.)
Serve immediately to lucky children and husbands alike.

Snow Ice Cream 2


Italian Pot Roast on a Snowy Day

snow1

It’s a day to be a little quieter, more reflective, or maybe just be still.  It snowed last night more than it’s snowed in a few years and it’s still coming down outside.  The wind is crazy as it always is in Lubbock, TX, which makes the wind chill around negative ridiculous.  Matt is getting to work from home – one draw back of having a desk job is that on a snow day, you still have to work.  But at least it can be done from the comforts of home.  Hot cups of coffee and a sweet, bundled up baby in tow.  I had dreams of going to the grocery store today to stock up for another week of good meals, but I think I’ll just warm up the amazing pot roast we had last night, roast an acorn squash till it nearly burns and make do with what we have.  If you have any cut of meat in your freezer like a roast, pork loin, whole chicken, try this recipe.  Stay in out of the cold and just let the oven do the cooking today.

pot roast

Pot Roast of Beef Braised in Red Wine*
6 servings

Vegetable oil
4lbs boneless beef roast, preferably chuck
1 tbs butter
3 tbs onion, finely chopped (about 1/2 of a medium sized onion)
3 tbs carrot, finely chopped (about 1 medium sized carrot)
1 1/2 cups dry red wine (Barolo, California Syrah, Zinfandel or Shiraz are all fine choices)
1 cup beef broth
1 1/2 tbs chopped, canned Italian tomatoes (we use Cento brand)
A pinch of dried thyme
1/2 tsp fresh marjoram or an 1/8 tsp dried
Salt
Black pepper, fresh ground

  • Preheat oven to 350F.
  • Put just enough vegetable oil in a large skillet to coat the bottom of the pan.  Turn the heat on to high and when the oil starts to shimmer, put in the roast.  Brown it well on all sides, then transfer to a platter and set aside.  Set aside your skillet without cleaning it out for use later.
  • In a separate pot with a tight-fitting lid, large enough to accommodate the meat, put 2 tbs of vegetable oil, the butter and the onion and cook on medium until the onion becomes a pale gold color.  Add the carrot and celery.  Stir thoroughly to coat well, and cook for 4 to 5 minutes, then add the browned meat back into the pan.  (We used a dutch oven)
  • Pour the wine into the skillet that you’d used to sear the roast, turn on the heat to medium high, and allow the wine to bubble briskly for a minute while scraping the pan with a wooden spoon to loosen cooking residues stuck to the pan.  Add the contents of the skillet to the pot with the meat.
  • Add the beef broth.  It should come up two-thirds of the way up the sides of the meat, and if it doesn’t add more broth or water.  Add in the tomatoes, thyme, marjoram, salt, and several grindings of pepper.  Turn the heat on to high, bring the contents of the pot to a boil, then cover the pot and put it on the middle rack of the preheated oven.  Cook for about 3 hours, turning the meat every 20 minutes or so, basting it with the liquid in the pot, which should be cooking at a slow, steady simmer.  All the liquid may evaporate before the roast is done.  If that happens, add 3 or 4 tablespoons of water.  Cook until the meat feels very tender when prodded with a fork (about 3 hours.)
  • Remove the meat to a cutting board.  If the liquid in the pot is too thin and hasn’t reduced to less than 2/3 cup, put the pot on the stove on high heat and boil down, while scraping the cooking residues stuck to the pot.  Taste the juices and correct for salt and pepper.  Slice the meat against the grain, put the slices on a warm platter, arranging them so they overlap slightly, pour the pot juices over them and serve immediately.

We served this with roasted carrots and it was the perfect accompaniment.  I hope you all have a warm, cozy day and enjoy the momentary break from reality!

*Recipe adapted from Marcella Hazan’s amazing book, Essentials of Classic Italian Cooking

Caramelized Banana Chocolate Chip Muffins

bananachocolate2

When I think of a true indulgence, I think about baked goods.  During my time of extra strict sugar restriction while I get my remaining baby weight off, I give myself one day a week to indulge in items that would really not even be allowed in moderation for me during the week.  I have to have that day.  It keeps me going during the week to think about all the scones and muffins and other breads I can have on Saturday.

When I was pregnant with Olive, I craved sugar constantly.  Matt likes to joke that Olive is mostly made out of Oreos and cereal.  I ate other things, but yes, carbs were king.  I made baked goods all the time, especially in the last trimester during the coldest part of winter.  For weeks, I kept us stocked up with various muffins for breakfast.  The combination of banana and chocolate chip became Matt’s favorite, and so when we were discussing a post I could do for Friday, he suggested I do banana chocolate chip muffins.  Banana’s Foster has been a favorite dessert (a favorite – there are many) of mine for a while, now, and so when I know there’s potential for bananas AND brown sugar AND melted butter in a recipe, I want to make it as bananas-fostery as possible.  So for this recipe, (adapted from allrecipes.com)  that meant browning the butter (duh) and letting it bubble away with the mashed bananas and substituting some of the white sugar for brown sugar.  I didn’t add rum, but that’s only because I thought it would get lost with the addition of dark chocolate chips, anyway.  I’d really like to try this creation without the chocolate next time (maybe tomorrow?) and add some rum to see if I can taste my efforts at creating a Bananas Foster muffin a little bit better.

I made a “mistake” with my alterations to the recipe.  I didn’t wait for the batter to cool (it was quite hot from being on the stove, turning into caramelized bananas) before I added the chocolate chips, so naturally, they melted.  I was unhappy with my dumb mistake at first, but decided to go with it and when they came out of the oven, I was happy to see a little swirly effect in the batter, which I thought was quite pretty.  I topped the muffins with a slice of banana and brown sugar and some with extra chocolate chips while in the oven.  The brown sugar that melted into goo on top of the bananas was a nice touch.  These muffins are definitely more dessert than breakfast, so maybe you should have them for afternoon snack time with a cup of coffee, instead of breakfast.  I wouldn’t want you to have to take a mid-morning nap or anything…

Caramelized Banana Chocolate Chip Muffins
yield: 1 dozen

1 1/2 cups all-purpose flour
1 teaspoon baking soda
1 teaspoon baking powder
1/2 teaspoon salt
1/2 teaspoon cinnamon
3 super duper ripe bananas, mashed, plus one banana for slicing as the topper for the muffins
1/2 cup white sugar
1/2 cup packed brown sugar
1 egg, lightly beaten
1/3 cup butter, melted and browned, if you know what’s good for you
1 cup chocolate chips

Preheat the oven to 375F.  Spray 12 muffin papers with non-stick spray and place into muffin tin.
In a large bowl, mix together the flour, baking soda, baking powder, salt and cinnamon.
On the stove, in a medium sauce pan, melt the butter until it begins to brown (you’ll see those grainy butter solids settling at the bottom of the pan) and add the bananas and sugars and let it bubble away for about 10 minutes on medium low heat, stirring periodically.  Remove from heat and let cool slightly and then scrape every last gooey drop into your flour mixture.  Mix well (I just used a fork) and then add your egg and mix just until incorporated.  At this point, if you want your chocolate to remain chips, let your batter cool for a while.  A trick to keep your chocolate chips from settling to the bottom of your muffins is to lightly coat them in flour before mixing them into your batter.  After the batter has cooled, gently fold the chips into the batter and spoon into the muffin liners.  I didn’t let my batter cool, so I was left with melted chocolate worked throughout.  I didn’t totally mix it up so it left a neat swirly effect in the muffins.  You just do whatever makes you happy.
Top the muffins with slices of banana and sprinkle extra brown sugar on top of each slice.
Bake in preheated oven for 18-25 minutes (mine took 23) until a toothpick comes out clean.

bananachocolate1


Enjoy your weekend, lovely folks.  See you Monday with a light recipe to start things off right.

Chicken Pot Pies – for you and baby

cpp3

Making baby food purees is a really fun phase of having a new baby.  Whether you start them at 4 months or 6 months, you have about 3-6 months of making purees out of just about everything.  Over the past few months, I’ve pureed coconut curry soup, chicken fricassee, beef ragu – you name it.  I’d tote along little containers of food when we’d go out to restaurants and even had a waitress warm one up in the microwave, once.  (It was on the road, the restaurant was dead, we were her only table.) As much of an adventure as this was, I will admit that I’m excited that Olive can now pretty much eat what we eat, only chopped up a little smaller.  So, when we go out to a restaurant, we can order her a couple of side dishes and she’s happy!

However, I don’t want to start her out on the ugly road of “kid food” and “kids’ menus.”  Sure, they might be nice, smaller portions, but I bet none of us would have to try very hard to name at least five items on any kid’s menu at any restaurant in America.  1. Grilled Cheese 2. Hot Dogs 3. Pizza (cheese or pepperoni only) 4. Chicken nuggets with fries 5. Macaroni and Cheese.
Do you see a horrible trend?  Where on earth are the vegetables and why on earth do we pick the worst foods with the poorest nutritional value and label them as “kid friendly” choices and then give them to little, growing bodies?  This trend isn’t likely to improve any time soon, so in the meantime, I want to suggest a different kind of “kid friendly” choice.

Soups!

We were at Jason’s Deli a couple weeks ago and noticed that their kids’ menu is exactly the same, only with “organic” thrown into the mix and “whole wheat” to disguise the literally 100% meat, cheese and bread menu.  So we ordered her a chicken pot pie soup and she absolutely loved it.  I also noticed that she didn’t have any problem at all eating the whole peas, where as at home, she began refusing pea puree.  I had a side of tomato basil soup and she loved that, too.  I will state right now before everyone chimes in, that I realize these soups are probably high in sodium.  Most soups are.  But let’s look back at the alternative kids’ choices for a minute…

I came home from Jason’s that night with a new thought for what to cook for Olive.  Grown up soups that I don’t have to puree!  I naturally looked through the cookbook I’ve been addicted to lately, the Bonne Femme Cookbook, and found a wonderful sounding Poulet Pot Pie.  The lovely author herself, Wini Moranville, commented on my post last week that I should try it (leaving out the cognac, of course, although I will be trying the grown-up version very soon.)  I absolutely loved the flavors in this recipe – the fresh tarragon and leeks were my favorite part, and Olive happily eats it without slowing down!   This is much less “soupy” than what you might be used to, but I think for a baby in the “I have a few teeth, now” phase, I think it’s perfect.  You could also improvise with adding in other, small-dice sized vegetables of your choice.

Poulet Pot Pie – for the whole family

4-6 servings

  • 1 sheet puff pastry
  • 2 cups cubed rotisserie chicken
  • 4 medium-sized carrots, peeled and cut into 1/2″ dice
  • 5 tablespoons unsalted butter
  • 4 medium-size leeks, halved lengthwise, rinsed, and thinly sliced crosswise (white and pale green parts only) about 2 cups
  • 1 small yellow onion, chopped (about 1/3 cup. Everything is bigger in Texas, I found. Our “small” onions are probably France’s “ginormous” onions, so just measure out 1/3 of a cup and put the other 2/3 cup in a plastic bag. I did exactly that, with exactly those measurements.  And it was the smallest onion I could find)
  • 2 garlic cloves, minced (if you don’t own a Microplane, you really should get one for anything minced.  I use mine constantly for cheese, ginger, garlic, etc.)
  • 1/3 cup all-purpose flour
  • 1 cup low-sodium chicken broth
  • 1/2 cup 2% or whole milk
  • 1/2 cup heavy cream
  • 1 tablespoon fresh tarragon, or 1/2 teaspoon dried tarragon, crushed and 1 tablespoon fresh parsley
  • Fresh ground black pepper and kosher salt, to taste

Thaw puff pastry according to package directions, set aside.
Place cubed up chicken in a large mixing bowl.
Preheat the oven to 400F
Bring a 2 quart saucepan of salted water to a boil.  Add the carrots, bring back to a boil and cook for 3 minutes.  Drain, rinse under cold water and drain again.  Add to the chicken in the bowl.
Melt the butter in a large saucepan over medium heat.  Add the leeks and onion and cook, stirring, until the onion is tender, but not brown, 4 to 5 minutes.  Add the garlic and cook, stirring, until fragrant, about 30 seconds more.  Stir in the flour, making sure all of the flour is moistened by the butter in the pan.  Cook and stir for 1 minutes.  Do not allow the flour mixture to brown.  Whisk in the chicken broth and milk.  Cook and stir until thickened and bubbly; cook and stir 1 minute more.  Stir in the cream.  Stir in the chicken and carrots, the tarragon, and salt and pepper.  Bring mixture to a boil, stirring occasionally.
You would then transfer the entire thing to a 2-quart casserole at this point, but I used little 4 oz ramekins and had enough leftover after filling up 6 ramekins to fill a large souffle dish for Matt and I to split.

cpp2

Look at all the pretty colors!

I used a large cookie cutter and cut out the puff pastry and placed it over the ramekins and sprayed the tops with olive oil cooking spray.  I put plastic wrap and then tin foil over the tops and froze 4 and then put two in the fridge.  To cook, I simply let the dish come to room temp from the fridge and baked at 400 until the puff pastry was nicely browned and the insides were bubbling, about 20 minutes.
cpp1

Enjoy exploring new soups for the family and for your new, little eaters!  If you want to check out my Pinterest Baby Food board for more ideas, you’ll find it’s just mostly good-looking soups 🙂 Remember: there’s no such thing as kid food!  It’s all food and it’s all good for everyone!

The Humble Omelet – if you have eggs, you have a meal.

It’s Monday.  In the fridge, there’s a half eaten container of fried rice, a tub of yogurt, some loosely covered bowl of something I ate last week in the very back and an almost empty container of milk.  I haven’t been to the store to stock up for my week of ambitious cooking at home but I don’t want to immediately admit defeat and head out to eat for lunch.  This happens every week.  And nearly every time I think there’s nothing good to eat for lunch, I realize that I have eggs.  If I have eggs, I have a meal.  Because there’s almost always some bits of cheese, unused herbs, bits of leftover meats or veggies or some leftover that can be incorporated into an egg dish.  If you have eggs and an onion and potato, you can make a hash.  If you have eggs and leftover veggies, you can make a frittata.  If you have eggs and nothing else but butter, you can make an amazing omelet.  Goodness, I’m glad I’m not a vegan.

Many esteemed chefs have done their share of obsessing over the simple preparations of an egg.  Chef Gordon Ramsay has the cooking of an egg as an exam, of sorts, for cooks aspiring to work in his restaurants.  Chef Wolfgang Puck had an omelet making contest as a qualifying exam for the most recent season of Top Chef.  Julia Child is famed for her demonstration of cooking a French omelet, much like the recipe I’ve written about here, and it was Jacques Pepin who taught my husband how to roll an omelet using just the pan.  Eggs are simple and beautiful and need hardly any embellishment to make a wonderful meal.  The recipe below is almost as simple as it gets.

omelet1

If you’d like to fill your omelet with more items, try bits of soft goat cheese, some shreds of Parmesan, crispy pieces of prosciutto or sauteed mushrooms.  Don’t overfill.  This is an IHOP move and it’s what we’re typically used to, but for this recipe, you’re not going for a burrito effect where the eggs act as a tortilla.  You’re really showcasing how a delicately seasoned and well cooked egg can be immensely satisfying and flavorful and not too filling.

A Simple Omelet – serves 1, even after looking in the fridge and determining there is nothing to eat.

3 eggs, room temp (set eggs in a bowl of warm water and they’ll be room temp in half the time)
Salt and pepper to taste
1 tablespoon unsalted butter
1 teaspoon fresh herbs, roughly chopped (we primarily use thyme and chives)

Crack your eggs into a separate bowl and whisk very well until no separation of whites and yolks remain.  Season with salt and pepper – really just about a 1/4 teaspoon and a few grinds of pepper.  Over-salting an egg is a grave mistake that you just can’t come back from.  It ruins them.
Heat the butter in a large, non-stick pan over medium heat (my skillet is a 10″.) Put two plates into a 200 degree oven to keep warm.  As we all know, eggs cool off REALLY quickly.  This helps.
Pour the eggs in and swirl the pan around to cover the bottom.  With a spatula, stir the eggs around in the center – don’t mess with the sides yet – create holes and shuffle things around for the first few seconds the eggs are in the pan.  As you shuffle and create holes and gaps, swirl the pan around and fill in the holes with the runny eggs.  Do this a few more times till the liquid in the egg starts to dissipate but still looks a little runny on top.  At this point, sprinkle your herbs over half the omelet.  Carefully, run your spatula around the edges of the pan and flip about a 1/4 of the omelet over itself from right to left.  If you’re deft with the pan skills, you can dump the egg onto your plate and roll the omelet up perfectly while doing so.  I don’t possess such skills yet, although I will continue to try.  I just use the spatula and continue to fold my omelet from right to left till it’s completely rolled up.  This creates nearly four folds.

omelet2

See the thin layers?  I must give credit where credit is due – Matt made this beautiful, delicate omelet.  The inside is cooked and yet still creamy and not dried out.

Garnish your omelet with extra herbs and enjoy!   Skip the 5 o’clock rush at the grocery store tonight and stay home.  If you have eggs, you have dinner.

Cherry Cream Doughnuts – not everything has to be perfect

When recipes don’t work out exactly as you’d hoped, it’s good to have a positive attitude.  Or, if you’re like me, you could furiously throw the item that didn’t work out as hard as you can into the sink so that it makes a nice splatter everywhere.  I wish I could say that this instance was the only time I’ve behaved in such a childish way.  But there was the hard-boiled egg-peeling incident of 2010…
I’m typically even keel.  I have seen a lot of hardship in my life and when chaos abounds,  I’m usually the calm in the storm.  However, when it comes to cooking,  and I do everything right, cut absolutely zero corners (which is counter to my nature) and it STILL doesn’t work out, I want to destroy something.  Usually the food in question.  The term “perfectionist” doesn’t imply that you do everything perfect – it implies that you wish like the dickens you could.  All the time.  Especially when it comes to peeling a hard-boiled egg.

Thomas Keller is a perfectionist.  I’m sure things have gone wrong for him with his recipes.  I’m sure he’s tested this doughnut recipe dozens of times, and goodness knows he expects perfection.  We own every cookbook he’s ever put out, starting with the first, truly intimidating set of recipes I’d ever seen in one place; The French Laundry Cookbook.  In all the times we’ve tried his recipes, we’ve done our utmost to follow his instruction to the letter.  We respect what he has worked so hard to achieve.  We’ve eaten at his restaurants and our lives have been changed for the better because of it.  We’ve become more disciplined in LIFE because we ate at Keller’s restaurant.  How many meals can have that power?

So it’s with all this respect for Keller and all he’s done to pave the way for perfection in recipes that for these doughnuts, I:
1. measured eggs for this recipe by weight, so I ended up using 2.2 eggs
2. cursed at a piping bag full of jam
3. still felt really proud, even though they didn’t look like the pretty picture in his Bouchon Bakery Cookbook, they tasted amazing.  The dough itself was astoundingly good in flavor.

You have to roll with things when they don’t go perfectly.  I’m sure I kneaded the dough too long or my fry oil was too hot, or not hot enough, but the texture of these doughnuts wasn’t as airy as I’d hoped.  They were dense like brioche, almost.  So I had a hard time filling them – in that the jam wouldn’t even go into the doughnut one centimeter – and that’s what led to the cursing and the soul searching, etc.  But my lovely, even-tempered, optimist husband told me that they could be saved and to just assemble them differently.  So, I cut the doughnuts in half, spread the jam I’d made (which was really good) in copious amounts, and piped the vanilla bean-flecked cream on top of the jam and called it a day!

(this photo is what I’d image they’d look like if they were actually filled doughnuts.  The true result is pictured below the recipes)
cherrycreamdonut3

Cherry Cream Doughnuts*

For the dough:

(I’m putting all these ingredients in grams.  Get a scale.  They’re cheap and it’ll make you a better baker.  If you don’t, then you’ll see conversions like this: 212 grams or 3/4 cup+1 1/2 tablespoons. Kill me now.)

518 grams AP flour
10 grams instant yeast
74 grams granulated sugar
9 grams kosher salt
212 grams whole milk (warmed in the microwave for 30 seconds)
2 large eggs or 3 small ones.  I can’t bear to tell you 111 grams of eggs.  But that’s how much he says to use.
9 grams vanilla paste – I also think weighing the vanilla is a little much.  It’s about 1 1/2 teaspoons
5 grams unsalted butter (barely a tablespoon)
Canola oil for deep-frying

Dust a surface on your counter with flour and spray a large bowl with  non stick spray.
Place the flour and yeast in the bowl of a stand mixer fitted with a dough hook and mix for about 15 seconds to distribute the yeast evenly.  Add all the remaining dough ingredients, except the butter and mix on low speed for 4 minutes to incorporate.  Continue to mix on low speed for 20 minutes.  Add the butter and fully incorporate.  Stop and scrape down the sides and push the dough off the hook.  Mix for 5 minutes more.
Run a bowl scraper around the sides and bottom of the bowl to release the dough and turn it out onto the work surface.  Gently pat the dough into a rectangular shape. Stretch the left side of the dough out and fold it over two-thirds of the dough, then stretch and fold it from the right side to the opposite side, as if you were folding a letter.  Repeat the process, working from the bottom and then the top.  Turn the dough over and place it seam side down into your prepared bowl.  Cover with a dish towel and let sit at room temp for 1 hour.
Return the dough to the work surface and gently but firmly pat the dough into a rectangle, pressing any large bubbles to the edges and then out of the dough.  Repeat the stretching and folding process and return the dough to the bowl, seam side down, cover with plastic wrap and refrigerate overnight.
Watch a recorded episode or two of Downton Abbey
Next day: roll out the dough on a lightly floured work surface into an 11 inch circle.  Line a sheet pan with parchment paper and lightly spray the parchment with non stick spray.  Using a 3″ round cookie cutter, cut 8 rounds from the dough, brush off any excess flour and place on the prepared pan.  Cover the baking sheet with plastic wrap or a towel and proof on the counter for 1-11/2 hours, until the doughnuts have doubled in size (they’re big boys) when the dough is pressed with a finger, the impression should remain.
Pour 3 inches of canola oil into a dutch oven or heavy stockpot, deep enough to allow the doughnuts to float freely.  Heat the oil to 335-345 and try your best to keep it in that range.  This is where I faltered.  I think if you have a fry-daddy or something like that, you’ll be better off.
Set a cooling rack over a baking sheet.  Gently lower three doughnuts into the oil and fry for 30 seconds without moving the doughnuts, to allow the dough to set.  Flip the doughnuts over and fry for 5 minutes, flipping them every 30 seconds or so, until they are rich, golden brown.  Transfer to the rack and cook remaining doughnuts in batches of 3.  Let doughnuts cool completely before filling.

For the filling:

I made Keller’s cherry jam.  Honestly, I don’t recommend doing this because the way he says to do it is to buy a cherry puree.  Well.  They don’t sell such things around here.  So I made my own puree.  And then I made jam out of it.  And then when I couldn’t get the dadgum jam inside the doughnuts, I questioned my reason for living and thought, “WHY DIDN’T I JUST BUY JAM?!”  So…my integrity will first tell you to make your own.  Then, my logical mom-side that only has two days a week she has help with the kid says not to waste a few precious hours making jam.  I’m torn.  Here’s a quick recipe, in case you want to have FULL dedication.  This is my own made-up recipe, not Keller’s.  But it was very tangy and lovely, all the same.

Quick Cherry Jam:

1 bag of frozen dark cherries
1/2 cup sugar
squeeze of lemon

Cook all that down in a stainless steel sauce pan and let it bubble over medium-low heat for about 15-20 minutes.  Transfer to a tall cup or deep bowl and blend with an immersion blender.  Strain over a bowl through a fine mesh strainer with a spatula until you’re just left with the cherry skins in the strainer.  Discard the skins and you have a pretty respectable jam in just a few minutes without messing with pectin.

For the whipped cream:

1 1/2 cups heavy cream
2 tablespoons powdered sugar
1 vanilla bean, split and seeds scraped.

Place the cream and sugar and vanilla seeds in a stand mixer fitted with the whisk attachment.  If you don’t have vanilla bean, substitute 1 tsp vanilla paste or extract.  Whisk at medium speed until the cream holds shape, or medium to stiff-peaks.  Don’t over whip.

To assemble:(My way) Cut each donut in half, spread a generous amount of jam on each half and pipe a tall mountain of whipped cream.  Drizzle more jam on top of the mountain and garnish with a cherry. Do assemble Keller’s way, assuming your doughnuts are light, fluffy and full of air pockets, put the jam in a piping bag, fitted with a round tip and stick in the side of the donut and fill slowly until the donut feels heavy.  Top with whipped cream and a cherry.

*recipe adapted from the Bouchon Bakery Cookbook, which is amazing and beautiful in every way.

cherrycreamdonut2

cherrycreamdonut1

Not too shabby.  Remember to have fun this weekend, indulge a bit, but make your indulgences worth every bite!  Check back Monday for a healthy, hearty recipe to start your week off right!

*(recipe adapted from the Bouchon Bakery Cookbook)

Roasted Butternut Squash with Brown Butter

Every time someone asks me how to cook any vegetable, my answer will 99% of the time be: roast it.  Olive oil, salt, pepper, done.  That’s all you need.  I have discovered a new, refreshed love for so many vegetables by simply roasting them.  Butternut squash is one that benefits from this cooking method more than most.  As King of the Squash (a term I deemed it worthy) the butternut squash is more dense, less watery and has a deeper flavor than most squash.  In the winter months, it’s the most perfect side dish for any meal, and since it can be pureed beautifully or left in small chunks, it is the perfect baby food for babies just starting out with solids, or graduating into finger foods.

I found the easiest way to cut up a butternut squash for this recipe is by cutting it into cross sections:

bns2

Once you scoop out all the seeds, begin cutting off the rind.  The rind so tough, no amount of cooking will really make it edible. I mean, it is edible, but it wouldn’t be enjoyable.

bns3

Once you get all the rind off, cube up the squash into about 1/2″ cubes.  It’s important to keep your cubes all the same size because when things are varying sizes, they cook at varying times, and it makes everything more difficult when trying to get dinner on the table to wait for a 1/3 of your squash to continue cooking.  So.  Be consistent in your chopping!

Now comes the easy part.  Spread out all the squash on a large, rimmed baking sheet and toss 2 tablespoons of oil till completely coated, and sprinkle with kosher salt and pepper.  Roast at 400 for 45 min to an hour.  I want to add that your baking sheet needs to be big enough so that your squash isn’t completely crowded and piled on top of each other.  I’ve roasted it that way and the squash just steams and you don’t get those nice, charred bits that add to the texture and depth of flavor of this dish.

bns4

So you want to bake it kind of past the point where you think you should.  I always wait till a few edge pieces look a little burnt.

When they’re out of the oven, immediately put them in a bowl to keep warm.  They’ll cool off pretty quick on the pan.  Now for the magic.  Take a tablespoon of butter (be generous, verging on two tablespoons) and put it on the stove on medium heat in a stainless steel pan.  Let the butter melt and swirl it around until the foam subsides.  Then, when it starts to smell rich and nutty and there are butter solids forming at the bottom of the pan (this is why you use stainless – you can’t see this happening in a black, non-stick pan) remove the butter from the heat, pour over your bowl of squash and sprinkle with cinnamon, Chinese 5 Spice, pumpkin pie spice – whatever strikes your mood!  My go-to is Vietnamese Cinnamon.

Let me tell you – this is magical stuff with the addition of the browned butter.  I deeply believe that butter in moderation like this is not only fine, but life-giving.  The richness of browned butter could make anyone feel like a king at the table.  Cooking for your family is all about making them feel loved, warmed and nurtured.  If you wanted to get creative, throw a sage leaf in with the butter while it’s browning. (By the way, that makes an amazing ravioli sauce)  And yes, I realize I’m putting a recipe that has browned butter under the category of “healthy meals.”  I’ll rant about that in another post, but let me just say that I think there’s a lot more to eating healthfully than counting calories.  And 1-2 tablespoons of fat (okay 3 counting the olive oil) is about a tablespoon of fat per serving.  We’re not going to kill anyone with those ratios. And we’ll have happy eaters!

bns1

When I cook for Olive, I don’t ever hold back on spices except for salt and extremely hot spice (and even then, I salt, just less than what I’d prefer, and I let her have a bit of something spicy to see if she likes it.)  She happily ate these little nuggets the entire time we ate.  So that meant a happy, quiet baby for nearly an hour of eating.  Is THAT motivation enough to make this for your baby?  If you have a baby who isn’t eating chunks yet, simply take about a half cup of the squash into a bowl, add a bit of low sodium chicken broth or water and puree with an immersion blender.  Add a bit more cinnamon or butter and you have an amazing puree for your little 4-6 month old!

Enjoy!  And don’t forget to let me know how it turns out.  I know I just basically wrote out the recipe, but I hate blogs who do that and then don’t put a straight-forward version down below for me to copy/paste.  So!

Roasted Butternut Squash with Browned Butter

1 butternut squash, 2-3 lbs
2 tablespoons olive oil
Kosher salt and fresh ground pepper to taste
1-2 tablespoons unsalted butter
Cinnamon or whatever spice you think sounds good!

Preheat your oven to 400.
Slice the butternut squash into 1″ cross sections.  Scoop out the seeds (I use a metal measuring spoon – they have sharper edges for scraping) and cut into 1/2″ cubes.
Arrange the squash on a large, rimmed baking sheet.  Drizzle with olive oil until thoroughly coated and then sprinkle with salt and pepper.
Roast in the oven until some pieces begin to brown, about an hour.  Check the cooking at 30 minutes and stir the squash around to ensure even baking.  I know my oven has hot spots and I assume yours does, too.
Once the squash is done roasting, place it in a bowl to keep warm.
In a small saute pan, heat butter over medium heat until foam subsides and brown bits start to form on the bottom of the pan.  You’ll want to swirl the pan a few times and really watch.  There’s a HUGE difference between browned butter and burnt butter and you don’t want the latter.  I think the whole process takes about 5 minutes, but it will vary so once you smell that intoxicating nuttiness, you’re done.
Pour butter over squash and adjust seasoning as you like.

Enjoy!  Serves 4 as a side dish.  Or package it all up into freezable portions for baby, if you can part with it.

Swiss Chard Salad worthy of lunch and dinner!

Last week, every meal I made came out of my current favorite  cookbook, The Bonne Femme Cookbook by Wini Moranville.  This book claims that these recipes are what French wives and mothers cook every day.  They aren’t difficult, they don’t require tons of prep, and they use ingredients that are in season and available nearly everywhere.  And any book about France will tell you that the majority of French mothers work outside the home!  Most of the meals I made last week took no longer than 30 minutes.  They tasted rich, but weren’t over the top, they had variety in flavors, ingredients and yet weren’t expensive.  They were all full flavor and I still lost two pounds at the end of the week and honestly, didn’t expect to because the meals had been so satisfying.  (how sad that we expect healthy food to be miserable)

This simple Swiss chard recipe was one I made last Monday.  I told Matt, “If we want to have it again, I’ll write a post about it” and not only did we have it again the next day for lunch, I wanted to have it a third time, but held back only because I had other meals planned.  It was that good.

There are two types of Swiss chard you can buy (there may be more, but these two are available at local grocery stores here in Lubbock, TX) – there’s rainbow chard which has beautiful red, pink and yellow stalks, and then there’s this variety, White Stalk Chard:

swisschard1


I found that this type isn’t bitter at all, which as most of you know, greens in general tend to have a bitter bite to them.  Many find that appealing, but despite my best efforts to get past the bitterness, I tend to add more and more bacon to greens that are TOO bitter, and that’s a bit counter productive to a week of trying to eat well.

So now you know what to look for to build this lovely meal.  The original recipe called for blue cheese instead of Parmesan, but I had parm on hand, so that’s what I used and I really loved the way the nuttiness of it went with the apples and chicken.  I think any cheese would be fantastic.

Swiss Chard with Roasted Chicken, Apples, Pistachios and Parmesan

1 1/4 pounds boneless, skinless chicken breast halves
Salt and freshly ground black pepper to taste
2 tablespoons extra virgin olive oil, plus extra for brushing the chicken
4 ounces Swiss chard leaves, coarsely shredded (I didn’t use the center stalk – just took the green)
1 large, tart red apple, such as a Braeburn (this is what I bought) peeled, cored and diced
1/4 cup diced Parmesan cheese (or any crumbly cheese)
3 tablespoons coarsely chopped pistachios
1 1/2 tablespoons balsamic vinegar

Preheat the oven to 350F
Season the chicken breasts with salt and pepper and brush them lightly with olive oil.  Place the chicken breasts in a shallow baking dish and bake until the internal temp registers 170F on an instant read thermometer, about 20 minutes (we use the ThermaPen and it’s awesome and quick.) Transfer the chicken to a cutting board to rest for 5 minutes or so.
Meanwhile, combine the Swiss chard, apple, cheese and pistachios in a large bowl.  Whisk together the olive oil, balsamic vinegar and salt and pepper in a small bowl.
Cut your chicken breasts into bite sized pieces, or shred it using two forks.  Add the chicken to the chard mixture and toss to combine; the chard leaves will soften a bit from the heat of the chicken, but this adds to the comfort of the meal, in my opinion.  Add the vinaigrette and toss again to combine.  Divide the salad among four shallow bowls and serve.

swisschard


The Weekend Feast

Matt and I got into the habit a few years ago of eating simply during the week and more “festally” (to feast) on the weekend.  Several reasons for this.  For one, we needed to lose about a hundred pounds between the two of us (and we did – yay) and several chefs we follow had been talking of other cultures living their lives this way and we couldn’t help but notice they were cultures withOUT a major weight problem, as a whole.  One of our favorite chefs, Rick Bayless, speaks of this way of eating and living in his book, Fiesta at Rick’s and of the art of the Mexican fiesta:

“…remember that nutritionists craft simple messages for maximum impact.  If they’ve deemed a food deleterious, it won’t likely creep onto the beneficial list…even sometimes, even on special occasions. Yet that’s exactly where it should be. Because, if we eat a wide variety of good food–fresh stuff in reasonable portions–there’s a perfect time for everything. For the simple pleasure of a fall apple and for the over-the-top chocolate fudge cake.”

It started to make sense to us that this would be a much easier way to maintain a desired, healthy weight than with the old, tried and not-so-true method of crash dieting, buying late night gym memberships, falling off the diet wagon, overeating, repeat.  I came across an amazing book called Supper of the Lamb, in which author Robert Farrar Capon devoted an entire chapter to eating “festally” (to feast) verses eating ferially (simply, meagerly.)  I could really quote this entire book, as it’s rich with language about cooking, eating and food that sums up nearly everything I have come to believe.  And he is an Episcopal priest, so he says things much more eloquently than I.  About festal verses ferial eating, he says:

“Both the ferial and the festal cuisine, therefore, must be seen as styles of unabashed eating.  Neither attempts to do anything to food other than render it delectable.  Their distinction is grounded, not in sordid dietetic tricks, but in a choice between honest frugality or generous expense…Let us fast, then — whenever we see fit, and as strenuously as we should.  But having gotten that exercise out of the way, let us eat.  Festally, first of all, for life without occasions is not worth living.  But ferially, too, for life is so much more than occasions, and its grand ordinariness must never go unsavored.”

You may begin to seeing a trend with this blog, as I continue to publish weekly recipes.  Mondays will almost always be something healthy and light to get you in the right mindset for your week.  Fridays will almost always be something more indulgent.  I want to stress, however, that eating with a festal attitude does not mean becoming gluttonous a couple days a week.  We’ve made that mistake and that, I fear, is another American frame of mind that things have to be BIG and ALL YOU CAN EAT in order to be “fun” or a party type atmosphere.   I believe it was a French woman, in the book, French Kids Eat Everything who said, “Oh no, a small piece [of cake], please.  If it’s too big, I won’t enjoy it”  We may laugh at this prim response, but have you SEEN the French?  They don’t exactly have an obesity epidemic and they are known for their indulgent recipes.  That, I realize, is an entirely different blog post.

Without further rambling, may I present to you, your weekend indulgence!  To be enjoyed with coffee, a friend and WITHOUT a SHRED of guilt.  Just make sure you don’t eat too many, or you might find yourself not enjoying them, anymore…

chocomering

Dark Chocolate Meringue Cookies with Espresso Ganache Filling

For the Meringue Cookies*:

  • 6 large egg whites, room temperature
  • 1/8 teaspoon cream of tartar
  • 3/4 cup Baker’s Sugar (superfine sugar – regular will do fine, too)
  • 3/4 cup nut flour (I used almond flour, but you could use any)
  • pinch of salt
  • 1/3 cup Dutch process cocoa powder

Preheat the oven to 225°F and line two baking sheets with parchment paper.
Place the egg whites and cream of tartar in the bowl of a stand mixer and beat on medium speed until fine bubbles form. Increase the speed to medium-high and whip until soft peaks form.
Slowly add the sugar and whip until the meringue holds stiff peaks.
In a small bowl, whisk together the nut flour, salt, and cocoa powder. Sprinkle over the meringue and mix for 30 seconds on low speed.
Remove from the mixer and use a spatula to finish folding the ingredients together until you have a smooth, thick, evenly mixed batter.
Using a piping bag or small spatula, spread the batter onto the parchment, spreading to about 2″ circles. Leave about 1″ between the circles.  If you’re feeling extra festal and someone is coming to share these cookies who is an avid fan of salt, try sprinkling the tops of the cookies before they bake in this cool espresso fusion salt.  I think even a sprinkle of kosher salt would add to it and a sprinkle of salt always helps balance out the richness of any dish.

Bake the discs in the oven for at least 60 minutes. You can then turn off the oven, crack the oven door open, and leave the discs to dry in the oven for a few hours, or up to overnight.  This is what I did and they peeled off the parchment paper just fine.
While your cookies are still cooking and/or drying out, get on with making your ganache filling.  I just made up a ganache recipe that I thought sounded good.  Here were the ingredients:

Espresso Ganache

Heat the heavy cream over medium heat until it comes to a boil.  Place your chocolate chips in a large glass bowl and pour the boiling cream over the chips.  Let it sit there for about 5 minutes, then gradually stir with a spatula in the center of the bowl.  It will appear like the milk won’t ever fully incorporate into the chocolate.  Then, like magic, the center starts to darken into a black silky texture and you just keep stirring and folding and little by little the chocolate mixes beautifully with the cream and you’re left with the most wonderful, glossy texture.  This is one of my favorite things to get to experience in the kitchen.
At this point, you have a beautiful ganache.  If you wanted, you could let it chill and make yourself some righteous truffles.  However, for filling cookies and having a nice texture that won’t leak out everywhere, I chose to add some cinnamon, espresso powder and powdered sugar to thicken the chocolate up a bit, and to make the filling sweeter than the cookie, and add depth to the chocolate flavor (with the espresso powder) which I think is a nice balance.  So, add the cinnamon and powdered sugar and stir with your spatula, folding it in on itself until fully incorporated.  You’ve ruined your glossy texture, but it’s okay.  Once it comes up more to room temp, you’ve got a wonderful texture to spread onto the cookies.
Spread and sandwich the cookies together.

Makes 12-ish sandwiched cookies.

Tune in Monday for a great recipe to kick off your week of eating clean, simple and deliciously!

*recipe adapted from King Arthur Flour