Crunchy Cornslaw – a new twist on the same ol’ slaw

Crunchy Corn Slaw Fish Tacos with Corn Slaw
This weekend we had a cookout with some of our friends from church and decided we’d bring a good coleslaw to go with the bbq type meats everyone would be cooking.  So we decided to do a punny version of coleslaw and bring cornslaw.  I started dreaming it up because every summer for the past four or five years, Matt and I have inadvertently gravitated toward a Corn Dish of the Summer.  A few years ago it was an amazing creamed corn, a year after that it was Esquites (a bowl full of the equivalent of Mexican street corn) and last year it was this amazing miso buttered corn with scallions and bacon, a la Momofuku.

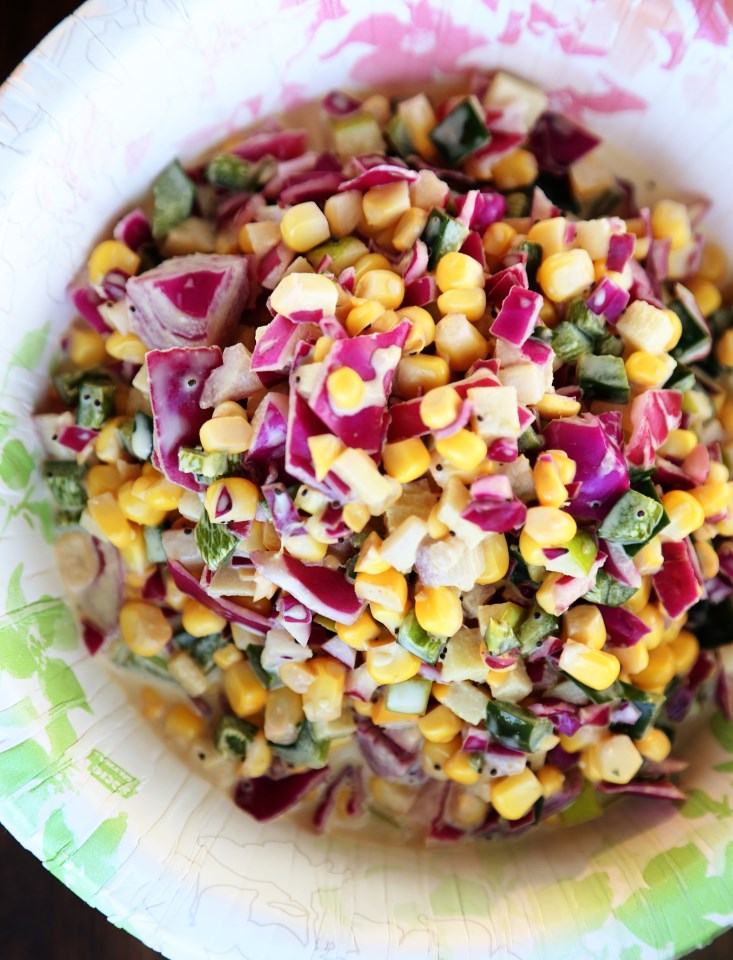
Now, I’m not saying this is THE corn dish of the summer of 2014, but it’s a start.  We really like it.  To compliment the sweetness of the corn, I added a Granny Smith apple and poppyseeds.  To offset the sweetness, I added plenty of purple cabbage and red onion and fresh poblano peppers – everything diced the same size (that’s important).  Then, I made my own mayo because we had just run out and I didn’t remember it the TWO times I’d been to the grocery store that day.  I was not going back.  So, homemade mayo with a little dijon and brown sugar and sherry vinegar – the perfect sauce for our perfect summer slaw!

Corn Cole Slaw
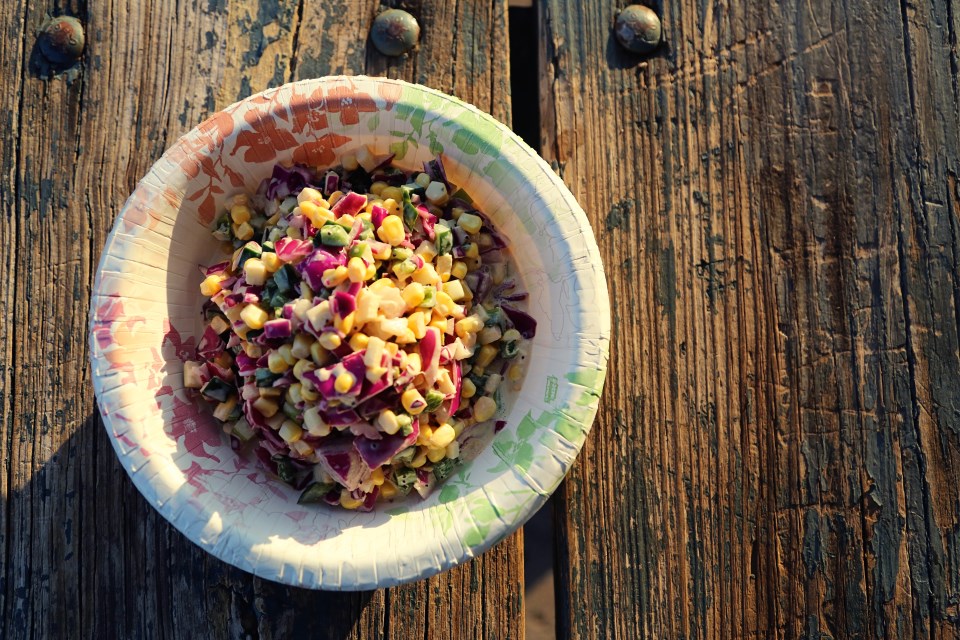
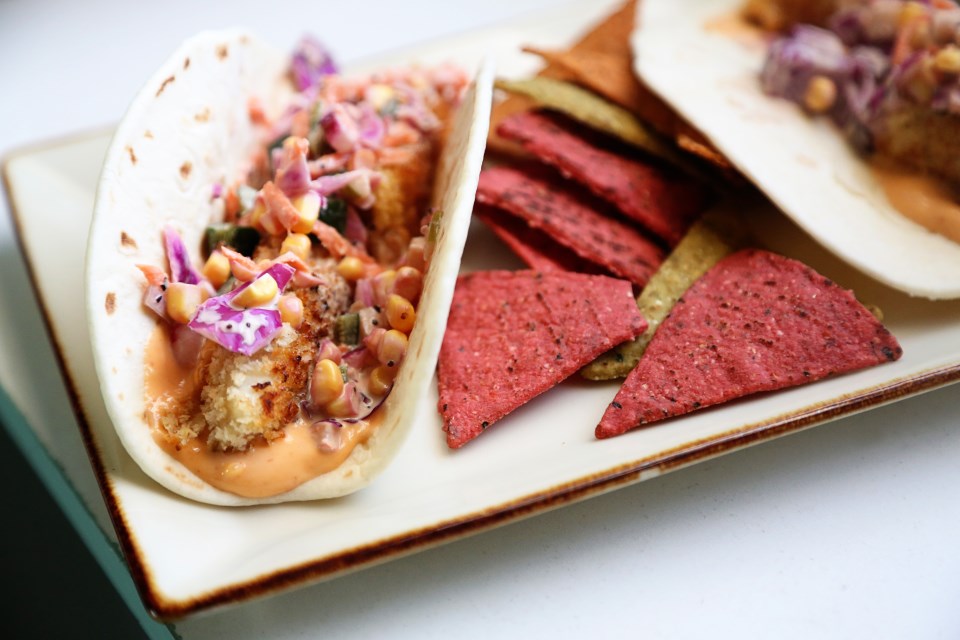
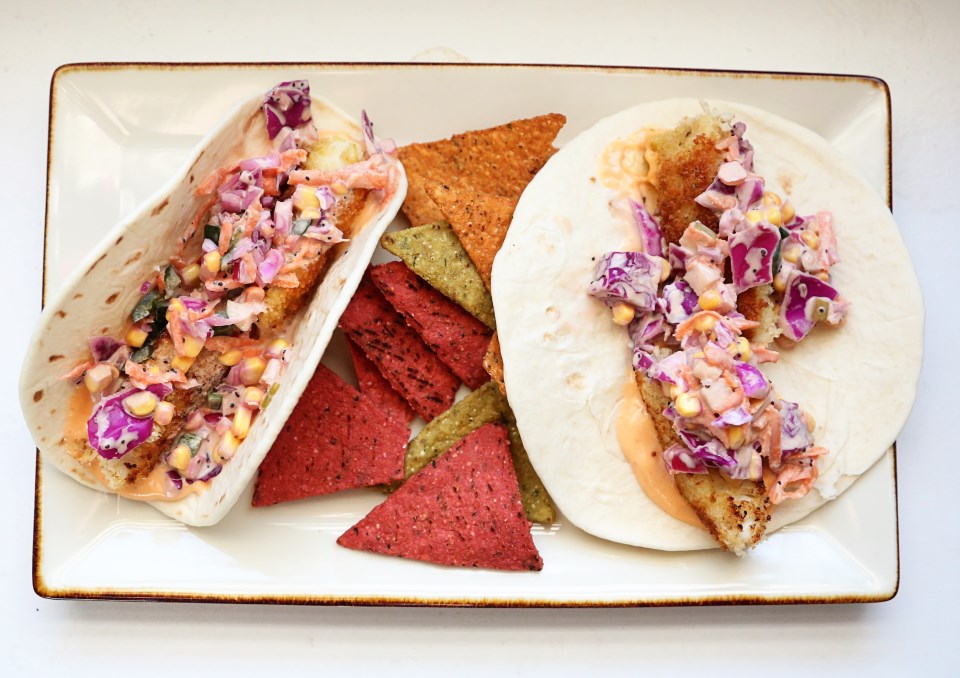
This stuff was fantastic as a side for smokey sausages on the grill (and grilled bread, of course!)  Tonight, I made fish tacos and made a little Srirracha mayo with the leftover batch of mayo from the slaw and topped our tacos with the still-crunchy slaw.  Amazing!  Welcome to summer, my friends!

Fish Tacos with Corn Slaw and Srirracha Mayo

Crunchy Cornslaw

4 large ears of corn
1/2 head purple cabbage, diced
2 poblano peppers, diced
1/2 cup red onion, diced
3 carrots, peeled and grated
1 Granny Smith apple, diced
1 TBS poppyseeds
1 cup of mayo (homemade or not – just don’t buy something fake or low fat or “miracle”)
2 TBS dijon mustard
2 TBS sherry vinegar
1 TBS brown sugar
salt and pepper to taste

In a large bowl, cut all the corn from the cobs directly into the bowl.  Add cabbage, peppers, onion, carrots, apple and poppyseeds and stir to combine.  In a smaller bowl, mix together the mayo, mustard, vinegar and brown sugar and fold into the corn mixture until everything is coated.  Season to your taste with salt and pepper.  If you want to make your own mayo, I’ll give you our super easy recipe below!  Happy cooking!

Homemade Mayo *
makes about 2 cups

2 large eggs
4 tsp dijon mustard
2 tsp white wine vinegar
1 tsp kosher salt
2 cups non-flavored oil like canola, grapeseed, vegetable

Add the eggs, mustard, vinegar and salt to a large cup and add the oil (if using an immersion blender). Start processing as you gradually lift the immersion blender up, letting the oil get sucked under in a steady stream.  If using a food processor, add everything except the oil to the processor or blender and blend for 30 seconds.  While running, slowly drizzle the oil in a thin, steady stream until all the oil is added and the mixture is smooth.

*adapted from Spike Mendelsohn’s awesome book, The Good Stuff


Fish Tacos 

2 fresh cod fillets or other firm, white fish
1 egg, beaten
1 cup panko breadcrumbs
1 tsp Old Bay seasoning
salt and pepper
olive oil for pan frying

Pat the fish fillets dry with paper towels and season each side with salt and pepper.  Cut into fish-stick sizes (mine were about 3-4″ sticks) by cutting the fillet across it’s width.  Put the beaten egg in a large bowl and the panko and seasoning mixed together in a separate bowl. Dip each stick into the beaten egg and then roll in the panko/Old Bay mixture and pat on all sides to fully coat.  Lay the coated fish sticks on a clean paper towel while you finish the others.

In a large, non-stick skillet over medium-high heat, add about 4 TBS of olive oil and let it heat till it shimmers.  Add the fish sticks without crowding (I had to do two batches) and fry till golden brown on each side.  Keep warm and crisp in a 250F oven until ready to assemble the tacos.

For assembly:

Dollop some srirracha mayo (there’s no recipe here – just add srirracha or any hot sauce to mayo and mix it up till it’s a heat level you like!  Mine was about 2 TBS per cup of mayo) along the center of a soft-taco sized tortilla.  Lay two fish sticks on top of the mayo and then top with the cornslaw.  Enjoy!

Palmer House Ragu

Palmer Ragu
Matt and I first read about homemade ragu in the book, Heat, by Bill Buford.  The section on ragu was about Mario Batali and his story of his own family’s obsession with their homemade bolognese sauce, or, ragu.  He said every Italian family had one, and each family was so fiercely defensive and prideful about their ragu recipe, that some men even seriously considered a woman as marriage material or not, based on the quality of her version.  Though the section was a bit humorous, I really felt that this was a dish with a history and a soul and an identity.  No two people can make the same ragu, and so each person should work on perfecting their own to their own liking!

Matt and I consulted an online recipe years ago when we made ragu the first few times.  This time, Matt said, “Let’s not consult anything.  We know how it goes; let’s do our own.”  So we did!  It was really fun to create our own concoction and add a little of this and a little of that till we thought it tasted “right.”  A pretty good description in Heat of the proper way to cook a ragu is simple:  “Take a liquid and a solid and cook it till it’s neither.”

So I’ll give you our now-official family ragu recipe.  I encourage you to come up with your own as you go!  Make a huge batch and freeze for later – you won’t be sorry. You can thaw it easily in a skillet with a little beef stock.  This stuff is great saucy or thick.  We like ours super chunky and less liquidy, so we let it verge on the dry side.  Matt made potato gnocchi to go with it, but we’ve done every noodle you can imagine, and my personal favorite is a nice, wide fettuccine noodle.  Garnish with shaved Parmesan and serve with a hearty glass of red and you’ll be so good you won’t know what to do with yourself.

potato gnocchi Palmer Ragu Night

Palmer House Ragu

3 tbs butter or olive oil
2 cups diced carrots
2 cups diced celery
2 cups diced onion*
1 lb ground beef (85%/15%)
1 lb ground pork
1/2 lb ground sausage
1 cup white wine
1 cup whole milk
1-28 oz can diced tomatoes
salt and pepper to taste
1 tsp oregano
a few gratings of whole nutmeg
pasta of your choice

*it’s important to try to make all your vegetables the same size dice so that they all cook and break down at the same rate.  We keep everything at about a 1/4″ dice.

In a large stockpot (I adore my Lodge ceramic dutch oven.  Half the cost of Le Creuset and just as good), over medium heat, add the butter and cook until it starts bubbling.  Then, add in the carrots, celery and onion, and cook, stirring occasionally, until beginning to soften.  Add in the meats and stir well to incorporate with the vegetables.  Cook until most of the pink is gone, but not all.  Add in the wine and bring to a simmer and cook until most of the liquid is gone.  Do the same with the milk.  After the milk is cooked off, add in the diced tomatoes and stir well to incorporate.  Add about a teaspoon of kosher salt and a few grinds of fresh pepper and let that sucker cook all afternoon.  We let ours bubble away for about 3 hours and as it cooks, I randomly come stir it, ladle off the fat that starts to separate so that the finished result won’t be too greasy.  Really, you can’t  cook this too long.  You can cook it too fast, but if it starts to dry out, simply add some water or beef stock and keep stirring.  When you like the look of it, add in the oregano and nutmeg and season again with salt to taste.  Let it cook another 30 min or so to let the flavors develop.  Serve over freshly boiled pasta (long noodles are the best) with shaves of Parmesan and a few shakes of crushed red pepper.  That’s how we roll, anyway.  Enjoy and mix it up however you like!  The secret is in the long cook time.  It’s amazing what a few ingredients will do together, over time!

Homemade Pizza with Duck, Sage and Dried Cherries

Duck Sage and Cherry Pizza

It’s Use Up the Leftovers Before the Christmas Road Trip Day!  This can be a fun little game and can even force you into being more creative than usual.  I love leaving an empty fridge before a big trip.  Helps to not have Ghosts of Dinners Past to greet you when you get back.  When the holidays are over, I want to move forward.  I don’t want to stare at a pan of bread pudding in the fridge.  I want to start fresh!

I had a bit of leftover duck terrine from Sunday (another wonderful recipe from Homemade Winter), a few sage leaves and dried cherries and thought that would be a great pizza combination.  It was, indeed!  We also made a pizza with leftover ground beef, goat cheese and sauteed leeks, and one with Matt’s favorite combo: Parmesan, pistachios and rosemary.  I made my trusty tomato soup and we dunked our pizza crusts in it, and had a wonderful “Pre-Christmas” lunch together before heading off tomorrow to spend a week going here and there and everywhere!

I’d recommend instead of the duck terrine, which I am 99.9% sure you don’t have in your fridge, that you just use any good quality ground sausage.  The combo of sausage and sage and cherries is classic and works no matter what.  For the sauce, just use a drizzle of olive oil and sprinkle Parmesan cheese all over the crust before topping it.  I put the sage leaves on during the last few minutes of cooking so they wouldn’t burn, and I positioned some plain mozzarella over the cherries so they wouldn’t burn, and it worked out great.

For the recipe, I’ll include a link to Matt’s perfected pizza crust, which makes 3 medium sized pizzas, and I’ll let YOU raid your own fridge for the toppings you so desire!  Here are some fun combinations:

  • Corn, chorizo and potato
  • Ham, cheddar and scallion
  • Canned tomatoes, basil, mozzarella and sliced garlic
  • Leek, goat cheese and bacon
  • Broccoli, alfredo sauce, bacon and parmesan
  • Asparagus, red onion and manchego

The fun is in the leftovers you find.  Don’t limit yourself to “normal” toppings – you never know what great combinations you could create!

Sage, Duck and Cherry Pizza

Chicken Fricassee, Deconstructed

chicken fricassee 2

Chicken Fricassee was one of the first meat dishes I made for Olive when she was a baby, just starting out on solids.  (The first meat she had was homemade beef ragu – I kinda threw the rule books out when it came to feeding her and I haven’t regretted it a single day.)  I made the dish from that month’s Martha Stewart Magazine and took a little bit of each component and blended it up with a little extra chicken stock. Olive consume it with a great fury.  The flavors are so simple and so rich – it truly is a comfort food dish.  And if you think it’s “fancy” because it has a French name, fear not – it’s basically a chicken pot pie without the pie.  All those amazingly comforting flavors of chicken soup, thyme, carrots, peas, cream gravy, butter – they’re all there.  You serve it over rice or pasta and revel in the comfort.  It’s not difficult and it tastes like pure love.

I’ve made that Martha Stewart version several times, but for this recipe, I worked out of the Bonne Femme cookbook and decided to deconstruct it because Olive is able to eat each component just chopped up small, but not big enough to tackle chicken still on the bone.  So I cooked the chicken, shredded it after it had cooled, and then assembled, garnishing with the pan gravy at the very end for an easy to eat version that everyone really loved.

chicken fricassee

chicken fricassee 3

chicken fricassee 2

Deconstructed Chicken Fricassee*
serves 4

2.5-3 lbs bone-in, skin-on chicken parts (legs, thighs, breasts, whatever – I used the whole chicken in pieces)
salt and pepper
2 tbs vegetable oil
1/2 a white onion, chopped fine
1/2 cup low-sodium chicken broth
1/2 cup dry white wine (or more chicken broth, if you don’t have any)
1 bay leaf
4 carrots, peeled and cut into 1/4 x 2″ sticks
1/2 cup frozen pearl onions
2 tbs unsalted butter
2 tbs AP flour
1/4 to 1/2 cup milk
2 tbs chopped fresh tarragon
1/4 cup chopped fresh parsley
2 tbs fresh lemon juice

Pat the chicken pieces dry with paper towels and season with salt and pepper on both sides.  Heat the oil in a large, deep skillet or stock pot over medium-high heat until it shimmers.  Add the chicken and cook, turning occasionally, until brown on all sides, 10-15 minutes.  Transfer the chicken to a plate and drain off all but a tbs of fat from the pan.

Add the onion to the pan and cook briefly, stirring, until fragrant.  Add the chicken broth and wine, stirring to loosen any browned bits from the bottom of the pan.  Return the chicken to the pan.  Add the bay leaf and bring to a boil, then reduce heat.  Cover and simmer for 25 minutes.  Then, scatter the carrots and pearl onions around the chicken; cover and simmer until the chicken is done (internal temp should register 170 on an instant read thermometer), about 15 minutes more.

With a slotted spoon, transfer the chicken and vegetables to a large bowl; cover with foil to keep warm.  Discard the bay leaf.  Pour the pan juices into a measuring cup and set aside.  Melt the butter in the pan over medium heat.  Stir in the flour with a wire whisk to make a smooth paste.  Cook and stir for one minute.  Slowly add the pan juices back to the pan, stirring with a wire whisk until smooth.  Cook the mixture until it boils and thickens, then continue to cook for one minute more.  Whisk in enough milk to make a sauce of the desired consistency and bring to a simmer.  Stir in the tarragon, parsley and lemon juice.

I then shredded up the chicken by hand, scattered an equal amount into each bowl over a heap of rice, arranged the vegetables on top of the chicken and then spooned my pan sauce over everything and cracked a lot of black pepper on top of that!  There’s something magical about fresh black pepper and a rich chicken dish.  It’s just perfect.

Enjoy!

*adapted from the Bonne Femme cookbook, which is perfect

Asparagus Tart – Roasting is still the best way to eat vegetables

asparagus tart 3

I know I said I’d write about what got the most requests on my question last week, but I haven’t had time to do a good job with the requests I got, so that will come at a later post.  The top requests were for kale.  Honestly, I’m a bit stumped.  What, exactly, is the mystery?  Put it in stuff?  Ha!  That would be my suggestion.  Stir it into soups, toss it in salads and wilt it a bit with warm roasted chicken or hot bacon.  However, I don’t want to be flippant, so I will look up some good uses for kale, the sad-replacement-for-chips, and get back to you.  The other suggestion that intrigued me was for proper hash browns.  My friend, Maria, said that she had tried them several times and hadn’t gotten that good, diner-esque texture to them.  Honestly, I haven’t, either.  So I am interested to look up ways to cook hash browns well and that will most definitely be a post, as it will be a learning process for me, as well.

Today I wanted to simply give you an awesome recipe that we had last night for dinner, as our “starter” dish.  A beautiful use of asparagus (hey, Tracey, you asked for asparagus recipes, too!) and a lovely and exciting way to serve them that feels indulgent (bet you’ve never used that word in association with asparagus) and fun for children, and even doable for one-year-olds learning to eat bigger chunks of food.  Olive ate about 6 bits of this tart and then she was done. I consider that a success.

Having a box of frozen puff pastry in your freezer at all times is a good move.  This stuff can make you look like a fabulous cook in about 20 minutes.  You can top it with anything and bake and have great appetizers, desserts, or a crust for a savory tart, like this one.

Also, I wanted to mention my deep love and perhaps borderline obsession with using up leftovers.  My goal at the end of most weeks is for my fridge to be empty, save condiments and milk.  It’s good to think of ways to use up your leftovers and I know no better way than to use eggs to achieve almost-better-than-the original-meal leftovers.  This morning, I took leftover pieces of the asparagus tart and fried an egg and put it on top.  Lots of fresh ground pepper and a few drops of hot sauce.  So good.

breakfast2

Asparagus Tart

serves 4

1 sheet of puff pastry, thawed
1 bundle of fresh asparagus, ends snipped and cut in half, length-wise (I found that this helped them cook faster than the original recipe)
Olive oil to coat the asparagus – 2 tbs
Freshly ground pepper and kosher salt
2 oz shredded Manchego cheese – Parmesan or Swiss would also work

Preheat the oven to 400F.  On a greased, rimmed baking sheet, roll out your puff pastry to about 9×13″ rectangle.  Poke all over the bottom with a fork and bake for 15 minutes, until golden.  Toss your asparagus in olive oil. When the pastry comes out, it will have shrunk.  It’s okay, I swear.  Cover the tart in the shredded cheese and lay your asparagus spears side by side, touching, and alternating head to toe (this just makes more asparagus fit and it looks prettier.)

asparagus tart 1


Sprinkle the top of the tart with salt and pepper.  If you have leftover asparagus spears, just place them, cut side down, on the baking sheet around the tart.  They turned out to be gloriously crispy when they came out.  Bake for 25 minutes until the asparagus is nicely wilted and slightly browned.  Let cool slightly, cut with a sharp knife into squares and serve!

In the morning, heat leftovers in a 350F oven and fry an egg to place on top.  Enjoy with a cup of coffee and try not to think about the fact that it’s only Wednesday.

asparagus tart 2

breakfast

*original recipe from Martha Stewart Living

Green on Green Salad

green on green 2

It’s the first day of Spring!  I used to be a complete fall/winter gal, and as far as loving cardigans to a fault, I still am.  But the new mother side of my life has made me  crave warmer weather, the ability to leave the screen door open so we can hear the birds, and not worrying if my kid is constantly too cold.  This time last year, I had a two week old baby in the house.  We were scared and bewildered, yet happy to have her as a part of our pack.  It’s been such a learning process.  Is there a “right” way to do things?  Well, if there is, I was sure on the hunt this year.  I asked every person I knew who might have an ounce of understanding or empathy, what they thought the “right” way was to feed/sleep/play/instruct my baby.  I’m sure they, like me, are breathing a sigh of slight relief that along with her first birthday passing, so has a large amount of my questions.  I think part of me craves that close knit village type atmosphere of raising a baby.  Mothers, grandmothers, aunts, cousins; all within arms reach of advice.  While that isn’t our reality, I am very thankful for technology that has made virtual villages out of our spread-apart lives.

One of my favorite parts of this “virtual village” is the way in the short time this blog has been up and running, I’ve been able to answer questions of fellow moms across several states on the basics of cooking, what to cook for baby, where on earth do you get Chinese 5 Spice?! and so on.  I love cooking so much and I hope that along the way, I can make at least one other person excited to cook a meal for their family or try something new.  I love when someone tells me, “I salt my pasta water because of you” (which is funny because at least three people have told me this, and I learned it from Mario Batali. Salty like the ocean!) I feel useful, even though I might be stuck in this house (or feel stuck from time to time), I feel knit together with so many by a common ambition for the quest for good food and a simple sense of accomplishment.

This salad is once again, from THE best cookbook of my year, so far, The Bonne Femme cookbook.  I served this salad with the broccoli and cauliflower recipe from Monday and seared chicken breasts with a simple pan sauce  (butter, chicken stock, pan drippings, reduce, reduce, reduce) and sliced, toasted almonds.  Very filling meal, very heart healthy – no one felt deprived!  (baby side note: Olive didn’t try this.  She was still sickly when I made it.  Will try again with her soon)

Green on Green Salad

serves 4

1 garlic clove, minced
Salt and freshly ground black pepper (about 1/4 tsp each)
2 tablespoons fresh lime juice
4 tablespoons extra virgin olive oil
2 teaspoons honey
a few drops of Tabasco, Cholula, Tapatio, or whatever peppe sauce you like best
4 cups baby arugula or just a bag of mixed greens
1/2 cup, halved, thinly sliced cucumber
1/4 cup thinly sliced scallions
1 avocado, peeled and sliced

In a small bowl, use the back of a spoon (or I use a drink muddler) to mash the garlic clove with the salt and pepper.  Add the lime juice and whisk until the salt is dissolved.  Add the olive oil, whisking until incorporated.  Whisk in the honey and red pepper sauce.

In a large bowl, toss the greens with enough dressing to make the leaves coated, but not too heavy.  Arrange the arugula on a large platter.  Toss the cucumber and scallions with a bit of the dressing and arrange them on top of the greens.  Arrange the avocado slices across the top of the salad.  Drizzle just a little more dressing on top of the avocado and serve.

green on green 3


Italian Pot Roast on a Snowy Day

snow1

It’s a day to be a little quieter, more reflective, or maybe just be still.  It snowed last night more than it’s snowed in a few years and it’s still coming down outside.  The wind is crazy as it always is in Lubbock, TX, which makes the wind chill around negative ridiculous.  Matt is getting to work from home – one draw back of having a desk job is that on a snow day, you still have to work.  But at least it can be done from the comforts of home.  Hot cups of coffee and a sweet, bundled up baby in tow.  I had dreams of going to the grocery store today to stock up for another week of good meals, but I think I’ll just warm up the amazing pot roast we had last night, roast an acorn squash till it nearly burns and make do with what we have.  If you have any cut of meat in your freezer like a roast, pork loin, whole chicken, try this recipe.  Stay in out of the cold and just let the oven do the cooking today.

pot roast

Pot Roast of Beef Braised in Red Wine*
6 servings

Vegetable oil
4lbs boneless beef roast, preferably chuck
1 tbs butter
3 tbs onion, finely chopped (about 1/2 of a medium sized onion)
3 tbs carrot, finely chopped (about 1 medium sized carrot)
1 1/2 cups dry red wine (Barolo, California Syrah, Zinfandel or Shiraz are all fine choices)
1 cup beef broth
1 1/2 tbs chopped, canned Italian tomatoes (we use Cento brand)
A pinch of dried thyme
1/2 tsp fresh marjoram or an 1/8 tsp dried
Salt
Black pepper, fresh ground

  • Preheat oven to 350F.
  • Put just enough vegetable oil in a large skillet to coat the bottom of the pan.  Turn the heat on to high and when the oil starts to shimmer, put in the roast.  Brown it well on all sides, then transfer to a platter and set aside.  Set aside your skillet without cleaning it out for use later.
  • In a separate pot with a tight-fitting lid, large enough to accommodate the meat, put 2 tbs of vegetable oil, the butter and the onion and cook on medium until the onion becomes a pale gold color.  Add the carrot and celery.  Stir thoroughly to coat well, and cook for 4 to 5 minutes, then add the browned meat back into the pan.  (We used a dutch oven)
  • Pour the wine into the skillet that you’d used to sear the roast, turn on the heat to medium high, and allow the wine to bubble briskly for a minute while scraping the pan with a wooden spoon to loosen cooking residues stuck to the pan.  Add the contents of the skillet to the pot with the meat.
  • Add the beef broth.  It should come up two-thirds of the way up the sides of the meat, and if it doesn’t add more broth or water.  Add in the tomatoes, thyme, marjoram, salt, and several grindings of pepper.  Turn the heat on to high, bring the contents of the pot to a boil, then cover the pot and put it on the middle rack of the preheated oven.  Cook for about 3 hours, turning the meat every 20 minutes or so, basting it with the liquid in the pot, which should be cooking at a slow, steady simmer.  All the liquid may evaporate before the roast is done.  If that happens, add 3 or 4 tablespoons of water.  Cook until the meat feels very tender when prodded with a fork (about 3 hours.)
  • Remove the meat to a cutting board.  If the liquid in the pot is too thin and hasn’t reduced to less than 2/3 cup, put the pot on the stove on high heat and boil down, while scraping the cooking residues stuck to the pot.  Taste the juices and correct for salt and pepper.  Slice the meat against the grain, put the slices on a warm platter, arranging them so they overlap slightly, pour the pot juices over them and serve immediately.

We served this with roasted carrots and it was the perfect accompaniment.  I hope you all have a warm, cozy day and enjoy the momentary break from reality!

*Recipe adapted from Marcella Hazan’s amazing book, Essentials of Classic Italian Cooking