Rosemary Pork Chops with Grapes and Parsnips

rosemary pork chops with parsnips and grapes
Yesterday was rainy and dark.  A cold front moved in yesterday afternoon and cooled everything down a few degrees and it put me in the most severe autumn mood.  I bought the ingredients for this dish at the beginning of this week because the forecast said there was a chance of rain every day and it just felt like fall had officially arrived!  I found this extremely autumnal recipe a few years ago in an issue of Martha Stewart Living and it became a very frequent dinner occurrence for us.  It takes literally 15 minutes from start to finish – maybe 20 if you include peeling the parsnips.   It’s perfect for a family on a budget as I can usually find discounted pork chops no matter when I go to the grocery store.  Parsnips may be hard to find at a mega grocery store, but if you can’t find them, you can substitute in carrots.  Parsnips are like carrot’s albino cousin.  Maybe slightly more bitter, but they mellow out while cooking.  The combination with the sweet grapes is perfect, though, so if you can find them, branch out and try them!  For babies, simply steam come cubed up, or puree after steaming with a little water or chicken stock!

pork chops with grapes and parsnips

Pork Chops with Parsnips and Grapes*
serves 4

2 tablespoons olive oil
4 boneless pork chops, about 1/2″ thick
salt and pepper
2 or 3 large parsnips, peeled and sliced 1/4″ thick
1 cup red grapes
3 tsp fresh chopped rosemary

In a large skillet, heat oil over medium-high. Season pork with salt and pepper and add to skillet along with parsnips. Brown pork and parsnips on both sides, about 5 minutes total. Add grapes and rosemary, and cover. Reduce heat to medium-low and cook until pork is cooked through, parsnips are tender, and grapes have just burst, 3 to 5 minutes. Serve pork with parsnips, grapes, and pan juices.

*recipe adapted for quantity from Martha Stewart Living

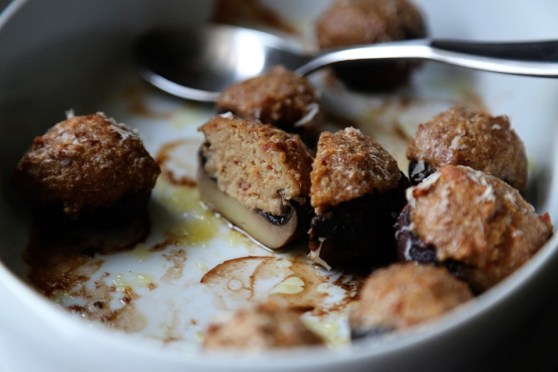
Mushroom Stuffed Mushrooms

stuffed mushrooms
I haven’t posted in a while.  Honestly, I have more literal time lately to post, but less mental space.  Ever feel that way?  This baby is crowding my brain and I’m still cooking all the time, but honestly, I’m cooking a bunch of repeats or things I don’t find particularly photo-worthy, so I just haven’t been shooting my food lately!  I did make this fabulous little side dish last week and we all agreed that it was better than the main dish (which I can’t remember – case in point).  So I’m sharing it with you!  I took little baby portobello mushrooms and tossed the stems in a food processor along with a bunch of other like-minded ingredients to form a great filling for stuffed mushrooms!  The kid tried “one happy bite” and that’s all we ask these days.  She has her comfort foods and right now, mushrooms isn’t one of them!  But that’s okay…I keep in mind that what kids observe, they’ll eventually imitate.  And she definitely observes people who enjoy pretty much every food on the map.  Trust the system, trust the system…

mushroom stuffed mushrooms


Mushroom Stuffed Mushrooms

12-15 baby portobello mushrooms, stems removed and reserved
1 ounce extra sharp white cheddar, grated
1 egg
1 tsp garlic oil or olive oil
1 garlic clove
4 tbs breadcrumbs
2 strips cooked bacon with drippings
1 tsp worchestershire sauce
1 tbs dijon mustard
a splash of chicken stock

Wipe the mushrooms with a paper towel and set in a greased baking dish, side by side.  Dump the stems of the mushrooms and all the other ingredients into a food processor and pulse until smooth.  Adjust seasoning with salt or pepper and extra chicken stock if it’s too thick.  The consistency for mine was like a pate or bean dip.  Top the mushrooms with the filling and pile it high.  Top with extra shredded cheese and a drizzle of olive oil and bake at 350F for 20-25 minutes, or until the tops are golden brown and puffed up slightly.  Enjoy!


Double Dark Chocolate Waffles

Double Dark Chocolate Waffles
The chocolate cravings have gone overboard.  I really blame it in all seriousness on pregnancy.  When I’m not pregnant, chocolate is good and fine, about on par with every other sweet. Not pregnant,  I don’t think about it outside of seeing it, I don’t dream up ways of using it to its maximum potential in breakfast foods, and I don’t think that it’s “needed” to get from 8 a.m. to 8 p.m. successfully.  When pregnant…well, all those things suddenly become priorities.  Like on Labor Day, I got up and looked up a basic buttermilk waffle recipe and then thought of the maximum way I could choco-fy it.  And I did.  Yes, I’ve had a similar waffle recipe on this blog before, BUT it wasn’t as good.  These waffles are fluffier, less dense, and the chocolate chips remain melty like a fresh-baked chocolate chip cookie during your entire breakfast.  So.  I’m not sorry for seeming repetitive.  If you’re pregnant, I’ll understand if I get a thank-you note in the mail later this week.
Double Chocolate Buttermilk Waffles
I topped these in three different ways and they were all good: melted butter and powdered sugar – easy, and the most cookie-like experience.  Butter with maple syrup: most waffle-like experience, but I’ve always felt that syrup on a chocolate anything is too much.  Turns out, it’s not.  And three: fresh raspberries all over the suckers.  Chocolate dipped fruit, anyone?  They were all good.  Dress it up, dress it down, this will be your new craving.

Double Chocolate Waffles
Double Dark Chocolate Waffles
makes about 12 Belgian-style waffles

2 cups AP flour
2 tablespoons brown sugar
2 tablespoons Dutch-process cocoa powder
2 teaspoons baking powder
1 teaspoon baking soda
1/2 teaspoon salt
2 cups buttermilk
1/3 cup vegetable oil
2 large eggs, lightly beaten
1 teaspoon vanilla extract
1 cup dark chocolate chips

Heat your waffle iron.  In a large bowl, combine the dry ingredients with a whisk until fully incorporated.  In a smaller bowl, whip up the wet ingredients.  Gently whisk the wet into the dry until just combined.  Fold in the chocolate chips.  Cook waffles to the waffle-iron’s suggested time (mine has a handy little light that goes off when they’re done) and keep in a 200 degree oven while you cook the rest to keep them nice and warm and crisp on the outside.  Serve with powdered sugar and melted butter, or whatever.  It really doesn’t matter – it’s all good.

Deviled Egg Burgers

deviled egg burgers
Here’s a little joyous addition to your Labor Day grilling if you want something new!  Our dear friend, Shannon, who has been with us through all kinds of culinary adventures over the past 10 years as our most enthusiastic taste-tester, came up with this awesome idea.  We were sitting at our favorite restaurant in Lubbock, Crafthouse Gastropub, enjoying one of their creative appetizers, the fried deviled eggs, when the idea came to her.  This dish is pure genius: hard boiled eggs, fry the whites in a crunchy batter and then serve the little fried egg halves with deviled egg spread so you can put as much as you want on your egg.  So crunchy and amazing!  As we were enjoying the dish, Shannon said, “This would be so good on a burger.”  And we all sat in silence for a second and let it sink in that deviled egg filling would indeed, be the best burger spread, ever.

And it is.

Deviled Egg Burger Spread
Imagine the goodness of mayo, mustard, pickle, the tang of vinegar and the creaminess of the ever-popular-fried-egg-on-a-burger-trend, all combined into one spread for your burger.  It TOTALLY works.  So, I just whipped up a very traditional deviled egg mix and added the basics and it has been my favorite burger of the summer!  If you want to try it, a dozen eggs yields enough for about 6 burgers as a spread.  So cut it in half if you don’t have all deviled-egg enthusiasts at your party and see how you like it!  Thanks, Shannon, for being our partner in culinary crime 🙂  We love you!

Deviled Egg Burgers 2
Deviled Egg Spread for Burgers

makes enough for 6 burgers

1 dozen hard boiled egg yolks
1 tsp paprika
2 tablespoons mayo
2 tablespoons dijon mustard
1 tablespoon sour relish
1 teaspoon white wine vinegar (or any vinegar, really)
salt and pepper to taste

Hard boil the eggs by bringing all dozen up to a boil (start them in cool water) and once it reaches a boil, remove from heat, cover, and let sit for 12 minutes.  Drain, rinse in cold water and peel.  The glory of this dish is that you don’t have to keep those fussy whites in tact.  If they fall apart, they fall apart.  If you don’t want to waste the whites, I’m sure you could crumble them up and incorporate them in this recipe as an egg-salad kinda thing.  Do what you wish.

In a large bowl, add all the yolks and the other ingredients and mash well with a potato masher or whisk until smooth.  Adjust with extra mayo or mustard as you wish – really, I eyeballed this mixture, so I may have had slightly more of something, but these approximations are fairly close to what I did.  Spread on burgers, sandwiches, etc, and enjoy!