Crusty Country French Toast

Crusty Country French Toast
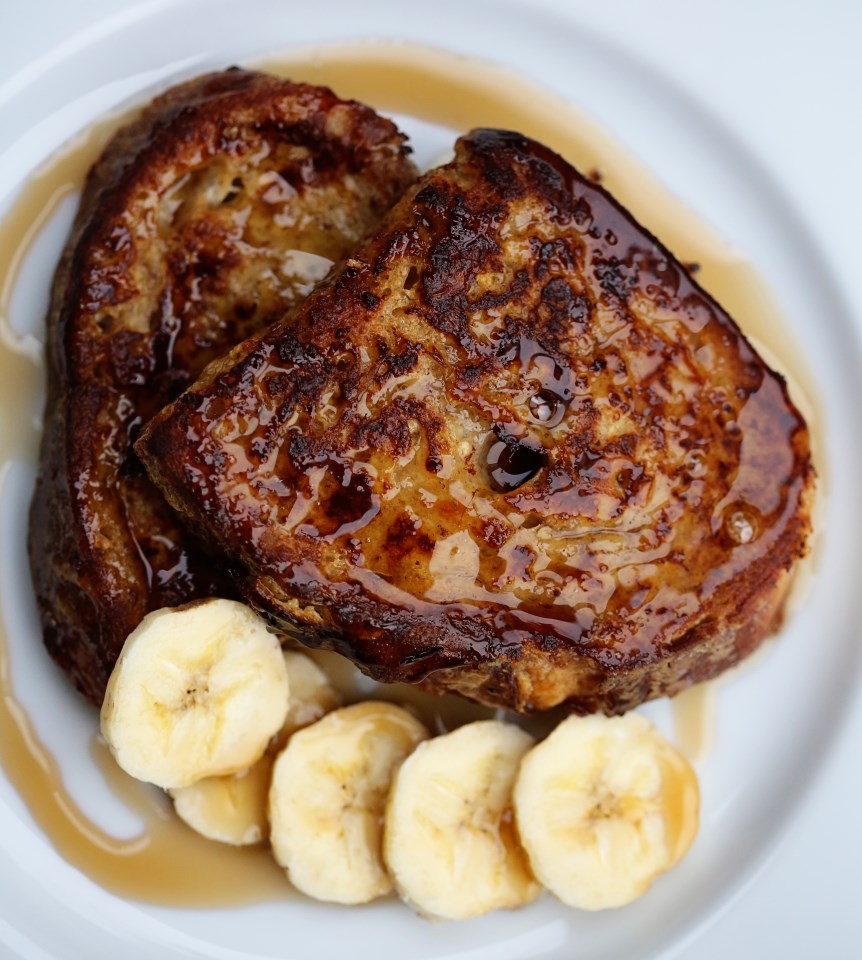
Everyone needs a good French toast recipe in their pocket. Especially if you are a home baker (or are married to one) and always have a stale butt-end of a loaf of bread on your counter. Matt makes bread all the time and it’s this really amazing, crusty, rustic sourdough that we plow through, typically, with only the tiniest bit on the end that dries out brick-tough that we give to our dog. But occasionally, he will make two loaves and I will have a bit more than I can use in a week. I wanted to have a French toast recipe that I didn’t have to look up – one that was easy to memorize – for just such occasions. I wanted it to work with a bread as crusty as a non-enriched loaf can get. (Enriched refers to added sugar, oil or butter that makes bread soft like sandwich bread, and makes bread less apt to get rock hard when it goes stale.) Matt just uses his sourdough starter, flour, salt and water. It makes an amazingly chewy, crusty bread, but it’s not exactly conducive to a pb&j for a little person.

This recipe will work with bread that is really tough and even soft bread like challah (the ultimate French toast bread). The difference is the soak time. If you’re using really soft, not-so-stale bread, just leave it in the mixture for less time. I left this bread in the mix for almost an hour, flipping them over after thirty minutes. I got up early to feed a baby, then she went blissfully back to sleep, so I had an hour 🙂 So the French toast had that sought-after custardy interior that is very easily obtained by using a softer loaf. Whatever bread you have, this recipe will work. Tuck it away for the weekend and try to memorize it – it’s worth it.

Country Bread French Toast Country Bread French Toast with Bananas

Crusty Country French Toast

8 thick slices of stale bread
4 large eggs
1/2 cup milk
1/2 cup heavy cream (you can honestly use whatever milk you have, but the richer the better, obviously)
1 tablespoon vanilla bean paste (or regular vanilla extract – I like vanilla)
1/2 teaspoon kosher salt (1/4 tsp table salt)
2 tablespoons brown sugar
1/8th of a teaspoon of almond extract

A few tablespoons of butter for frying

Preheat your oven to 200F.

Arrange the slices of bread in a 13×9″ dish and squeeze them in or cut them up into smaller pieces if you have to (or work in two batches if you have a smaller dish). Combine all the other ingredients in a large bowl and whip up till very well incorporated. Pour mixture over the bread and let the bread soak it up for 10-30 minutes per side, depending on the staleness of your bread. If you’re using a soft bread like Texas toast, just let it soak a few minutes per side until it oozes out if you poke it. For a rustic loaf that’s near crouton-consistency, let the slices soak for a good thirty minutes per side. If you have lots of leftover mixture (the thickness of your bread will determine this), you can save it in a sealed container for a week and use it again next weekend. Or just makes lots of batches and freeze the leftovers to pop in the toaster on another day!

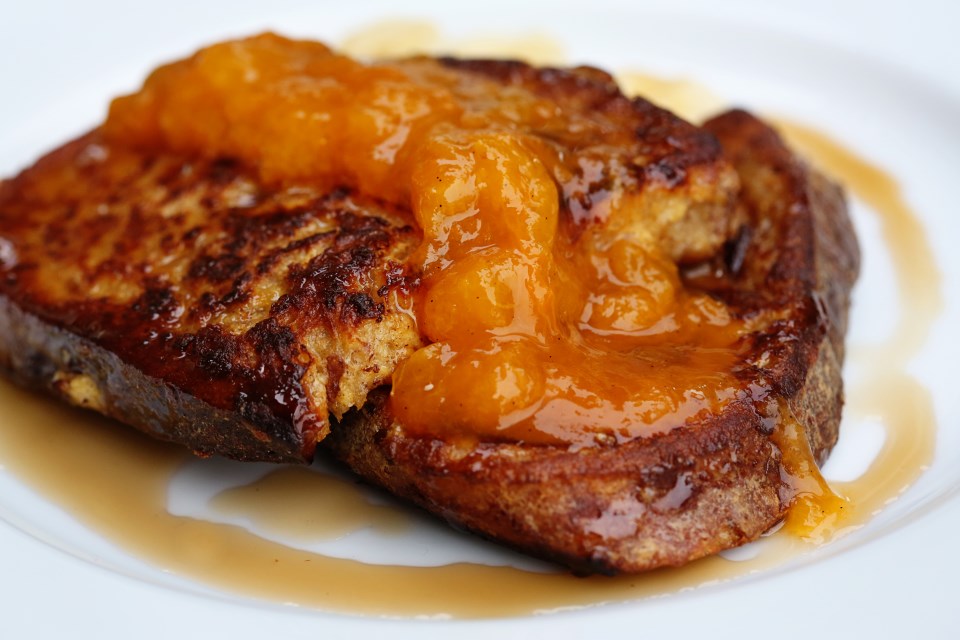
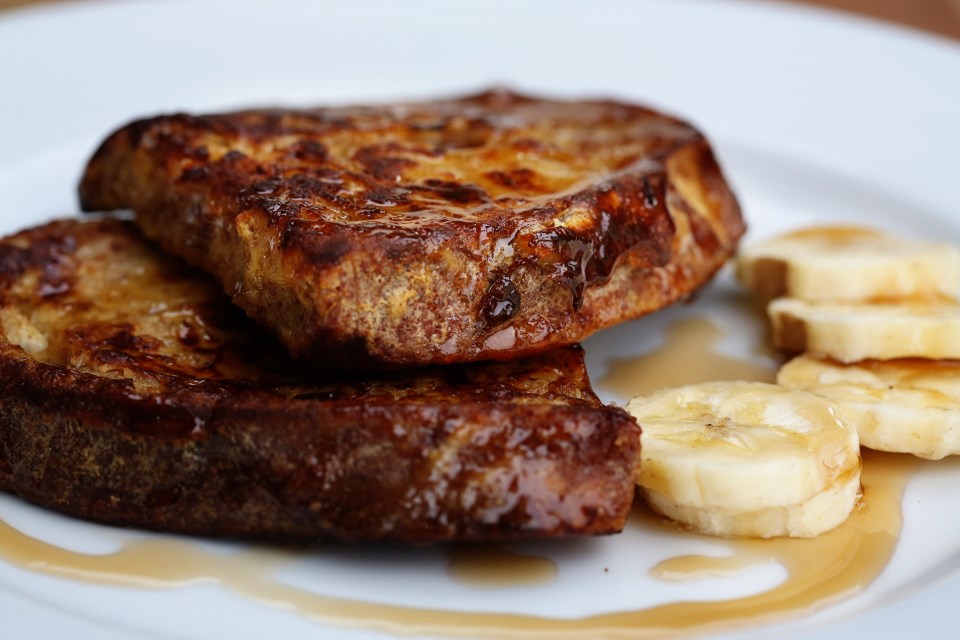
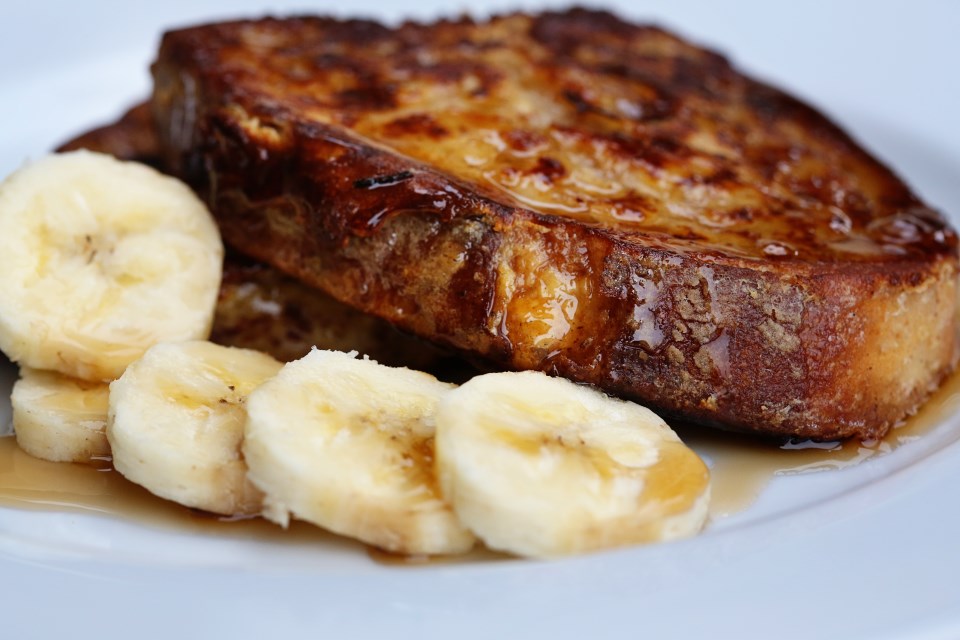
In a non-stick skillet over medium high heat, melt a tablespoon of butter and work in batches, frying the toast until golden on each side, about 3-5 minutes per side. Keep the toast in a single layer in your oven to keep warm until you’re done cooking the rest. Serve with melted butter and your favorite topping. Shown below with my homemade peach preserves – hooray for summer! 🙂

Crusty French Toast

Advertisement

Dark Chocolate Cherry Pie Biscuits

Black Cherry Chocolate Biscuits
Dark chocolate and cherry – a pretty perfect desert combination. I regularly make dark chocolate oatmeal for Olive and myself and I will stir in dried cherries almost every time. There’s just something special about the tart zinginess of the cherries combined with the rich, deep earthy heft of dark chocolate. I’m just full of adjectives tonight. This baking project was a fun one – Olive and I were watching Tangled on a Sunday afternoon and I decided to bake something fun. A while back, Joy the Baker had this really fun baking competition and one of the challenges were these amazing apple pie biscuits. I remembered the recipe seeming like it wouldn’t work because it was too sloppy and wet, but they turned out incredible. (And there’s wonderful step-by-step instructions for how to do her biscuits, which you can apply to this recipe as well.) Fast forward to my version of this recipe and I felt the same way all over again – that there would be too much juice from the cherries for this recipe to work the same. And honestly, there was a bit more juice than with the apple version, but nothing a little draining didn’t fix. These were fun, decadent and great for breakfast during the week!

They also look so white because I had recently bought expensive, pasture-raised eggs made by chickens with PhDs and I didn’t want to waste one on making an egg wash for a few biscuits. So I brushed them with heavy cream.  Not as pretty, but it saved an egg from not getting to fulfill its destiny of becoming a fried egg on my toast the next morning.

Dark Chocolate Cherry Almond Biscuits Cherry Chocolate Biscuits

Dark Chocolate Cherry Pie Biscuits*

For the cherry filling:
2 cups fresh, pitted cherries, roughly chopped
2 tablespoons unsalted butter
2 tablespoons packed brown sugar
1/8 teaspoon almond extract
squeeze of lemon

For the dough:
2 cups self-rising flour
1/4 cup cold, unsalted butter, cut into small cubes
2 tablespoons granulated sugar
2/3 to 3/4 cup cold buttermilk

Preheat your oven to 425F. Line a baking sheet with parchment and set aside.

In a skillet over medium heat, melt the butter and brown sugar until they are all incorporated and bubbling and then stir in the cherries. Mash them around (I use a drink muddler) and let the mixture cook for about 5 minutes. Stir in the extract and a squeeze of half a lemon and add a pinch of salt. Stir around and let it cook for one more minute. Drain off all but about 2-3 tablespoons of liquid (cherries give off more liquid than the original recipe’s apples, but you don’t want NO juice) and set the mixture aside to cool while you make the dough.

To make the dough, mix the flour and butter together with your hands or a pastry blender until the butter is broken up into small pea-sized bits. Stir in the sugar and then make a well in the center of your dough. Add the buttermilk and with a fork, stir together until combined. The dough should be soft and moist, so use a bit more buttermilk if needed.

Use all-purpose flour to dust your work surface. I ignored this step in the original recipe and the bottoms of my biscuits tasted sour because they were in dusted with self-rising and there’s baking powder in self-rising flour so DON’T BE LAZY LIKE ME and just get out the all purpose to dust. It isn’t that difficult.

Spoon the dough onto your floured surface and gently pat it into a small rectangle. Dust the top with a little extra flour and roll out into a rectangle about 7 x 10 inches. Arrange the cherries over half the long side of the dough and carefully fold the other half of the dough over the filling, crimping along the edges to seal in most of the filling. It doesn’t have to be perfect and it will be messy. If you have cracks, just gently pinch them closed and carry on. You want to have about a 6 x 8 inch rectangle when it’s all said and done, so just pat it into submission. Cut into 12 squares and place on prepared cookie sheet about 2 inches apart. Brush the biscuits with a beaten egg that was not raised by monks and sprinkle with sugar and cinnamon if desired (I just used sugar since cinnamon didn’t fit in with the flavor profile I was going for.)

Bake for 12-14 minutes, or until golden brown and serve right away. The sugar topping will melt if you store these in a plastic bag on your counter throughout the week, so it’s best to eat these the same day or store in an air-tight container.

*adapted from Joy the Baker

Apricot Cream Scones

apricot white chocolate cream scones
Here’s a wonderful recipe I’ve done countless ways over the past few months and it’s delicious every time.  Quick, easy and amazingly fluffy on the inside while being crispy on the outside – these scones are an amazing way to make breakfast better.  Today I’m sharing with you one of my favorite flavor combinations: apricot and white chocolate.  However, anything you want to add will work. I’ve done cheddar and chives for a savory version, a simple version with just currents and then just plain for the most amazing biscuits! This recipe comes from The Best New Recipe cookbook and so you know the recipes have been endlessly tested and work.  I loved this recipe because I had it memorized the first time I did it.  Four ingredients.  Doesn’t get easier than that.  No cutting in butter – these scones/biscuits/whatever you want to call them have just heavy cream!  I even skip the patting out and cutting into triangle method that Best New calls for and make it even easier by just making these drop-style.

I hope you add this to your arsenal of recipes to whip out when company arrives or a friend drops by for coffee (that still happens in my head, although not so much in reality).  My white chocolate chips got kind of torched, but no scone was left behind.
apricot cream scones

Apricot Cream Scones

10 ounces (2 cups, but start weighing your flour!) all purpose flour
2 teaspoons sugar
2 teaspoons baking powder
1/2 teaspoon salt
1 1/2 cups heavy cream

Add-Ins:
1/4 cup white chocolate chips
1/4 cup chopped, dried apricots

Preheat the oven to 425 degrees.  Line a baking sheet with parchment or spray with oil.  Whisk together the dry ingredients, stir in the white chocolate and apricots and then with a fork, whip in the cream.  It gets super sticky and super hard to stir.  If it seems too dry, add a splash or two more.  I usually add just a bit more.  Then, by the spoonful, drop mounds onto your baking sheet about 2 inches apart.  Brush the tops of the scones with more heavy cream and bake 15-20 minutes, until golden brown.  Serve immediately with butter.

Cheesy Cornmeal Waffles with Spicy Honey

Smoked Gruyere Cornmeal Waffles with Spicy Honey Smoked Gruyere Cornmeal Waffles
Parks and Recreation was one of our favorite shows of all time.  We were sad to see it end a few weeks ago and had to cook something special for the finale.  I debated quite a lot about what to cook.  I could’ve done a plain hamburger inspired by the episode where Ron and Chris battle it out in a food war. We thought about doing bacon wrapped shrimp served with all the bacon and eggs the store had to offer, but I figured that might be a tad wasteful. And so we settled on waffles, as Leslie Knope would’ve wanted.  I decided to do a savory waffle with a side of bacon and plenty of melted butter and Mike’s Hot Honey on top.  Mike’s makes some amazingly spicy and delicious honey that we love putting on our pizza crusts and it’s really good on so many things like buffalo wings or smoked sausages, but it was especially good on top of this cheesy waffle!

Smoked Gruyere Cornmeal Waffles and Spicy Honey


Cheesy Cornmeal Waffles with Hot Honey

  • Servings: about 8 Belgian waffles
  • Print


  • 1 cup of self rising flour
  • 1 cup of all purpose cornmeal
  • 2 teaspoons of baking powder
  • 1/2 teaspoon of salt
  • 1 tablespoon of sugar
  • 1/2 cup grated cheddar cheese
  • 2 scallions, sliced thin
  • 1/2 tsp smoked paprika (optional)
  • 1/8 tsp cayenne (optional)
  • eggs
  • 1 cup buttermilk
  • 1/3 cup water
  • 1/4 cup of canola oil

Get your waffle iron heating up.  In a large bowl, mix the dry ingredients along with the cheese and scallions.  In a separate bowl, whisk the eggs, buttermilk, water and oil until well blended.  Add the wet ingredients to the dry and beat with a fork until no dry parts remain.  Cook in a waffle iron and keep warm in a 200 degree oven until you’re finished cooking all the waffles.  Serve with hot honey, regular syrup, sweet bbq sauce, or anything you can think of. Hey, why not a fried egg on top?! And make sure you have plenty of crispy bacon alongside.  Enjoy!


Savory Vegetable Souffles – Meatless Mondays Never Tasted So Good

Brussels Sprout and Cheddar Souffle Brussels Sprouts and Cheddar Souffle
Happy Monday After Daylight Savings Time!  This will be a hard week for many, getting used to the time change.  I love it once the adjustment takes place because I LOVE that it stays light outside till nearly 8:30 in the spring and nearly 10 in the summer.  We get to play later (it seems) and it’s important to not feel so closed in after months of the cold, dark evenings of winter.

I’ve been in a new, happy rut, lately.  On most Mondays lately, I’ve been making a vegetable souffle.  I hardly ever have my act together for dinner on Monday and I usually haven’t been to the store for the week (like today), but I nearly always have some sort of leftover veg in the fridge and (usually) four eggs.  Voila – this beautiful souffle, big enough for all of us to eat more than a big portion.  I’d say it would serve 4 as a side dish or 2.5 (like us) as a main. And it’s so versatile!Brussels Sprouts Souffle
The pics above were made with Brussels sprouts and cheddar and the pics below were spinach and gruyere.  I’ve done leftover broccoli with white cheddar, leek, and asparagus, too!  If you have eggs, cheese and some leftover vegetables, you have a meal!  And a really good one.  Every time I have made this, Olive has said, “this is a good meal, Mama.” Good enough for me!  It’s a wonderful vehicle for getting more vegetables into your little people, as well.
Spinach and Parmesan Souffle

Savory Vegetable Souffles

  • Servings: 4-6 as a side
  • Print

1/3 cup grated parmesan or fine bread crumbs
2 cups cooked vegetables, finely chopped.  Use boiled brussels sprouts, spinach, leeks, asparagus, kale, whatever floats your boat!
5 tablespoons butter
salt and pepper
1/4 cup flour
1 cup milk
4 eggs, room temp and separated
1/2 cup grated hard cheese – cheddar, gruyere, gouda, romano, parm, etc

Heat the oven to 375F. Butter a 6-cup souffle dish or 6 one cup ramekins, if you want everyone to have a nice, neat side dish of their very own.  Coat the sides of the dish with cheese or breadcrumbs. Cook your vegetable in salted boiling water until tender.  Drain and squeeze out as much moisture as you can.  Season with salt and pepper and set aside.

In a large saucepan, melt the 1/4 cup butter over medium heat, stir in the flour and cook, stirring frequently, for 2 minutes.  Whisk in the milk and cook until the sauce has thickened, whisking the entire time.  Season with salt and pepper to taste and add a splash more milk if it gets too thick (you want a thick gravy consistency).  Set aside off the heat.  Into your egg yolks, whisk in about 1/2 cup of the hot cream sauce to warm them and then return them to the rest of the sauce and whisk to incorporate.  Stir in the cheese and when it’s melted, fold in the vegetables.

With a mixer, beat the egg whites until stiff.  Stir a quarter of them into the souffle base and then fold in the remainder until no white streaks show.  Bake souffles on a rimmed baking sheet in the middle of the oven until risen and golden, 30-35 minutes.  The middle will be slightly wobbly if you’ve made it in one large dish.  Serve immediately!

*recipe adapted from The New Vegetarian Cooking for Everyone cookbook, which is completely fantastic so far.  Hasn’t steered us wrong, yet!


Spinach and Parmesan Souffles

Cranberry Orange Upside Down Cake

Caramel Cranberry Orange Upside Down Cake
Lately, I find myself wandering through the house, doing chores, taking care of the little people and cooking and I think, “I should be doing something more.”  And not more in the sense of extra stuff, but more…grand? Important? I am not sure.  I haven’t quite been able to put my finger on just what it is I’m feeling.  I think I remember this feeling from when Olive was a baby.  There’s a certain amount of monotony to taking care of a baby in that first year.  Every day it’s the same feedings, the same breakfasts, the same play time, the same nap schedules, the same dinners, the same bedtime routines, etc.  It’s all the same thing, every day, for months.  And when they get a bit older, you can start shaking up the routine because they don’t have to eat and sleep every 3 hours.  But for a few months, there’s a bit of a Groundhog Day effect and I have felt it even more in the winter as we’re cooped up from the cold.

Each morning I pray that God will show me what needs to be done in His kingdom.  Who needs served?  Who needs a kind word or an encouragement? Who needs a meal or maybe even just a smile in the store?  I believe, although I don’t follow through with this belief far enough, that seeking God’s kingdom FIRST, really will cause everything else in my life “to be added to me.”  I get it so backwards.  I become so self-seeking.  How can my children or my husband make ME happy today?  When I seek God’s way of serving others first, I immediately feel content.  Enough.  Important. Working for self and for the approval of others is a bottomless well. It will never be filled and neither will I.  But flip the equation around and see to it that others’ bowls are filled before my own and God will see to it that my cup is running over.  It’s not always going to look like material wealth and health, but more importantly, it will start to look like real joy – from the inside out.

This cranberry cake was made for a few sweet ladies at a ministry our church helps out with from time to time called Family Promise. It’s a program that helps families who find themselves on the brink of homelessness to live and save up their income for rent while they live in the Family Promise house.  Our church volunteers to help a couple times a year by bringing dinners, having activities for the children and staying overnight. Last week was our week to serve so Matt and I signed up to take a meal and hang out with the families for a while after we ate.  There were two single mothers with infants and one single mother with a sweet, twelve year old girl living there, whom we’d met before and were so happy to see them, again.  We brought take-out from our favorite Hawaiian BBQ joint (I didn’t get my homemade meal-act together this time) and I brought this cranberry upside down cake.  We ate and watched TV together and played and I felt blessed by them.  We just brought the food – they brought perspective and showed us real joy – from the inside out.

Cranberry Upside Down Cake with Orange Zest Upside Down Cranberry Orange Cake


Cranberry Orange Upside Down Cake

For the fruit layer:
8 oz frozen cranberries
5 tablespoons unsalted butter
1 cup packed light brown sugar
2 tablespoons orange juice
zest from 1 orange

For the cake:
1 1/2 cups cake flour
1/2 teaspoon baking powder
1/4 teaspoon salt
6 tablespoons unsalted butter, softened
1/2 cup granulated sugar
1/2 cup packed light brown sugar
2 large eggs
1 teaspoon pure vanilla extract
1/4 teaspoon almond extract
3/4 cup sour cream (or Greek plain yogurt)

Preheat the oven to 350F.  Butter the bottom and sides of a 9 inch round cake pan and line the bottom with parchment paper.  I like to do this to ensure all the fruit filling comes off the pan.

Pour the cranberries on top of the parchment paper and sprinkle with orange zest.  In a medium-size sauce pan, melt the butter over medium-low heat.  Add the brown sugar, orange juice and cook, stirring, until the sugar melts and boils gently.  Pour the mixture over the cranberries in the pan.

In a small bowl, stir together the cake flour, baking powder, and salt.  In the bowl of an electric mixer, beat the butter, granulated sugar and brown sugar on medium until well blended.  Beat in the eggs and vanilla and almond until combined.  With the mixer on low, mix half the dry ingredients into the batter until just combined.  Mix in the sour cream and then the remaining dry ingredients until just combined (in other words, don’t over-mix).

Scoop the batter into the pan (it will be thick) and then spread it around evenly with a spatula.  Place cake pan on a rimmed baking sheet to catch drips.  Bake until a toothpick inserted in the center comes out clean, about 40 minutes.  Place the pan on a wire rack to cool for 10 minutes.  Run a knife around the edges of the pan to loosen the cake and invert onto a serving plate.  Serve warm.

*recipe adapted from the Bonne Femme Cookbook’s recipe for Pear Cake Reverse

Cranberry Orange Cake Cranberry Upside Down Cake

Cheesy Potato Fritatta

spanish tortilla with scallions
It’s the middle of the week.  There has been a loss of momentum.  Or maybe you’ve just gained yours? Either way, you have no idea what to make for dinner and all you have are some leftover potatoes. Do you also have eggs? Everyone has eggs.  Do you have an onion?  Maybe some cheese?  A bit of salt and pepper and olive oil?  Then you’re set.  And dinner will be marvelous.  And filling.  And comforting.  You don’t have to make things complicated to make them delicious and I can’t count how many times I’ve declared, “There’s nothing to eat in this house!” only to be humbled by actually finding something, and not only something, but something truly delicious.  How lazy I can be sometimes!  This meal was inspired by a book called An Everlasting Meal, which is a sort of love-song to making the most out of everything you’re given.  It saved my family from take out with this simple recipe and I will certainly make it again!

potato egg fritatta

Potato Fritatta

2 small potatoes (about 2 cups, peeled and sliced into 1/4″ slices)
1 small onion, sliced thin
1/2 cup shredded cheddar cheeses (can be omitted without any damage done)
salt and pepper
3 eggs, beaten (four if you add the cheese, like I did)

Heat oven to 375F.
In a large skillet over medium heat, heat about 1/3 cup of olive oil and add the potatoes and onions.  Season well with salt and pepper. Cook, slightly covered, until the potatoes are soft. Strain the potatoes and onions out of the pan and put them in a bowl.  Reserve the olive oil from the pan.  Let the onions and potatoes cool and then add in the cheese, beaten eggs and more salt and pepper.  In a 10″ non-stick skillet, add some of the oil from your other skillet and make sure all the sides and bottom are nicely coated.  Pour the egg/potato mixture and cook over medium heat on the stove until the bottom looks set.  Transfer the pan to the oven and let it finish cooking until the top is slightly puffy, about 15 minutes.  Remove from the oven and let it cool for about 10 minutes, and then invert onto a serving plate.  Serve with sour cream, chopped chives or scallions and hot sauce! This dish is great warm, room temp, or even cold. It would be a super easy lunch on the go or weekend breakfast.  

Bacon and Blue Cheese Scones

bacon blue cheese scones
I’ve noticed a trend.  Every time it’s freezing, lately, snowing in particular, I post a blog entry.  I also bake something.  Today I made a banana chocolate chip bread with Olive and after putting her down for her “quiet” time (hardly ever quiet, but at least she stays in there), I came to write right away before the littler one wakes up from her nap.  Everything happens in thirty-minute windows, lately.  Feedings, naps, playtimes, snacks, lunch, cleanup, laundry folding, getting dressed, errands – it all goes like clockwork.

I remember this feeling of monotony and spinning my wheels when Olive was a baby.  I don’t know what it is about the infant phase – it is all at once sweet, boring, thrilling, gross, blissful and extremely isolating.  I think the feelings of isolation come from the cabin fever.  It’s hard to get a baby ready to go out and do something outside the home when you know you’ll have to do something baby related in another hour.  I love this phase but I am always looking forward to getting out of the house more and feeling productive.  January is the antithesis of productive as far as my photography business goes.  No hustle and bustle of bridal and engagement shoots, yet.  Everything is dead, gray and cold.  And maybe that’s okay.  It’s a big, gigantic pause button and one that I (usually) am glad to press each year.  But I’m a people-person.  And not just a little-people person.  I love interacting with grown-ups and perhaps that’s the catharsis of this blog.  It was born the year my first daughter was born and it kept me connected to all of you who love cooking just as much as I do.  I hope one day to have a cooking class.  How grand would that be?!  But the time isn’t right, yet.  For now, I’ll write about scones and look forward to hearing from you all.  And go feed the baby in another thirty minutes…

I improvised this lovely recipe from Annie’s Eats because I had neither scallions or cheddar and only about half the bacon her recipe called for.  I first made her original recipe when I went on a road trip and they were just wonderful.  My altered version was also great and amazing as a little side treat with a cup of soup.  Especially on a day like today, there’s nothing quite like the smell of bacon coming from the oven.  And with a bit of cold butter melting on top of one of these babies, you’ll be set.

Bacon and Blue Cheese Scones

Bacon and Blue Cheese Scones

3 cups all-purpose flour
1 tbsp. baking powder
1 tsp. salt
1-2 tsp. ground black pepper
8 tbsp. cold unsalted butter, cut into small cubes
1/2 cup blue cheese crumbles
5 slices bacon, cooked and chopped into small pieces
1 cup buttermilk (plus up to ½ cup extra, if needed)

For the egg wash:
1 large egg
2 tbsp. water

Preheat oven to 400F.

In a large bowl, combine the flour, baking powder, salt and pepper and then cut in the butter with a pastry blender or a fork until broken down and the butter resembles crumbly sand.  Fold in the blue cheese and bacon and then stir in the buttermilk.  Add a little extra to form a sticky dough if it seems too dry.  Turn out onto a floured work space and form into a rectangle, about 1/2 inch thick.  Cut into squares or circles or daisies or whatever you prefer and place on a greased cookie sheet.  Brush with egg wash.  Bake for 20-25 minutes until golden brown.  Serve with cold butter.

Poppyseed, Prune and Lemon Coffee Cake

coffeecake
Coffee cake has always seemed a bit boring to me.  In a land filled with pies and cookies and brownies, why would you ever choose a coffee cake?  It’s cake’s slightly dry cousin.  I never see a coffee cake recipe and think, “Yeah, I’ll spend time making that” when I could be spending time making something more satisfying.

That was all until I saw this recipe from Tasting Table.  Do you get the Tasting Table emails?  If not, you should.  So many great recipes and interesting gift ideas abound in every email.  This coffee cake looked absolutely decadent (it should – there’s almost three cups of sugar – ack!) But I figured in the name of Thanksgiving indulgence and postpartum cravings, I’d dive in and try it.  And I dadgum near ate the entire pan myself.  Not my proudest moment, but it was pretty enjoyable.  The filling reminded me of fig newtons and the lemon zest brightened the entire sugar-laden thing up.  I’d definitely recommend making this when you have family in your house over Christmas.  It makes a ton, it feeds and satisfies a lot (or one person over the course of a week) and it is super comforting.  Enjoy!

coffeecake2
Poppyseed, Prune and Lemon Coffee Cake
makes one 13×9 cake

For the Streusel:

1 cup all-purpose flour
3 tablespoon sugar
2 tablespoons packed light brown sugar
1¼ teaspoons ground ginger
2 teaspoons ground cinnamon
4 tablespoons unsalted butter, melted

For the Coffee Cake:

Softened unsalted butter, for greasing
3¾ cups all-purpose flour
2 cups sugar
1 tablespoon baking powder
1½ teaspoons salt
¼ teaspoon baking soda
1 cup (16 tablespoons) unsalted butter, melted
1 cup buttermilk
4 large eggs, at room temperature, beaten
¼ cup sour cream
2 teaspoons vanilla extract

For the Filling:
½ cup chopped prunes
½ cup packed dark brown sugar
¼ cup poppy seeds
Zest of 1 lemon

1. Make the streusel: In a medium bowl, whisk the flour, sugar, light brown sugar, ginger and cinnamon until everything is well incorporated. Add the melted butter to the flour-spice mixture and mix with a fork or a wooden spoon until fully incorporated and clumps begin to form. Make ahead: Unbaked streusel can be stored in an airtight container in the freezer for up to a month.

2. Make the cake: Preheat the oven to 350°. Grease a 13- x 9-inch baking pan with the softened butter and dust the pan with flour.

3. In a large bowl, whisk together the flour, sugar, baking powder, salt and baking soda.

4. In a separate large bowl, whisk together the buttermilk, eggs, sour cream, vanilla extract and melted butter until very smooth.

5. Using a rubber spatula, mix the dry ingredients into the wet ingredients until well combined.

6. Layer half the batter in the prepared baking pan; smooth it out to the edge leveling the top with an offset spatula. (Tip: Since the batter is so thick, it’s best to scoop it in ¼ cup mounds into the pan before spreading.)

7. Sprinkle the prunes evenly over the batter then sprinkle with the dark brown sugar and the poppy seeds. Top the filling with the lemon zest.

coffee cake
8. Layer the remaining batter over the filling using the same method mentioned above. Smooth out the top of the batter, ensuring it is even and reaches the edges of the pan. Sprinkle the top with the streusel, and then bake until a toothpick inserted in the center of the cake comes out clean, about 45 to 55 minutes.  I had to bake it over an hour to get the middle done.  I recommend rotating it halfway through baking!

*recipe from Tasting Table

Chewy Dark Chocolate and Apricot Granola Bars

chewy granola
Well, friends, I’m happy to report that my daughter, Eleanor, was born three weeks (almost 4!) ago and she’s doing amazing and we are surviving the sleepless nights and the toddler-sister adjustment without too many scrapes and bruises.  Life is certainly different than it was just a month ago.  But it’s also a billion times sweeter.  Here’s my new family (pics taken by my wonderful friend, Katrina):

ep-118

ep-117

ep-158
ep-150
It’s remarkable how little time in the day I actually can get things done, which explains further why posting recipes took a very, very far back burner to everything else.  I also didn’t cook a single thing for two weeks.  It felt weird, but it was nice to have a break. We have remarkable friends who brought us dinner for nearly two whole weeks and then it was Thanksgiving and although we didn’t travel, we certainly cooked!  And a few of those recipes will come in the following weeks.  I wanted to post an easy and satisfying snack for my first post back, because that’s what I need in my new life, now, and honestly, I’m hungry all the time while nursing a baby around the clock.  I find myself insanely hungry when Eleanor wakes up for her 2 a.m. feed but too tired to go to the kitchen to find something and so I fixed that problem yesterday by making some truly crave-worthy granola bars.  Chewy, almost falling apart, no-bake, and filled with my favorite things – namely, dark chocolate, apricots and almonds.

I hope you enjoy these and I am looking forward to getting back in the kitchen around the baking-est time of the year.  🙂

Chewy Granola Bars


Chewy Dark Chocolate Apricot Granola Bars
makes about 16-24

2 cups puffed rice cereal
2 cups rolled oats
1/2 cup wheat germ
1 cup mix-ins (I used dark chocolate, dried apricots and some leftover trail mix that had almonds and raisins – you use what you can find!)
3/4 cup honey
1/2 cup dark brown sugar
1/2 tsp kosher salt
3/4 cup creamy peanut butter

Combine the dry ingredients into a large bowl.  In a medium saucepan, combine the honey, sugar, salt and peanut butter and let it come to a boil for about a minute.  Remove from heat and pour over the dry ingredients (if you don’t want your chocolate melting, add it after you get everything else combined.  I didn’t care and it didn’t melt that much).  Stir until fully incorporated and then press in either a 13×9 greased baking dish, or like I did, a rimmed sheet pan (for slightly thinner bars).  Let it cool completely and then slice and store.