Shocking Red Pasta – just in time for Halloween

Pink Pasta

I’ve been busy working on a post about my week in food.  By request, a few of you expressed interest in seeing the “normal, everyday” recipes we do around here, so every night since my Sweet Potato Pie post (below), I’ve been taking pics of some element of what we’ve eaten at most meals.  There’s a few keeper recipes in there, so stay tuned!

For today – RED pasta!  It looks almost gruesome.  I got the recipe from Clotilde’s amazing vegetarian cookbook, The French Market Cookbook.  She called it Shocking Pink Pasta, but mine was just not pink, it was straight-up RED.  I wasn’t a huge fan of the addition of the cumin (no offense to the original recipe – it’s not you, it’s me,)  so I swapped out dried thyme (in my head) and I think it would go great with the other flavors.  This is a good use of beets, once again.  I just love them.  This dish had great flavor, was a stretch for the imagination and was actually pretty fun – not exactly the most common words you’d use to describe a simple dinner that took 20 minutes to make, was healthy and included beets.  If I were you, I’d serve this for dinner on Halloween night.  Then you could sit back and eat a side of leftover candy and not feel too much remorse with your blood, I mean beet-stained hands 🙂  Bwahahaha…

Shocking Red Pasta
serves 4

2 cups beets, about 4 medium – peeled and cubed
1 cup light whipping cream
1 garlic clove
1 teaspoon kosher salt
1 teaspoon ground thyme
1 pound pasta
Freshly ground black pepper
1/2 cup chopped fresh flat-leaf parsley
2⁄3 cup almonds, toasted

In a food processor or blender, combine the beets, cream, garlic, salt, and thyme. Process until smooth.  Bring salted water to a boil in a large pot. Add the pasta and cook until it’s al dente. Drain, return the pasta to the pot, and fold in the sauce. Return to medium heat and cook until heated through, about 1 minute.  Divide among warm bowls, sprinkle with pepper, and top with the parsley and almonds. Serve immediately.

Sweet Potato Pie with Butter Rum Sauce

7G9A3567

Last weekend we were invited to our friends’ house for a dinner party.  The theme was Cajun and so Matt made a humongous pot of gumbo, which has been many meals this week and is very good, and I made this sweet potato pie that was obliterated by the end of the night and I sadly didn’t have any leftovers for breakfast.  I’m actually glad it got gobbled up because that’s instant portion control. I shared one slice of this pie with Olive, she ate most of it, and I enjoyed every bit.   I had a lady at church last night say, “I’d love to live in your house so that I could eat your food, but then I’d be 7,000 pounds.”  I’m not exactly sure this blog is conveying the truth if that’s the overall sentiment!   I’m also not sure I’m conveying properly the amounts of these foods I DON’T eat.  I made three batches of The Cinnamon Rolls over the course of two weeks and I think overall, I ate two whole cinnamon rolls, maybe three.  But it wasn’t a couple each batch, or “the whole pan” like a lot of people swear they’d eat if they made it themselves at home.  I don’t think people give themselves enough credit.  Of course you wouldn’t eat the whole pan.  How on earth would that be enjoyable to have a stomach ache because of something you baked?  Maybe that’s the whole problem with portion control with indulgent foods.  People get a feeling like they need to “eat the whole thing” to pretend like it never happened, to remove it from sight and further temptation.  They feel “bad” eating it in the first place and so why not eat it badly?!  Whatever the reason, it’s a wrong mindset.  And one I hope to never impose on Olive-that rich foods are somehow bad and we should feel guilty or gain 7,000 pounds for eating them on a weekly basis.

During the week, we eat simply.  Bowls full of beans, rice, sauteed chard and potatoes and steamed fish, beet pasta, roasted carrots, butternut squash soup-that was this week.  These do not make the most riveting blog posts, nor do I always remember to take pictures of “regular” meals.  Perhaps I should!  Maybe it would help balance out peoples’ fear of the occasional pie or butter sauce.  My hope for myself and anyone who loves to cook is that we find a good balance and that we effectively remove all GUILT from eating.  Find a way.  Whether that’s eating smaller portions or just meals made from fresh, good ingredients that couldn’t live in a box if they tried.  Maybe if that was the norm, and eating at home was what we did 6 days out of the week, than a crazy good, gooey brownie on the weekend or a night out at a restaurant would seem like the treat it is, instead of the impending portion of guilt that it’s come to be.

7G9A3572

This pie was light and fluffy almost like a souffle.  It wasn’t overly sweet and so it went AMAZINGLY well with the butter rum sauce I decided to make at the last minute.   I think it would be perfect without the sauce, but it was the gilding of the lily for a festive occasion like a dinner get-together.   I also adore the website I adapted this from – The Gumbo Pages!  That is the best website name, possibly ever.  And the recipe was clearly from someone who never had to write it down.  A lot of “approximate” measurements and “about this much” kinda talk.  I love the nature of a recipe like that.  And I love that this recipe came from someone with the nickname “Pie Man.”  Honestly, how can you go wrong with that combination?

7G9A3576

Sweet Potato Pie with Butter Rum Sauce
makes one, 9″ pie

3 cups cooked, peeled and mashed sweet potatoes (about 3 medium potatoes)
2 eggs
2 tablespoons melted butter
1/4 teaspoon cinnamon
1/8 teaspoon nutmeg
1/2 cup cream
1/2 teaspoon lemon juice
2 teaspoons vanilla
dash of salt
1/2 cup sugar

Boil the potatoes whole in plenty of water (covering them by about two inches) for about 30 minutes, until tender all the way through.  Peel them after they’ve cooled a bit and give them a rough dice.  Mix the potatoes in a stand mixer with the paddle attachment until they are smooth and very few lumps remain.  Mix the eggs with the cream and spices, lemon juice and vanilla until smooth and gradually mix it into the potatoes.  Add the salt and sugar and let the mixture blend on medium for about 5 minutes. Pour filling into UNbaked 9″ pie shell, bake for 40-45 minutes at 350-325.  Serve with butter rum sauce or whipped cream!

Butter Rum Sauce

1 stick of butter
1/3 cup heavy cream
1/2 cup sugar
a few pinches of kosher salt to taste
2 tbs rum

Let the butter melt with the cream and sugar and stir until the sugar is completely dissolved.  Add salt until it tastes right to you – let it take some of the sweetness away and give it some depth.  Add the rum and mix well and serve!

Pot Roast Pies

Pot Roast Pie
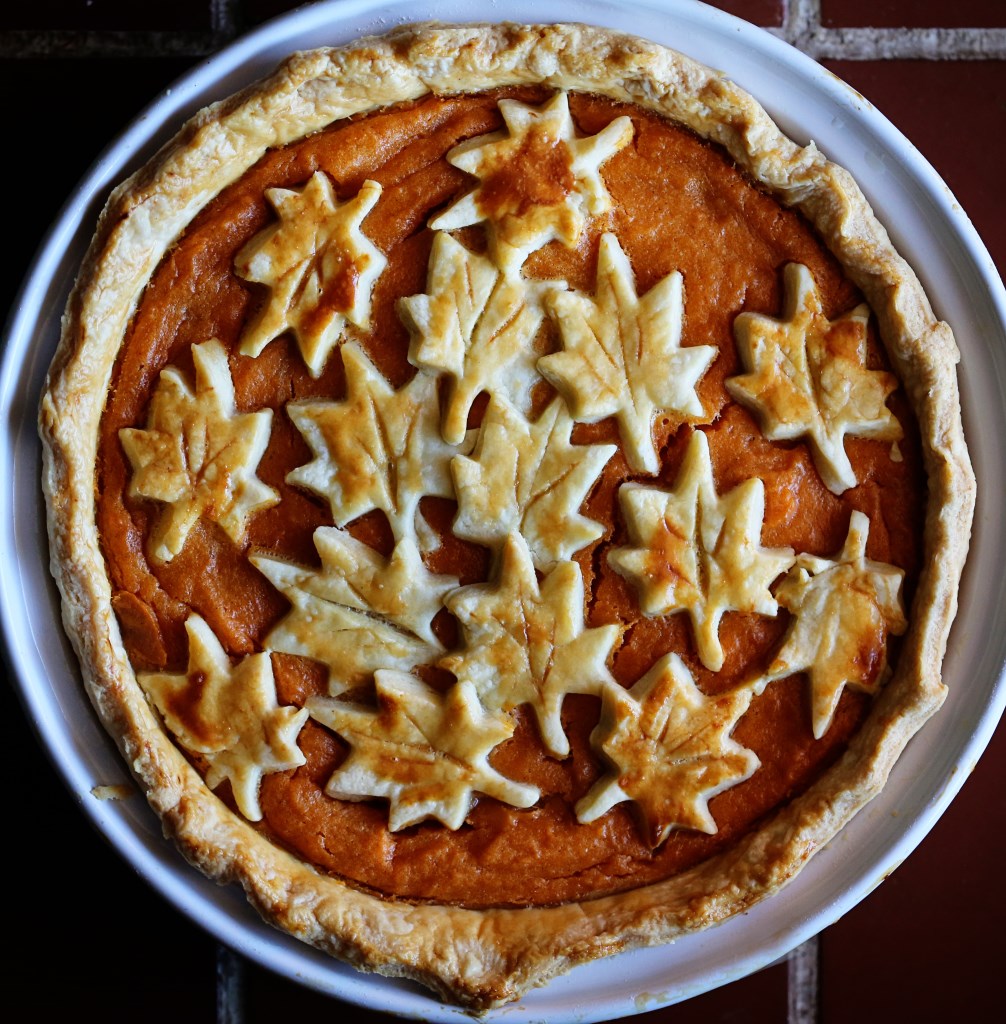
It’s official.  I’m in fall-cooking mode.  Bring on the orange vegetables and the slow cooked meats and the braising liquids.  Bring on the pies with custard fillings and mulled wine.  Let the apples stew in cider and the cinnamon sticks abound, we have officially fallen into the best time of year!  I love how the natural seasons for foods are meant to put a little extra meat on your bones to survive the cold winter months.  Even though most of us have climate controlled air year round, I still appreciate the way shopping seasonally will naturally guide you through the year.  I am jumping the gun just a tad, but since the 10 day forecast has us in the 40s at night and the 70s in the day, I’m embracing the way things feel.  I have waiting a long, hot summer to start dreaming of stews and caramelized butternut squash.  I’m ready.

Let’s start with bringing back the Sunday pot roast.  Matt and I want to have that tradition for our family.  Growing up, we both regularly had pot roast on Sunday afternoons after church.  It’s the natural ease of letting something cook on the stove or in a slow cooker while you’re at church.  Mom always make yeast wheat rolls to go with it.  Some of my favorite food memories came from that meal and I will feature her winning recipe on this blog soon!  Matt has made a few amazing versions and I tried a recipe I saw on Pinterest yesterday and it was remarkably easy and very flavorful!  Then, today for lunch, I played with the leftovers and came up with little pot roast hand pies, covered in pan juices.

Pot Roast Pie with Pan Juices

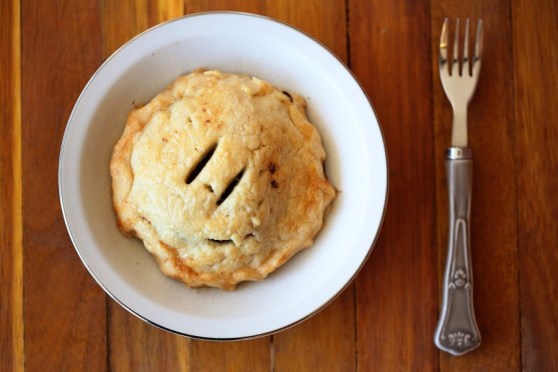
This was a good move in all directions.  Leftover pot roast from yesterday with potatoes and carrots.  Chopped up a few pieces of each component and tucked spoonfuls into the only pie dough worth memorizing and baked.  I didn’t want to add too much of the leftover cooking liquid from the roast inside the pies because I didn’t want them to be soggy as they cooked and leak out everywhere.  So, once the pies came out, I ladled warm, beefy pot roast juices over the pie itself and it soaked up just enough for the crust to not be too dry, yet it remained crispy and flaky and buttery.  Best. Fall. Lunch. Ever.  Too bad the baby wouldn’t partake.  She really missed out.  Too many eggs for breakfast, I guess.  Although, I think on a day when she is super hungry, she will really like this.  I can just see her cute little hands holding a tiny pie.  Ah, well.  Maybe next time!

Sunday Pot Roast Pie

Balsamic Orange Pot Roast*
serves 4-6

4 – 5 Lbs of Beef Chuck Roast
2 cups water
1/2 Cup Light Brown Sugar
1/4 Cup Balsamic Vinegar
1 Tbs of Soy Sauce
1 Tsp of Salt
1/4 Tsp of Red Pepper Flakes
3 Cloves of Fresh Garlic – Pressed
Zest of one orange
a few fingerling potatoes
4 large carrots, peeled and chopped into 2″ pieces

Put the roast in your slow cooker and surround with the potatoes and carrots.  Mix all the other ingredients together and pour over the roast.  Cook on low for 8 hours.  Eat and enjoy and the next day…

The Best Pie Crust Ever
2 sticks of cold butter, chopped into little pieces
2 cups of flour
1 tsp kosher salt
1/8 cup ice water

Put a cup of flour in your stand mixer with a paddle attachment and add the salt.  Mix to blend.  Add half the butter by small handfuls, beating on low until all the butter is fully incorporated into that cup of flour.  Then, add the next cup of flour and beat on low until completely blended.  Then, add the water sprinkle by sprinkle until the dough comes together and stays together when pressed with your fingers.  Separate into two discs, wrap in plastic and let chill for at least an hour.  Take out 20 minutes before making the hand pies so they will roll out easy.

Assemble!

Take a few components from the leftovers – a bit of roast, some carrots and potatoes.  Chop well!  Heat up the juice from the leftovers on low on your stove.  Roll out your pie dough and cut out 4″ circles.  Fill the circles with 2 heaping tablespoons of roast mixture.  Place another 4″ round of dough on top and crimp the edges.  Brush with a beaten egg and bake at 375F for 30-40 minutes, until the crust is nicely browned.

Place a hand pie into a shallow bowl and ladle a warmed cup of leftover pot roast juice over the pie and serve immediately!

*recipe adapted from The Chic Site

Mexican Chocolate and Horchata Risotto

Horchata Risotto
I really can’t think of a better day to make this dish than today.  It’s cold, cloudy and all I want to do is eat complex carbs, sprinkle cinnamon on them and then take a nap.  The other day, I found a recipe in my cute little French non-diet diet book for a simple chocolate rice pudding.  I started improvising and adding cinnamon.  Then more cinnamon.  Then some cream, then more vanilla.  It started tasting exactly like horchata, my favorite Mexican beverage, and I was happy.  I even thought, “Why ruin this horchata by adding the chocolate the recipe calls for?”  So I ladled out half of the rice pudding and added the chocolate to the other half.  Woah.  Insanely good.  The intense cinnamon and vanilla, mixed with the dark chocolate was a revelation.  Such a depth of flavor you wouldn’t really expect from something as seemingly bland as a rice pudding.  It was amazing.  And with just a little extra cream to loosen up the consistency, it was exactly the way risotto should be, only sweet!  Dessert risotto – you heard it here first, folks.  I think it should be a “thing” if it isn’t already.  It’s going to be a “thing” in this house, at least!

Mexican Chocolate Risotto

Horchata/Mexican Chocolate Risotto
serves 4 as a dessert

2 cups milk
1/4 cup sugar
Pinch of salt
1 cup Arborio rice (this is risotto rice that plumps up and absorbs a lot of moisture.  I’d really recommend not using any other kind)
1 tsp vanilla bean paste
1 tbs cinnamon
– then, for Mexican Chocolate, stir in 3 ounces dark chocolate chips (the darker the better – I used 70%)

Pour the milk, sugar and salt into a saucepan and bring to a boil over medium heat.  Add the rice and cook for 20 minutes, stirring occasionally, until the milk is absorbed.  You may need to add  a few more splashes of milk or cream to keep the rice creamy.  It may take more time and more milk in order for the rice to not be crunchy anymore.

Stir in the vanilla and cinnamon and taste.  Revel.  Feel happy.  Then, when you’re ready, add in the chocolate to the entire batch or just half, like I did.  Stir until fully melted and incorporated.  Sprinkle with extra cinnamon and a sprinkle of cayenne if you dare.  Serve with a warm cup of hot chocolate and be sure you’re wearing fuzzy slippers.

Enjoy.

Literal Banana Bread

Banana Oat Bread
We always have bananas around here.  I realize my last post was about bananas and I apologize for the redundancy.  They are the most logical, good-in-a-pinch snack or breakfast for a little one.  I cut them up and put them in oatmeal most mornings, so one day when I had a lot of ripe ones and it was cloudy out, I thought that I’d do a literal banana bread and mix banana into the dough and add a lot of oatmeal to kinda make a bread version of my daily breakfast.  I really loved how rustic it turned out.  It was really great warmed with butter and sprinkled with cinnamon – as most things are.  I always think of how I could improve something the second it comes out of the oven.  With this, I think thick slices dipped in batter and turned into banana French toast would be amazing.

Banana Oat Loaf

Banana Oat Bread*
makes two loaves

3 cups whole wheat flour
2 tsp salt
1/2 oz yeast
1/2 stick butter, softened
generous 1 1/4 cups water
2 large bananas, chopped
1 bowl of oatmeal, muesli or granola

Put the flour, salt, yeast and butter into a bowl.  Slowly add water to the bowl and mix carefully by hand until the dough becomes elastic.  Knead the dough for 5 minutes, then cover the bowl and set aside to rest for two hours.

Divide the dough into two, then add a chopped banana to each, using your hands to mash the banana into the mixture.  This makes the dough crazy sticky, so add enough oatmeal to each to regain the original texture.

Line a baking sheet with parchment or a silpat.  Roll each dough into a ball, then press into the bowl of oats, so that the dough becomes completely coated.  Place the loaves on a baking sheet and let rise for 1-2 hours.

Preheat the oven to 400F.  Using a knife, deeply score the top of each ball into 8 sections.  Bake the loaves for 25-30 minutes, then transfer to a wire rack to cool.

*adapted from the amazing book, 100 Great Breads by Paul Hollywood.  

Bananas Foster Tart Tatin

bananatatin001 bananatatin003


My mom and dad got me an awesome tart tatin pan for my birthday this year and I couldn’t wait to use it.  I had a recipe from Martha Stewart saved on my phone for the longest time and hadn’t gotten around to making it, but when I received this pan in the mail and looked at my five mysteriously mushy bananas on my counter, I knew what had to be done.  Okay, so the mysteriously mushy bananas – I bought a perfectly yellow, no bruise bunch that were on the top of the pile, and a day later, I went to cut up one for Olive and they felt like bags full of jelly.  ALL OF THEM.  Still perfectly yellow, still no bruises, but all mush.  What in the world?!  I thought maybe since I’d put them beside tomatoes, that maybe the gasses from the tomatoes instantly ripened the bananas?  So a day later, I bought another bunch and put one banana with the tomatoes and the rest far away from them and the banana that was with the tomatoes was fine.  So, the mystery remains.  Maybe they were on the bottom of the truck since they were on the top of the pile!

Despite their mushy texture, the bananas worked out perfectly for this recipe and I was glad to be able to use them.  The French love their tart tatins.  They basically do it with every fruit in season.  And my theory is that the French use fancy terms to make ordinary dishes sound fancy.  Like tartines.  Tartines are various toppings on toast.  That’s it.  Some might call it bruschetta, some call it toast.  It’s all the same.  Or how about this tart tatin?  Yeah, it’s an upside down cake/tart.  They typically use puff pastry instead of cake batter, so the result is a crispy, almost turnover texture with caramelized fruit on the top.  It’s a wonderful way to use up old fruit and to do something really simple in a hurry for guests.  And you should always keep frozen puff pastry on hand.  It’s a freezer staple for me.  You can use it in so many ways from topping little strips with shredded cheese or sausage or peppers for an instant appetizer to using it as a base for a cobbler, strawberry shortcake or whatever you can dream up!

bananatatin005 bananatatin004

Bananas Foster Tart Tatin*
serves 8

  • All-purpose flour, for work surface
  • 1 sheet frozen puff pastry, thawed
  • 6 tablespoons unsalted butter
  • 3/4 cup packed light-brown sugar
  • 1/2 teaspoon ground cinnamon
  • 1/8 teaspoon salt
  • 5 large ripe bananas, peeled, halved lengthwise
  • 1 teaspoon pure vanilla extract
  • 2 tablespoons dark rum
  • 1 cup creme fraiche, for serving

Preheat oven to 400 degrees. Roll out pastry on a lightly floured work surface to a 13 1/2-inch square. Using a large skillet as a guide, cut out a 12-inch round. Transfer pastry round to a baking sheet lined with parchment paper, and refrigerate until firm, about 15 minutes. Make three 1/2-inch slits in center of round; set pastry aside at room temperature.

Melt butter in a 12-inch skillet over medium-high heat. Stir in sugar, cinnamon, and salt. Cook, swirling skillet occasionally, until mixture turns medium amber, about 3 minutes.

Arrange bananas in skillet, overlapping slightly. Cook, without stirring, 3 minutes. Drizzle vanilla and rum over bananas, and cook until most of the rum has evaporated and liquid has thickened, about 1 1/2 minutes. Remove from heat.

Place pastry round on top of bananas, and transfer to oven. Bake until pastry is golden brown and puffed, about 25 minutes. Remove from oven, and carefully invert the tart onto a serving plate. Whisk creme fraiche until fluffy, about 3 minutes. Serve dessert warm or at room temperature with the creme fraiche.

*I didn’t adapt this Martha Stewart recipe at all, except that my tatin pan was 9″ instead of the 12 the recipe calls for.  I didn’t have too many bananas – it worked out perfectly.

Parsnip Puree with Coriander Brown Butter

parsnip002

I remember the months of making Olive’s baby food with great fondness and happy farewells.  While it was fun to show her new foods, I was all too glad to stop blending and pureeing things like chicken pot pie or beef stroganoff.  Because while certain foods look nice pureed, others look like…gray.  And gray just isn’t an appealing color in the food world.

Whenever I see recipes for purees, I instantly think, “That’s baby food” because it was to me.  I never followed the rules of how to feed your baby what at what age, except for the standard “biggies” like honey, peanut butter and strawberries.  I just always blended up whatever we were having and it always worked out great.  Her first foods weren’t bland cereals, but full flavored vegetables.  Olive ate and enjoyed nearly everything my trusty immersion blender wanted to create and I think, because of that, she isn’t very averse to strong flavors, spices and seasonings.  I always seasoned her baby food.  I’d hold back on the salt more than what my palette would prefer, but I felt that her food should taste good and that if we enjoyed it, she’d enjoy it!

Today’s recipe fits a lot of current trends.  Substitutions for those evil, fear-inducing potatoes?  Check.  Browned Butter?  Check.  Calling baby food a puree and feeling fancy while serving it for dinner?  Check.  I made this dish last night as a side to lamb chops and roasted broccoli.  (Olive gnawing on the lamb chop ranks up there with Greatest Moments Ever.)  We all enjoyed it and I think it will make an appearance again during the fall season.  Those crusty bits that Olive called bacon?  Yeah, that’s roasted garlic.  Totally awesome.  If I could do anything, I’d make parsnips not so sweet.  And then, by George, they’d actually taste like mashed potatoes!  🙂

parsnip003

Parsnip Puree with Coriander Brown Butter*
serves 4-6 as a side

2 lbs parsnips, peeled and chopped into 1 inch pieces
5 TBS unsalted butter
2-4 TBS milk
Salt and fresh ground pepper
1/4 tsp ground coriander
2 cloves chopped garlic

Boil the chopped parsnips in salted water until tender.  Transfer to a food processor, or to a large bowl if using an immersion blender.  Add two tablespoons of butter, the milk and salt and pepper and blend until smooth and creamy and no chunks remain.  Add a dash more milk if you want.  Adjust the seasoning with salt and pepper to taste.

In a stainless steel skillet over medium heat, add the remaining three tablespoons of butter, coriander and chopped garlic.  Swirl the butter around until bubbling and starting to brown.  Keep the garlic moving around so it doesn’t burn.  Remove from heat and pour over the parsnip puree to serve!

*recipe from Real Simple magazine this month, in which they gave us four entire weeks of dinner planning.  I’m not going to squander that work done for me, so we’re eating through Week 1 and enjoying it very much.  Especially the lack of effort part.