Buffalo Chicken Sandwiches with Blue Cheese Slaw

Buffalo Chicken Sandwiches with Blue Cheese and Celery Cole Slaw
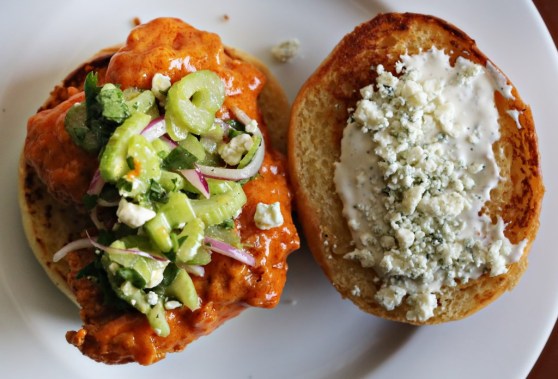
In the Palmer house, we like to do things from scratch.  Sometimes we even go so far as to make the contraption that makes the food (thank you, Alton Brown).  But I would say our current favorite food-past time is eating a dish at a restaurant and saying, “I bet we could make a better version of this at home” and then going home and trying it out.  One of our favorite restaurants here in town is Crafthouse Gastropub.  They always have good brews on tap and they have a creative menu and generally execute things pretty well.  Matt was really excited to try their buffalo chicken sandwich and had been anticipating it for a long time, but it fell kinda short when we finally had it.  Maybe it was because we had this idea in our heads of what it would be and it wasn’t that way – sometimes you can really cheat a restaurant by doing this.  The slaw was really wet and ran down his arm and pooled onto the plate.  The chicken wasn’t “buffalo” enough and was also too big, so it was really hard to eat.  It was a good enough sandwich for what it was, but we said then and there that we’d try this one at home.

So we did.  And it was tremendous.  We used the recipe for the fried chicken sandwich from Serious Eats and I think they really have a perfect process.  Using chicken thighs instead of the breast makes for a smaller patty and a more flavorful one, and it’s easier to eat.  We used our very favorite buffalo sauce and Matt thickened it with a bit of roux and it worked perfectly.  We didn’t want the drippy situation and making the sauce thicker like buffalo gravy – if you will – was the right move.  Matt found a slaw recipe online from a girl who really knows her stuff, Carla Hall from Top Chef, that had celery and blue cheese.  What is more perfect with buffalo chicken than blue cheese and celery?  Then, we totally cheated and bought a nice jar of ranch dressing and mixed in some chunky blue cheese crumbles for the sauce.  And to finish everything off, Matt made outrageous potato rolls for the buns.  It was, by every definition, the perfect chicken sandwich.  Right size, right proportions, right flavor – right on.

I’ll post our thickened buffalo sauce recipe below, as well as Matt’s potato rolls.  There’s a lot of components to this sandwich, but you can improvise on pretty much all of it if you want.  I’d highly recommend keeping the fried chicken thigh the same, though.  I can’t imagine how to improve it.

Buffalo Chicken Sandwich

The Perfect Buffalo Sauce 

  • 1 1/2 tablespoons white vinegar
  • 1/4 teaspoon cayenne pepper
  • 1/8 teaspoon garlic powder
  • 1/4 teaspoon Worcestershire sauce
  • 1 teaspoon Tabasco sauce
  • 1/4 teaspoon salt
  • 6 tablespoons Frank’s hot sauce
  • 6 tablespoons unsalted butter

Mix all the ingredients together in a medium saucepan over low to medium heat until well combined and heated through.  To thicken, like we did for our sandwiches, take two tablespoons of unsalted softened butter in a small dish and add about two tablespoons of flour to form into a paste (an uncooked roux).  Throw this little ball of buttery flour into your buffalo sauce and whisk until fully incorporated and thickened.  We dunked each crispy chicken patty into the buffalo sauce before assembling our sandwiches.

Buffalo Chicken Sandwiches

Potato Buns*
makes 8 sandwich-sized buns

  • 1 russet potato (big enough to make 1/2 cup mashed potato), peeled and chopped
  • 1/3 cup unsalted butter, softened
  • 1 tbsp. honey or agave nectar
  • 1/2 tsp. salt
  • 1 egg
  • 1/2 cup milk, warmed
  • 1 1/8 tsp. instant yeast
  • 1/4 cup reserved potato water
  • 2 1/2 – 3 cups bread flour
  • 2 tbs salted butter, melted, for brushing the buns


Boil potato until tender.  Drain cooking water, reserving 1/4 cup for use in the rolls.  Finely mash the potato and measure out 1/2 cup.  Let cool to nearly room temperature.

In the bowl of a stand mixer fitted with the paddle attachment, mix together the mashed potato, butter, honey, salt and egg.  Mix together on medium speed for about 2 minutes.  Combine the yeast with the warm milk and reserved potato water, and pour into the mixer bowl.  Mix on low speed until incorporated.  Gradually add the flour, about 1/2 cup at a time, until a soft dough forms.  Switch to the dough hook attachment on knead on low speed for 5 minutes, adding more flour if necessary to achieve a soft dough that is slightly tacky but not sticky.  Transfer the dough to a lightly oiled bowl, turning once to coat.  Cover with plastic wrap and let rise in a warm place until doubled in bulk, about 60-90 minutes.

Line a baking sheet with parchment paper.  Turn the down out onto a lightly floured surface and punch it down.  Separate into 8 equal pieces and shape into buns.   Place the buns on the prepared baking sheet, about 1 1/2 inches apart.  Brush each bun with melted butter.  Cover with a clean kitchen towel and let the dough rise again until the rolls have grown into each other, about 30-45 minutes.  Meanwhile, preheat the oven to 400 degrees F.

Bake in the preheated oven for about 15 minutes, until golden.  We started checking the buns for doneness around 12 minutes.  Serve warm.

*recipe adapted from Annies-Eats where we made bigger rolls, left out the sugar and brushed with butter instead of dusting with flour to make extra soft buns.
Spicy Roasted Chickpeas

Spicy Roasted Chickpeas
I‘ve seen this recipe around the Pinterest/Facebook/Blog world for a while, now and the first time I tried it, it was one of those moments when I bitterly complained that what I made didn’t look at ALL like the picture.  Ever feel that way?  I think the second time around, without a recipe, I just followed my nose and used the spices I like and let them roast much longer and I had SUCCESS!  They turned out super crunchy, wonderfully spiced and a great little starter for our meal, which Olive claimed as the favorite part of her meal and kept saying, “Mes, hickpeas?”  over and over and over.  I really think she ate about a half cup.  I wouldn’t recommend that to other moms, but that’s what happened and since they were part of the meal, I let it slide.  But yeah, they eat like a snack and I would recommend this to anyone for a healthier option for a party snack, during a movie, etc.  And you can have fun with whatever spice blend you want!  Happy Monday and I hope everyone had a wonderful weekend!

Spicy Roasted Chickpeas

2 cans chickpeas, drained and rinsed
2 tbs olive oil
1/2 tsp each of:
salt, pepper, onion powder, paprika
a sprinkle of garlic powder

Preheat the oven to 375. Spread out the drained, rinsed chickpeas on paper towels and dry those suckers out WELL.  Place the chickpeas on a rimmed baking sheet and add the olive oil.  Mess them around with your hands till every last wee pea is coated in oil.  Sprinkle the spice blend over the peas and roll them all around till they are all coated.  Place the chickpeas in the oven for 25-35 minutes until they are golden and when the pan is shaken, they sound hard and roll around easy.

Let them cool for a bit before transferring them to a bowl, just because you don’t want to enthusiastically grab a handful of glowing-hot peas.

Serve at the beginning of the meal or for a snack and enjoy!

Coffee Can Bread

Coffee Can Brown BreadBoston Brown Bread Loaf

I love this bread.  It’s definitely a bread meant for soup, butter, honey, a fried egg on top – something it can soak up.  It’s dense, smells like gingerbread and it bakes in an old coffee can.  How much more nostalgic or delightful can this get? We first made this recipe to accompany homemade clam chowder.  Both recipes came out of arguably the best issue of Bon Appetit in years – the November 2012 issue.  That issue had several recipes we’ve made countless times, AND an interview with Nick Offerman, a.k.a Ron Swanson.  Best issue ever.

This is called Boston Brown Bread.  It’s a classic recipe in New England and is typically made to go with clam chowder.  I love that it makes two loaves. I can freeze one right out of the oven, or give it away.  I think this time, it will travel with us this weekend to go see our friends, Matt and Anna in Dallas, who JUST found out they are having a baby GIRL in January.  We are so excited to go spend some time with our culinary soul mates and best friends.

So, call your nearest neighbor who you might suspect keeps everything and ask if they have any old coffee cans you can use.  I did exactly that with my friend, Ann, and she delivered.  🙂 One more thing that makes me happy when I make this bread – I think of Ann!

Have a wonderful weekend and bake something memorable!
Sliced Boston Brown Bread with Butter
Coffee Can Bread
makes two loaves

A few tablespoons of butter
2 cups whole milk
1/2 cup molasses
1/4 cup packed light brown sugar
1 tsp kosher salt
1 1/4 cups whole wheat flour
1 cup all-purpose flour
1 cup rye flour (this is the important one to not substitute – I think you could sub AP flour for the wheat and it would be just fine, but the rye imparts an important flavor to the bread)
1/3 cup cornmeal
1 tablespoon baking soda
1 tsp baking powder

2 – empty, clean coffee cans, 11-13 ounces

Preheat oven to 350F.  Cut two 6″ squares of foil.  Coat insides of the cans and one side of each piece of foil with butter.  Stir milk and brown sugar and salt in a small saucepan over low heat until sugar dissolves and mixture is just warmed (don’t boil).  Whisk whole wheat flour and the remaining ingredients in a large bowl.  Add milk mixture, whisking until smooth.  Divide batter between cans and smooth tops.  (note! if the cans still have a lip rim, simply take your can opener to the top and it will cut that lip right off).

Cover cans with foil, butter side down.  Secure foil with kitchen twine.  Place cans foil side up in a deep roasting pan or heavy, shallow pot.  Pour very hot water into pan to come about 2-3″ up the side of the cans.
Coffee Can Brown Bread out of the oven

Bake until a skewer inserted through the foil into the center of each loaf comes out clean, about 1.5 hours.  Transfer to a wire rack and let cool for 10 minutes.  Run a thin knife around the edges of the cans.  invert to release loaves onto a cooling rack.  Let cool for 20 minutes before slicing.  Serve with soft, salted butter and rejoice.

This is great salted butter.  We buy unsalted for baking, but for eating, salted is the way to go!
the only butter you need

Soft-Scrambled Eggs

Soft Scrambled Eggs

Everyone wants to be known for something.  We all strive to be important in some way and to matter to more than just ourselves.  Some of us get little snippets of fame from the jobs we do or the opinions we have or maybe from how cute our red-headed children happen to be.  Most of this attention is fleeting – it can last a day, an online minute or maybe as much as a year before the new wears off.  A good friend once put it so well, regarding our need for others’ acceptance: “You’re only as good as your last performance.”  This is a shockingly true statement that I would venture most of us, at one time or another in our lives, have felt.

Over the last year, I’ve worked through the book, The Divine Conspiracy.  It has flipped my world upside down.  Or maybe, finally, right-side up.  I’d recommend it to anyone searching for something they can’t quite put their finger on. One of the main points early on in the book is that we have this need to matter and to be unique and special because we were specifically designed to be that way.  We were designed by an infinitely unique and powerful creator who made us to be just like Him.  So, it’s not bad to strive to be noticed.  It’s just futile to strive for the approval of our peers – of anyone but the One who created us to be His unique treasures in the first place.  And as we all know, most of our days are spent in search of approval, recognition or acceptance from people online.  People we never see and from a strange sea of online crowds who are simply going about their day trying to be noticed, too.  It’s futile.  At times, I want to unplug from it all and just be important to my family and my very small circle of friends with whom I physically see on a regular basis.  It would be so much simpler to be special and to matter to just 20 people instead of trying to impress 200.

How on earth is this post going to be about scrambled eggs?!  Well, through my first year as a new mother, I really picked up the baton of cooking for my family.  I have embraced it with the foreknowledge that the recipes I cook now will be the stories and the comfort food Olive talks about when she’s in college, missing home cooked meals.  This is how I have come to matter (in my eyes) to my world.  I cook.  I provide food for Matt and Olive and occasionally friends and when I am lucky, family as well.  I usually cook new things, new recipes, Pinterest inspirations, but there are a few dishes that I can make whether I’m sleepy or not, paying attention to measurements or holding a kid on my hip.  Soft scrambled eggs is one of these recipes.  They are actually more of a skill than you might think.  But with a little extra effort and attention, these eggs will blow your mind.  We’ve all had the over-cooked rubbery eggs on breakfast buffets the world over.  These, by contrast, are super creamy, soft, flavorful (not sulfury) and are mind-blowing on top of a piece of buttered toast.  It’s the ultimate comfort breakfast food.  I have had people remark about these eggs like, “What on earth did you put in these?!  Cheese?  Cream?”  Nope.  Salt and Pepper!  And a tablespoon of butter.  That’s it.

I’ll be really detailed in the recipe so that you, too, can learn to do these right.  They just require a little more whisking and a little less heat than you’re probably used to. I hope they become part of your weekly recipe repertoire and I hope that you really enjoy at least one recipe you make on a regular basis.  It could be chocolate chip cookies or banana pancakes or even a simple roasted chicken.  But if you find something that you enjoy doing and you do it enough times to do it well, you will be an instant local-celebrity in the eyes of the people sitting around your table. And that, for me, is becoming more than enough. It’s good to matter to at least a few people in this life and I can think of no more worthwhile group of people than family.

Soft Scrambled Eggs with Pesto

Soft Scrambled Eggs
4 eggs serves two people

4 large eggs
about a teaspoon of kosher salt
fresh cracked pepper
1 tbs of unsalted butter.  If you use a butter substitute, I can’t help you

First, get your butter in a medium saucepan (like a good pan for soup) and turn on the heat to 3 or 4.  Seems low, but this is one of the tricks.  My stove’s lucky number is 4.  Yours might be hotter so adjust as you see fit.

While the butter is melting, crack the eggs into a big measuring cup and season with the salt and pepper like this:
seasoned eggs

Then, whisk whisk whisk until they are forming bubbles.  Like this:
well beaten eggs

By this point, your butter should nearly be on its way to getting frothy in the hot pan.  Pour in your eggs and start whisking.  I use a flat whisk (you can kinda see it in the pic) and it’s so excellent for getting into the edges of the pan.  Whisk almost constantly, occasionally lifting the pan away from the heat and scraping the bottom and sides of the pan, fully incorporating the eggs as they cook so that you maintain a very small curd, like cottage cheese sized bits of egg.  Continue doing this; on the heat, off the heat, on the heat, off the heat, until your eggs are nearly looking done, and more on the side of creamy, but no traces of whites remain.  Your eggs will look underdone to you if you’ve never done this method before.  But trust me, if the whites are all gone and you have a super creamy consistency, you are ready to eat.  Get the eggs out of the pan immediately into a bowl and serve at once.  This morning I put some leftover pesto, which became my own green eggs and ham and it was a breakfast fit for a king.  Or a toddler. 🙂

The pesto WILL be a future blog post.  It’s the best I’ve ever had and it came from an Italian grandmother so you know it has to be legit.

soft scrambled eggs and pesto in a homemade tortilla

Coffee Infused Tres Leches Cake

manyleches005


There are three things that make a dessert experience truly great:
1. The occasion
2. The company who helps you eat it
3. The number of leches involved

This particular dessert experience was one I will always remember.  My friend, Becky came into town for a few short days and because of her husband’s nomadic ways, they have traveled far away from Lubbock, I fear, never to return.  I cherish the times she comes back into town and actually spends some good, quality time over at our house.  I shot Becky and Trevor’s wedding four years ago and we became fast friends, immediately glued together by our love of food and cooking.  I was elated when she said she’s spend the better part of the day with me, so the first question we naturally discussed was, “What are we going to bake?!”

Becky is one of those people who knows how to cook.  It’s in her soul – she was taught from a very early age how to work her way around a kitchen, learning from her father and grandmother.  Becky’s happy place is in the kitchen, and so naturally, we both had a zen-like afternoon baking together.  We shared stories, we complained about bad food and we ATE our creation with gusto and silent, head-nodding approval between bites.  It was perfect.

We decided to do Rick Bayless’ Coffee Infused Tres Leches Cake that I’d recently seen on his show, Mexico, One Plate at a Time.  Rick Bayless is one of those safe names in the cooking world.  If the recipe is from his show, or from one of his many restaurants, or amazing cookbooks, you can rest assured the recipe will work, and will become one of your favorites to return to again and again.  This has happened to me many times and this cake happily joins the ranks.

This cake is intense.  It should be paired with a strong cup of black coffee and nothing else.  The addition of the coffee in the milk mixture is pure genius.  It cuts the richness just right and adds depth where there might just be a generic sweetness.  It has this incredibly creamy texture with hints of cinnamon and coffee.  It’s the best tres leches cake I’ve ever had.  (And I grew up around here – I’ve had plenty.)  It made me think of the wonderful flavors of horchata, and I think next time I make this, I’ll replace horchata for the heavy cream.

manyleches006

Coffee Tres Leches Cake*
serves 6

For the cake:
1 cup all purpose flour
¾ cup sugar
1 ½ teaspoons baking powder
Salt
4 eggs at room temperature
¼ cup vegetable oil
¼ teaspoon vanilla extract, preferably Mexican
½ teaspoon cream of tartar

For the milk mixture:
1 cup heavy cream
1 12-ounce can evaporated milk
1 14-ounce can sweetened condensed milk
½ cup freshly brewed espresso or strongly brewed coffee
1 teaspoon vanilla extract, preferably Mexican
¼ teaspoon cinnamon
1 cup sugar
5 egg whites at room temperature
½ teaspoon cream of tartar
extra cinnamon for dusting (or cocoa powder – or espresso powder would be good, too!)

Heat the oven to 350 degrees. Line a muffin pan that makes 6 large muffins with muffin papers. Or, I don’t have a huge muffin pan, so I used little ramekins and lined the bottom of each with parchment.  Just do it and you won’t be sad, scraping your cake off the bottom of the dish.
Place the flour, 6 tablespoons of the sugar, the baking powder and a pinch of salt in a large bowl and whisk to combine. Separate the eggs, dropping the whites into the bowl of a mixer and the yolks into a medium bowl.  Add the oil, vanilla and 2 tablespoons of water to the yolks and mix well. Beat the egg whites with the cream of tartar until they start to thicken and form soft peaks.  Gradually add the remaining 6 tablespoons of sugar and continue to beat until stiff peaks form.
Add 1/3 of the flour mixture to the egg yolks and mix well. Gently fold in 1/3 of the beaten egg whites. Repeat, alternating the flour mixture and egg whites until everything is thoroughly combined.  Scoop the fluffy batter into the prepared muffin tins, place in the hot oven and bake until the tops spring back when touched, 20 to 22 minutes. Allow to cool slightly, then take the individual cakes out of the dishes and invert them into a deep 13×9 inch baking dish.

Combine the heavy cream, evaporated milk, condensed milk, coffee, vanilla, cinnamon and a pinch of salt in a bowl and mix well. Slowly pour the mixture over the cakes, soaking them thoroughly. Cover with plastic wrap and refrigerate for 1 hour to allow the milks to be absorbed into the cakes.  It actually took longer than that for mine to absorb.  We spooned the mixture over the cakes and poked extra holes in them so they’d soak up more milk.  In the end, I still had some leftover, so don’t worry about that.

Combine the sugar with 1/3 cup water in a small (2-quart) saucepan and bring to a boil over high heat, swirling the pan gently until all the sugar is dissolved.  Dip a brush in water and use it to clean the sides of the pan so no sugar crystals remain.  (This is an important step in keeping the syrup from recrystallizing.) Lower the heat to medium and boil the syrup until it reaches soft ball stage (about 240 degrees).
While the syrup is boiling, beat the egg whites with the cream of tartar and a pinch of salt until the whites form soft peaks.  Drizzle in the hot sugar syrup very slowly while the mixer is running.  Continue to beat until the bottom of the bowl is cool.  This takes forever, so do what Becky does and place ice packs on the outside of your bowl.  Or peas.
To serve, place each soaked cake on a plate, decorate with a big dollop of meringue, toasting the peaks with a kitchen torch.  Sprinkle with the cinnamon or cocoa and eat with great gusto!

*only slightly adapted from the original recipe

manyleches003 manyleches007 manyleches009


Thank you for that afternoon, Becky.  It will sustain me for months to come.  Until next time!  XOXO

Zucchini Bruschetta – Hold Off on Cardigans a Little Longer…

Zucchini Bruschetta detail

The summer seems to be winding down, although I wouldn’t be surprised if we had 100 degree days well into October.  I’m getting in that cozy fall mood, already, though, and it’s dangerous because I want to wear cardigans and listen to jazz and eat pumpkin flavored things and it’s still 98 and muggy outside.  Sometimes if the summer goes on a little too long, I start protesting by wearing my sweaters, regardless of the temp.  I consider it my adult fussypants-ness.  Everyone’s got a cross to bear – mine is shorts-weather.

This recipe keeps me mildly okay with the fact that it’s still summer.  It’s so fresh and happy and has such bright, bold flavors and colors that it makes the perfect appetizer when your friends are keeping you company in the kitchen as you finish roasting the pig…or whatever it is you cook for your friends.  This is also a great way to use up the only thing you got to grow in your garden, this year.  What is it about zucchini?  Why does it:
1. Always grow
2. Grows as big as a Great Dane
3. Give you more yield than any one family could ever consume?

Zucchini gives false hope.  “Hey, you can grow me!  Now let’s see how you do with carrots!  Go on!  I want to see you try!  Loser.”

Or that’s how my zucchini plant makes ME feel…

zucchini bruschetta appetizers

Zucchini and Olive Bruschetta*
serves 6-8 appetizer sized portions

1 baguette, cut into 1/4″ slices
2 tbs olive oil, plus more for drizzling
4 small zucchini (about 12 ounces)
1 large avocado (ripe, duh)
zest and juice from one lemon
12 large mint leaves, chopped
1/3 cup toasted almonds or any nut, really
1/3 cup chopped catamala olives, or whatever floats your boat
2 ounces pecorino romano, parmesan or other firm cheese you enjoy

Heat oven to 375°F and arrange a rack in the middle.  Slice zucchini lengthwise into 1/3” slices and then stack the slices and cut into 1/3 “ matchsticks lengthwise. Once all the zucchini are sliced, cut them lengthwise into 1” pieces.

Place the zucchini in a colander and toss with ½ teaspoon of kosher salt, and set aside to drain for 20 minutes. Meanwhile, brush the bread on both sides with olive oil. Place on a baking sheet and bake until crusty and brown, about 10 to 12 minutes. Turn once halfway through to toast evenly. Remove and cool.

Peel and pit avocado then cut into 1/2-inch dice. Place in a medium bowl and toss with lemon juice and zest. Roughly chop mint leaves and add to avocados.

Line a large plate with paper towels and spread out salted zucchini. Lay another layer of paper towels on top and pat off excess moisture. Add to the avocado bowl along with the almonds and olives and mix thoroughly. Taste and adjust salt to your liking.

Top each crostini with a heaping spoonful of the zucchini mixture. Drizzle over olive oil and fresh cracked pepper. Using a peeler thinly shave cheese and top each crostini with a few slices and serve.

*recipe adapted from aidamollenkamp.com

Chicken Fricassee, Deconstructed

chicken fricassee 2

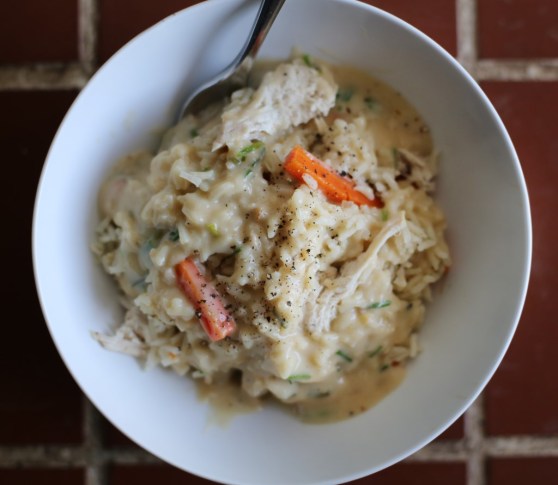
Chicken Fricassee was one of the first meat dishes I made for Olive when she was a baby, just starting out on solids.  (The first meat she had was homemade beef ragu – I kinda threw the rule books out when it came to feeding her and I haven’t regretted it a single day.)  I made the dish from that month’s Martha Stewart Magazine and took a little bit of each component and blended it up with a little extra chicken stock. Olive consume it with a great fury.  The flavors are so simple and so rich – it truly is a comfort food dish.  And if you think it’s “fancy” because it has a French name, fear not – it’s basically a chicken pot pie without the pie.  All those amazingly comforting flavors of chicken soup, thyme, carrots, peas, cream gravy, butter – they’re all there.  You serve it over rice or pasta and revel in the comfort.  It’s not difficult and it tastes like pure love.

I’ve made that Martha Stewart version several times, but for this recipe, I worked out of the Bonne Femme cookbook and decided to deconstruct it because Olive is able to eat each component just chopped up small, but not big enough to tackle chicken still on the bone.  So I cooked the chicken, shredded it after it had cooled, and then assembled, garnishing with the pan gravy at the very end for an easy to eat version that everyone really loved.

chicken fricassee

chicken fricassee 3

chicken fricassee 2

Deconstructed Chicken Fricassee*
serves 4

2.5-3 lbs bone-in, skin-on chicken parts (legs, thighs, breasts, whatever – I used the whole chicken in pieces)
salt and pepper
2 tbs vegetable oil
1/2 a white onion, chopped fine
1/2 cup low-sodium chicken broth
1/2 cup dry white wine (or more chicken broth, if you don’t have any)
1 bay leaf
4 carrots, peeled and cut into 1/4 x 2″ sticks
1/2 cup frozen pearl onions
2 tbs unsalted butter
2 tbs AP flour
1/4 to 1/2 cup milk
2 tbs chopped fresh tarragon
1/4 cup chopped fresh parsley
2 tbs fresh lemon juice

Pat the chicken pieces dry with paper towels and season with salt and pepper on both sides.  Heat the oil in a large, deep skillet or stock pot over medium-high heat until it shimmers.  Add the chicken and cook, turning occasionally, until brown on all sides, 10-15 minutes.  Transfer the chicken to a plate and drain off all but a tbs of fat from the pan.

Add the onion to the pan and cook briefly, stirring, until fragrant.  Add the chicken broth and wine, stirring to loosen any browned bits from the bottom of the pan.  Return the chicken to the pan.  Add the bay leaf and bring to a boil, then reduce heat.  Cover and simmer for 25 minutes.  Then, scatter the carrots and pearl onions around the chicken; cover and simmer until the chicken is done (internal temp should register 170 on an instant read thermometer), about 15 minutes more.

With a slotted spoon, transfer the chicken and vegetables to a large bowl; cover with foil to keep warm.  Discard the bay leaf.  Pour the pan juices into a measuring cup and set aside.  Melt the butter in the pan over medium heat.  Stir in the flour with a wire whisk to make a smooth paste.  Cook and stir for one minute.  Slowly add the pan juices back to the pan, stirring with a wire whisk until smooth.  Cook the mixture until it boils and thickens, then continue to cook for one minute more.  Whisk in enough milk to make a sauce of the desired consistency and bring to a simmer.  Stir in the tarragon, parsley and lemon juice.

I then shredded up the chicken by hand, scattered an equal amount into each bowl over a heap of rice, arranged the vegetables on top of the chicken and then spooned my pan sauce over everything and cracked a lot of black pepper on top of that!  There’s something magical about fresh black pepper and a rich chicken dish.  It’s just perfect.

Enjoy!

*adapted from the Bonne Femme cookbook, which is perfect

Stroopwafels – Your New Coffee Lid

stroop008
My friend, Libby, and I first saw stroopwafel cookies at an outdoor market in the center of Haarlem, Holland.  We were having an “off” day from our Let’s Start Talking mission trip and decided to explore the town’s morning market.  I think it must have been the very first time in my life that I explored and ventured off so far away from home and with zero adult supervision.  We were technically adults as sophomores in college (are you done laughing, yet?) – I say “technically” because someone trusted us to go across the globe to teach English to non-native speakers, but in all other manners of speaking, we were babies.

While walking the streets of Haarlem (or trying our best to ride our bikes without getting killed after not being on a bike since the 90s) we discovered so many things we didn’t know existed.  Crazy street performers that came alive at the sound of a coin dropping into their hats, a sweet, old lady flipping tiny pancakes over with a spear in her honeycomb-style pan (ebilskivers), and probably the best of all – the Stroopwafel  (pronounced “strope”) – two waffle cookies sandwiched together with soft caramel. We smelled them from down the street – the air was cloaked in butterscotch.  We followed our noses to a little stand in the center of the street where a man was making salad-plate-sized waffles, pressing them with a hand-held grid patterned iron, and spreading each waffle with a thick caramel sauce before sandwiching them together and handing them to us, gooey and oozing out the sides.  They were warm, soft and crispy around the edges and we took one bite and with wide eyes, didn’t say another word until we were done eating.  It was one of those magical food memories that has cemented that time and space in my brain, forever.  A part of my heart will always be with my friend, Libby, on the streets of Haarlem, eating stroopwafels and wondering how we got so lucky.  Eleven years later in our toddler-run worlds of rushing around and enjoying quick cups of coffee in the wee hours of the morning, I like to go back to that place where nothing else in the world existed except our adventure.

When we got back from Holland, we started to see reproductions of these cookies in grocery stores.  A poor man’s stroopwafel, but better than nothing.  I don’t think most people know that you’re supposed to place the cookie on top of your coffee after you pour it, so that the room temp caramel softens with the heat and when bitten into, oozes out just a bit.  The ones we got in the market were obviously over-sized to sell to American tourists, but the true size is a perfect fit for the top of a coffee mug.

stroop005

I wanted to make my own for years, but had never attempted it till last weekend.  I found a basic stroopwafel recipe online and had some leftover butterscotch sauce in the fridge and it worked perfectly.  I recommend making the butterscotch because I think that salty note is just amazing with the sweetness of the cookie.  I also doubled the cinnamon the original recipe called for and was quite happy with the results.  If you’re not in the mood to make your own caramel or butterscotch, I thought the other night, while I was supposed to be sleeping, that those sheets of caramel sold in grocery stores for caramel apples would work perfectly because they’re already flattened out!  You really need a pizzelle iron to make these and if you don’t have one, I would suspect that you could be pretty successful if you have a handheld bacon press and just pressed them out on a griddle.  They don’t take long to cook at high heat (about one minute) and you have to split them in half before they cool down, so get ready to suck it up and act like a woman (I didn’t miss-type).   As I will say over and over again on this blog: nothing in this life worth having comes easy.

And homemade stroopwafels are definitely worth having.  Libby, my dear – can’t wait to have coffee with you, again in a couple weeks.  Of course, you’re always there, in my head, during my morning cup.  Always.

stroop004

Stroopwafels*
makes about 15-20

4 cups all-purpose flour
1 tsp. ground cinnamon
1/2 cup white sugar
1 cup unsalted butter
2 large eggs
1 (.25 ounce) package active dry yeast
1/2 cup warm water

For the filling:
Confession: I honestly don’t remember how I made the caramel/butterscotch in my fridge. It was a few weeks old and I’d gone on vacation since then, so I honestly don’t remember.  It was mighty fine, though.  I will share this link with you, though, because I’ve made this exact recipe many times and it’s pretty fail-proof.  You don’t be disappointed and it only takes about 15 minutes.  Or buy caramel apple sheets from the store.  But this will taste better.

Preheat pizzelle iron, or griddle, if you don’t have a pizzelle, and heat up the bacon press if you’re using that.
Dissolve the yeast in the warm water.
Cut the butter into the flour either by hand (I did this whole recipe by hand and got a bit of muscle build from doing what Kitchen-Aid does 10x better but hey, I’m stubborn.)  Mix in the sugar, cinnamon, eggs and yeast mixture. Mix well (use your mixer with a paddle attachment unless you, too, want to build your muscles) and set aside to rise for 30 to 60 minutes. It might not double or even rise very much, but as long as you had it in a semi-warm place for that hour, it’ll be fine.  Mine didn’t rise much.  Roll dough into 15ish small balls (about a ping pong ball size), squeeze each ball into the preheated pizzelle iron and bake for about 30 seconds to a minute. Cut the wafels in two and spread with the filling.  Eat immediately or let it it come to room temp and enjoy them as lids to hot coffee.

And please, whatever you do, don’t eat these alone.  I think I shared these with about 5 different people.  That’s the key to happiness, I’ve found 🙂

*adapted from Diana’s Desserts

stroop006

Sweet Soy Glazed Chicken

Honey Soy Glazed Chicken Legs

Happy Wednesday.  I got to spend today baking in the kitchen with one of my favorite people in the world, Becky McGrew.  We baked something truly decadent and crazy rich, but that will be a post for another day. 🙂  Today is more practical.  At the beginning of the week, I have such gusto for cooking my meals.  I go to the store on Sunday nights and buy my grocery list for meals to get me through at least Wednesday night (I don’t like to buy more than that, lest things go bad in the fridge, waiting to be cooked.)  Thursday morning is usually winding down and trying to find a use for my many leftovers.  It’s good to have a few recipes you can always rely on to be great and interesting in the middle of the week.  Recipes that aren’t hard, aren’t boring and make you feel glad you didn’t just give up and go out to dinner.

This is a perfect mid-week meal because it gets you over the hump in the week and gives you amazing leftovers.  Such a rich, sweet and savory glaze on this chicken pairs perfect with a few light sides like stir-fried snap peas or roasted brussels sprouts with fish sauce vinaigrette.

Honey Soy Glazed Chicken*

12 chicken legs (or other parts, but I’d definitely use chicken on the bone)
kosher salt and freshly ground pepper
2 tablespoons neutral oil (not olive)
2 tablespoons ketchup
1/2 cup soy sauce
1 cup honey
2 to 3 cloves garlic, minced

Preheat oven to 400ºF. Wash and dry and lightly salt and pepper the chicken and place in a 9X13-inch pan.

Combine remaining ingredients and pour over chicken. Toss chicken in the sauce and then arrange, skin-side down in the baking pan. Place in the oven for 30 minutes. Remove pan, turn chicken over, and return to the oven for another 30 minutes. Remove pan and turn chicken over once more. Turn the oven down to 375ºF and bake for an additional 15 minutes.  My chicken didn’t get as glazed as the original recipe appears, so I took matters into my own hands and placed the chicken on a serving platter and tented it with foil to keep warm and then put the sauce on the stove in a medium saucepan and let it reduce by half until really syrupy.  BEST DECISION EVER.  I then took a ladle of the syrup and added it to rice as an accompaniment.  BEST DECISION EVER.  I think you could add the reduced soy glaze to just about anything and it would be…the best decision ever.  Totally delictable, dresses up any sad chicken, any sad side dish.  Would be great tossed with roasted broccoli for a stir-fry.  Geez, the possibilities are endless.  Enjoy!

*recipe adapted from Alaxandra Cooks

Beautiful Beets and Second Chances

beets008

This is a perfect Monday post because no one really reads my Monday posts so I can be as nerdy as I want.  Here it comes…

beets012 beets013 beets006

I took a lot of pictures of beets the other today.  They’re beautiful.  Why aren’t they more popular in this country?  A PINK food?  Come on! Kids should be all over these.  They stain worse than food coloring.  They roast up sweet and savory.  I think a lot of people in this country have been scarred by canned or pickled beets.  That’s the taste they have in their minds.  I can understand why that wouldn’t be the most appealing taste memory.  But think about this – what if someone decided a long time ago that the best way to eat a potato would be to brine it?  Everyone would say, “Eww, potatoes.”  THINK ABOUT THAT!  So, my determination is to try previously unappealing foods in different ways than they are known for.  Roasting is almost always the best way to cook a root vegetable.  It works with just about anything from asparagus to parsnips to turnips.  It’s good to give foods with a bad reputation a  second chance. You never know if you’re one recipe away from your new favorite food.

This post is really just for showing the pics I took of beets.  And if you are curious, peel them, chop them into cubes, coat them in olive oil, sprinkle with salt and pepper and roast them for 30 minutes at 400F until tender.  No brainer.

beets002 beets003 beets004 beets007 beets001 beets015
Ready for roasting

My family looking at me as if I’d gone crazy while I took pictures of beets for 30 minutes.
beets014