Biscuits and Chicken Curry “Gravy”

biscuits and gravy
When I met Matt and he first moved to Texas from Tennessee, he marveled at how us West Texans liked to “smother” our food.  Smothered burritos, smothered chili cheese dogs, biscuits and tons of gravy.  I never really thought about it till he pointed it out.  We certainly aren’t a “sauce on the side” kind of culture.  I grew up eating biscuits and gravy on Saturday mornings as a rare treat.  It was by far my favorite comfort food growing up and remains so to this day.  Matt even prefers rolls to biscuits.  I’m the opposite.  Opposites really do attract.  So I suppose it was a natural progression to eventually combine two lovely opposites – spicy Indian sauced dishes and Southern biscuits and gravy.

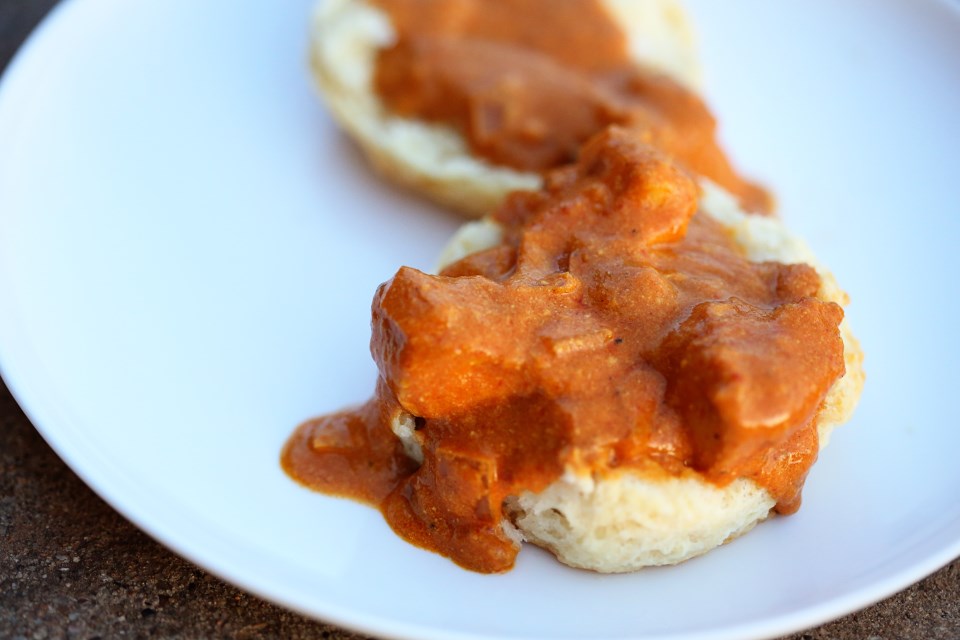
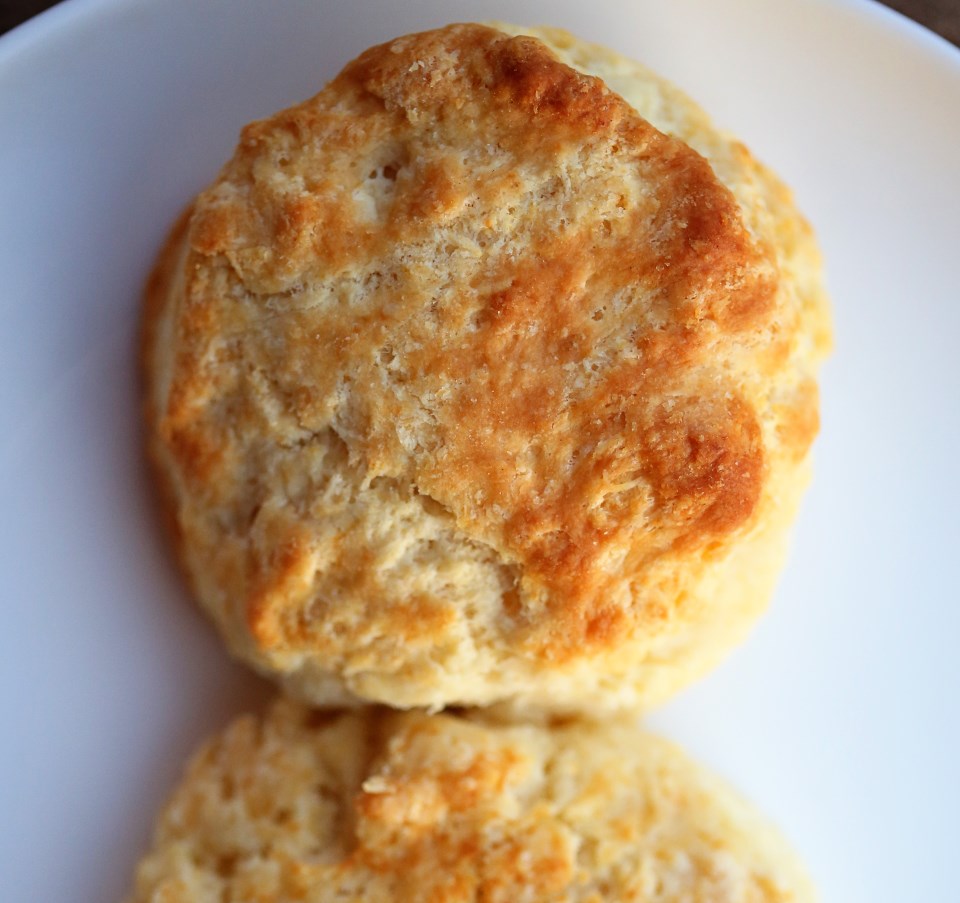
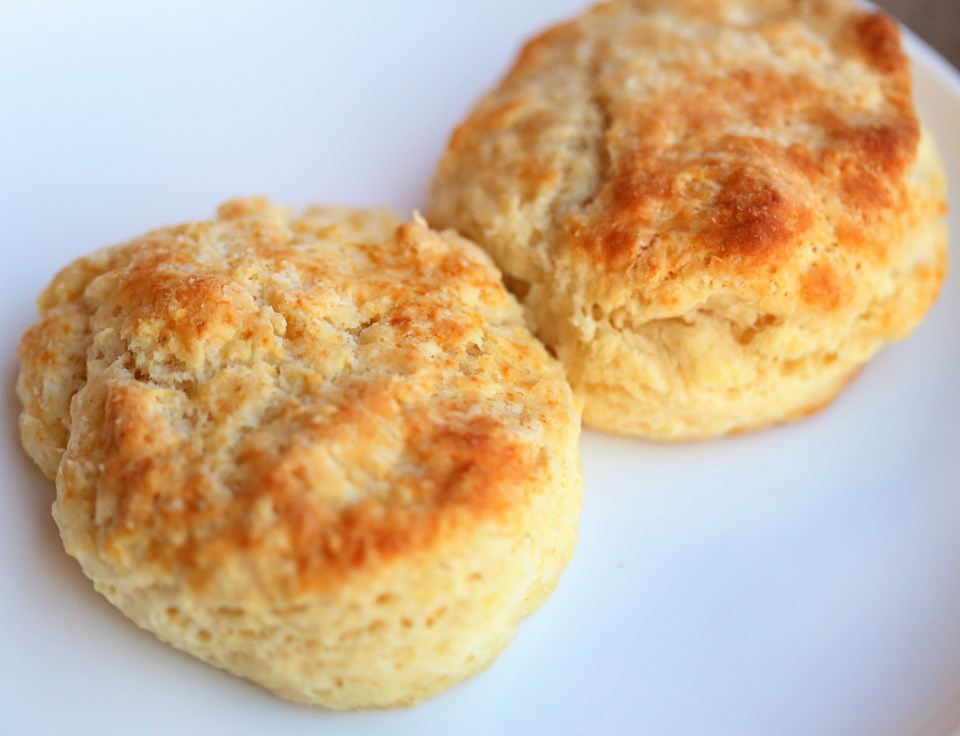
This dish was a fabulous invention.  Won’t even pretend to be humble about it.  I made a crockpot full of chicken tikka masala a couple weeks ago and I thought, instead of the traditional naan flatbread, I would serve it over buttermilk biscuits for a collision of India meets West Texas.  It worked.  Really well.  The crispy, fluffy, buttery biscuit was the perfect little sponge for the spicy, sweet curry.  The biscuit recipe was from one of our favorite cookbooks, Fire in My Belly.  The recipe calls to grate frozen butter into the flour to create the most even distribution of butter I’ve ever seen!  What a great technique! The crockpot recipe was wonderful, too, but I’m excited to try my friend, Katrina’s recipe, as it’s on a stained recipe card and comes by way of her Indian friend.  You know that’s got to be good. Next time, I will.  And I’ll definitely serve it with a side of biscuits 🙂
Biscuits
Buttermilk Biscuits*
makes two dozen

4 cups (20 oz) AP flour
3 TBS (1 1/4 oz) baking powder
2 TBS (3/4 oz) sugar
1 TBS+2 tsp (1/2 oz) salt
14 TBS (7 oz) butter, frozen
2 cups (14 oz) buttermilk

Preheat oven to 400F. In a large bowl, whisk together the flour, baking powder, sugar and salt.  Using a box grater, grate the frozen butter into the flour mixture, tossing after each quarter stick of butter to coat the butter shards with flour.  Toss to combine.  Stir in 1 3/4 cups of the buttermilk and, using large strokes and stirring from the bottom up, stir just enough to combine the mixture into a crumbly mass.  If the dough doesn’t come together, stir in more buttermilk a tablespoon at a time, just until the mixture barely holds together.

Dust a clean, flat work surface with flour.  Scrape the dough onto the floured surface, gather into a ball and gently knead with the palms of your hands about 10 times, just enough to form a cohesive dough ball.  Sprinkle a little more flour onto the dough and gently roll or pat into an even 3/4 inch thickness.

Dip a 2 1/2 inch round biscuit butter in flour and punch out the biscuits.  Gather any remaining dough, knead a few times to form a cohesive ball and roll or pat the dough into an even 3/4 inch thickness.  Repeat until all used up.

Place the biscuits on a baking sheet, close enough so the edges just touch.  Bake until the biscuits start to brown – they should be a rich golden brown, about 20 minutes.  Let the biscuits rest 5 minutes before serving.

*from Kevin Gilespie’s book, Fire in My Belly
Homemade Biscuits

Crockpot Chicken Tikka Masala*
serves 4

1 pound boneless skinless chicken breast, cut into bite size chunks
1/2 onion, finely minced
2 tablespoons butter
3 cloves garlic, minced
1 tablespoon freshly grated ginger
2 teaspoons curry powder
2 teaspoons curry paste ( I used Thai Red Curry Paste)
2 tablespoons ground garam masala
1 teaspoon turmeric
1/4 teaspoon cayenne pepper (you can add as much as you want but my kiddo was sharing so I kept the heat down)
1/4 teaspoon salt
1 (6 ounce) can tomato paste
1 (14 ounce) can lite coconut milk
1/2 cup plain Greek yogurt
1/4 cup half and half

In a large glass measuring cup or bowl mix together the coconut milk, Greek yogurt and half and half. Stir in the tomato paste, garlic, ginger and all the spices. Mix well.

Spray the inside of your crockpot bowl with cooking spray or grease with olive oil. Sprinkle the onion over the bottom of the crockpot bowl. Add the chicken and then pour the coconut milk mixture over the chicken so the chicken is completely covered. Add the butter and place the lid on the crockpot. Cook on high for 4 hours or on low for 6 to 8 hours. I like to stir mine once or twice during cooking, but it is not necessary. When ready to serve, taste and season with salt and pepper if desired. Serve over homemade biscuits 🙂

*adapted from Half Baked Harvest

Advertisement

Soft-Scrambled Eggs

Soft Scrambled Eggs

Everyone wants to be known for something.  We all strive to be important in some way and to matter to more than just ourselves.  Some of us get little snippets of fame from the jobs we do or the opinions we have or maybe from how cute our red-headed children happen to be.  Most of this attention is fleeting – it can last a day, an online minute or maybe as much as a year before the new wears off.  A good friend once put it so well, regarding our need for others’ acceptance: “You’re only as good as your last performance.”  This is a shockingly true statement that I would venture most of us, at one time or another in our lives, have felt.

Over the last year, I’ve worked through the book, The Divine Conspiracy.  It has flipped my world upside down.  Or maybe, finally, right-side up.  I’d recommend it to anyone searching for something they can’t quite put their finger on. One of the main points early on in the book is that we have this need to matter and to be unique and special because we were specifically designed to be that way.  We were designed by an infinitely unique and powerful creator who made us to be just like Him.  So, it’s not bad to strive to be noticed.  It’s just futile to strive for the approval of our peers – of anyone but the One who created us to be His unique treasures in the first place.  And as we all know, most of our days are spent in search of approval, recognition or acceptance from people online.  People we never see and from a strange sea of online crowds who are simply going about their day trying to be noticed, too.  It’s futile.  At times, I want to unplug from it all and just be important to my family and my very small circle of friends with whom I physically see on a regular basis.  It would be so much simpler to be special and to matter to just 20 people instead of trying to impress 200.

How on earth is this post going to be about scrambled eggs?!  Well, through my first year as a new mother, I really picked up the baton of cooking for my family.  I have embraced it with the foreknowledge that the recipes I cook now will be the stories and the comfort food Olive talks about when she’s in college, missing home cooked meals.  This is how I have come to matter (in my eyes) to my world.  I cook.  I provide food for Matt and Olive and occasionally friends and when I am lucky, family as well.  I usually cook new things, new recipes, Pinterest inspirations, but there are a few dishes that I can make whether I’m sleepy or not, paying attention to measurements or holding a kid on my hip.  Soft scrambled eggs is one of these recipes.  They are actually more of a skill than you might think.  But with a little extra effort and attention, these eggs will blow your mind.  We’ve all had the over-cooked rubbery eggs on breakfast buffets the world over.  These, by contrast, are super creamy, soft, flavorful (not sulfury) and are mind-blowing on top of a piece of buttered toast.  It’s the ultimate comfort breakfast food.  I have had people remark about these eggs like, “What on earth did you put in these?!  Cheese?  Cream?”  Nope.  Salt and Pepper!  And a tablespoon of butter.  That’s it.

I’ll be really detailed in the recipe so that you, too, can learn to do these right.  They just require a little more whisking and a little less heat than you’re probably used to. I hope they become part of your weekly recipe repertoire and I hope that you really enjoy at least one recipe you make on a regular basis.  It could be chocolate chip cookies or banana pancakes or even a simple roasted chicken.  But if you find something that you enjoy doing and you do it enough times to do it well, you will be an instant local-celebrity in the eyes of the people sitting around your table. And that, for me, is becoming more than enough. It’s good to matter to at least a few people in this life and I can think of no more worthwhile group of people than family.

Soft Scrambled Eggs with Pesto

Soft Scrambled Eggs
4 eggs serves two people

4 large eggs
about a teaspoon of kosher salt
fresh cracked pepper
1 tbs of unsalted butter.  If you use a butter substitute, I can’t help you

First, get your butter in a medium saucepan (like a good pan for soup) and turn on the heat to 3 or 4.  Seems low, but this is one of the tricks.  My stove’s lucky number is 4.  Yours might be hotter so adjust as you see fit.

While the butter is melting, crack the eggs into a big measuring cup and season with the salt and pepper like this:
seasoned eggs

Then, whisk whisk whisk until they are forming bubbles.  Like this:
well beaten eggs

By this point, your butter should nearly be on its way to getting frothy in the hot pan.  Pour in your eggs and start whisking.  I use a flat whisk (you can kinda see it in the pic) and it’s so excellent for getting into the edges of the pan.  Whisk almost constantly, occasionally lifting the pan away from the heat and scraping the bottom and sides of the pan, fully incorporating the eggs as they cook so that you maintain a very small curd, like cottage cheese sized bits of egg.  Continue doing this; on the heat, off the heat, on the heat, off the heat, until your eggs are nearly looking done, and more on the side of creamy, but no traces of whites remain.  Your eggs will look underdone to you if you’ve never done this method before.  But trust me, if the whites are all gone and you have a super creamy consistency, you are ready to eat.  Get the eggs out of the pan immediately into a bowl and serve at once.  This morning I put some leftover pesto, which became my own green eggs and ham and it was a breakfast fit for a king.  Or a toddler. 🙂

The pesto WILL be a future blog post.  It’s the best I’ve ever had and it came from an Italian grandmother so you know it has to be legit.

soft scrambled eggs and pesto in a homemade tortilla

Dark Chocolate Chip-Pecan Pancakes

Chocolate Chocolate Chip Pancake stack

I opened up this recipe this week with the intention of pinning it to my Pinterest recipe board.  Then I went to my recipe board and discovered that I’d pinned this exact recipe four times over the last 2 years.  My subconscious must really want these pancakes.  I decided, no more pining for a pin!  I made these bad boys this morning for breakfast, right when the clouds rolled in and it started raining.  We enjoyed the rest of our coffee on the front porch while watching the rain and I’d be lying if I said it wasn’t the perfect way to spend the morning.

These pancakes are intense, rich, but not too sweet.  I accidentally left out the melted butter from the batter (believe me that I would never do that intentionally) and they turned out just fine!   Matt had pancake syrup on his and I had creme fraiche sweetened with a bit of honey on mine and I will proudly say that my way was the best.  But his way photographed better 🙂 Whatever you decide to put on top of these pancakes, be it whipped cream, syrup, powdered sugar, yogurt, it’s going to be the right decision.  The baby girl loved them, too and called them “panpays”, which was nearly the cutest thing I’d heard all week.

Enjoy your weekend!  Hope you find time to make these desert-like pancakes at some point!

Chocolate Chocolate Chip Pancakes

Chocolate Pecan Pancakes*
makes about 10 pancakes

  • 1 cup all-purpose flour
  • 1/3 cup granulated sugar
  • 1/3 cup Dutch-process cocoa powder
  • 1 1/2 teaspoons baking powder
  • 1/4 teaspoon salt
  • 1 cup milk
  • 1 large egg
  • 4 tablespoons unsalted butter, melted
  • 1 teaspoon vanilla extract
  • 1/2 cup mini chocolate chips
  • 1/4 cup chopped pecans
  • 4 tablespoons vegetable oilPreheat oven to 225 degrees. In a large mixing bowl, whisk together flour, granulated sugar, cocoa, baking powder, and salt. In another bowl, whisk together milk, egg, melted butter, and vanilla; pour over flour mixture, whisking to combine. Fold in chocolate chips and pecans; let batter stand until slightly thickened, 5 to 10 minutes.

    In a large nonstick skillet, heat 1 tablespoon oil over medium heat until a water droplet sizzles; swirl to coat bottom of pan with oil. Reduce heat to medium-low. Spoon four small mounds (1 heaping tablespoon each) of batter into skillet. Cook until bubbles appear in center, 3 to 4 minutes. With a thin spatula, flip pancakes; continue cooking until set, 3 to 4 minutes more.

    Transfer to a baking sheet; cover loosely with foil; place in oven to keep warm. Repeat with remaining oil and batter in three more batches (adjust heat as necessary to avoid overbrowning).

    Stack ’em up and enjoy, topped with anything you’d like!

*recipe adapted from Martha Stewart Living

Stack of Chocolate Pancakes

Brown Butter Almond Brittle Ice Cream

almond brittle ice cream002

I promise you that this is the best ice cream you will ever make at home.  We stumbled on Jeni’s Splendid Ice Creams at Home a couple years ago and I believe the first recipes I made from this book were the Kona Stout  and the Roasted Strawberry and Buttermilk for Matt’s company picnic.  Both flavors got such rave reviews, that when I went to buy this book for my friend, Anna’s birthday, a week later, Barnes and Noble told us that they’d recently sold the rest of their copies – all to Matt’s co-workers, it turned out 🙂  I think the way Jeni makes ice cream is a revelation.  She combines a bit of cornstarch into the base and then adds just one and a half ounces of cream cheese per quart recipe, and the texture and consistency turns out amazing.  Perfectly creamy, freezes well, and her flavors are never too sweet – always a perfect balance.  The recipes in this book range from really unique (gouda and vodka plumped cranberries) to traditional (vanilla bean) to genius (sweet potato with torched marshmallows – gotta try this one, next).

Summer time is the perfect time to buy this book and try out a new recipe at each and every opportunity you get.  Our little ice cream maker will get a work out during these hot months to come!  But we have faith that it feels it is finally getting to do what it was created to do, thanks to Jeni’s Splendid ice creams and our not-so-splendid hundred degree days!

This week, I made three flavors out of this book:  Brown Butter Almond Brittle, Roasted Pistachio and Bourbon Butter Pecan.  All amazing.  The Almond Brittle was the most requested at our church get-together last night, and the most consumed (although I adore the pistachio), so I’ve written out the recipe for you here today.  It calls for almost a pound of butter.  ACTUALLY you only use a tablespoon of that pound of butter.  The solids that settle to the bottom of the pan after you brown butter is what gets mixed into the base and it creates a divinely nutty, roasted flavor in the ice cream base.  Yet another way brown butter makes the world a better place.

almond brittle ice cream004

Brown Butter Almond Brittle Ice Cream*
makes about 1 quart

for the base:
2 cups whole milk
1 tablespoon plus 1 teaspoon cornstarch
1.5 oz (3 tbs) softened cream cheese
1/8 tsp fine sea salt (I use kosher)
3/4 lb unsalted butter
1 1/4 cups heavy cream
2/3 cup sugar
2 tbs light corn syrup

1 cup crushed Almond Brittle (recipe below)

Mix about 2 tbs of the milk with the cornstarch in a small bowl to make a smooth slurry.  Whisk the cream cheese and salt in a large bowl until smooth.  Fill a large bowl with ice and water.

Melt the butter over medium heat in a 4 quart saucepan.  Bring to a boil and let bubble until the foam starts to subside and the butter is a rich dark brown (not black!).  Remove from the heat and let stand until the butter solids settle to the bottom of the pan, about 5 minutes.

Pour the clear butter oil into a storage container (once it solidifies you can use it as you normally would for cooking so it’s not a waste!) As you get closer to the butter solids in the bottom of the pan, use a teaspoon to remove as much liquid butter as you can.  You should have about 1 tablespoon of brown butter solids and a little bit of melted fat in the bottom of the pan (it’s impossible to remove all the fat).

Add the remaining milk, cream, sugar and corn syrup to the butter solids, bring to a rolling boil over medium-high heat and boil for 4 minutes.  Remove from the heat and gradually whisk in the cornstarch slurry (you’ll need to stir it up again as it will settle and solidify some).  Bring the mixture back to a boil over medium high heat and cook, stirring with a heatproof spatula or whisk, until slightly thickened, about 1 minute.  Remove from the heat.

Gradually whisk the hot milk mixture into the cream cheese mixture until smooth.  Pour the mixture into a 1 gallon Ziploc freezer bag and submerge the sealed bag in the ice bath.  Let stand, adding more ice as necessary, until cold, about 30 minutes.

Pour the ice cream base into the frozen canister of your ice cream maker and spin until thick and creamy.  Pack the ice cream into a storage container, folding in the chopped almond brittle as you go.  Press a sheet of parchment directly against the surface of the ice cream (this is important to avoid freezer burn and maintain a good consistency) and seal with an airtight lid.  Freeze until firm, at least 4 hours.

Almond Brittle*
makes about 2 cups

1 cup sugar
1/2 cup light corn syrup
1/4 cup water
3/4 teaspoon salt
1 stick of unsalted butter, cut into 1 inch pieces
2 cups slivered almonds
1/2 teaspoon baking soda

Generously oil a large baking sheet.

Combine the sugar, corn syrup, water, and salt in a 4 quart saucepan and bring to a boil over medium-high heat, stirring to dissolve the sugar. Insert a candy thermometer in the pan, add the butter, and bring back to a boil, then cook until the mixture reaches 300F.  Remove from the heat and immediately stir in the almonds and then the baking soda, working quickly but combining them thoroughly.

Pour the mixture out onto the oiled baking sheet, spreading it to a 1/4 inch thick layer.  Allow to cool completely before smashing to bits. 🙂

*recipes taken nearly word for word from Jeni’s book.

almond brittle ice cream005

Champagne Mangoes and a Glorious Mango Curd

mango curd macaron dish

When we were in Mexico City last year with our friends, Cali and Alex, we were introduced to the ultimate mango.  Small, lemon yellow and sweeter than a peach.  Cali showed us that there was a specific mango fork that you need to peel it properly, and then she went on to show the proper way to peel and dice up these golden nuggets of wonder. She is my unofficial mango-expert.  I will forever associate her with this wonderful fruit and every time I peel one, I always think, “Is this how Cali would do it?”   I had never experienced a mango like the ones in Mexico, before, and when we got back home, I was on the look out.  I was so excited to see one that looked very similar at the grocery store called Champagne mangoes, and the next time Cali came over, I had her confirm its validity.  We had a winner!  So now, whenever I see that they are in abundance at the store, I get a half dozen.  The last time I did, I let them go too long before eating them, and faced the fear of letting them go bad.

So, I decided that I wanted to make a mango curd.  I looked up a recipe and it called for 15 ounces of mango and that’s exactly how much I had.  The recipe turned out so well, I filled macarons with it and also filled citrus cupcakes with the curd and topped them in coconut cream cheese frosting.  Epic win for the cupcakes, epic fail on the macarons.  The macarons tasted great, but the cookie itself didn’t turn out very well.  They all went hollow!  I have made macaron cookies before and the best I can describe them is that they are the croissant of cookies.  Every batch is different, every recipe is different and their success depends on so many factors, it’s a little maddening. The quality of the ingredients, the humidity in your kitchen, the exact temp of your oven, etc, etc, etc.  I surprised myself and didn’t FREAK OUT when the first batch of cookies EXPLODED, the second batch was pretty perfect, and the third batch baked like the first.  A true testament to how baking is a fickle beast.  They at least looked pretty:

mango curd macarons

The cupcakes, on the other hand, were a no-brainer.  I took a basic yellow cake recipe and added in Fiori di Sicilia, then made a cream cheese frosting, added a bit of coconut extract and topped each with toasted coconut after filling the cupcakes with the mango curd.  Such a wonderful combination, that I wanted to share those recipes with you, today, but mainly, this mango curd is the winner.  A week later, I still had some in a jar so they were put on some buttermilk pancakes this morning with fresh blueberries and slices of Champagne mangoes, of course.

mango curd cupcakes

mango cupcakes

Champagne Mango Curd*

Makes 1 to 1.5 cups

15-ounces ripe mango, peeled, pitted, cut into 1/2-inch pieces (It took 5 Champagne mangoes)
1/3 cup sugar
3 tablespoons fresh lime juice
Pinch of salt
4 large egg yolks
1/4 cup (1/2 stick) unsalted butter, cut into small pieces

Puree mango, sugar, lime juice and salt in processor, scraping down sides of work bowl occasionally. Add yolks; puree 15 seconds longer. Strain through sieve set over large metal bowl, pressing on solids with back of spatula to release as much puree as possible. Discard solids in sieve.

Set metal bowl over saucepan of simmering water (do not allow bottom of bowl to touch water); whisk puree until thickened and thermometer registers 170°F., about 10 minutes. Remove from over water. Whisk in butter 1 piece at a time. Cover and refrigerate overnight.

*taken from Smitten Kitchen, who took it from Bon Appetit

Citrus Cupcakes*

1 stick unsalted butter, softened
2 cups all-purpose flour
1 tablespoon baking powder
1/2 teaspoon fine salt
1 1/2 cups granulated sugar
3 large eggs, room temperature
1 cup whole milk
1 teaspoon Fiori di Sicilia, or 1/2 tsp orange extract + 1/2 tsp vanilla

Preheat oven to 350 degrees. Butter and flour 12-16 muffin tins, or just line with cupcake liners and spray those with non-stick spray.  Whisk together flour, baking powder, and salt. Beat together butter and granulated sugar with a mixer on medium speed until combined, 1 to 2 minutes. Add eggs and beat well, scraping down sides of bowl as necessary. Reduce speed to low and gradually add flour mixture, beating until combined. Add milk and extracts and beat until just combined.
Divide batter among cups; smooth tops with an offset spatula. Bake until golden and a toothpick inserted into centers comes out clean, 25-30 minutes. Let cakes cool in pans on wire racks 15 minutes. Turn out cakes onto racks to cool completely before filling.

*adapted from Martha Stewart Living

Coconut Frosting*

1 stick unsalted butter, softened
4 ounces cream cheese, room temperature
5 cups confectioner’s sugar
1/4 teaspoon fine salt
1/4 cup whole milk
1/2 teaspoon pure vanilla extract
1/4 tsp coconut extract

1/2 cup coconut, toasted, for topping cupcakes

Beat together butter and cream cheese with a mixer on medium-high speed until pale and creamy, about 1 minute. Reduce speed to medium. Add confectioner’s sugar, 1 cup at a time, beating well after each addition. Add salt, milk, and vanilla, coconut extract and beat until fluffy, about 3 minutes. If not using immediately, cover surface of frosting with plastic wrap. Frosting can be refrigerated in an airtight container up to 1 week. Before using, bring to room temperature, then beat on low speed until smooth.

*adapted from Martha Stewart Living

To Assemble:

I used the large tip from my piping bag to cut out the centers of my cupcakes and I really went pretty much to the bottom of each cupcake with the cut.  The curd is pretty runny out of the piping bag, so I had to hold it up in the air between fillings.  I inserted the tip of the piping bag and slowly squeezed until the sides of the cupcake bulged a bit.  I like filling.  Then, I just smoothed the frosting on top of each cupcake and sprinkled with toasted coconut.

mango cupcake with coconut frosting

Potatoes Gratin

food-12

This is such a beautifully simple dish.  It’s also quite rich and begs that you throw away your fear of dairy, potatoes and butter and embrace how amazing those ingredients, in combination, can truly be.  This is not the potatoes gratin you are used to where rather thick slices of potato are all stacked on top of each other in a huge dish, covered in cheese.  This recipe actually has no cheese.  I know I’d had the dehydrated versions of potatoes gratin out of the box, and possibly something similar at a buffet, but I’d never tried making it myself until we read the book, Must Have Been Something I Ate, by Jeffrey Steingarten. (This book will change you.)

The section of his book that this recipe comes from is entitled “There is a God in Heaven”, (I love a person as emphatic about food as I am)  with the quote beneath the section headline, “But as luck would have it, there is a God in Heaven.  Medical researchers now know that not all saturated fats are the same, and that cocoa butter does not raise our cholesterol.”  And in that section is an entire chapter dedicated to Gratin Dauphinois (the French created this dish, of course), or Potatoes Gratin.  Gratin, coming from the word “gratter”, meaning, “to scrape”  referring to the crispy bits of cream that get glued to the sides of the pan and scrape off and crunch so amazingly well.  Say no more.

We have eaten this dish as a meal, before, but it goes best as an accompaniment to a really great steak and a really fresh salad or other light side.  Also, don’t make the mistake of serving a rich dessert  after eating these potatoes.  I’m all for indulgence and you will never, ever find me saying that you should avoid entire food groups or ingredients altogether (bring on the corn, cheese, gluten, you name the poison) but I am also not dumb enough to serve a rich dessert after a dish this heavy.  You’d sink all the way to the bottom of the playa lake.  Everything in balance!

food-15

Potatoes Gratin*
serves 6-8 as a side

4 tbs butter, softened to room temp
1 cup whole milk
1 large garlic clove, peeled and lightly crushed
1/2 tsp freshly ground pepper
3/4 tsp salt
1/8 tsp freshly ground nutmeg
1.5 lbs baking potatoes
1.5 cups heavy cream

Preheat your oven to 425F. Place the milk, garlic clove, pepper, salt and nutmeg in a small saucepan, stir, bring to a boil and then remove from the heat.
Meanwhile, liberally butter the bottom and sides of a 9×13″ baking dish, using about half the butter.  Peel the potatoes, rinse them, and pat them dry.  Then, slice them 1/8th of an inch thick, discarding the smallest slices (This is easier with a mandoline) The cooking times really depend on this thickness, so don’t go too much thicker.  Under no circumstances should you wash the potatoes after they have been sliced — the surface starch is absolutely indispensable.

Evenly arrange the potatoes in the buttered dish in ONE LAYER of overlapping slices.  You will undoubtedly have some slices left over.  Don’t try to cram them in.  Bring the milk to a boil again and pour it over the potatoes, removing the garlic.  Cover the pan with a sheet of foil and bake in the middle of the oven for about 15 minutes, until most of the milk has been absorbed.  Meanwhile, bring the cream to a boil and remove from heat.  When the potatoes are ready, remove and discard the foil.  Bring the cream back to a boil and pour it over the potatoes, dotting the surface with the remaining butter.

Bake, uncovered, for another 20 to 25 minutes, until the potatoes have turned golden brown, spotted with darker, crisp areas.  You may need to rotate the dish halfway through cooking to ensure an even browning. We love thyme leaves in this dish and will sprinkle some on when the dish is nearly done baking.  Let the gratin settle for 10 minutes.  Then eat immediately – taste and texture suffer with each passing minute.  Cut into 6 to 8 rectangles and serve with a wide, metal slotted spatula.

*most of the text taken directly from Jeffrey Steingarten’s book.  Go get it!

food-14

Creamy Rice with Peas and Asparagus

pea asparagus rice

There is a beautiful quarterly cookbook/magazine called Canal House cooking.  It is founded by two friends who meet together every day to talk about what they had for dinner the night before, and then they get cooking.  They decided to start writing down their recipes and what resulted was this beautiful magazine book.  I like to try recipes out that are in season, and so I am currently going through their Spring issue.  And even though there aren’t a  lot of fresh peas in our produce bins, I know that they are currently in season somewhere out there in lands where it rains, so I felt this was still an appropriate recipe for an overcast May day.  Asparagus is also in season, so I added some chopped up that I had roasted a few nights before and it was a really excellent addition.  Canal House calls this dish Risi E Bisi  (rice and peas) and it’s just that simple.

This is an excellent dish for little ones.  The comfort of soft rice and cheese and the addition of greens and a dab of butter makes this dish all-inclusive. For smaller, toothless ones, this would be so simple to pulse a few times with an immersion blender!  Olive still doesn’t like asparagus, but I think I’ve only given it to her 5 times.  I’m going to try at least 15 more times before I determine that she does not, in fact, love asparagus.  I challenge any  mom out there to do the same!  Case in point: I had nearly determined that Olive didn’t like peas until I hadn’t given them to her for a week or so, and then tried again and she gobbled them up.  I realized that familiarity equals good for a child.  So if you make a wide variety of vegetables simply familiar to a child, the enthusiasm will soon follow.  I believe this with all my heart, even on days where Olive spits out anything green.  One day she won’t, and I’ll be glad I didn’t let her under-developed, under-exposed palate determine her food preferences!

green rice

Creamy Rice with Peas and Asparagus
serves 6

2 tbs extra virgin olive oil
4 tbs butter
1 onion, finely chopped
2 cups fresh peas (you could also use frozen, as I did and it turned out great)
salt
6 cups hot chicken or vegetable stock
1 1/2 cups arborio rice, or other short grain rice.  I didn’t have any on hand, so I used plain long grain white and it was just fine.
1/2 cup freshly grated parmigiano-reggiano
pepper to taste
1 bunch asparagus, roasted at 400 with olive oil, salt and pepper until tender

Heat the olive oil and 2 tbs of the butter together in a heavy medium pot over medium heat.  Add the onions and cook until soft and golden, 5-10 minutes.  Add the peas and season with salt.  Cook for a minute or two, then add 1 cup of the hot stock.

Cover the pot, reduce the heat to medium-low, and simmer the peas until they begin to soften, about 5 minutes.

Stir in the rice and 4 cups of the remaining hot stock. Cover the pot and adjust the heat to maintain a gentle boil.  Cook the rice, stirring occasionally, until tender, about 20 minutes.

Remove the pot from the heat and moisten the rice and peas (if needed and too thick) with the remaining cup of stock (I didn’t do this step – my rice didn’t absorb as much as arborio would have) Stir in the remaining 2 tbs of butter and half of the cheese.  Fold in the chopped, roasted asparagus if you want.  Season with salt and pepper and serve sprinkled with remaining cheese.

Coconut Cream Cheese Pound Cake

ccc-1
This picture is of the cake resting on my toy kitchen that I had as a child.  Mom and I looked up pics of me and my cousin, Tracy, playing with this kitchen when I was three and she was five.  We were both wearing frilly dresses and prancing around the room with spoons in hand, creating recipes out of air and pretending it was delicious.  Ah, nostalgia 🙂 Doesn’t seem that long ago…
It’s funny how you can also be nostalgic about something that wasn’t even your personal memory.  My mom made this cake for my older brother and it was his favorite, but it became part of my food nostalgia anyway.  I think that’s another wonderful thing about food – others’ enjoyment of it can create memories for you, whether you took part or not.  I like remembering foods my brothers’ liked.  Matt loved cherry cheesecake, Chad was more of a savory guy and really had a thing for mustard.  I love both!  And I love that when I went home for a speedy trip this week to visit my mom, that we made this cake together and remembered good times.  Olive sat on the stove while Mom narrated my work to her as I made the cake.  Mom used to make it while I would sit on the counter and talk to her and now she plays with my daughter while I make it.  Life just doesn’t get sweeter than that.
ccc-2
Coconut Cream Cheese Pound Cake
1/2 cup butter
1/2 cup shortening
1 8-oz pkg. cream cheese
3 cups sugar
1 tsp coconut flavor
1/2 tsp. vanilla extract
6 eggs
3 cups flour
a pinch of salt
1/2 tsp baking powder
1 cup bakers coconut
Preheat oven to only 325 degrees.  Grease and flour a 10″ tube pan or bundt pan.  Cream butter, shortening and cream cheese together in a large bowl.  Gradually add the sugar, beating at medium speed until light and fluffy.  Stir in coconut flavoring and vanilla.  Add the eggs one at a time, beating well after each addition.  Combine the flour, salt and baking powder and add to batter.  Stir just until blended.  Fold in the coconut.  Pour the batter into a prepared tube pan or bundt pan.  Bake for 1 hour and 15 minutes, or until a tester inserted in the center comes out clean.  Cool in the pan on a wire rack for 10-15 minutes.  Remove cake from the pan and allow it to cool completely on a wire rack before cutting.
This cake is dense and rich.  Don’t worry too much about the sugar content.  It’s not an iced cake, anyway!  Just imagine the sugar you wouldn’t bat an eye at putting into the frosting of a regular cake and instead, put it into the batter 🙂 And if you haven’t gotten the hint that weekends are for feasting and not for guilt, I fear you never will!  Happy Eating!
ccc-3

The Battle of the Quiches

Quiche

My friend, Summer, hates quiche.  The very word gives her mock dry heaves.  We’ve all had a traumatic experience with some kind of food; whether it be an ingredient (dill for me, pomegranate juice for Matt) or an entire meal ruined by getting sick later in the evening, it’s hard to come back to good terms with the food after the trauma.  I’m not sure why Summer hates quiche, but according to her, the description she gives is of a “rubbery filling, soggy crust, gross texture” and what comes to mind, for me, is the mini-quiches you find at baby showers the world over, or the frozen pie-sized quiches that could double as semi-wet Frisbees.  Either way, it’s not a huge shock that a lot of people have a bad connotation when they hear the word.

Thomas Keller is here to save the day, once again.

He sees the problem with the American version/view of quiche, as well:

“Why didn’t the French quiche ever really translate to America? American culinary culture embraced it, then trashed it without ever knowing what it was…I think it was a mechanical problem, not having the right tool–a ring mold about two inches high.  When the modern quiche took off here in the 1970s, that wasn’t widely available.  Instead, a pie pan was commonly substituted for the two-inch ring mold.  And then came the premade pie shell.  Who would want to eat quiche made in that? A quiche has to have a specific thickness or you cannot cook it properly: It must be two inches high, in a crust thick enough to remain crisp, and not become soggy, during cooking.  Custard in a pie shell invariably overcooks (if you cooked it slowly enough, the crust would become soggy).” — Thomas Keller, Bouchon Cookbook, page 86

We’ve made Keller’s quiche several times.  The foundation is a good crust and so we go back to the crust I will rely on for the rest of my life – the same crust used in my strawberry pie a few posts ago.  It’s perfect, it flakes, it is sturdy without being tough, and it tastes like butter because that’s the only fat used.  Why look elsewhere?  The key is to completely bake the crust first, with plenty of overhang so that it doesn’t shrink while baking.  And I’m sorry you’ll have to buy a special tool to make it, but a 2 inch ring mold is necessary.  Not expensive and if you want to really make this recipe correctly, you need one.

We decided for this post, that we’d compare a store-bought quiche with Keller’s quiche.  I didn’t buy the most disgusting one I could find, either.  I actually bought probably the best a grocery store has to offer.  An in-house made quiche Florentine (bacon/cheese) baked in a pre-made pie shell (assuming.)  It was set in a metal pie tin with holes poked all in the bottom.  I appreciated that effort, because at least someone is acknowledging that quiche shells go soggy.  Didn’t quite work, though.  Here they are, back to back:

Battle of the Quiches

Store bought on the left, Keller on the right.
You can’t tell much, texture-wise, so I’ll tell you.  And again, I’m fairly impressed with the grocery store made quiche.  It’s about as good as a pre-made, American pie version gets.  However, the crust was really wet and soggy on the bottom. Couldn’t exactly pick it up without it sagging, whereas the Keller quiche’s crust is very crispy and fully cooked on the bottom (you can tell by the color and how it even stands away from the plate a bit.)  The Keller quiche has almost a half inch more custard and the store bought quiche’s crust tasted like sand.  Honestly.  Sand held together by water.  It really wasn’t good.  Now, the store-bought quiche’s filling was fine, taste-wise.  It had bacon – how can that not be at least decent?  (I could imagine a frozen mini-version would find a way) but anyway, it was a good effort, but the crust was awful and it was wet, just like you don’t want it to be.  It also had that over cooked texture – kind of rubbery- that eggs get if cooked too long.  I swear to you, I am not making this up, after a few days and microwaving the leftover Keller quiche, it STILL had a smooth, silky, custard-like texture.  Almost creme brulee texture.  It’s so darn good.

Fun experiment and I would say that if you’re interested in doing something for the sake of the experiment and doing things properly, buy yourself a ring mold and get after it.  And remember – a Keller quiche takes two days.  So if this is for Sunday brunch, start it on Saturday afternoon.

Roquefort and Leek Quiche

I also want to add, for the sake of The Family Meal, that Olive ate on both quiches with  much enthusiasm.  Yes, even those big chunks of Roquefort.  She leaned forward and said, “mmmmm!” to both.  Eggs are awesome.  Oh, and she also said, “Quiche” perfectly.  I think because “quiche” sounds like her version of the word “cheese”.  Whatever works, Ollie.

For the crust:

2 cups AP flour, plus extra for rolling out
1 tsp kosher salt
8 ounces chilled, unsalted butter, cut into 1/4″ pieces
1/4 cup ice water

Place 1 cup of the flour and the salt in the bowl of a heavy-duty mixer fitted with a paddle attachment.  Turn the mixer to low and add the butter a small handful at a time.  When all the butter has been added, increase the speed to medium and mix until the butter is completely blended with the flour.  Reduce the speed, add the remaining flour, and mix just to combine.  Add the water and mix until incorporated.  The dough will come around the paddle and should feel smooth, not sticky, to the touch.
Remove the dough from the mixer and check to be certain that there are no visible pieces of butter remaining.  Pat the dough into a 7-8″ disk and wrap in plastic wrap.  Refrigerate for at least 1 hour, up to a day.

Lightly brush the inside of a 9×2″ ring mold with canola oil (or cooking spray works) and place it on a parchment-lined baking sheet.
Place the dough on a floured work space and rub all sides with flour.  Roll out the dough into about a 14″ diameter circle.  Lift the dough into the ring, centering it carefully and pressing it gently against the sides and bottom edges of the ring.  Trim any dough that extends more than an inch outside the ring.  Carefully check for crack in your dough and patch any cracks with your trimmed dough (I DIDN’T DO THIS AND OUR QUICHE LEAKED ALL OVER THE PLACE)
Refrigerate your dough for 10 minutes to resolidify your butter (if you don’t do this, the butter will drain out of your dough as it bakes.  Done it; learn from my mistakes)
Line the bottom of your crust with parchment and fill with pie weights (our pie weights are dry beans – a whole pound of them.  We just keep them for use in pies).  Bake shell in a preheated 375F oven for 35-45 minutes, or until the edges of the dough are lightly browned.  Carefully remove the parchment and the weights.  Check the dough for cracks and patch with reserved dough trimmings (DO THIS STEP) Return the shell to the oven for another 15-20 minutes, or until the bottom is rich golden brown.  Remove from oven and let the shell cool completely on the baking sheet.

Basic Quiche Batter

2 cups milk
2 cups heavy cream
6 large eggs
1 tbs kosher salt
1/4 tsp ground pepper
A few gratings of fresh nutmeg, or 1/8 tsp of ground nutmeg

Combine the milk and cream in a large saucepan over medium heat and heat until a skin begins to form on the surface of the milk.  Remove from the heat and let cool for 15 minutes before continuing.  If you have an immersion blender, add the rest of your ingredients to the saucepan and blend for about a minute to fully aerate the batter and make it light and foamy.  Pour the batter into your quiche shell (which is still on your lined, rimmed baking sheet – this thing inevitably will leak a tish.)
At this point, if you’d like to add ingredients, go for it.  Be creative.  We did his blue cheese and leek version and it was awesome.  You simply add these ingredients (about a cup of each ingredient, chopped fine and cooked properly) to the quiche batter as you’re pouring it into the shell.  Try crumbled, cooked bacon and cheddar cheese, or caramelized onion and grated swiss.  The options are endless.
Bake for 1 1/2 to 1 3/4 hours, or until the top of the quiche is browned and the custard is set when the pan is jiggled.  Remove and let cool to room temp on a cooling rack.  Refrigerate until chilled, at least one day, up to 3 days.  Once the quiche is thoroughly chilled, scrape away the excess crust from the top edge of the quiche.  Set the quiche down and carefully lift off the ring.  Preheat the oven to 375F.  Line a baking sheet with parchment.  Using a serrated knife, carefully cut the quiche into 8 pieces.  Place the pieces on a baking sheet and reheat for 15 minutes, or until hot throughout.  Serve immediately.

Quiche shell