Thai Tea Pie – Happy Pi Day!

Pie Tea
Have you ever had Thai Tea?  That smokey, campfire, roasted marshmallow tasting tea at Thai restaurants that they pour a luscious amount of heavy cream over top and it slowly drizzles down into the tea, creating a creamsicle effect?  It’s amazing.  It’s odd.  It’s unique and it’s unforgettable.  We had the epiphany the other day while we were at one of our favorite Thai places in town and they had Thai Tea cupcakes on display at the counter.  We had to try one, of course, and as we were eating, Matt said, “If this was a pie, it would be Pie Tea.”  I love a good pun and I loved the idea even more.  I knew it would work!  So today, on Pi Day, I tried it!  I simply substituted the sugar called for in a basic custard pie filling with Thai Tea mix and poured it into my favorite pie crust and baked it for an hour!  It was amazing!  Topped with fresh whipped cream to mimic the heavy cream poured on top of the traditional drink, this has become a new favorite creation.

I hope you venture out to your local Asian market and pick up a mix and try it out for yourself.  It’s super easy and really unique!  I’d say the taste isn’t exactly as campfire as I’d hoped, and it’s a bit watery (not sure why – I bet there’s very little troubleshooting online for using a tea mix in your pie) but it’s definitely got the burnt caramel/cream effect and of course, the crust holds up.    🙂

Happy Pi Day!

Thai Tea Pie Tea


Thai Tea Pie

1 unbaked pie crust
4 eggs
1 cup Thai Tea mix
1 tsp vanilla extract
1/4 tsp kosher salt
2 cups whole milk
1 egg white for brushing the crust

Preheat the oven to 400F.  Roll out your pie crust and fit into a deep dish pie plate (you’ll have a little leftover if you use my recipe).  Mix all the ingredients together and whip until well blended.  Pour into the pie shell and place pie plate on a rimmed baking sheet.  Bake for 50 minutes to a little over an hour.  It’ll puff up a bit and then it will settle once it cools.  Top with whipped cream and enjoy yourself!


Advertisement

S’mores Pie

S'mores Pie

I had a wonderful Thanksgiving and I hope you did, too!  I got to spend it with my whole family!  Both my brothers came down with their children and with them and my parents, there were 16 of us bedding down in our old childhood home! I got to see my grandmother and my sweet Aunt Mary, too!  I really don’t think I’ve seen that much family in one weekend in several years. It was good for the soul and I don’t feel like I even overate as much as I usually do, which enabled me to enjoy the heck out of this pie I created on Friday night.

S’mores pie!  When we showed Olive s’mores for the first time this summer, we made them with dark chocolate.  I loved the balance the dark chocolate gave to the super sweet marshmallow and graham cracker.  So when thinking of a pie to make for Thanksgiving, I thought of doing the darkest chocolate pie I knew how to do and topping it with my favorite meringue and then torch the heck out of the top.

Best.  Chocolate Pie. Ever.

Seriously, if you want to win some kind of chocolate pie award, this is your pie.  Make it with a traditional crust and serve it with soft whipped cream and that is all you’ll need for ultimate bragging rights.  I nearly skipped out on the meringue, but I wanted that dramatic torched effect so I went with it.  I think if I were to do this pie over, I would give it more s’moresy flavor by just dumping a bunch of marshmallows on top and burning them to a crisp.  Because I’m that s’mores gal – the one who likes to eat slightly sweet bits of char instead of marshmallows.  I’d say most people aren’t like this or don’t have a coal deficiency or whatever, so I erred on the side of not-too-burnt.  The results were great and I will definitely make this pie again at Christmas!

torching the smores pie helping torch the pie
My nephew, Landon, helped me torch it!

aerial s'mores pie

S’mores Pie

2 eggs, beaten
1-5 ounce can of evaporated milk
1 cup white sugar
1/4 cup brown sugar
2 TBS cocoa powder
1 TBS instant coffee granules
3.5 ounces dark chocolate, chopped
1/4 cup butter
2 TBS corn meal
For the crust:
1 and a half packages of graham crackers, crushed fine (12 large)
2 TBS sugar
4 TBS butter, melted
2 TBS water
pinch of salt
Preheat oven to 350 degrees.  Combine the crushed graham crackers, sugar, salt and butter until it’s well combined.  If it doesn’t hold together when you press it between your fingers, add the tablespoons of water.  Press into a 9″ pie plate and set aside.
Combine the eggs, evaporated milk and sugars until smooth.  Put the cocoa powder and instant coffee in a small cup and add a tablespoon of water and whip it into a paste.  Whisk this paste into the egg/milk mixture.  Melt the dark chocolate and butter together in a microwave at 30 second increments, stirring after each time until completely smooth and glossy.  Add the chocolate and butter to the egg mixture and then whisk in the corn meal until smooth.
Pour into the pie shell and place your pie on a rimmed baking sheet and bake for 45 minutes to an hour, until the middle doesn’t jiggle anymore.  Let the pie come to room temp before making the meringue!
For the meringue:
5 egg whites, room temp (room temp is important)
1 cup of sugar
1/3 cup water
Place the sugar and water in a small saucepan and bring to a gentle boil till the temp reaches 250 on a candy thermometer.  While it’s boiling, put the egg whites in a mixer at medium speed and beat with a pinch of salt until soft peaks form.  When the sugar is up to temp, remove from heat and while the mixer is going on medium, drizzle the syrup in a very thin stream until completely incorporated and then increase speed to high and whip until the bowl cools down.  This takes a while so be patient.
Assemble!
Dump ALL the meringue on top of your ROOM TEMP pie and with a blow torch (such a great addition to any kitchen) or a dainty creme brulee torch (not as fun) torch the meringue until evenly browned.  If you have neither, you can brown it in the oven under the broiler but you have to be VIGILANT as to not burn the meringue.  A broiler works scary fast.

Black Plum and Blackberry Galette

black plum galette
I’m in love with this pie.  It’s a galette – a free-form pie that is usually very rustic and can be sweet or savory, or even resemble a thin pancake in some regions of France.  I love it because it eliminates the pressure to make a pretty pie crust.  So many people struggle with pie crust, and when the edges crack, it can make even the most tempered person lose their cool.  But the galette solves all that.  You simply roll out your dough, fill it up and fold the edges over.  If you add an egg wash and some crunchy sugar sprinkled over the dough, no one in the world will care that it isn’t in a pie plate!  We enjoyed plums and a few blackberries in this pie because they were ripe and in season and cheap!  I really don’t buy fruit if it isn’t on sale.  I just figure that sale price tells me what’s in abundance and that’s an easy way to know what’s in season!

I served this over the course of a few days to a few different friends.  I love that one dish can unite so many.  I believe five different friends, total, shared this pie at different times over the weekend.  This is my very favorite thing about cooking and sharing meals.  And yes, a plum galette and a cup of coffee is a meal 🙂 I think people stay longer and open up quicker and are more at ease if you have something to offer them to eat and drink.  I’m not always good about doing this, especially for the most frequent friends.  And how awful to treat the frequent friends less special!  It’s hard for those of us who can’t be trusted with baked goods in the house, to have them in the house during the week.  But, maybe you could consider it a bit of a social challenge for yourself to bake this pie and then see how many different friends you can get to share it with you.  🙂

plum galette

Plum and Blackberry Galette*

2 1/2 cups plus 2 tablespoons all-purpose flour (spooned and leveled), plus more for rolling
1 cup (2 sticks) cold unsalted butter, cut into pieces
5 tablespoons plus 1 teaspoon sugar
1 teaspoon salt
1/2 cup ice water
1/4 cup whole, skin-on almonds, toasted
5 to 6 plums, halved, pitted, and sliced 1/4 inch thick (keep slices together if possible – this was hard for me because my plums were cling and didn’t come away from the pit very easy.  I just sliced them as best I could – still pretty)
1 to 2 tablespoons heavy cream

In a food processor, combine 2 1/2 cups flour, butter, 1 teaspoon sugar, and salt; pulse until mixture resembles coarse meal. Sprinkle with 1/4 cup ice water. Pulse until dough is crumbly but holds together when squeezed (if necessary, add up to 1/4 cup remaining ice water, 1 tablespoon at a time). Don’t overmix! Remove dough from processor and shape into a disk; wrap in plastic and refrigerate 1 hour. Meanwhile, wipe bowl of food processor clean and add almonds, 3 tablespoons sugar, and 2 tablespoons flour; pulse until ground to a coarse meal.

Preheat oven to 350 degrees. On a floured surface, roll out dough to 1/4-inch thickness. Transfer to a parchment-lined baking sheet; sprinkle almond mixture over dough (this is necessary for absorbing the juices from the fruit so your crust won’t be a soggy mess.  Plus, it tastes great.)  With a spatula, transfer plums to dough; press lightly to fan out, leaving a 2-inch border. Fold edge of dough over fruit. Refrigerate 20 minutes (this is so your butter doesn’t leak out). Brush crust with cream (I used an egg); sprinkle galette with 2 tablespoons sugar (I used super crunchy sugar!)  Bake until crust is golden and underside is cooked through, about 70 minutes.

*I made this from Martha Stewart’s Pies and Tarts cookbook, which, is a book I could look at for hours on end, reading it like a novel.  That’s one way to get better at cooking, by the way – read cookbooks like they’re novels 🙂

Blackberry Jam Tart – I get pie with a little help from my friends…

Blackberry Jam and Toasted Almond Tart

Blackberry Tart with Cornmeal Crust

This tart was made because I bought three packages of fresh blackberries at 99 cents a pack (usually $3) and after we had some for a snack, I realized they would probably mold by the next day, and I would have wasted them.  So, looking up blackberry recipes on Martha Stewart Living online, I found a wonderful recipe that calls for a cornmeal crust, a jar of jam and some blackberries.  Perfect.  And I JUST happened to have the most perfect jar of blackberry jam in my pantry, made by my friends in Seattle, who have an entire acre, basically, of wild blackberry bushes beside their house.  I think jams and preserves are one of those treats that should be enjoyed in season.  It’s so much more satisfying to get a jar from the literal fruits of someone’s labor, than to just go pick up any ol’ flavor you want at the grocery store.  I think eating this way is another way of naturally limiting one’s sugar intake.  My friend, Brynn’s dad, makes this blackberry hybrid batch of jam each spring/early summer, and sometimes, there’s no fruit and we’re all sad, and sometimes there’s an abundance and I get one, coveted jar.  This stuff is the most amazing jam I’ve ever eaten.  So we wait, excitedly, all year for it.  Tell me that’s not better for the soul than having exactly the flavor you want, any time of the year?  Cook seasonally, bake seasonally, and natural moderation will follow.

My cousin, Kathleen, and her daughter, Hannah, stopped by earlier this week to pick up the disc from a senior session I did for Hannah.  Hannah’s boyfriend was with them, too, and when I asked if they’d like a piece of the berry tart I’d just made that afternoon, this precious boy’s eyes lit up and he just said, “uhhhh.”  All it takes is one in your group to say “yes” for you to feel comfortable to take a piece, as well!  They all stayed and ate and chatted and kept Matt and me company as we started prep for our dinner.  I was in my little piece of heaven.  Just wish it happened more often.  I don’t always have a piece of pie or tart or cookies, but I ALWAYS have coffee.  Always. So stop by any time.  You might get pie, if you’re lucky!

A Piece of Blackberry Jam Tart

Blackberry Tart with Blackberry Jam, Toasted Almonds and a Cornmeal Crust

Blackberry Jam Tart*

For the crust:  (I didn’t have enough butter, so I just halved the recipe. It makes two crusts, anyway, so it worked out!  I’ll post the full, two-crust recipe. This recipe also uses a food processor, which is easier, but you don’t burn as many calories and you have a food processor to clean up. Sometimes I’d rather pull a muscle than have to clean gadgets)

2 cups AP flour
1/2 cup cornmeal
1 tsp salt
1 tsp sugar
2 sticks unsalted butter, cold, cut into small pieces
1/4 to 1/2 cup ice water

Place the flour, cornmeal, salt and sugar in a bowl and whisk until combined.  Add the butter and cut with a pastry cutter until the mixture resembles coarse sand.  Add a few tablespoons of water and continue cutting it into the mixture until the dough holds together when pressed between your fingers.  Knead it inside the bowl about 10 times until it all holds together in a ball.  Divide the dough in half and wrap in plastic wrap and press into a nice disc.  Refrigerate for at least one hour, up to one day before using.

For the Tart:

AP flour, for surface rolling
half a jar (about one cup) of blackberry jam
12 ounces fresh blackberries (about 3 cups)
1/4 cup toasted, sliced almonds

Preheat oven to 375 degrees.  Roll out the crust into an 11 inch round (about 1/4 inch thick) on a floured surface.  Press dough into the bottom and up the sides of a 10 inch springform pan.  Trim the edges to come 1 inch up the sides using a paring knife.  Use the trimmings to patch up any thin areas or holes in the crust bottom.  Refrigerate for 30 minutes.

Prick the tart shell all over with a fork.  Bake until golden brown, about 25 minutes. Immediately spread jam into the tart shell, top with blackberries, sprinkle with almonds and bake for 10 minutes more.  Serve warm.

*adapted from Martha Stewart Living

Blackberry Tart

The Battle of the Quiches

Quiche

My friend, Summer, hates quiche.  The very word gives her mock dry heaves.  We’ve all had a traumatic experience with some kind of food; whether it be an ingredient (dill for me, pomegranate juice for Matt) or an entire meal ruined by getting sick later in the evening, it’s hard to come back to good terms with the food after the trauma.  I’m not sure why Summer hates quiche, but according to her, the description she gives is of a “rubbery filling, soggy crust, gross texture” and what comes to mind, for me, is the mini-quiches you find at baby showers the world over, or the frozen pie-sized quiches that could double as semi-wet Frisbees.  Either way, it’s not a huge shock that a lot of people have a bad connotation when they hear the word.

Thomas Keller is here to save the day, once again.

He sees the problem with the American version/view of quiche, as well:

“Why didn’t the French quiche ever really translate to America? American culinary culture embraced it, then trashed it without ever knowing what it was…I think it was a mechanical problem, not having the right tool–a ring mold about two inches high.  When the modern quiche took off here in the 1970s, that wasn’t widely available.  Instead, a pie pan was commonly substituted for the two-inch ring mold.  And then came the premade pie shell.  Who would want to eat quiche made in that? A quiche has to have a specific thickness or you cannot cook it properly: It must be two inches high, in a crust thick enough to remain crisp, and not become soggy, during cooking.  Custard in a pie shell invariably overcooks (if you cooked it slowly enough, the crust would become soggy).” — Thomas Keller, Bouchon Cookbook, page 86

We’ve made Keller’s quiche several times.  The foundation is a good crust and so we go back to the crust I will rely on for the rest of my life – the same crust used in my strawberry pie a few posts ago.  It’s perfect, it flakes, it is sturdy without being tough, and it tastes like butter because that’s the only fat used.  Why look elsewhere?  The key is to completely bake the crust first, with plenty of overhang so that it doesn’t shrink while baking.  And I’m sorry you’ll have to buy a special tool to make it, but a 2 inch ring mold is necessary.  Not expensive and if you want to really make this recipe correctly, you need one.

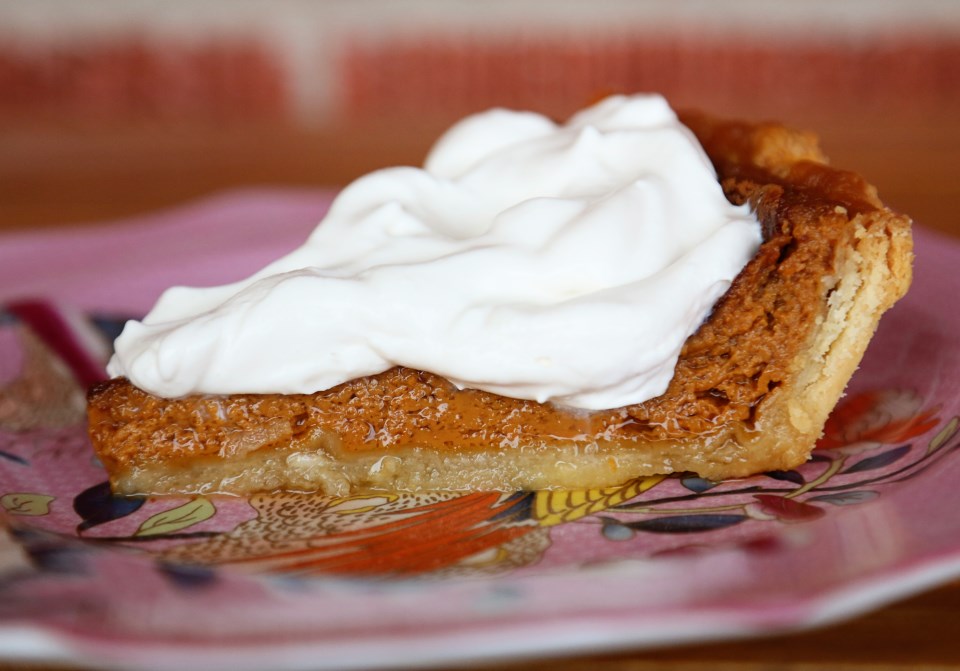
We decided for this post, that we’d compare a store-bought quiche with Keller’s quiche.  I didn’t buy the most disgusting one I could find, either.  I actually bought probably the best a grocery store has to offer.  An in-house made quiche Florentine (bacon/cheese) baked in a pre-made pie shell (assuming.)  It was set in a metal pie tin with holes poked all in the bottom.  I appreciated that effort, because at least someone is acknowledging that quiche shells go soggy.  Didn’t quite work, though.  Here they are, back to back:

Battle of the Quiches

Store bought on the left, Keller on the right.
You can’t tell much, texture-wise, so I’ll tell you.  And again, I’m fairly impressed with the grocery store made quiche.  It’s about as good as a pre-made, American pie version gets.  However, the crust was really wet and soggy on the bottom. Couldn’t exactly pick it up without it sagging, whereas the Keller quiche’s crust is very crispy and fully cooked on the bottom (you can tell by the color and how it even stands away from the plate a bit.)  The Keller quiche has almost a half inch more custard and the store bought quiche’s crust tasted like sand.  Honestly.  Sand held together by water.  It really wasn’t good.  Now, the store-bought quiche’s filling was fine, taste-wise.  It had bacon – how can that not be at least decent?  (I could imagine a frozen mini-version would find a way) but anyway, it was a good effort, but the crust was awful and it was wet, just like you don’t want it to be.  It also had that over cooked texture – kind of rubbery- that eggs get if cooked too long.  I swear to you, I am not making this up, after a few days and microwaving the leftover Keller quiche, it STILL had a smooth, silky, custard-like texture.  Almost creme brulee texture.  It’s so darn good.

Fun experiment and I would say that if you’re interested in doing something for the sake of the experiment and doing things properly, buy yourself a ring mold and get after it.  And remember – a Keller quiche takes two days.  So if this is for Sunday brunch, start it on Saturday afternoon.

Roquefort and Leek Quiche

I also want to add, for the sake of The Family Meal, that Olive ate on both quiches with  much enthusiasm.  Yes, even those big chunks of Roquefort.  She leaned forward and said, “mmmmm!” to both.  Eggs are awesome.  Oh, and she also said, “Quiche” perfectly.  I think because “quiche” sounds like her version of the word “cheese”.  Whatever works, Ollie.

For the crust:

2 cups AP flour, plus extra for rolling out
1 tsp kosher salt
8 ounces chilled, unsalted butter, cut into 1/4″ pieces
1/4 cup ice water

Place 1 cup of the flour and the salt in the bowl of a heavy-duty mixer fitted with a paddle attachment.  Turn the mixer to low and add the butter a small handful at a time.  When all the butter has been added, increase the speed to medium and mix until the butter is completely blended with the flour.  Reduce the speed, add the remaining flour, and mix just to combine.  Add the water and mix until incorporated.  The dough will come around the paddle and should feel smooth, not sticky, to the touch.
Remove the dough from the mixer and check to be certain that there are no visible pieces of butter remaining.  Pat the dough into a 7-8″ disk and wrap in plastic wrap.  Refrigerate for at least 1 hour, up to a day.

Lightly brush the inside of a 9×2″ ring mold with canola oil (or cooking spray works) and place it on a parchment-lined baking sheet.
Place the dough on a floured work space and rub all sides with flour.  Roll out the dough into about a 14″ diameter circle.  Lift the dough into the ring, centering it carefully and pressing it gently against the sides and bottom edges of the ring.  Trim any dough that extends more than an inch outside the ring.  Carefully check for crack in your dough and patch any cracks with your trimmed dough (I DIDN’T DO THIS AND OUR QUICHE LEAKED ALL OVER THE PLACE)
Refrigerate your dough for 10 minutes to resolidify your butter (if you don’t do this, the butter will drain out of your dough as it bakes.  Done it; learn from my mistakes)
Line the bottom of your crust with parchment and fill with pie weights (our pie weights are dry beans – a whole pound of them.  We just keep them for use in pies).  Bake shell in a preheated 375F oven for 35-45 minutes, or until the edges of the dough are lightly browned.  Carefully remove the parchment and the weights.  Check the dough for cracks and patch with reserved dough trimmings (DO THIS STEP) Return the shell to the oven for another 15-20 minutes, or until the bottom is rich golden brown.  Remove from oven and let the shell cool completely on the baking sheet.

Basic Quiche Batter

2 cups milk
2 cups heavy cream
6 large eggs
1 tbs kosher salt
1/4 tsp ground pepper
A few gratings of fresh nutmeg, or 1/8 tsp of ground nutmeg

Combine the milk and cream in a large saucepan over medium heat and heat until a skin begins to form on the surface of the milk.  Remove from the heat and let cool for 15 minutes before continuing.  If you have an immersion blender, add the rest of your ingredients to the saucepan and blend for about a minute to fully aerate the batter and make it light and foamy.  Pour the batter into your quiche shell (which is still on your lined, rimmed baking sheet – this thing inevitably will leak a tish.)
At this point, if you’d like to add ingredients, go for it.  Be creative.  We did his blue cheese and leek version and it was awesome.  You simply add these ingredients (about a cup of each ingredient, chopped fine and cooked properly) to the quiche batter as you’re pouring it into the shell.  Try crumbled, cooked bacon and cheddar cheese, or caramelized onion and grated swiss.  The options are endless.
Bake for 1 1/2 to 1 3/4 hours, or until the top of the quiche is browned and the custard is set when the pan is jiggled.  Remove and let cool to room temp on a cooling rack.  Refrigerate until chilled, at least one day, up to 3 days.  Once the quiche is thoroughly chilled, scrape away the excess crust from the top edge of the quiche.  Set the quiche down and carefully lift off the ring.  Preheat the oven to 375F.  Line a baking sheet with parchment.  Using a serrated knife, carefully cut the quiche into 8 pieces.  Place the pieces on a baking sheet and reheat for 15 minutes, or until hot throughout.  Serve immediately.

Quiche shell