Homemade Salted Butter with Fresh Thyme

butter002

Since we found Pereira Pastures Dairy a couple months ago, I suddenly had access to raw cream and milk, which fulfills my dream of having a milk man.  It doesn’t arrive on my porch in cute, glass bottles, but it does come from a friendly man in Abernathy who does his best every day with the land and beautiful Jersey cows God gave him to make the best product he can.  He treats those cows so well and it shows in his product.  I ordered a couple bottles of cream over the past two weeks and I’m telling you, this cream is legit.  There was only a half inch at the bottom of the bottle where the cream had separated from the rest of the milk.  THAT much raw cream just screams to be made into butter.  So, after being inspired by a story in the May issue of Martha Stewart Living magazine about Diane St. Clair, who makes butter for the French Laundry and Per Se, I decided to make my own.  I went a simpler route than the recipe featured in the magazine and just basically whipped the cream into oblivion until it separated into buttermilk and butter.  I then kneaded it, washed it (washing it makes it last longer) added some salt and sprigs of fresh thyme from my “garden” and voila – I had made my very own compound raw butter.

Making compound butters (essentially butter with stuff mixed in to flavor it) is really easy.  When the butter is at room temp, simply mix in herbs, seasonings, whatever you want and then wrap it up in plastic wrap and chill until firm.  Then, like my salted thyme butter, use it on fish or chicken or just bread for something really wonderful.  Sure, buying butter is so much easier.  And less expensive.  And less messy and time consuming. However, I think doing things from scratch offers a natural inclination for satisfaction and moderation that you just can’t buy.  How much slower you’ll eat butter you made than stuff you can scoop out of a tub!

raw butter001


First, dump cream (I used two cups) into the bowl of a stand mixer fitted with a paddle attachment.  Then, whip on medium high until whipped cream forms.  Then, really, just let that sucker whip until it suddenly separates.  This process can take anywhere from 10-15 minutes of solid whipping.  You should have something that looks like this:

butter001


Strain the buttermilk out and save it to make pancakes or biscuits!

butter004


Then, gather the butter solids and knead them in your hands under running water, squeezing the excess buttermilk out.  Then, you can either leave it alone for plain butter, or mix in salt and herbs, like I did here:

butter003


Then, transfer to a sheet of plastic wrap, form into a log and refrigerate until firm.  Or leave it out on the counter if you’ll be using it right away.

butter005


And for a simple approach, just slice it and eat it on a cracker 🙂

raw butter001

Fish Sticks and Sticking to Your Guns

fish and taters001

The method is working.  We have a few food rules when it comes to feeding Olive and ourselves.  All these thoughts are fueled by the game-changing book, “French Kids Eat Everything“.  I highly recommend it if you find yourself stressed that your kid eats a limited selection of foods.  Babies don’t know snacking exists.  They learn it soon enough from peers and tv and observing adults who randomly nibble throughout the day, but in the formative first couple years of life where you have most of the control over what your baby consumes, you can show them a different way.  And maybe even learn to eat better, yourself!  Olive gets one snack a day. Yes, she’s 15 months old (almost) and only snacks once a day. (And it’s a good one! Something fun and really tasty. Usually a piece of fruit or some dark chocolate and bread with milk.  You gotta make it something they look forward to.)  It’s in between lunch and dinner, because that’s the longest stretch without food.  We also have to emulate this discipline for her.  How would it be fair to snack in front of her without including her?  And if I want her to be hungry enough at a meal to be willing to try something new, well darn it, she needs to not have eaten a snack an hour before dinner!  Makes sense to me and it seems so obvious, yet so few do it.  We should all eat this way!  Hunger is a discipline that too few of us experience. And the discipline is learned before the age of two.  It can be learned if started after two, but it’s just so much harder (think: excessive whining).

We’ve even pushed dinner back to 7:30 the past few nights and she has eaten EVERYTHING.  Whereas before, I was serving dinner at 6:30 and it was a fight to get her to eat for 10 minutes straight (she’d had her snack just two hours before and had drank milk in between, so, consequently, she was only mildly interested in dinner.)  Eating an hour later has been a transformation –  she ate marvelously and ate everything from fish to broccoli to berries to a nice piece of Manchego (the King of Cheese).  So, it’s working!   The next day, she ate like a bird and acted like bananas were the devil (a  former favorite). Even if she has days like that, I try to remind myself that she will not starve and that maybe she’ll eat more at the next meal (this is SO hard.)  This structure of eating has made my days better, too.  I don’t have to constantly find something for her to eat.  Other than her snack, we’re all eating at the same time.  This will get harder as she gains the ability to ask for things and tell me she’s hungry.  I’ll tackle that problem when it gets here.  Hopefully between now and then, she’ll form the habit of knowing when food is served and being willing to wait till we can all sit at the table together for the family meal.  Also, because she eats so much quantity at each meal, she’s often not even that hungry until about 30 minutes before the next meal. So waiting for the meal is as simple as distracting her with playing in another room with Matt, or just including her in the cooking process like holding the herbs, or a peeled carrot, or whatever.  She sits on the counter a lot 🙂

The recipes today come from two cookbooks.  The fish recipe came from Tyler Florence’s book, Start Fresh, which is an absolutely wonderful book filled with recipes I would be just as happy eating as I would serving them to a toothless baby or toddler.  Toward the end of the book, there are recipes for the whole family to share.  My wonderful friend, Becky, sent this cookbook to me as a gift to me and Olive, and she put sticky notes all throughout the book with comments she made about which recipes looked good, which she wanted to try, etc.  It made me miss her so much and long for my genius-in-the-kitchen friend to be beside me, cooking and enjoying these recipes with me.  I’d recommend doing that to any cookbook you buy for someone – it just made it seem like she was here with me as I looked through it.

The tartar sauce recipe comes from the Bonne Femme cookbook and I swear to you, this is THE best tartar sauce I’ve ever had.  It puts every other tartar sauce to shame.  Makes them seem like a joke.  Like mayo with pickles.  This has tang and zip and crunch and so much flavor, I really will never feel satisfied eating any other tartar sauce, ever again.  (Dramatic, much?)  I’ve made two batches since last week and turned the latest batch into a potato salad.  Amazing.  You can’t go wrong with these recipes and I feel that this would even be an acceptable meal for a kid who does not like everything.  Surely on this plate, any kid could find SOMETHING they were happy to eat!

fish and taters004

Oven Baked Fish Sticks with Roasted Potatoes
serves 4

1/2 cup buttermilk
1 lb cod or tilapia fillets, cut into 1 inch wide fingers
1 cup panko breadcrumbs (I ran out of panko and used plain and it worked fine)
2 tsp fresh thyme leaves
Salt and freshly ground pepper
1 lb assorted baby potatoes, scrubbed and quartered
2 tbs olive oil

Preheat the oven to 400F.  Line two rimmed baking sheet with parchment paper.

Pour buttermilk into a large bowl.  Add the fish pieces and turn to coat.  In another bowl, stir together the panko, thyme, and salt and pepper to taste.  Dredge each fish finger in the breadcrumbs to coat completely and arrange on a baking sheet.

Combine the potatoes (and broccoli pieces, or asparagus or green beans – whatever other green veg you want!) in a bowl and drizle with the oil.  Toss to coat thoroughly, then arrange the vegetables on the other baking sheet.  Bake the fish and vegetables, turning once, until the fish fingers are golden, about 15 minutes.  The potatoes may need longer.  If so, simply take the fish out when they’re done and tent with foil to stay warm.

Serve fish (and potatoes, really) with tartar sauce!

fish and taters012

fish and taters005

Tartar Sauce
makes about a cup

3/4 cup high-quality mayonnaise (we think, aside from homemade, that Hellmans REAL mayo is the best.  No low-fat or miracle whip crap.)
2 tablespoons chopped cornichons (small sour French pickles)
1 small shallot or 1 scallion (white part and some tender green tops), minced (about 2 tablespoons)
1 tablespoon finely chopped fresh parsley or fresh parsley and chives
2 teaspoons Dijon mustard
2 teaspoons capers, drained and chopped
2 teaspoons white wine vinegar or fresh lemon juice
2 teaspoons finely chopped fresh tarragon or chervil
Salt and freshly ground black pepper to taste

In a bowl, gently fold the mayonnaise, cornichons, shallot, parsley, mustard, capers, vinegar, and tarragon together (don’t mix too vigorously, or your sauce will be too smooth). Season with salt and pepper. Cover and refrigerate for at least 1 hour, and preferably 2 hours, before serving. Store, covered, in the refrigerator for up to 1 week.

fish and taters008

Food Memories: Durango Cake

durango004

When I polled the Facebook audience a few weeks ago on peoples’ favorite food memories, I was absolutely thrilled with all the responses.  So many unique stories and some that felt as familiar as my own childhood.  From broccoli rice casserole to stewed cabbage.  From Eastern New Mexico to Ireland – so many people had one thing in common: good memories made from a meal and shared with family.  I made it my unofficial mission to tackle a few stand-out comments that included recipes I might actually be able to make.  I got to share the first food memory  with the author herself.  This week, sadly, the author of today’s food memory, my friend from high school, Kelli Morrison,  lives in Oklahoma and can’t partake directly in the cake recipe she so graciously shared with me.  But I have a feeling she’s made it so many times that she won’t feel like she’s missing out TOO much.

This is a glorified Texas sheet cake.  For those who have made and love Texas sheet cake, you will love this cake.  I think the true magic is the icing.  It gets crunchy around the edges and the cake itself is so fluffy and perfectly moist that it truly is the best chocolate cake I’ve ever had.  I think next time, I will add some cinnamon to the cake batter because I love cinnamon and chocolate together, and I think I may make these into cupcakes so that each cake can have icing completely surrounding it!  I may even make a double batch of icing just to make sure I have enough.  I’m telling you, this icing is ridiculously good…

durango002

Here’s what Kelli had to say about her memory of this truly wonderful cake:

Ok, so it’s a cake that was always made in a pan that could be easily traveled with, because we always were taking it places! It all started when my dad was moonlighting as a farm land real estate agent and the gentleman he worked for offered up his RV for us to use on summer vacation. So we took it to Durango for a week. At the last minute, my mom invites my recently widowed grandmother (on my dad’s side) to come with us (like, invites her the night before we’re leaving at the crack of dawn). Grandmother has no money to contribute toward the trip, but stays up that evening and packs her bags and makes this chocolate dream cake. Total hit. The next summer, we end up doing the same trip in the same RV up to our favorite lake for fishing and my brother requests the same cake that grandma brought to Durango last year. Even though grandma didn’t go the second year, my mom got the recipe and made one for the trip. From then on, it was, as my brother put it, “that good ‘ol Durango Cake.” We have made it frequently ever since, and it is always requested for birthdays, church socials, pot luck, holidays-it’s a staple in the Stroud family and among our church friends who have become so familiar with it over the years.
It has a deep, rich chocolate-on-chocolate flavor, with a thin chocolate glaze that is cooked and poured over the top while the cake is still warm (one reason it has to be IN a pan, not on a pedestal). Once the glaze cools, it creates a very thin sheet of icing that looks like broken glass when you cut into it-not thick like frosting. Because the glaze is so runny when you pour it, it usually runs all over the cake and spills over the side, so a side or corner piece is very desirable because the outside edge is covered in glaze as well.
I have been known to take a slice in each hand and scarf it like it’s going out of style just before bed, and then wake up in the morning, put another slice in a bowl, break it up into bite-sized pieces and pour milk over it and eat it like cereal. I know. I’m obsessed. But seriously, this cake is phenomenal.

durango003

Durango Cake

Cake:
2 cups flour
2 cups sugar
1 stick butter
1/2 cup oil
1 cup water
4 tbs baking cocoa
1/2 cup buttermilk
2 eggs
1 tsp baking soda
1/2 tsp salt
1 tsp vanilla extract
Cooking spray for dish

Glaze:
1 stick butter
2 tbs baking cocoa
2 tbs milk
2 cups powdered confectioners sugar
1 tsp vanilla

Preheat oven to 350.

For cake:
In a large bowl using an electric mixer (I did everything by hand), blend flour and sugar well.

In a medium saucepan heat 1 stick of butter, oil, water and cocoa until almost boiling.  Set aside.
In third container (I use a 1 cup glass measure), combine buttermilk, eggs, soda, salt, and vanilla. Whip with a fork until well mixed.
Pour heated mixture into flour mixture and blend. While mixing, add buttermilk mixture and mix well until color is even.

Pour into sprayed or greased 9×13 casserole dish (I use a Pyrex). Bake at 350 for 30-35 minutes.

Allow to cool slightly. While it’s cooling, bring all ingredients for the glaze to a boil in a saucepan on the stove. It is okay if there are several tiny lumps of sugar that don’t dissolve. Remove from heat. Pour the glaze over the top of the cake, ensuring that the whole top of the cake gets covered (you may have to use a spatula to spread it a bit). Some glaze will run down and fill up the edges where the cake has pulled away from the pan. Cover upon cooling.

Note from Kelli: if you have large quantities of vanilla ice cream, it is perfectly acceptable to eat this cake while it is still warm. Otherwise, allow it to cool before serving. It is also acceptable to put fresh sweetened fruit atop this cake when serving. Strawberries, cherries, or especially peaches are quite delicious.

Potatoes Gratin

food-12

This is such a beautifully simple dish.  It’s also quite rich and begs that you throw away your fear of dairy, potatoes and butter and embrace how amazing those ingredients, in combination, can truly be.  This is not the potatoes gratin you are used to where rather thick slices of potato are all stacked on top of each other in a huge dish, covered in cheese.  This recipe actually has no cheese.  I know I’d had the dehydrated versions of potatoes gratin out of the box, and possibly something similar at a buffet, but I’d never tried making it myself until we read the book, Must Have Been Something I Ate, by Jeffrey Steingarten. (This book will change you.)

The section of his book that this recipe comes from is entitled “There is a God in Heaven”, (I love a person as emphatic about food as I am)  with the quote beneath the section headline, “But as luck would have it, there is a God in Heaven.  Medical researchers now know that not all saturated fats are the same, and that cocoa butter does not raise our cholesterol.”  And in that section is an entire chapter dedicated to Gratin Dauphinois (the French created this dish, of course), or Potatoes Gratin.  Gratin, coming from the word “gratter”, meaning, “to scrape”  referring to the crispy bits of cream that get glued to the sides of the pan and scrape off and crunch so amazingly well.  Say no more.

We have eaten this dish as a meal, before, but it goes best as an accompaniment to a really great steak and a really fresh salad or other light side.  Also, don’t make the mistake of serving a rich dessert  after eating these potatoes.  I’m all for indulgence and you will never, ever find me saying that you should avoid entire food groups or ingredients altogether (bring on the corn, cheese, gluten, you name the poison) but I am also not dumb enough to serve a rich dessert after a dish this heavy.  You’d sink all the way to the bottom of the playa lake.  Everything in balance!

food-15

Potatoes Gratin*
serves 6-8 as a side

4 tbs butter, softened to room temp
1 cup whole milk
1 large garlic clove, peeled and lightly crushed
1/2 tsp freshly ground pepper
3/4 tsp salt
1/8 tsp freshly ground nutmeg
1.5 lbs baking potatoes
1.5 cups heavy cream

Preheat your oven to 425F. Place the milk, garlic clove, pepper, salt and nutmeg in a small saucepan, stir, bring to a boil and then remove from the heat.
Meanwhile, liberally butter the bottom and sides of a 9×13″ baking dish, using about half the butter.  Peel the potatoes, rinse them, and pat them dry.  Then, slice them 1/8th of an inch thick, discarding the smallest slices (This is easier with a mandoline) The cooking times really depend on this thickness, so don’t go too much thicker.  Under no circumstances should you wash the potatoes after they have been sliced — the surface starch is absolutely indispensable.

Evenly arrange the potatoes in the buttered dish in ONE LAYER of overlapping slices.  You will undoubtedly have some slices left over.  Don’t try to cram them in.  Bring the milk to a boil again and pour it over the potatoes, removing the garlic.  Cover the pan with a sheet of foil and bake in the middle of the oven for about 15 minutes, until most of the milk has been absorbed.  Meanwhile, bring the cream to a boil and remove from heat.  When the potatoes are ready, remove and discard the foil.  Bring the cream back to a boil and pour it over the potatoes, dotting the surface with the remaining butter.

Bake, uncovered, for another 20 to 25 minutes, until the potatoes have turned golden brown, spotted with darker, crisp areas.  You may need to rotate the dish halfway through cooking to ensure an even browning. We love thyme leaves in this dish and will sprinkle some on when the dish is nearly done baking.  Let the gratin settle for 10 minutes.  Then eat immediately – taste and texture suffer with each passing minute.  Cut into 6 to 8 rectangles and serve with a wide, metal slotted spatula.

*most of the text taken directly from Jeffrey Steingarten’s book.  Go get it!

food-14

Caesar Salad and Chilling Out

food-9

We’ve been trying to eat outside on our patio table more often as the weather warms up and the days get longer.  I want to enjoy myself in this zen-like way where I don’t care about a little extra mess, where Olive eats everything we serve and she isn’t wildly distracted by the dogs and the wind and the trees and the air and where I lean back in my chair, leisurely taking bites of my food and just enjoy the moment and the concept of taking a little longer than usual to eat dinner.  But instead, what has happened the few times we’ve done this, is I get all worked up and stressed trying to feed Olive and trying not to make a complete mess without her in the playful looking restraints of a high chair, and I end up trying to scarf down my food so that I can tend to whatever mess is going on, or try to block Olive from feeding all her food to Cash.

I do this to myself.  (For the record, this stress is only with food and dining – I am okay with a muddy kid or a messy house or whatever – but please, don’t put food in your hair and whatever you do, do NOT drop food from your tray!) I don’t enjoy the experience of something different and out of control, I let that ruin the experience for me.  Now, my sweet husband might just say, “Let’s not eat outside anymore if it bothers you so much!” (always trying to keep me from feeling anything but joy) but I think what I need, instead, is MORE dining experiences where not everything is micro-managed by my desires for things to look and go perfectly.

It happened again this Sunday – we had a picnic in the park with some people from our church group and we brought a tish bit of an ambitious lunch.  Matt had made all the components for this really great Vietnamese pork and noodle salad and everything was so delicious, but I instantly got down about: 1. the wind blowing lettuce and dirt in my face 2. my baby walking around the blanket and the park NOT eating and spitting things out that we tried to make her eat (God bless one of our friends who had the brains to bring a banana 3. just the overall lack of control I had over the components of my meal – it was messy and I needed a bowl and lots of napkins and NO wind, but I didn’t have those things and I became really negative and I am 100% sure I ruined the experience for Matt, who was trying his best to stay positive while eating beside a big rain cloud (me).

Whenever I struggle with sinful things in my life like jealousy or greed or pride or even the need for control (a sin, I believe), I try to do a bit of immersion therapy on myself and directly expose myself to the thing I can’t seem to handle as often as possible until I am over it.  It has worked in the past and I think I will try to apply it here.  I resolve to eat outside MORE often.  To let messiness happen MORE in situations where I’d like to appear perfect, and I resolve to look at my situations like Olive would – like an opportunity she’s never had before and quite possibly might never have again!

An opportunity you might never have, again, is enjoying a properly made Caesar dressing, because absolutely no restaurants make this dressing right, or from scratch.  This recipe is so flavorful and has just the right balance of tanginess from the lemon and anchovies and creaminess from the oil that it’s nearly like a beautiful, homemade mayonnaise  with a kick!  I see this salad happening a LOT during this hot summer ahead!

food-10

Just a little behind the scenes shot of how I usually take my food photos 🙂

food-11

Caesar Salad with Homemade Croutons*
makes about a cup of dressing

4 tbs lemon juice, plus more to taste
1 clove of garlic, minced
salt to taste
black pepper to taste
1 large egg yolk
4 anchovies, plus more for garnish, if you like
1/2 cup canola oil
3 tbs bacon grease from 4 strips of cooked bacon, or melted butter that has been cooled
Torn up romaine lettuce
Parmesan cheese, freshly grated

Combine all the ingredients except the canola oil in a tall, wide cup and blend with an immersion blender and then slowly drizzle in the oil.  Taste and adjust for seasoning with salt and pepper and extra lemon juice.

Toss leftover cubed up bread on a baking sheet, brush with olive oil, and toast until golden brown.

Toss a couple tablespoons with the lettuce until nicely coated.  Top with croutons, cut up pieces of the bacon and extra Parmesan cheese.  And lots of cracked pepper!

*recipe adapted a lot from Ruhlman’s amazing sounding Chicken Fried Pork Belly Caesar.

Mini Cherry Pies with Brown Sugar Meringue

cherry meringue mini pies-23

I fulfilled a little dream, today.  I baked with my daughter.  And she even wore a mini-apron. In just a few more months, she’ll be able to stand beside me on her stool and really help.  Today, she got to sit on the counter, play with the rolling pin, say, “row, row, row” as she rolled the dough and even properly sneaked little bites of the raw dough to eat.  This girl knows how to live.  And I’m so happy that she’s teaching me how to live mine, all over again.

image_1 photo

I found cherries on sale for $2.97, regularly over $7!  Cherries are in season in May, so I really hope they stay cheap for a few more weeks!  I did a couple things with my purchase.  First, I put a few whole in a jar and covered them with bourbon.

cherry meringue mini pies-20

A great addition to cocktails in a few weeks, I’m sure!  Or a grown up ice cream Sunday.  Or, a merciful substitution for those horrid Maraschino circles of candy that call themselves cherries.

cherry meringue mini pies-19

For my second act, I overcooked a batch of cherry pie filling so much that it resembled bits of dried cherries, resting comfortably in glue.  (I’d left it on the stove to “simmer” while I went to see my friend in the hospital.  Um, don’t ask why I did that.)  Matt rescued my near-break down by going and getting me another pound at 10:00 last night, then helped me pit every last one of them so I could start over.  That’s true love.

So I had a vague vision of what I wanted to do.  I wanted to make mini pies, fill them with tart cherry filling and use a brown sugar meringue that I’ve used before and wanted to make again because it’s close to perfection and is SO SWEET that it can really only be paired with something tart.  So these little devils are a combination of three recipes: Martha Stewart’s hand pie dough, My Baking Addiction’s cherry pie filling and Cindy Pawlcyn’s brown sugar meringue that she uses on her mile high lemon meringue pie at her amazing restaurant, Mustards Grill in Napa Valley (we went! we ate! we went into a food coma!)

The results were pretty great.  I think next time, I’d use my tried and true pie crust recipe and just add lemon zest to it.  Other than that, this recipe is a winner!  Especially for this super hot weekend that reminds us all too well that we live in the desert and it is officially summer.

cherry meringue mini pies-1

Mini Cherry Pies with Brown Sugar Meringue
makes two dozen

For the Crust

3 cups AP flour
1/4 tsp baking soda
1 tsp baking powder
1/2 tsp salt
2 tsp lemon zest (this microplane works best!)
1 stick of butter (1/2 cup, room temp)
1 cup sugar
1 large egg
3 oz. cream cheese at room temp
2 tbs buttermilk
1 tsp vanilla extract

In a medium bowl, whisk together the flour, baking soda, baking powder, salt and zest.

With an electric mixer on high speed (I used my stand mixer with the paddle attachment), beat butter and sugar until pale and fluffy, about 5 minutes.  Add the egg and beat until just combined.  Add cream cheese, buttermilk, and vanilla; beat until well combined.  Add reserved flour mixture, and beat until smooth.  Form dough into a ball and cover with plastic wrap and flatten into a disc.  Refrigerate 1 hour, up to overnight or freeze up to 1 month.

Let the dough come up to room temp and then roll out into a circle about 1/4 inch thick.  Cut out 4″ rounds and press them into a standard muffin tin, making sure to patch up any holes that form.  This dough is kind of crackly, so don’t fret.  It patches up pretty easily.  Prick the bottom of each pie with a fork and bake in a preheated 375 degree oven for 15 minutes, or until golden brown.  Some of the bottoms of the pies will puff up, but when they’ve cooled just press the puffed up centers down a bit before filling.  I wasn’t about to cut 24 parchment rounds and fill each cup with pie weights.  I’m not THAT dedicated to perfection.

For the Filling

5 to 6 cups fresh, pitted cherries
1/2 cup water
2 tbs lemon juice (fresh!)
2/3 cup sugar
4 tbs constarch
1/2 tsp almond extract

In a saucepan over medium heat, combine the cherries, water, lemon juice, sugar and cornstarch.  Bring to a boil; reduce heat to low and cook, stirring frequently, for about 10 minutes.  Stir in the almond extract and cool slightly before using.

image

I really love using my copper jam pot – (pardon the iPhone pic) The copper heats up almost instantly, as do the sides, so it cooks jam more evenly.  There are lovely, affordable ones here!

For the Meringue:

3/4 cup egg whites (about 6 large)
1/4 teaspoon cream of tartar
1 1/2 cups firmly packed brown sugar

Place the egg whites and cream of tartar in an electric mixer fitted with the whip attachment. Place the brown sugar in a medium, heavy saucepan with high sides (that sugar will boil up and scare the meringue right out of you if you have a small pan), add water to cover, attach a candy thermometer to the pan, and turn the heat on high. When the sugar is at about 240 degrees, start whipping the whites on high speed (they should be foamy and starting to thicken before you add the sugar). When the sugar is at the high soft-ball stage (245 degrees), remove the thermometer from the sugar and, with the mixer still running, carefully avoiding the whip, pour the sugar into the egg whites in a thin stream. When steam starts to come off the whites, add the sugar more quickly. When all sugar has been added, continue whipping until firm but soft peaks form.

Assemble!

Fill each pie shell with the filling.  Then top each with a generous dollop of meringue (you’ll have leftover meringue) and then get a torch and torch those suckers.  I don’t like toasting meringue in my oven because I inevitably scorch them and that makes me feel like a failure and I try to avoid that feeling whenever possible.  It’s all about setting yourself up to succeed in the kitchen that will keep you coming back.

I think these are best served with iced coffee because that’s what you need on a 100 degree day like today!

cherry meringue mini pies-6


Little fingers are very curious 🙂


cherry meringue mini pies-8


cherry meringue mini pies-17


JOY!

Food Memories: Chicken n’ Noodles

food-7

Many of us have memories of being little and watching our moms or dads or grandmas cook or bake for the family.  The first memory that comes to mind for me is watching my mom cut out biscuits with an old green chili can she had cut the top and bottom off of (it’s the perfect biscuit size!) and then slap each side of the biscuit in vegetable oil, then slide the disc in line with the others to fill up an entire pizza pan.  There is something methodically calming about watching someone cook.  I always felt like I was helping, even if I never touched anything.  I felt involved, because mom let me stand there or sit on the counter across from her and talk to her while she worked.  I will always be thankful that she let me hang around the kitchen.  She was always so busy doing a thousand things for our family that it was the one moment when things were somewhat calm and we could just be together and I could count on it every night because I (thankfully) had a mom that cooked dinner 6 out of the 7 days of the week.  You really can’t replace that kind of experience with anything else.  Those memories stick.

My dear friend, Louise Shoemaker, shared a memory and a meal with me last week that seemed so fitting for my blog and for what I love about cooking for my family and eating together.  She is one of the best writers I know, (she was my 10th grade English teacher – how lucky I am to still be friends with her!) so I asked her to write a little blurb about the recipe and the memory that went along with it.  My favorite part about this recipe was consulting her every 5 minutes to make sure I was doing things right.  She had driven up to Lubbock for the day and ate this meal with us!  I’d never made noodles from scratch, and technically, neither had she, but she’d watched her mother so much that she knew.  Here is what she had to say about the chicken noodle soup that made a permanent home in her memory:

RGBBounce
L
ouise and her Mother

It’s funny that a food memory starts with a sharp, clear visual. The bright yellow Pyrex bowl and the red-handled Daisy egg beater swirling the rich gold of fresh yolks. I’ll never forget the 50’s color scheme of the kitchen: pink walls, turquoise cabinet doors, chocolate brown trim. I can still see the white enamel-on-steel kitchen table and my mom in her long, slim dress with the apron tied smartly and the scarf pulled back over her careful bobby-pin curls. It’s as clear in my eye today as it was in those days 50-some years ago.

It must have been a Wednesday. Two days until payday and five mouths to feed on a budget stretched to the last nickel. So, a plump (cheap!) boiling hen, a dozen eggs, a pile of flour, a splash of water, and we knew we’d make it till Friday.

Chicken’n Noodles: made-from-scratch pasta boiled in rich, fresh stock, with chunks of chicken so tender it fell off the bone. A silky thickened sauce, glistening with a bit of butter, and thick, rustic slabs of slightly chewy noodles curling on a plate. YUMM!

The aroma of that meal is the smell of childhood, and it takes me right back there to that kitchen watching my mom pour the beaten eggs into the crater of the flour volcano and mix and knead and roll the dough out to a four-foot circle. I can see her boning a mountain of chicken, dropping heaping handfuls of raw noodles into bubbling broth. Cooking this meal was a production, an infrequent event. I’ve savored the memory of Chicken and Noodles for decades. It was amazing to re-create it with Alisa. And Olive.

I like to think of them cooking together for years to come, Olive sharing with her mother an experience so rich and elemental and, in today’s environment, rare. You’re a lucky (impossibly adorable) munchkin, Ollie! And your mama is pretty awesome, too!

food-6

I am giving you the recipe I did – I only added a few things to the stock, the rest, I followed Louise’s mom’s story-like recipe as best I could.  With pointers from Louise along the way…

Chicken’n Noodles

For the stock:
1 chicken, cut into pieces (8 pieces, bone still in: wings, breasts, legs, thighs)
Water
Salt
1 onion, chopped into quarters
3 carrots, chopped into thirds
2 bay leaves
3 sprigs of thyme

Put the chicken pieces into a large stock pot and cover with water until covered by about 2 inches.  Add a couple tablespoons of salt along with the onion, carrot, bay leaves and thyme.  Bring to a boil, skimming any foam off the top as it comes.  Reduce to a simmer and maintain a simmer (I left my burner on about a 3-4) for 1 and a half to 2 hours.
Remove the chicken from the pan and let it cool.  Then, remove skin, bones and any fat that remains.  Chop or hand-shred the chicken and set aside in a bowl in the fridge while you make the noodles.  Skim the stock of as much fat as you can, but don’t fuss too much.  Remove the carrots, onion and herbs and discard so you’re left with a (mostly) clear broth.  Keep the broth at a simmer with the lid on while you make the noodles.

For the noodles:

3 eggs
a big ol’ mound of flour (maybe 4-6  cups)
salt
elbow grease

Pour a mound of flour on a clean work space and create a hole in the center, volcano-style.  Make it deep enough so that when added, the eggs don’t spill over the side. Leave flour on the floor of the volcano so you can’t see your counter.  Crack the eggs into the hole and with your hand or a fork, whip up the eggs, incorporating flour as you go from the sides.  You won’t use all the flour, of course.  Keep incorporating flour to the eggs, stirring all the while, until you are left with a ball of dough that isn’t very sticky anymore.  Knead the ball for a good 10 minutes until you’re left with a very smooth ball of dough.  Trade off with a friend if you get tired:

food-1 food-2

Clean your hands and insert your finger into the center of the dough.  If it comes back super sticky, add more flour and knead some more.  Cover your dough with a towel and let it rest for 10 minutes.

food-3

Clean off your work space and if you’ve worked clean, you can save most of the flour you didn’t use.

Roll out the dough on a lightly floured surface till it’s an 1/8th of an inch thin.  Or thinner.  You may need to let the dough rest a few times throughout this process because it will start to shrink back up.  Once you get it thin enough, cut it into whatever shapes you like.  I chose squares because I have a kiddo that needs everything cut up, anyway.  Louise remembers her mom cutting looooooooong, thick strips, which would be wonderful, too.  You could even get cute and cut out little shapes from tiny cookie cutters.  Once you get all the dough cut, make sure each piece is coated in flour and bring at least a cup more flour with you to the stove to boil and put this dish together.

Making it Into Soup:

Get your stock to a rolling boil.  Dump your noodles in a handful at a time until they’re all in the pot, stirring as you go so they don’t stick.  This is the vague portion of our program.  Once the noodles are al dente, add the chicken back in and bring it back up to a simmer over medium-low heat.  While stirring, add a sprinkling of flour – maybe 1/4 cup – and stir until fully incorporated.  Keep adding flour till a good consistency is reached.  You’re wanting an opaque sauce that’s neither soupy nor gravy – somewhere in the middle.  If it coats the back of a spoon, it’s probably ready.  Adjust the seasoning with salt until it sings of chicken goodness.  Ladle up, top with a good sprinkle of freshly ground black pepper and enjoy.  We had ours with a wonderful Chardonnay and some crusty challah bread with butter.  Really – it does NOT get better than that.  The baby went crazy for this soup, too, and ate her entire bowl, plus some of ours.

food-5

food-4

Bread: Guest post from Matt Palmer, a.k.a. The Bread Man

Alisa: I wanted Matt to write about the bread that he’s made countless times in the past seven years.  He started on a quest to learn to bake at the same time he wanted to become more likable at his office (to improve his performance review, which, the only thing that was negative was, “Matt’s kind of intimidating”) and so the two tasks naturally went hand in hand.  After one year of bringing bread in to the office every Friday, not surprisingly, there wasn’t a negative comment on his next review 🙂  Bread is the great equalizer.  This loaf, in particular, is beautiful in its simplicity, flavor, crusty exterior and soft, spongy interior.  Frankly, it’s the perfect loaf.  I think life has a lot of challenges, but if you could say that you could turn out a loaf of bread like this (given a day’s notice) any time it was needed, well, I’d consider that success.

Country loaf close up

Matt: I like making things from scratch. I enjoy learning how things work, and with cooking you usually end up with something better than what you can get at the store – and it’s cheaper, better for you, and you even get a night’s entertainment out of it. So I guess it was just a matter of time before I got into baking. I’ve been making bread pretty regularly for a few years now, and I’ve certainly gotten better, but I’m still an amateur. Bread is one of those things that you could devote your life to (think Jiro Dreams of Sushi) and still find things to improve on.

That’s part of why I love it, but if that sounds disheartening to you, the good news is that even the poorest homemade loaf is better than anything you can get at the store. With a little bit of practice you can make bread better than you can get anywhere (unless you happen to live in San Francisco, New York, or a country that still cares about good bread). It’s kinda like chocolate chip cookies – the best bread you can buy where I live is essentially the bread equivalent of Chips Ahoy. Maybe you live somewhere with a bakery that sells something other than cupcakes, but unless the guy behind the counter looks like this, I’m guessing the bread there is still a Soft Batch at best. I’m sure the worst batch of homemade chocolate chip cookies that came out of your mom’s oven blows either of those away. The bread that will soon come from your oven is the same – once you’ve tried it, you’ll be hooked.
 Plain bread
Bread
21 oz bread flour (or AP flour if you prefer)
14 oz water (66%, for the bread nerds out there)
1 tsp instant/rapid rise yeast
2 tsp salt
Mix up the dry ingredients (you are using a scale, aren’t you?) and then add the water. Mix until the flour is all hydrated then cover it and set it aside for twenty minutes. (Or I could just say autolyse. See, you should become a baker, we have our own secret language.)
Stretch the dough out and fold it back up in thirds like you would a letter. Turn the dough 90 degrees and repeat, then put it seam side down in an oiled bowl. Wait ten minutes, then repeat. After three of these stretch-and-fold sessions your dough is probably developed. Put the dough back in the bowl and cover it and place it in the fridge overnight, or for up to 2-3 days (you might use less yeast if you know you’re going to wait several days to bake).
About two hours before you want to bake, take the dough out and let it warm up on the counter for a bit. Press it out into a circle (gently, we’re not making pie), then gather each side up to form a ball. Roll the ball in small circles on the counter to develop surface tension. This is a lot easier to understand when you see it, so you might want to watch a video.
Put the dough (now a boule, if you want to talk the talk) into a bowl lined with a floured towel. I use a basket called a banneton, which I flour directly, and it leaves little rings of flour on the loaf.
Leave the dough covered, on the counter to rise. This will probably take about an hour and a half, but you can tell if a loaf is still rising by poking it gently – if it springs back quickly, leave it to rise some more. If the indention stays, you’re ready to bake.
About a half hour before baking, preheat your oven to 450, with your baking stone, Dutch oven, or preferred baking device inside. You can bake on a sheet pan, and if that’s your plan you don’t need to preheat for very long. I recommend a Lodge cast iron combo cooker, which gives you the added heat while also trapping steam, and you can put dough into it without getting second degree burns, which is tough to do in a normal Dutch oven.
When the dough is ready, remove your preheated Dutch oven and flip the bowl over to put the dough into the pan. Make a couple of cuts in the loaf so it doesn’t rupture when it rises in the oven (this is called scoring), then put the lid on the Dutch oven and return it to the oven for thirty minutes.
Remove the lid from the Dutch oven and bake another 30 minutes.
Remove the loaf from the oven (the interior of the loaf should be around 200 degrees, if you want to make sure it’s done) and put it on a rack to cool. Lean in close and I bet you can hear the loaf “sing.” It’s tempting to cut into it right away, but I promise it’s better if you let it sit and finish cooking – think of it like resting a steak.
plain country bread loaf

Blackberry Jam Tart – I get pie with a little help from my friends…

Blackberry Jam and Toasted Almond Tart

Blackberry Tart with Cornmeal Crust

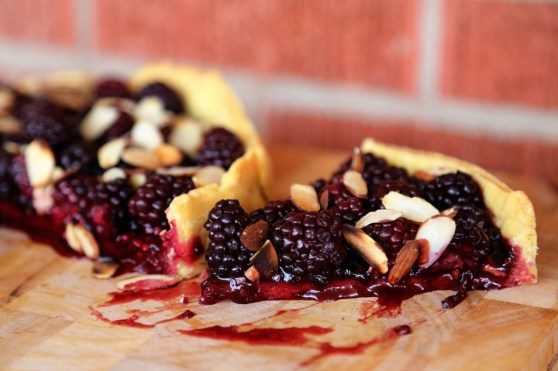
This tart was made because I bought three packages of fresh blackberries at 99 cents a pack (usually $3) and after we had some for a snack, I realized they would probably mold by the next day, and I would have wasted them.  So, looking up blackberry recipes on Martha Stewart Living online, I found a wonderful recipe that calls for a cornmeal crust, a jar of jam and some blackberries.  Perfect.  And I JUST happened to have the most perfect jar of blackberry jam in my pantry, made by my friends in Seattle, who have an entire acre, basically, of wild blackberry bushes beside their house.  I think jams and preserves are one of those treats that should be enjoyed in season.  It’s so much more satisfying to get a jar from the literal fruits of someone’s labor, than to just go pick up any ol’ flavor you want at the grocery store.  I think eating this way is another way of naturally limiting one’s sugar intake.  My friend, Brynn’s dad, makes this blackberry hybrid batch of jam each spring/early summer, and sometimes, there’s no fruit and we’re all sad, and sometimes there’s an abundance and I get one, coveted jar.  This stuff is the most amazing jam I’ve ever eaten.  So we wait, excitedly, all year for it.  Tell me that’s not better for the soul than having exactly the flavor you want, any time of the year?  Cook seasonally, bake seasonally, and natural moderation will follow.

My cousin, Kathleen, and her daughter, Hannah, stopped by earlier this week to pick up the disc from a senior session I did for Hannah.  Hannah’s boyfriend was with them, too, and when I asked if they’d like a piece of the berry tart I’d just made that afternoon, this precious boy’s eyes lit up and he just said, “uhhhh.”  All it takes is one in your group to say “yes” for you to feel comfortable to take a piece, as well!  They all stayed and ate and chatted and kept Matt and me company as we started prep for our dinner.  I was in my little piece of heaven.  Just wish it happened more often.  I don’t always have a piece of pie or tart or cookies, but I ALWAYS have coffee.  Always. So stop by any time.  You might get pie, if you’re lucky!

A Piece of Blackberry Jam Tart

Blackberry Tart with Blackberry Jam, Toasted Almonds and a Cornmeal Crust

Blackberry Jam Tart*

For the crust:  (I didn’t have enough butter, so I just halved the recipe. It makes two crusts, anyway, so it worked out!  I’ll post the full, two-crust recipe. This recipe also uses a food processor, which is easier, but you don’t burn as many calories and you have a food processor to clean up. Sometimes I’d rather pull a muscle than have to clean gadgets)

2 cups AP flour
1/2 cup cornmeal
1 tsp salt
1 tsp sugar
2 sticks unsalted butter, cold, cut into small pieces
1/4 to 1/2 cup ice water

Place the flour, cornmeal, salt and sugar in a bowl and whisk until combined.  Add the butter and cut with a pastry cutter until the mixture resembles coarse sand.  Add a few tablespoons of water and continue cutting it into the mixture until the dough holds together when pressed between your fingers.  Knead it inside the bowl about 10 times until it all holds together in a ball.  Divide the dough in half and wrap in plastic wrap and press into a nice disc.  Refrigerate for at least one hour, up to one day before using.

For the Tart:

AP flour, for surface rolling
half a jar (about one cup) of blackberry jam
12 ounces fresh blackberries (about 3 cups)
1/4 cup toasted, sliced almonds

Preheat oven to 375 degrees.  Roll out the crust into an 11 inch round (about 1/4 inch thick) on a floured surface.  Press dough into the bottom and up the sides of a 10 inch springform pan.  Trim the edges to come 1 inch up the sides using a paring knife.  Use the trimmings to patch up any thin areas or holes in the crust bottom.  Refrigerate for 30 minutes.

Prick the tart shell all over with a fork.  Bake until golden brown, about 25 minutes. Immediately spread jam into the tart shell, top with blackberries, sprinkle with almonds and bake for 10 minutes more.  Serve warm.

*adapted from Martha Stewart Living

Blackberry Tart

Pizza Night!

sun dried tomato, mozz and basil


We do pizza night nearly once a week.  It’s kind of a weekend thing because Matt makes the dough the night before and we think up a new topping combination we haven’t tried, yet while flipping through magazines and cookbooks.  It’s even better to have friends over, make individual pizzas and let everyone top their own.  Matt has the crust down to an art.  It’s perfect every time and trust me, he’s tried at least a half dozen different recipes and ways of doing the crust.  He finally got the texture he was searching for: chewy, crispy, even in the very center under all the toppings and sauce, and great flavor.  It’s honestly lacking nothing.  And it makes us bitter when we go out for pizza, thinking, “Why didn’t we just make our own?”

We have Jim Lahey to thank, the pizza guru himself.  His book, My Pizza, is forever bookmarked on the crust and sauces recipes.  The recipe isn’t the only trick, though!  We have a stone that we start heating up as soon as we begin prepping.  We heat it as high as the oven will go – ours is 500 – and let it heat for at least 30 minutes.  Then, right when we’re about to cook, we switch it to the high broil setting so that it cooks the top as fast as the stone cooks the bottom.  I don’t trust my pizza peel skills, so I let Matt put them in the oven.  (Self admitted wimp when it comes to this and frying things.  I’m scared of lunging heat particles.)

You need never buy pizza sauce again in your life.  If you do, you’re probably sacrificing flavor, money and freshness.  The only thing it won’t save is time.  But really, it doesn’t take that long and you get to squish tomatoes between your fingers.  Always a bonus.

The topping combinations we came up with this week:

Sun Dried Tomato, Goat Cheese and Basil
sun dried tomato

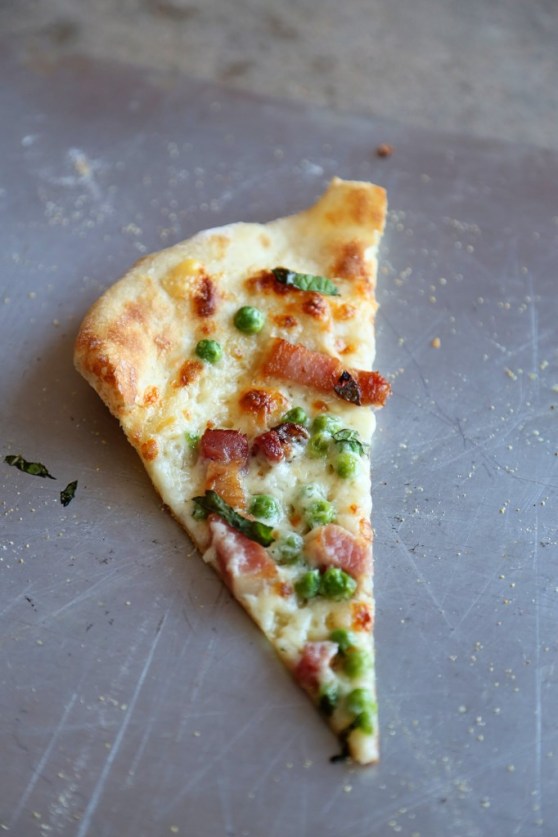
Pea, Bacon and Mint with Bechemel Sauce (alfredo, basically)
pea, bacon, mint

Mexican Chorizo, Purple Potato, Queso Fresco and Fresh Corn (this was my idea and my favorite of the three, but chorizo is cheating because it makes everything delicious like bacon or butter.  Three cheers for lymph nodes and salivary glands and such – I’m at least comforted that they don’t try to hide these ingredients from the list)

purple potato, chorizo, roasted corn and queso fresco


The best part of pizza night is that there’s no limit to your topping choices!  We’ve done so many from buffalo chicken to dried cherries and sausage (a fav) and even Thai chicken.  Get creative and get a pizza stone!

Pizza Dough:

500 grams all purpose flour
350 grams water
1/4 tsp active dry yeast
2 tsp fine sea salt

In a medium bowl, thoroughly blend the flour, yeast, and salt.  Add the water and with a wooden spoon or your hands, mix thoroughly.

Cover the bowl with plastic wrap or a kitchen towel and allow it to rise at room temp for 18 hours or until it has more than doubled.  it will take longer in a chilly room and less time in a very warm one.

Flour a work surface and scrape the dough out of the bowl.  Divide it into 4 equal parts and shape them:  For each portion, start with the right side of the dough and pull it toward the center; then do the same with the left, then the top, then the bottom.  The order doesn’t actually matter; what you want is four folds. Shape each portion into a round and turn seam side down.  Mold the dough into a neat circular mound.  The mounds should not be sticky; if they are, dust with more flour.

If you don’t intend to use the dough right away, wrap the balls individually in plastic and refrigerate for up to 3 days.  Return to room temp by leaving them out on the counter, covered in a damp cloth for 2 to 3 hours before needed.

Shape each ball into about an 8-9″ round (about 1/4″ thick).  Put on a pizza peel (we have a wooden one and we dust it with cornmeal so that the dough slides off easily once topped) and top with a thin layer of desired sauce. We’ve used plain olive oil, pesto, bechemel, marinara, buffalo sauce, homemade ranch dressing, etc – possibilities are endless and should correspond with your toppings!  One tip if you’re using a fresh mozzarella that might be watery is to sprinkle the top of the cheese with a little corn meal.  It absorbs the extra moisture!  Top your pizza as desired – maybe don’t go crazy because the weight makes it hard to get off the peel.  If you’re using fresh herbs, put them on once your pizza comes out, unless you just want that charred effect.  We cook our pizzas at a preheated 500F oven for exactly 5 minutes.  Right before we put the pizzas in, we turn our oven to broil.  Some of this may be trial and error depending on how your oven cooks (oh, for a wood-burning stove!) but that’s part of the fun of cooking – figure out what works!

Marinara Sauce that we use every time:

1 – 28oz. can whole tomatoes.  We like San Marzano
2 tablespoons olive oil
1/4 tsp salt
2 tbs red wine vinegar

Combine all ingredients and crush tomatoes with your hands, removing the tough stem ends of the tomatoes.  Mix well.  That’s it!  🙂