Chewy Mexican Chocolate Cookies

Mexican Chocolate Cookies 3
This is one of my most favorite cookie recipes.  I found it a few years ago in a baking issue of Cooking Light magazine.  I’ve made it several times and I always get requests for the recipe.  The original recipe is soft out of the oven but then it hardens up pretty fast and becomes sort of like a short bread or pecan sandy texture.  I love the original, crunchy, good-with-coffee version, but I’m a soft and chewy cookie kinda gal.  So I adapted the recipe a bit to make the cookies more flat and chewy and I LOVED the results!  Crispy along the edges, soft in the middle – with a bite from the pepper and cinnamon!  As you can tell, I’m a fan of the Mexican chocolate flavor and I hope, within my life, to incorporate it into as many baked goods as possible.

Chewy Mexican Chocolate Cookies
I hope you try this recipe out!  If you’d like the cookies to be the original crunchy style, leave out the extra egg and cut back to 4 TBS butter.  But I don’t think you will want that after you taste these 🙂

Chewy Mexican Chocolate Cookies
makes about 30 cookies

5 oz bittersweet chocolate, coarsely chopped (I use Ghirardelli 60% chips and skip the chopping)
3.4 oz AP flour (about 3/4 cup)
1/2 tsp ground cinnamon
1/4 tsp baking powder
1/4 tsp salt
a few grinds of black pepper
a pinch of cayenne
1 1/4 cups sugar
6 TBS butter, softened
2 eggs
1 tsp vanilla extract

Preheat the oven to 350F. Place the chocolate in a small glass bowl and microwave for one minute, stir and microwave 30 seconds more to fully melt.  Stir with a rubber spatula to full incorporate and ensure it’s all melted and set aside to cool.

Combine the flour, cinnamon, baking powder, salt, cayenne and black pepper and stir well with a whisk.

Combine sugar and softened butter in a large bowl and beat with a mixer or by hand until well blended.  Add the eggs and beat well.  Add the cooled chocolate and vanilla and beat until just blended.  Fold in the flour mixture until fully incorporated.

Drop by level tablespoons 2 inches apart on a baking sheet lined with parchment paper (I’ve tried it without and they will come off a regular sheet pan if you spray it with enough oil.) Bake at 350F for 12 minutes or until cracked on top and almost set.  Let the cookies cool on the pan for a couple minutes and then transfer to a wire rack until cooled completely.  Dust with powdered sugar if desired!

Mexican Chocolate Cookies 2

*recipe adapted from Cooking Light magazine, 2010

Chicken Piccata with Thyme and Mushrooms

Chicken Piccata and Buttered Noodles
This was the first full meal I made on our new gas stove that Matt installed for us last weekend!  He worked so hard rerouting gas lines (scary) and changing out new electrical outlets (scarier) and sawing a bigger hole in our counter top (can’t turn back, now!) and it all ended up totally awesome!  We have wanted a gas stove for years – they just heat so much quicker, they come down from high heat quicker – everything is more precise.  And plus – FIRE!  It’s pretty appealing.  I am tempted to roast marshmallows on this thing.  But I won’t.  I am very thankful for this machine and I swear I’ll deep clean it more than I did our old electric one…
Buttered Noodles
For the first meal, I did a simple chicken piccata with mushrooms and thyme and some soft, buttered noodles.  It was very comforting and yet refreshing at the same time.  I love the bite of the lemon juice and the capers in this dish and so for a twist, I added my favorite herb, thyme, instead of the traditional parsley and I also added some sauteed baby portobello mushrooms.  It all came together great and we thoroughly enjoyed our first meal from the shiny new stove!

chicken piccata

Chicken Piccata with Thyme and Mushrooms
serves 4

3 chicken breasts, butterflied and split in half
1/2 cup flour for dredging
salt and pepper to season the chicken
6 tablespoons of butter
2 tablespoons olive oil
1/2 cup chicken stock
1/3 cup fresh squeezed lemon juice
1 tablespoon fresh chopped thyme leaves
1/4 cup capers, drained
1 cup mushrooms, sliced thin
8 oz. long pasta, such as linguine or spaghetti

Heat your oven to 200F.  This is to hold your chicken as you cook it and until the noodles are ready so that everything stays hot until you’re ready to serve.

Bring a large pot of water to boil.  Salt it.  Salt it some more.  As it’s heating…

Butterfly the chicken breasts by sliding a very sharp knife length-wise into the thickest part of the chicken breast (kinda like you’d cut an english muffin in half) and lay the chicken breast open and cut down the middle, forming two, thinner cutlets.  Do this with the remaining chicken breasts and dry them on both sides and season both sides with a sprinkle of kosher salt and fresh cracked pepper.

Heat the oil and 2 tablespoons of butter over medium high heat in a large, stainless skillet.  When the butter starts bubbling and popping, coat each chicken breast in flour, shake off the excess and lay floured cutlets on a paper towel until ready to fry.  I worked in two batches – three pieces at a time.  Fry for about 3-5 minutes per side, until golden brown and an instant-read thermometer says at least 160. (It’ll cook some more as it sits to warm in the oven.)  Place fried chicken on a plate and place in the oven to keep warm as you fry up the rest.  For the second batch, add two more tablespoons of butter to the pan before frying the rest.

Remove the chicken and place on the platter in the oven.  Add the lemon juice, chicken stock and capers and thyme to the pan and scrape up the brown bits and season with salt and pepper.  Add the mushrooms and let the sauce reduce for a couple minutes.  Remove from heat and whisk in the remaining two tablespoons of butter and spoon sauce/mushrooms over the chicken and serve with buttered noodles.

To finish the noodles once they are done boiling, add the drained noodles to a bowl, add a splash of pasta water, a tablespoon of butter and fresh cracked pepper and stir to combine.  Garnish with fresh chopped herbs if you like!

Chicken Piccata with Thyme and Mushroom

Wright’s Smoked Sausage and Leek Orecchiette

sausage and leek pasta
I’m here to proclaim my love for a particular brand of sausage.  No one is paying me, I’m just that fanatic about it.  If you try it, you will feel the same way.  Wright’s has been making amazing pork products for years.  We first fell in love with their peppered, thick-cut bacon a few years back when our friend, John, made these amazing bacon wrapped jalapenos for a company party and said, “The secret is Wright’s!”  Just a couple months ago we noticed their line of ground sausage.  They have a regular, hot and spicy, sage and smoked.  The smoked is astoundingly good.  I can’t adequately describe it so I’ll just say – go buy it and put it in everything from eggs, to pizza to pasta to your sausage gravy and you will not only gain at least ten pounds at the end of your quest, but you will be happier.  At least that’s how it happened to me.

I created this little pasta dish with ground smokey sausage, sauteed leeks and crushed red pepper.  A pretty classic combination but with that smokey sausage, it takes it to a new level.  The orecchiette pasta was perfect for holding little bits of sausage and leek – this is a fast dinner that is completely satisfying and easy to throw together after work.  After you try this sausage, you will keep one on hand at all times.

leek and sausage pasta

Smokey Sausage and Leek Orecchiette
serves 4-6

8 oz orecchiette pasta, or any short and broad pasta
2 medium sized leeks, cleaned, halved and chopped into 1/4″ strips (about 2 cups of leeks)
8 oz Wright’s Smoked Sausage
1/4 cup shredded cheddar cheese
1/2 cup leftover pasta water after boiling
crushed red pepper flakes

Bring a large pot of salted water to boil. (More salt than you think – for a gallon pot, I’d say at least 1/4 cup of salt.  I know – the pasta is flavored by it, it doesn’t absorb it all.  Your pasta will be good enough to eat plain.) Add the pasta and cook to the package directions – usually 12-15 minutes until al dente.  While the pasta water is coming to a boil and while the pasta cooks, cook the sausage, leaving in moderate sized chunks, until cooked through.  Drain the sausage on paper towels and drain off all but a tablespoon of the grease and saute the leeks until  starting to color on the edges.  Then, add a splash of water, cover, and let steam for 10 minutes until soft.
Add the cooked pasta to the leeks and fold in the sausage.  Add the cheddar cheese and stir till melted.  Then add the 1/2 cup of pasta water and stir until fully incorporated and everything is smooth (pasta water is an instant sauce-maker for pasta.)  Garnish with crushed red pepper and serve!  The baby ate this UP.


Irish Lamb Stew – a taste of home, no matter where you’re from

Saint Patricks Day - Irish Stew
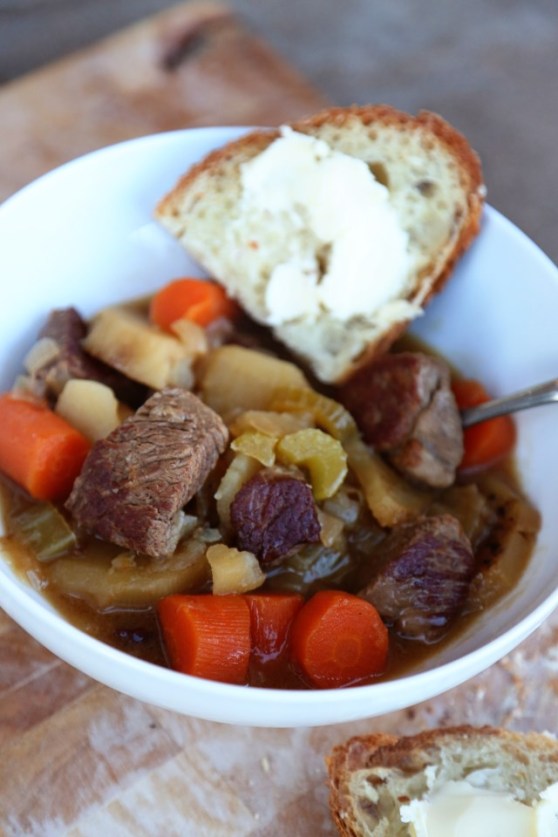
Happy Saint Patrick’s Day!  I confess I don’t know a lot about the real dishes of Ireland; the dishes people grew up eating around their family tables.  I only know that around here, people eat corned beef and cabbage and drink copious amounts of Guiness Stout.  In order to do something a little more authentic than four leaf clover shaped cookies, I consulted my fabulous and too-far-away friend, Elisha Clarke on some of her favorite Irish dishes.  Elisha was born and raised in Ireland and TODAY is her birthday!  I very much feel the luck of the Irish because I know her!  She is an amazing photographer and I hope one day I can go hang out with her in Ireland and see first hand the beauty she gets to photograph every day.
Irish Stew with Country Bread
When I asked her about dishes she grew up loving, she listed five or so and Irish stew actually wasn’t one of her favorites, haha.  But then she sent me a link to a cute, Irish celebrity chef doing this stew on Jaime Oliver’s show and he made it look so simple and delicious, I had to try it!  It came together easily and as it cooked for over an hour, I had time to relax with my family!  As I took the first bite, I was immediately transported to my own dining table as a child.  My mom made beef stew quite often and would let it simmer on the stove while we were at church.  I always loved it and she served it with saltine crackers that we’d crush up into our stew.  Tasting this very similar Irish lamb version made me smile – thousands of miles separate the humble meals of working class Americans and working class Irish, yet we are instantly connected by a warm meal.  Elisha mentioned that her country has very poor origins and so therefore, the traditional dishes are very humble in nature.  I think all the best dishes in any culture originate from people making the best of what they have been given.  My family did it, Elisha’s family did it, and if I were to guess, I’d say that probably most of you could relate to that story, as well.  A simple bowl of warm stew on a cold evening can comfort and connect family and friends, no matter how far apart.
Irish Stew
Irish Lamb Stew*
serves 6

2 TBS vegetable oil
2lb 3oz lamb shoulder, trimmed and cut into 1 inch chunks (could also use beef chuck roast)
2 onions, peeled and roughly chopped
3 celery stalks, trimmed and sliced
1 bay leaf
4 large carrots, peeled and roughly chopped
4 1/2 cups beef stock
2 lbs potatoes, peeled and cut into 1/2 inch slices
3 TBS butter cut into small cubes
salt and ground black pepper to taste
slices of country bread, to serve

Place a large, flameproof casserole pot over a high heat, add 1 tablespoon of the oil and brown the lamb pieces in two batches. Remove and set aside on a plate. Reduce the heat to medium–high, add another tablespoon of oil and fry the onion, celery and carrot for 4–6 minutes or until the onions have softened.

Preheat the oven to 325F. Return the meat to the pot, along with the bay leaf and stock, season with kosher salt and ground black pepper and bring to the boil. Remove from the heat and push the slices of potato down into and across the top of the stew, dot with the butter and give a final seasoning of sea salt and ground black pepper. Cover and place in the oven to cook for about 1½ hours or until the meat is tender, then remove the lid and cook for a further 10 minutes until the potatoes have browned.

Serve the stew in deep bowls with crusty, buttered bread to mop up all the juices!  Happy Saint Patrick’s Day!

*minimally adapted from Donal Skehan’s beautiful recipe

Thai Tea Pie – Happy Pi Day!

Pie Tea
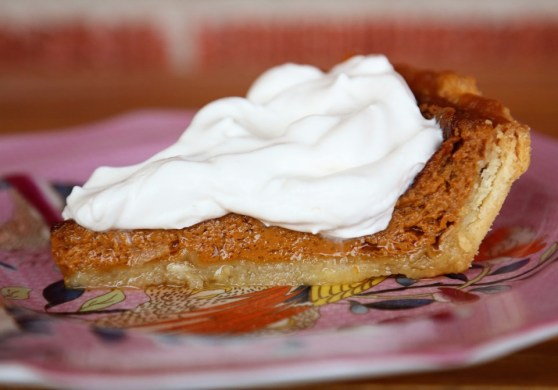
Have you ever had Thai Tea?  That smokey, campfire, roasted marshmallow tasting tea at Thai restaurants that they pour a luscious amount of heavy cream over top and it slowly drizzles down into the tea, creating a creamsicle effect?  It’s amazing.  It’s odd.  It’s unique and it’s unforgettable.  We had the epiphany the other day while we were at one of our favorite Thai places in town and they had Thai Tea cupcakes on display at the counter.  We had to try one, of course, and as we were eating, Matt said, “If this was a pie, it would be Pie Tea.”  I love a good pun and I loved the idea even more.  I knew it would work!  So today, on Pi Day, I tried it!  I simply substituted the sugar called for in a basic custard pie filling with Thai Tea mix and poured it into my favorite pie crust and baked it for an hour!  It was amazing!  Topped with fresh whipped cream to mimic the heavy cream poured on top of the traditional drink, this has become a new favorite creation.

I hope you venture out to your local Asian market and pick up a mix and try it out for yourself.  It’s super easy and really unique!  I’d say the taste isn’t exactly as campfire as I’d hoped, and it’s a bit watery (not sure why – I bet there’s very little troubleshooting online for using a tea mix in your pie) but it’s definitely got the burnt caramel/cream effect and of course, the crust holds up.    🙂

Happy Pi Day!

Thai Tea Pie Tea


Thai Tea Pie

1 unbaked pie crust
4 eggs
1 cup Thai Tea mix
1 tsp vanilla extract
1/4 tsp kosher salt
2 cups whole milk
1 egg white for brushing the crust

Preheat the oven to 400F.  Roll out your pie crust and fit into a deep dish pie plate (you’ll have a little leftover if you use my recipe).  Mix all the ingredients together and whip until well blended.  Pour into the pie shell and place pie plate on a rimmed baking sheet.  Bake for 50 minutes to a little over an hour.  It’ll puff up a bit and then it will settle once it cools.  Top with whipped cream and enjoy yourself!


Dinner Tonight: Tomato Cobbler with Blue Cheese Biscuits and some Blogger Love

Blue Cheese Biscuits with Roasted Tomatoes
I’m loving other foodies’ blogs this week.  After signing off of eating out for Lent, this week I decided to make nothing but food from amazing recipes I saw on Pinterest or other blogs I follow.  Today’s main recipe comes from Joy the Baker’s amazing blog.  I saw her recipe for tomato cobbler and blue cheese biscuits on Pinterest and I wanted it THAT VERY SECOND.  The recipe takes almost two hours, start to finish, so I had to save it for a night where we weren’t running around.  That night was tonight and I absolutely loved this dish.  Sweet and tangy roasted tomatoes, caramelized onions, sweet basil and peppery, blue cheese biscuits…honestly, I can’t think of a more perfect combination of flavors.

Olive ate an entire biscuit, and a couple tomatoes and declared it, “good.” 🙂  I wasn’t sure if she would, so instead of making this dish the entire meal, I served it alongside some baked, herbed tilapia, inspired by my personal friend and fellow food-blogger, Becky from Apronclad.com.  I typically pan fry fish but when Becky posted about baking it, I thought, “hey, I’m already baking the main course, why not pop some fish in the oven, too?”  It turned out light and simple and I love how the protein in this case, was the side dish 🙂

Baked Tilapia with Herbs
I just thought this was a beautiful dish before it was baked! Here’s the simple method I used.  Thanks, Becky for the inspiration!

Baked Tilapia with Herbs
serves 2 and a toddler

3 small fillets of white fish – cod, tilapia, mahi mahi, etc.
1 tablespoon olive oil
salt and pepper
snipped fresh herbs – I used thyme and chives, about a teaspoon each
1 tablespoon of butter, cut into small cubes

In a shallow baking dish, spread the olive oil around and place the fish on the oil. Season fillets  with kosher salt and pepper and sprinkle the snipped herbs all on top and around the fish.  Dot the top of each fillet with a couple pieces of butter and bake at 375F for 15-18 minutes, until fish flakes apart easily.  Serve with a squeeze of lemon if desired.


Olive inhaled her fish, as it is a bit of a comfort-food item for her by this point.  I make fish every week.  Familiarity breeds comfort.  Serve your kids something covered in herbs enough and they’ll eventually not balk at it. You think your kids wouldn’t eat this meal?  I disagree! I think eventually they would.  I have watched over the past couple weeks as Olive has really come into a “grown-up” phase of her life where she MUST assert her own authority over things at ALL TIMES.  It’s fine, it’s normal, but I can see where this point in a toddler’s development would create a negative environment around food, trying new foods or even just mealtimes in general.  Here’s what we do:  Every meal, whatever we’re having, I put a tiny portion of each component on her plate.  I tell her what each thing is and then I back away.  Don’t even pay attention.  Make small-talk! The only time I intervene is when she hasn’t tried a particular component and I encourage her to.  Not shockingly, this is the only time during dinner she protests.  She doesn’t want to be told what to eat.  Do you?  I really should back off in this area even more.  So we just say she has to taste it.  Or simply smell it!  After a smell or a tiny lick, she will 99% of the time decide to eat it.  We emphasize that she doesn’t have to like it, but we DO want her to just taste.  If she doesn’t like the taste, that’s fine, and she can spit it back out if she wants.  It’s working!

We have had upsets.  We’ve had back tracking.  We’ve had days where the girl will literally only eat a cracker and declare herself “all done” and get up from the table and leave and not even come back for fruit.  We have had days where she cries because I tell her she can’t have dessert first.  Most of the time her fighting is on days where she really doesn’t have much of an appetite.  So I let it slide.  I think the most important thing you can do to get your kids to eat what you serve is to STOP ACTING LIKE YOU CARE.  And more importantly, if they don’t eat it, don’t serve them something else.  Don’t go to the kitchen and short-order them a side of PB&J.  I always make sure there is something on the table I know Olive likes and then the rest is up to her.  It’s tough to watch your kid not eat much at a meal.  But trust me – they make up for it at the next one!

I’ll do a simple repost on the tomato cobbler recipe.  I know several friends who would fawn over this recipe and I hope they will make it this weekend!  Summer Richards, I’m talking to you 🙂
Tomato Cobbler with Blue Cheese Biscuits

Tomato Cobbler with Blue Cheese Biscuits*
serves 6

For the Biscuits:

2 cups all-purpose flour
2 tablespoons baking powder
1 tablespoon granulated sugar
1/2 teaspoon salt
1/2 teaspoon coarse ground black pepper
3 tablespoon unsalted butter, cold and cut into cubes
3 tablespoons vegetable shortening, cold and cut into cubes
1/2 cup blue cheese crumbles
3/4 cup cold buttermilk

For the Filling:

2 tablespoons olive oil
1 tablespoon unsalted butter
2 large onions, sliced
3 cloves garlic, minced
2 tablespoons balsamic vinegar
2 pounds cherry tomatoes
1/4 cup coarsely chopped basil
3 tablespoons all-purpose flour
1/2 teaspoon red pepper flakes
salt and coarsely ground black pepper

To make the Biscuits:

In a medium bowl, whisk together flour, baking powder, sugar, and salt.  Add cold butter and shortening.  With your fingers, quickly break up the fat into the dry ingredients.  Rub the fats into the dry ingredients until well incorporated.  Some butter pieces will be the size of small peas, other will be the size of oat flakes.  Toss in blue cheese crumbles.  Stir to incorporate.

Create a small well in the center of the flour mixture.  Add buttermilk all at once.  With a fork, quickly bring together the wet and dry ingredients.  The dough will be rather shaggy.  Dump dough out onto a lightly floured work surface.  Knead dough about 10 times, bringing it together into a disk.  Wrap dough in plastic wrap and refrigerate until the filling is assembled.

To make the tomato Filling:

Add olive oil and butter to a medium saute pan over medium heat.  Add sliced onions and season with salt and pepper.  Cook and brown onions, stirring occasionally, until caramelized, about 18 to 20 minutes.  Add garlic and cook for one minute more.   Remove pan from heat, add balsamic vinegar and set aside.

In a large bowl, toss together clean cherry tomatoes (no need to cut them), chopped basil, flour, and red pepper flakes.  Add caramelized onions and toss together until everything is lightly and evenly coated in flour.  Season with salt and pepper.

Place rack in the upper third of the oven and preheat oven to 375 degrees F.

Pour the tomato and onion filling into a square 8×8-inch baking dish.  Place in the oven and bake tomatoes filling for 25 minutes.

Remove the biscuit dough from the fridge.  On a lightly floured work surface, roll out biscuit dough into a 3/4 or 1-inch thickness.  Use a 1 1/2 to 2-inch round biscuit cutter to cut out biscuits.  Dip the cutter in flour should it get sticky.  Remove the partially cooked filling from the oven and carefully place 6 biscuits atop the tomato filling in the pan.  Brush biscuit tops with buttermilk and sprinkle with salt and pepper.  Reshape and reroll excess biscuit dough to make extra biscuits at another time.  (The shaped biscuit dough freezes very well.)

Return warm filling and biscuit dough to oven and bake for 17-20 minutes, until the biscuits are golden brown and cooked through, and the tomato mixture is bubbling.

Remove from the oven and allow to cool for about 15 minutes before serving.  Tomato Cobbler is best served warm.

*posted directly from Joy the Baker’s blog

Biscuits and Chicken Curry “Gravy”

biscuits and gravy
When I met Matt and he first moved to Texas from Tennessee, he marveled at how us West Texans liked to “smother” our food.  Smothered burritos, smothered chili cheese dogs, biscuits and tons of gravy.  I never really thought about it till he pointed it out.  We certainly aren’t a “sauce on the side” kind of culture.  I grew up eating biscuits and gravy on Saturday mornings as a rare treat.  It was by far my favorite comfort food growing up and remains so to this day.  Matt even prefers rolls to biscuits.  I’m the opposite.  Opposites really do attract.  So I suppose it was a natural progression to eventually combine two lovely opposites – spicy Indian sauced dishes and Southern biscuits and gravy.

This dish was a fabulous invention.  Won’t even pretend to be humble about it.  I made a crockpot full of chicken tikka masala a couple weeks ago and I thought, instead of the traditional naan flatbread, I would serve it over buttermilk biscuits for a collision of India meets West Texas.  It worked.  Really well.  The crispy, fluffy, buttery biscuit was the perfect little sponge for the spicy, sweet curry.  The biscuit recipe was from one of our favorite cookbooks, Fire in My Belly.  The recipe calls to grate frozen butter into the flour to create the most even distribution of butter I’ve ever seen!  What a great technique! The crockpot recipe was wonderful, too, but I’m excited to try my friend, Katrina’s recipe, as it’s on a stained recipe card and comes by way of her Indian friend.  You know that’s got to be good. Next time, I will.  And I’ll definitely serve it with a side of biscuits 🙂
Biscuits
Buttermilk Biscuits*
makes two dozen

4 cups (20 oz) AP flour
3 TBS (1 1/4 oz) baking powder
2 TBS (3/4 oz) sugar
1 TBS+2 tsp (1/2 oz) salt
14 TBS (7 oz) butter, frozen
2 cups (14 oz) buttermilk

Preheat oven to 400F. In a large bowl, whisk together the flour, baking powder, sugar and salt.  Using a box grater, grate the frozen butter into the flour mixture, tossing after each quarter stick of butter to coat the butter shards with flour.  Toss to combine.  Stir in 1 3/4 cups of the buttermilk and, using large strokes and stirring from the bottom up, stir just enough to combine the mixture into a crumbly mass.  If the dough doesn’t come together, stir in more buttermilk a tablespoon at a time, just until the mixture barely holds together.

Dust a clean, flat work surface with flour.  Scrape the dough onto the floured surface, gather into a ball and gently knead with the palms of your hands about 10 times, just enough to form a cohesive dough ball.  Sprinkle a little more flour onto the dough and gently roll or pat into an even 3/4 inch thickness.

Dip a 2 1/2 inch round biscuit butter in flour and punch out the biscuits.  Gather any remaining dough, knead a few times to form a cohesive ball and roll or pat the dough into an even 3/4 inch thickness.  Repeat until all used up.

Place the biscuits on a baking sheet, close enough so the edges just touch.  Bake until the biscuits start to brown – they should be a rich golden brown, about 20 minutes.  Let the biscuits rest 5 minutes before serving.

*from Kevin Gilespie’s book, Fire in My Belly
Homemade Biscuits

Crockpot Chicken Tikka Masala*
serves 4

1 pound boneless skinless chicken breast, cut into bite size chunks
1/2 onion, finely minced
2 tablespoons butter
3 cloves garlic, minced
1 tablespoon freshly grated ginger
2 teaspoons curry powder
2 teaspoons curry paste ( I used Thai Red Curry Paste)
2 tablespoons ground garam masala
1 teaspoon turmeric
1/4 teaspoon cayenne pepper (you can add as much as you want but my kiddo was sharing so I kept the heat down)
1/4 teaspoon salt
1 (6 ounce) can tomato paste
1 (14 ounce) can lite coconut milk
1/2 cup plain Greek yogurt
1/4 cup half and half

In a large glass measuring cup or bowl mix together the coconut milk, Greek yogurt and half and half. Stir in the tomato paste, garlic, ginger and all the spices. Mix well.

Spray the inside of your crockpot bowl with cooking spray or grease with olive oil. Sprinkle the onion over the bottom of the crockpot bowl. Add the chicken and then pour the coconut milk mixture over the chicken so the chicken is completely covered. Add the butter and place the lid on the crockpot. Cook on high for 4 hours or on low for 6 to 8 hours. I like to stir mine once or twice during cooking, but it is not necessary. When ready to serve, taste and season with salt and pepper if desired. Serve over homemade biscuits 🙂

*adapted from Half Baked Harvest

Banana Caramel Cream Pavlova

Bananas Foster Pavlova
This seems like a Sunday afternoon dessert.  Ethereal, light, comforting and sweet.  For many during the season of Lent, Sunday is a break from their chosen 40 day fast.  We had to break our fast this morning as we had family in town and went to church and then they had to get a quick lunch and get on the road.  So we had brunch out at our favorite place, Crafthouse.  Does it count if we didn’t pay for the meal? 🙂 Anyway, we are dedicated to our no-eating-out fast and will continue throughout the weeks and will not plan on breaking the fast on Sundays.

One of my plans for Lent is to plan meals that are more exciting than going out to eat – things we look forward to more than going to a restaurant!  This fancy-schmancy dessert could make anyone feel as if they were at a posh little bistro having dessert and coffee!  I’ve done a pavlova on this blog before, and I love how versatile they can be.  A few weeks ago I bought this yogurt in a moment of weakness.  I always buy plain yogurt and add my own sugar because flavored yogurts have SO MUCH SUGAR.  However, I couldn’t resist the flavor description: honey salted caramel?! After we tasted it, Matt suggested it would be awesome on a pavlova and that we could add bananas and have it be a shockingly all-white dessert.  Cloud like, from the Greek Gods themselves.  I added vanilla bean to my pavlova and torched raw sugar on top of the bananas and with the combination of the salted caramel tanginess of the yogurt, it made an incredible dessert!  It makes me want to try lots of different combinations with various yogurt flavors!  I’ll post my pavlova recipe for you, here, again and you can do whatever toppings you can dream up!

Vanilla Bean Pavlovas
makes 12-15 small meringues

1 1/2 teaspoons vanilla bean paste
1/2 teaspoon cream of tartar
1 1/2 Tbsp cornstarch
1 1/2 cups granulated sugar
5-6 (about 6 oz) large egg whites, room temperature
Pinch salt

Place rack in the middle of the oven and preheat the oven to 275°. Line a large baking sheet with parchment paper.  Stir the cornstarch into the sugar in a small bowl.

In a large bowl of a heavy-duty mixer, fitted with whisk attachment, whip egg whites, cream of tartar and salt, starting on low, increasing to medium speed until soft peaks start to become visible, approximately 2 to 3 minutes.

Increase speed to medium-high, slowly and gradually sprinkling in the sugar-cornstarch mixture. A few minutes after these dry ingredients are added, slowly pour in the vanilla.  Increase speed a bit and whip until meringue is glossy, and stiff peaks form when the whisk is lifted, 4 to 5 minutes.

Pipe or spoon the meringue into 8-10 large round mounds that are 3 inches wide on the parchment-lined baking sheet.  With the back of a spoon, create an indentation in the middle of the mound for holding the filling once meringue is baked.

Place baking sheet in the oven. Reduce oven temperature to 250°F. Bake for 50-60 minutes, or until the meringues are crisp, dry to the touch on the outside, and white — not tan-colored or cracked. The interiors should have a marshmallow-like consistency. Check on meringues at least once during the baking time. If they appear to be taking on color or cracking, reduce temperature 25 degrees, and turn pan around.

Gently lift from the baking sheet and cool on a wire rack. Will keep in a tightly sealed container at room temperature for a week.

Ginger Scallion Sauce and Taking a Fast from Fast Food

Ginger Scallion Sauce
It’s Ash Wednesday and for many, that means a time of choosing to fast from one vice or another in order to devote the time previously taken by the vice to thinking about God or praying for focus or simply remembering Christ’s sacrifice.  It doesn’t even have to be a vice, necessarily, but something that you do or perhaps over indulge on a daily or weekly basis, that if you gave it up, it would create a bit of a hole or an inconvenience in your day and force you to remember why you are fasting from it in the first place.  Many give up certain foods: sugar, coffee, sodas, fried foods.  Some give up distractions like apps on their cell phones or Facebook or watching tv.

Matt suggested that we give up eating out at restaurants for Lent this year.  This obviously involves my participation more than his, as I will be doing the majority of the cooking.  But I know that for both of us, we lean on the ability to go get something fast and easy too often.  I cook a LOT, but I use dining out as a “break” or a “reward” for cooking all week.  I use it when I just “don’t wanna” and sometimes when I just feel plain burned out on thinking up another meal to cook at home. I thought it was a good thing to give up, though, and so I agreed.  He will no doubt cook more often during this time, too.  Today is the first day of Lent and today’s recipe is from our lunch today.

I don’t believe you have to be Catholic to participate in the season of Lent.  I believe any tradition that helps us refocus on the sacrifice and life of Christ is a worthwhile endeavor.  Borrowing from other religious cultures can enhance our own or refresh the way we see things and shed new light on old habits.  Someone questioned how we “do” Lent regarding what we give up and asked if it’s just “another resolution” or if we really pray or do what we’re supposed to do in the absence of the thing we’re giving up.  I have never thought of Lent as “just another resolution” and fully intend on dining out at restaurants once the 40 days are over.  But for these next six weeks, I plan on remembering a few things in the absence of the convenience of dining out and every time I feel tempted:

1. It’s a privilege to eat out – even fast food, not just nice restaurants.
2. Not everyone has the joy of owning a house or a kitchen to cook in.  We do.
3. When I don’t feel like cooking over the next 40 days, I will think of my new friends at Carpenter’s Church who only WISH they had a nice kitchen, but instead have to rely on the kindness of soup kitchens downtown to get a hot meal.
4. Not everyone can afford good produce at the grocery store.  We can and I plan on utilizing that honor.
5. Dining out is a break from reality.  So many people in the world never get a break from their harsh realities.  They have no choice.

This morning I taught my little cooking class at Carpenter’s and our class ended and we finished cleaning up about 10 till noon.  Typically, I would have called up Matt and said, “We’ll just come pick you up, I don’t feel like cooking again.”  But I called him up instead and said, “I gotta run home and cook – lunch will be a little later today.”  I had been to the store yesterday and bought all the items needed (a privilege)  for one of our favorite garnishes for Asian type dishes, Ginger Scallion Sauce.  We love to put it on just about anything, and today, I tossed it along with some sticky rice and leftover pork we cooked on Sunday, and some pineapple (and a fried egg, of course).  A really fresh, tasty meal and it only took me 30 minutes, start to finish.

You don’t have to give up something for Lent in order to be “good” or “right.”  It’s not about that.  However, in order to be more disciplined in life, there really is no other way than to TRY.  Think you’re not disciplined enough to give something up for 40 days?  Well… have you tried?

Sticky Rice with Broiled Pork and Pineapple


Ginger Scallion Sauce
makes about 3 cups

Momofuku Ginger Scallion Sauce
Look how lazy I am.  But there you have it – we don’t alter it so I figured I’d just show you the page out of the book!  Everything in the Momofuku cookbook is good, from what we’ve tried, so far.  David Chang is one of our biggest celebrity chef crushes and we think he can do no wrong.  Pick up this book today! And the Momofuku Milk Bar cookbook while you’re at it!


Glazed Pork Chops with Home Fries and a Fried Egg – The Ultimate Breakfast for Dinner

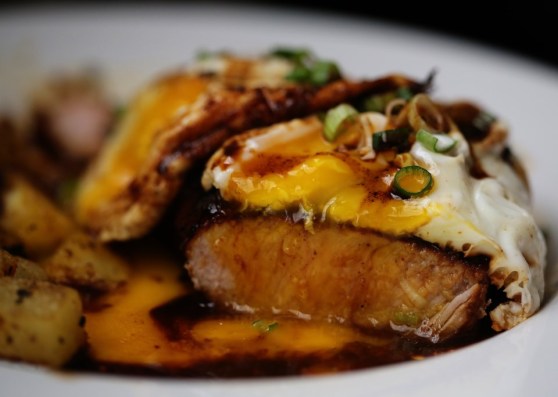
brunch-pork chops, home fries and a fried egg
We made this brunch meal a few weeks ago and it has stuck with me as one of the most satisfying meals I’ve had in a long time.  A salty/sweet glazed pork chop with home fries and a fried egg – the perfect brunch!  The pork recipe comes from Serious Eats and we followed it to the letter.  So I will give you my home fries recipe, here, and let you follow the Serious Eats link to make the rest.   This was just as good as any brunch you might get on Sunday at a nicer restaurant and best of all – it only took about 30 minutes!  Serious Eats is one of our favorite sites for recipes.  There are certain, very popular sites (don’t want to drop names but it starts with a M and ends with an artha Stewart dot com)  that don’t have reliable recipes.  You can tell when a recipe has just been thought up but not tested thoroughly.  Not so at Serious Eats.  You can bet that each recipe has been done a few times and you can rely on the promised outcome!

That’s another thing I love about writing this blog and reading most food blogs – the author is posting things she has literally tried at home!  So even if something goes wrong here or there, you can ask questions in the comments and be a part of the unofficial test group in helping to refine the recipe!  And I hope you all who read my blog will tell me when you hit road bumps.  I’m learning every day how to be better at this craft and it’s not helping me one bit if you stay silent when a recipe goes wrong for you!

Happy cooking and when in doubt, fry up some potatoes…

Pork Chops with Home Fries and a Fried Egg

Seasoned Home Fries
makes two servings (plus 1/2 for the little tater tot at your table)

1 large baking potato
2 tablespoons olive oil
1/2 tsp seasoned salt
1/4 tsp fresh cracked pepper

Scrub the potato and dice evenly into 1/2″ square dice.  The more evenly you chop, the more evenly your potatoes will cook!  Heat a large saucepan filled with water over high heat till boiling.  Drop the potatoes and cook until partially cooked – still a little firm, but getting softer on the outside when pierced with a fork.  Remove the potatoes and spread out on a cookie sheet lined with paper towels and pat the potatoes dry.

Heat the olive oil in a non-stick skillet over medium high heat until it shimmers.  Season the potatoes with season salt and pepper and toss in the skillet.  Let them brown evenly on each side and then remove from heat, adjust seasoning as you wish and serve with pork chops and a fried egg!

brunch