The Best Peach Cobbler: Food is Healing

Peach Cobbler over Vanilla Ice Cream
I grew up in Eastern New Mexico.  Which is basically West Texas.  Which is basically the South.  Basically.  And in the South, when someone is ailing, grieving, winging it as a single parent for a week with a house full of kids, or whatever – we bring food.  The more comforting the dish, the better.

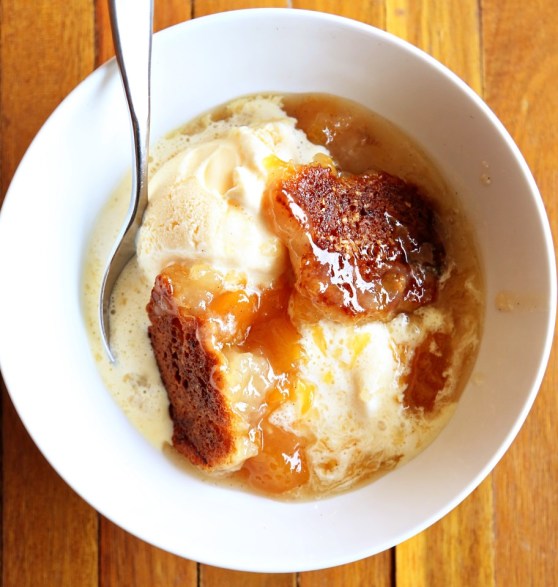
Enter: homemade peach cobbler.  The BEST peach cobbler you’ll likely ever have.

My Aunt Mary could have been my grandmother.  The oldest in a family of eight children, Aunt Mary has acted like our grandmother as far back as I can remember.  She picked me up from school, she made a few dresses for me, she always gave away the best homemade treats at Halloween and she stood in place of my own ailing grandmother when I got married.  Did the same for both my brothers’ weddings, too.  Aunt Mary also brings food.  I would guess it is her first thought when she hears of someone’s suffering.

A few years ago my dad’s 20 year-old carpentry business and production shop burned to the ground in one night.  I remember us all sitting around the dining room table a couple days later, feeling numb and really not knowing what to say or do next.  It was as if a close family member had passed away.  Aunt Mary walked in holding this still-warm peach cobbler and a pint of vanilla ice cream.  We made a bowl and after the first bite,  I felt a little bit of weight released from my shoulders as my heart sank into those amazing flavors.  It was the food-equivalent of a hug.  It could have been the emotions of the day or the fact that we all love Aunt Mary so much, but I think it was the best peach cobbler, or any cobbler, I’d ever had in my life.

When my grandpa passed away a couple weeks ago, we were sitting around the house the afternoon after his funeral and Aunt Mary called.  She said, “I was just sitting here and realized that I NEVER brought over any food!”  I smiled and said quietly to myself, “please let it be peach-” at the same time she said, “I JUST made a peach cobbler. Can I drop by?”

And the same comfort washed over us, again.  This time my uncle had the first taste and in his quiet demeanor, he just nodded and said, “That IS the best cobbler I’ve ever had.”  And he’s a farmer.  He knows his cobbler.  I sat Aunt Mary down before she could leave and told her that this time, she HAD to tell me the recipe.  So, from memory she just told me how she did it.  I love recipes like that.  She even apologized and blushed a little when she told me how much sugar. 🙂

So I want to give this comforting recipe to you.  So you can give it to someone else.  Food, sometimes, is so much more than nourishment, calories, ingredients, fast or fancy restaurants.  It can be those words you don’t know how to say or that comfort you wish you could provide but  just don’t know how.

Classic Peach Cobbler

Peach Cobbler

serves 8-10

1 stick unsalted butter
2 – 28 oz cans of sliced peaches (don’t drain.  And the ounces may vary.  Aunt Mary just said, “Not the soup-can size – the bigger one! So I guessed.)
3 cups sugar (I know.  You might eat this once a year.  It’s okay.)
1 cup flour
1 tsp baking powder
1/4 tsp kosher salt (she told me 1/8 tsp salt, but kosher is bigger so I always double the amount if I’m using it)
1/2 cup milk

Preheat your oven to 400F.  In a 9×13 pan, melt the stick of butter in the oven.

In a large skillet over medium high heat, add the peaches with their syrup, two cups of sugar and let it start bubbling.  Meanwhile, mix flour and the remaining cup of sugar, baking powder and salt together in a bowl and then add the milk.

Pour the batter on top of the melted butter.  Then pour the peach mixture over the batter.  Bake about 40 minutes until the batter is a rich brown.  I’d really advise letting this cool down considerably before eating.  You’ll think there’s waaaaaay too much syrup, but it thickens upon cooling and you have this glorious syrup to pour over your ice cream. Worth it.

Peach Cobbler

Advertisement

Dinner Tonight: Tomato Cobbler with Blue Cheese Biscuits and some Blogger Love

Blue Cheese Biscuits with Roasted Tomatoes
I’m loving other foodies’ blogs this week.  After signing off of eating out for Lent, this week I decided to make nothing but food from amazing recipes I saw on Pinterest or other blogs I follow.  Today’s main recipe comes from Joy the Baker’s amazing blog.  I saw her recipe for tomato cobbler and blue cheese biscuits on Pinterest and I wanted it THAT VERY SECOND.  The recipe takes almost two hours, start to finish, so I had to save it for a night where we weren’t running around.  That night was tonight and I absolutely loved this dish.  Sweet and tangy roasted tomatoes, caramelized onions, sweet basil and peppery, blue cheese biscuits…honestly, I can’t think of a more perfect combination of flavors.

Olive ate an entire biscuit, and a couple tomatoes and declared it, “good.” 🙂  I wasn’t sure if she would, so instead of making this dish the entire meal, I served it alongside some baked, herbed tilapia, inspired by my personal friend and fellow food-blogger, Becky from Apronclad.com.  I typically pan fry fish but when Becky posted about baking it, I thought, “hey, I’m already baking the main course, why not pop some fish in the oven, too?”  It turned out light and simple and I love how the protein in this case, was the side dish 🙂

Baked Tilapia with Herbs
I just thought this was a beautiful dish before it was baked! Here’s the simple method I used.  Thanks, Becky for the inspiration!

Baked Tilapia with Herbs
serves 2 and a toddler

3 small fillets of white fish – cod, tilapia, mahi mahi, etc.
1 tablespoon olive oil
salt and pepper
snipped fresh herbs – I used thyme and chives, about a teaspoon each
1 tablespoon of butter, cut into small cubes

In a shallow baking dish, spread the olive oil around and place the fish on the oil. Season fillets  with kosher salt and pepper and sprinkle the snipped herbs all on top and around the fish.  Dot the top of each fillet with a couple pieces of butter and bake at 375F for 15-18 minutes, until fish flakes apart easily.  Serve with a squeeze of lemon if desired.


Olive inhaled her fish, as it is a bit of a comfort-food item for her by this point.  I make fish every week.  Familiarity breeds comfort.  Serve your kids something covered in herbs enough and they’ll eventually not balk at it. You think your kids wouldn’t eat this meal?  I disagree! I think eventually they would.  I have watched over the past couple weeks as Olive has really come into a “grown-up” phase of her life where she MUST assert her own authority over things at ALL TIMES.  It’s fine, it’s normal, but I can see where this point in a toddler’s development would create a negative environment around food, trying new foods or even just mealtimes in general.  Here’s what we do:  Every meal, whatever we’re having, I put a tiny portion of each component on her plate.  I tell her what each thing is and then I back away.  Don’t even pay attention.  Make small-talk! The only time I intervene is when she hasn’t tried a particular component and I encourage her to.  Not shockingly, this is the only time during dinner she protests.  She doesn’t want to be told what to eat.  Do you?  I really should back off in this area even more.  So we just say she has to taste it.  Or simply smell it!  After a smell or a tiny lick, she will 99% of the time decide to eat it.  We emphasize that she doesn’t have to like it, but we DO want her to just taste.  If she doesn’t like the taste, that’s fine, and she can spit it back out if she wants.  It’s working!

We have had upsets.  We’ve had back tracking.  We’ve had days where the girl will literally only eat a cracker and declare herself “all done” and get up from the table and leave and not even come back for fruit.  We have had days where she cries because I tell her she can’t have dessert first.  Most of the time her fighting is on days where she really doesn’t have much of an appetite.  So I let it slide.  I think the most important thing you can do to get your kids to eat what you serve is to STOP ACTING LIKE YOU CARE.  And more importantly, if they don’t eat it, don’t serve them something else.  Don’t go to the kitchen and short-order them a side of PB&J.  I always make sure there is something on the table I know Olive likes and then the rest is up to her.  It’s tough to watch your kid not eat much at a meal.  But trust me – they make up for it at the next one!

I’ll do a simple repost on the tomato cobbler recipe.  I know several friends who would fawn over this recipe and I hope they will make it this weekend!  Summer Richards, I’m talking to you 🙂
Tomato Cobbler with Blue Cheese Biscuits

Tomato Cobbler with Blue Cheese Biscuits*
serves 6

For the Biscuits:

2 cups all-purpose flour
2 tablespoons baking powder
1 tablespoon granulated sugar
1/2 teaspoon salt
1/2 teaspoon coarse ground black pepper
3 tablespoon unsalted butter, cold and cut into cubes
3 tablespoons vegetable shortening, cold and cut into cubes
1/2 cup blue cheese crumbles
3/4 cup cold buttermilk

For the Filling:

2 tablespoons olive oil
1 tablespoon unsalted butter
2 large onions, sliced
3 cloves garlic, minced
2 tablespoons balsamic vinegar
2 pounds cherry tomatoes
1/4 cup coarsely chopped basil
3 tablespoons all-purpose flour
1/2 teaspoon red pepper flakes
salt and coarsely ground black pepper

To make the Biscuits:

In a medium bowl, whisk together flour, baking powder, sugar, and salt.  Add cold butter and shortening.  With your fingers, quickly break up the fat into the dry ingredients.  Rub the fats into the dry ingredients until well incorporated.  Some butter pieces will be the size of small peas, other will be the size of oat flakes.  Toss in blue cheese crumbles.  Stir to incorporate.

Create a small well in the center of the flour mixture.  Add buttermilk all at once.  With a fork, quickly bring together the wet and dry ingredients.  The dough will be rather shaggy.  Dump dough out onto a lightly floured work surface.  Knead dough about 10 times, bringing it together into a disk.  Wrap dough in plastic wrap and refrigerate until the filling is assembled.

To make the tomato Filling:

Add olive oil and butter to a medium saute pan over medium heat.  Add sliced onions and season with salt and pepper.  Cook and brown onions, stirring occasionally, until caramelized, about 18 to 20 minutes.  Add garlic and cook for one minute more.   Remove pan from heat, add balsamic vinegar and set aside.

In a large bowl, toss together clean cherry tomatoes (no need to cut them), chopped basil, flour, and red pepper flakes.  Add caramelized onions and toss together until everything is lightly and evenly coated in flour.  Season with salt and pepper.

Place rack in the upper third of the oven and preheat oven to 375 degrees F.

Pour the tomato and onion filling into a square 8×8-inch baking dish.  Place in the oven and bake tomatoes filling for 25 minutes.

Remove the biscuit dough from the fridge.  On a lightly floured work surface, roll out biscuit dough into a 3/4 or 1-inch thickness.  Use a 1 1/2 to 2-inch round biscuit cutter to cut out biscuits.  Dip the cutter in flour should it get sticky.  Remove the partially cooked filling from the oven and carefully place 6 biscuits atop the tomato filling in the pan.  Brush biscuit tops with buttermilk and sprinkle with salt and pepper.  Reshape and reroll excess biscuit dough to make extra biscuits at another time.  (The shaped biscuit dough freezes very well.)

Return warm filling and biscuit dough to oven and bake for 17-20 minutes, until the biscuits are golden brown and cooked through, and the tomato mixture is bubbling.

Remove from the oven and allow to cool for about 15 minutes before serving.  Tomato Cobbler is best served warm.

*posted directly from Joy the Baker’s blog