Coconut Quinoa with Seared Sausage and Peaches

Peaches, Sausage and Coconut Oil Quinoa
This is a healthy, filling and tasty meal that is easy to throw together in thirty minutes. It’s nearing the end of peach season and it’s with sadness that we say goodbye to one of the best years I’ve witnessed for this magical fruit. There was something truly special about the peaches on our tiny tree in the backyard. Matt brought one in to me a couple weeks ago and when I tasted it, the first thing I said was, “This tastes like a Jolly Rancher!” The summer peach is like the summer tomato – neither fruit can be reproduced in full effect and glory throughout the rest of the year. So we ate our modest harvest directly from the tree while standing in the yard and I cooked up the rest in a couple different meals.

The quinoa is nearly the show-stealer for this meal, though. Our good friend posted a quick tip on her Facebook feed a few weeks ago, mentioning that she loved to stir coconut oil into her quinoa at the end of cooking and top it with avocado. We tried that exact recipe and swooned. I made it again as quickly as possible and created this meal. The coconut quinoa and the sweet spice of the sausage and peaches paired perfectly together and tasted like summer. There’s not much time left to make meals like this, so hop to it!

Sausage, Peaches and Quinoa

Coconut Quinoa with Grilled Sausage and Peaches

  • Servings: 4
  • Difficulty: easy
  • Print

1 cup pearl quinoa
2 cups water
2 TBS extra virgin coconut oil
salt and pepper to taste
2 cooked sausage links (to serve 4)
1 TBS unsalted butter
1-2 ripe summer peaches, sliced

Rinse the quinoa for about a minute under cold running water. This may seem unnecessary to you, as it did to me the first time, but it’s the difference between good tasting quinoa and extremely bitter tasting quinoa. How ’bout I write “quinoa” one more time?

In a medium saucepan, bring the water to a boil and add in the quinoa and lower to a simmer and cover. Cook for about 20 minutes until water is absorbed. Or just follow the package instructions! When it’s done, stir in the coconut oil and salt and pepper and adjust seasoning to taste. If you want to go vegetarian, simply substitute avocado for the sausage and serve with seared peaches. For the sausage, add a tablespoon of butter into a clean skillet and sear the sausage until browned on both sides. Remove the sausage and add the peaches and saute until warmed through. Serve on top of quinoa along with the sausage.


Advertisement

Cheesy Cornmeal Waffles with Spicy Honey

Smoked Gruyere Cornmeal Waffles with Spicy Honey Smoked Gruyere Cornmeal Waffles
Parks and Recreation was one of our favorite shows of all time.  We were sad to see it end a few weeks ago and had to cook something special for the finale.  I debated quite a lot about what to cook.  I could’ve done a plain hamburger inspired by the episode where Ron and Chris battle it out in a food war. We thought about doing bacon wrapped shrimp served with all the bacon and eggs the store had to offer, but I figured that might be a tad wasteful. And so we settled on waffles, as Leslie Knope would’ve wanted.  I decided to do a savory waffle with a side of bacon and plenty of melted butter and Mike’s Hot Honey on top.  Mike’s makes some amazingly spicy and delicious honey that we love putting on our pizza crusts and it’s really good on so many things like buffalo wings or smoked sausages, but it was especially good on top of this cheesy waffle!

Smoked Gruyere Cornmeal Waffles and Spicy Honey


Cheesy Cornmeal Waffles with Hot Honey

  • Servings: about 8 Belgian waffles
  • Print


  • 1 cup of self rising flour
  • 1 cup of all purpose cornmeal
  • 2 teaspoons of baking powder
  • 1/2 teaspoon of salt
  • 1 tablespoon of sugar
  • 1/2 cup grated cheddar cheese
  • 2 scallions, sliced thin
  • 1/2 tsp smoked paprika (optional)
  • 1/8 tsp cayenne (optional)
  • eggs
  • 1 cup buttermilk
  • 1/3 cup water
  • 1/4 cup of canola oil

Get your waffle iron heating up.  In a large bowl, mix the dry ingredients along with the cheese and scallions.  In a separate bowl, whisk the eggs, buttermilk, water and oil until well blended.  Add the wet ingredients to the dry and beat with a fork until no dry parts remain.  Cook in a waffle iron and keep warm in a 200 degree oven until you’re finished cooking all the waffles.  Serve with hot honey, regular syrup, sweet bbq sauce, or anything you can think of. Hey, why not a fried egg on top?! And make sure you have plenty of crispy bacon alongside.  Enjoy!


Savory Vegetable Souffles – Meatless Mondays Never Tasted So Good

Brussels Sprout and Cheddar Souffle Brussels Sprouts and Cheddar Souffle
Happy Monday After Daylight Savings Time!  This will be a hard week for many, getting used to the time change.  I love it once the adjustment takes place because I LOVE that it stays light outside till nearly 8:30 in the spring and nearly 10 in the summer.  We get to play later (it seems) and it’s important to not feel so closed in after months of the cold, dark evenings of winter.

I’ve been in a new, happy rut, lately.  On most Mondays lately, I’ve been making a vegetable souffle.  I hardly ever have my act together for dinner on Monday and I usually haven’t been to the store for the week (like today), but I nearly always have some sort of leftover veg in the fridge and (usually) four eggs.  Voila – this beautiful souffle, big enough for all of us to eat more than a big portion.  I’d say it would serve 4 as a side dish or 2.5 (like us) as a main. And it’s so versatile!Brussels Sprouts Souffle
The pics above were made with Brussels sprouts and cheddar and the pics below were spinach and gruyere.  I’ve done leftover broccoli with white cheddar, leek, and asparagus, too!  If you have eggs, cheese and some leftover vegetables, you have a meal!  And a really good one.  Every time I have made this, Olive has said, “this is a good meal, Mama.” Good enough for me!  It’s a wonderful vehicle for getting more vegetables into your little people, as well.
Spinach and Parmesan Souffle

Savory Vegetable Souffles

  • Servings: 4-6 as a side
  • Print

1/3 cup grated parmesan or fine bread crumbs
2 cups cooked vegetables, finely chopped.  Use boiled brussels sprouts, spinach, leeks, asparagus, kale, whatever floats your boat!
5 tablespoons butter
salt and pepper
1/4 cup flour
1 cup milk
4 eggs, room temp and separated
1/2 cup grated hard cheese – cheddar, gruyere, gouda, romano, parm, etc

Heat the oven to 375F. Butter a 6-cup souffle dish or 6 one cup ramekins, if you want everyone to have a nice, neat side dish of their very own.  Coat the sides of the dish with cheese or breadcrumbs. Cook your vegetable in salted boiling water until tender.  Drain and squeeze out as much moisture as you can.  Season with salt and pepper and set aside.

In a large saucepan, melt the 1/4 cup butter over medium heat, stir in the flour and cook, stirring frequently, for 2 minutes.  Whisk in the milk and cook until the sauce has thickened, whisking the entire time.  Season with salt and pepper to taste and add a splash more milk if it gets too thick (you want a thick gravy consistency).  Set aside off the heat.  Into your egg yolks, whisk in about 1/2 cup of the hot cream sauce to warm them and then return them to the rest of the sauce and whisk to incorporate.  Stir in the cheese and when it’s melted, fold in the vegetables.

With a mixer, beat the egg whites until stiff.  Stir a quarter of them into the souffle base and then fold in the remainder until no white streaks show.  Bake souffles on a rimmed baking sheet in the middle of the oven until risen and golden, 30-35 minutes.  The middle will be slightly wobbly if you’ve made it in one large dish.  Serve immediately!

*recipe adapted from The New Vegetarian Cooking for Everyone cookbook, which is completely fantastic so far.  Hasn’t steered us wrong, yet!


Spinach and Parmesan Souffles

White Bean Stew with Smoked Sausage and Kale – Using Up Leftovers!

Scrappy Stew - White Beans, Kale and Roast Chicken
So it seems winter is going to beat us down at least one more time before spring officially arrives.  Maybe more, but I’m hoping for just one last hurrah.  I used to love winter and all its coziness and hot tea and warm socks.  But now that I’m a mother of two little people, I find winter to be quite suffocating.  I just NEED there to be the option to go outside.  When I had Ellie back in November, I quickly taught Ollie how to open the backyard door by herself.  That was probably the best move I made all year.  She could come and go while I fed the baby and everyone was happy.  But when it snows, there’s this expectation from Ollie that we MUST GO OUTSIDE NOW AND YOU MUST GO WITH ME.  And it just isn’t that easy.  And frankly, as most of you know, it takes 15 minutes to get a child bundled up to go outside and then 5 minutes for them to get so cold they want to come back in.  I fail to see how it’s worth the effort.

The one thing I DO love about cold weather is the food. I love making a huge pot of beans and eating it over the following days in various ways.  Over cornbread, with smoked sausage, in a quesadilla, with a fried egg, whatever, it’s all good.  And this most recent batch of stew we made was my favorite.  Because Matt made it.  Seriously, though, we both make our beans in the same way and much in the spirit of the Family Meal Blog, I always love when a recipe is made by someone else in this family.  This stew also does my most favorite thing in the entire kitchen-world: it uses up leftovers!  We threw in a half used can of diced tomatoes, a handful of kale, onion, and some leftover turkey and sausage from a local bbq joint and it was frankly, amazing.  The beauty of a good bean stew is that you can add anything and if the beans are good, you’re good to go.  For this, I recommend using dried beans instead of canned, although canned would cut the prep/cook time by a good 8 hours.  They just don’t have the depth of flavor that starting with dried beans does.  And because we’re a part of Rancho Gordo’s Bean of the Month Club, (yes) I recommend you get their beans if you can find them!

White Bean and Kale Stew


White Bean Stew with Smoked Sausage and Kale

  • Servings: 8-10
  • Print

*start this recipe the day before you want to eat it! Modified for a slow cooker below the recipe!

1 lb dried white beans, such as canellini
2 bay leaves
1 small onion, diced
1 carrot, diced
1 stalk of celery, diced (these three ingredients together are called mire poix)
2 garlic cloves, smashed
1 can fire roasted tomatoes (we used half a can because that’s what we had leftover in our fridge)
1 smoked sausage link, chopped
4 oz. smoked turkey breast
1 small bunch of kale, rinsed and chopped

The night before you want to eat this stew, rinse the beans and then submerge them in a large stockpot by about 2 inches of water along with the bay leaf.

In the morning, bring the beans to a boil in the same water you soaked them in and add the onion, carrot and celery and garlic cloves.  Season with salt and pepper.  Reduce to an active simmer and cook until beans are tender.  This time can really vary.  I’d say on average, I have the beans simmering for about 2 hours before they are a texture I like.  Some like al dente beans.  I’m not one of those people.  I also don’t like them to be total mush, like canned, but it’s your preference, really.  Just start tasting them after an hour and keep going if you’re not satisfied.

After about an hour of simmering, add in the tomatoes and meats (and honestly, the meats were leftovers in our fridge. You could add bacon, ground beef, no meat at all – this soup will be amazing no matter what).  Toss the kale in about 30 minutes before serving and adjust the seasoning of the stew with extra salt and pepper.  Remove the bay leaves and serve with crusty buttered bread.

Slow Cooker Note: this could all be done in a slow cooker if you wanted to get it on before you go to work.  Just soak the beans in a large slow cooker overnight with the bay leaves with at least 2-3 inches of water covering the beans.  In the morning before you leave for work, add in the mire poix and garlic and turn it to low.  When you get home, add in the rest of the ingredients and turn it on high for about 30 minutes to let it boil.  Adjust the seasoning and serve.

Creamy Roasted Carrot Soup

roasted carrot soup with cayenne and ginger
Fall means soup.  Soup means it’s cold enough outside to not want to die at the thought of eating soup for dinner.  And it being cold enough outside seems to make everything around here better.  I sleep better, we can play outside longer without my redhead overheating and everything just feels fresh.  And I’m a bit of a broken record when it comes to hailing soups as a surefire way to get your kids to eat their vegetables, but I’m going to say it, again.  Cooking just about any vegetable and pureeing it into a soup is the easiest way to get a baby, toddler, picky adult to eat a vegetable otherwise sneered at due to its texture or appearance.  Olive used to eat asparagus.  But then, she turned two and decided she was no longer interested.  But the other day I made a batch of asparagus soup and she drank it down.  Same flavor, different delivery vehicle.  And when you add a piece of crusty, buttery bread on the side, the soup suddenly seems like a complete meal.

My go-to soup in the fall is usually butternut squash.  But I nearly always have a half-used bag of carrots in the fridge, waiting to become something more exciting than diced up for chicken pot pie.  The other day I made this soup and I loved it.  We ate on it for several days – always a good side dish or starter, and good for dunking toasted bread.  I don’t need to say it, again, but this batch of soup would fill up about 12 baby food jars.  Can you lend 30 minutes to making a vegetable soup?  How about $3 for a 2lb bag of carrots?  How much is a jar of baby food, again?  You get the point.

Yay, soup!

roasted carrot soup
Roasted Carrot Soup
serves 6-8

1 sweet onion, diced
3 TBS olive oil
2 lbs carrots, peeled and chopped
6 cups vegetable or chicken stock
1/2 cup heavy cream
Salt and Pepper to taste
ground ginger and paprika for garnish

Heat the olive oil in a large pot over medium high heat until it shimmers.  Toss in the onion and saute until tender but not browned, about 5-6 minutes.  Add in the carrots and cook for about 10 minutes, stirring to coat in the oil.  Add the stock and let the pot come to a boil, then reduce the heat and simmer for about 20 minutes, or until the carrots are tender.  Puree directly in the pot with an immersion blender, or take in batches to a standard blender and puree until smooth.  If you used a standard blender, return the soup to the pot and add the heavy cream.  Season with salt and pepper to taste and then ladle into bowls and sprinkle with ground ginger, paprika and a splash of cream or sour cream.

Chicken Avocado Taquitos with Red Pepper Soup

chicken taquitos with green chili
These recipes jumped off the screen last Monday when I was looking for something quick, nutritious and slightly comforting to make for my family.  Both recipes come from the great world of Pinterest and they paired together like old friends.  The first was baked chicken taquitos and I improvised from the original recipe a bit and added avocado (because it improves nearly everything) and green chili powder instead of cayenne.  Both additions worked well and I’ll definitely make this recipe again!

The second recipe comes from a dear friend and fellow food blogger, Becky McGrew of Apronclad.com!  She made this roasted red pepper soup a while back and I have kept it in the back of my head as yet another wonderful soup to introduce new flavors to our little two-year old, Olive.  The soup made a wonderful dip for the taquitos and was obviously wonderful on its own as a starter/side dish for the meal.  It has some Italian herbs in it, which are awesome, but I think next time to match up a little better with the Mexican theme, I think I’d omit the basil and thyme and add in Mexican oregano and cilantro to finish.  Whatever you do, just make this soup.  It’s outstanding!  I didn’t mess with the recipe at all, so just go on over to Becky’s blog and get the recipe there, plus very nice step-by-step instructions!

chicken taquitos

Baked Chicken Avocado Taquitos*

2 boneless skinless chicken breasts, pounded to ½ inch thickness
½ teaspoon garlic salt
1 teaspoon green chili powder
½ teaspoon onion powder
1 teaspoon cumin
8 6-inch flour tortillas
1 cup shredded mexican blend or cheddar cheese
1 large, ripe avocado
Preheat oven to 450. Line a baking sheet with nonstick foil and spray heavily with cooking spray.

In a small bowl whisk together garlic salt, green chili powder, onion powder and cumin. Rub seasoning into both sides of chicken breasts. Spray a large pan or skillet with cooking spray and cook chicken over medium heat about 8-10 minutes or until cooked through. Chop chicken up into small cubes. Divide chicken evenly among all tortillas, spreading the chicken into a strip down the middle of each tortilla. Top chicken with about 2 tablespoons of shredded cheese and a few pieces of avocado. Tightly roll each tortilla into a taquito. Place end side down on prepared baking sheet. Spray taquitos heavily with cooking spray. Bake 10-15 minutes until tortilla edges begin to brown/blacken and cheese is melty. We dipped ours into the soup and also our favorite – Mexican crema!  Seriously, so much more flavor than sour cream!

*adapted from Creme de la Crumb

Chicken Piccata with Thyme and Mushrooms

Chicken Piccata and Buttered Noodles
This was the first full meal I made on our new gas stove that Matt installed for us last weekend!  He worked so hard rerouting gas lines (scary) and changing out new electrical outlets (scarier) and sawing a bigger hole in our counter top (can’t turn back, now!) and it all ended up totally awesome!  We have wanted a gas stove for years – they just heat so much quicker, they come down from high heat quicker – everything is more precise.  And plus – FIRE!  It’s pretty appealing.  I am tempted to roast marshmallows on this thing.  But I won’t.  I am very thankful for this machine and I swear I’ll deep clean it more than I did our old electric one…
Buttered Noodles
For the first meal, I did a simple chicken piccata with mushrooms and thyme and some soft, buttered noodles.  It was very comforting and yet refreshing at the same time.  I love the bite of the lemon juice and the capers in this dish and so for a twist, I added my favorite herb, thyme, instead of the traditional parsley and I also added some sauteed baby portobello mushrooms.  It all came together great and we thoroughly enjoyed our first meal from the shiny new stove!

chicken piccata

Chicken Piccata with Thyme and Mushrooms
serves 4

3 chicken breasts, butterflied and split in half
1/2 cup flour for dredging
salt and pepper to season the chicken
6 tablespoons of butter
2 tablespoons olive oil
1/2 cup chicken stock
1/3 cup fresh squeezed lemon juice
1 tablespoon fresh chopped thyme leaves
1/4 cup capers, drained
1 cup mushrooms, sliced thin
8 oz. long pasta, such as linguine or spaghetti

Heat your oven to 200F.  This is to hold your chicken as you cook it and until the noodles are ready so that everything stays hot until you’re ready to serve.

Bring a large pot of water to boil.  Salt it.  Salt it some more.  As it’s heating…

Butterfly the chicken breasts by sliding a very sharp knife length-wise into the thickest part of the chicken breast (kinda like you’d cut an english muffin in half) and lay the chicken breast open and cut down the middle, forming two, thinner cutlets.  Do this with the remaining chicken breasts and dry them on both sides and season both sides with a sprinkle of kosher salt and fresh cracked pepper.

Heat the oil and 2 tablespoons of butter over medium high heat in a large, stainless skillet.  When the butter starts bubbling and popping, coat each chicken breast in flour, shake off the excess and lay floured cutlets on a paper towel until ready to fry.  I worked in two batches – three pieces at a time.  Fry for about 3-5 minutes per side, until golden brown and an instant-read thermometer says at least 160. (It’ll cook some more as it sits to warm in the oven.)  Place fried chicken on a plate and place in the oven to keep warm as you fry up the rest.  For the second batch, add two more tablespoons of butter to the pan before frying the rest.

Remove the chicken and place on the platter in the oven.  Add the lemon juice, chicken stock and capers and thyme to the pan and scrape up the brown bits and season with salt and pepper.  Add the mushrooms and let the sauce reduce for a couple minutes.  Remove from heat and whisk in the remaining two tablespoons of butter and spoon sauce/mushrooms over the chicken and serve with buttered noodles.

To finish the noodles once they are done boiling, add the drained noodles to a bowl, add a splash of pasta water, a tablespoon of butter and fresh cracked pepper and stir to combine.  Garnish with fresh chopped herbs if you like!

Chicken Piccata with Thyme and Mushroom

Irish Lamb Stew – a taste of home, no matter where you’re from

Saint Patricks Day - Irish Stew
Happy Saint Patrick’s Day!  I confess I don’t know a lot about the real dishes of Ireland; the dishes people grew up eating around their family tables.  I only know that around here, people eat corned beef and cabbage and drink copious amounts of Guiness Stout.  In order to do something a little more authentic than four leaf clover shaped cookies, I consulted my fabulous and too-far-away friend, Elisha Clarke on some of her favorite Irish dishes.  Elisha was born and raised in Ireland and TODAY is her birthday!  I very much feel the luck of the Irish because I know her!  She is an amazing photographer and I hope one day I can go hang out with her in Ireland and see first hand the beauty she gets to photograph every day.
Irish Stew with Country Bread
When I asked her about dishes she grew up loving, she listed five or so and Irish stew actually wasn’t one of her favorites, haha.  But then she sent me a link to a cute, Irish celebrity chef doing this stew on Jaime Oliver’s show and he made it look so simple and delicious, I had to try it!  It came together easily and as it cooked for over an hour, I had time to relax with my family!  As I took the first bite, I was immediately transported to my own dining table as a child.  My mom made beef stew quite often and would let it simmer on the stove while we were at church.  I always loved it and she served it with saltine crackers that we’d crush up into our stew.  Tasting this very similar Irish lamb version made me smile – thousands of miles separate the humble meals of working class Americans and working class Irish, yet we are instantly connected by a warm meal.  Elisha mentioned that her country has very poor origins and so therefore, the traditional dishes are very humble in nature.  I think all the best dishes in any culture originate from people making the best of what they have been given.  My family did it, Elisha’s family did it, and if I were to guess, I’d say that probably most of you could relate to that story, as well.  A simple bowl of warm stew on a cold evening can comfort and connect family and friends, no matter how far apart.
Irish Stew
Irish Lamb Stew*
serves 6

2 TBS vegetable oil
2lb 3oz lamb shoulder, trimmed and cut into 1 inch chunks (could also use beef chuck roast)
2 onions, peeled and roughly chopped
3 celery stalks, trimmed and sliced
1 bay leaf
4 large carrots, peeled and roughly chopped
4 1/2 cups beef stock
2 lbs potatoes, peeled and cut into 1/2 inch slices
3 TBS butter cut into small cubes
salt and ground black pepper to taste
slices of country bread, to serve

Place a large, flameproof casserole pot over a high heat, add 1 tablespoon of the oil and brown the lamb pieces in two batches. Remove and set aside on a plate. Reduce the heat to medium–high, add another tablespoon of oil and fry the onion, celery and carrot for 4–6 minutes or until the onions have softened.

Preheat the oven to 325F. Return the meat to the pot, along with the bay leaf and stock, season with kosher salt and ground black pepper and bring to the boil. Remove from the heat and push the slices of potato down into and across the top of the stew, dot with the butter and give a final seasoning of sea salt and ground black pepper. Cover and place in the oven to cook for about 1½ hours or until the meat is tender, then remove the lid and cook for a further 10 minutes until the potatoes have browned.

Serve the stew in deep bowls with crusty, buttered bread to mop up all the juices!  Happy Saint Patrick’s Day!

*minimally adapted from Donal Skehan’s beautiful recipe

Dinner Tonight: Tomato Cobbler with Blue Cheese Biscuits and some Blogger Love

Blue Cheese Biscuits with Roasted Tomatoes
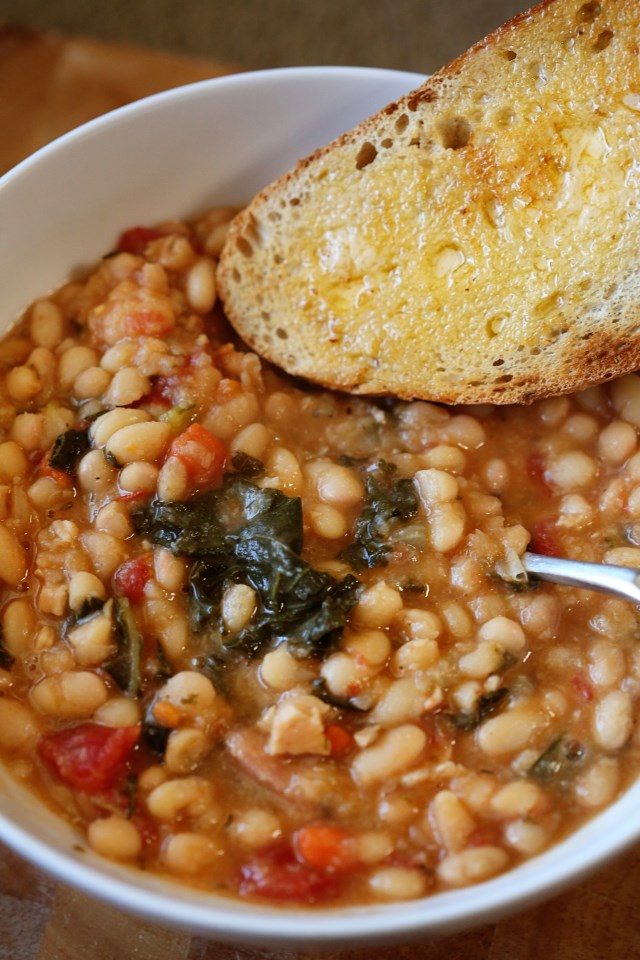
I’m loving other foodies’ blogs this week.  After signing off of eating out for Lent, this week I decided to make nothing but food from amazing recipes I saw on Pinterest or other blogs I follow.  Today’s main recipe comes from Joy the Baker’s amazing blog.  I saw her recipe for tomato cobbler and blue cheese biscuits on Pinterest and I wanted it THAT VERY SECOND.  The recipe takes almost two hours, start to finish, so I had to save it for a night where we weren’t running around.  That night was tonight and I absolutely loved this dish.  Sweet and tangy roasted tomatoes, caramelized onions, sweet basil and peppery, blue cheese biscuits…honestly, I can’t think of a more perfect combination of flavors.

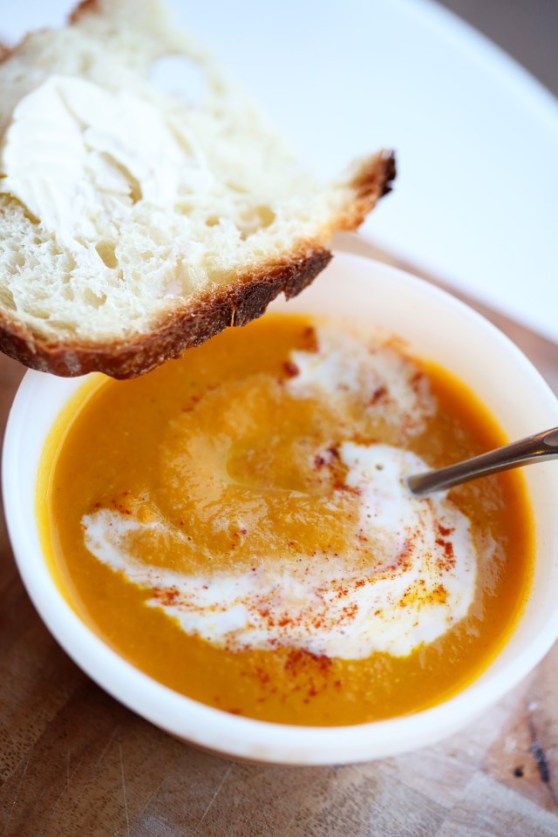
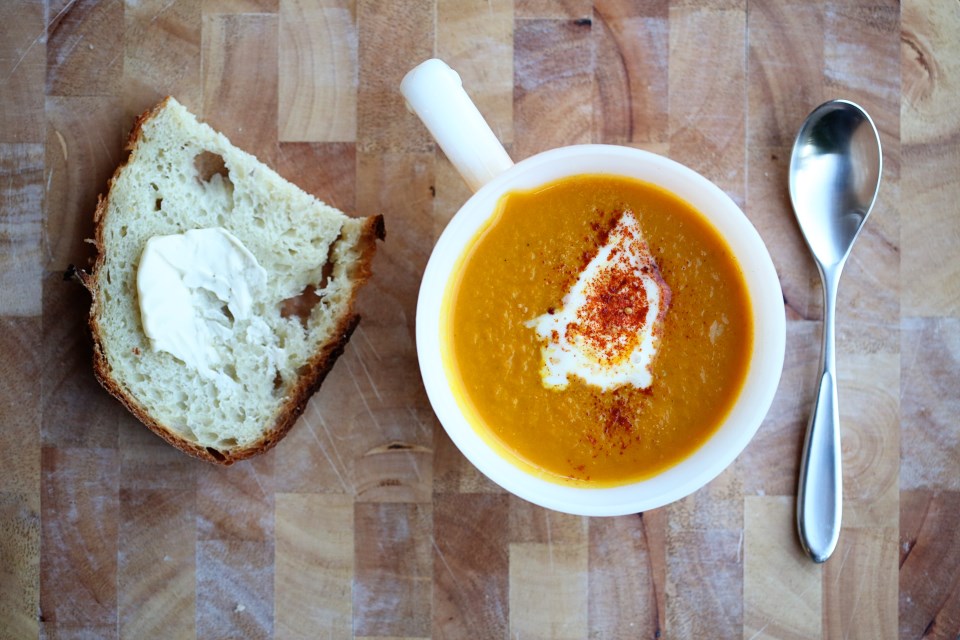
Olive ate an entire biscuit, and a couple tomatoes and declared it, “good.” 🙂  I wasn’t sure if she would, so instead of making this dish the entire meal, I served it alongside some baked, herbed tilapia, inspired by my personal friend and fellow food-blogger, Becky from Apronclad.com.  I typically pan fry fish but when Becky posted about baking it, I thought, “hey, I’m already baking the main course, why not pop some fish in the oven, too?”  It turned out light and simple and I love how the protein in this case, was the side dish 🙂

Baked Tilapia with Herbs
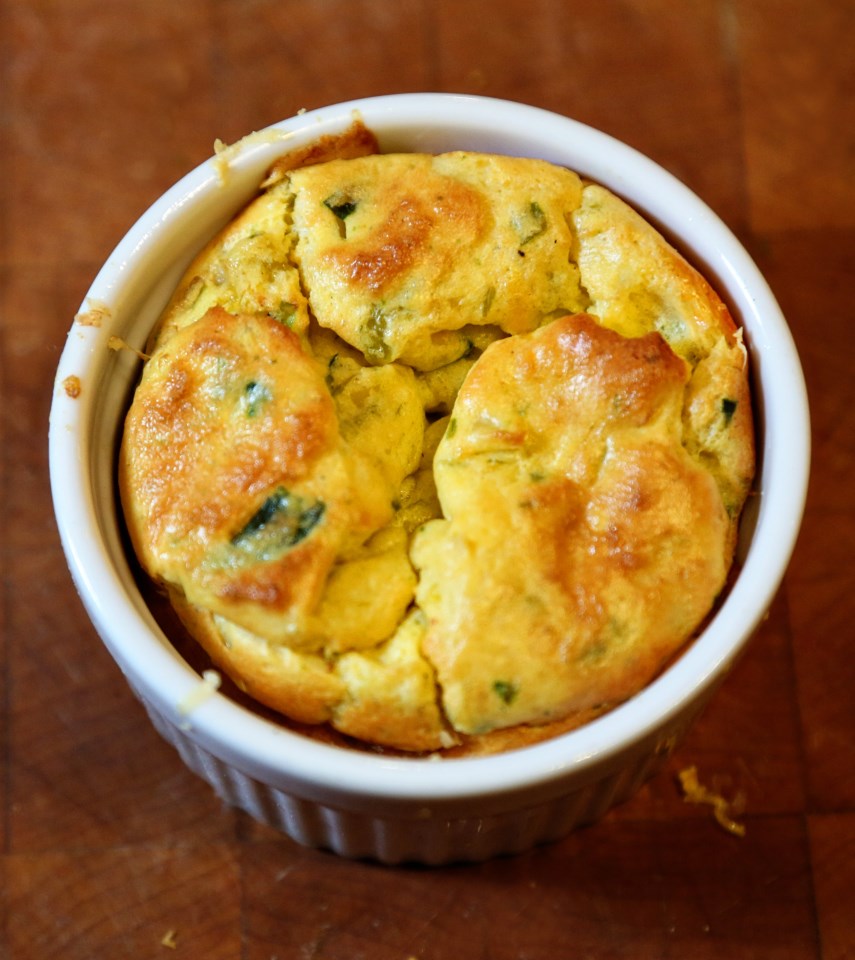
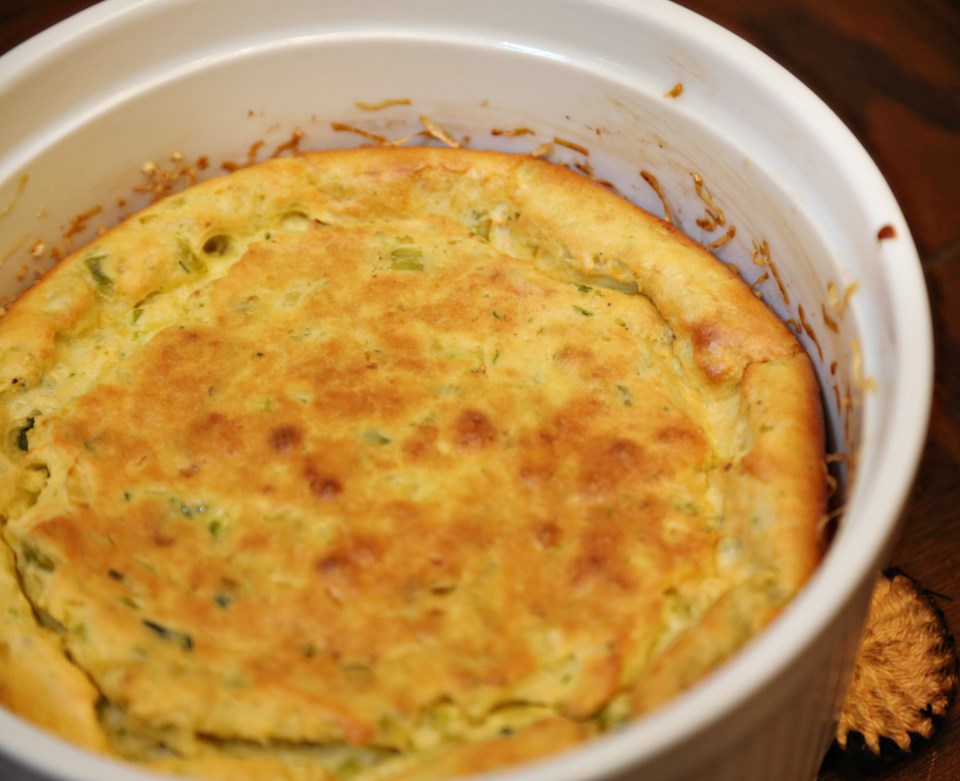
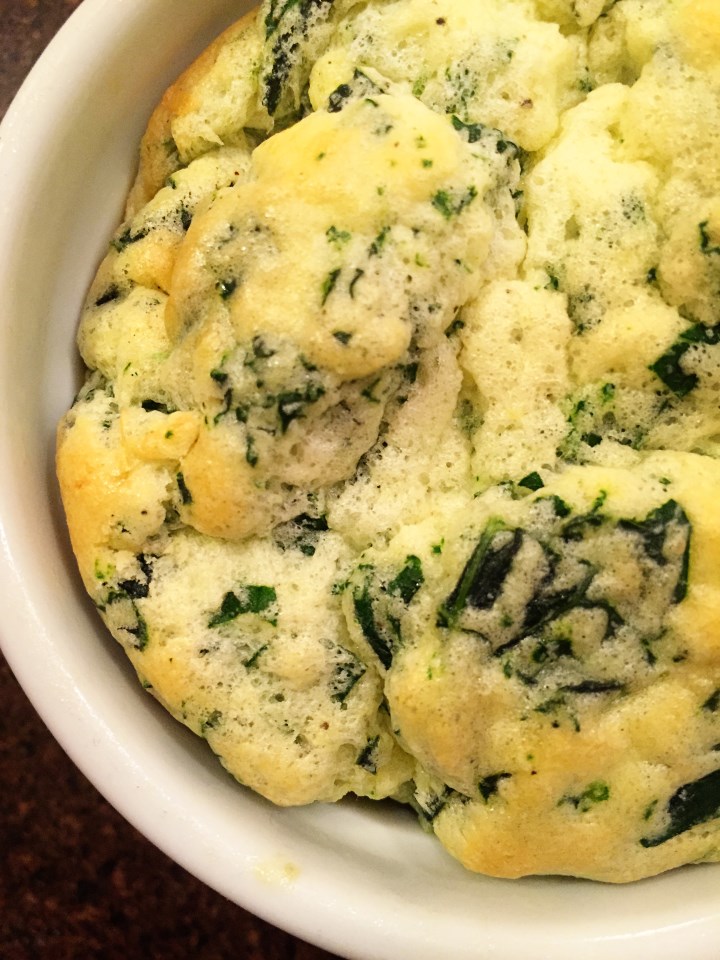
I just thought this was a beautiful dish before it was baked! Here’s the simple method I used.  Thanks, Becky for the inspiration!

Baked Tilapia with Herbs
serves 2 and a toddler

3 small fillets of white fish – cod, tilapia, mahi mahi, etc.
1 tablespoon olive oil
salt and pepper
snipped fresh herbs – I used thyme and chives, about a teaspoon each
1 tablespoon of butter, cut into small cubes

In a shallow baking dish, spread the olive oil around and place the fish on the oil. Season fillets  with kosher salt and pepper and sprinkle the snipped herbs all on top and around the fish.  Dot the top of each fillet with a couple pieces of butter and bake at 375F for 15-18 minutes, until fish flakes apart easily.  Serve with a squeeze of lemon if desired.


Olive inhaled her fish, as it is a bit of a comfort-food item for her by this point.  I make fish every week.  Familiarity breeds comfort.  Serve your kids something covered in herbs enough and they’ll eventually not balk at it. You think your kids wouldn’t eat this meal?  I disagree! I think eventually they would.  I have watched over the past couple weeks as Olive has really come into a “grown-up” phase of her life where she MUST assert her own authority over things at ALL TIMES.  It’s fine, it’s normal, but I can see where this point in a toddler’s development would create a negative environment around food, trying new foods or even just mealtimes in general.  Here’s what we do:  Every meal, whatever we’re having, I put a tiny portion of each component on her plate.  I tell her what each thing is and then I back away.  Don’t even pay attention.  Make small-talk! The only time I intervene is when she hasn’t tried a particular component and I encourage her to.  Not shockingly, this is the only time during dinner she protests.  She doesn’t want to be told what to eat.  Do you?  I really should back off in this area even more.  So we just say she has to taste it.  Or simply smell it!  After a smell or a tiny lick, she will 99% of the time decide to eat it.  We emphasize that she doesn’t have to like it, but we DO want her to just taste.  If she doesn’t like the taste, that’s fine, and she can spit it back out if she wants.  It’s working!

We have had upsets.  We’ve had back tracking.  We’ve had days where the girl will literally only eat a cracker and declare herself “all done” and get up from the table and leave and not even come back for fruit.  We have had days where she cries because I tell her she can’t have dessert first.  Most of the time her fighting is on days where she really doesn’t have much of an appetite.  So I let it slide.  I think the most important thing you can do to get your kids to eat what you serve is to STOP ACTING LIKE YOU CARE.  And more importantly, if they don’t eat it, don’t serve them something else.  Don’t go to the kitchen and short-order them a side of PB&J.  I always make sure there is something on the table I know Olive likes and then the rest is up to her.  It’s tough to watch your kid not eat much at a meal.  But trust me – they make up for it at the next one!

I’ll do a simple repost on the tomato cobbler recipe.  I know several friends who would fawn over this recipe and I hope they will make it this weekend!  Summer Richards, I’m talking to you 🙂
Tomato Cobbler with Blue Cheese Biscuits

Tomato Cobbler with Blue Cheese Biscuits*
serves 6

For the Biscuits:

2 cups all-purpose flour
2 tablespoons baking powder
1 tablespoon granulated sugar
1/2 teaspoon salt
1/2 teaspoon coarse ground black pepper
3 tablespoon unsalted butter, cold and cut into cubes
3 tablespoons vegetable shortening, cold and cut into cubes
1/2 cup blue cheese crumbles
3/4 cup cold buttermilk

For the Filling:

2 tablespoons olive oil
1 tablespoon unsalted butter
2 large onions, sliced
3 cloves garlic, minced
2 tablespoons balsamic vinegar
2 pounds cherry tomatoes
1/4 cup coarsely chopped basil
3 tablespoons all-purpose flour
1/2 teaspoon red pepper flakes
salt and coarsely ground black pepper

To make the Biscuits:

In a medium bowl, whisk together flour, baking powder, sugar, and salt.  Add cold butter and shortening.  With your fingers, quickly break up the fat into the dry ingredients.  Rub the fats into the dry ingredients until well incorporated.  Some butter pieces will be the size of small peas, other will be the size of oat flakes.  Toss in blue cheese crumbles.  Stir to incorporate.

Create a small well in the center of the flour mixture.  Add buttermilk all at once.  With a fork, quickly bring together the wet and dry ingredients.  The dough will be rather shaggy.  Dump dough out onto a lightly floured work surface.  Knead dough about 10 times, bringing it together into a disk.  Wrap dough in plastic wrap and refrigerate until the filling is assembled.

To make the tomato Filling:

Add olive oil and butter to a medium saute pan over medium heat.  Add sliced onions and season with salt and pepper.  Cook and brown onions, stirring occasionally, until caramelized, about 18 to 20 minutes.  Add garlic and cook for one minute more.   Remove pan from heat, add balsamic vinegar and set aside.

In a large bowl, toss together clean cherry tomatoes (no need to cut them), chopped basil, flour, and red pepper flakes.  Add caramelized onions and toss together until everything is lightly and evenly coated in flour.  Season with salt and pepper.

Place rack in the upper third of the oven and preheat oven to 375 degrees F.

Pour the tomato and onion filling into a square 8×8-inch baking dish.  Place in the oven and bake tomatoes filling for 25 minutes.

Remove the biscuit dough from the fridge.  On a lightly floured work surface, roll out biscuit dough into a 3/4 or 1-inch thickness.  Use a 1 1/2 to 2-inch round biscuit cutter to cut out biscuits.  Dip the cutter in flour should it get sticky.  Remove the partially cooked filling from the oven and carefully place 6 biscuits atop the tomato filling in the pan.  Brush biscuit tops with buttermilk and sprinkle with salt and pepper.  Reshape and reroll excess biscuit dough to make extra biscuits at another time.  (The shaped biscuit dough freezes very well.)

Return warm filling and biscuit dough to oven and bake for 17-20 minutes, until the biscuits are golden brown and cooked through, and the tomato mixture is bubbling.

Remove from the oven and allow to cool for about 15 minutes before serving.  Tomato Cobbler is best served warm.

*posted directly from Joy the Baker’s blog

Butternut Squash and Celery Root Soup and trying something new

Butternut Squash Soup
This is one of the best soups I’ve made all winter.  Previously, butternut squash soups were borderline too sweet for me – I could never finish an entire batch and would guiltily throw the leftovers down the sink.  I’ve made this version three times, now, and each time, we eat it all!  It doesn’t get boring – the flavors are so complex and balanced, thanks to that crazy looking celery root.  It’s perfect!  It’s also incredibly filling and very low fat, so I think it’s quite possibly the most wonderful food to have when you’re watching what you eat, but don’t want to feel deprived.  It’s also perfect as a baby food!  With just two simple vegetables, it’s a great way to introduce flavors to a little one just starting out on solids, or a toddler who might eat soup better than they would eat a new vegetable.  For toddlers, I think the best way to serve soup is in a small, handled cup.  Fill it half way and let them sip at their own pace.  They love feeling in control and YOU will feel better with limited soup-spills as would occur most certainly if you handed them a spoon 🙂  This soup is also a great way to introduce YOU to a new vegetable!  Who here has bought and prepared celery root?  (also called celeriac)  If you haven’t, you don’t have to be afraid – it tastes like celery with the consistency of a sweet potato!

I’m happy to announce a little cooking segment I’ll be doing this year on my friend, Paul’s PBS show, 24 Frames!  (this soup makes an appearance!)  It’s very exciting to be a part of something creative and I’m deeply flattered that he included me in his show. I love talking about food more than anything, so once I get over the mortal fear of seeing myself talk on camera, I’ll finally start to enjoy watching my own segment.  Please tune in to 24 Frames every Saturday night at 9 p.m. Central on PBS!  The show should be available online very soon for those who don’t live in this area, and when it is, I’ll post a link!

Thank you all for watching and for reading my blog.  It’s very humbling and I hope you can feel a little more confident in the kitchen with every new recipe you try!

Butternut Squash and Celery Root Soup

Butternut Squash and Celery Root Soup
serves 6-8

 2 tablespoons olive oil
1 medium onion, diced
1 – 2lb butternut squash, peeled, seeded and diced
1 celery root, peeled, rinsed and diced
2 teaspoons kosher salt
2 teaspoons dried rosemary
4 cups low sodium chicken or vegetable stock, hot
black pepper and cream for garnish
1. Peel and chop the onion, celery root and butternut squash.
2. Heat the oil in a large stock pot.
3. Add the onion and cook, stirring often, until softened, about 5 minutes.
4. Stir the squash, celery root and salt into the pot and cook for about 10 minutes until the squash begins to soften.
5. Add the rosemary and chicken broth and bring to a boil.  Reduce heat and let simmer over medium heat, partially covered, for 20 minutes, or until vegetables are tender.
6. Using a blender in batches, or an immersion blender, puree the soup until completely smooth.  Adjust the seasoning with salt and pepper and thin out with cream or extra stock as desired.  Ladle into bowls and add a swirl of cream and a few dashes of fresh cracked pepper and serve!