Blueberry Muffin Oatmeal Cookies with Lemon Cream Glaze

blueberry oatmeal cookies002
My girls love to waste oatmeal. They pick their favorite jams to stir into a base that I so lovingly prepare with vanilla bean paste and butter and cinnamon. They seem excited. Then they eat two bites and say they’re all done. And so I eat a lot of oatmeal. And I really get tired of wasting it. I actually despise wasting food. We are a family who eats every bit of our leftovers if I can help it. So naturally I had to find a solution for the oatmeal leftovers (besides cooking something different for breakfast, which is obvious, but every time I think, “Today is the day. Today they will eat oatmeal.”)

Enter: leftover oatmeal cookies! It had to be a thing, right?! It is! I did a quick search on how to use leftover cooked oatmeal and modified the recipe to include some awesome blueberry jam and iced them with a super tart lemon cream glaze. They were pretty delicious! They taste like mini muffin cookies and they were so easy. The variations are endless, too, which is what I like. Brown sugar cinnamon? Cherry chocolate? Lemon poppy seed? They’d all be awesome! For now, here’s the blueberry version! Enjoy!

blueberry oatmeal cookies001

Blueberry Muffin Oatmeal Cookies with Lemon Cream Glaze

makes about 3-4 dozen cookies

2 cups flour
1 tsp baking powder
1/4 tsp baking soda
1 tsp salt
1 tsp cinnamon
3/4 cup brown sugar
2/3 cup unsalted butter, softened
2 eggs
1 1/2 c. cooked oatmeal


First, make your oatmeal if you don’t truly have leftover oatmeal. I make one cup (which makes about 2 cups cooked) and I make mine with butter and two to three tablespoons of blueberry preserves. You could really flavor your oatmeal any way you like. The secret to good cookies is a little more flavor add-ins than you’d do for just eating oatmeal. Let the oatmeal cool to room temp before making the cookies.

Preheat the oven to 375F.

Sift the flour, baking powder and soda, salt and cinnamon together. Mix the brown sugar and butter together until creamy. Add the eggs, one at a time, alternating with the flour mixture.  Mix the cooked oatmeal until just combined.

Drop by the tablespoon full onto greased cookie sheets. Bake for 12-15 minutes until lightly browned. Let the cookies cool completely before adding the glaze.

Lemon Cream Glaze

2 cups powdered sugar
1/4 cup heavy cream
1 tablespoon vanilla bean paste
zest from 1 large lemon
juice from the same lemon
salt to taste (this is important)

Add the cream to your powdered sugar until it forms a nice paste. You may not use the entire quarter cup. Add the zest and lemon juice and vanilla and then if you think it needs to be thinner, add more cream. The consistency should be like thin pancake batter. Gradually add pinches of salt, stirring well after each pinch, tasting along the way until the flavors start to sing a little louder. Salt is something I add to all my icings and glazes and it makes such a difference!


Lemon Panna Cotta and Gingerbread with Blueberries and Thyme

Lemon Panna Cotta with Gingerbread and Thyme
When we were in Nashville last week, we had the joy of eating at Catbird Seat – an intimate restaurant with a unique seating that allows its guests to watch the chefs prepare each plate.  This restaurant combines the nuttiness of molecular gastronomy and the comfort of Southern cuisine.  It’s impressive without being too fussy.  The food was amazing and we left very satisfied!  We were served things like grilled morel mushrooms stuffed with chicken liver pate (my favorite),
photo 1
a yeast soup filled with smoked croutons and potatoes (tasted exactly like a loaded baked potato),
photo 2
and the dish that inspired today’s post: a lemon cornmeal cake with goat’s milk panna cotta and blueberries with thyme and marjoram.  Here’s a pic of the dish from the restaurant:

This was one dish that I knew I could conceivably recreate at home without any fancy equipment.  Watching them assemble this was mezmerizing and I took a few guesses as to what each component was before the chef handed me the plate.  Perks of being able to talk to the chef while they’re plating 🙂  When I got home, I dreamed up my own version.  I love lemon and thyme together, so I knew I’d keep that aspect of the dish.  Instead of putting lemon in the cake like they did, I infused the panna cotta with lemon and then made a gingerbread for the base because I love the flavors of gingerbread and figured it’d go well with everything.  And it did!  I happened upon some really great blueberries that actually TASTE like blueberries and the combination of all the flavors is delicate but powerful and the panna cotta is so smooth, it risks falling completely apart if moved too much.  I loved how this turned out and it really wasn’t that hard to make the components and assemble.  Next time you’re at a restaurant and love a dish – try to recreate it at home!  It’s a good way to learn to be creative in the kitchen!

Lemon Panna Cotta with Gingerbread

Lemon Panna Cotta with Gingerbread

For the panna cotta (to be done a day ahead)*:

1 cup whole milk, divided
2 tsp. unflavored gelatin
2 1/2 cups heavy whipping cream
1/2 cup sugar
Zest from two lemons, plus a wedge of the lemon
1 tsp vanilla bean paste (or one vanilla bean, scraped)

Pour 1/2 cup milk into a medium bowl; sprinkle gelatin over. Let sit until gelatin softens, about 15 minutes.
Meanwhile, combine cream, sugar, lemon zest and wedge, and remaining 1/2 cup milk in a large saucepan. Scrape vanilla seeds from bean into saucepan; add bean (or add your vanilla bean paste). Bring to a simmer over medium heat, whisking until sugar dissolves. Remove from heat; cover and let steep for 10 minutes.
Bring cream mixture back to a simmer. Add gelatin mixture and stir until dissolved. Strain. Divide among eight 3/4-cup ramekins. Chill uncovered until panna cotta is set, at least 6 hours.  *adapted from Bon Appetit

For the gingerbread (to make a thin version like mine):

2¼ cups sifted (9 ounces) unbleached all-purpose flour, plus more for dusting the pan
½ teaspoon baking soda
½ teaspoon salt
2 teaspoons ground ginger
1 teaspoon ground cinnamon
½ teaspoon ground cloves
½ teaspoon freshly grated nutmeg
½ teaspoon ground allspice
1 teaspoon Dutch-processed cocoa
8 tablespoons (1 stick) unsalted butter, melted and cooled to room temperature
¾ cup mild or light molasses
¾ cup (5¼ ounces) sugar
½ cup buttermilk
½ cup milk
1 large egg

Adjust an oven rack to the middle position and heat the oven to 350 degrees. Line a large, rimmed sheet pan with parchment paper and spray with nonstick spray.

Whisk together the flour, baking, soda, salt, ginger, cinnamon, cloves, nutmeg, allspice and coca in a medium bowl.

Beat butter, molasses, sugar, buttermilk, milk , and egg in a large bowl with an electric mixer on low speed. Add the dry ingredients and beat on medium speed until the batter is smooth and thick, about 1 minutes, scraping down the sides of the bowl with a rubber spatula as needed. Do not overmix. Scrape the batter into the prepared pan and smooth the surface.

Bake until the top springs back when lightly touched and the edges have pulled away from the pan sides, about 20 minutes. Set the pan on a wire rack and cool for at least 10 minutes. Serve warm or at room temperature.

Gingerbread can be wrapped in plastic, then foil, and refrigerated up to 5 days.

*if you want to make a regular pan of this, simply bake in a 9×13″ pan and bake for 35-40 minutes.   Adapted from The New Best Recipe.

Life Happens – Fire Up the Grill

image_1
The past few weeks have been a game of “just make it through this day.”  My grandpa was very ill and had cancer surgery, then spent the next two weeks rapidly going downhill till his body finally gave up the fight last Friday.  We were in and out of the ICU waiting room for a couple weeks, then there all day Friday, then I went to my hometown of Portales, NM for a couple days this week for the funeral, then Matt left for two and half days on a business trip.  In the midst of those three weeks, Olive was sick for two of them, I was sick for one week, we had crazy awful dirt storms and everything around the house just started taking a back seat to our little survival game.  In hindsight, it went about as well as it could and my family grew closer than ever before.  Needless to say, I didn’t blog much and while I really don’t want to neglect my regular posts, sometimes life just takes over.

image_2
So last Saturday, the day after my grandpa passed away and we were in the short calm of the storm, we decided to have a “normal” dinner at home and thought it sounded super relaxing to just grill almost every part of the meal and eat outside.
image
Matt made a pot of BBQ baked beans from Rancho Gordo (we are part of a Bean of the Month club.  No joke) And they were smoky and full of good texture and went perfectly with all the grilled components of the meal.  We grilled a sirloin tri-tip steak and made a really unique green chili and tomato salsa with worchestershire sauce for the salt and it was perfect with the BBQ flavors and our grilled bread.  Yes, grilled bread – it was awesome.  Kind of a hillbilly bruschetta, if you will.

photo 3


photo 4

photo 5
 I’d highly recommend this grilled bread.   We took a loaf of sourdough bread, cut it in half, spread vegetable oil and kosher salt on the cut sides and let it grill till crispy.  THEN we mixed a clove of smashed garlic in with a half stick of butter and seasoned it with salt and spread that on slices of the grilled bread.  I swear to you, you will never want another bread for an outdoor BBQ as long as you live!

This whole meal was so therapeutic.  The weather was good, we all sat outside and enjoyed the smell of the grill, the breeze was actually gentle instead of tornado-like, and even the kid was transfixed by her surroundings long enough to just SIT and eat.  I think everyone needs to take a break from time to time.  A break from all the performing we find ourselves doing.  I feel like I perform with my photography, with this blog, with just about everything that is broadcast on social media.  And maybe in times where we find it very hard to STOP performing for everyone, life throws us an unavoidable circumstance that forces us to simplify and slow down.  Only God could restore my energy at a time like this.  Only God could bring families closer out of death.  And only God would design food to be so comforting and satisfying that one meal would have the ability to inflate my entire family’s sails just a little bit more than before the meal began.

There will be a steadier stream of posts coming, now.  I THINK most of the drama is at a standstill for now.  Thank you for being patient!


Chicken Piccata with Thyme and Mushrooms

Chicken Piccata and Buttered Noodles
This was the first full meal I made on our new gas stove that Matt installed for us last weekend!  He worked so hard rerouting gas lines (scary) and changing out new electrical outlets (scarier) and sawing a bigger hole in our counter top (can’t turn back, now!) and it all ended up totally awesome!  We have wanted a gas stove for years – they just heat so much quicker, they come down from high heat quicker – everything is more precise.  And plus – FIRE!  It’s pretty appealing.  I am tempted to roast marshmallows on this thing.  But I won’t.  I am very thankful for this machine and I swear I’ll deep clean it more than I did our old electric one…
Buttered Noodles
For the first meal, I did a simple chicken piccata with mushrooms and thyme and some soft, buttered noodles.  It was very comforting and yet refreshing at the same time.  I love the bite of the lemon juice and the capers in this dish and so for a twist, I added my favorite herb, thyme, instead of the traditional parsley and I also added some sauteed baby portobello mushrooms.  It all came together great and we thoroughly enjoyed our first meal from the shiny new stove!

chicken piccata

Chicken Piccata with Thyme and Mushrooms
serves 4

3 chicken breasts, butterflied and split in half
1/2 cup flour for dredging
salt and pepper to season the chicken
6 tablespoons of butter
2 tablespoons olive oil
1/2 cup chicken stock
1/3 cup fresh squeezed lemon juice
1 tablespoon fresh chopped thyme leaves
1/4 cup capers, drained
1 cup mushrooms, sliced thin
8 oz. long pasta, such as linguine or spaghetti

Heat your oven to 200F.  This is to hold your chicken as you cook it and until the noodles are ready so that everything stays hot until you’re ready to serve.

Bring a large pot of water to boil.  Salt it.  Salt it some more.  As it’s heating…

Butterfly the chicken breasts by sliding a very sharp knife length-wise into the thickest part of the chicken breast (kinda like you’d cut an english muffin in half) and lay the chicken breast open and cut down the middle, forming two, thinner cutlets.  Do this with the remaining chicken breasts and dry them on both sides and season both sides with a sprinkle of kosher salt and fresh cracked pepper.

Heat the oil and 2 tablespoons of butter over medium high heat in a large, stainless skillet.  When the butter starts bubbling and popping, coat each chicken breast in flour, shake off the excess and lay floured cutlets on a paper towel until ready to fry.  I worked in two batches – three pieces at a time.  Fry for about 3-5 minutes per side, until golden brown and an instant-read thermometer says at least 160. (It’ll cook some more as it sits to warm in the oven.)  Place fried chicken on a plate and place in the oven to keep warm as you fry up the rest.  For the second batch, add two more tablespoons of butter to the pan before frying the rest.

Remove the chicken and place on the platter in the oven.  Add the lemon juice, chicken stock and capers and thyme to the pan and scrape up the brown bits and season with salt and pepper.  Add the mushrooms and let the sauce reduce for a couple minutes.  Remove from heat and whisk in the remaining two tablespoons of butter and spoon sauce/mushrooms over the chicken and serve with buttered noodles.

To finish the noodles once they are done boiling, add the drained noodles to a bowl, add a splash of pasta water, a tablespoon of butter and fresh cracked pepper and stir to combine.  Garnish with fresh chopped herbs if you like!

Chicken Piccata with Thyme and Mushroom

Basil Lemonade – it’s 107 Degrees, Today

basil lemonade

It’s hot. Really hot.  107F, to be exact.  I was about to post a lovely recipe for a summer corn chowder and then I realized that I certainly don’t want to eat hot soup today and I assume you don’t, either.  You probably don’t even feel like eating much at all.  With heat like this, you need one thing: to stay hydrated so that you don’t have a panic attack and swerve into the cars coming toward you during rush hour.  I’m giving you a stupidly easy recipe, today.  It even involves a mixGASP!  I’ve made this lemonade for several events and at each event, people fawn over it like it’s magical or something.  “How is it sooooo good?”  I really don’t know why basil has such a wonderful effect on lemonade, but it does.  Adds that floral, refreshingly peppery note to it. Gives it a boost and elevates it from boring ol’ lemonade status.  Sure, you could do this without a mix, but I haven’t yet, and so I’m not going to claim that everything I do is from scratch.  So today, I urge you to do as little as possible, as well,  and making this lemonade is right up that “minimal effort” alley.  Enjoy.

Today’s snack time will be little cherry hand pies that Ollie and I made this morning, and this lemonade.  She’s never had lemonade, so we’ll see how it goes.  The hand pies were really easy.  You make the only pie dough that’s worth your time, cut out 3″ rounds, fill with fresh chopped cherries and squeeze shut, crimping with a fork.  Bake at 350 for 35 minutes until browned.  And no, our snack times don’t look like this.  They are in the high chair with me flipping through a magazine or doing dishes while Olive smears cherries all over her face in our dimly lit dining room.  But that wouldn’t photograph nicely, now, would it?  🙂

Cherry Hand Pies with Basil Lemonade

Basil Lemonade

Country Time Lemonade mix, filled to the 2 quart line
1/4 cup lemon juice
1/2 cup fresh basil leaves, washed
1/4 cup sugar
A little less than 2 quarts of water

Dissolve the lemonade mix into the water in a large pitcher.  Using your hands, crush the basil leaves until the oils are released.  Mix into the lemonade.  Stir in the sugar and lemon juice and mix well.  Let it sit in your fridge until cold – the longer it sits, the more basil-y it gets.  Strain into glasses (no one wants a soggy leaf in their cup) over ice and serve!

Basil Lemonade Drink

Domestic Goodness – The Day to Day Matters

pantry utility redo012

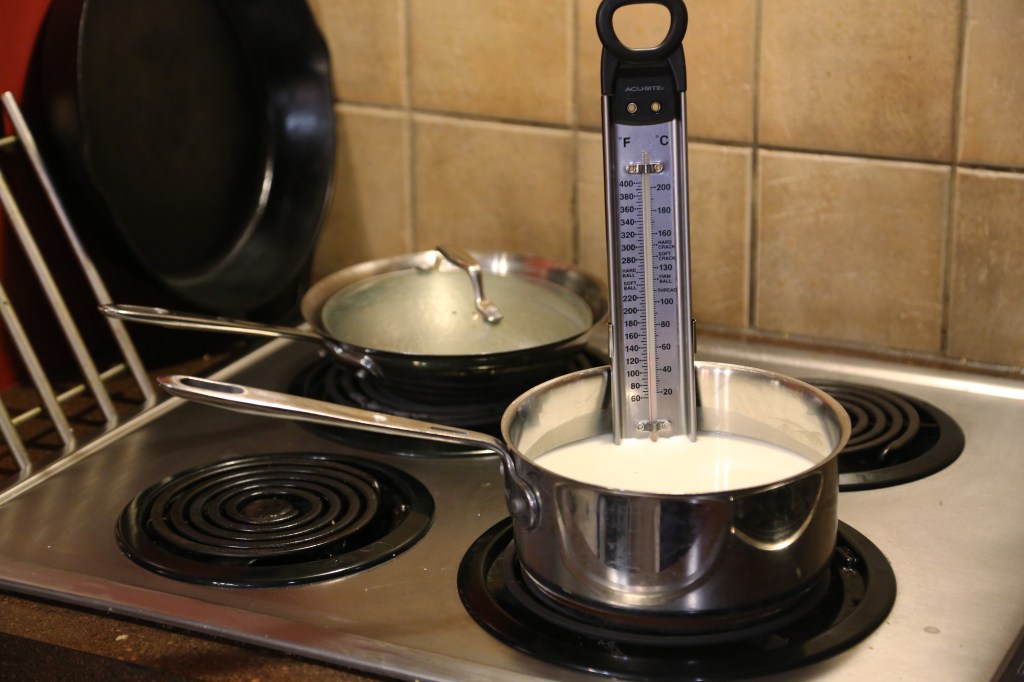
“Keep your work space clean”

This was my mom’s mantra in the kitchen.  Every time I’d help her with cooking a meal, she would say this sentence at some point during our work.  She has no idea how important this lesson truly is for any home cook, professional chef or really, anyone in any professional field, ever. Professional chefs refer to the order of their kitchen, or their cooking station as their “mise en place” – everything in its place.  This refers to the ingredients they cook with, primarily, but it also refers to the pots and pans and knives and towels and, well, everything.  This concept is so important that many cooks get fired for being messy or leaving their works place a wreck.  The reasoning makes sense: if you know where things are, you will cook more efficiently and get your work done quicker and with fewer errors.  There will also be a higher standard for what you put on the plate as the place it came from was clean and professional.  Sure, we all make messes while we cook, but as my mom would tell me, we should clean as we go.  Not only does it leave less for you to do after dinner, but it helps you feel more in control.  And when you have a toddler climbing up your pants as you stir a pot on the stove, it’s good to feel like you have some control over the situation.

I’ve been rocking the stay at home mom thing for a few months, now.  My photography business has happily slowed down since December while I’ve launched this blog and thoroughly enjoyed my time at home, managing the house, planting a garden, cooking a LOT and getting to experience the wonder that is Olive.  I will get back to doing weddings more frequently, but I’m honestly in no rush.  Wedding photography is a very demanding job, one that I love, but I believe things come and go in seasons and right now, this is my season of being less busy.  Even though I have something to do nearly every minute of the day, I feel on top of things.  I’m going at my own pace.  I used to not love staying at home, but I think that’s because I was bad at it.  I didn’t find joy in the mundane, the every day tasks.  But I’m beginning to.

Not every day feels this way.  Sometimes it’s all I can do to keep a happy face while I fold microscopic socks while keeping Olive engaged so she won’t put all of Cash’s food, piece by piece, into his water bowl.  But for the most part, I’ve embraced the beauty of the mundane.  The happy calm from a home in order.  It’s not mundane, anymore.  It’s sacred.  It’s sacred because God is in all things and is constantly working through all things. Even the laundry. In your life, if you constantly say “what’s next?” or “I’m “just” a mom, but later, when the kids are in school, I’ll try to figure out what I’m really meant to do”, you’re selling yourself short.   Newsflash:  You’re meant to do exactly what you’re doing right now.  Whatever it is.  And you should find ways to do it with joy.  Even if it’s a job you hate or a situation you find beneath you.  I read a quote the other day that said, “How you spend your days is how you spend your life.”  And although that sounds so cliche, it’s so right.  Do you want to spend your days, your life, waiting for something better to come along?  I’m not saying we shouldn’t work toward new goals, but maybe we should all start doing a better job at being thankful and making the most of our “right now”, with whatever we’ve been given, in any situation we find ourselves.

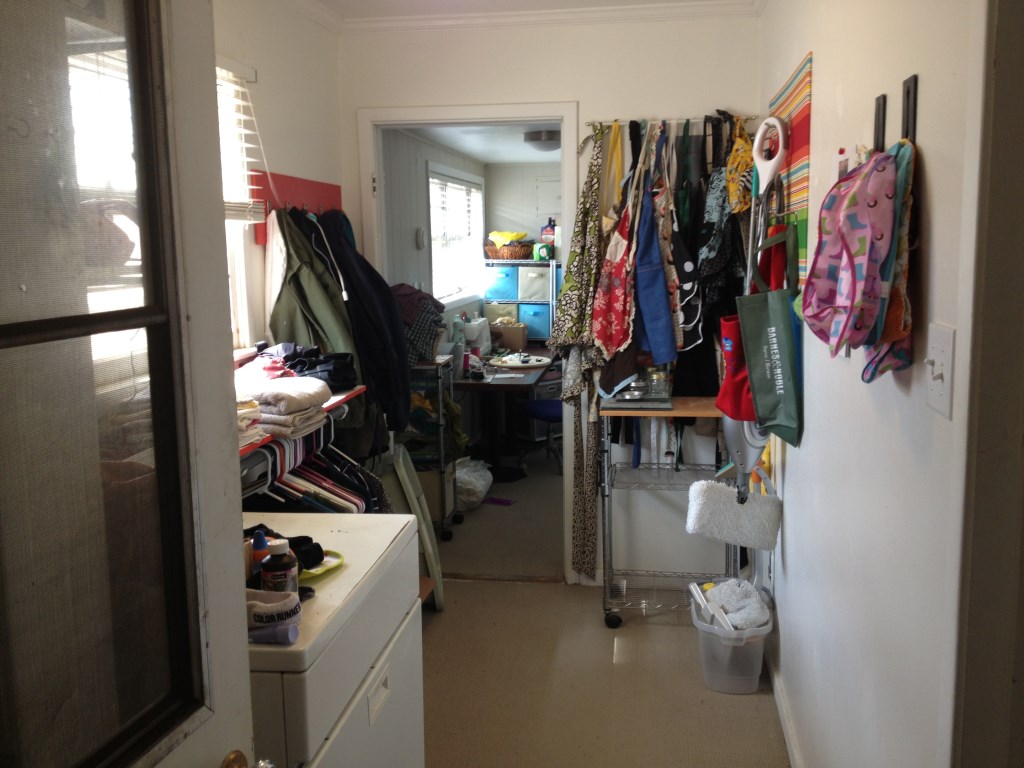
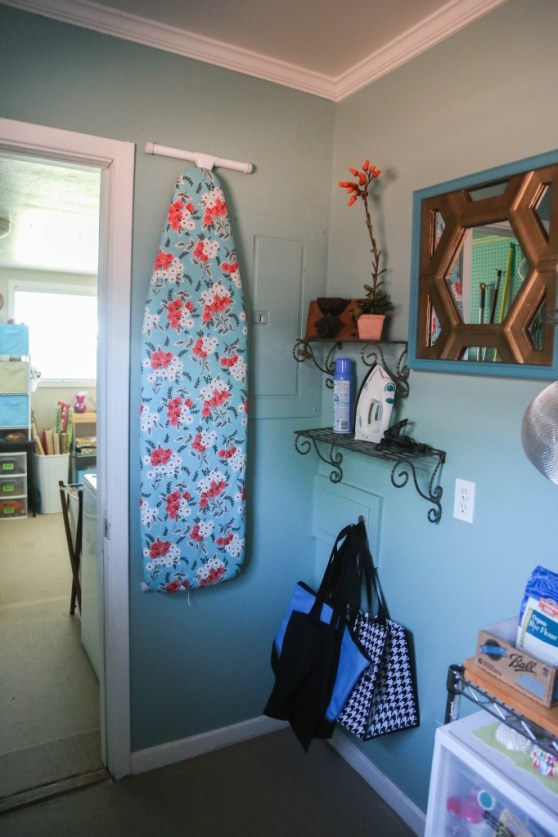
A way that I chose to have joy in my seemingly-mundane current station in life was to revamp the place I spend a lot of time: the utility area.  So utterly boring, right?  I agree.  And it’s usually the most cluttered, messy, thrown-down room in the house.  In our house, that area has our pantry, our washer and drier, a craft area, a place to iron, a storage area, and Cash’s food and stuff.  That’s a lot of crap to cram into two, tiny, hallway-sized rooms.  And that’s a lot of time spent in a place that is ugly and thrown-down and messy.  Here’s a before pic – the view coming through the garage door:

IMG_3657

What if THIS greeted you every time you came home?  Would you feel like working?  All those things hanging on a curtain rod are aprons.  Yeah, I have plenty.  I gave a lot away and kept the ones people made for me.  De-clutter! I’m the antithesis of a hoarder.  If it doesn’t get used in a year, it gets given away or thrown out.

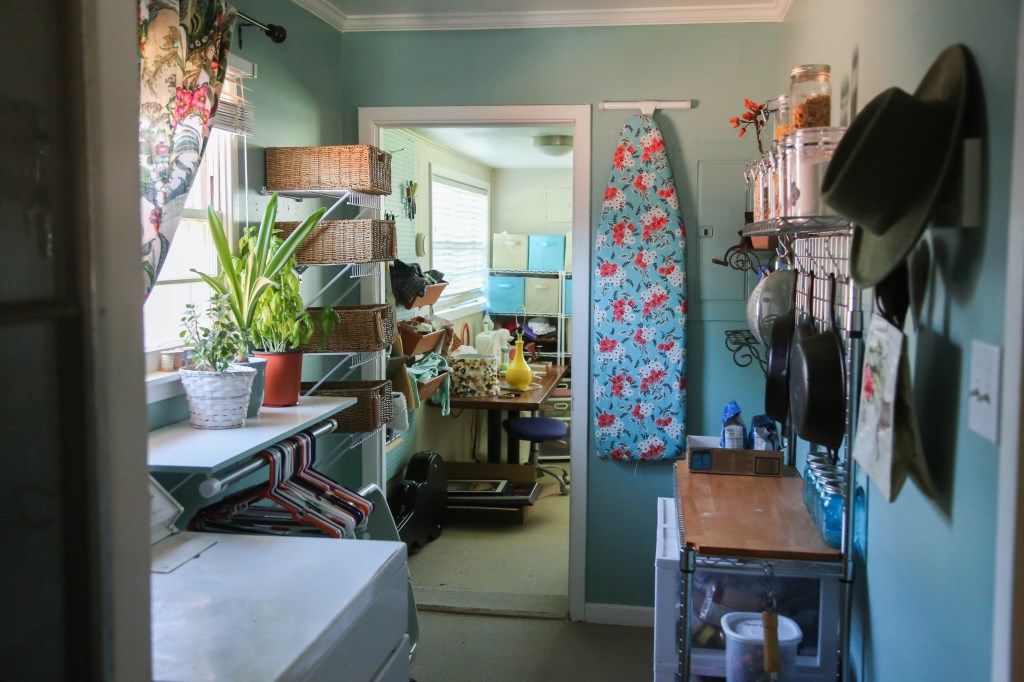
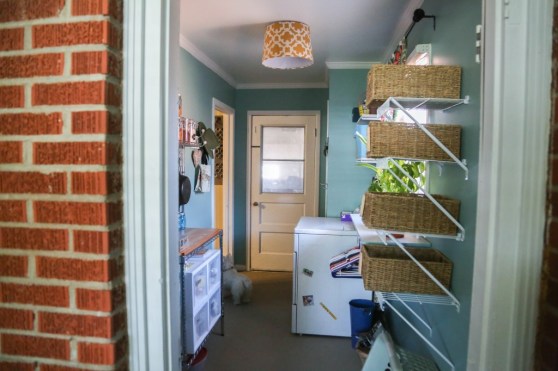
And here is the new view coming into the house:

pantry utility redo002

Much, much better.  As you can see, the craft area is still junky, but it’s SO hard to keep it not-junky if you actually craft.  And I do.  I’m currently making World’s Ugliest Lampshade.

Below, you can see how the pantry has order, however imperfect.  But I know where everything is, and that’s what matters.  I put a cute light switch cover on the wall, then put two hooks in the openings for our keys.  Right below is a hook for my purse.  Which my purse currently isn’t on – it’s in the car where it shouldn’t be.  But you get the idea.

pantry utility redo003

Then, I ordered a super cute ironing board cover and hung my iron on the wall as domestic-style art.  This really has become a peaceful area to iron, my most hated domestic duty.

pantry utility redo004

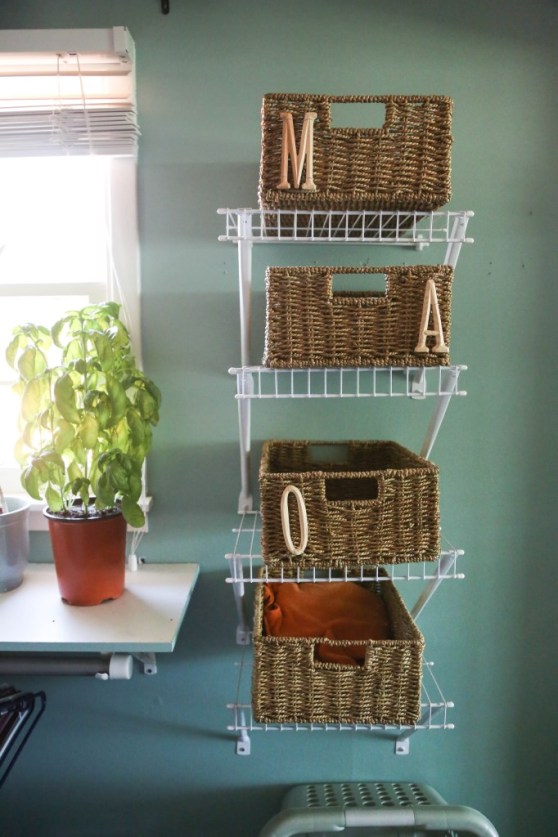
Then, I got all Pinteresty and made a laundry-folding area.  My mom used to yell, “Come get your stacks!” (of clothes) and now, I can yell, “Come get your basket!” and hopefully have the same results.  I made four shelves because I’m pretty sure we’re not done having children.  But for now, Olive gets both because that girl has more tiny outfits than one would ever need in life.  Good thing they cycle out of clothes every 3 months!

pantry utility redo008

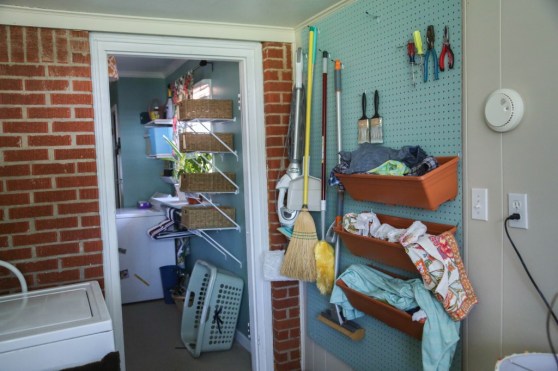
From the craft area looking into the laundry/pantry area – I’m proud of my lampshade rigged light.  Just hung it against the ceiling on little screw hooks.  Magnets on the side of the drier for Olive to play with.  They usually end up in Cash’s water bowl, too.

pantry utility redo005

This looks messy, but that’s because they’re currently in use.  Three planter boxes – one for items that need repair, one for “projects” and one for items that need ironing.  Plus, a cute pegboard painted with the same paint for all the tools.  I love that I don’t have to go hunting in the garage for these things, anymore.

pantry utility redo010

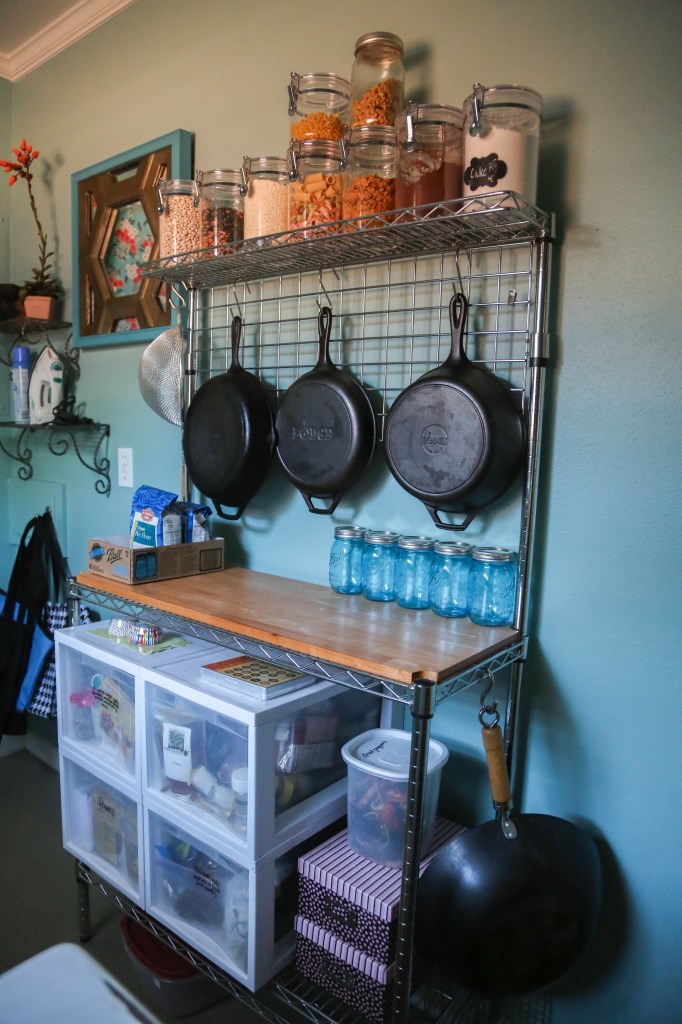
My most Martha-moment – putting stuff in these jars.  I love the OCD appeal and I love how all the colors show through.  You can see here: beans, rice, pasta, feuilletine (it’s a candy additive thing you’ll make if you own Momofuku Milk Bar cookbook long enough), cocoa and cake flour.

pantry utility redo012

I also hang the super heavy pots here – we use these about once a week, so they don’t need to be in the kitchen with the daily use stuff, taking up space.  Those awesome teal Ball jars are at Target, currently!  Go get some!  The drawers below are for spices that won’t fit on my magnetic spice rack (or that I’ve stopped caring enough to buy spice cans for), extraneous and random flours, weird baking items like straight up glucose (I’m not scared) and baking additions like chocolate bars, cocoas, nuts and baking chips.  Then, a tupperware full of dried chilies that we never use but it makes us feel prepared, and two boxes (the pink ones) of cake and cookie decorating things.  All items that clutter up kitchen drawers!  This area is my favorite part of the redo.  Obviously 🙂

pantry utility redo015

Hope you enjoyed the tour!  And I hope that if there’s a room in your house that you use all the time, but simultaneously makes you feel depressed by being in it, that you would at least reorganize!  I really didn’t spend much on all this – I had all the storage units and I just bought the paint and the laundry shelves, which cost about $25 total.  Just rearranging things and painting the walls can make a world of difference!

And remember: whatever you’re doing in life right now is what you’re supposed to be doing.  So find the joy in whatever small ways you can!  You matter and what you do matters, even if it’s not flashy or expensive or even if you don’t get acclaim for doing it.  I wish I’d learned that years ago…

Homemade Goat Cheese

pure goat cheese

Good Monday Morning to you all!  I’ve been meaning to blog about homemade goat cheese for several weeks, now.  I stumbled upon this process because I’d bought a quart of goat’s milk when Olive was starting to wean and I read or heard or saw somewhere that goat’s milk digests easier than cow’s milk, so I figured I’d give it a shot.  I naturally tasted it before I gave it to her.  It tasted like liquid goat cheese.  I wouldn’t personally want to drink that, but I let her try it in the name of not pushing my personal tastes onto my child.  She wouldn’t take more than one sip.  Actually cried (this was around 9 months) so I bought a quart of whole cow’s milk instead and we haven’t looked back.  So I turned the goat’s milk into a nice, creamy 4 ounce log of goat cheese with garlic and herbs.  It was delicious.

I guess I’ll take this time to tell you that I don’t believe in eating something just because it has health benefits.  Eating grass straight from the yard is probably beneficial in some way, but that doesn’t mean I’m going to do it.  I believe things should have flavor, seasoning, and should taste wonderful in addition to however many antioxidants they might have.  So this, I suppose, ties in to the way I have always cooked for Olive.  I haven’t ever given her something without seasoning.  From 6 months, whatever she’s eaten has been seasoned with something (yes, less salt than I’d prefer, don’t worry.) And now that she’s eating from the table, it’s game ON.  Welcome to the wonderful world of food, Ollie.  We have chocolate!

Making goat cheese is easier than making bread, but the two go together quite nicely.  I don’t personally think that it’s easier or cheaper than buying goat cheese at the store.  I think a quart of goat’s milk is comparable to a cheap log of goat cheese.  However, it’s fun to do stuff from scratch, it’s creamier, tastier and gives you a sense of self satisfaction that you did something the old way.  Isn’t that reason enough to at least give it a try?


DIY Goat Cheese – adapted from Serious Eats
makes one, 4 oz log of goat cheese

1 quart of full fat goat’s milk (I bought this brand)
1/4 cup freshly squeezed lemon juice (from one large lemon, maybe two)
1/2 clove freshly grated garlic
a few pinches of salt
Herbs – whatever sounds good to you (rosemary, chives, herbs de Provence, non herbs like honey, chopped dried fruits, etc.  Possibilities are endless.  If you use something sweet, omit the garlic)

Fill a medium saucepan with goat’s milk.  Heat gradually until it reaches 180F.  Watch closely.  It shouldn’t take more than 15 minutes.  A candy thermometer works nice in this situation, but I used a probe meat thermometer the second time because it was more accurate (pictured here was my first attempt.)
cooking goat milk

Once it hits the magical temperature, remove from heat and stir in lemon juice. Let stand until milk starts to curdle, about 20 seconds. Don’t expect curdles, like cottage cheese curdles. Slight clumping will occur, but nothing too drastic. You can add a few extra droplets if nothing is actually happening.

Line a colander with a thin, flour sack kitchen towel.  Or lots and lots of layers of cheese cloth that you probably don’t have on hand.  Most of you have a thin kitchen towel that you can almost see through. As long as there aren’t holes, use it.  It’s efficient, it works great and just remember to wash it quickly and don’t throw it in the used-towel bin for a week all wadded up in a sweaty goat cheese smelling ball.  Like I did.

Set your lined colander over a deep bowl and ladle in the milk.  It will seem like it’s all seeping through, but don’t fret. Tie up the ends of the towel and suspend over the bowl and let it drain for about 2 hours.
straining goats milk

Transfer the cheese to a bowl and mix in seasonings to taste.  The first time I did it, I added the grated garlic, salt and about a teaspoon of herbs de Provence.  The second time, I roasted my garlic and added in olive oil.  SO GOOD. This time, I left out the garlic and stirred in some raw honey and a little salt and used it in a salad recipe from the Bonne Femme cookbook.  Amazing results.  Have fun with it!

After you mix in your flavors, if you want to be able to cut it or have some sort of shape, wrap it up in plastic wrap and leave in the fridge for a couple hours to let it firm up.  (see below) then you can cut it for bread or whatever you like.

goat cheese with baguette and raw honey


With just bread and extra honey it’s basically a dessert!

goat cheese honey salad


On top of baguette slices, broiled and then drizzled with extra honey.  Set on top of a mixed greens salad with toasted pine nuts and a sherry vinaigrette.  An excellent lunch!

The Creme Brulee of Lemon Bars

7G9A1687

I’ve stuck to this recipe for a few years now.  I love lemon desserts and my only complaint is that something claiming to be a lemon dessert isn’t ever lemony enough.  I want a ZINGER of a lemon shock.  I know this may cause several of you to stop reading, but given the choice between a GOOD lemon bar and a brownie, I’d choose the lemon bar.  Not every time.  Like I said, it’d have to be good.  Not too eggy, just enough curd, just enough crust, big time lemon flavor and another thing: don’t dust your lemon bars with confectioners’ sugar.  I’ll give you a few reasons:

1. Lemon bars usually have at least two cups of sugar.  So..there’s enough sugar.  Why would you dust something with more sugar that is already shockingly sweet? (I’m not complaining – lemon and sugar need each other)

2. I don’t like inhaling powdered sugar with each bite.  It kind of ruins the whole eating experience to have to hack on powder.

So that’s really only two reasons.  With the right recipe, you don’t need a dusting of sugar to cover up the weird, sometimes sticky top of a lemon bar.  This recipe is so wonderful because the top gets crunchy like a creme brulee.  I’m not sure why.  Maybe because I mix up the filling while the crust is baking, so by the time the crust is ready for the filling, the filling has sat and separated a bit.  I whip it up really good, too, so maybe it’s the airy texture?  Or maybe the key is to let them cool completely before cutting and don’t cover them up if you’re not serving them right away, lest the top get soft.  That way you get that good crunch on the top, the velvety curd in the middle and the buttery crumble of the crust all together.  This is adapted from Paula Deen’s recipe, and to me, it’s the perfect lemon bar recipe.  The only one you need.

Creme Brulee Lemon Bars

Crust
2 cups all-purpose flour
1 cup confectioners’ sugar, plus more for dusting
2 tbs lemon zest (just zest the lemons you will use for the filling)
pinch of salt
2 sticks butter, at room temperature, plus more for greasing

Filling
4 eggs
2 cups granulated sugar
6 tablespoons all-purpose flour
6 tablespoons fresh lemon juice

Preheat the oven to 350F.  Grease a 9x13x2″ pan.  Cover the bottom in parchment paper and let it hang off the sides (just along the long edge) so that you can remove it for cutting better.)
Make the crust by combining flour, confectioners’ sugar, zest and salt in a large bowl.  Cut in the butter to make a crumbly mixture.  Press the mixture into the prepared pan.  You may need to dip your fingers into a little flour or confectioners’ sugar to keep the dough from sticking to your fingers.  Bake for 15-20 minutes.

Meanwhile, to make the filling, mix the eggs, granulated sugar, flour, and lemon juice.  Pour this over the baked crust and bake for 25 minutes longer.  Don’t sprinkle with confectioners’ sugar. Run a knife around the edges to loosen the bars, and then carefully, by the parchment overhang, lift the entire pan of bars out of the pan and transfer to a cutting board to cut.  I like to cut off the very edge of the bars so that each one will be perfectly smooth, cut, squared edges (obsessive) but that’s really up to you.  No one said you couldn’t eat the trimmings and no one would have to know they ever existed.

Caramelized Banana Chocolate Chip Muffins

bananachocolate2

When I think of a true indulgence, I think about baked goods.  During my time of extra strict sugar restriction while I get my remaining baby weight off, I give myself one day a week to indulge in items that would really not even be allowed in moderation for me during the week.  I have to have that day.  It keeps me going during the week to think about all the scones and muffins and other breads I can have on Saturday.

When I was pregnant with Olive, I craved sugar constantly.  Matt likes to joke that Olive is mostly made out of Oreos and cereal.  I ate other things, but yes, carbs were king.  I made baked goods all the time, especially in the last trimester during the coldest part of winter.  For weeks, I kept us stocked up with various muffins for breakfast.  The combination of banana and chocolate chip became Matt’s favorite, and so when we were discussing a post I could do for Friday, he suggested I do banana chocolate chip muffins.  Banana’s Foster has been a favorite dessert (a favorite – there are many) of mine for a while, now, and so when I know there’s potential for bananas AND brown sugar AND melted butter in a recipe, I want to make it as bananas-fostery as possible.  So for this recipe, (adapted from allrecipes.com)  that meant browning the butter (duh) and letting it bubble away with the mashed bananas and substituting some of the white sugar for brown sugar.  I didn’t add rum, but that’s only because I thought it would get lost with the addition of dark chocolate chips, anyway.  I’d really like to try this creation without the chocolate next time (maybe tomorrow?) and add some rum to see if I can taste my efforts at creating a Bananas Foster muffin a little bit better.

I made a “mistake” with my alterations to the recipe.  I didn’t wait for the batter to cool (it was quite hot from being on the stove, turning into caramelized bananas) before I added the chocolate chips, so naturally, they melted.  I was unhappy with my dumb mistake at first, but decided to go with it and when they came out of the oven, I was happy to see a little swirly effect in the batter, which I thought was quite pretty.  I topped the muffins with a slice of banana and brown sugar and some with extra chocolate chips while in the oven.  The brown sugar that melted into goo on top of the bananas was a nice touch.  These muffins are definitely more dessert than breakfast, so maybe you should have them for afternoon snack time with a cup of coffee, instead of breakfast.  I wouldn’t want you to have to take a mid-morning nap or anything…

Caramelized Banana Chocolate Chip Muffins
yield: 1 dozen

1 1/2 cups all-purpose flour
1 teaspoon baking soda
1 teaspoon baking powder
1/2 teaspoon salt
1/2 teaspoon cinnamon
3 super duper ripe bananas, mashed, plus one banana for slicing as the topper for the muffins
1/2 cup white sugar
1/2 cup packed brown sugar
1 egg, lightly beaten
1/3 cup butter, melted and browned, if you know what’s good for you
1 cup chocolate chips

Preheat the oven to 375F.  Spray 12 muffin papers with non-stick spray and place into muffin tin.
In a large bowl, mix together the flour, baking soda, baking powder, salt and cinnamon.
On the stove, in a medium sauce pan, melt the butter until it begins to brown (you’ll see those grainy butter solids settling at the bottom of the pan) and add the bananas and sugars and let it bubble away for about 10 minutes on medium low heat, stirring periodically.  Remove from heat and let cool slightly and then scrape every last gooey drop into your flour mixture.  Mix well (I just used a fork) and then add your egg and mix just until incorporated.  At this point, if you want your chocolate to remain chips, let your batter cool for a while.  A trick to keep your chocolate chips from settling to the bottom of your muffins is to lightly coat them in flour before mixing them into your batter.  After the batter has cooled, gently fold the chips into the batter and spoon into the muffin liners.  I didn’t let my batter cool, so I was left with melted chocolate worked throughout.  I didn’t totally mix it up so it left a neat swirly effect in the muffins.  You just do whatever makes you happy.
Top the muffins with slices of banana and sprinkle extra brown sugar on top of each slice.
Bake in preheated oven for 18-25 minutes (mine took 23) until a toothpick comes out clean.

bananachocolate1


Enjoy your weekend, lovely folks.  See you Monday with a light recipe to start things off right.