Basil Risotto – Herbs are Vegetables, Too

Basil Risotto
Leafy greens.  For most Americans, this isn’t the most appealing set of words.  However, most of us might just think LETTUCE or  SPINACH or KALE and think, “How on earth am I supposed to eat several cups of that a week?!  Lettuce not forget about herbs (please forgive that pun, I really had no other choice.)  They are brimming with nutrients! It’s such an easy and flavorful way to add more vitamins and fiber to your diet and your recipes.  I always tend to forget that things like basil, thyme, oregano, mint – these are quite leafy and quite green, too!  Sure, you can’t eat as much of them as you can kale in one sitting, but a mild basil goes amazingly well with spinach and can really add a lot of interest to a dish.  Basil is full of beta-carotene, Vitamin A, K and its leaves are rich with essential oils known for being anti-inflammatory.  And lucky you, the summertime is a time when basil grows like a weed!  

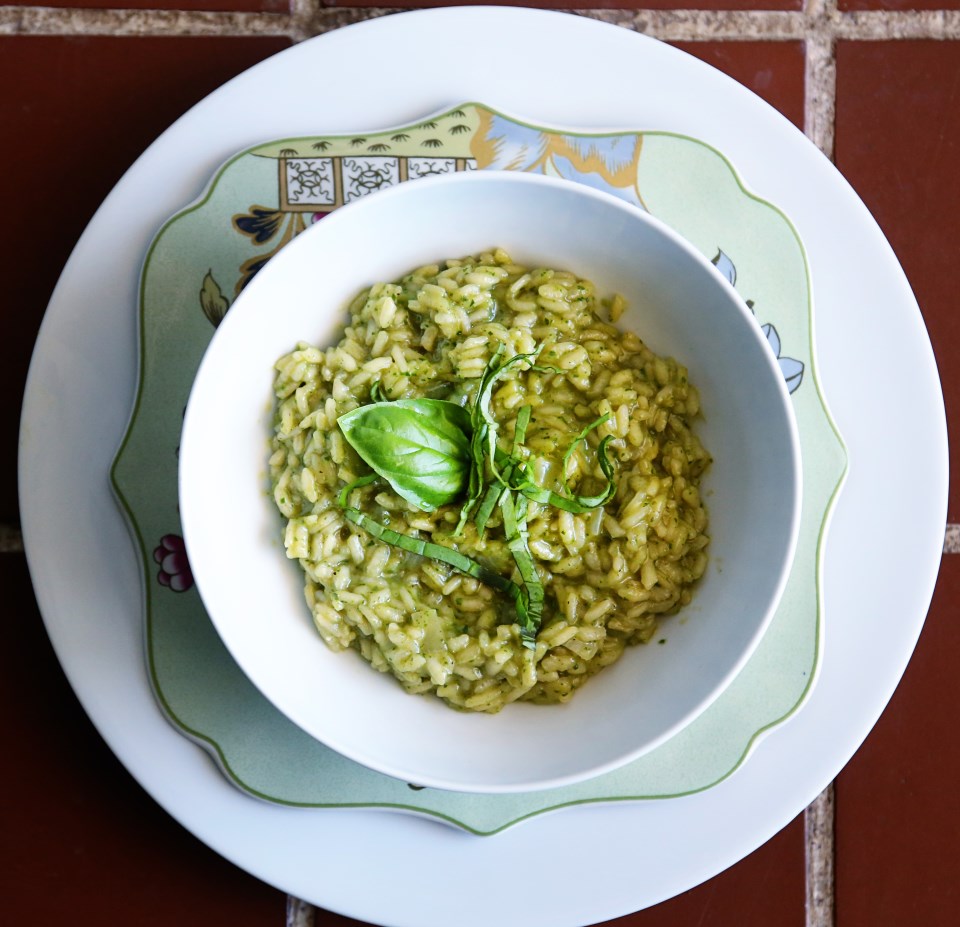
I realize that lettuces, spinach, cabbages, etc, are sometimes challenging for little ones (and me) to eat.  But I’ve fully gotten Olive acclimated to the flavors of pesto and I consider that a small victory.  It’s green, so it opens the door for other vegetables to eventually be accepted as well.  For this creamy, bright risotto, I made a pureed basil (not really pesto as I didn’t have Parmesan or pine nuts on hand) with just basil, garlic and garlic oil and stirred it into my risotto in the last minute of cooking.  Garnished with a chiffonade of fresh basil and we had lunch!  Olive loved it and I loved that while it seemed like comfort food, it was actually quite healthy and nutritious for us both.  Not a lot of butter and oil – just good chicken stock (which is amazing for your health on its own), basil, onion and rice!

I encourage you to think of herbs as a choice for getting more vegetables into your diet.  And what better herb to start with than basil?

Pesto Risotto
Basil Risotto

serves 6-8 as a meal

2 cups arborio rice
2 TBS butter
5-6 cups good chicken stock (low sodium if store-bought or just use water and season later)
1/2 cup chopped onion
1 large garlic clove
2 cups packed basil leaves
4 TBS olive oil (I used garlic oil)
2 garlic cloves
salt and pepper to taste

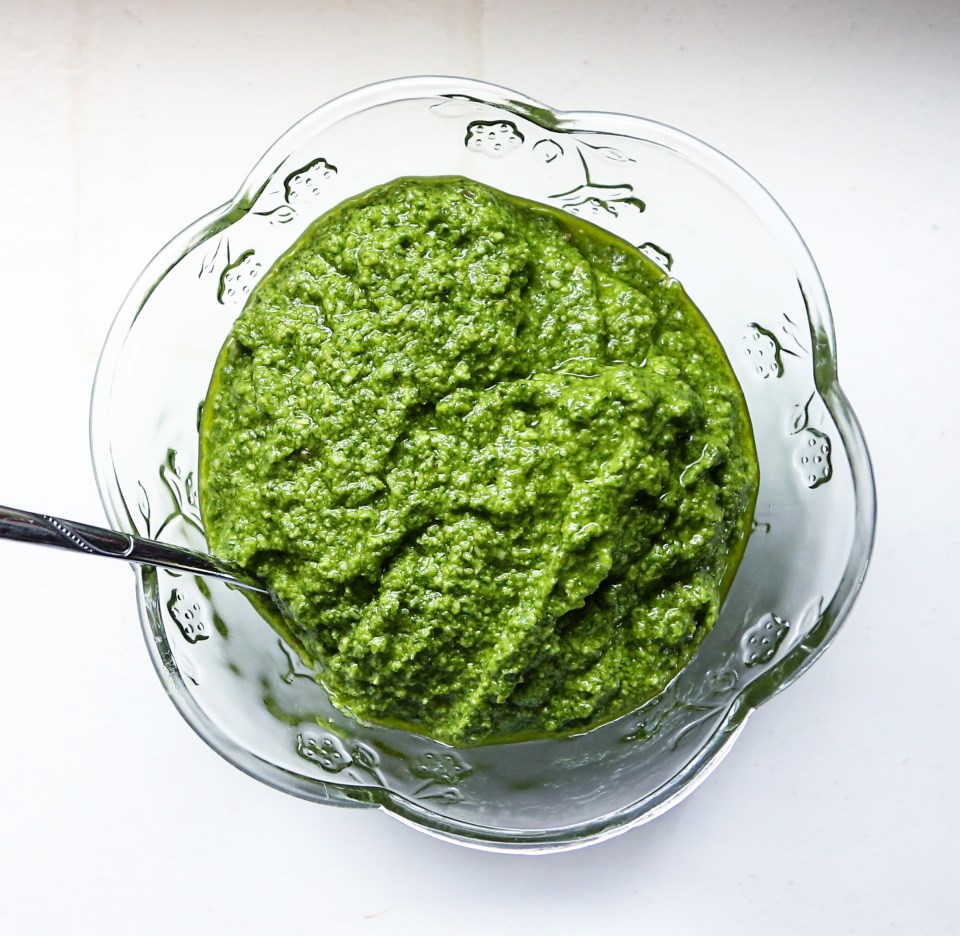
In a large cup with an immersion blender or in a food processor, blend the basil leaves, olive oil, garlic and about a half tsp salt and pepper.  Taste and adjust seasoning to your liking.  You can full out make a regular pesto if you want, but this is what I had on hand and it worked great.  If you make a full batch of pesto, only stir in about 1/4th of a cup into your risotto.

In a large saucepan, heat the chicken stock to a simmer.

In a large, deep skillet over medium heat, melt the butter until it starts to bubble and then saute the onion and garlic until soft, stirring to not let the garlic burn.  Stir in the rice and stir to fully coat in the butter and onion.  Begin adding 1/2 cups of stock to the pan, stirring pretty regularly to ensure the rice doesn’t stick to the bottom of the pan.  When the liquid cooks off, add another 1/2 cup and keep this process up until you’re down to about a cup of stock and have been cooking it for at least 20 minutes.  Near the end, taste the rice – you don’t want it crunchy, but you don’t want it mushy either.  Think of it like pasta – a nice bite to it is key.  Stir in another half cup of stock if you think it could use it and then add in the basil paste.  Remove pan from the heat and serve immediately.  Garnish with fresh basil or a grating of fresh Parmesan and cracked pepper.

Advertisement

Cooking Basics: Basil Pesto

Basil Pesto Ingredients
This is an important recipe to have memorized.  If you know the basic formula, you can make a pesto with just about any green/oil/nut/hard cheese.  It’s a great way to dress up a simple pasta salad, a plain filet of fish, or even boiled potatoes for a spin on potato salad.  When it’s a pasta-only kinda day around here, pesto somehow makes me feel better about not trying harder to dish out variety.  I think, “At least Olive is eating something green and different on top of her pasta.”  While that may be the dinner equivalent to justifying nutella as a “healthy” snack, I’m sticking with calling pesto healthy.  In moderation.  The stuff is mostly olive oil.  But I think if it’s used as a garnish, it’s just fine  and a little goes a long way, anyway!
Pesto

So here is your Cooking Basic for the week –

Basil Pesto
makes about a cup and a half

3 cups packed fresh basil leaves
1/2 cup toasted pine nuts
1/2 cup grated Parmesan cheese
4 cloves of garlic
1/2 cup olive oil
salt and pepper to taste

Put everything except the oil in a food processor and turn it on.  While it’s whirring around, gradually drizzle in the olive oil through the open chute of the processor lid.  Let it process for about 30 seconds and then open and taste for salt and pepper.  I end up putting about a teaspoon of kosher salt and a few grinds of fresh cracked pepper to mine.  Pesto will keep on the counter for about a week or in the fridge for 2-3 weeks.  The top of the pesto will turn brown, but it can simply be scraped off before use.  Pressing a sheet of plastic wrap on its surface helps with the oxidization, too.

Basil Pesto Tortellini

Rustic Tortellini Soup

Tortellini Soup
I love this recipe because it first evokes memories of eating at a very dear friend’s house, second, it is incredibly flavorful and hearty and third, it is SO very simple to throw together.  It also makes enough for 8-10 people!  AND it tastes better and better the longer it sits in your fridge!  The glories of a good soup.

I had this soup for the first time at our friend, Rod and Jill’s house.  Rod and Jill were our travel buddies on our awesome road trip to Seattle last summer and besides sharing a love of recreational vehicles, we share a love of food and cooking!  Jill made this soup on a fall afternoon and invited us over last minute to share it.  No one in their right mind turns down a free meal and we have even been known to cancel our plans if we receive a dinner invitation last-minute.  Yes, I think it’s that important to take someone up on their offer to share a meal with you.  Drop what you’re doing, don’t worry about the details and just say “when can we be there and what can we bring?” (although I’m of the belief that you should not bring a dish to a dinner invitation unless you ask first!  If they say “nothing” then by golly, bring nothing! If you must bring something, bring wine!)

We may be exiting out of soup season with the coming of warmer weather, but since this could basically double as a pasta dish, I think a nice, crisp salad and some bread would turn it into an amazing summer-patio meal as well!  The tomato/basil/celery flavors are certainly reminiscent of summer!  Whenever you make it, I know you’ll love it and keep it in your recipe arsenal for future use!

Tortellini and Sausage Soup

Rustic Tortellini Soup*
serves 8-10

1 lb ground sausage (I used Wright’s hot and spicy)
1 onion, chopped fine
2 celery stalks, chopped fine
2-14 oz. cans fire roasted tomatoes
2-14 oz. cans white beans (cannelini or great northern – drain one can and puree the other can in its juices)
1/2 cup red wine
2 cups beef broth
2 lbs tortellini (any flavor – I found mine in the refrigerator section near the cheese)
a small bunch of fresh basil

In a large skillet over medium-high heat, brown the sausage and then set aside to drain on paper towels.  Pour out all but a tablespoon of oil and saute the onion and celery until they begin to soften. Add the two cans of tomatoes (with juices) and the drained and pureed beans.  Stir to combine everything and then add the broth and wine and bring to a boil, tasting for salt, pepper and adjust your tastes with more wine if you want.  Add in several of the basil leaves and let the soup simmer for about 10 minutes.

Cook the tortellini to the package instructions and put about a 1/2 cup in each bowl and then top with the tomato/sausage soup.  Garnish with some chopped basil and a sprinkle of Parmesan cheese if you like.

*I would like to note that Jill’s recipe is better than mine.  I asked her via email if she knew it by heart and she said things like, “I think it was this much” and “I sometimes do this instead” and while I LOVED the way this version turned out, I have fonder memories of hers.  So this soup can be altered and flavored to your tastes!

Basil Lemonade – it’s 107 Degrees, Today

basil lemonade

It’s hot. Really hot.  107F, to be exact.  I was about to post a lovely recipe for a summer corn chowder and then I realized that I certainly don’t want to eat hot soup today and I assume you don’t, either.  You probably don’t even feel like eating much at all.  With heat like this, you need one thing: to stay hydrated so that you don’t have a panic attack and swerve into the cars coming toward you during rush hour.  I’m giving you a stupidly easy recipe, today.  It even involves a mixGASP!  I’ve made this lemonade for several events and at each event, people fawn over it like it’s magical or something.  “How is it sooooo good?”  I really don’t know why basil has such a wonderful effect on lemonade, but it does.  Adds that floral, refreshingly peppery note to it. Gives it a boost and elevates it from boring ol’ lemonade status.  Sure, you could do this without a mix, but I haven’t yet, and so I’m not going to claim that everything I do is from scratch.  So today, I urge you to do as little as possible, as well,  and making this lemonade is right up that “minimal effort” alley.  Enjoy.

Today’s snack time will be little cherry hand pies that Ollie and I made this morning, and this lemonade.  She’s never had lemonade, so we’ll see how it goes.  The hand pies were really easy.  You make the only pie dough that’s worth your time, cut out 3″ rounds, fill with fresh chopped cherries and squeeze shut, crimping with a fork.  Bake at 350 for 35 minutes until browned.  And no, our snack times don’t look like this.  They are in the high chair with me flipping through a magazine or doing dishes while Olive smears cherries all over her face in our dimly lit dining room.  But that wouldn’t photograph nicely, now, would it?  🙂

Cherry Hand Pies with Basil Lemonade

Basil Lemonade

Country Time Lemonade mix, filled to the 2 quart line
1/4 cup lemon juice
1/2 cup fresh basil leaves, washed
1/4 cup sugar
A little less than 2 quarts of water

Dissolve the lemonade mix into the water in a large pitcher.  Using your hands, crush the basil leaves until the oils are released.  Mix into the lemonade.  Stir in the sugar and lemon juice and mix well.  Let it sit in your fridge until cold – the longer it sits, the more basil-y it gets.  Strain into glasses (no one wants a soggy leaf in their cup) over ice and serve!

Basil Lemonade Drink

The Ultimate Meatball and Taking Food to a Friend

meatball and marinara

We’ve been on the receiving end of food donations twice in our life and both times, we were touched by others’ thoughtfulness, great recipes and the comfort that was passed to us through the dishes they made.  It takes a bit of humbling to bring food to someone who can’t cook for themselves, or simply don’t want to or don’t have the time.  You worry if they’ll like what you made.  You worry if they will critique the preparation or that you brought store-bought cookies instead of homemade.  If I could only convince you that anything you bring is wonderful and welcome, I would.  If they can’t eat it right away or they have duplicates, they can freeze what you brought!  To worry too much about what to bring, or to worry the recipient about what you brought, shifts the focus off the deserving and on to you.  Keep the focus where it belongs, ask if they have any requests or food allergies, and get cooking!  Homemade is always nice, but I will admit, I did not turn away store-bought cookies, chocolate or coffee! 🙂

My wonderful, life-long friend, Summer, had her second baby almost two weeks ago.  A beautiful, darling girl!  I immediately began to think of what I would bring for Summer and Phil to eat.  Summer is my food buddy.  I trust her cooking as much as my own.  Her sense of taste is far beyond most people, almost to a fault.  We used to live together in college, and I think one of our first food-bonding moments was throwing chicken patties off the balcony of our apartment because they were just so disgusting.  They were pre-cooked, breaded chicken patties and they tasted like…gray.  Or sweat.  It wasn’t good.  We both were actually offended.  How could you screw up a breaded piece of chicken, and worse, sell it to poor college students?! In our act of defiance against badly cooked food, we became unofficial food critics in our own right.  We were each other’s taste-testers. A favorite game throughout our friendship is Guess the Ingredient! in which we excitedly wait while the other tastes and see if they guess right.  I love that no matter what time of day, I can text Summer a description of something I made or want to make, and she will react with an appropriate amount of shock, enthusiasm and awe.

We joke that Summer always says her FAVORITE thing in the ENTIRE world is whatever I last cooked for her.  True to the accusation, I asked if she had any requests for what I could bring for them, and she requested the last meal I made for her, which was the BEST meatball recipe I’ve ever run across.  It’s tough to get a meatball right.  They can be too dry or too mealy or rubbery from being over cooked, or simply too greasy.  This recipe is perfect.  And even more perfect, it came to me via fashion designer, Michael Kors in his appearance on Martha Stewart Living.  So they’re both delicious AND fashionable.  Win-win.

The secret ingredient to these meatballs is the water.  Smooshing all these ingredients together, especially with the water, is not for the faint of heart.  My mother would die a thousand deaths before making this recipe.  She has a thing with texture.  However, I like playing with my food, so it’s rather enjoyable for me.  The meat mixture is very delicate, so be gentle as you turn them while cooking.  I usually use two spatulas to help me turn them without smashing them apart.  Getting a good crust on each side is key.  Then, there will still be a slight crust, even after they’ve stewed in the sauce for a while.  Oh, and serving this with spaghetti is up to you. It’s not tradition – the Italians eat their meatballs in a bowl with crusty bread.  But, the recipe makes enough sauce that even after we finish up the meatballs, I have plenty of sauce left to toss with noodles the next day.  Olive absolutely adores these.  She ate two, 3 inch meatballs by herself before slowing down.  They are so soft, you could easily smash it up for a little one.  And they get better the next day!

meatball

Frankie’s Meatballs in Rao’s Marinara Sauce

  • 1 pound lean ground beef
  • 1 pound ground pork
  • 1 1/2 cloves garlic
  • 2 large eggs
  • 1 cup freshly grated Pecorino Romano cheese
  • 1 1/2 tablespoons chopped fresh Italian parsley
  • Coarse salt and freshly ground pepper
  • 2 cups plain dry bread crumbs
  • 2 cups water, room temperature
  • 1 cup olive oil
  1. In a large bowl, combine beef and pork using your hands. Mince 1/2 clove garlic and add to meat mixture along with the eggs, cheese, and parsley; season with salt and pepper. Continue mixing with your hand until well combined. Add bread crumbs and mix well. Add water, 1 cup at a time, and continue mixing until mixture is quite moist.
  2. Shape mixture into 2 1/2-to-3-inch balls. Heat oil in a large skillet over medium-high heat. Smash remaining clove of garlic with the back of a knife and add to skillet. Cook until lightly browned and fragrant, 1 to 2 minutes; remove with a slotted spoon and discard. Working in batches, add meatballs to skillet. Cook until browned and cooked through, turning, about 10 minutes. Drain on paper towels and serve immediately.
  3. Meanwhile, bring marinara sauce to a boil in a large nonreactive saucepan. Reduce heat to a simmer and add meatball. Let meatballs cook in sauce about 20 minutes; serve immediately with pasta, if desired.

Rao’s Marinara Sauce
Makes 7 cups

  • Four 28-ounce cans whole tomatoes with basil, preferably San Marzano
  • 1/2 cup olive oil
  • 6 tablespoons minced onion
  • 4 cloves garlic, peeled and minced
  • Coarse salt and freshly ground pepper
  • 12 leaves fresh basil, torn (optional)
  • Pinch of dried oregano
  1. Remove tomatoes from can and place in a large bowl, reserving juices. Crush tomatoes using your hands; remove and discard the hard core from stem end, and any skin and tough membrane; set aside. (Wear an apron and keep your hand submerged as you crush.  This is messy business, but kind of therapeutic  .)
  2. Place oil in a large, nonreactive saucepan over medium-low heat. Add onion, and cook until soft and just beginning to brown, about 3 minutes. Stir in garlic, and cook until softened, about 30 seconds. Stir in tomatoes and reserved juices; season with salt. Increase heat and bring to a boil. Immediately reduce heat to low and simmer until slightly thickened, about 1 hour.
  3. Stir in basil, if using, oregano, and season with pepper; continue cooking 1 minute more. Remove from heat and serve.

*Recipes taken directly from Martha Stewart Living.  They can not be improved upon.

frankie's meatsauce

Thai Basil Whatever

thai basil


I wanted to share with you a recipe I’ve been making for years.  Matt and I cooked a lot of Thai food in the first few years we were married.   Matt had a version of this dish while living in Nashville at a place that served Chinese food, but had Thai posters all over their walls.  So Matt asked one day if they would make him some Thai food and the guy excitedly made a chopped chicken dish with Thai basil and hot Thai chilies.  Matt was hooked.  We love the flavors of fish sauce, soy sauce, the heat of peppers and the sweetness of basil that this dish brings.  It’s a wonderful mix of sweet/sour/spicy.  Over the years, we’ve lost the original recipe we first referenced and so this is legitimately a Palmer original.

Again – don’t be afraid of fish sauce.  It’s completely essential to the flavor balance of this dish.  If you can’t find Thai basil, regular Italian basil works just fine.  I’ve used ground pork, chicken and turkey, as well as hand chopped chicken thighs (so good), but my go-to is ground turkey.  Don’t leave off the fried egg!

Thai Basil Turkey 
serves 4

1lb ground chicken, turkey or pork
3 tbs peanut oil or canola oil
1 medium white onion, chopped fine
6 cloves garlic, chopped
4 or 5 seeded jalapenos, diced (or Thai chilies, or whatever kind of pepper/heat level you want)
1 tbs fish sauce
1 tbs soy sauce
1/2 cup chopped fresh basil leaves

This recipe goes quicker if you use a large wok over really high heat.  If you don’t have a wok, use the largest stainless steal skillet, or cast iron skillet you have.  Heat the oil over medium high heat till it shimmers.  Add in the onion and stir a few times till they soften.  Working quickly, stir in the garlic and cook until fragrant, about 30 seconds.  Add in your ground meat and jalapenos and stir until meat is cooked through.  If you want more heat, stir in your chilies closer to the end of cooking.  When the meat has cooked through, toss in the fish and soy sauce and stir to coat.  Remove the pan from heat, stir in the chopped basil and cover to keep warm.  In a non-stick skillet, fry a couple eggs in peanut oil, and a splash of soy sauce and serve on top.

I typically serve this over about a half cup of rice.  I’m not going to tell you how to cook rice.


Cooking from a Food Memory

Chicken Brian

The first time I went down to Tulsa, Oklahoma to meet Matt in person, we ate this dish together with his family at a restaurant called Carrabba’s.  (We met via instant messenger, after a dear friend of mine, who was talking to both of us at the same time said, “Here, you guys talk to each other, you’re telling me about the same band” (Jurassic 5) and after talking that day, we talked every day, increasing in hours logged (we had only land lines way back in 2003 and ran through multiple calling cards each week.)  6 months later we were engaged, and a year after that, we got married.  We’ve been eating good meals together ever since. Aww)

Matt ordered the Chicken Bryan and we both marveled at the melty goat cheese and sun dried tomato mix that was tangy and sweet.  A revelation!  Since that day, I’ve tried to recreate it multiple times, but I never can quite replicate it.  (Not enough butter?)

This week, I tried again and I’m slowly getting closer.  It’s such a good dish, and as I look at their online menu, it says they drizzle a basil lemon butter sauce on top.  Ah.  That might help. Will try again next time!  I happily used up the rest of my goat cheese and even made a mini portion on a bread and butter China plate for Olive, just so she’d feel fancy, too.  (I think it worked, as she made some of the chicken into a hat near the end of the meal.)

As a side, I made the creamed spinach and basil recipe from a few weeks ago, and put a scoop inside squares of puff pastry, baked it, and although they didn’t stay together in the neat little pouches I folded, they were still amazingly good and a perfect side for this dish.

spinach puffs 2

Chicken with Sun Dried Tomatoes, Goat Cheese and Basil
serves 4 to 6

1 lb chicken tenderloins
Salt and pepper
4 tbs olive oil
1/2 cup sun dried tomatoes, sliced in half
8-12 basil leaves
1 shallot, diced small (1/4 cup – you can use an onion if that’s what you have on hand)
1/4 cup white wine or chicken stock
4 oz goat cheese

Pat the chicken dry with paper towels and season each side with kosher salt and pepper.  Heat olive oil (go two tablespoons at a time) over medium heat until shimmering and cook the chicken strips in batches, not over crowding the pan, or they won’t get a good sear.  Chicken strips don’t take long to cook, maybe 1-2 minutes per side. Let the strips sit on a plate, covered in foil to keep warm until ready to plate.  In your empty skillet, add the diced shallot and saute until golden.  Then, add in a splash of wine or chicken stock, scraping up the browned chicken bits and then add a tablespoon of butter to make a pan sauce.  Set your sauce off the burner so it won’t continue to reduce.

Put your chopped sun dried tomatoes in a saucepan with a quarter cup of water and let it simmer to re-hydrate a bit.  Assemble the chicken, two strips per plate, with a sprinkling of sun dried tomatoes, a basil leaf or two, and a slice of goat cheese.  Place the plates under the broiler until the cheese melts.  Drizzle your reserved sauce over the cheese and serve!

Baby Food – Creamed Spinach and Basil

spinach

Yesterday was one of those days when things just weren’t quite right.  I was getting over a stomach virus so I was getting nothing done and Olive refused to eat any part of a dish I cooked because it had peas (a dish she’s eaten before with much gusto), and thus, ate only orange foods and milk all day.  I really haven’t quite figured out days like that.  I try not to put too much thought into it and move on to the next meal, assuming she’ll eat more at dinner if she didn’t eat much at lunch and vice versa.  It’s hard to remember that babies aren’t little robots you can program as you like.  Some days I don’t feel like eating much for lunch, but I’m ravenous at dinner.  Some days I feel like bacon and eggs and toast and jam for breakfast and some days I’m just in the mood for coffee.  I only assume children are the same (maybe not the coffee part.)  I think it’s important in these seemingly picky-eating times to remain consistent.  Don’t start a bad habit just to get through a rough patch.  If through the picky days, we remain calm and smiling and say, “These two things are for lunch – take them or leave them” I think children will catch on a lot quicker that meal times are directed by mom and dad – and not by them.  A world where a baby dictates what we have for dinner – Lord, help us all…

Today was a little bit better.  Olive ate a two ounce portion of this spinach basil dish, and some leftover mango from yesterday – that was lunch!  Oh, and bits of our chicken, after we thought she had enough to eat 🙂

This is, by far, one of my favorite side dishes, and one of my favorite ways to cook/eat/enjoy spinach.  Matt and I found this recipe from watching an episode of Martha Stewart Living, where the great Jean-Georges Vongerichten cooked his amazing chicken and potatoes (where the potatoes are better than the chicken) and served this spinach on the side.  What a warm, comforting, indulgent family meal!  We have made both of these recipes multiple times over the past few years and each time, they feel new and exciting.  The spinach and basil would be absolutely perfect at Thanksgiving as a side dish.  There’s something about the basil that adds so much depth of flavor to the dish.  The cream helps with that, too…

Today, I didn’t have any fennel or serrano peppers, so I left them out of the original recipe, (which I highly recommend)  but I found it to still be wonderful and ideal for a baby in the 8 month and up range.  To make this for a baby just introduced to solids, simply blend with a couple tablespoons of water or chicken stock.

Creamed Spinach and Basil

serves 4 small portions.  Or 2 and a hungry baby

  • Coarse salt and freshly ground white pepper to taste
  • 3 cups tightly packed spinach leaves
  • 3 cups tightly packed basil leaves
  • 1 tablespoon olive oil
  • 4 tablespoons finely chopped shallots
  • 2 teaspoons finely chopped garlic
  • 3 tablespoons very finely chopped celery
  • 1 1/2 cups heavy cream
  1. Bring a large pot of salted water to a boil. Add spinach and basil and cook until wilted. Immediately transfer to an ice-water bath. Drain and squeeze dry; coarsely chop and set aside. (It looks like there’s hardly enough for one person – it spreads out and thickens up with the addition of the other ingredients, promise.)

  2. Heat oil in a medium skillet over medium-high heat. Add garlic and shallots and cook until golden. Add celery and continue cooking until soft and translucent.

  3. Add cream and let reduce until thickened, about 10 to 15 minutes. Add spinach and basil and stir to combine. Cook until warmed through. Season with salt and pepper; serve immediately.


Spinach and Basil 2


A little side note for any moms out there who might have a similar issue to me – Olive eats more…diligently…if she is holding something in her hand.  I am not a fan of letting her try to feed herself, yet, and letting her hold a toy is too distracting.  Most things are too distracting, but if we find that she can’t focus on the meal, I usually offer her one of her “salt and pepper” shakers.  She can hold them in her hands and it almost seems the instant she grabs one, she will happily take several more bites.  So, these are her salt and pepper shakers.  Filled with white and long grain black rice, respectively.  They make a nice shaking sound, the rice stays IN the container, and later, as she develops, she can even pretend to season her food.  Although we will certainly teach her to not season before she tastes, as a courtesy to the chef. 😉

spinach and basil 4


spinach and basil 3


7G9A0510

Bye-bye, Papa (said every day after lunch when he goes back to work – she’s going to be one tomorrow – how on earth did we get to this point?)