So I saw this really fun video circulating on Facebook a few weeks ago and like everyone else, it gave me the confidence to try it out myself! These little roses are so much fun to make and they are so beautiful! I thought they’d make an excellent special occasion type dessert. I did the recipe exactly like the video said and I was pleased with the process but not really the results. I mean, they’re okay, but they are definitely prettier than they are tasty. And I honestly think that’s the point. It was a super fun and easy “cooking craft” to do with Olive and so I’ll give it points for that because not every baking recipe is truly kid-accessible. But I decided to alter the recipe to be as delicious as it is beautiful. Here’s a couple problems the original recipe has:
1. The bake time is long and the thin apple slices burn on top, so we cover them during part of baking.
2.They stick like dadgum superglue to the muffin pan and get ripped apart when you take them out, therefore…
3. I fixed that by removing them from the pan while they were still super hot, but…
4. There’s the problem with eating super-baked tiny shreds of apple peel. It gives it that rose look, however…
5. The apple peel feels like tough strings in your mouth. Not really two adjectives you want for your baked goods.
6. The apples snap in half from the original recipe, so I fixed that by soaking them in hot lemon water instead of cold.
7. They just fall flat, taste-wise, so I added a bit of scrumptiousness into the filling along with the apple slices by adding cinnamon roll type flavors.
8. Also, I’m a pie crust junkie, so I switched to pie crust instead of puff pastry and it was indeed more delicious, but…
9. The falling apartness was magnified with the pie crust, so you fix that once and for all by…
10. Using greased muffin liners to bake these babies in. Voila. Most of the problems solved.
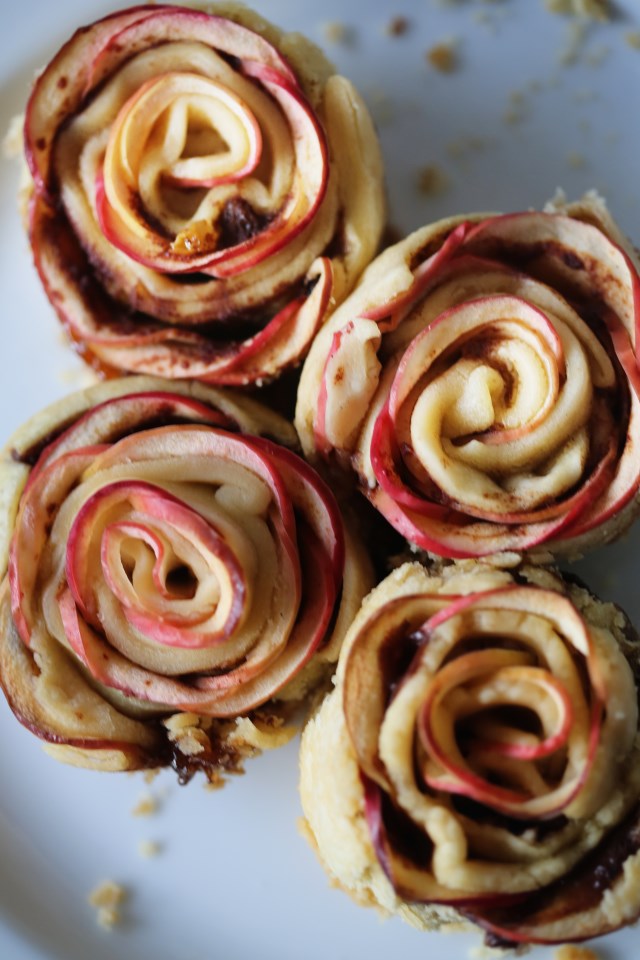
So my suggestion for the final round of 100% deliciousness is to peel the apples. How to fix the “but they don’t look like a rose, anymore!” problem? Add a couple drops of red food coloring to the warm water while the apples soak, OR pomegranate or cranberry juice and BOOM! Red roses. I didn’t do this for my final pics because everyone in my house was getting rather sick of eating these tiny apple roses, BUT I did color some apple slices in pomegranate juice and they were BEAUTIFUL. So I’ll try them like that again and make a special Christmas rose wreath edition of this recipe for those who care. Which I think might be 5 people, total. In any case, I present to you:


Apple Pie Roses
Ingredients:
1 box frozen pie crust, softened in the fridge (Yeah, yeah, I always make pie crust, but these don’t need that extra effort. It’s effort enough as it is and the store-bought crust tasted just great.)
1 apple, peeled (or not – up to you), and sliced into VERY THIN half moons
Hot water and the juice from 1/2 a lemon
For the filling:
1/4 cup dark brown sugar
1/8 tsp allspice
1/8 tsp nutmeg
1 tsp cinnamon
1 tsp vanilla
squeeze of the other half of the lemon
2 TBS melted butter
1/2 cup chopped golden raisins, softened for a few minutes in boiling water
melted butter for brushing the tops
Cut and soak your apple slices in boiling water and lemon while you do everything else. I let mine soak for nearly an hour but I don’t think that’s necessary.
Preheat your oven to 375F. Combine the filling ingredients in a bowl and set aside. Roll out your pie crust and cut into 2.5″ x 6″ strips. Mine were NOT perfectly cut. It doesn’t matter. Spoon about a teaspoon of the filling on the strips of dough and spread it around. Drain and layer the apple slices, slightly overlapping, along the top half of the dough. Fold the other half up over the apples and pinch at the ends to secure, and then roll up into a rose. Refer to the lovely video if you need help!


Place the roses into greased muffin cups (this is important). Brush the tops of the roses with melted butter and sprinkle with sugar. Bake, covered with foil, for 30 minutes. Then uncover and bake for another 20-30 minutes, watching to make sure the edges don’t burn.