Peanut Butter and Jelly Thumbprint Cookies

Peanut Butter and Jelly Thumbprint Cookies3
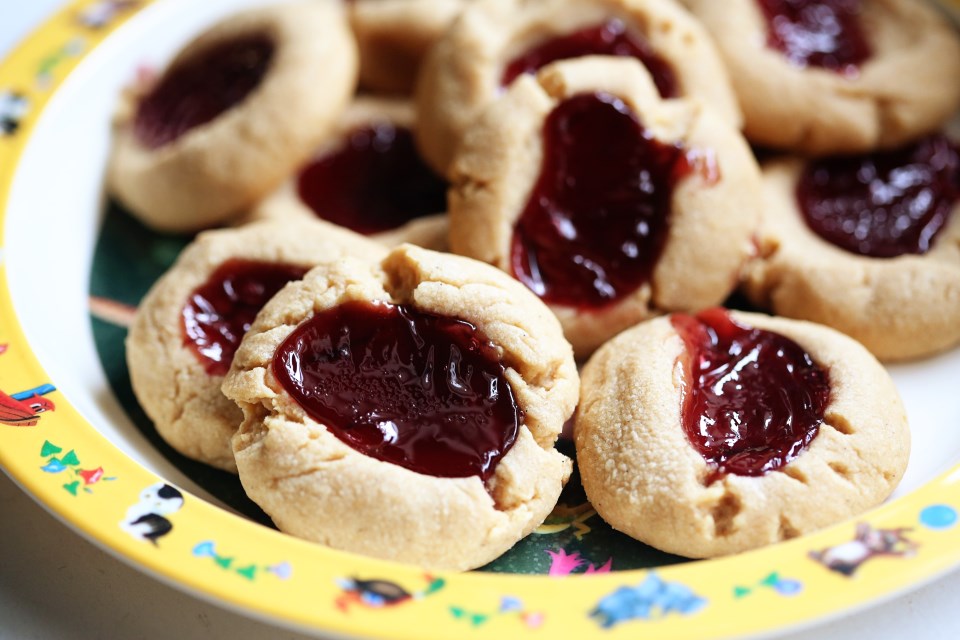
Hello there! This is a delightful little cookie that takes no time at all to make and is so much fun for little helpers! I had this idea a while back whenever I saw powdered peanut butter in the grocery store and have wanted to try it out. It took a little tweaking, but I loved the texture of the cookie itself. One word of advice: don’t use jelly! I know, I know, it’s a riff off of peanut butter jelly sandwiches, but use something a little thicker like a jam or preserve. I used grape jelly because it’s iconic and it really ran out of the cookies more than I would have liked. This did not stop them from being utterly addicting; it just kept them from looking super pretty.

Thumbprint cookies have always been a favorite of mine and this version is so fun and really makes you feel like a kid again. With Thanksgiving and Christmas around the corner, I think this would be a great recipe to have for a cookie exchange! Drizzle it with a bit of white or dark chocolate to make it even more fancy! Enjoy!

Peanut Butter and Jelly Thumbprint Cookies2

Peanut Butter and Jelly Thumbprint Cookies


makes about 2 dozen

1 cup salted butter, softened
½ cup confectioners’ (powdered) sugar, plus ¼ cup more for dusting
2 teaspoons pure vanilla extract
¼ tsp salt
1 1/4 cups all purpose flour
1 cup peanut butter powder

about 1/2 cup fruit preserves or jam

Preheat oven to 325°F. Line a baking sheet with parchment paper.

In the bowl of a stand mixer fitted with paddle attachment, blend butter and sugar until fluffy and light, 2 minutes. Add vanilla and salt, scraping down bowl as needed. Pick up the baby, who has been crying at your knee for the past ten minutes and hold her while you try to measure out peanut butter powder. Let her sneeze into it. Do everything with one arm tied behind your back. Switch to low and gently mix in flour and peanut butter powder, just until combined.

Roll tablespoonfuls of dough into 1-inch balls. Create some interest by making some pea-sized and some into the shape of a carrot. Pretend to eat them, but then actually do. Place dough balls on parchment lined baking sheets. Press down the center of each ball with your thumb, making a slight depression, or a hole clean through to where you can see the bottom of the baking sheet.

Fill cookie centers with a teaspoonful of preserves and be sure to lick the spoon between each cookie. Makes it better. Bake 12-15 minutes or until golden brown and puffy, but take care not to over-bake. Let cool a few minutes on baking sheet, then transfer to finish cooling on wire rack.

When cookies are completely cooled, eat seven or eight with a glass of milk while singing every song you know in your best cat voice. Cookies can be kept in airtight container at room temp for a few days. Emphasis on “can.”

*recipe adapted from Chew Out Loud

Peanut Butter and Jelly Thumbprint Cookies

Turkey Sliders

Turkey Burgers with Cucumber Radish
We’ve been plugging away in the Palmer house, keeping ourselves alive and enjoying our lady babies. It’s shocking how little time I have to do extra things like take pictures of the food we eat so that I can write about it. I’m doing good most days to just get things on the table before someone needs a nap or a diaper change or to be held, all of which are pretty difficult while cooking or taking photographs. I say this to excuse myself for not writing for a month and to tell you that not everything is perfect all the time and I can’t and am not even trying to keep all the balls in the air that I used to. Looking back, having just one kid was a dadgum BREEZE. In fact, that’s when I started this blog – when Olive was just seven months old! My days are filled with super baby joy and crazy games of pretend and doing lots of laundry (Eleanor is a super spitter-upper) and cooking and reading endless Olivia books and knitting and sometimes working on my “real” job of editing photographs. It’s a whirlwind and I know that it will slow down soon and these babies won’t need me every five minutes.  But in the meantime, the meals coming out of here are going to be pretty basic, pretty tasty and pretty easy.

If you are in the stage of life where a little person is needing YOU every five minutes, you’ll appreciate this recipe.  It was mega easy. Super tasty. Didn’t miss the beef, AND it is covered in SriRancha.  That’s right, Sriracha sauce and ranch dressing.  Sriracha mixed with most things is wonderful, but mayo or ranch is especially awesome.  I topped them with super crunchy cucumber slices and icicle radish (hadn’t ever tried those before – they were a fun supermarket find and we loved them!) Try these tonight – you won’t be sorry!

Turkey Burgers

Turkey Sliders

1 lb ground turkey
1 shallot, diced (about 1/4 cup – you can use any kind of onion)
1 garlic clove, minced
1 tsp salt
1/2 tsp pepper
1/2 cup shredded cheddar cheese
Slider hamburger buns

Toppings:
1/2 a cucumber, sliced thin
Any kind of radish, sliced
Slices of American cheese (although you could use any, but I like the traditional taste of American and how it melts)
Sriracha sauce and Ranch dressing, mixed.  Use a ratio of 3 parts Ranch to one part Sriracha

In a large bowl, combine the turkey, shallot, garlic, salt, pepper and cheese until well mixed.  Form into about 1/4 cup size patties and cook in a skillet until a thermometer inserted reads at least 160F. If you don’t have an instant read thermometer, you should invest in one, and if you don’t want to invest in one, I would guess I cooked these for about 10 minutes per side on a medium-level heated cast iron skillet.

Turn on your oven’s broiler to high and place patties on a serving plate and top with slices of cheese (I used a quarter of a slice on each) and melt under the broiler.  Serve with generous amounts of SriRancha, cucumber and radish.


Crunchy Coconut Crusted Fish Tacos with Sriracha Mayo

crunchy coconut fish tacos with sirracha mayo
This was a fabulous meal last night.  I love the combination of coconut shrimp, but had no shrimp on hand and so I did the same crust on cut up fillets of tilapia and it worked perfectly.  We made our quick, crunchy cabbage slaw and srirracha mayo and it was the perfect combination: crunchy, sweet, spicy and satisfying! I did a different version of this with my corn slaw recipe, but the addition of the coconut has made it my new favorite! And Olive ate hers deconstructed (who cares) and gave the fish her “more, please” seal of approval.

Mealtimes around here have become more routine.  I don’t have as much time to plan out weekly menus or to be creative with new riffs on old classics.  I suppose you could say I’m just keeping us alive!  But I do make an effort to offer variety and color and make most meals, although there’s the very necessary trip to Torchy’s about once a week 🙂 I’ve learned to give myself a break from the demands of perfection (a struggle of mine) since this sweet baby came along in November.  I think with every child you have, you get one step further away from the possibility of having all your ducks in a constant, shiny row.  And I am kinda digging it.  I think everyone feels a little bit happier when I don’t consider frozen chicken nuggets to be some sort of personal failure.  😉

coconut fish tacos

Crunchy Coconut Crusted Fish Tacos with Cabbage Slaw and Sriracha Mayo

For the Fish:
3 Tilapia (or other white fish) fillets
1/2 cup sweetened coconut flakes
1/2 cup panko breadcrumbs
2 eggs
1/3 cup flour

For the Slaw:
2 cups chopped purple cabbage
1/2 red onion, sliced thin
2 carrots, shredded
1/4 cup cilantro
1/3 cup mayo
1 TBS red wine vinegar
1 tsp sugar
salt and pepper to taste

Cut the fish into 1/2 inch strips and season with salt and pepper.  Set up three bowls: the first with flour, the second with the two beaten eggs and the third with the coconut/panko combination.  Dredge each piece of fish in flour, then egg, then coconut/panko and set on a paper towel to rest while you do the remaining pieces.  Heat up olive or coconut oil in a pan and fry the fish till they are golden on each side and place on a paper towel or baking rack to drain.  Keep warm in a 200 degree oven while you get the rest of dinner prepared.

For the slaw: combine all the ingredients and adjust seasoning as you like.  More vinegar, salt or pepper.  For the Sriracha mayo, just add sriracha to mayo.  Duh.  Not much to it, but it’s amazing with these tacos.  I did about a 1/4 cup to 1 TBS ratio for ours.  Adjust based on your desired level of spiciness!  To serve, start with a good amount of the mayo on a tortilla, add two fish sticks and plenty of slaw.  Enjoy!


Cheesy Potato Fritatta

spanish tortilla with scallions
It’s the middle of the week.  There has been a loss of momentum.  Or maybe you’ve just gained yours? Either way, you have no idea what to make for dinner and all you have are some leftover potatoes. Do you also have eggs? Everyone has eggs.  Do you have an onion?  Maybe some cheese?  A bit of salt and pepper and olive oil?  Then you’re set.  And dinner will be marvelous.  And filling.  And comforting.  You don’t have to make things complicated to make them delicious and I can’t count how many times I’ve declared, “There’s nothing to eat in this house!” only to be humbled by actually finding something, and not only something, but something truly delicious.  How lazy I can be sometimes!  This meal was inspired by a book called An Everlasting Meal, which is a sort of love-song to making the most out of everything you’re given.  It saved my family from take out with this simple recipe and I will certainly make it again!

potato egg fritatta

Potato Fritatta

2 small potatoes (about 2 cups, peeled and sliced into 1/4″ slices)
1 small onion, sliced thin
1/2 cup shredded cheddar cheeses (can be omitted without any damage done)
salt and pepper
3 eggs, beaten (four if you add the cheese, like I did)

Heat oven to 375F.
In a large skillet over medium heat, heat about 1/3 cup of olive oil and add the potatoes and onions.  Season well with salt and pepper. Cook, slightly covered, until the potatoes are soft. Strain the potatoes and onions out of the pan and put them in a bowl.  Reserve the olive oil from the pan.  Let the onions and potatoes cool and then add in the cheese, beaten eggs and more salt and pepper.  In a 10″ non-stick skillet, add some of the oil from your other skillet and make sure all the sides and bottom are nicely coated.  Pour the egg/potato mixture and cook over medium heat on the stove until the bottom looks set.  Transfer the pan to the oven and let it finish cooking until the top is slightly puffy, about 15 minutes.  Remove from the oven and let it cool for about 10 minutes, and then invert onto a serving plate.  Serve with sour cream, chopped chives or scallions and hot sauce! This dish is great warm, room temp, or even cold. It would be a super easy lunch on the go or weekend breakfast.  

Green Beans with Toasted Pecans and Blue Cheese

Green Beans with Toasted Pecans and Blue Cheese
I’m on a quest to serve up vegetables in a different way each week.  It’s not a New Year’s resolution or anything like that, but just a general promise to be more dedicated to making vegetables enticing.  So often I just rummage through my fridge or freezer and half heartedly throw a vegetable alongside whatever we’re having for dinner.  And I cook them the same way every time.  So every trip I make to the grocery store, now, I grab a would-be-boring vegetable and resolve to make it more interesting than my standard roast-everything method.

Last week I did this with green beans.  I usually boil them in salted water until they are tender (not squeaky!) and then brown a little butter and toss them.  It’s fine.  It’s just what I always do!  So this time, I boiled my green beans, set them aside and then tossed in some toasted pecans and blue cheese crumbles and a few dried cranberries and got everything all nice and warm and it was totally delicious. In fact, it was more exciting than the main course!  The best part – it was quick and easy and shocked us out of the same ol’ routine.  Not bad for a green bean.

Green Beans with Blue Cheese and Toasted Pecans

Green Beans with Pecans and Blue Cheese

  • Servings: 4-6 as a side
  • Print

  • 1 lb fresh green beans
  • 1 cup toasted pecans, roughly chopped
  • 1/4 cup blue cheese crumbles
  • 1/4 cup dried cranberries
  • salt and pepper to taste

In a large pot of adequately salted (that’s about 1/8 cup salt per stock pot.  Or more.  Tastes like the ocean, at least) boil green beans until tender.  Your teeth should not squeak when you chew them! Strain the green beans and set aside.  In a large skillet, toast the pecans until fragrant, and then toss in the green beans, blue cheese, cranberries and a dash of salt and pepper. Add a splash of olive oil if they seem too dry, but depending on your blue cheese, you may get enough oil from it to coat the beans nicely.  Don’t let your cheese burn!

Cheesy Broccoli Rice from Scratch

broccoli rice casserole
This was undoubtedly a comfort food for many of you growing up, as it was for me.  Creamy and cheesy with just a hint of something green, but mostly rice and cheese.  So all in all, the perfect vegetable dish. 😉 My mom made it a lot and sometimes I crave it but I’ve never made it myself.

A lot of recipes you see online call for cans of stuff, velveeta and things that just don’t seem like…food.  Now, I’m not saying that the from-scratch version is any better for you, BUT it has all real ingredients and gives you a good feeling and that’s what makes the indulgence worth it.  I decided one day I would make this dish and since I don’t keep any cream-of-whatever on hand, I made a simple bechemel (white gravy base) and added in lots of extra sharp cheddar.  Each ingredient cooked separately in chicken stock to give lots of added flavor and the results were fabulous!

We still have lots of snow on the ground and the roads are hard to travel, so warm, cheesy dishes are the perfect meal to stay inside and enjoy.  Be warm and well fed! 🙂

Cheesy Broccoli Rice Casserole


Cheesy Broccoli Rice

  • 1 head broccoli, chopped small
  • 2 cups chicken broth (although vegetable broth would enable the entire
  • dish to be vegetarian)
  • 1 cup white rice
  • pinch of salt
  • 4 TBS unsalted butter
  • 4 TBS flour
  • 1 cup whole milk (plus more to adjust consistency)
  • 1 cup shredded sharp cheddar
  • salt and pepper to taste
  • breadcrumbs and extra cheese for topping (I used crushed Ritz crackers)

Preheat oven to 400F.

In a large, deep skillet, bring the broth to a boil and throw in the broccoli.  Steam it with a lid covering until the broccoli is starting to get tender, about 5 minutes.  Remove the broccoli with a slotted spoon and set aside in a large bowl.  Add the rice to the broth and cook until tender (about 15-20 minutes).  Dump rice into the bowl with the broccoli (it’s okay if there’s a little extra liquid).

Wipe the skillet clean and melt the butter over medium heat.  Whisk in the flour until it’s all coated and bubbling, but not turning brown.  Whisk in the milk and let it come back up to a boil, adding more splashes of milk to maintain a gravy-like consistency.  I’m sorry I don’t have exact amounts, but it’s really an add enough until it looks right kinda thing.  Stir in the cheddar and whisk until melted.  Add more milk if it seems too thick.  Adjust the seasoning with salt and pepper until it tastes right and then stir in the broccoli and rice.  Top with breadcrumbs and extra cheese and melt in the oven until bubbling.

Chewy Dark Chocolate and Apricot Granola Bars

chewy granola
Well, friends, I’m happy to report that my daughter, Eleanor, was born three weeks (almost 4!) ago and she’s doing amazing and we are surviving the sleepless nights and the toddler-sister adjustment without too many scrapes and bruises.  Life is certainly different than it was just a month ago.  But it’s also a billion times sweeter.  Here’s my new family (pics taken by my wonderful friend, Katrina):

ep-118

ep-117

ep-158
ep-150
It’s remarkable how little time in the day I actually can get things done, which explains further why posting recipes took a very, very far back burner to everything else.  I also didn’t cook a single thing for two weeks.  It felt weird, but it was nice to have a break. We have remarkable friends who brought us dinner for nearly two whole weeks and then it was Thanksgiving and although we didn’t travel, we certainly cooked!  And a few of those recipes will come in the following weeks.  I wanted to post an easy and satisfying snack for my first post back, because that’s what I need in my new life, now, and honestly, I’m hungry all the time while nursing a baby around the clock.  I find myself insanely hungry when Eleanor wakes up for her 2 a.m. feed but too tired to go to the kitchen to find something and so I fixed that problem yesterday by making some truly crave-worthy granola bars.  Chewy, almost falling apart, no-bake, and filled with my favorite things – namely, dark chocolate, apricots and almonds.

I hope you enjoy these and I am looking forward to getting back in the kitchen around the baking-est time of the year.  🙂

Chewy Granola Bars


Chewy Dark Chocolate Apricot Granola Bars
makes about 16-24

2 cups puffed rice cereal
2 cups rolled oats
1/2 cup wheat germ
1 cup mix-ins (I used dark chocolate, dried apricots and some leftover trail mix that had almonds and raisins – you use what you can find!)
3/4 cup honey
1/2 cup dark brown sugar
1/2 tsp kosher salt
3/4 cup creamy peanut butter

Combine the dry ingredients into a large bowl.  In a medium saucepan, combine the honey, sugar, salt and peanut butter and let it come to a boil for about a minute.  Remove from heat and pour over the dry ingredients (if you don’t want your chocolate melting, add it after you get everything else combined.  I didn’t care and it didn’t melt that much).  Stir until fully incorporated and then press in either a 13×9 greased baking dish, or like I did, a rimmed sheet pan (for slightly thinner bars).  Let it cool completely and then slice and store.

Double Dark Chocolate Waffles

Double Dark Chocolate Waffles
The chocolate cravings have gone overboard.  I really blame it in all seriousness on pregnancy.  When I’m not pregnant, chocolate is good and fine, about on par with every other sweet. Not pregnant,  I don’t think about it outside of seeing it, I don’t dream up ways of using it to its maximum potential in breakfast foods, and I don’t think that it’s “needed” to get from 8 a.m. to 8 p.m. successfully.  When pregnant…well, all those things suddenly become priorities.  Like on Labor Day, I got up and looked up a basic buttermilk waffle recipe and then thought of the maximum way I could choco-fy it.  And I did.  Yes, I’ve had a similar waffle recipe on this blog before, BUT it wasn’t as good.  These waffles are fluffier, less dense, and the chocolate chips remain melty like a fresh-baked chocolate chip cookie during your entire breakfast.  So.  I’m not sorry for seeming repetitive.  If you’re pregnant, I’ll understand if I get a thank-you note in the mail later this week.
Double Chocolate Buttermilk Waffles
I topped these in three different ways and they were all good: melted butter and powdered sugar – easy, and the most cookie-like experience.  Butter with maple syrup: most waffle-like experience, but I’ve always felt that syrup on a chocolate anything is too much.  Turns out, it’s not.  And three: fresh raspberries all over the suckers.  Chocolate dipped fruit, anyone?  They were all good.  Dress it up, dress it down, this will be your new craving.

Double Chocolate Waffles
Double Dark Chocolate Waffles
makes about 12 Belgian-style waffles

2 cups AP flour
2 tablespoons brown sugar
2 tablespoons Dutch-process cocoa powder
2 teaspoons baking powder
1 teaspoon baking soda
1/2 teaspoon salt
2 cups buttermilk
1/3 cup vegetable oil
2 large eggs, lightly beaten
1 teaspoon vanilla extract
1 cup dark chocolate chips

Heat your waffle iron.  In a large bowl, combine the dry ingredients with a whisk until fully incorporated.  In a smaller bowl, whip up the wet ingredients.  Gently whisk the wet into the dry until just combined.  Fold in the chocolate chips.  Cook waffles to the waffle-iron’s suggested time (mine has a handy little light that goes off when they’re done) and keep in a 200 degree oven while you cook the rest to keep them nice and warm and crisp on the outside.  Serve with powdered sugar and melted butter, or whatever.  It really doesn’t matter – it’s all good.

Vegetable Puff Pastry Pizza

Vegetable Pizza on Puff Pastry
This was lunch for me and Olive, today.  I LOVED it.  We had a random selection of leftover veg in the fridge and my mind always goes the leftover route of omelet or fritatta, but not today.  We had puff pastry in the fridge and a tiny bit of leftover Romesco sauce and so I knew I had a pizza in there, somewhere.  The flavors were amazing and the whole thing took 20 minutes to make (minus the time it took to let the puff pastry thaw out.)  Super winner in my book.

Olive took two bites of one tiny square and declared herself done, not hungry, anymore.  Okay!  I have to roll with things like that.  Inside my head, I think, “What could I offer her that I know she’d eat? Crackers?  Pasta?  Something without kale and asparagus on it?”  But no.  I can not get into that habit or I’ll have the toughest time getting out of it.  In the last few months, I’ve seen Olive eat potatoes of all colors (those purple things on the pizza are potatoes), tomatoes, asparagus, kale, carrots and cheese.  So in my head, I knew that this wasn’t a challenging meal for her.  She’s had a tough week with food, though, and I knew before I even made it that it would probably tank.  I asked her later how she liked lunch and she said, “It was good! I tried two bites!”  So there you go.  To her it wasn’t a failure.  To me it was because she didn’t inhale it like she would’ve a pizza with just pepperoni and cheese.  Quantity doesn’t always mean quality.  I have to remember that exposure and consistency are the major keys to training up good eaters.  Mere exposure is helpful because then you don’t have the kid that cries at the sight of vegetables on their plate and familiarity breeds comfort, eventually.  Eventually.  Eventually is the result of patience and to be honest, it’s not my strongest attribute.  But I’m learning and I’m trying and I will tell myself on days when my little half-pint only eats four bites all day that she will be okay.  She’ll learn.  Eventually.

unbaked Veggie Pizza
Here’s the pizza raw so you can see better what I found in my fridge to add:  kale rubbed with a bit of olive oil, leftover roasted root vegetables, leftover grilled asparagus and half a tomato.  The sauce was our leftover Romesco sauce and I put all this on top of one sheet of frozen puff pastry.  Puff pastry is flawless.  Super fancy-seeming lunch in 20 minutes.  I’ll take it!

Veggie Pizza


Vegetable Puff Pastry Pizza
serves two as a main or 4 as an appetizer

One sheet frozen puff pastry, thawed
2 TBS tomato sauce or Romesco sauce
Any toppings you like.  I used:
1/2 cup chopped kale
1/2 cup chopped (already cooked) asparagus
Half a tomato, cut into wedges
1/2 cup (already roasted) potatoes and carrots
1/2 cup shredded Italian blend cheese

On a rimmed baking sheet, spray with oil and lay out your puff pastry to thaw.  When thawed enough to unfold, spread it out and roll it out bigger on each side to be about 1″ longer all the way around.  Spread your sauce and then sprinkle the cheese to cover it well.  Arrange your vegetables and coat the kale in a little bit of olive oil and rub it into the leaves to soften them up.  Bake in a 400F oven for 15-20 minutes until golden brown.

Leftover Veggie Pizza

Chicken Avocado Taquitos with Red Pepper Soup

chicken taquitos with green chili
These recipes jumped off the screen last Monday when I was looking for something quick, nutritious and slightly comforting to make for my family.  Both recipes come from the great world of Pinterest and they paired together like old friends.  The first was baked chicken taquitos and I improvised from the original recipe a bit and added avocado (because it improves nearly everything) and green chili powder instead of cayenne.  Both additions worked well and I’ll definitely make this recipe again!

The second recipe comes from a dear friend and fellow food blogger, Becky McGrew of Apronclad.com!  She made this roasted red pepper soup a while back and I have kept it in the back of my head as yet another wonderful soup to introduce new flavors to our little two-year old, Olive.  The soup made a wonderful dip for the taquitos and was obviously wonderful on its own as a starter/side dish for the meal.  It has some Italian herbs in it, which are awesome, but I think next time to match up a little better with the Mexican theme, I think I’d omit the basil and thyme and add in Mexican oregano and cilantro to finish.  Whatever you do, just make this soup.  It’s outstanding!  I didn’t mess with the recipe at all, so just go on over to Becky’s blog and get the recipe there, plus very nice step-by-step instructions!

chicken taquitos

Baked Chicken Avocado Taquitos*

2 boneless skinless chicken breasts, pounded to ½ inch thickness
½ teaspoon garlic salt
1 teaspoon green chili powder
½ teaspoon onion powder
1 teaspoon cumin
8 6-inch flour tortillas
1 cup shredded mexican blend or cheddar cheese
1 large, ripe avocado
Preheat oven to 450. Line a baking sheet with nonstick foil and spray heavily with cooking spray.

In a small bowl whisk together garlic salt, green chili powder, onion powder and cumin. Rub seasoning into both sides of chicken breasts. Spray a large pan or skillet with cooking spray and cook chicken over medium heat about 8-10 minutes or until cooked through. Chop chicken up into small cubes. Divide chicken evenly among all tortillas, spreading the chicken into a strip down the middle of each tortilla. Top chicken with about 2 tablespoons of shredded cheese and a few pieces of avocado. Tightly roll each tortilla into a taquito. Place end side down on prepared baking sheet. Spray taquitos heavily with cooking spray. Bake 10-15 minutes until tortilla edges begin to brown/blacken and cheese is melty. We dipped ours into the soup and also our favorite – Mexican crema!  Seriously, so much more flavor than sour cream!

*adapted from Creme de la Crumb