Chewy Dark Chocolate and Apricot Granola Bars

chewy granola
Well, friends, I’m happy to report that my daughter, Eleanor, was born three weeks (almost 4!) ago and she’s doing amazing and we are surviving the sleepless nights and the toddler-sister adjustment without too many scrapes and bruises.  Life is certainly different than it was just a month ago.  But it’s also a billion times sweeter.  Here’s my new family (pics taken by my wonderful friend, Katrina):

ep-118

ep-117

ep-158
ep-150
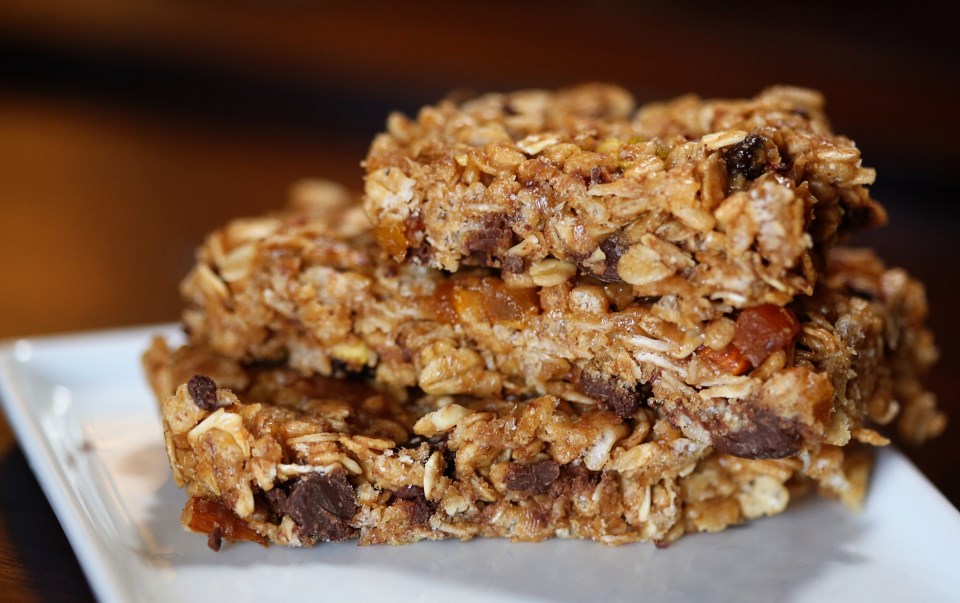
It’s remarkable how little time in the day I actually can get things done, which explains further why posting recipes took a very, very far back burner to everything else.  I also didn’t cook a single thing for two weeks.  It felt weird, but it was nice to have a break. We have remarkable friends who brought us dinner for nearly two whole weeks and then it was Thanksgiving and although we didn’t travel, we certainly cooked!  And a few of those recipes will come in the following weeks.  I wanted to post an easy and satisfying snack for my first post back, because that’s what I need in my new life, now, and honestly, I’m hungry all the time while nursing a baby around the clock.  I find myself insanely hungry when Eleanor wakes up for her 2 a.m. feed but too tired to go to the kitchen to find something and so I fixed that problem yesterday by making some truly crave-worthy granola bars.  Chewy, almost falling apart, no-bake, and filled with my favorite things – namely, dark chocolate, apricots and almonds.

I hope you enjoy these and I am looking forward to getting back in the kitchen around the baking-est time of the year.  🙂

Chewy Granola Bars


Chewy Dark Chocolate Apricot Granola Bars
makes about 16-24

2 cups puffed rice cereal
2 cups rolled oats
1/2 cup wheat germ
1 cup mix-ins (I used dark chocolate, dried apricots and some leftover trail mix that had almonds and raisins – you use what you can find!)
3/4 cup honey
1/2 cup dark brown sugar
1/2 tsp kosher salt
3/4 cup creamy peanut butter

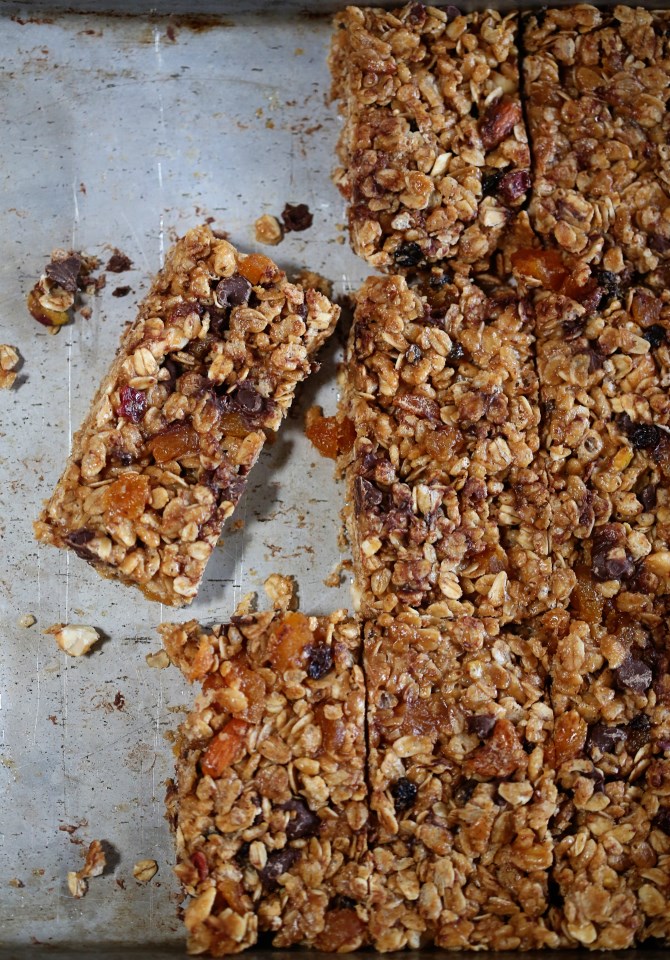
Combine the dry ingredients into a large bowl.  In a medium saucepan, combine the honey, sugar, salt and peanut butter and let it come to a boil for about a minute.  Remove from heat and pour over the dry ingredients (if you don’t want your chocolate melting, add it after you get everything else combined.  I didn’t care and it didn’t melt that much).  Stir until fully incorporated and then press in either a 13×9 greased baking dish, or like I did, a rimmed sheet pan (for slightly thinner bars).  Let it cool completely and then slice and store.

Advertisement

Mushroom Stuffed Mushrooms

stuffed mushrooms
I haven’t posted in a while.  Honestly, I have more literal time lately to post, but less mental space.  Ever feel that way?  This baby is crowding my brain and I’m still cooking all the time, but honestly, I’m cooking a bunch of repeats or things I don’t find particularly photo-worthy, so I just haven’t been shooting my food lately!  I did make this fabulous little side dish last week and we all agreed that it was better than the main dish (which I can’t remember – case in point).  So I’m sharing it with you!  I took little baby portobello mushrooms and tossed the stems in a food processor along with a bunch of other like-minded ingredients to form a great filling for stuffed mushrooms!  The kid tried “one happy bite” and that’s all we ask these days.  She has her comfort foods and right now, mushrooms isn’t one of them!  But that’s okay…I keep in mind that what kids observe, they’ll eventually imitate.  And she definitely observes people who enjoy pretty much every food on the map.  Trust the system, trust the system…

mushroom stuffed mushrooms


Mushroom Stuffed Mushrooms

12-15 baby portobello mushrooms, stems removed and reserved
1 ounce extra sharp white cheddar, grated
1 egg
1 tsp garlic oil or olive oil
1 garlic clove
4 tbs breadcrumbs
2 strips cooked bacon with drippings
1 tsp worchestershire sauce
1 tbs dijon mustard
a splash of chicken stock

Wipe the mushrooms with a paper towel and set in a greased baking dish, side by side.  Dump the stems of the mushrooms and all the other ingredients into a food processor and pulse until smooth.  Adjust seasoning with salt or pepper and extra chicken stock if it’s too thick.  The consistency for mine was like a pate or bean dip.  Top the mushrooms with the filling and pile it high.  Top with extra shredded cheese and a drizzle of olive oil and bake at 350F for 20-25 minutes, or until the tops are golden brown and puffed up slightly.  Enjoy!


Roasted Green Chile and Caramelized Onion Dip

Green Chili and Caramelized Onion Dip
Here in the West Texas/Eastern New Mexico region, we have a summertime tradition.  We wait all year for it and when the weekend comes, we can smell it in the air.  On every supermarket corner, there they are: green chiles, rotating in a huge, iron roaster over a fire, filling the air with the sweet and savory charred smell of heaven on earth.  A couple weekends ago, it was Chile Roasting Day.  It only happens for a couple weekends at the end of the summer or the beginning of the fall season, so there’s a sense of urgency to buy as many bags as we can before they’re gone.  There’s just one problem: letting them go to waste (they’ll mold within a couple weeks in your fridge) or freezing them, which takes away some of their magic, if you ask me.

So this year, we bought two bags like this:
bag of roasted green chilies
…and we promised we wouldn’t let them go to waste OR freeze them.  Maybe we should store up for winter, but there’s something pretty special about waiting all year for something.  Like a summer tomato.  It’s worth the wait and any other time of the year, it just isn’t the same. (blog post coming soon…)

So all week, I’m going to be posting green chile recipes!  If you happen to live in this region, go stock up because I fear this weekend will be the last.  If you don’t live in this region, I’m sorry.  It’s really the only thing we have on you because we have to deal with dirt storms for a third of our year and 100 degree heat for another third.  Let us revel in this, our only leg up on the competition.  (mostly kidding – I’d send you a bag, but I don’t want to freeze them). 🙂

Today your recipe is a roasted green chile dip with caramelized onions.  I posted about a caramelized onion dip last summer and I thought it would be the perfect base for adding some green chile magic.  So here you go, my friends.  Enjoy the first green chile recipe of the best week of the summer.

Roasted Green Chili Dip
Roasted Green Chile and Caramelized Onion Dip

makes about two cups

1/4 cup vegetable oil
3 TBS unsalted butter
2 large, yellow onions, sliced thin
8 oz cream cheese
1/2 cup sour cream
1/2 cup mayo
7-10 roasted, mild green chiles, seeded or not, it’s up to you.
1 TBS red wine vinegar
kosher salt to taste – I used about 2 teaspoons

In a large, deep sided skillet, add the oil and butter over medium-medium high heat until the butter starts to bubble.  Add the sliced onions and spread out into one layer and let them sizzle for about 5 minutes until they start to color.  Stir them around and repeat this process, not stirring too much to let them caramelize.  This process takes about 30 minutes and you want to err on the side of too caramelized than not enough.  Mine looked like this:
Caramelized Onions
Meanwhile, in a food processor, add the cream cheese, sour cream, mayo and vinegar and a teaspoon of salt.  Pulse until blended.  When the onions are done, scoop them into the food processor and add the green chiles.  I added just three at first, two seeded and peeled, and one whole, minus the stem.  It wasn’t enough green chile flavor for me, so I just kept adding them.  There are LOTS of amazing flavors in the roasted skins and since you are blending them up, it’s completely recommended to not peel the skins from your chiles when you add them.  So!  Add a few, pulse, and see how you like it.  Add some salt, pulse some more.  Add a few more chiles.  Really, it’s up to your taste and what you like.  We ended up adding 7 green chiles, 3 peeled and seeded and 4 whole (minus stem).  It was a perfect heat level for us AND we were using mild chiles, so obviously, with the hot variety, you might want to seed all of them.  I bought mild because I wanted LOTS AND LOTS of flavor without killer heat.  This is a fun game of taste testing, so have some chips ready.  Enjoy!


Chilled Strawberry Soup

Chilled Strawberry Soup
I ran across this interesting recipe last week and wanted desperately to try it.  A chilled strawberry soup!  What could be more summery or fun?

The original recipe called for Riesling and a garnish of black pepper and olive oil and next time I do it, I really want to try that version.  Since I would be serving it to Olive and wouldn’t be cooking the alcohol out, I decided to alter the 1/2 cup of Riesling for lime juice and I think the results were so refreshing.  Some might call this a smoothie, and it basically is, but it’s thinner and if you go the adult version route, it would certainly be more elevated than a smoothie.  Olive loved this different snack and I loved it for breakfast this morning!  I garnished the soup with a bit of chocolate mint from my plant out back.  Did you know there was such a thing as chocolate mint?!  I didn’t but was intrigued and I think there is a subtle smooth difference between it and basic sweet mint (which has the quintessential “gum” flavor).  I thought mint and hints of chocolate would be great on a strawberry soup and it was – next time I may even add some dark chocolate shavings as a garnish!

Enjoy!  It’s a hot one out there, today!

Chilled Strawberry Soup
makes about 3 cups

3 cups strawberries, hulled
1 cup plain Greek yogurt
Juice from two large limes (about 1/2 cup)
1/3 cup raw honey
Garnish: mint, chocolate, cracked pepper

Put all ingredients except the garnish in a blender or food processor and blend for about a minute, scraping down the sides.  If you want to go the extra mile, strain the soup through a fine mesh sieve to remove the seeds. Chill for at least an hour and garnish as you wish!  (I didn’t chill ours at all and it was great).

Superbowl Food: Roasted Sweet Peppers with Goat Cheese and Proscuitto

sweet cherry peppers with goat cheese and proscuitto
This made an excellent little appetizer bite tonight for a get-together we went to with some of our friends.  We decided to cook based on a theme and that theme was “stuffed” since our dear friend, Cali, will have her baby in about three weeks.  I made these roasted peppers and some high-class pigs in a blanket and a truly college-essence PopTart cake, which I’ll post pics of tomorrow.  The peppers were a hit.  I tried them first with bacon and it was too greasy.  The proscuitto was just right, a perfect blend of salty and sweet and were gone in minutes.  I think it would make a great addition to a Superbowl spread so I’m giving you the simple recipe here!

stuffed sweet peppers
Sweet Peppers with Goat Cheese and Proscuitto

1 jar Mezzetta Sweet Cherry Peppers, or something similar
1, 8oz log goat cheese
1 tablespoon garlic oil or olive oil with 1 clove minced garlic
1 package thin sliced proscuitto, cut into 4 strips each

Get the goat cheese up to room temp and in a medium bowl, add the garlic oil, or olive oil and minced garlic and stir well to combine.  Drain the peppers and dry on lots of paper towels and fill each pepper with goat cheese until full.  I used a spreader and it worked great.  Take a thin strip of proscuitto and wrap around the peppers and place on a greased baking rack fitted on top of a rimmed baking sheet and bake at 375 until proscuitto crisps up, about 20 minutes (check to make sure they don’t burn).  Also: try to keep the top of the peppers up – the goat cheese will melt and drip mostly out if you don’t!

Serve immediately!


Spicy Roasted Chickpeas

Spicy Roasted Chickpeas
I‘ve seen this recipe around the Pinterest/Facebook/Blog world for a while, now and the first time I tried it, it was one of those moments when I bitterly complained that what I made didn’t look at ALL like the picture.  Ever feel that way?  I think the second time around, without a recipe, I just followed my nose and used the spices I like and let them roast much longer and I had SUCCESS!  They turned out super crunchy, wonderfully spiced and a great little starter for our meal, which Olive claimed as the favorite part of her meal and kept saying, “Mes, hickpeas?”  over and over and over.  I really think she ate about a half cup.  I wouldn’t recommend that to other moms, but that’s what happened and since they were part of the meal, I let it slide.  But yeah, they eat like a snack and I would recommend this to anyone for a healthier option for a party snack, during a movie, etc.  And you can have fun with whatever spice blend you want!  Happy Monday and I hope everyone had a wonderful weekend!

Spicy Roasted Chickpeas

2 cans chickpeas, drained and rinsed
2 tbs olive oil
1/2 tsp each of:
salt, pepper, onion powder, paprika
a sprinkle of garlic powder

Preheat the oven to 375. Spread out the drained, rinsed chickpeas on paper towels and dry those suckers out WELL.  Place the chickpeas on a rimmed baking sheet and add the olive oil.  Mess them around with your hands till every last wee pea is coated in oil.  Sprinkle the spice blend over the peas and roll them all around till they are all coated.  Place the chickpeas in the oven for 25-35 minutes until they are golden and when the pan is shaken, they sound hard and roll around easy.

Let them cool for a bit before transferring them to a bowl, just because you don’t want to enthusiastically grab a handful of glowing-hot peas.

Serve at the beginning of the meal or for a snack and enjoy!