The Best Appetizer, Ever

warm dates with olive oil and salt
Okay, so it’s not spinach artichoke dip (the best junky appetizer, ever) but I love it. It’s just three ingredients! It’s salty, sweet, chewy, and indulgent all in one! It’s so easy that it hardly qualifies to be a blog post, but I can’t help it because we love it so much we have it at least once a week so I wanted to share it with you.  I present to you: Warmed dates with olive oil and kosher salt. That’s it.  Matt read about this appetizer in a book I got for him for Christmas called Delancey.  We ate at Delancey’s in Seattle when we were there last year and had some of the best pizza of our lives.  It’s a cute restaurant owned by a husband/wife duo and the book is the tale of their beginnings in the food world and how they combined their talents in opening the perfect pizza shop.  He bakes the pizza and she takes care of appetizers and desserts. It’s kind of a fantasy of Matt’s to do the same and own a brick oven style pizza joint. I could totally run the apps and desserts.  Maybe one day we will after our children are old enough to be our waitstaff 😉

7G9A8306
These warmed dates are in that book – just a simple appetizer that are completely satisfying.  I could honestly have these dates with a slice of Matt’s bread and be totally happy for dinner.  It seems weird and too simple, but it just works.  Simply heat fresh dates on the stove in some good olive oil until they are slightly sizzling.  Then, sprinkle with kosher salt and serve warm.  Amazing and easy and spiffs up your dinner in about 15 seconds.  Also, our opinionated three year old loves them.

Warmed Dates with Olive Oil and Kosher Salt

Advertisement

Rustic Vichyssoise (potato and leek soup)

Vichyssoise 2
Too hot outside for another soup recipe?  What if I told you it was a cold soup?  Would that change your mind or keep you further away?  We are okay with gazpacho so why not potato and leek?  Maybe if it had a fancy French name?  Vichyssoise (pronounced vishy-swah) is a silky potato soup, cooled down with cream and it might just become your new favorite soup.

A French chef at the Ritz in the 1950s, Louis Diat, was credited with this soup’s [cold] invention.  He said as a boy, he and his brother would cool off the potato and leek soup his grandmother would make, by pouring milk or cream into the hot soup.  He loved the experience so much, he wanted to create a soup for his patrons at the Ritz similar to the soup he had as a boy.

I haven’t quite gotten behind the cold version, yet.  I think the silky potato soup is amazing hot and it has so much depth.  For a dish that has so few ingredients, it tastes like it has a dozen. The potato/leek combination is rather magical in and of itself.  Matt loves the cold version (chill the soup first, then add cream, or you’ll just end up with lukewarm soup if you add cream to hot soup) I love it hot, Olive loves it somewhere in between and once again, this is a great way to provide vegetables for a great little eater who is otherwise distracted by the experience of being two 🙂

I, of course, defaulted to my favorite French cookbook for the recipe – Winnie never steers me wrong!

Vichyssoise 1
Rustic Vichyssoise* (rustic because I forgot to peel the potatoes first)

2 TBS unsalted butter
2 medium-size leeks (or one Texas size – white and pale green parts only, halved lengthwise, rinsed and chopped, about 1 cup)
6 cups low-sodium chicken broth (I had beef broth on hand and it turned out great)
1.5 lbs yellow or white potatoes, peeled and roughly chopped(or unpeeled if you forget and want to call it rustic :))
Salt and fresh ground pepper to taste
1 TBS heavy cream
1/4 cup snipped fresh chives for garnish

Melt the butter in a 4 quart saucepan over medium heat.  Add the leeks and cook, stirring, until tender but not brown, 4 to 5 minutes.  Pour in the broth slowly and then add the potatoes and salt and pepper.  Bring to a boil.  Reduce the heat, cover the pan, and cook at an active simmer until the potatoes are tender, about 30 minutes.

Blend in the pot with an immersion blender until no chunks of potato remain (or, working in batches, puree in a blender).  Stir in the cream and season with extra salt and pepper, if needed.  Garnish with fresh chives and add extra cream to your liking.  For making traditional Vichyssoise, chill the soup for a few hours and then add about 1/4 cup cold cream or half and half to each serving.  Re-season as needed.

*slightly adapted from the Bonne Femme Cookbook

Superbowl Food: Roasted Sweet Peppers with Goat Cheese and Proscuitto

sweet cherry peppers with goat cheese and proscuitto
This made an excellent little appetizer bite tonight for a get-together we went to with some of our friends.  We decided to cook based on a theme and that theme was “stuffed” since our dear friend, Cali, will have her baby in about three weeks.  I made these roasted peppers and some high-class pigs in a blanket and a truly college-essence PopTart cake, which I’ll post pics of tomorrow.  The peppers were a hit.  I tried them first with bacon and it was too greasy.  The proscuitto was just right, a perfect blend of salty and sweet and were gone in minutes.  I think it would make a great addition to a Superbowl spread so I’m giving you the simple recipe here!

stuffed sweet peppers
Sweet Peppers with Goat Cheese and Proscuitto

1 jar Mezzetta Sweet Cherry Peppers, or something similar
1, 8oz log goat cheese
1 tablespoon garlic oil or olive oil with 1 clove minced garlic
1 package thin sliced proscuitto, cut into 4 strips each

Get the goat cheese up to room temp and in a medium bowl, add the garlic oil, or olive oil and minced garlic and stir well to combine.  Drain the peppers and dry on lots of paper towels and fill each pepper with goat cheese until full.  I used a spreader and it worked great.  Take a thin strip of proscuitto and wrap around the peppers and place on a greased baking rack fitted on top of a rimmed baking sheet and bake at 375 until proscuitto crisps up, about 20 minutes (check to make sure they don’t burn).  Also: try to keep the top of the peppers up – the goat cheese will melt and drip mostly out if you don’t!

Serve immediately!


Superbowl Food – Nacho Grits!

nacho grits


Super Bowl?  Super bowl!  Super good idea in a bowl.  Nacho grits? Not yo grits!  I’m done.

You take all the things you love about nachos and you cook a big pot of grits (which are just liquid corn chips if you think about it) and you put out bowls and let people top their grits with whatever combination they love the most!  Provide chips, too, because what jerk makes people crave nachos and then doesn’t have that as an option?  Not this gal.  After making all the toppings, I REALLY wanted super-cheesy nachos!  But the nacho grits was an awesome idea, so we had to create it.  And it was tremendously filling and amazing.

For my bowl, I went with chorizo, black olive, scallion, shredded asadero cheese, Ro-tel, cilantro and Mexican crema.  I incorporated cheese and garlic into the grits, so they already had that “nacho cheese” flavor.  Really quite delicious!  I’d recommend very small bowls for this magical side dish at the big game because it will fill your guests up very quickly!

nacho grit spread


Click here to see my recipe for grits and let your imagination run wild with all your favorite nacho toppings!

Curried Potato Pockets with Lemon Dill Cream

curry potato puffs with dill cream

This was an incredibly flavorful dinner for us last Tuesday night.  It was one of those meals that came from a lack of motivation to go to the store.  I had two large potatoes, an onion and some puff pastry and I knew – there’s a meal there, somewhere.  With just a little prep, I had a meal on the table in about an hour.  I made these with left-over pie crust, as well, but everyone, including Olive, preferred the ones with puff pastry.  Buttery and flaky with that smoky curry spice went exceptionally well with the tang of the yogurt and dill.

This meal included one of those moments where I wasn’t giving Olive any sort of chance and declared that she wouldn’t like the yogurt sauce and so I didn’t offer her any.  After we had eaten a few bites, she said, “I want the sauce?!” and so I put some on her plate and she ate it all!  Yet another lesson in giving your kids a chance to prove you wrong. You never know when they’ll surprise you!

curried potato puffs

Curry Potato Pockets with Lemon Dill Cream
makes 9 puff pockets with plenty of filling to spare

2 medium russet potatoes, cleaned, skinned and diced small
1 large yellow onion, diced small
4 tbs butter
1 tbs curry powder
1/2 tsp ground cumin
salt and pepper to taste
1 sheet frozen puff pastry, thawed and cut into 9 squares
2 tbs cream for brushing the pastry
1/2 cup plain, full fat yogurt
squeeze of one lemon
2 tbs chopped fresh dill
salt to taste

In a large skillet over medium heat, melt the butter and once it starts to froth, add in the onion and potato.  Stir around until the potato begins to soften and then cover with a lid and cook for about 10 minutes.  Remove the lid and add in the curry, cumin and salt and pepper.  Continue cooking over low heat until the potatoes are completely soft.  Remove mixture from stove and set aside.

Set your oven at 400F.  Mash the potato/onion mixture in a bowl until mostly smooth and adjust the seasoning as desired.

Cut the puff pastry into 9 squares and put a heaping tablespoon of filling in the middle of each square.  Dip your finger in the cream and dab along the edges and pinch/fold them together into little letters – really, however you pinch and fold is up to you, as long as they have a fighting chance of staying closed while baking! Place on a greased cookie sheet and repeat until all the squares are filled.  Brush the tops with the remaining cream and bake for about 30 minutes, or until golden brown.

For the yogurt dipping sauce: simply chop the dill and squeeze the lemon into the yogurt and stir till combined.  Adjust with a little salt and serve along side the pastries.  Personally, I don’t like this sauce on its own, but with the curry pockets, it’s just an amazing balance of flavors.

Enjoy!

Homemade Goat Cheese

pure goat cheese

Good Monday Morning to you all!  I’ve been meaning to blog about homemade goat cheese for several weeks, now.  I stumbled upon this process because I’d bought a quart of goat’s milk when Olive was starting to wean and I read or heard or saw somewhere that goat’s milk digests easier than cow’s milk, so I figured I’d give it a shot.  I naturally tasted it before I gave it to her.  It tasted like liquid goat cheese.  I wouldn’t personally want to drink that, but I let her try it in the name of not pushing my personal tastes onto my child.  She wouldn’t take more than one sip.  Actually cried (this was around 9 months) so I bought a quart of whole cow’s milk instead and we haven’t looked back.  So I turned the goat’s milk into a nice, creamy 4 ounce log of goat cheese with garlic and herbs.  It was delicious.

I guess I’ll take this time to tell you that I don’t believe in eating something just because it has health benefits.  Eating grass straight from the yard is probably beneficial in some way, but that doesn’t mean I’m going to do it.  I believe things should have flavor, seasoning, and should taste wonderful in addition to however many antioxidants they might have.  So this, I suppose, ties in to the way I have always cooked for Olive.  I haven’t ever given her something without seasoning.  From 6 months, whatever she’s eaten has been seasoned with something (yes, less salt than I’d prefer, don’t worry.) And now that she’s eating from the table, it’s game ON.  Welcome to the wonderful world of food, Ollie.  We have chocolate!

Making goat cheese is easier than making bread, but the two go together quite nicely.  I don’t personally think that it’s easier or cheaper than buying goat cheese at the store.  I think a quart of goat’s milk is comparable to a cheap log of goat cheese.  However, it’s fun to do stuff from scratch, it’s creamier, tastier and gives you a sense of self satisfaction that you did something the old way.  Isn’t that reason enough to at least give it a try?


DIY Goat Cheese – adapted from Serious Eats
makes one, 4 oz log of goat cheese

1 quart of full fat goat’s milk (I bought this brand)
1/4 cup freshly squeezed lemon juice (from one large lemon, maybe two)
1/2 clove freshly grated garlic
a few pinches of salt
Herbs – whatever sounds good to you (rosemary, chives, herbs de Provence, non herbs like honey, chopped dried fruits, etc.  Possibilities are endless.  If you use something sweet, omit the garlic)

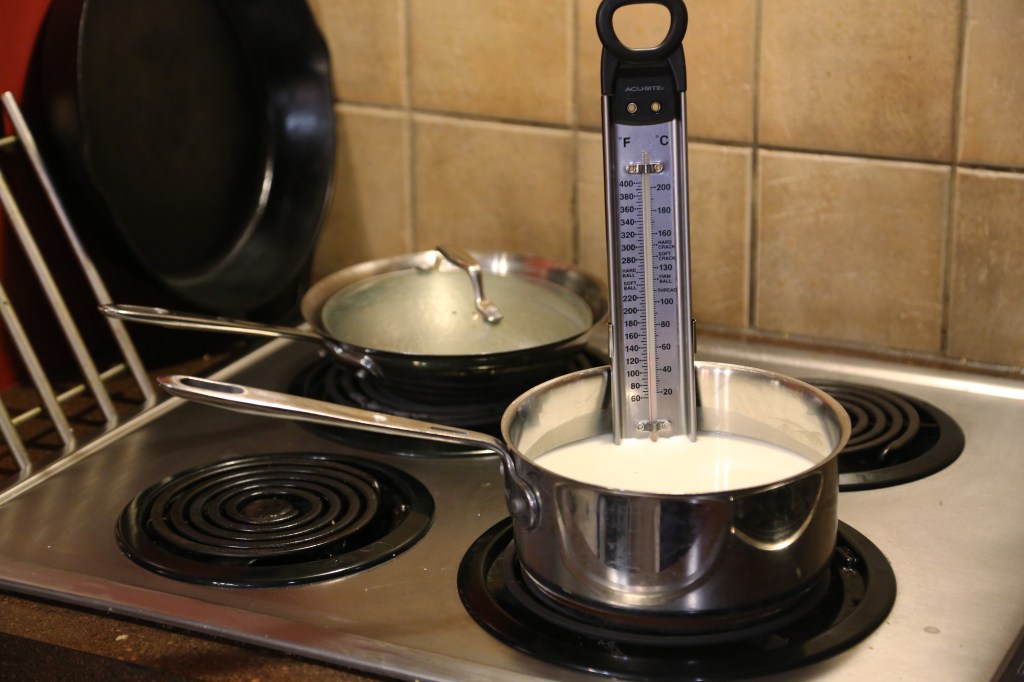
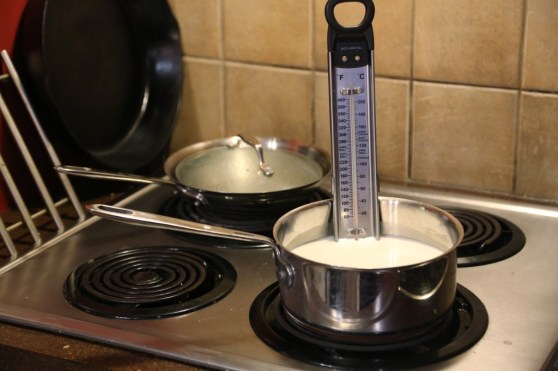
Fill a medium saucepan with goat’s milk.  Heat gradually until it reaches 180F.  Watch closely.  It shouldn’t take more than 15 minutes.  A candy thermometer works nice in this situation, but I used a probe meat thermometer the second time because it was more accurate (pictured here was my first attempt.)
cooking goat milk

Once it hits the magical temperature, remove from heat and stir in lemon juice. Let stand until milk starts to curdle, about 20 seconds. Don’t expect curdles, like cottage cheese curdles. Slight clumping will occur, but nothing too drastic. You can add a few extra droplets if nothing is actually happening.

Line a colander with a thin, flour sack kitchen towel.  Or lots and lots of layers of cheese cloth that you probably don’t have on hand.  Most of you have a thin kitchen towel that you can almost see through. As long as there aren’t holes, use it.  It’s efficient, it works great and just remember to wash it quickly and don’t throw it in the used-towel bin for a week all wadded up in a sweaty goat cheese smelling ball.  Like I did.

Set your lined colander over a deep bowl and ladle in the milk.  It will seem like it’s all seeping through, but don’t fret. Tie up the ends of the towel and suspend over the bowl and let it drain for about 2 hours.
straining goats milk

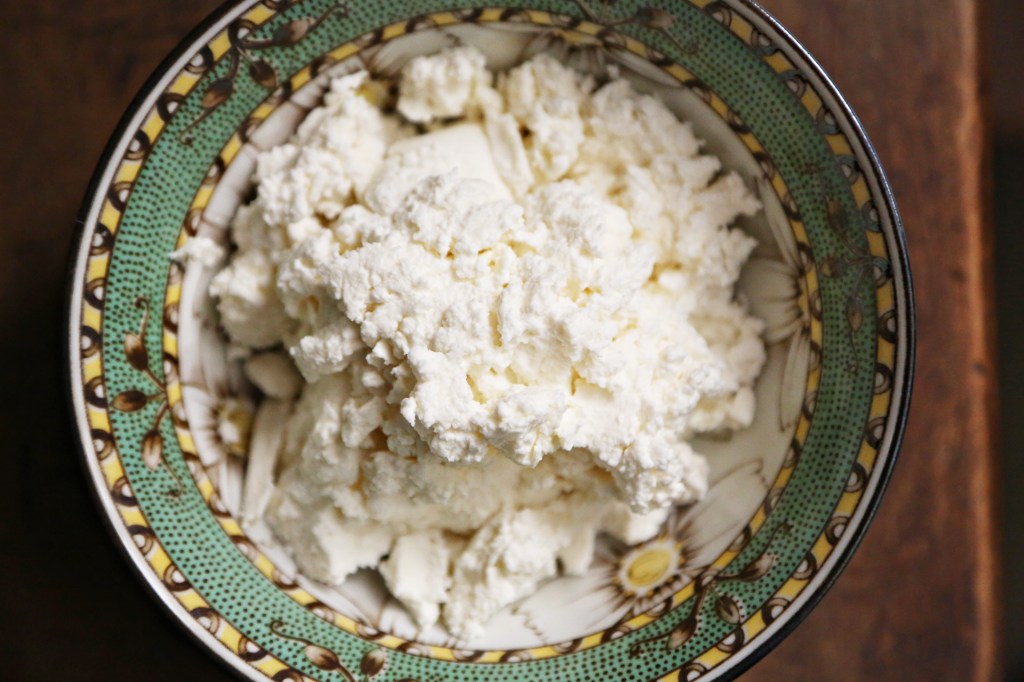
Transfer the cheese to a bowl and mix in seasonings to taste.  The first time I did it, I added the grated garlic, salt and about a teaspoon of herbs de Provence.  The second time, I roasted my garlic and added in olive oil.  SO GOOD. This time, I left out the garlic and stirred in some raw honey and a little salt and used it in a salad recipe from the Bonne Femme cookbook.  Amazing results.  Have fun with it!

After you mix in your flavors, if you want to be able to cut it or have some sort of shape, wrap it up in plastic wrap and leave in the fridge for a couple hours to let it firm up.  (see below) then you can cut it for bread or whatever you like.

goat cheese with baguette and raw honey


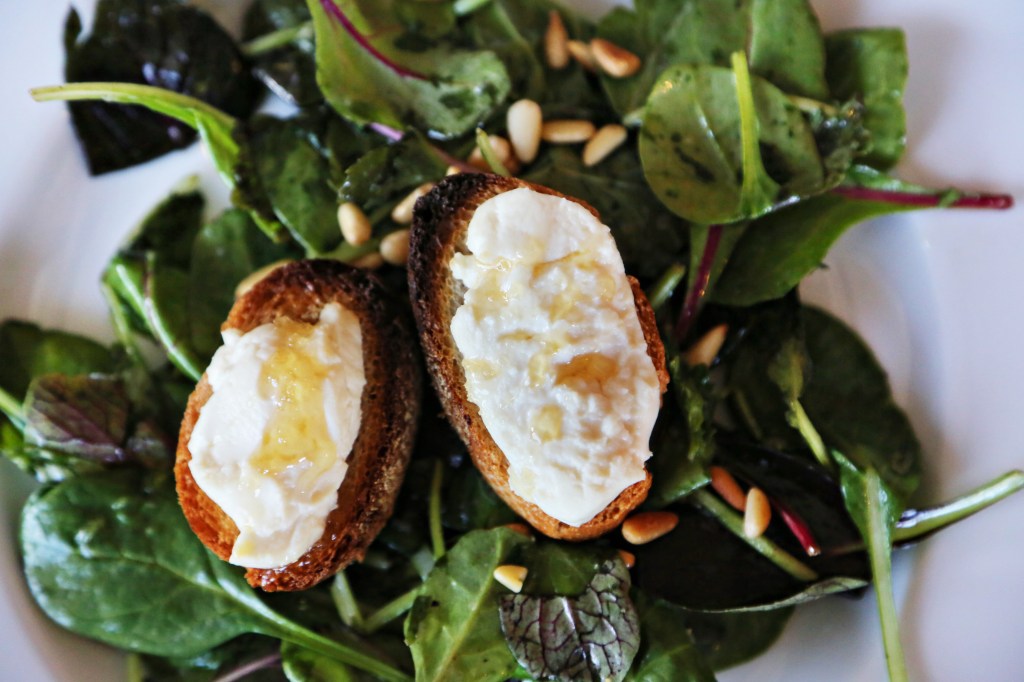
With just bread and extra honey it’s basically a dessert!

goat cheese honey salad


On top of baguette slices, broiled and then drizzled with extra honey.  Set on top of a mixed greens salad with toasted pine nuts and a sherry vinaigrette.  An excellent lunch!