Green Beans with Toasted Pecans and Blue Cheese

Green Beans with Toasted Pecans and Blue Cheese
I’m on a quest to serve up vegetables in a different way each week.  It’s not a New Year’s resolution or anything like that, but just a general promise to be more dedicated to making vegetables enticing.  So often I just rummage through my fridge or freezer and half heartedly throw a vegetable alongside whatever we’re having for dinner.  And I cook them the same way every time.  So every trip I make to the grocery store, now, I grab a would-be-boring vegetable and resolve to make it more interesting than my standard roast-everything method.

Last week I did this with green beans.  I usually boil them in salted water until they are tender (not squeaky!) and then brown a little butter and toss them.  It’s fine.  It’s just what I always do!  So this time, I boiled my green beans, set them aside and then tossed in some toasted pecans and blue cheese crumbles and a few dried cranberries and got everything all nice and warm and it was totally delicious. In fact, it was more exciting than the main course!  The best part – it was quick and easy and shocked us out of the same ol’ routine.  Not bad for a green bean.

Green Beans with Blue Cheese and Toasted Pecans

Green Beans with Pecans and Blue Cheese

  • Servings: 4-6 as a side
  • Print

  • 1 lb fresh green beans
  • 1 cup toasted pecans, roughly chopped
  • 1/4 cup blue cheese crumbles
  • 1/4 cup dried cranberries
  • salt and pepper to taste

In a large pot of adequately salted (that’s about 1/8 cup salt per stock pot.  Or more.  Tastes like the ocean, at least) boil green beans until tender.  Your teeth should not squeak when you chew them! Strain the green beans and set aside.  In a large skillet, toast the pecans until fragrant, and then toss in the green beans, blue cheese, cranberries and a dash of salt and pepper. Add a splash of olive oil if they seem too dry, but depending on your blue cheese, you may get enough oil from it to coat the beans nicely.  Don’t let your cheese burn!

Advertisement

Classic Bruschetta

bruschetta
It’s nice to know an Italian.  They have the goods on traditional recipes and the right way to process a bumper crop of tomatoes.  I have such a friend, Jennifer, and this year, fortune smiled on her plants and she started to get WAY more than she could use and process on her own.  So she asked if I wanted some. (huzzah)  Since that same fortune didn’t happen to fall on my plants this year and my crop looked more like a handful of marbles, I enthusiastically said YES (plus, what crazy person turns down garden tomatoes?!)  I was so happy we could finally make our homemade BLTs before the last whiff of summer is completely gone.  I made a wonderful, basic tomato sauce (recipe coming soon) and canned it for the winter and with the rest of the tomatoes she brought, I saved two for our BLTs and the rest I asked her for her favorite bruschetta recipe.

She told me that there wasn’t really a recipe, but that this was how her granddad always made it and those kind of recipes are my favorite, anyway.  In the spirit of handing down family recipes, I’m not going to list quantities. I’ll basically give it to you like she gave it to me – the taste and adjust method!  If you have any tomatoes still coming off the vine (as many of us in this region do) then I hope you enjoy this recipe! If your crop is done, then look for the ripest plum tomatoes you can find in the grocery store.  We served this with Matt’s plain country bread, and honestly, it was the best meal I’d had in weeks.  Sometimes, nothing beats pure and simple.  Thank you, Jen, for sharing your tomatoes and your recipe with us – we benefited greatly from both!

bruschetta 3

Classic Bruschetta
makes a good amount

Dice up a few, ripe, plum tomatoes.  Add in minced garlic, a nice pour of good olive oil and add in a handful of shredded fresh basil.  Mix to combine and then add in a generous grating of fresh Parmesan cheese and adjust the seasoning to your liking with salt and garlic powder.  Serve on toasted baguette or just about anywhere you can think to use it!

Butternut Squash and Celery Root Soup and trying something new

Butternut Squash Soup
This is one of the best soups I’ve made all winter.  Previously, butternut squash soups were borderline too sweet for me – I could never finish an entire batch and would guiltily throw the leftovers down the sink.  I’ve made this version three times, now, and each time, we eat it all!  It doesn’t get boring – the flavors are so complex and balanced, thanks to that crazy looking celery root.  It’s perfect!  It’s also incredibly filling and very low fat, so I think it’s quite possibly the most wonderful food to have when you’re watching what you eat, but don’t want to feel deprived.  It’s also perfect as a baby food!  With just two simple vegetables, it’s a great way to introduce flavors to a little one just starting out on solids, or a toddler who might eat soup better than they would eat a new vegetable.  For toddlers, I think the best way to serve soup is in a small, handled cup.  Fill it half way and let them sip at their own pace.  They love feeling in control and YOU will feel better with limited soup-spills as would occur most certainly if you handed them a spoon 🙂  This soup is also a great way to introduce YOU to a new vegetable!  Who here has bought and prepared celery root?  (also called celeriac)  If you haven’t, you don’t have to be afraid – it tastes like celery with the consistency of a sweet potato!

I’m happy to announce a little cooking segment I’ll be doing this year on my friend, Paul’s PBS show, 24 Frames!  (this soup makes an appearance!)  It’s very exciting to be a part of something creative and I’m deeply flattered that he included me in his show. I love talking about food more than anything, so once I get over the mortal fear of seeing myself talk on camera, I’ll finally start to enjoy watching my own segment.  Please tune in to 24 Frames every Saturday night at 9 p.m. Central on PBS!  The show should be available online very soon for those who don’t live in this area, and when it is, I’ll post a link!

Thank you all for watching and for reading my blog.  It’s very humbling and I hope you can feel a little more confident in the kitchen with every new recipe you try!

Butternut Squash and Celery Root Soup

Butternut Squash and Celery Root Soup
serves 6-8

 2 tablespoons olive oil
1 medium onion, diced
1 – 2lb butternut squash, peeled, seeded and diced
1 celery root, peeled, rinsed and diced
2 teaspoons kosher salt
2 teaspoons dried rosemary
4 cups low sodium chicken or vegetable stock, hot
black pepper and cream for garnish
1. Peel and chop the onion, celery root and butternut squash.
2. Heat the oil in a large stock pot.
3. Add the onion and cook, stirring often, until softened, about 5 minutes.
4. Stir the squash, celery root and salt into the pot and cook for about 10 minutes until the squash begins to soften.
5. Add the rosemary and chicken broth and bring to a boil.  Reduce heat and let simmer over medium heat, partially covered, for 20 minutes, or until vegetables are tender.
6. Using a blender in batches, or an immersion blender, puree the soup until completely smooth.  Adjust the seasoning with salt and pepper and thin out with cream or extra stock as desired.  Ladle into bowls and add a swirl of cream and a few dashes of fresh cracked pepper and serve!

Citrus Cured Salmon

7G9A1929


It’s Monday – time to scale back.  Drink more water, take a walk after dinner.  Eat lighter, eat simpler.  Undo what might have been done over the weekend of eating out with friends, drinks with co-workers or quick meals eaten on the run out of paper bags.  I am currently in a very scaled-back mindset.  This blog obviously has the most popularity when I post sugar and flour concoctions (don’t worry, there’s plenty in the queue) but for this week, I’m going to write about simple, clean, mindfully healthy recipes that are also incredibly fulfilling and delicious.

Over the weekend I dipped into Michael Ruhlman’s cookbook, “Ruhlman’s Twenty” and tackled the citrus cured salmon.  This is not the type of recipe that calls my name. I love cured salmon in the form of lox, but this type of do-it-from-scratch recipe is a direct influence of my husband.  He has made me see the joy in cooking for cooking’s sake.  Not just eating the food, but enjoying the process.  I can honestly say I thought he was crazy when I first heard him say, “I don’t even need to eat what I made, as long as I taste it and see that it came out well, I can move on.”  I used to think this was ridiculous because I used to be a quantity over quality type eater.  I used to think more was more.  More mediocre food is better than less high-quality food.  This is a mindset of an over-eater.  As Matt taught me the joy of the process of cooking, I began to see what he meant.  Just tasting that something you spent hours making came out well is beginning to be enough of a pay-off for me. And when you don’t eat as much, you have more to share.  Which puts you in the middle of what food should be: communal.

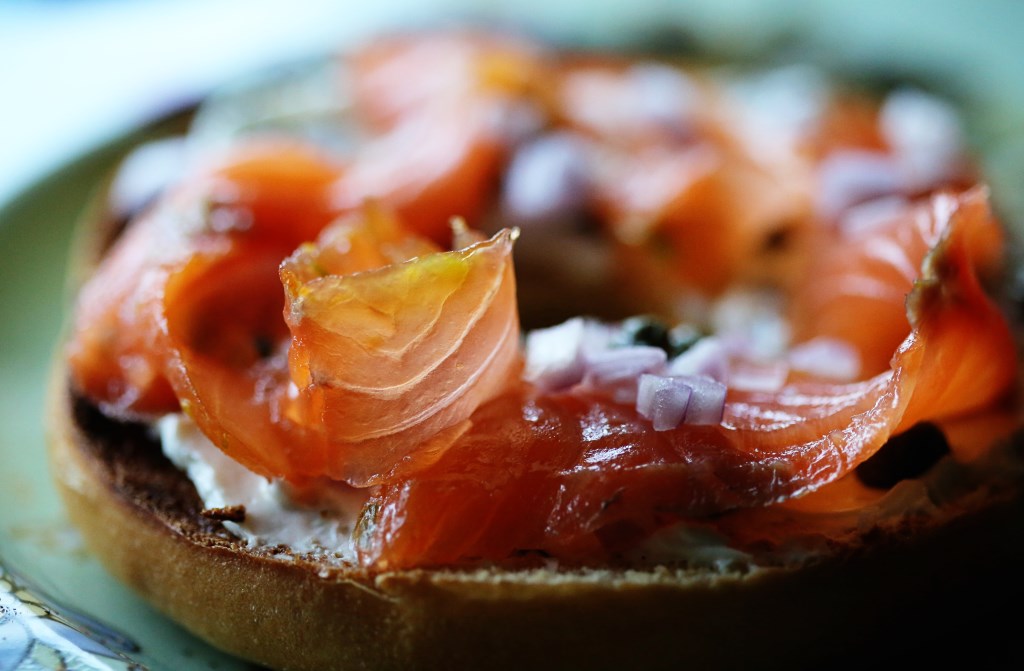
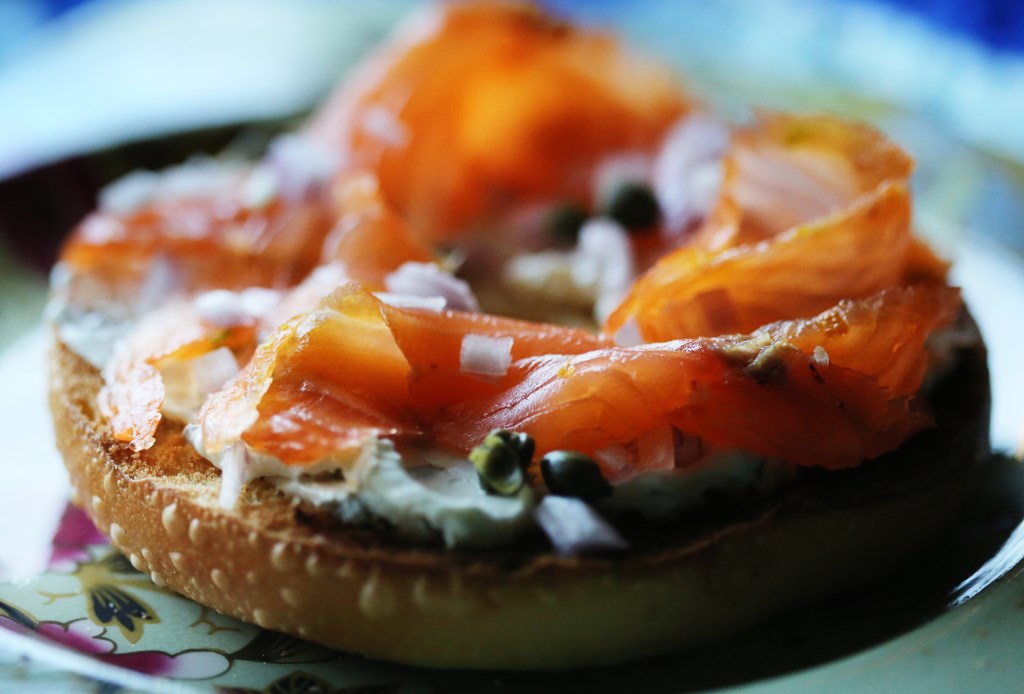
I know what you’re thinking: this stuff is pretty easy to buy in the store.  However, I never want to buy it because how old is that fish, anyway?  And where did it come from?  All these questions  are answered simply if you just do it yourself.  So, we bought a pound of salmon from the fresh fish counter, I grated lots and lots of zest and dumped kosher salt on it.  24 hours later – perfectly cured salmon with a HUGE citrus flavor.  Amazing with cream cheese and capers and diced shallots on top of Matt’s homemade, toasted bread.  This is eating simply and without regret!

Happy Zesty Monday.

Citrus Cured Salmon

Citrus Cured Salmon*

1.5 lb salmon filet
1 tsp orange zest
2 tsp lemon zest
1 tsp lime zest
1/2 cup kosher salt
1/4 cup sugar

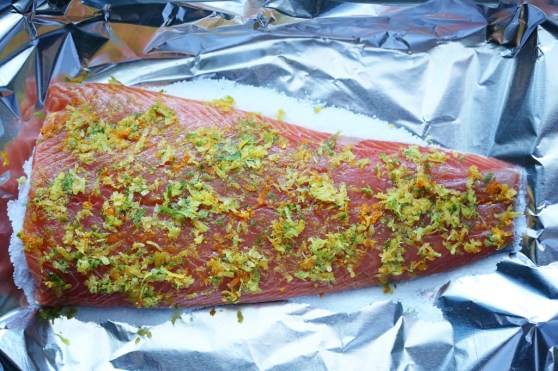
In a small bowl, combine the salt and sugar and stir to distribute the sugar throughout the salt.  In another bowl, combine the citrus zests.  (Buy a Microplane.)

Lay a sheet of aluminum foil large enough to extend beyond the length of the salmon.  Spread a third of the salt mixture in the center of the foil to serve as a bed for the salmon.  Place the salmon skin-side down on the salt.  Distribute the zest evenly across the salmon.  Pour the remaining salt mixture over the salmon.  It should be covered.  Fold the foil up to contain the salt.  Place another sheet of foil over the salmon and crimp the sheets together firmly.  The idea is to have a tight package in which the salt mixture is in contact with all surfaces of the salmon.

Set the foil package on a baking sheet.  Set another baking sheet or dish on top of the salmon and weight it down with a brick or a few cans from your pantry.  This will help press the water out of the salmon as it cures.  Refrigerate the salmon for 24 hours.

Unwrap the salmon and remove it from the cure, discarding the foil and the cure.  Rinse the salmon and pat dry with paper towels.  To remove the skin, place the salmon skin-side down on a cutting board.  Holding a sharp, thin, flexible knife at about a 30-degree angle, cut between the flesh and the skin.  When you can get a grip on the skin, pull it back and forth against the knife to separate it from the flesh.  Set the salmon on a rack or on paper towels on a tray and refrigerate for 8 to 24 hours, to allow the salt concentration to equalize and to dry the salmon out further.  Wrap the salmon in parchment and store in the fridge for up to 2 weeks.

Serve sliced extremely thin on crackers, bagels, or with scrambled eggs for a hearty breakfast – the options are up to your tastes!

*adapted from Rhulman’s book in that we could only find 1.5lb filets of salmon and his recipe called for 2-3lbs.

lox