Blackberry Lime Cinnamon Rolls with Lime Vanilla Bean Icing

Blackberry Lime Cinnamon Roll - cross section
Good Sunday morning to you all!  This week has been a tough one for me.  I got sick on Tuesday and as anyone who has ever been pregnant knows, you can’t take the good meds when you’re sick.  So I had the usual, insulting cold in the middle of summer, had two weddings and one family shoot to edit, made a ginormous birthday cake for a friend which took up all of Tuesday AND my wonderful redhead decided to cut her usual nap time in half, so I had only one good hour during the day to get my photo work done (still got the wedding done in my two-week time frame – bragging, I don’t care, gotta throw that out there).

Blackberry Lime Morning Rolls
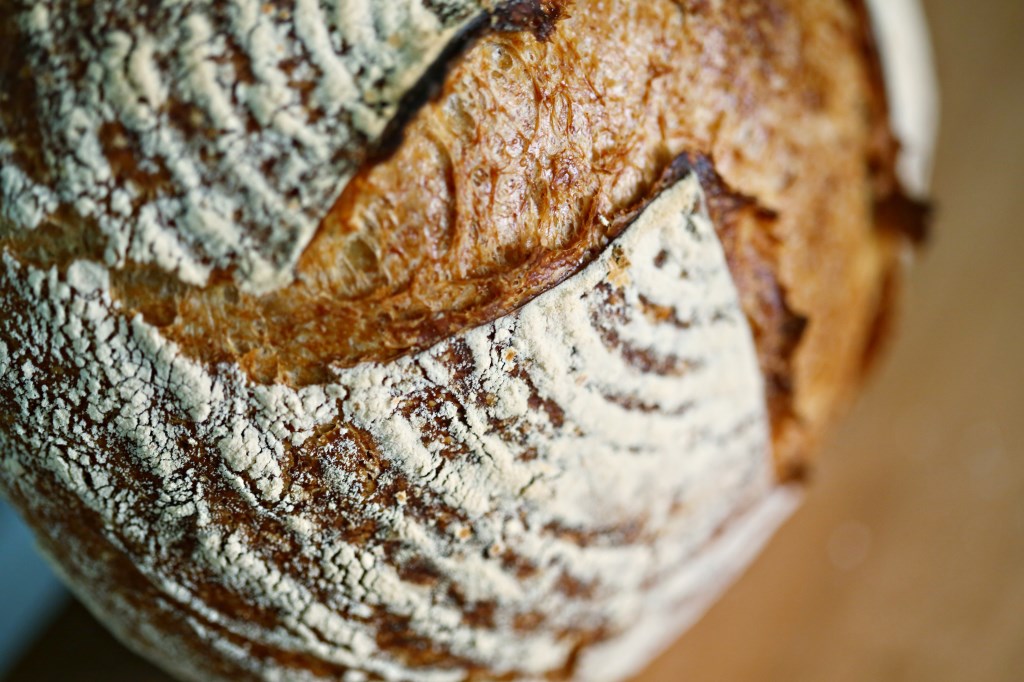
In the midst of my feeling like my head was stuck in a cloud and everything else, I felt it was the right time to make cinnamon rolls.  I don’t know – it was just therapeutic.  A few weeks ago, Matt made Joy the Baker’s first Baking Bootcamp recipe – a triple berry cinnamon swirl bread – and it was just outstanding.  Wonderful recipe and the flavors were so perfect.
Triple Berry Cinnamon Swirl Bread
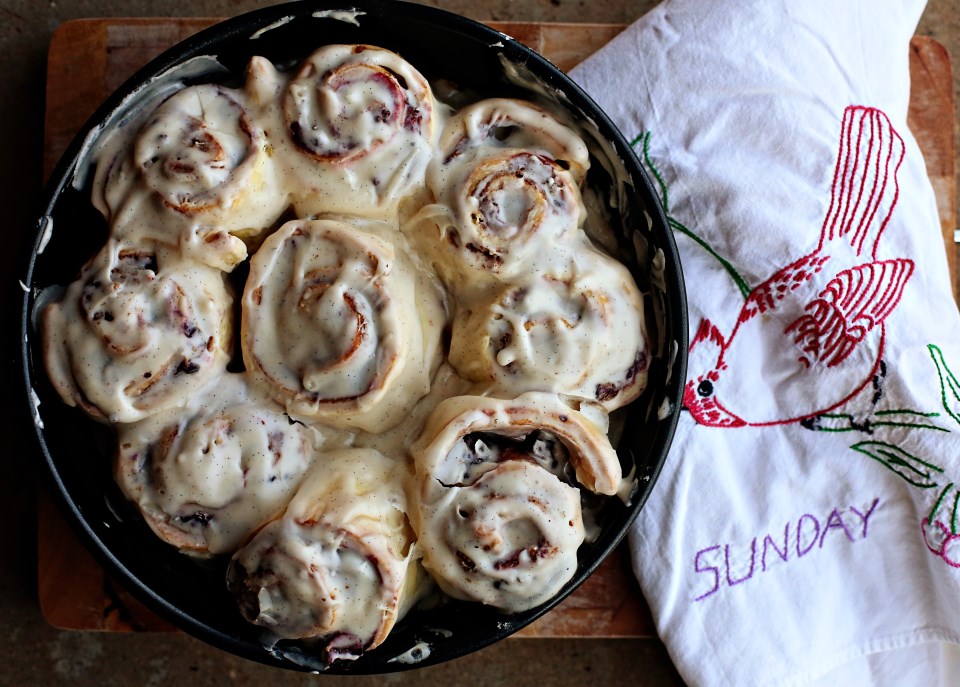
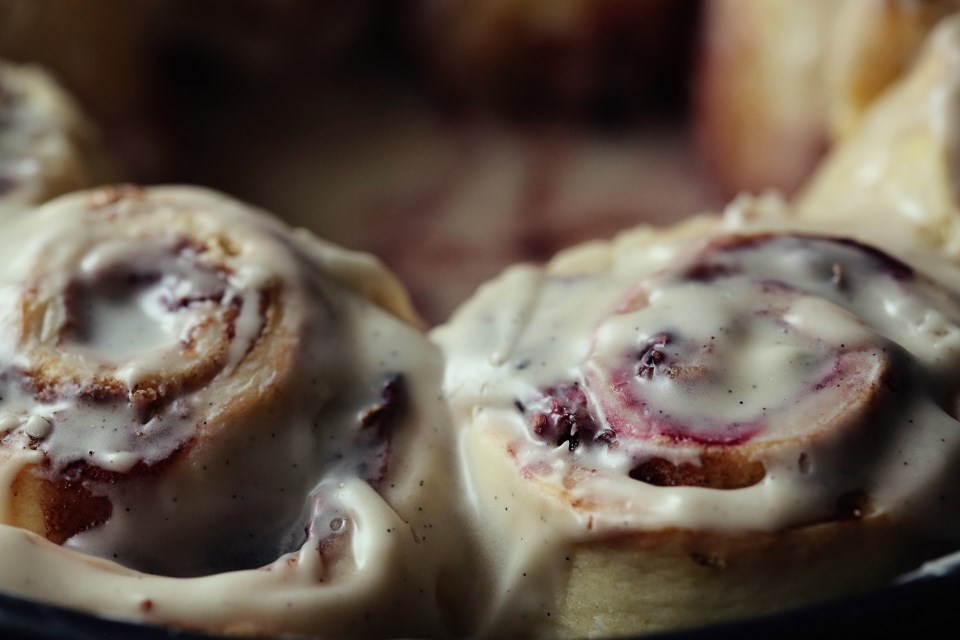
The day he made it, I knew I wanted to turn it into cinnamon rolls with some kind of citrus glaze.  I finally got around to it and…score.  They were so bright and comforting at the same time.  I will definitely make these again when I’m not afflicted with Taste Blindness (I’ll expound on that, later).  And you should make them, too!  They take about an hour less than typical from-scratch cinnamon rolls and can be used with most any fruit – so get creative!

Morning Rolls - Blackberry Lime


Blackberry Lime Cinnamon Rolls with Lime Vanilla Bean Icing*

For the Dough:
2 1/4 teaspoons active dry yeast
1 tablespoon granulated sugar
3/4 cup whole milk, warmed to a warm lukewarm
1 large egg yolk 2 tablespoons unsalted butter, melted
2 1/4 cups King Arthur All-Purpose Flour
1/2 teaspoon salt a bit of olive oil for greasing the bowl

For the Filling: 1/4 cup unsalted butter, at room temperature
1/4 cup granulated sugar
3 teaspoons ground cinnamon
2 cups fresh blackberries
Zest from two limes
1 large egg, beaten for egg wash

In a medium bowl stir yeast with sugar. Stir in  the lukewarm milk and then add the egg yolk and melted butter.  Whisk together until thoroughly combined.  Allow mixture to rest for 5 minutes.  It should foam and froth. In a large bowl whisk together the flour and salt. Pour the milk mixture over the dry ingredients and start kneading it until it pulls away from the edges of the bowl. Place dough on a lightly floured counter and knead by hand for about 10 minutes more.  Dough ball should be smooth and damp, without being too sticky.  Shape dough into a ball. Grease a large bowl with olive oil.  Place the dough in the bowl and cover.  Allow to rest at warm room temperature for about 1 hours, or until doubled in size.

While the dough rises, whisk together the butter with sugar and cinnamon for the filling.  Preheat the oven to 375 degrees F. Grease a 9 inch cake pan.  Set aside. After the dough has doubled in size, place it on a lightly floured counter and knead twice.  Using a rolling pin to roll the dough to a rectangle of about 18×12 inches. Spoon the cinnamon filling over top, spreading evenly, leaving a clean 1-inch border around the edges. Sprinkle the fresh blackberries over the cinnamon filling and grate the lime zest over everything.
Blackberry Cinnamon Rolls
(My blackberries were apparently from the Land of Canaan, so I had to cut them up). Start by rolling the longest side of the dough.  The roll will be a bit lumpy because of all the berries. Using a sharp knife, cut the log into 1 1/2 inch rolls and place cut-side down.  Brush the rolls with the beaten egg. Bake for 20-25 minutes until golden brown.  Allow to cool for about 30 minutes before icing.

For the Icing:
1 cup powdered sugar
juice from one lime
3 tbs heavy cream
1 tsp vanilla bean paste
a good pinch of kosher salt

Mix everything together in a medium bowl and thin out the icing with more lime juice, or thicken it up with more sugar.  Easy as that!

Have a happy rest of your weekend 🙂

*I adapted Joy’s recipe for the Triple Berry Cinnamon Swirl Bread a bit, but you can see her original and wonderful recipe HERE.

Blackberry Lime Cinnamon Rolls

Advertisement

English Muffins – Family Guest Post

English Muffins from Scratch
The guy that inspires me to do everything better in my life wrote this post today.  He is known affectionately by several of our friends as “The Bread Man” and rightfully so.  After deciding to cook through The Bread Baker’s Apprentice a few years back, he’s baked bread nearly every week since then.  All Matt wants to do in life is to enjoy the process.  It is a rare talent that I do not possess.  I care much more about the outcome than he does and every day I learn from him how to live in the moment, just a little bit better than the day before.  Without any more rambling, here’s Matt’s take on English Muffins…of which I ate six…

Homemade English Muffins

When we go out for dinner and Alisa asks me what I’m in the mood for the answer is frequently (when it’s not pizza) “barbecue or Asian,” so I guess it’s no surprise that I like David Chang so much. He’s become famous for smoky east-meets-west combinations like his bacon dashi. On his excellent series Mind of a Chef he made equally reverent visits to a top Japanese katsuobushi producer and Allan Benton’s Tennessee smokehouse, did an impressive tour of Tokyo ramen shops and drank an equally impressive amount of Kentucky bourbon.

He’s also no-nonsense about flavor, and every dish of his we’ve made has been great. The Brussels sprouts recipe from Momofuku made a believer out of my dad, a lifelong Brussels sprouts hater. From the simple (has ginger scallion sauce made an appearance on this blog yet?) to the complex – and some of his recipes can get mind-numbingly complex – many of his recipes have become household favorites for us.
What does this have to do with English muffins? This recipe actually comes from the Momofuku cookbook, and as a bread lover and general fan of everything Chang does, I’ve been wanting to try it for a while. I actually made this on a recent Sunday night, perhaps fueled by the return of Downton Abbey, and had to laugh when I realized I was cooking English muffins out of an Asian cookbook at midnight.
These are fun to make – the dough is very delicate, and there’s something really satisfying about laying them into a pan that barely seems warm and turning them gently until they seem somehow sturdier, then start to pick up the first hints of the golden brown color we associate with English muffins. As with every other recipe from this book, they were delicious, and as with every other bread recipe I’ve tried I feel like I could spend years trying to master it.
This recipe is actually from Chang’s chef, Milkbar genius, Christina Tossi.  Here’s a link to the chef herself making these, step by step.  There’s really no way to improve this recipe and we followed it to the letter.  Also, I don’t want to write out 16 steps.
English Muffins

Dark Chocolate and Ricotta Pancakes

dark chocolate ricotta pancakes


Chocolate or coffee?  Which ingredient controls my mind the most?  Coffee may win out just a hair with its zero-calorie-yet-complex-and-indulgent attribute, but chocolate comes in at a close second.  I received an amazing cookbook for Christmas from Matt.  The Mast Brothers Chocolate cookbook.  It’s stunning.  A voyage in pictures and recipes in the lives of Rick and Michael Mast – two brothers who make and sell chocolate in New York City.  The pictures are dark and stunning and the stories are as wholesome and exciting as the product they sell.  Everything from a sustainable source, every ingredient in their chocolate from a farmer they literally know and have probably had dinner with.  Nothing they do is the easy way out and it’s an amazing way of life to aspire to, and a joy of a book to read through like a novel.

One of the recipes that caught both Matt’s and my eye was the dark chocolate and ricotta pancakes.  I’m usually on the lookout for something special to fix us for breakfast on Saturday and that recipe just jumped off the page.  The picture showed these nearly-burned pancakes (although not burned – just super dark chocolate) and browned butter frothing around the edges.  Sold.  All the recipes in this book (if you can procure some really great chocolate) are simple and straight-forward.  Hardly any recipe takes up more than a paragraph and so it all seems so accessible.  I used Lindt 70%, our favorite dark chocolate that you can actually find in a grocery store.  The results were amazing – your classic chocolate chip pancake bumped up a notch.  Enjoy and take your Saturday morning a bit slower!

Dark Chocolate Ricotta Pancakes*
makes 10-12 small pancakes

3 eggs, separated
1 cup ricotta cheese
1/3 cup whole milk
3 tablespoons sugar
1 pinch kosher salt
2/3 cup AP flour
3 ounces dark chocolate, finely chopped
6 tablespoons unsalted butter

In a medium bowl, whisk egg yolks with ricotta cheese, milk, sugar, and salt.  Add flour and chocolate and combine.
In a separate bowl using a handheld mixer, beat egg whites to soft peaks.  Fold the egg whites into the flour-ricotta mixture.

Melt one tablespoon of butter for each batch of pancakes in a large cast iron skillet over medium heat.  Ladle batter onto pan in 4-inch circles.  When the edges brown and batter bubbbles, flip pancakes.  They are pretty messy, so just do your best.

Serve with maple syrup and a cup of black coffee and rejoice.

*adapted from Mast Brothers Chocolate: A Family Cookbook

Banana Chocolate Bread

Banana Bread with Dark Chocolate
We are experts at wasting bananas.  I blame it on the Redhead.  She always says she wants one, takes one or two bites, and then plays with the peel and leaves the rest.  She sometimes takes a bite out of the SIDE of the entire banana, then is done.  I usually cut up the bananas beforehand, but I feel like I’m always a bit of a chump when she asks me for “a big one!” and I give her a whole banana and the situation mentioned above happens every single time.  So, I very often turn left-over bananas into smoothies with a bit of plain yogurt, but by the time I’ve been played twice, I give up offering her bananas, and at least three turn brown before the week is over.

Enter banana bread.  This recipe called for exactly three, old, brown bananas!  I wanted to use up our produce and stuff in the fridge before we left town for Christmas travels because I hate wasting food, and banana bread helped use up those old bananas, my yogurt that was about to go bad, a couple eggs and some milk.  We enjoyed this bread going down the road to Tulsa for snacks and breakfast and it was one of the best banana bread recipes I’ve used.  Obviously, as it came from Cooks Illustrated’s awesome cookbook, The New Best Recipe.  I always feel safe using their recipes.  They had a variation for adding chocolate to their banana bread, and as you may have seen on this blog, I won’t pass up an opportunity to use chocolate in a baked good.

Banana Chocolate Bread

Banana Chocolate Bread
makes one 9″ loaf

2 cups (10 ounces) AP flour, plus more for dusting the pan
10 tablespoons sugar
3/4 teaspoon baking soda
1/2 teaspoon salt
2 1/2 ounces bittersweet chocolate, chopped very fine
3 very ripe, large bananas, mashed well (about 1 1/2 cups)
1/4 cup plain yogurt
2 large eggs, lightly beaten
6 tablespoons unsalted butter, melted and cooled a bit
1 teaspoon vanilla extract

Adjust oven rack to the lower-middle position and heat the oven to 350 degrees.  Grease the bottom and sides of a 9 x 5″ loaf pan; dust with flour, tapping out excess.

Whisk the flour, sugar, baking soda, salt and chocolate together in a large bowl; set aside.

Mix the mashed bananas, yogurt, eggs, butter, and vanilla with a whisk in a medium bowl.  Lightly fold the banana mixture into the dry ingredients with a rubber spatula until just combined and the batter looks thick and chunky.  Scrape the batter into the prepared loaf pan.

Bake until the loaf is golden brown and a toothpick inserted in the center comes out clean, about an hour.  Cool in the pan for 5 minutes, then transfer to a wire rack.  Bread can be wrapped with plastic wrap and stored at room temp for up to 3 days.

Chocolate Banana Bread

Cranberry Rosemary Biscotti

rosemary cranberry biscotti
As I type, I’m eating one of these merry little cookies.  The tart bite of the cranberry and the floral spring of the rosemary, combined with the sugary sweetness of white chocolate just tastes and looks like Christmas to me. More than the joy of eating these cookies is the tradition of making them.  I think holiday traditions are as comforting as coming in to a warm house from the cold.  Traditions are the glue that holds the holiday season together, no matter how hectic and scared we may get that Amazon Prime really won’t come in two days…

I’ve been doing too much, lately.  I got in over my head with a few embroidery projects because 1. I’m still new to the craft, but 2. I enjoy it so much that, 3. I think I am better than I really am, so 4. It takes me much longer to complete a project in real life than it does in my head.  I also feel that with a baby in the mix and a couple precious hours in the day to get things done, that I should have scaled back.  Baked less, bought fewer presents, gotten take-out a little more often.  But I felt compelled to keep the ship afloat and do everything I wanted to do, even if there was no time.

Amidst this feeling of being on a slowly sinking ship, I still hauled my tail into the kitchen yesterday morning and got the dough for this biscotti mixed up.  I don’t think I’ve ever made the same version of this recipe twice, but that stops this year.  I’ve finally found a combination of recipes that works and that tastes good.  I’ve tried everything you can imagine from a no-butter, all egg white recipe (sad) to a recipe that called for oil (weird) and switching between fresh cranberries or dried.  I don’t know why I tried so many variants when I knew in my heart that cookies need and deserve to be made with butter.  And after using dried cranberries every year, I tried fresh this year and I really love it.  It distinguishes the cranberry from what could have been any ol’ dried fruit.  Fresh cranberries tint the dough slightly swirly pink and with the flecks of green rosemary, these cookies just make me feel the season that much more.  Baking brings me closer to peace.  Being in the kitchen is a calm that I don’t feel anywhere else.  And so, even though Christmas seemed to come exactly 5.5 seconds after Thanksgiving this year, I found a pocket of time to keep the tradition going and bake my holiday anchor, also known as: Cranberry Rosemary Bisotti.

cranberry rosemary

Cranberry Rosemary Biscotti
makes about 2 dozen cookies

2 cups AP flour
1 1/2 teaspoons baking powder
3/4 cup sugar
1/2 cup  unsalted butter, room temp
1 teaspoon grated lemon zest
2 tablespoons chopped fresh rosemary
1/4 teaspoon salt
2 large eggs
1 1/2 cups fresh cranberries, cut in half
6 ounces white chocolate chips

Preheat the oven to 350F.  Line two baking sheets with parchment paper, or use a silpat.  Whisk the flour and baking powder in a medium bowl. Using an electric mixer, beat the sugar, butter, lemon zest, and salt in a large bowl till fluffy. Beat in the eggs 1 at a time. Add the flour mixture and beat just until blended. Stir in the rosemary and cranberries with a rubber spatula gently, until well incorporated.

Form the dough into two logs, side by side on a baking sheet.  Shape into long, flat strips, about 10″x 3″ by about 1/2″ high.  Bake for 30 minutes until firm and then let cool about 20 minutes before cutting.

Cut the logs into 1/2″ strips and arrange the slices on the baking sheets and bake for 30 minutes, flipping over once during baking.  Let the cookies cool completely on a rack before drizzling with white chocolate.

Melt the white chocolate chips in a microwave safe bowl at 30 second increments, stirring after each time, until just melted.  With a spatula, dunk into the chocolate and fling it around the kitchen with wild abandon.  Or, just drizzle it over the biscotti until completely used up and everything is a huge mess.  Let it dry before storing in an air tight container for about 2 weeks.  These cookies keep a while, so they’re great for gifts!

Ollie and her biscotti

A Blueberry Morning

Blueberry Muffins


It’s super cold – winter blew in last night leaving everything gray and bone-chillingly cold.  We are having a lazy day inside and all I can think about are these warm blueberry muffins with cold butter and hot blueberry syrup soaking into every crumb.  My mom made this combination quite frequently for us, growing up.  I associate them with cold, Sunday mornings. We needed something rather fast while getting ready for church, yet warming at the same time.  Something Mom could pop in the oven and then have time to get ready, herself!  She would boil the blueberry liquid and add a little sugar to make a wonderful blueberry syrup to pour on top of the muffins.  That was always my favorite part.  Just HOW blue can I make this muffin?

So when I saw a can of wild Maine blueberries in the grocery store, my mind went instantly to these muffins and I had to make them for us.  Mom’s were better, but that’s to be expected 🙂  Stay warm, today, Lubbock!

Blueberry Muffins with Butter Blueberry Muffins with Blueberry Syrup

Blueberry Muffins with Blueberry Syrup*
makes 12-16 muffins

12 1/2 ounces cake flour
1 teaspoon baking soda
2 teaspoons baking powder
Heavy pinch salt
1 cup sugar
1/2 cup vegetable oil
1 egg
1 cup yogurt
1 1/2 cups blueberries (fresh, frozen or I used a can of blueberries packed in water – that part is important if you use canned)

Preheat the oven to 375F. Line 16 muffin tins with papers and spray the papers with non stick spray.  Whisk the cake flour, baking soda, powder and salt in a large bowl.  In another bowl, whisk the sugar, oil, egg and yogurt until smooth.  Add the dry ingredients and stir just until combined.  Reserve the juice that comes in the can of blueberries and put it on the stove in a small saucepan with 1/4 cup sugar and let it come to a boil.  Reduce the heat and simmer during the baking time of the muffins.

Fold the blueberries into the batter and divide among the muffin cups.  Bake for 20-25 minutes, until the tops are golden brown.  Remove and remove from the pan, letting them cool upside down for about 10 minutes.  Split, add a copious amount of salted butter and drown in blueberry syrup.  Cheers.

*adapted from Alton Brown’s Blueberry muffin recipe

Cooking on the Road

map

They made up their minds, and they started packing.
They left before the sun came up that day.
An exit to eternal summer slacking,
But where were they going without ever knowing the way?

muffins009

I think we might be crazy.  But we’ve made up our minds to drive from here to Seattle in an RV with some really good friends, good music, and good food.  We’re bringing the coffee maker, some good quality beans and our guitars, so I think we may survive. 🙂  We have  friends who live in Seattle, and so we decided to make the trip part of the vacation.  In preparation for a few days on the road, I decided to get to baking.  No one likes to decide what to have for breakfast, so I took it upon myself to make it a no-brainer.  I consulted Annie’s Eats, of course, because that woman knows how to prepare for anything.  She has a wonderful selection of baked goods on her blog, and when I grow up, I want to be just like her.  (I may be older but that’s not the issue, here.)

I chose from her blog, the peanut butter banana oatmeal muffins,(they looked so great but I refrained from taste-testing) the chocolate cherry muffins and the bacon and cheddar scones.  We were forced to taste-test the chocolate muffins because they looked too chocolately for their own good and so what else were we going to do?  Leave it to chance?!  They can hardly be called muffins, in my opinion.  They are nearly flourless chocolate cakes, but just enough flour to make them decadent brownies.  In fact, next time I want to make brownies, I’m using this recipe.  So they might be more for snack time instead of breakfast.

muffins003

Chocolate Cherry Muffins*
(I doubled the recipe and it turned out great)

6 oz. bittersweet chocolate, finely chopped
6 tbs. unsalted butter, cut into small pieces
½ cup all-purpose flour
½ tsp. baking powder
¼ tsp. salt
2 eggs
2/3 cup sugar
1 tsp. vanilla extract
2/3 cup dried cherries, chopped if desired

Directions:
Preheat an oven to 350º F. Line a muffin pan with muffin cups or grease wells.

In a small heatproof bowl, combine the chocolate and butter. Set the bowl over but not touching simmering water in a small saucepan and melt the chocolate and butter, stirring occasionally, until smooth and blended. Let cool slightly.

In a small bowl, stir together the flour, baking powder and salt. In another bowl, whisk together the egg, sugar and vanilla until light in color and doubled in volume. Whisk in the chocolate mixture and then the flour mixture just until combined. Stir in the dried cherries. Divide the batter evenly among the wells of the prepared pan and smooth the tops. Bake until a toothpick inserted into the center of a muffin comes out with a few moist crumbs attached, about 25-30 minutes.

Makes 7-8 muffins.

*didn’t adapt this at all from Annie’s Eats, except for doubling it and using half dark chocolate, half milk because that’s what I had on hand!

muffins008

The scones I prepared up until baking and just froze them raw.  Then, I will put them in that tiny RV oven and add a few minutes on to baking time and we will have an amazing breakfast heading down the road!  I can’t wait for our adventure and I can’t wait for all the amazing food we will try and the sites we’ll see and the memories we will make.  And with any luck, we’ll all still like each other when we get home.  🙂  I’ll be sure and take lots of REAL, non-iPhone pictures and have a few posts about our gastronomical adventures when I return.

Bacon Cheddar Scones*
makes 8-10

For the scones:
3 cups bread flour
1 tbsp. baking powder
1 tsp. salt
1-2 tsp. ground black pepper (depending on your preference)
8 tbsp. cold unsalted butter, cut into small cubes
1½ cups grated cheddar cheese
1/4 cup chopped fresh chives
10 slices bacon, cooked and chopped or crumbled into small pieces
1 cup buttermilk (plus up to ½ cup extra, if needed)

For the egg wash:
1 large egg
2 tbsp. water

Preheat the oven to 400˚ F.  In the bowl of an electric mixer fitted with the paddle attachment, combine the flour, baking powder, salt and black pepper; mix briefly to combine.  Add the cubes of butter and mix on low speed until the mixture is crumbly and the butter pieces are about the size of small peas.  (Alternatively, this can be done in a regular mixing bowl, using a pastry blender or two knives to cut the butter into the dry ingredients.)  Add in the grated cheese and mix just until incorporated.

Mix in the green onions, bacon, and 1 cup of the buttermilk into the flour-butter mixture.  Stir by hand just until all the ingredients are incorporated.  If the dough is too dry to come together, mix in the remaining buttermilk a tablespoon or two at a time until the dough can be formed into a ball.  Transfer the dough to a lightly floured surface and pat the dough into an 8-inch disk.  Cut with a 3″ biscuit cutter into 12 circles, place on a greased cookie sheet, wrap in plastic and freeze till ready to eat.  Before baking, remove from freezer, brush with egg wash and bake for 25-30 minutes until golden brown.

*slightly adapted from Annie’s Eats

muffins002

Bread: Guest post from Matt Palmer, a.k.a. The Bread Man

Alisa: I wanted Matt to write about the bread that he’s made countless times in the past seven years.  He started on a quest to learn to bake at the same time he wanted to become more likable at his office (to improve his performance review, which, the only thing that was negative was, “Matt’s kind of intimidating”) and so the two tasks naturally went hand in hand.  After one year of bringing bread in to the office every Friday, not surprisingly, there wasn’t a negative comment on his next review 🙂  Bread is the great equalizer.  This loaf, in particular, is beautiful in its simplicity, flavor, crusty exterior and soft, spongy interior.  Frankly, it’s the perfect loaf.  I think life has a lot of challenges, but if you could say that you could turn out a loaf of bread like this (given a day’s notice) any time it was needed, well, I’d consider that success.

Country loaf close up

Matt: I like making things from scratch. I enjoy learning how things work, and with cooking you usually end up with something better than what you can get at the store – and it’s cheaper, better for you, and you even get a night’s entertainment out of it. So I guess it was just a matter of time before I got into baking. I’ve been making bread pretty regularly for a few years now, and I’ve certainly gotten better, but I’m still an amateur. Bread is one of those things that you could devote your life to (think Jiro Dreams of Sushi) and still find things to improve on.

That’s part of why I love it, but if that sounds disheartening to you, the good news is that even the poorest homemade loaf is better than anything you can get at the store. With a little bit of practice you can make bread better than you can get anywhere (unless you happen to live in San Francisco, New York, or a country that still cares about good bread). It’s kinda like chocolate chip cookies – the best bread you can buy where I live is essentially the bread equivalent of Chips Ahoy. Maybe you live somewhere with a bakery that sells something other than cupcakes, but unless the guy behind the counter looks like this, I’m guessing the bread there is still a Soft Batch at best. I’m sure the worst batch of homemade chocolate chip cookies that came out of your mom’s oven blows either of those away. The bread that will soon come from your oven is the same – once you’ve tried it, you’ll be hooked.
 Plain bread
Bread
21 oz bread flour (or AP flour if you prefer)
14 oz water (66%, for the bread nerds out there)
1 tsp instant/rapid rise yeast
2 tsp salt
Mix up the dry ingredients (you are using a scale, aren’t you?) and then add the water. Mix until the flour is all hydrated then cover it and set it aside for twenty minutes. (Or I could just say autolyse. See, you should become a baker, we have our own secret language.)
Stretch the dough out and fold it back up in thirds like you would a letter. Turn the dough 90 degrees and repeat, then put it seam side down in an oiled bowl. Wait ten minutes, then repeat. After three of these stretch-and-fold sessions your dough is probably developed. Put the dough back in the bowl and cover it and place it in the fridge overnight, or for up to 2-3 days (you might use less yeast if you know you’re going to wait several days to bake).
About two hours before you want to bake, take the dough out and let it warm up on the counter for a bit. Press it out into a circle (gently, we’re not making pie), then gather each side up to form a ball. Roll the ball in small circles on the counter to develop surface tension. This is a lot easier to understand when you see it, so you might want to watch a video.
Put the dough (now a boule, if you want to talk the talk) into a bowl lined with a floured towel. I use a basket called a banneton, which I flour directly, and it leaves little rings of flour on the loaf.
Leave the dough covered, on the counter to rise. This will probably take about an hour and a half, but you can tell if a loaf is still rising by poking it gently – if it springs back quickly, leave it to rise some more. If the indention stays, you’re ready to bake.
About a half hour before baking, preheat your oven to 450, with your baking stone, Dutch oven, or preferred baking device inside. You can bake on a sheet pan, and if that’s your plan you don’t need to preheat for very long. I recommend a Lodge cast iron combo cooker, which gives you the added heat while also trapping steam, and you can put dough into it without getting second degree burns, which is tough to do in a normal Dutch oven.
When the dough is ready, remove your preheated Dutch oven and flip the bowl over to put the dough into the pan. Make a couple of cuts in the loaf so it doesn’t rupture when it rises in the oven (this is called scoring), then put the lid on the Dutch oven and return it to the oven for thirty minutes.
Remove the lid from the Dutch oven and bake another 30 minutes.
Remove the loaf from the oven (the interior of the loaf should be around 200 degrees, if you want to make sure it’s done) and put it on a rack to cool. Lean in close and I bet you can hear the loaf “sing.” It’s tempting to cut into it right away, but I promise it’s better if you let it sit and finish cooking – think of it like resting a steak.
plain country bread loaf