Apple Pie Roses

apple pie roses
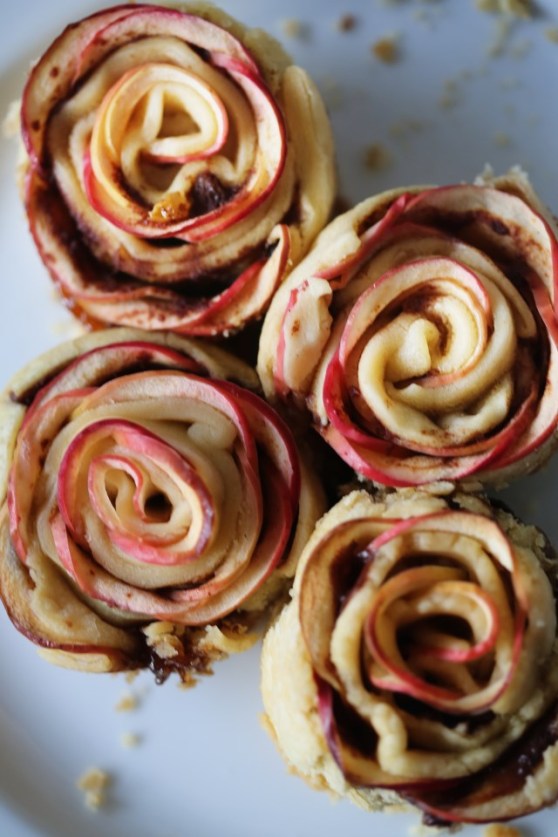
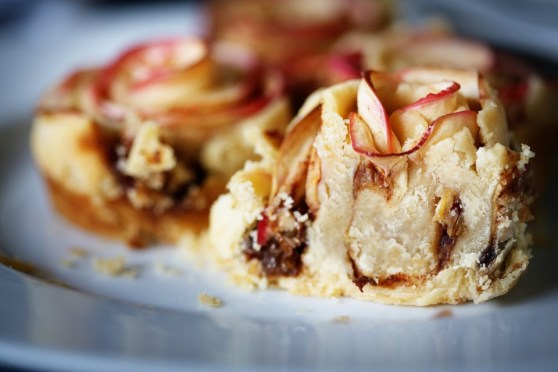
So I saw this really fun video circulating on Facebook a few weeks ago and like everyone else, it gave me the confidence to try it out myself! These little roses are so much fun to make and they are so beautiful! I thought they’d make an excellent special occasion type dessert. I did the recipe exactly like the video said and I was pleased with the process but not really the results. I mean, they’re okay, but they are definitely prettier than they are tasty. And I honestly think that’s the point. It was a super fun and easy “cooking craft” to do with Olive and so I’ll give it points for that because not every baking recipe is truly kid-accessible. But I decided to alter the recipe to be as delicious as it is beautiful. Here’s a couple problems the original recipe has:

1. The bake time is long and the thin apple slices burn on top, so we cover them during part of baking.
2.They stick like dadgum superglue to the muffin pan and get ripped apart when you take them out, therefore…
3. I fixed that by removing them from the pan while they were still super hot, but…
4. There’s the problem with eating super-baked tiny shreds of apple peel. It gives it that rose look, however…
5. The apple peel feels like tough strings in your mouth. Not really two adjectives you want for your baked goods.
6. The apples snap in half from the original recipe, so I fixed that by soaking them in hot lemon water instead of cold.
7. They just fall flat, taste-wise, so I added a bit of scrumptiousness into the filling along with the apple slices by adding cinnamon roll type flavors.
8. Also, I’m a pie crust junkie, so I switched to pie crust instead of puff pastry and it was indeed more delicious, but…
9. The falling apartness was magnified with the pie crust, so you fix that once and for all by…
10. Using greased muffin liners to bake these babies in. Voila. Most of the problems solved.

So my suggestion for the final round of 100% deliciousness is to peel the apples. How to fix the “but they don’t look like a rose, anymore!” problem? Add a couple drops of red food coloring to the warm water while the apples soak, OR pomegranate or cranberry juice and BOOM! Red roses. I didn’t do this for my final pics because everyone in my house was getting rather sick of eating these tiny apple roses, BUT I did color some apple slices in pomegranate juice and they were BEAUTIFUL. So I’ll try them like that again and make a special Christmas rose wreath edition of this recipe for those who care. Which I think might be 5 people, total. In any case, I present to you:
apple roses Apple Rose

Apple Pie Roses

Ingredients:
1 box frozen pie crust, softened in the fridge (Yeah, yeah, I always make pie crust, but these don’t need that extra effort. It’s effort enough as it is and the store-bought crust tasted just great.)
1 apple, peeled (or not – up to you), and sliced into VERY THIN half moons
Hot water and the juice from 1/2 a lemon

For the filling:
1/4 cup dark brown sugar
1/8 tsp allspice
1/8 tsp nutmeg
1 tsp cinnamon
1 tsp vanilla
squeeze of the other half of the lemon
2 TBS melted butter
1/2 cup chopped golden raisins, softened for a few minutes in boiling water
melted butter for brushing the tops

Cut and soak your apple slices in boiling water and lemon while you do everything else. I let mine soak for nearly an hour but I don’t think that’s necessary.

Preheat your oven to 375F. Combine the filling ingredients in a bowl and set aside. Roll out your pie crust and cut into 2.5″ x 6″ strips. Mine were NOT perfectly cut. It doesn’t matter. Spoon about a teaspoon of the filling on the strips of dough and spread it around. Drain and layer the apple slices, slightly overlapping, along the top half of the dough. Fold the other half up over the apples and pinch at the ends to secure, and then roll up into a rose. Refer to the lovely video if you need help!

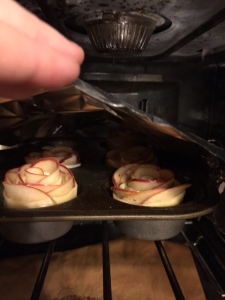
Place the roses into greased muffin cups (this is important). Brush the tops of the roses with melted butter and sprinkle with sugar. Bake, covered with foil, for 30 minutes. Then uncover and bake for another 20-30 minutes, watching to make sure the edges don’t burn.
IMG_7289

Apple Crisp: Food Memories

Fall Apple Crisp
I’ve done a few posts on food memories from my own family and ones from friends and I love those posts more than any other. They are more than just recipes – they are links to the past and to feelings that can’t be accessed any other way. Food is such a tie to our heritage, to our families and to the love we felt when we first experienced those memorable dishes. I never tweak these recipes because it’s my job to post about and honor the memory, not the recipe itself. My dear friend, Becky, had this picture of her grandmother’s hand written recipe on her Instagram account and when I saw it, I knew I had to make it.

Last year, Becky invited me over to look through her grandmother’s things before they had an estate sale in the wake of her passing. I had the honor of taking home a patchwork quilt she had made. Not only do my girls play on it outside nearly every day, but I used it as a backdrop for the photos I took of the final dish. I hope it makes this post that much more meaningful for my friend.

The recipe itself is completely delicious and comforting and full of the essence of the fall season! I love that it calls for “oleo” – a sure sign the baker lived through the 50s 🙂 So this was the only tweak I made by using butter instead. I also topped the apple crisp with cinnamon horchata ice cream because I was all out of whipping cream. I’m sure if Nana could have tasted the ice cream, she wouldn’t mind the substitution.

recipe
I asked Becky to share a few thoughts about her Nana and this recipe. She also provided this amazing picture and it makes me wish I’d known her. She looked so joyful.

12087400_10207282108429358_1362057034_n
My Nana (Oma Lee) was the 5th of 6 kids born in 1926 to a generous, kind-hearted family. They took in the homeless, cared for the sick, fed the hungry. They also laughed more than most.

For a couple of years while I was in college, I got to live with her and got to know her on a deeper level. She was a counselor to me, a friend, comic relief, an adult when I acted like a child. We watched Miss America pageants and Hallmark movies together and ate dilly bars from DQ.

Nana shared an apple “pie” recipe with me during that time, and it’s the only apple pie I’ve ever made, because its kinda fool proof (I need that) and darn tasty.

I made it for her once and she went on and on about how delicious it was. When I reminded her it was one of her recipes, she laughed for the longest time then said in a straight voice, “well that’s why it’s so good”. Man, I miss her.

Apple Crisp 2

Apple Crisp

6 cups peeled, sliced apples
1/3 cup sugar
1 teaspoon cinnamon
1/2 teaspoon salt
2 tablespoons melted butter
For the streusel topping:
3/4 cup sugar
1/2 cup flour
1/3 cup butter

Whipped topping or ice cream to garnish

Preheat the oven to 375F. Mix together apples, sugar, cinnamon, salt and melted butter.  Place in a greased 8″ square baking dish. Set aside.

Combine the 3/4 cup sugar and flour and then cut in the butter until the texture is fine crumbles. Sprinkle over the apples. Bake for about 45 minutes, or until apples are tender*. Serve warm with dollops of whipped topping (or ice cream!)

*Becky advised that I brown the apple crisp for a few minutes under the broiler because it doesn’t really get brown during baking.

Dark Chocolate Cherry Pie Biscuits

Black Cherry Chocolate Biscuits
Dark chocolate and cherry – a pretty perfect desert combination. I regularly make dark chocolate oatmeal for Olive and myself and I will stir in dried cherries almost every time. There’s just something special about the tart zinginess of the cherries combined with the rich, deep earthy heft of dark chocolate. I’m just full of adjectives tonight. This baking project was a fun one – Olive and I were watching Tangled on a Sunday afternoon and I decided to bake something fun. A while back, Joy the Baker had this really fun baking competition and one of the challenges were these amazing apple pie biscuits. I remembered the recipe seeming like it wouldn’t work because it was too sloppy and wet, but they turned out incredible. (And there’s wonderful step-by-step instructions for how to do her biscuits, which you can apply to this recipe as well.) Fast forward to my version of this recipe and I felt the same way all over again – that there would be too much juice from the cherries for this recipe to work the same. And honestly, there was a bit more juice than with the apple version, but nothing a little draining didn’t fix. These were fun, decadent and great for breakfast during the week!

They also look so white because I had recently bought expensive, pasture-raised eggs made by chickens with PhDs and I didn’t want to waste one on making an egg wash for a few biscuits. So I brushed them with heavy cream.  Not as pretty, but it saved an egg from not getting to fulfill its destiny of becoming a fried egg on my toast the next morning.

Dark Chocolate Cherry Almond Biscuits Cherry Chocolate Biscuits

Dark Chocolate Cherry Pie Biscuits*

For the cherry filling:
2 cups fresh, pitted cherries, roughly chopped
2 tablespoons unsalted butter
2 tablespoons packed brown sugar
1/8 teaspoon almond extract
squeeze of lemon

For the dough:
2 cups self-rising flour
1/4 cup cold, unsalted butter, cut into small cubes
2 tablespoons granulated sugar
2/3 to 3/4 cup cold buttermilk

Preheat your oven to 425F. Line a baking sheet with parchment and set aside.

In a skillet over medium heat, melt the butter and brown sugar until they are all incorporated and bubbling and then stir in the cherries. Mash them around (I use a drink muddler) and let the mixture cook for about 5 minutes. Stir in the extract and a squeeze of half a lemon and add a pinch of salt. Stir around and let it cook for one more minute. Drain off all but about 2-3 tablespoons of liquid (cherries give off more liquid than the original recipe’s apples, but you don’t want NO juice) and set the mixture aside to cool while you make the dough.

To make the dough, mix the flour and butter together with your hands or a pastry blender until the butter is broken up into small pea-sized bits. Stir in the sugar and then make a well in the center of your dough. Add the buttermilk and with a fork, stir together until combined. The dough should be soft and moist, so use a bit more buttermilk if needed.

Use all-purpose flour to dust your work surface. I ignored this step in the original recipe and the bottoms of my biscuits tasted sour because they were in dusted with self-rising and there’s baking powder in self-rising flour so DON’T BE LAZY LIKE ME and just get out the all purpose to dust. It isn’t that difficult.

Spoon the dough onto your floured surface and gently pat it into a small rectangle. Dust the top with a little extra flour and roll out into a rectangle about 7 x 10 inches. Arrange the cherries over half the long side of the dough and carefully fold the other half of the dough over the filling, crimping along the edges to seal in most of the filling. It doesn’t have to be perfect and it will be messy. If you have cracks, just gently pinch them closed and carry on. You want to have about a 6 x 8 inch rectangle when it’s all said and done, so just pat it into submission. Cut into 12 squares and place on prepared cookie sheet about 2 inches apart. Brush the biscuits with a beaten egg that was not raised by monks and sprinkle with sugar and cinnamon if desired (I just used sugar since cinnamon didn’t fit in with the flavor profile I was going for.)

Bake for 12-14 minutes, or until golden brown and serve right away. The sugar topping will melt if you store these in a plastic bag on your counter throughout the week, so it’s best to eat these the same day or store in an air-tight container.

*adapted from Joy the Baker

Cranberry Orange Upside Down Cake

Caramel Cranberry Orange Upside Down Cake
Lately, I find myself wandering through the house, doing chores, taking care of the little people and cooking and I think, “I should be doing something more.”  And not more in the sense of extra stuff, but more…grand? Important? I am not sure.  I haven’t quite been able to put my finger on just what it is I’m feeling.  I think I remember this feeling from when Olive was a baby.  There’s a certain amount of monotony to taking care of a baby in that first year.  Every day it’s the same feedings, the same breakfasts, the same play time, the same nap schedules, the same dinners, the same bedtime routines, etc.  It’s all the same thing, every day, for months.  And when they get a bit older, you can start shaking up the routine because they don’t have to eat and sleep every 3 hours.  But for a few months, there’s a bit of a Groundhog Day effect and I have felt it even more in the winter as we’re cooped up from the cold.

Each morning I pray that God will show me what needs to be done in His kingdom.  Who needs served?  Who needs a kind word or an encouragement? Who needs a meal or maybe even just a smile in the store?  I believe, although I don’t follow through with this belief far enough, that seeking God’s kingdom FIRST, really will cause everything else in my life “to be added to me.”  I get it so backwards.  I become so self-seeking.  How can my children or my husband make ME happy today?  When I seek God’s way of serving others first, I immediately feel content.  Enough.  Important. Working for self and for the approval of others is a bottomless well. It will never be filled and neither will I.  But flip the equation around and see to it that others’ bowls are filled before my own and God will see to it that my cup is running over.  It’s not always going to look like material wealth and health, but more importantly, it will start to look like real joy – from the inside out.

This cranberry cake was made for a few sweet ladies at a ministry our church helps out with from time to time called Family Promise. It’s a program that helps families who find themselves on the brink of homelessness to live and save up their income for rent while they live in the Family Promise house.  Our church volunteers to help a couple times a year by bringing dinners, having activities for the children and staying overnight. Last week was our week to serve so Matt and I signed up to take a meal and hang out with the families for a while after we ate.  There were two single mothers with infants and one single mother with a sweet, twelve year old girl living there, whom we’d met before and were so happy to see them, again.  We brought take-out from our favorite Hawaiian BBQ joint (I didn’t get my homemade meal-act together this time) and I brought this cranberry upside down cake.  We ate and watched TV together and played and I felt blessed by them.  We just brought the food – they brought perspective and showed us real joy – from the inside out.

Cranberry Upside Down Cake with Orange Zest Upside Down Cranberry Orange Cake


Cranberry Orange Upside Down Cake

For the fruit layer:
8 oz frozen cranberries
5 tablespoons unsalted butter
1 cup packed light brown sugar
2 tablespoons orange juice
zest from 1 orange

For the cake:
1 1/2 cups cake flour
1/2 teaspoon baking powder
1/4 teaspoon salt
6 tablespoons unsalted butter, softened
1/2 cup granulated sugar
1/2 cup packed light brown sugar
2 large eggs
1 teaspoon pure vanilla extract
1/4 teaspoon almond extract
3/4 cup sour cream (or Greek plain yogurt)

Preheat the oven to 350F.  Butter the bottom and sides of a 9 inch round cake pan and line the bottom with parchment paper.  I like to do this to ensure all the fruit filling comes off the pan.

Pour the cranberries on top of the parchment paper and sprinkle with orange zest.  In a medium-size sauce pan, melt the butter over medium-low heat.  Add the brown sugar, orange juice and cook, stirring, until the sugar melts and boils gently.  Pour the mixture over the cranberries in the pan.

In a small bowl, stir together the cake flour, baking powder, and salt.  In the bowl of an electric mixer, beat the butter, granulated sugar and brown sugar on medium until well blended.  Beat in the eggs and vanilla and almond until combined.  With the mixer on low, mix half the dry ingredients into the batter until just combined.  Mix in the sour cream and then the remaining dry ingredients until just combined (in other words, don’t over-mix).

Scoop the batter into the pan (it will be thick) and then spread it around evenly with a spatula.  Place cake pan on a rimmed baking sheet to catch drips.  Bake until a toothpick inserted in the center comes out clean, about 40 minutes.  Place the pan on a wire rack to cool for 10 minutes.  Run a knife around the edges of the pan to loosen the cake and invert onto a serving plate.  Serve warm.

*recipe adapted from the Bonne Femme Cookbook’s recipe for Pear Cake Reverse

Cranberry Orange Cake Cranberry Upside Down Cake

Caramelized Pear and Biscuit Pie

Caramelized Pear Biscuit Pie
Happy New Year’s Eve!  It is a frigid 20 degrees today with a windchill of about -5 and this morning as I got reluctantly out of my bed, I looked out the frosted window and saw gray.  Just gray with bits of white flocking everything in sight.  I thought of what I would make for breakfast for the redhead and for Matt, who was working from home due to the weather, and I wanted something warm and cozy with possibly a bit of cinnamon.  We had pears getting way too ripe on the counter and lest I waste such beautiful fruit, I decided to do a spin on Joy the Baker’s apple pie biscuits.  The apples for her recipe are obviously not mushy pear consistency and so they cut up and bake into biscuits nicely.  I knew that wouldn’t be possible with pears and I’d just end up frustrated, so I decided to do a free form biscuit/pie/tart mashup and the results were amazing.  I adapted her biscuit recipe to include creme and lemon juice instead of buttermilk and the result was cakey, tangy perfection on top of caramlized pears.

I highly recommend this dish.

Pear Biscuit Pie

Caramelized Pear and Biscuit Pie*

For the pears:
4 ripe pears, peeled and sliced
4 TBS brown sugar
4 TBS unsalted butter
1/2 tsp kosher salt

For the biscuits:
2 cups self-rising flour
2 TBS granulated sugar
4 TBS cold butter, cut into small pieces
3/4 heavy cream
2 TBS lemon juice
1/4 cup milk

In the super old, awesome, vintage skillet your husband got you for Christmas, melt the butter and brown sugar and salt together until bubbly.  Fold in the pears until they’re all coated and set aside.

Preheat your oven to 425F.  In a large bowl, cut the butter into the flour and sugar until it’s all well incorporated.  You can use your hands to break up the butter into tiny pieces in the flour, or just use a pastry cutter.  Either way, make sure it resembles tiny pea-sized crumbles.  Stir the lemon juice into the heavy cream and pour into the flour.  Stir up until it’s all moistened and then add the milk until a sticky dough forms.  You may need more milk.  Loosely form biscuits and layer on top of the pears.  Brush with a beaten egg and sprinkle with coarse sugar.  Bake for 25-30 minutes until the biscuits are golden brown.

*adapted from Joy the Baker

Pear and Biscuit Pie

Homemade Banana Meringue Pudding

Banana Meringue Pudding
I’ve had a long-standing love for banana pudding.  Between it and Bananas Foster, I have a hard time choosing my favorite.  At one point, it was my favorite dessert on earth.  I bounce back and forth, now, between Sticky Toffee Pudding or Bananas Foster.  Or anything with lemon.  Or chocolate.

My favorite type of banana pudding, however, is the one that has the sweetened condensed milk and sour cream and extra Nilla wafers and all that awesome goodness, but I’m always up for trying a new version. (Matt made this version pictured, by the way).  I’ve seen pastry chefs putting meringue on more than just pies for a while.  So when we saw a meringue on top of a banana pudding in the latest issue of Bon Appetit, we knew it had to be a winner.  And it was!  However, I immediately knew a few tweaks I wanted to do to it once we tasted it.  First, the base custard just wasn’t banana-y enough.  We always keep a few black bananas in our freezer – when you want banana flavor, nothing beats an over-ripe banana.  It’s so concentrated that just one will do to amp up the flavor in a vanilla pudding to make it burst with sweet banana flavor.  Also, I would use a cooked meringue or a brown sugar meringue instead of the one from this recipe because the meringue wept too much, filling the leftovers up with water.  Ick.  Cooking your egg whites and sugar before whipping takes care of this problem.

However, for a eat-in-one-sitting recipe, the Bon Appetit version was great (but not banana-y enough, and leftovers got weird).  So as long as you have a crowd, this dessert will impress and satisfy!  (for the recipe below, I’ve included my favorite meringue and I’ve added a super-ripe banana, pureed into the base).

Banana Pudding with Meringue
Banana Meringue Pudding

4 large eggs
cup sugar
¼ cup cornstarch
4 cups whole milk
2 tablespoons unsalted butter
2 teaspoons vanilla extract
1 super ripe (black) banana
Pinch of kosher salt


Lightly whisk eggs in a large bowl just to blend. Whisk sugar and cornstarch in a medium saucepan. Gradually whisk milk into sugar mixture and heat over medium heat, whisking often, until very warm to the touch. Gradually whisk half of hot milk mixture into eggs, then whisk egg mixture back into milk mixture in saucepan.

Cook, whisking constantly, until thickened and whisk leaves a trail in pudding (it should be the consistency of mayonnaise), about 4 minutes. Remove from heat, add butter, vanilla, a super-duper ripe banana and salt and puree with an immersion blender until butter is melted and mixture is smooth.


Cover pudding with plastic wrap, pressing directly onto the surface. Chill until cool, about 2 hours.
For the meringue:

3 large egg whites (room temp)
1/8 teaspoon cream of tartar
3/4 cups firmly packed brown sugar

Place the egg whites and cream of tartar in an electric mixer fitted with the whip attachment. Place the brown sugar in a medium, heavy saucepan with high sides (that sugar will boil up and scare the meringue right out of you if you have a small pan), add water to cover, attach a candy thermometer to the pan, and turn the heat on high. When the sugar is at about 240 degrees, start whipping the whites on high speed (they should be foamy and starting to thicken before you add the sugar). When the sugar is at the high soft-ball stage (245 degrees), remove the thermometer from the sugar and, with the mixer still running, carefully avoiding the whip, pour the sugar into the egg whites in a thin stream. When steam starts to come off the whites, add the sugar more quickly. When all sugar has been added, continue whipping until firm but soft peaks form.

For Assembly:

1 box Nilla wafers
3 ripe bananas, sliced

Spread one third of the banana pudding into a casserole dish (9×9 or 9×13 will do fine).  Top with a layer of alternating bananas and cookies, then more pudding and repeat until most or all of your ingredients are used up.  Top with meringue and torch with a blow torch if that’s how you roll, or under a broiler with a very watchful eye (as in, don’t take your eyes off it).

Lemon Panna Cotta and Gingerbread with Blueberries and Thyme

Lemon Panna Cotta with Gingerbread and Thyme
When we were in Nashville last week, we had the joy of eating at Catbird Seat – an intimate restaurant with a unique seating that allows its guests to watch the chefs prepare each plate.  This restaurant combines the nuttiness of molecular gastronomy and the comfort of Southern cuisine.  It’s impressive without being too fussy.  The food was amazing and we left very satisfied!  We were served things like grilled morel mushrooms stuffed with chicken liver pate (my favorite),
photo 1
a yeast soup filled with smoked croutons and potatoes (tasted exactly like a loaded baked potato),
photo 2
and the dish that inspired today’s post: a lemon cornmeal cake with goat’s milk panna cotta and blueberries with thyme and marjoram.  Here’s a pic of the dish from the restaurant:

This was one dish that I knew I could conceivably recreate at home without any fancy equipment.  Watching them assemble this was mezmerizing and I took a few guesses as to what each component was before the chef handed me the plate.  Perks of being able to talk to the chef while they’re plating 🙂  When I got home, I dreamed up my own version.  I love lemon and thyme together, so I knew I’d keep that aspect of the dish.  Instead of putting lemon in the cake like they did, I infused the panna cotta with lemon and then made a gingerbread for the base because I love the flavors of gingerbread and figured it’d go well with everything.  And it did!  I happened upon some really great blueberries that actually TASTE like blueberries and the combination of all the flavors is delicate but powerful and the panna cotta is so smooth, it risks falling completely apart if moved too much.  I loved how this turned out and it really wasn’t that hard to make the components and assemble.  Next time you’re at a restaurant and love a dish – try to recreate it at home!  It’s a good way to learn to be creative in the kitchen!

Lemon Panna Cotta with Gingerbread

Lemon Panna Cotta with Gingerbread

For the panna cotta (to be done a day ahead)*:

1 cup whole milk, divided
2 tsp. unflavored gelatin
2 1/2 cups heavy whipping cream
1/2 cup sugar
Zest from two lemons, plus a wedge of the lemon
1 tsp vanilla bean paste (or one vanilla bean, scraped)

Pour 1/2 cup milk into a medium bowl; sprinkle gelatin over. Let sit until gelatin softens, about 15 minutes.
Meanwhile, combine cream, sugar, lemon zest and wedge, and remaining 1/2 cup milk in a large saucepan. Scrape vanilla seeds from bean into saucepan; add bean (or add your vanilla bean paste). Bring to a simmer over medium heat, whisking until sugar dissolves. Remove from heat; cover and let steep for 10 minutes.
Bring cream mixture back to a simmer. Add gelatin mixture and stir until dissolved. Strain. Divide among eight 3/4-cup ramekins. Chill uncovered until panna cotta is set, at least 6 hours.  *adapted from Bon Appetit

For the gingerbread (to make a thin version like mine):

2¼ cups sifted (9 ounces) unbleached all-purpose flour, plus more for dusting the pan
½ teaspoon baking soda
½ teaspoon salt
2 teaspoons ground ginger
1 teaspoon ground cinnamon
½ teaspoon ground cloves
½ teaspoon freshly grated nutmeg
½ teaspoon ground allspice
1 teaspoon Dutch-processed cocoa
8 tablespoons (1 stick) unsalted butter, melted and cooled to room temperature
¾ cup mild or light molasses
¾ cup (5¼ ounces) sugar
½ cup buttermilk
½ cup milk
1 large egg

Adjust an oven rack to the middle position and heat the oven to 350 degrees. Line a large, rimmed sheet pan with parchment paper and spray with nonstick spray.

Whisk together the flour, baking, soda, salt, ginger, cinnamon, cloves, nutmeg, allspice and coca in a medium bowl.

Beat butter, molasses, sugar, buttermilk, milk , and egg in a large bowl with an electric mixer on low speed. Add the dry ingredients and beat on medium speed until the batter is smooth and thick, about 1 minutes, scraping down the sides of the bowl with a rubber spatula as needed. Do not overmix. Scrape the batter into the prepared pan and smooth the surface.

Bake until the top springs back when lightly touched and the edges have pulled away from the pan sides, about 20 minutes. Set the pan on a wire rack and cool for at least 10 minutes. Serve warm or at room temperature.

Gingerbread can be wrapped in plastic, then foil, and refrigerated up to 5 days.

*if you want to make a regular pan of this, simply bake in a 9×13″ pan and bake for 35-40 minutes.   Adapted from The New Best Recipe.

Banana Chiffon Cake with Salted Caramel Cream Cheese Icing

Banana Chiffon Cake with Salted Caramel Cream Cheese Icing
I have a wonderful friend named Katrina.  She is the mother of two, wild at heart, loves all things done from scratch and enjoys nothing more than giving things away for free that she worked hard to produce and for which she should be charging good money.  I try my best to pay her for her amazing pasture-raised, organic eggs, but occasionally she’ll leave a dozen on my porch because “she had too many to use that week.”  Look at these beauties!

free range eggs

free range and all that jazz
So a few weeks ago when I was blessed with an extra dozen eggs on my porch, I decided to sacrifice them to the baking gods and make a chiffon cake.  NOTHING whips up faster than a fresh, room temp egg white.  And when you have fresh eggs (we’re talking hours from the chicken) you do NOT have to keep them in the fridge.  And for baked goods, nearly all recipes will call for a room temp egg.  I was completely shocked the first time I used Katrina’s eggs when making a chocolate mousse and the egg whites beat into stiff peaks in about a MINUTE.  I’m not exaggerating.  Amazing.  This post is really just me bragging that I have a super cool friend who raises really great chickens who lay really amazing eggs.

For the recipe today, I give you a banana chiffon cake with salted caramel icing.  A chiffon cake is kinda like an angel food cake except not so angelic.  It uses both the yolks and whipped egg whites AND has oil.  But the texture is similar to an angel food cake except this cake is super moist.  When I was little, the only cake my grandmother would ever make (to my recollection) was an angel food cake, and I can only imagine that was because it has no added fat.  She was missing out 🙂

Banana Chiffon Cake


Banana Chiffon Cake with Salted Caramel Cream Cheese Icing*

For the cake:

10 1/2 oz sugar
5 1/3 oz plain cake flour
1 1/4 tsp baking powder
1/4 tsp baking soda
1/2 tsp salt
7 large eggs; 2 whole, 5 separated, at room temp
2/3 cup water
1/2 cup vegetable oil
1 tsp vanilla extract
1/2 tsp cream of tartar
1 cup mashed ripe bananas (about 2 medium)

For the icing:

1 recipe salted caramel sauce
1 – 8 oz. package cream cheese at room temp


Adjust the oven rack to the lower-middle position and heat the oven to 325 degrees.  Whisk the sugar, flour, baking powder, soda and salt together in a large bowl.  Whisk in the 2 whole eggs, 5 egg yolks (reserve the whites), water, oil and extract until the batter is just smooth.

Pour the reserved egg whites into the bowl of a sand mixer; beat at low speed until foamy, about 1 minute.  Add the cream of tartar, gradually increase the speed to medium-high, and beat the whites until very thick and stiff, just short of dry (as little as 7 minutes in a stand mixer and as little as 2 minutes if you’re using eggs that are only 5 hours old) 🙂 With a large rubber spatula, fold the banana mush into the batter, then fold the whites into the batter, making sure to not over mix, but being sure you get all the way down to the bottom of the bowl to incorporate whites into all the batter.

Pour the batter into an ungreased large tube pan (9-inch diameter, 16-cup capacity).  Rap the pan against the counter a few times to rupture any large air pockets.  If using a pan with a removable bottom, grasp both sides with your hands while firmly pressing down on the tube with your thumbs to keep the batter from seeping from the pan during this process. Wipe off any bbatter that may have dripped or splashed onto the inside walls of the pan with a paper towel.

Bake the cake until a toothpick inserted in the center comes out clean, 65 to 75 minutes.  Immediately turn the cake upside down to cool (I’ll admit, this is scary, but have faith).  If the pan does not have prongs around the rim for elevating the cake, invert the pan onto the neck of a wine bottle or funnel.  Let the cake cool COMPLETELY before inverting.

To unmold, run a thin knife around the pan between the cake and pan wall.  Use a skewer to loosen the cake from the tube.  Loosen the cake from the bottom of the pan with a knife and invert it onto a serving pan.  Hope for the best.  Half of my cake was hollow because I didn’t incorporate the egg whites sufficiently.  This is life.

Spread the icing over the top of the cake and let it drip down the sides.

To make the icing:

After making the salted caramel sauce, leave it in the pan and with a mixer or by hand with a whisk, whip the softened cream cheese until fully incorporated and no tiny lumps remain.  Let it come up to room temp and then beat again before pouring over the cake.

*cake recipe adapted from The New Best Recipe cookbook.  This book is endlessly tested and will never steer you wrong.


Brown Butter Honey Ice Cream in Milk Toast Bowls

Japenese Milk Bread Bowl with Brown Butter Ice Cream
This recipe is insane.  What’s more insane than each component is the sum of its parts.  Matt saw a recipe for Japanese Brick Toast a few weeks ago and I had seen a similar recipe on Pinterest that looked downright heavenly.  He said in Japan they put ice cream with buttery toasted sweet bread as a dessert (…which is doubtful – I’ve seen Japanese people.  They don’t look like they eat ice cream in bread bowls).  Why has no one thought of doing a bread bowl for ICE CREAM?!  It’s genius.  The bread soaks up the melted ice cream and you’re left with this spongy cake-like texture when you get to eating the bread part.  This dessert demands to be shared.  Because if you don’t share it, you’ll feel like a dadgum glutton.  I mean, LOOK at that thing!

For the ice cream, we look no further than Jenni’s Splendid Ice Creams.  I posted about her Brown Butter Almond Brittle ice cream last year.  I’m a broken record when it comes to browned butter.  I can’t help it.  We began making ice cream out of her book about four years ago and haven’t even wasted our time with a different method.  She’s perfected the texture of homemade ice cream, in my opinion.  So for this recipe, I used her browned butter ice cream base and added honey and vanilla bean paste.  It was perfect in our little ice cream bowl.  The bread deserves a post of its own and don’t you worry – we’ll blog about it, soon.  Matt loves it too much and loved the process too much to only make it once.  He can’t wait to try it, again.  For now, enjoy a truly amazing bowl of browned butter ice cream:

Milk Toast with Brown Butter Ice Cream, Bananas and Honey

Browned Butter and Honey Ice Cream

for the base:
2 cups whole milk
1 tablespoon plus 1 teaspoon cornstarch
1.5 oz (3 tbs) softened cream cheese
1/8 tsp fine sea salt (I use kosher)
3/4 lb unsalted butter
1 1/4 cups heavy cream
2/3 cup sugar
2 tbs light corn syrup
1 tbs vanilla bean paste

Raw honey to fold into the ice cream


Mix about 2 tbs of the milk with the cornstarch in a small bowl to make a smooth slurry.  Whisk the cream cheese and salt in a large bowl until smooth.  Fill a large bowl with ice and water.

Melt the butter over medium heat in a 4 quart saucepan.  Bring to a boil and let bubble until the foam starts to subside and the butter is a rich dark brown (not black!).  Remove from the heat and let stand until the butter solids settle to the bottom of the pan, about 5 minutes.

Pour the clear butter oil into a storage container (once it solidifies you can use it as you normally would for cooking so it’s not a waste!) As you get closer to the butter solids in the bottom of the pan, use a teaspoon to remove as much liquid butter as you can.  You should have about 1 tablespoon of brown butter solids and a little bit of melted fat in the bottom of the pan (it’s impossible to remove all the fat).

Add the remaining milk, cream, sugar, vanilla bean paste and corn syrup to the butter solids, bring to a rolling boil over medium-high heat and boil for 4 minutes.  Remove from the heat and gradually whisk in the cornstarch slurry (you’ll need to stir it up again as it will settle and solidify some).  Bring the mixture back to a boil over medium high heat and cook, stirring with a heatproof spatula or whisk, until slightly thickened, about 1 minute.  Remove from the heat.

Gradually whisk the hot milk mixture into the cream cheese mixture until smooth.  Pour the mixture into a 1 gallon Ziploc freezer bag and submerge the sealed bag in the ice bath.  Let stand, adding more ice as necessary, until cold, about 30 minutes.

Pour the ice cream base into the frozen canister of your ice cream maker and spin until thick and creamy.  Pack the ice cream into a storage container, folding in drizzles of raw honey as you go.  Press a sheet of parchment directly against the surface of the ice cream (this is important to avoid freezer burn and maintain a good consistency) and seal with an airtight lid.  Freeze until firm, at least 4 hours.

Layer ice cream with sliced bananas and serve in boring porcelain bowls, or sweet bread bowls.  It’s up to you.  🙂  (recipe for bread bowls coming soon!)


Banana Coffee Almond Shake

Coffee Almond Banana shake

Coffee, frozen banana, toasted almonds, milk and a squeeze of chocolate sauce.  How can you go wrong with that?!  This is an extremely simple, delicious and relatively low sugar pick-me-up for your hot summer afternoon!  I saw a recipe similar on Serious Eats and had to try my own version!  The only sweetness comes from the banana and a tablespoon of honey – not too shabby for something that seems pretty indulgent!  It was absolutely perfect for that mid-afternoon I-gotta-have-something-sweet attack that happens to me every day.  Enjoy and change up the ingredients as you like!
Coffee Banana Almond shake

Banana Coffee Almond Shake
makes one large or two small servings

1/2 cup strong brewed coffee, room temp
1/4 cup milk (any kind of milk will work)
1/4 cup toasted sliced almonds
1 frozen banana
1 TBS honey, agave nectar, whatever you like best
5 large ice cubes (about a cup of crushed ice)

In a blender, add the coffee, milk, almonds and banana and blend for about 30 seconds.  Then add the ice and blend for 30 seconds to a minute more.  Drizzle with chocolate sauce (or not – it’s up to you, but I had some in my pantry and, well, it was awesome) and serve!