Cheesy Cornmeal Waffles with Spicy Honey

Smoked Gruyere Cornmeal Waffles with Spicy Honey Smoked Gruyere Cornmeal Waffles
Parks and Recreation was one of our favorite shows of all time.  We were sad to see it end a few weeks ago and had to cook something special for the finale.  I debated quite a lot about what to cook.  I could’ve done a plain hamburger inspired by the episode where Ron and Chris battle it out in a food war. We thought about doing bacon wrapped shrimp served with all the bacon and eggs the store had to offer, but I figured that might be a tad wasteful. And so we settled on waffles, as Leslie Knope would’ve wanted.  I decided to do a savory waffle with a side of bacon and plenty of melted butter and Mike’s Hot Honey on top.  Mike’s makes some amazingly spicy and delicious honey that we love putting on our pizza crusts and it’s really good on so many things like buffalo wings or smoked sausages, but it was especially good on top of this cheesy waffle!

Smoked Gruyere Cornmeal Waffles and Spicy Honey


Cheesy Cornmeal Waffles with Hot Honey

  • Servings: about 8 Belgian waffles
  • Print


  • 1 cup of self rising flour
  • 1 cup of all purpose cornmeal
  • 2 teaspoons of baking powder
  • 1/2 teaspoon of salt
  • 1 tablespoon of sugar
  • 1/2 cup grated cheddar cheese
  • 2 scallions, sliced thin
  • 1/2 tsp smoked paprika (optional)
  • 1/8 tsp cayenne (optional)
  • eggs
  • 1 cup buttermilk
  • 1/3 cup water
  • 1/4 cup of canola oil

Get your waffle iron heating up.  In a large bowl, mix the dry ingredients along with the cheese and scallions.  In a separate bowl, whisk the eggs, buttermilk, water and oil until well blended.  Add the wet ingredients to the dry and beat with a fork until no dry parts remain.  Cook in a waffle iron and keep warm in a 200 degree oven until you’re finished cooking all the waffles.  Serve with hot honey, regular syrup, sweet bbq sauce, or anything you can think of. Hey, why not a fried egg on top?! And make sure you have plenty of crispy bacon alongside.  Enjoy!


Advertisement

Challah French Toast with Caramelized Bananas and Toasted Almonds

Challah French Toast with Caramelized Bananas
So when Matt made Challah a couple weekends ago, the leftover loaf sat on our counter among other homemade rolls he made.  We ate the rolls, but the Challah just sat there, threatening to mold.  So I stuck it in the fridge to prolong its life and waited for the weekend.  Saturday rolled around and I turned that almost-moldy bread into amazing French toast.  Cinnamon, vanilla bean, a touch of almond extract made the batter extra decadent.  I pan fried some bananas and almond slices in a touch of butter and agave nectar and sprinkled them on top.  It was so good and once again, I got the satisfaction of knowing I didn’t let Matt’s bread go to waste!  

Happy Weekend!  
Challah French Toast
batter makes enough for about 8-10 slices of thick toast

4 eggs
2/3 cup milk
1 tsp cinnamon
1 tsp vanilla bean paste or extract
1/4 tsp almond extract
8-10 thick slices of bread – any bread will do, but dense, enriched bread works best
2 bananas, sliced
1/4 cup sliced almonds
Butter for pan
Syrup of your choice – I chose dark amber agave nectar

*Give yourself a 30 minute head start so the bread can soak! Heat your oven to 200F.  

Whisk the eggs, milk, cinnamon and extracts together and pour into a 9×13″ pan.  Arrange the bread till it fills the pan and let it soak on one side for 15 minutes, then flip and let it soak for another 15 minutes, pressing down to soak up more batter.  

Heat a large non-stick skillet or griddle over medium heat and add butter.  When butter starts to bubble, add the slices of bread (work in batches) and cook till golden brown on each side, about 5 minutes per side.  As they finish, put them on a baking sheet and place in the oven to keep warm while you finish the rest.

When you’re done with the toast, wipe the skillet out with a few paper towels and over medium high heat, toast the almonds until brown and fragrant.  Remove and add one tablespoon of butter, a swirl of syrup and the bananas and cook until golden on each side, about 1-2 minutes per side.  Top the toast with almonds and bananas and syrup and serve!


Dark Chocolate and Ricotta Pancakes

dark chocolate ricotta pancakes


Chocolate or coffee?  Which ingredient controls my mind the most?  Coffee may win out just a hair with its zero-calorie-yet-complex-and-indulgent attribute, but chocolate comes in at a close second.  I received an amazing cookbook for Christmas from Matt.  The Mast Brothers Chocolate cookbook.  It’s stunning.  A voyage in pictures and recipes in the lives of Rick and Michael Mast – two brothers who make and sell chocolate in New York City.  The pictures are dark and stunning and the stories are as wholesome and exciting as the product they sell.  Everything from a sustainable source, every ingredient in their chocolate from a farmer they literally know and have probably had dinner with.  Nothing they do is the easy way out and it’s an amazing way of life to aspire to, and a joy of a book to read through like a novel.

One of the recipes that caught both Matt’s and my eye was the dark chocolate and ricotta pancakes.  I’m usually on the lookout for something special to fix us for breakfast on Saturday and that recipe just jumped off the page.  The picture showed these nearly-burned pancakes (although not burned – just super dark chocolate) and browned butter frothing around the edges.  Sold.  All the recipes in this book (if you can procure some really great chocolate) are simple and straight-forward.  Hardly any recipe takes up more than a paragraph and so it all seems so accessible.  I used Lindt 70%, our favorite dark chocolate that you can actually find in a grocery store.  The results were amazing – your classic chocolate chip pancake bumped up a notch.  Enjoy and take your Saturday morning a bit slower!

Dark Chocolate Ricotta Pancakes*
makes 10-12 small pancakes

3 eggs, separated
1 cup ricotta cheese
1/3 cup whole milk
3 tablespoons sugar
1 pinch kosher salt
2/3 cup AP flour
3 ounces dark chocolate, finely chopped
6 tablespoons unsalted butter

In a medium bowl, whisk egg yolks with ricotta cheese, milk, sugar, and salt.  Add flour and chocolate and combine.
In a separate bowl using a handheld mixer, beat egg whites to soft peaks.  Fold the egg whites into the flour-ricotta mixture.

Melt one tablespoon of butter for each batch of pancakes in a large cast iron skillet over medium heat.  Ladle batter onto pan in 4-inch circles.  When the edges brown and batter bubbbles, flip pancakes.  They are pretty messy, so just do your best.

Serve with maple syrup and a cup of black coffee and rejoice.

*adapted from Mast Brothers Chocolate: A Family Cookbook

Mexican Dark Chocolate Waffles with Cinnamon Whipped Cream

Mexican Chocolate Waffles with Cinnamon Cream

As I was drifting off to sleep after our New Year’s Eve party, I suddenly shouted out, “Mexican chocolate waffles!  Wouldn’t that be great?! And served with cinnamon whipped cream!”  “or dulce de leche,” Matt said.  YES! It was one of those ideas I knew would work.  I had some Mexican chocolate in our pantry that I hadn’t used, yet, and I usually like to think of a fun breakfast when we are all home together.  So New Years Day seemed like the perfect morning for a fun breakfast, laced with chocolate.

It worked as good as it did in my dream-like state at 1:30 a.m.  The chunks of Mexican chocolate gave the waffles a chocolate/spice/sugar grit throughout, and the waffles were crispy and as I brushed them with melted butter, I knew we had a winner.  I’d recommend these for any time you want something a little out of the ordinary.  The girls at the grocery store seemed to think me mad for buying Ibarra brand instead of Nestle’s Abuelita.  I really am not well versed in Mexican chocolate, but next time, I’ll avoid the scorn and buy Abuelita brand.  However, for tasty little chunks in a dark chocolate waffle, Ibarra worked just great 🙂

You can serve these with the simple cinnamon vanilla whipped cream, or like Matt suggested, I think some warmed dulce de leche would be amazing.  Or even some simple chocolate syrup.  No matter what you do, these waffles stand delicious on their own!

Mexican Chocolate Waffles

Mexican Dark Chocolate Waffles with Cinnamon Whipped Cream*
makes about 6-8 small waffles, or 4-6 Belgian

3-1/2 oz AP flour (about 1/2-3/4 cup)
1 oz. (1/4 cup) cornstarch
1/2 tsp salt
1/2 tsp. baking powder
1/4 tsp baking soda
2 TBS dark cocoa powder
1 tsp cinnamon
3/4 cup buttermilk
1/4 cup milk
6 Tbs. vegetable oil
1 large egg, separated
1 Tbs. sugar
1/2 tsp vanilla extract
1/2 cup Ibarra Mexican chocolate (half a baking bar), chopped fine

Cinnamon Whipped Cream
1 cup heavy cream
1 TBS cinnamon
1 tsp vanilla bean paste or vanilla extract
1 tsp sugar

Preheat the oven to 200F.

Combine all the dry ingredients in a large bowl with a whisk and set aside.  In a separate bowl, combine the milks, oil, egg yolk, sugar and vanilla extract and blend well.  In a separate bowl, whip the egg white with a pinch of salt until stiff peaks form.   Set aside.  Mix the wet ingredients into the dry with a few simple stirs, then mix in the chopped chocolate and then gently fold in the egg white until fully incorporated.  Don’t overmix!  The egg white makes these waffles crisp!

Cook the waffles according to your waffle maker directions.  I use a stove-top waffle maker and it takes about 1-2 minutes per side over medium high heat and I use about 1/2 cup waffle batter spread over my waffle iron per batch.

As you bake, place the finished waffles directly on your oven rack to keep crisp and warm until ready to serve.

For the whipped cream: In a tall cup with an immersion blender, or in a stand mixer with the whisk attachment, blend the heavy cream, cinnamon, vanilla bean paste and sugar until soft to medium peaks form.  Give a generous dollop per waffle and top with shaved chocolate or cinnamon.  Enjoy!

*base waffle recipe adapted from Fine Cooking

A Blueberry Morning

Blueberry Muffins


It’s super cold – winter blew in last night leaving everything gray and bone-chillingly cold.  We are having a lazy day inside and all I can think about are these warm blueberry muffins with cold butter and hot blueberry syrup soaking into every crumb.  My mom made this combination quite frequently for us, growing up.  I associate them with cold, Sunday mornings. We needed something rather fast while getting ready for church, yet warming at the same time.  Something Mom could pop in the oven and then have time to get ready, herself!  She would boil the blueberry liquid and add a little sugar to make a wonderful blueberry syrup to pour on top of the muffins.  That was always my favorite part.  Just HOW blue can I make this muffin?

So when I saw a can of wild Maine blueberries in the grocery store, my mind went instantly to these muffins and I had to make them for us.  Mom’s were better, but that’s to be expected 🙂  Stay warm, today, Lubbock!

Blueberry Muffins with Butter Blueberry Muffins with Blueberry Syrup

Blueberry Muffins with Blueberry Syrup*
makes 12-16 muffins

12 1/2 ounces cake flour
1 teaspoon baking soda
2 teaspoons baking powder
Heavy pinch salt
1 cup sugar
1/2 cup vegetable oil
1 egg
1 cup yogurt
1 1/2 cups blueberries (fresh, frozen or I used a can of blueberries packed in water – that part is important if you use canned)

Preheat the oven to 375F. Line 16 muffin tins with papers and spray the papers with non stick spray.  Whisk the cake flour, baking soda, powder and salt in a large bowl.  In another bowl, whisk the sugar, oil, egg and yogurt until smooth.  Add the dry ingredients and stir just until combined.  Reserve the juice that comes in the can of blueberries and put it on the stove in a small saucepan with 1/4 cup sugar and let it come to a boil.  Reduce the heat and simmer during the baking time of the muffins.

Fold the blueberries into the batter and divide among the muffin cups.  Bake for 20-25 minutes, until the tops are golden brown.  Remove and remove from the pan, letting them cool upside down for about 10 minutes.  Split, add a copious amount of salted butter and drown in blueberry syrup.  Cheers.

*adapted from Alton Brown’s Blueberry muffin recipe

Overnight Steel-Cut Oatmeal


Back when I was still a fairly new mom and my night’s sleep was a fun game of Russian Roulette, I started putting my breakfast on the stove the night before so that I wouldn’t have to use my brain in the morning. I bought these fancy steel cut oats and the side of the can said that they would take 40-60 minutes to cook, but THEN, at the very end of the directions, it said, “For quick-cooking method, let the oats soak in water overnight and then boil for 10 minutes.”  This was the answer to needing breakfast after a who-knows-how-much-sleep kinda night!  I would literally add everything to the pot the night before – the butter, the pinch of salt and even stuck my stirring spatula in there so that I would not have to use even one iota of brain cells to make breakfast.

I’ve been doing this a few times a week ever since!  On days that I run out of steel cut, I just use plain rolled oats, except I don’t soak them overnight.  I just like the steel cut – they are chewy and interesting and they don’t turn to glue and mush after they go cold, so they are perfect for making a big batch on Monday and then warming them up with a splash of milk the next day – it’s always a great texture!  Most commonly, I make chocolate oatmeal.  It’s Olive’s favorite and I love hearing her request it the first second she sees me in her room in the morning “Chock-ate oatMEEEEL?!”  I’ll add that recipe to the end of this one for those who saw it in my Week in the Life post!

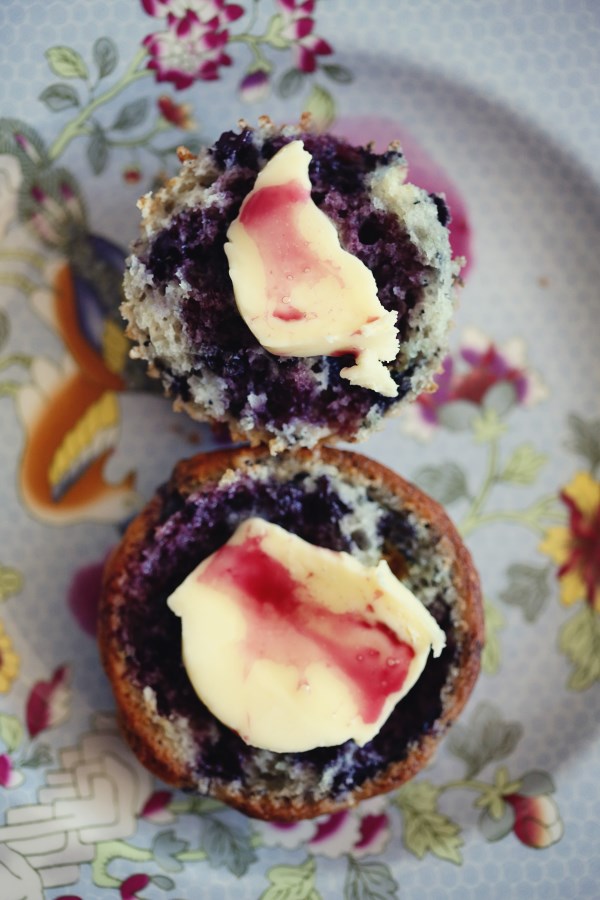
For today I recreated my favorite dessert bread at our grocery store – Apricot White Chocolate!  I had a little of everything and so I went for it, and it was amazing!  What’s fun about oatmeal is the various toppings you can add – so if you have guests for the weekend, make a huge pot and set out an array of dried fruits, nuts, fresh fruits or syrups and let them add what they want!  Great for kids, for people watching their diet and for picky eaters!
apricot and white chocolate oatmeal

Overnight Oatmeal with
White Chocolate, Apricot and Toasted Walnuts

2 cups water
1/2 cup steel cut oats (or one cup of rolled oats and skip the night before step)
pinch of salt
1 tsp of vanilla extract
tablespoon of fat – I use butter, but it’s GREAT with coconut oil and it’s probably just fine without it)
splash of milk or cream
1/4 cup white chocolate chips
1/4 cup dried apricots, chopped
1/4 cup toasted walnuts, pecans, almonds – whatever you have on hand

Right after Top Chef is over, before you check Facebook for the 75th time, put a large saucepan on the stove and add the steel cut oats, water, butter, vanilla and salt.  Place a rubber spatula in the pot, too, so you won’t have to think at all in the morning.  Go to bed.
First thing in the morning, or 10 minutes after your toddler starts talking in her crib, turn on the burner to medium-high heat and bring oats to a boil.  Lower the heat to medium and continue to simmer for 10-15 minutes, stirring occasionally until the liquid is absorbed.  Add a splash of milk or cream if it gets too thick and taste for texture.  If it’s to your liking, remove from heat, place a small portion in a bowl and stick it in the fridge to cool a bit for the toddler while you assemble yours.  Stir in the white chocolate chips till they melt and then top with the dried apricots and walnuts.  Take the kid’s portion out of the fridge, stir again, and then add a few chips so she can stir them around or pick them out herself and discard the rest.  That’s at least how it happened to me.

Chocolate OatMEEEEEEL version:

same as above, except add:

1/4 cup dark chocolate chips
1 tsp cinnamon
sliced banana or dried cranberries

I love banana and chocolate.  Near the end of the cooking time, I add the cinnamon to the pot and stir to incorporate.  I take the pot off the heat and stir in the chocolate chips until an adequate darkness is achieved.  This may call for more chocolate.  Because I use 70%, I have no guilt and no shame.  Top with sliced bananas and eat! Sometimes I shake it up and stir in dried cranberries.  The cranberry/chocolate or banana/chocolate combo is always a winner.  Do what you feel with the toppings, but more often than not, we just do plain chocolate oatmeal!  Olive is never disappointed.

Cooking on the Road

map

They made up their minds, and they started packing.
They left before the sun came up that day.
An exit to eternal summer slacking,
But where were they going without ever knowing the way?

muffins009

I think we might be crazy.  But we’ve made up our minds to drive from here to Seattle in an RV with some really good friends, good music, and good food.  We’re bringing the coffee maker, some good quality beans and our guitars, so I think we may survive. 🙂  We have  friends who live in Seattle, and so we decided to make the trip part of the vacation.  In preparation for a few days on the road, I decided to get to baking.  No one likes to decide what to have for breakfast, so I took it upon myself to make it a no-brainer.  I consulted Annie’s Eats, of course, because that woman knows how to prepare for anything.  She has a wonderful selection of baked goods on her blog, and when I grow up, I want to be just like her.  (I may be older but that’s not the issue, here.)

I chose from her blog, the peanut butter banana oatmeal muffins,(they looked so great but I refrained from taste-testing) the chocolate cherry muffins and the bacon and cheddar scones.  We were forced to taste-test the chocolate muffins because they looked too chocolately for their own good and so what else were we going to do?  Leave it to chance?!  They can hardly be called muffins, in my opinion.  They are nearly flourless chocolate cakes, but just enough flour to make them decadent brownies.  In fact, next time I want to make brownies, I’m using this recipe.  So they might be more for snack time instead of breakfast.

muffins003

Chocolate Cherry Muffins*
(I doubled the recipe and it turned out great)

6 oz. bittersweet chocolate, finely chopped
6 tbs. unsalted butter, cut into small pieces
½ cup all-purpose flour
½ tsp. baking powder
¼ tsp. salt
2 eggs
2/3 cup sugar
1 tsp. vanilla extract
2/3 cup dried cherries, chopped if desired

Directions:
Preheat an oven to 350º F. Line a muffin pan with muffin cups or grease wells.

In a small heatproof bowl, combine the chocolate and butter. Set the bowl over but not touching simmering water in a small saucepan and melt the chocolate and butter, stirring occasionally, until smooth and blended. Let cool slightly.

In a small bowl, stir together the flour, baking powder and salt. In another bowl, whisk together the egg, sugar and vanilla until light in color and doubled in volume. Whisk in the chocolate mixture and then the flour mixture just until combined. Stir in the dried cherries. Divide the batter evenly among the wells of the prepared pan and smooth the tops. Bake until a toothpick inserted into the center of a muffin comes out with a few moist crumbs attached, about 25-30 minutes.

Makes 7-8 muffins.

*didn’t adapt this at all from Annie’s Eats, except for doubling it and using half dark chocolate, half milk because that’s what I had on hand!

muffins008

The scones I prepared up until baking and just froze them raw.  Then, I will put them in that tiny RV oven and add a few minutes on to baking time and we will have an amazing breakfast heading down the road!  I can’t wait for our adventure and I can’t wait for all the amazing food we will try and the sites we’ll see and the memories we will make.  And with any luck, we’ll all still like each other when we get home.  🙂  I’ll be sure and take lots of REAL, non-iPhone pictures and have a few posts about our gastronomical adventures when I return.

Bacon Cheddar Scones*
makes 8-10

For the scones:
3 cups bread flour
1 tbsp. baking powder
1 tsp. salt
1-2 tsp. ground black pepper (depending on your preference)
8 tbsp. cold unsalted butter, cut into small cubes
1½ cups grated cheddar cheese
1/4 cup chopped fresh chives
10 slices bacon, cooked and chopped or crumbled into small pieces
1 cup buttermilk (plus up to ½ cup extra, if needed)

For the egg wash:
1 large egg
2 tbsp. water

Preheat the oven to 400˚ F.  In the bowl of an electric mixer fitted with the paddle attachment, combine the flour, baking powder, salt and black pepper; mix briefly to combine.  Add the cubes of butter and mix on low speed until the mixture is crumbly and the butter pieces are about the size of small peas.  (Alternatively, this can be done in a regular mixing bowl, using a pastry blender or two knives to cut the butter into the dry ingredients.)  Add in the grated cheese and mix just until incorporated.

Mix in the green onions, bacon, and 1 cup of the buttermilk into the flour-butter mixture.  Stir by hand just until all the ingredients are incorporated.  If the dough is too dry to come together, mix in the remaining buttermilk a tablespoon or two at a time until the dough can be formed into a ball.  Transfer the dough to a lightly floured surface and pat the dough into an 8-inch disk.  Cut with a 3″ biscuit cutter into 12 circles, place on a greased cookie sheet, wrap in plastic and freeze till ready to eat.  Before baking, remove from freezer, brush with egg wash and bake for 25-30 minutes until golden brown.

*slightly adapted from Annie’s Eats

muffins002

Dark Chocolate Chip-Pecan Pancakes

Chocolate Chocolate Chip Pancake stack

I opened up this recipe this week with the intention of pinning it to my Pinterest recipe board.  Then I went to my recipe board and discovered that I’d pinned this exact recipe four times over the last 2 years.  My subconscious must really want these pancakes.  I decided, no more pining for a pin!  I made these bad boys this morning for breakfast, right when the clouds rolled in and it started raining.  We enjoyed the rest of our coffee on the front porch while watching the rain and I’d be lying if I said it wasn’t the perfect way to spend the morning.

These pancakes are intense, rich, but not too sweet.  I accidentally left out the melted butter from the batter (believe me that I would never do that intentionally) and they turned out just fine!   Matt had pancake syrup on his and I had creme fraiche sweetened with a bit of honey on mine and I will proudly say that my way was the best.  But his way photographed better 🙂 Whatever you decide to put on top of these pancakes, be it whipped cream, syrup, powdered sugar, yogurt, it’s going to be the right decision.  The baby girl loved them, too and called them “panpays”, which was nearly the cutest thing I’d heard all week.

Enjoy your weekend!  Hope you find time to make these desert-like pancakes at some point!

Chocolate Chocolate Chip Pancakes

Chocolate Pecan Pancakes*
makes about 10 pancakes

  • 1 cup all-purpose flour
  • 1/3 cup granulated sugar
  • 1/3 cup Dutch-process cocoa powder
  • 1 1/2 teaspoons baking powder
  • 1/4 teaspoon salt
  • 1 cup milk
  • 1 large egg
  • 4 tablespoons unsalted butter, melted
  • 1 teaspoon vanilla extract
  • 1/2 cup mini chocolate chips
  • 1/4 cup chopped pecans
  • 4 tablespoons vegetable oilPreheat oven to 225 degrees. In a large mixing bowl, whisk together flour, granulated sugar, cocoa, baking powder, and salt. In another bowl, whisk together milk, egg, melted butter, and vanilla; pour over flour mixture, whisking to combine. Fold in chocolate chips and pecans; let batter stand until slightly thickened, 5 to 10 minutes.

    In a large nonstick skillet, heat 1 tablespoon oil over medium heat until a water droplet sizzles; swirl to coat bottom of pan with oil. Reduce heat to medium-low. Spoon four small mounds (1 heaping tablespoon each) of batter into skillet. Cook until bubbles appear in center, 3 to 4 minutes. With a thin spatula, flip pancakes; continue cooking until set, 3 to 4 minutes more.

    Transfer to a baking sheet; cover loosely with foil; place in oven to keep warm. Repeat with remaining oil and batter in three more batches (adjust heat as necessary to avoid overbrowning).

    Stack ’em up and enjoy, topped with anything you’d like!

*recipe adapted from Martha Stewart Living

Stack of Chocolate Pancakes

Strawberry Banana Split Crepes

crepes

I’ve posted a lot of recipes lately that have strawberries, but there is a good reason – they’re in season!  When you’re at the store and strawberries are $1.30 for a pound, instead of $4 – that’s your sign that they are in season!  Now, I’m not kidding myself into believing that they aren’t grown in hot houses, BUT at least it’s the season for them, and in my mind, that makes me feel like they taste better.

I wanted to make a strawberry crepe, so I looked up a simple crepe recipe, and where it called for 1/2 cup of water, I added a 1/2 cup of strawberry puree instead, plus a bit more water to thin it out.  My strawberry puree was made-up, too, as was the strawberry-vanilla bean whipped cream!

You need to make your crepe batter the night before you use it, so make this batter tonight and have crepes in the morning while the weekend is still here!  This recipe looks like a sugar bomb, but it actually wasn’t.  The crepes have zero sugar except the strawberry puree, which only has 3 tbs and it’s also used to sweeten the whipped cream. So if you don’t add the chocolate sauce, this is really low sugar!  And it definitely doesn’t taste like you held back!

bsplit crepes

Strawberry Crepes

3/4 cup whole milk
1 cup flour
2 eggs
1/2 cup strawberry puree (recipe follows)
2 tbs water
3 tbs melted butter

Put all the ingredients into a bowl or a large, tall cup and with your immersion blender, blend for 15-20 seconds until fully mixed.  If you don’t have an immersion blender, use a regular blender for the same time.  Transfer to a container and chill for one hour, up to 48 hours (I just did this step before I went to bed and used it the next morning.)

In a 10″ non-stick, shallow skillet, heat teaspoon of butter over medium high heat, or just spray with non stick spray, but you want your pan to be pretty hot.  Add a quarter cup of batter to the pan and swirl around till it’s spread as thin as possible. THE FIRST CREPE IS ALWAYS CRAP.  Just throw it away.  Now, you’re ready to begin.  By 1/4 cup scoops, (I used a ladle) swirl your batter in the pan very quickly and let it set for at least 1 to 2 minutes before flipping.  If your pan is hotter than mine, you may need to alter your time.  With a wide spatula (I used a fish spatula), slide under the crepe and flip over.  The other side won’t take as long to cook.  Keep finished crepes covered in a towel so they will stay warm and pliable.  This batter made about 8-10 crepes for me, but if you’re really skilled at swirling your batter, you could squeeze 15 crepes out of this amount.  I am not skilled and my crepes are always thicker than they should be, but they’re still delicious!

Fill the crepe with sliced bananas, a drizzle of left over strawberry puree, and a dollop of whipped cream.  Add more strawberries and whipped cream on top, and if you’re feeling the entire banana split thing, drizzle in chocolate syrup (I used Torani chocolate syrup.)  Or even some toasted pecans!  Have fun – it’s the weekend!

Strawberry Puree

1 lb of fresh strawberries, hulled and halved
3 tbs sugar
1 vanilla bean, split and scraped of its seeds. If you don’t have a vanilla bean, wait, and add some vanilla paste or vanilla extract later when you’re blending)
1/4 cup water

Place all the ingredients into a medium saucepan and cook over medium low heat till bubbly.  Cook for about 15 minutes until the strawberries begin to break down.  Remove the vanilla bean and transfer to a blender or a tall cup with your immersion blender and blend, with an extra 1/2 cup of water till fully blended and no chunks remain.  Add the vanilla bean paste or vanilla extract (about 1 tsp) if you want and blend again.

Strawberry Vanilla Bean Whipped Cream

1 cup heavy cream
1 tsp vanilla bean paste
1/4 cup strawberry puree

Place all ingredients into a bowl and whip until soft peaks form.  (I used my immersion blender, duh)