Black Plum and Blackberry Galette

black plum galette
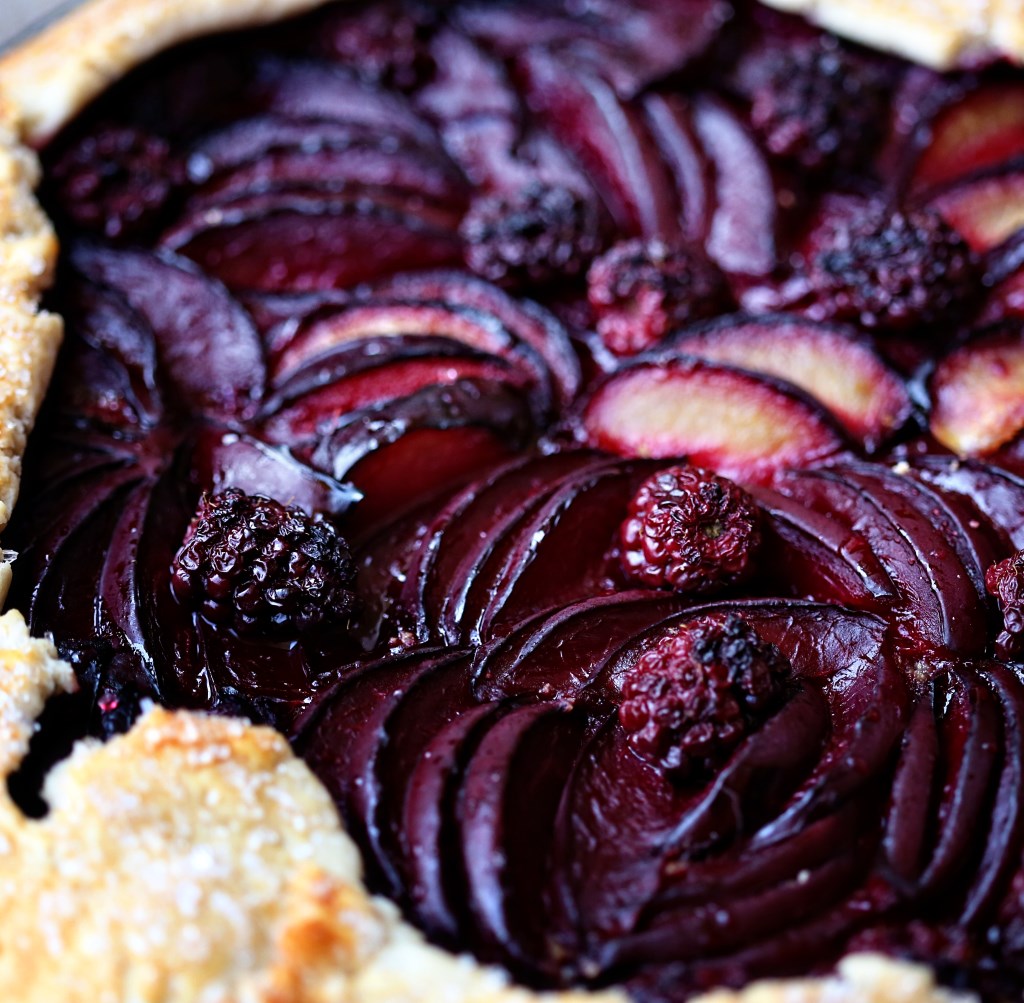
I’m in love with this pie.  It’s a galette – a free-form pie that is usually very rustic and can be sweet or savory, or even resemble a thin pancake in some regions of France.  I love it because it eliminates the pressure to make a pretty pie crust.  So many people struggle with pie crust, and when the edges crack, it can make even the most tempered person lose their cool.  But the galette solves all that.  You simply roll out your dough, fill it up and fold the edges over.  If you add an egg wash and some crunchy sugar sprinkled over the dough, no one in the world will care that it isn’t in a pie plate!  We enjoyed plums and a few blackberries in this pie because they were ripe and in season and cheap!  I really don’t buy fruit if it isn’t on sale.  I just figure that sale price tells me what’s in abundance and that’s an easy way to know what’s in season!

I served this over the course of a few days to a few different friends.  I love that one dish can unite so many.  I believe five different friends, total, shared this pie at different times over the weekend.  This is my very favorite thing about cooking and sharing meals.  And yes, a plum galette and a cup of coffee is a meal 🙂 I think people stay longer and open up quicker and are more at ease if you have something to offer them to eat and drink.  I’m not always good about doing this, especially for the most frequent friends.  And how awful to treat the frequent friends less special!  It’s hard for those of us who can’t be trusted with baked goods in the house, to have them in the house during the week.  But, maybe you could consider it a bit of a social challenge for yourself to bake this pie and then see how many different friends you can get to share it with you.  🙂

plum galette

Plum and Blackberry Galette*

2 1/2 cups plus 2 tablespoons all-purpose flour (spooned and leveled), plus more for rolling
1 cup (2 sticks) cold unsalted butter, cut into pieces
5 tablespoons plus 1 teaspoon sugar
1 teaspoon salt
1/2 cup ice water
1/4 cup whole, skin-on almonds, toasted
5 to 6 plums, halved, pitted, and sliced 1/4 inch thick (keep slices together if possible – this was hard for me because my plums were cling and didn’t come away from the pit very easy.  I just sliced them as best I could – still pretty)
1 to 2 tablespoons heavy cream

In a food processor, combine 2 1/2 cups flour, butter, 1 teaspoon sugar, and salt; pulse until mixture resembles coarse meal. Sprinkle with 1/4 cup ice water. Pulse until dough is crumbly but holds together when squeezed (if necessary, add up to 1/4 cup remaining ice water, 1 tablespoon at a time). Don’t overmix! Remove dough from processor and shape into a disk; wrap in plastic and refrigerate 1 hour. Meanwhile, wipe bowl of food processor clean and add almonds, 3 tablespoons sugar, and 2 tablespoons flour; pulse until ground to a coarse meal.

Preheat oven to 350 degrees. On a floured surface, roll out dough to 1/4-inch thickness. Transfer to a parchment-lined baking sheet; sprinkle almond mixture over dough (this is necessary for absorbing the juices from the fruit so your crust won’t be a soggy mess.  Plus, it tastes great.)  With a spatula, transfer plums to dough; press lightly to fan out, leaving a 2-inch border. Fold edge of dough over fruit. Refrigerate 20 minutes (this is so your butter doesn’t leak out). Brush crust with cream (I used an egg); sprinkle galette with 2 tablespoons sugar (I used super crunchy sugar!)  Bake until crust is golden and underside is cooked through, about 70 minutes.

*I made this from Martha Stewart’s Pies and Tarts cookbook, which, is a book I could look at for hours on end, reading it like a novel.  That’s one way to get better at cooking, by the way – read cookbooks like they’re novels 🙂

Advertisement

Basil Lemonade – it’s 107 Degrees, Today

basil lemonade

It’s hot. Really hot.  107F, to be exact.  I was about to post a lovely recipe for a summer corn chowder and then I realized that I certainly don’t want to eat hot soup today and I assume you don’t, either.  You probably don’t even feel like eating much at all.  With heat like this, you need one thing: to stay hydrated so that you don’t have a panic attack and swerve into the cars coming toward you during rush hour.  I’m giving you a stupidly easy recipe, today.  It even involves a mixGASP!  I’ve made this lemonade for several events and at each event, people fawn over it like it’s magical or something.  “How is it sooooo good?”  I really don’t know why basil has such a wonderful effect on lemonade, but it does.  Adds that floral, refreshingly peppery note to it. Gives it a boost and elevates it from boring ol’ lemonade status.  Sure, you could do this without a mix, but I haven’t yet, and so I’m not going to claim that everything I do is from scratch.  So today, I urge you to do as little as possible, as well,  and making this lemonade is right up that “minimal effort” alley.  Enjoy.

Today’s snack time will be little cherry hand pies that Ollie and I made this morning, and this lemonade.  She’s never had lemonade, so we’ll see how it goes.  The hand pies were really easy.  You make the only pie dough that’s worth your time, cut out 3″ rounds, fill with fresh chopped cherries and squeeze shut, crimping with a fork.  Bake at 350 for 35 minutes until browned.  And no, our snack times don’t look like this.  They are in the high chair with me flipping through a magazine or doing dishes while Olive smears cherries all over her face in our dimly lit dining room.  But that wouldn’t photograph nicely, now, would it?  🙂

Cherry Hand Pies with Basil Lemonade

Basil Lemonade

Country Time Lemonade mix, filled to the 2 quart line
1/4 cup lemon juice
1/2 cup fresh basil leaves, washed
1/4 cup sugar
A little less than 2 quarts of water

Dissolve the lemonade mix into the water in a large pitcher.  Using your hands, crush the basil leaves until the oils are released.  Mix into the lemonade.  Stir in the sugar and lemon juice and mix well.  Let it sit in your fridge until cold – the longer it sits, the more basil-y it gets.  Strain into glasses (no one wants a soggy leaf in their cup) over ice and serve!

Basil Lemonade Drink

Brown Butter Almond Brittle Ice Cream

almond brittle ice cream002

I promise you that this is the best ice cream you will ever make at home.  We stumbled on Jeni’s Splendid Ice Creams at Home a couple years ago and I believe the first recipes I made from this book were the Kona Stout  and the Roasted Strawberry and Buttermilk for Matt’s company picnic.  Both flavors got such rave reviews, that when I went to buy this book for my friend, Anna’s birthday, a week later, Barnes and Noble told us that they’d recently sold the rest of their copies – all to Matt’s co-workers, it turned out 🙂  I think the way Jeni makes ice cream is a revelation.  She combines a bit of cornstarch into the base and then adds just one and a half ounces of cream cheese per quart recipe, and the texture and consistency turns out amazing.  Perfectly creamy, freezes well, and her flavors are never too sweet – always a perfect balance.  The recipes in this book range from really unique (gouda and vodka plumped cranberries) to traditional (vanilla bean) to genius (sweet potato with torched marshmallows – gotta try this one, next).

Summer time is the perfect time to buy this book and try out a new recipe at each and every opportunity you get.  Our little ice cream maker will get a work out during these hot months to come!  But we have faith that it feels it is finally getting to do what it was created to do, thanks to Jeni’s Splendid ice creams and our not-so-splendid hundred degree days!

This week, I made three flavors out of this book:  Brown Butter Almond Brittle, Roasted Pistachio and Bourbon Butter Pecan.  All amazing.  The Almond Brittle was the most requested at our church get-together last night, and the most consumed (although I adore the pistachio), so I’ve written out the recipe for you here today.  It calls for almost a pound of butter.  ACTUALLY you only use a tablespoon of that pound of butter.  The solids that settle to the bottom of the pan after you brown butter is what gets mixed into the base and it creates a divinely nutty, roasted flavor in the ice cream base.  Yet another way brown butter makes the world a better place.

almond brittle ice cream004

Brown Butter Almond Brittle Ice Cream*
makes about 1 quart

for the base:
2 cups whole milk
1 tablespoon plus 1 teaspoon cornstarch
1.5 oz (3 tbs) softened cream cheese
1/8 tsp fine sea salt (I use kosher)
3/4 lb unsalted butter
1 1/4 cups heavy cream
2/3 cup sugar
2 tbs light corn syrup

1 cup crushed Almond Brittle (recipe below)

Mix about 2 tbs of the milk with the cornstarch in a small bowl to make a smooth slurry.  Whisk the cream cheese and salt in a large bowl until smooth.  Fill a large bowl with ice and water.

Melt the butter over medium heat in a 4 quart saucepan.  Bring to a boil and let bubble until the foam starts to subside and the butter is a rich dark brown (not black!).  Remove from the heat and let stand until the butter solids settle to the bottom of the pan, about 5 minutes.

Pour the clear butter oil into a storage container (once it solidifies you can use it as you normally would for cooking so it’s not a waste!) As you get closer to the butter solids in the bottom of the pan, use a teaspoon to remove as much liquid butter as you can.  You should have about 1 tablespoon of brown butter solids and a little bit of melted fat in the bottom of the pan (it’s impossible to remove all the fat).

Add the remaining milk, cream, sugar and corn syrup to the butter solids, bring to a rolling boil over medium-high heat and boil for 4 minutes.  Remove from the heat and gradually whisk in the cornstarch slurry (you’ll need to stir it up again as it will settle and solidify some).  Bring the mixture back to a boil over medium high heat and cook, stirring with a heatproof spatula or whisk, until slightly thickened, about 1 minute.  Remove from the heat.

Gradually whisk the hot milk mixture into the cream cheese mixture until smooth.  Pour the mixture into a 1 gallon Ziploc freezer bag and submerge the sealed bag in the ice bath.  Let stand, adding more ice as necessary, until cold, about 30 minutes.

Pour the ice cream base into the frozen canister of your ice cream maker and spin until thick and creamy.  Pack the ice cream into a storage container, folding in the chopped almond brittle as you go.  Press a sheet of parchment directly against the surface of the ice cream (this is important to avoid freezer burn and maintain a good consistency) and seal with an airtight lid.  Freeze until firm, at least 4 hours.

Almond Brittle*
makes about 2 cups

1 cup sugar
1/2 cup light corn syrup
1/4 cup water
3/4 teaspoon salt
1 stick of unsalted butter, cut into 1 inch pieces
2 cups slivered almonds
1/2 teaspoon baking soda

Generously oil a large baking sheet.

Combine the sugar, corn syrup, water, and salt in a 4 quart saucepan and bring to a boil over medium-high heat, stirring to dissolve the sugar. Insert a candy thermometer in the pan, add the butter, and bring back to a boil, then cook until the mixture reaches 300F.  Remove from the heat and immediately stir in the almonds and then the baking soda, working quickly but combining them thoroughly.

Pour the mixture out onto the oiled baking sheet, spreading it to a 1/4 inch thick layer.  Allow to cool completely before smashing to bits. 🙂

*recipes taken nearly word for word from Jeni’s book.

almond brittle ice cream005

Champagne Mangoes and a Glorious Mango Curd

mango curd macaron dish

When we were in Mexico City last year with our friends, Cali and Alex, we were introduced to the ultimate mango.  Small, lemon yellow and sweeter than a peach.  Cali showed us that there was a specific mango fork that you need to peel it properly, and then she went on to show the proper way to peel and dice up these golden nuggets of wonder. She is my unofficial mango-expert.  I will forever associate her with this wonderful fruit and every time I peel one, I always think, “Is this how Cali would do it?”   I had never experienced a mango like the ones in Mexico, before, and when we got back home, I was on the look out.  I was so excited to see one that looked very similar at the grocery store called Champagne mangoes, and the next time Cali came over, I had her confirm its validity.  We had a winner!  So now, whenever I see that they are in abundance at the store, I get a half dozen.  The last time I did, I let them go too long before eating them, and faced the fear of letting them go bad.

So, I decided that I wanted to make a mango curd.  I looked up a recipe and it called for 15 ounces of mango and that’s exactly how much I had.  The recipe turned out so well, I filled macarons with it and also filled citrus cupcakes with the curd and topped them in coconut cream cheese frosting.  Epic win for the cupcakes, epic fail on the macarons.  The macarons tasted great, but the cookie itself didn’t turn out very well.  They all went hollow!  I have made macaron cookies before and the best I can describe them is that they are the croissant of cookies.  Every batch is different, every recipe is different and their success depends on so many factors, it’s a little maddening. The quality of the ingredients, the humidity in your kitchen, the exact temp of your oven, etc, etc, etc.  I surprised myself and didn’t FREAK OUT when the first batch of cookies EXPLODED, the second batch was pretty perfect, and the third batch baked like the first.  A true testament to how baking is a fickle beast.  They at least looked pretty:

mango curd macarons

The cupcakes, on the other hand, were a no-brainer.  I took a basic yellow cake recipe and added in Fiori di Sicilia, then made a cream cheese frosting, added a bit of coconut extract and topped each with toasted coconut after filling the cupcakes with the mango curd.  Such a wonderful combination, that I wanted to share those recipes with you, today, but mainly, this mango curd is the winner.  A week later, I still had some in a jar so they were put on some buttermilk pancakes this morning with fresh blueberries and slices of Champagne mangoes, of course.

mango curd cupcakes

mango cupcakes

Champagne Mango Curd*

Makes 1 to 1.5 cups

15-ounces ripe mango, peeled, pitted, cut into 1/2-inch pieces (It took 5 Champagne mangoes)
1/3 cup sugar
3 tablespoons fresh lime juice
Pinch of salt
4 large egg yolks
1/4 cup (1/2 stick) unsalted butter, cut into small pieces

Puree mango, sugar, lime juice and salt in processor, scraping down sides of work bowl occasionally. Add yolks; puree 15 seconds longer. Strain through sieve set over large metal bowl, pressing on solids with back of spatula to release as much puree as possible. Discard solids in sieve.

Set metal bowl over saucepan of simmering water (do not allow bottom of bowl to touch water); whisk puree until thickened and thermometer registers 170°F., about 10 minutes. Remove from over water. Whisk in butter 1 piece at a time. Cover and refrigerate overnight.

*taken from Smitten Kitchen, who took it from Bon Appetit

Citrus Cupcakes*

1 stick unsalted butter, softened
2 cups all-purpose flour
1 tablespoon baking powder
1/2 teaspoon fine salt
1 1/2 cups granulated sugar
3 large eggs, room temperature
1 cup whole milk
1 teaspoon Fiori di Sicilia, or 1/2 tsp orange extract + 1/2 tsp vanilla

Preheat oven to 350 degrees. Butter and flour 12-16 muffin tins, or just line with cupcake liners and spray those with non-stick spray.  Whisk together flour, baking powder, and salt. Beat together butter and granulated sugar with a mixer on medium speed until combined, 1 to 2 minutes. Add eggs and beat well, scraping down sides of bowl as necessary. Reduce speed to low and gradually add flour mixture, beating until combined. Add milk and extracts and beat until just combined.
Divide batter among cups; smooth tops with an offset spatula. Bake until golden and a toothpick inserted into centers comes out clean, 25-30 minutes. Let cakes cool in pans on wire racks 15 minutes. Turn out cakes onto racks to cool completely before filling.

*adapted from Martha Stewart Living

Coconut Frosting*

1 stick unsalted butter, softened
4 ounces cream cheese, room temperature
5 cups confectioner’s sugar
1/4 teaspoon fine salt
1/4 cup whole milk
1/2 teaspoon pure vanilla extract
1/4 tsp coconut extract

1/2 cup coconut, toasted, for topping cupcakes

Beat together butter and cream cheese with a mixer on medium-high speed until pale and creamy, about 1 minute. Reduce speed to medium. Add confectioner’s sugar, 1 cup at a time, beating well after each addition. Add salt, milk, and vanilla, coconut extract and beat until fluffy, about 3 minutes. If not using immediately, cover surface of frosting with plastic wrap. Frosting can be refrigerated in an airtight container up to 1 week. Before using, bring to room temperature, then beat on low speed until smooth.

*adapted from Martha Stewart Living

To Assemble:

I used the large tip from my piping bag to cut out the centers of my cupcakes and I really went pretty much to the bottom of each cupcake with the cut.  The curd is pretty runny out of the piping bag, so I had to hold it up in the air between fillings.  I inserted the tip of the piping bag and slowly squeezed until the sides of the cupcake bulged a bit.  I like filling.  Then, I just smoothed the frosting on top of each cupcake and sprinkled with toasted coconut.

mango cupcake with coconut frosting

Mini Cherry Pies with Brown Sugar Meringue

cherry meringue mini pies-23

I fulfilled a little dream, today.  I baked with my daughter.  And she even wore a mini-apron. In just a few more months, she’ll be able to stand beside me on her stool and really help.  Today, she got to sit on the counter, play with the rolling pin, say, “row, row, row” as she rolled the dough and even properly sneaked little bites of the raw dough to eat.  This girl knows how to live.  And I’m so happy that she’s teaching me how to live mine, all over again.

image_1 photo

I found cherries on sale for $2.97, regularly over $7!  Cherries are in season in May, so I really hope they stay cheap for a few more weeks!  I did a couple things with my purchase.  First, I put a few whole in a jar and covered them with bourbon.

cherry meringue mini pies-20

A great addition to cocktails in a few weeks, I’m sure!  Or a grown up ice cream Sunday.  Or, a merciful substitution for those horrid Maraschino circles of candy that call themselves cherries.

cherry meringue mini pies-19

For my second act, I overcooked a batch of cherry pie filling so much that it resembled bits of dried cherries, resting comfortably in glue.  (I’d left it on the stove to “simmer” while I went to see my friend in the hospital.  Um, don’t ask why I did that.)  Matt rescued my near-break down by going and getting me another pound at 10:00 last night, then helped me pit every last one of them so I could start over.  That’s true love.

So I had a vague vision of what I wanted to do.  I wanted to make mini pies, fill them with tart cherry filling and use a brown sugar meringue that I’ve used before and wanted to make again because it’s close to perfection and is SO SWEET that it can really only be paired with something tart.  So these little devils are a combination of three recipes: Martha Stewart’s hand pie dough, My Baking Addiction’s cherry pie filling and Cindy Pawlcyn’s brown sugar meringue that she uses on her mile high lemon meringue pie at her amazing restaurant, Mustards Grill in Napa Valley (we went! we ate! we went into a food coma!)

The results were pretty great.  I think next time, I’d use my tried and true pie crust recipe and just add lemon zest to it.  Other than that, this recipe is a winner!  Especially for this super hot weekend that reminds us all too well that we live in the desert and it is officially summer.

cherry meringue mini pies-1

Mini Cherry Pies with Brown Sugar Meringue
makes two dozen

For the Crust

3 cups AP flour
1/4 tsp baking soda
1 tsp baking powder
1/2 tsp salt
2 tsp lemon zest (this microplane works best!)
1 stick of butter (1/2 cup, room temp)
1 cup sugar
1 large egg
3 oz. cream cheese at room temp
2 tbs buttermilk
1 tsp vanilla extract

In a medium bowl, whisk together the flour, baking soda, baking powder, salt and zest.

With an electric mixer on high speed (I used my stand mixer with the paddle attachment), beat butter and sugar until pale and fluffy, about 5 minutes.  Add the egg and beat until just combined.  Add cream cheese, buttermilk, and vanilla; beat until well combined.  Add reserved flour mixture, and beat until smooth.  Form dough into a ball and cover with plastic wrap and flatten into a disc.  Refrigerate 1 hour, up to overnight or freeze up to 1 month.

Let the dough come up to room temp and then roll out into a circle about 1/4 inch thick.  Cut out 4″ rounds and press them into a standard muffin tin, making sure to patch up any holes that form.  This dough is kind of crackly, so don’t fret.  It patches up pretty easily.  Prick the bottom of each pie with a fork and bake in a preheated 375 degree oven for 15 minutes, or until golden brown.  Some of the bottoms of the pies will puff up, but when they’ve cooled just press the puffed up centers down a bit before filling.  I wasn’t about to cut 24 parchment rounds and fill each cup with pie weights.  I’m not THAT dedicated to perfection.

For the Filling

5 to 6 cups fresh, pitted cherries
1/2 cup water
2 tbs lemon juice (fresh!)
2/3 cup sugar
4 tbs constarch
1/2 tsp almond extract

In a saucepan over medium heat, combine the cherries, water, lemon juice, sugar and cornstarch.  Bring to a boil; reduce heat to low and cook, stirring frequently, for about 10 minutes.  Stir in the almond extract and cool slightly before using.

image

I really love using my copper jam pot – (pardon the iPhone pic) The copper heats up almost instantly, as do the sides, so it cooks jam more evenly.  There are lovely, affordable ones here!

For the Meringue:

3/4 cup egg whites (about 6 large)
1/4 teaspoon cream of tartar
1 1/2 cups firmly packed brown sugar

Place the egg whites and cream of tartar in an electric mixer fitted with the whip attachment. Place the brown sugar in a medium, heavy saucepan with high sides (that sugar will boil up and scare the meringue right out of you if you have a small pan), add water to cover, attach a candy thermometer to the pan, and turn the heat on high. When the sugar is at about 240 degrees, start whipping the whites on high speed (they should be foamy and starting to thicken before you add the sugar). When the sugar is at the high soft-ball stage (245 degrees), remove the thermometer from the sugar and, with the mixer still running, carefully avoiding the whip, pour the sugar into the egg whites in a thin stream. When steam starts to come off the whites, add the sugar more quickly. When all sugar has been added, continue whipping until firm but soft peaks form.

Assemble!

Fill each pie shell with the filling.  Then top each with a generous dollop of meringue (you’ll have leftover meringue) and then get a torch and torch those suckers.  I don’t like toasting meringue in my oven because I inevitably scorch them and that makes me feel like a failure and I try to avoid that feeling whenever possible.  It’s all about setting yourself up to succeed in the kitchen that will keep you coming back.

I think these are best served with iced coffee because that’s what you need on a 100 degree day like today!

cherry meringue mini pies-6


Little fingers are very curious 🙂


cherry meringue mini pies-8


cherry meringue mini pies-17


JOY!