Espresso Chocolate Cake with Cinnamon Cream

Espresso Chocolate Cake with Cinnamon Whipped Cream
I’m a pretty big fan of the combination of chocolate and cinnamon.  They compliment each other so well in baked goods and the combination nearly exudes warmth.  This flourless indulgence boasts the rich flavors of espresso, as well.  And if there’s anything the first year of motherhood has taught me, it’s that coffee is from the Good Lord.  Chocolate is, as well, but coffee has really become a friend in need this year.  Together, they have become our go-to desserts.  This cake should be enjoyed with coffee if you are into that kind of supreme happiness.  The original recipe doesn’t call for cinnamon, but lately I’ve been adding it to just about everything including the fresh whipped cream I made for this cake.  I put more cinnamon than I thought I should and it turned out perfect.  And then I sprinkled it with cinnamon.  Maybe I have a deficiency?

Either way – try this cake.  And don’t leave out the whipped cream.  It was extra special.  Happy weekend and happy baking!

Flourless Espresso Chocolate Cake

Flourless Espresso Chocolate Cake with Cinnamon Cream*
makes one, 9″ round cake

  • 3 tablespoons unsalted butter, plus more for cake pan
  • 6 ounces bittersweet chocolate, preferably 70 percent cacao, chopped
  • 6 large eggs, separated, room temperature
  • 1 cup sugar, divided
  • 3 tablespoons instant-espresso powder
  • 1 tsp cinnamon
  • 1/4 teaspoon coarse salt
  • 1 tablespoon pure vanilla extract
  • 2 cups heavy cream
  • 2 tbs cinnamon

Preheat oven to 350 degrees. Butter the sides and bottom of a springform pan. Melt butter and chocolate in a glass or other heat proof bowl in the microwave at 30 second increments until melting and stir together to fully melt and incorporate.  Set aside.

Beat together egg yolks and 1/2 cup sugar with a mixer on medium-high speed until thick and pale, about 3 minutes. Add espresso powder, 1 tsp cinnamon and salt; beat until combined, about 1 minute. Add vanilla and melted-chocolate mixture; beat about 1 minute more.

In another bowl, beat egg whites on medium-high speed until foamy. Increase speed to high; gradually add remaining 1/2 cup sugar, beating until stiff peaks form, about 5 minutes. Fold into chocolate mixture in 3 batches. Transfer batter to pan and bake until set, 40 to 45 minutes. Let cake cool completely in pan on a wire rack. Remove side of pan; transfer cake to a serving plate. Serve whipped cream alongside cake.  To make the whipped cream, beat the heavy cream in a mixer on medium-high until soft peaks form.  Sprinkle in the cinnamon and whip a little longer, but not too long – you want the cream to stay soft, not get clumpy (which happens from too much whipping.)  Serve with coffee and be sure and save some for yourself for breakfast tomorrow!

*adapted from Martha Stewart Living

Advertisement

Cappuccino Chocolate Cake

cappcake3

Some things get better with time: wine, cheese, beards…this cake.  I made it on Sunday afternoon and we had a piece and it was extremely good, but we wrapped it up and let it sit in the fridge for a few days and THEN it was something to behold.  The layers meld into one another after a couple days in the fridge.  The whipped cream softens the layers of chocolate cake and it transforms into a Swiss Cake Roll/Tirimisu kinda thing and it’s amazing.  Good news: it’s a really great cake if you eat it instantly.  Greater news: it only gets better from there.

The recipe comes from Fran Bigelow’s wonderful book, Pure Chocolate.  I learned how to make truffles from this book with much sweat, tears and good results.  Fran is the expert when it comes to chocolate and none of her recipes have steered me wrong.  Her truffles and chocolate tempering require huge amounts of patience.  They simply can’t be rushed.  And when I have about 2 days, I want to try her recipe for dark chocolate brandied apricot torte.  But I didn’t have that much time and saw that this cake took only a couple hours. It delivered rich chocolate and creamy coffee flavors and honestly, what is better than that combination?  This is the perfect party cake or good to have in your fridge (since it lasts all week) to whip out with a cup of coffee when a friend stops by.  Given that friends still stop by in your neck of the woods.  Oh, to live in Mayberry…

cappcake


Cappuccino Chocolate Cake
serves 10-12

6 ounces bittersweet chocolate (70% is preferable), finely chopped
6 large eggs, separated
1/2 cup plus 1 tbs sugar
3 tablespoons brewed cooled espresso
Cappuccino Whipped Cream (recipe below)
dark cocoa powder for dusting

With a rack positioned in the middle of the oven, preheat to 325F.

Lightly butter a 9×13″ or quarter sheet pan and line with parchment paper.  Lightly butter the parchment paper.

In a glass bowl set over a sauce pan of barely simmering water (I prefer this to a double boiler, as my DB always heats too quickly and scorches the chocolate = sad Alisa) and melt the chocolate.  Remove when nearly melted and continue stirring until smooth.  Set aside.

In a mixer fitted with the whisk attachment or using a hand mixer, combine the egg yolks and half the sugar and whip on medium high speed.  Once combined, scrape the sides of the bowl and increase the speed to high.  Continue whipping until the mixture becomes thick, pale yellow in color, and the sugar has dissolved, 5 to 6 minutes.

Clean the whisk and in another clean bowl, begin whipping the egg whites on medium high speed, increasing the speed until frothy.  Slowly add the remaining sugar and continue whipping until the peaks are stiff but not dry.

Pour the cooled coffee into the melted chocolate all at once and quickly stir together to prevent seizing.  If it does thicken and start to separate, don’t worry.  Constant stirring will make it smooth and creamy.

Lighten the chocolate mixture by folding in one-third of the yolks.  Then add the lightened chocolate mixture to the remaining yolks and gently fold.  The mixture will become light and airy with large air bubbles where some traces of yolk remain.  That’s okay and kind of pretty, anyway.

Lighten the yolk mixture by quickly folding in one-quarter of the whites, then gently fold in the remaining whites in 3 parts, trying not to over mix and lose the volume.

Pour the glossy dark chocolate batter into the prepared pan, smoothing the top.  The pan will be more than three-quarters full.  Bake for 20-25 minutes, until the top is slightly domed in the center and dry to the touch.  A tester inserted will come out dry and clean with a few crumbs.  Let cool in the pan at room temp.  The layer will pull away from the sides of the pan as it cools.

Have ready the Cappuccino Whipped Cream filling in the fridge.  Remove the cooled cake by running a thin bladed knife around the edges of the pan.  Place the bottom of the baking sheet lined with parchment over the cake and invert.  Peel the parchment paper off.

Using a ruler and the tip of a paring knife, mark the cake into 3 equal sections across the width.  Cut the cake with a serrated blade to make 3 layers about 4 inches wide each.

Place one chilled cake layer on a serving plate.  With a metal spatula, spread one third of the filling over the layer, generously overlapping the edges.  Repeat with second layer and a layer of filling. (The layers should be equal in height to each other.)  Top with the last chilled cake layer.  Be careful not to overwork the cream and frost the top and sides.  Refrigerate at least 4 to 6 hours to set the cake an meld the flavors.  Before serving, dust with cocoa powder.  Can be stored in the fridge for up to 2 days (or a week, if you’re us)

Variation: to make this child-friendly(er): just omit the espresso from the whipped cream.

Cappuccino Whipped Cream
makes 3 1/2 cups

1/4 cup plus 2 tbs sugar
3 tbs brewed espresso
2 cups heavy cream, chilled

In a stand mixer fit with the whisk attachment, whisk together the sugar and coffee until frothy.  The sugar will begin to dissolve.  Add the cream and whisk until thoroughly combined and soft peaks form.  Take care not to over whip the cream as it may begin to lose its creamy texture.  Store in the fridge till ready to use.

cappcake2

A First Birthday Cake

olive-00171

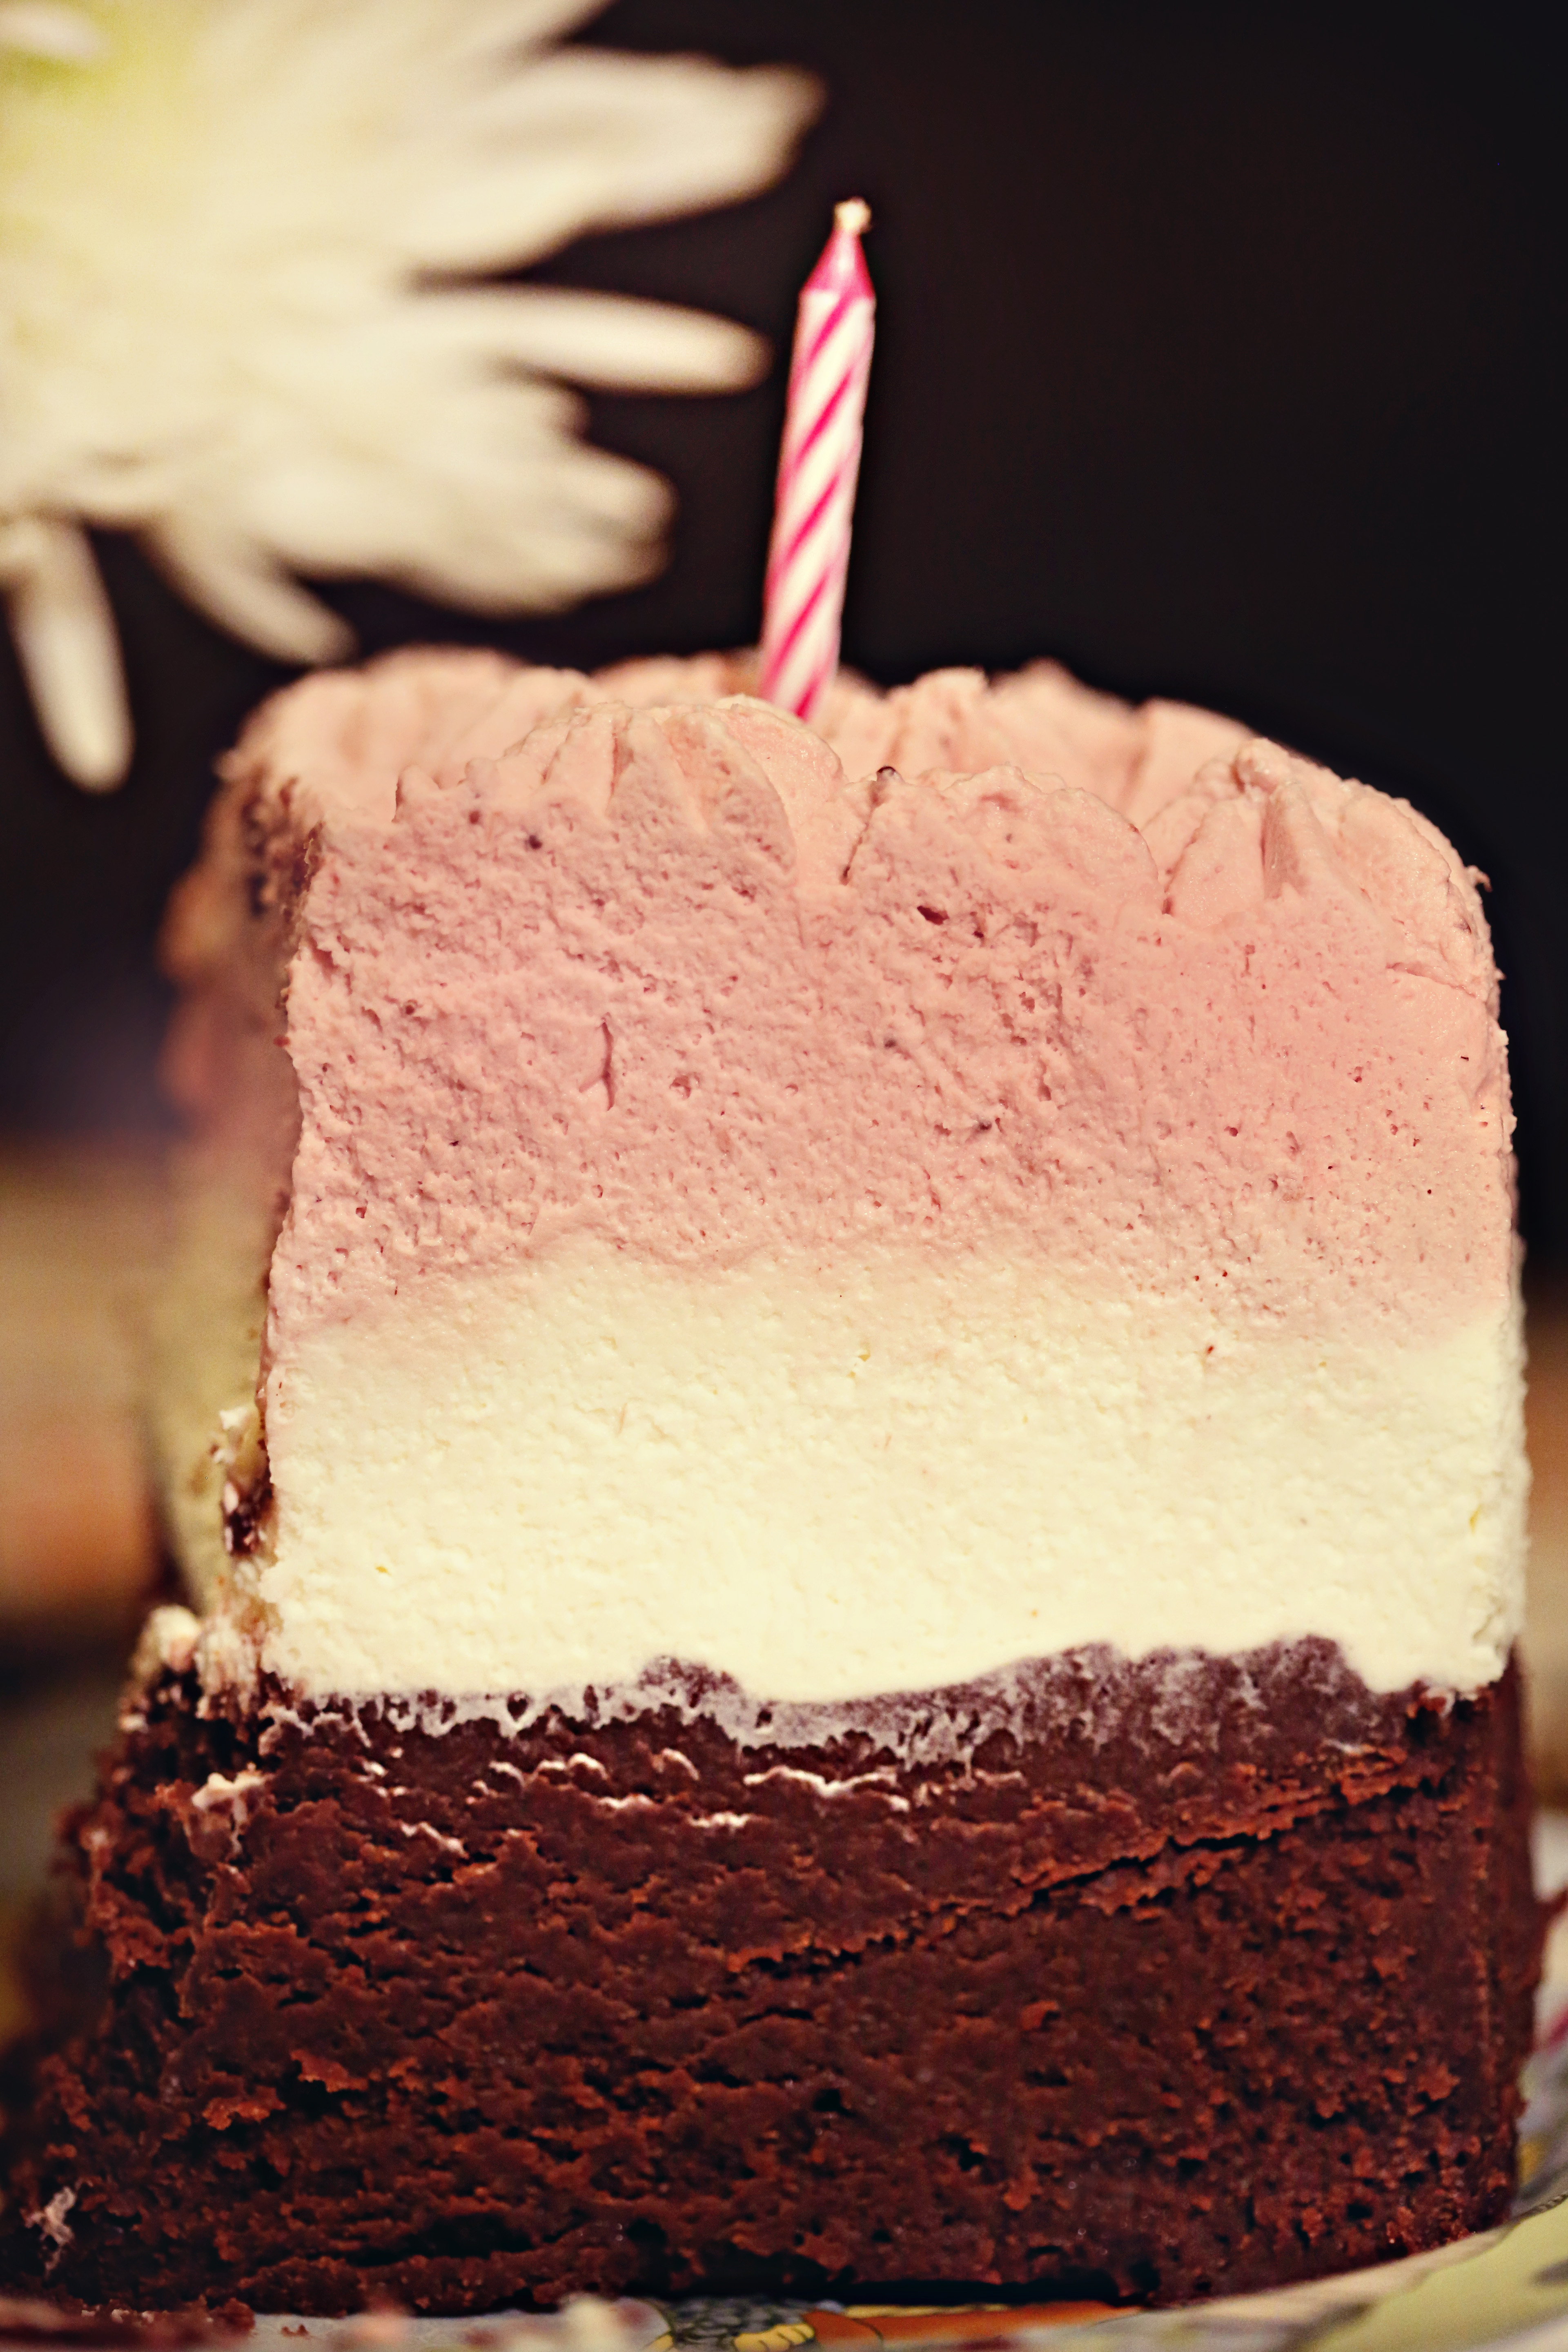
Exactly one year ago, this pic was taken.  Olive was just 6 days old and we were home, out on our porch, having a glass of wine and marveling at this red headed little girl in our arms.  Matt made a birth DAY cake that we had when we got home from the hospital with friends and family to celebrate her actual birth and the only thing that changed this year was the cake and the size of the red head.

482407_10151518156698265_1304279150_n

We’ve had such a wonderful year with Olive.  It’s been amazing to watch her discover things, develop likes and dislikes (kitties, peas – respectively) and one of the most enjoyable activities in my life this year has been showing her food.  It’s crazy to realize that these little creatures don’t know what ANYTHING is.  They don’t know a peach from a mango from a pear from a plate of spaghetti.  They don’t know how garlic smells while roasting or the magic that is mire poix sizzling away in butter.  It’s our JOY to get to show them!  For

“…no matter what they think, we know: We are the ones who have tasted and seen how gracious it all is.” 

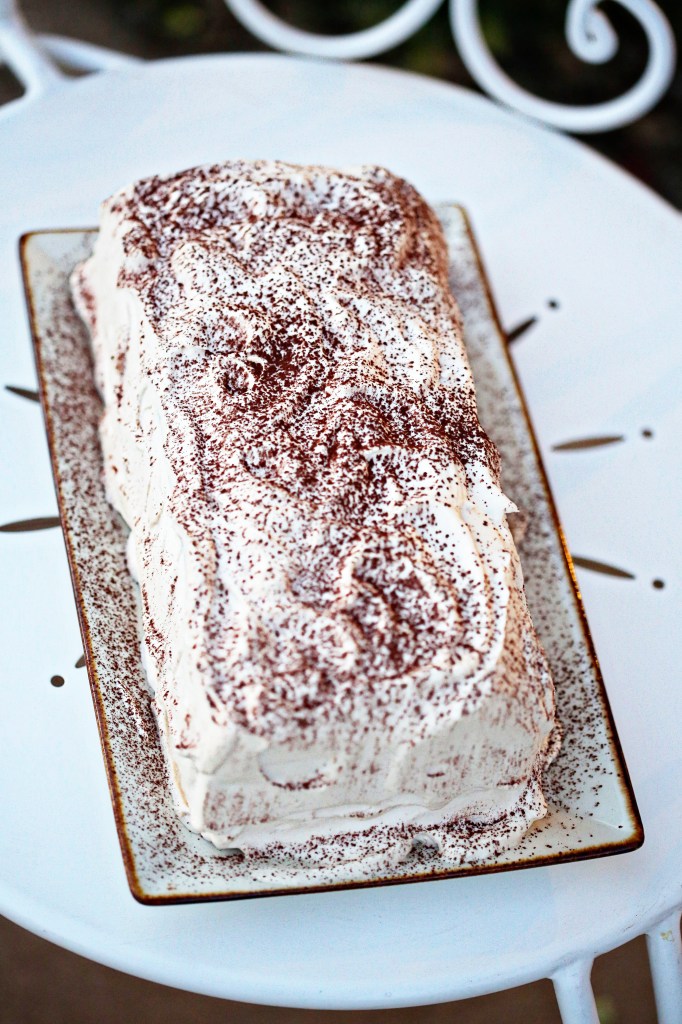
In this spirit of education, Matt and I contemplated what we wanted Olive to try for her first birthday.  She’d had many fruits so I considered a lemon layer cake, strawberry shortcake, something with banana cream.  Matt really wanted her to have chocolate for the first time and REALLY GOOD chocolate, at that.  So we combined forces and created a Neapolitan-esque cake with a flourless chocolate cake as the base, a white chocolate mousse in the middle and topped with a thick, strawberry whipped cream.  The chocolate cake is by far the best chocolate “cake” I’ve ever had.  Taken from the brilliant Dave Lebovitz, it’s nearly like a truffle center, or the best fudge of your life.  The white chocolate mousse was taken from Annie’s Eats, which I’d used on a cake for Matt for Valentine’s day this year, which he was crazy about.  And then the strawberry whipped cream was just a last minute sort of creation by me for Olive.  Because she loves strawberries and I figured if she didn’t like the rest, she’d at least like a third of her cake and we wouldn’t look like complete fools when it came show time.

Olive's Birthday Cake

For the bottom layer, Matt baked it in a 9″ round cake pan.  We had a hard time getting the cake out (panic moment) and so I crumbled it all up and pressed it tightly into a spring form pan.  Then I lined the pan with a couple layers of acetate strips, stacked on top of each other and taped on the outside, to get that tall form for piping in the other two layers.  All you do is pipe in the white chocolate mousse on top of the chocolate cake, let it sit in the fridge while you make the whipped cream, and then pipe in the whipped cream and wrap plastic wrap across the top of the tube so it doesn’t dry out and let it sit in the fridge over night, or for an hour in the freezer.  This makes it much easier to cut.

Chocolate Cake (Orbit Cake)

14 tablespoons unsalted butter, cut into 1/4″ cubes, plus more for the pan
10 ounces 62% semisweet chocolate, finely chopped (our FAVORITE dark chocolate, which we exclusively used for this cake, is Lindt’s 70% dark chocolate bars.  Heaven.)
5 large eggs
1 cup granulated sugar

Position rack in the middle of the oven and preheat to 350F. Lightly butter a 9×2″ round cake pan and line the bottom with parchment paper (if you do this easy step, you won’t have to mush it all into a spring-form pan like I did.)
Place the butter and chocolate in a glass bowl and microwave at 30 second increments, stirring after each, until the chocolate is completely  melted, glassy, and incorporated with the butter.
In a large bowl, whisk together the eggs and sugar.  Gradually whisk in the melted chocolate mixture and continue whisking until thoroughly combined.
Pour batter into the prepared pan.  Place the pan in a larger roasting pan, and cover the top of the cake pan with foil.  Add enough hot water to the baking pan to come halfway up the sides of the cake pan and bake for 1 hour and 15 minutes to 1 hour and 30 minutes until the cake has set.  To test, touch the center of the cake lightly with your finger: the surface will be slightly tacky, but your fingers should come away clean.
Carefully remove the cake pan from the water bath and place on a cooling rack to cool completely.
Cover the pan with plastic wrap and refrigerate for at least 2 hours – up to 3 days.
To assemble with the mousse, run a knife around the edges of the cake to loosen the sides.  Invert onto a serving plate, wrap in the acetate strips (or wax paper – tape doesn’t stick to parchment) and get on with making the next step.

White Chocolate Mousse

1 1/2 tsp powdered gelatin
2 tbs water
12 oz white chocolate chips (don’t use almond bark – it won’t taste right)
3 cups heavy cream

Sprinkle the gelatin over the water in a small bowl and let stand at least 5 minutes to soften.  Place the white chocolate in a medium bowl.  Bring 1 cup of the cream to a boil in a small saucepan.  Remove the pan from the heat, add the gelatin mixture and stir until dissolved.  Pour the hot cream mixture over the white chocolate and let stand about 1 minute.  Whisk until the mixture is smooth.  Cool to room temperature, about 5-8 minutes, stirring occasionally.

In the clean bowl of a stand mixer fitted with the whisk attachment, whip the remaining 2 cups of cream at medium speed until it begins to thicken.  Increase the speed to high and whip until soft peaks form when the whisk is lifted.  Using a whisk, mix one-third of the whipped cream to the white chocolate mixture to lighten it.  Fold in the remaining whipped cream gently with a rubber spatula until no streaks remain.  Spoon the white chocolate mousse into the pan over the chocolate cake.  Smooth the top with an offset spatula.

Strawberry Whipped Cream

1 jar of strawberry jam – the fancier the better
3 cups heavy cream

Scrap the jar of jam into a small saucepan over low heat and add about 1/4 cup of water.  Heat it just enough so that it incorporates with the water and you break up any lumps with a whisk and the jam is smooth.  Transfer it to a bowl and let it cool about 30 minutes, stirring occasionally to help it cool.
In a stand mixer with a whisk attachment, stir the cream on medium for a while until it starts to thicken.  Then whip on medium high while you gently let the jam stream into the edge of the bowl, careful to not hit the whisk in the middle, until completely incorporated.  Whip until a little firmer than soft peaks.  At this point, I added a little red food coloring (just a few drops) to make it more pink and folded it in with a spatula until fully incorporated. Do what you will with that.  I just wanted it to be pink to truly look Neapolitan. Transfer cream to a piping bag fitted with a large star tip and pipe, pipe, pipe until you can’t pipe any more.  Have fun with it.  Make zigzags and peaks and star flowers – whatever you want.  Just fill in all the gaps and sprinkle the top with extra crunchy sugar for effect.

serves at least 20