Fish Sticks and Sticking to Your Guns

fish and taters001

The method is working.  We have a few food rules when it comes to feeding Olive and ourselves.  All these thoughts are fueled by the game-changing book, “French Kids Eat Everything“.  I highly recommend it if you find yourself stressed that your kid eats a limited selection of foods.  Babies don’t know snacking exists.  They learn it soon enough from peers and tv and observing adults who randomly nibble throughout the day, but in the formative first couple years of life where you have most of the control over what your baby consumes, you can show them a different way.  And maybe even learn to eat better, yourself!  Olive gets one snack a day. Yes, she’s 15 months old (almost) and only snacks once a day. (And it’s a good one! Something fun and really tasty. Usually a piece of fruit or some dark chocolate and bread with milk.  You gotta make it something they look forward to.)  It’s in between lunch and dinner, because that’s the longest stretch without food.  We also have to emulate this discipline for her.  How would it be fair to snack in front of her without including her?  And if I want her to be hungry enough at a meal to be willing to try something new, well darn it, she needs to not have eaten a snack an hour before dinner!  Makes sense to me and it seems so obvious, yet so few do it.  We should all eat this way!  Hunger is a discipline that too few of us experience. And the discipline is learned before the age of two.  It can be learned if started after two, but it’s just so much harder (think: excessive whining).

We’ve even pushed dinner back to 7:30 the past few nights and she has eaten EVERYTHING.  Whereas before, I was serving dinner at 6:30 and it was a fight to get her to eat for 10 minutes straight (she’d had her snack just two hours before and had drank milk in between, so, consequently, she was only mildly interested in dinner.)  Eating an hour later has been a transformation –  she ate marvelously and ate everything from fish to broccoli to berries to a nice piece of Manchego (the King of Cheese).  So, it’s working!   The next day, she ate like a bird and acted like bananas were the devil (a  former favorite). Even if she has days like that, I try to remind myself that she will not starve and that maybe she’ll eat more at the next meal (this is SO hard.)  This structure of eating has made my days better, too.  I don’t have to constantly find something for her to eat.  Other than her snack, we’re all eating at the same time.  This will get harder as she gains the ability to ask for things and tell me she’s hungry.  I’ll tackle that problem when it gets here.  Hopefully between now and then, she’ll form the habit of knowing when food is served and being willing to wait till we can all sit at the table together for the family meal.  Also, because she eats so much quantity at each meal, she’s often not even that hungry until about 30 minutes before the next meal. So waiting for the meal is as simple as distracting her with playing in another room with Matt, or just including her in the cooking process like holding the herbs, or a peeled carrot, or whatever.  She sits on the counter a lot 🙂

The recipes today come from two cookbooks.  The fish recipe came from Tyler Florence’s book, Start Fresh, which is an absolutely wonderful book filled with recipes I would be just as happy eating as I would serving them to a toothless baby or toddler.  Toward the end of the book, there are recipes for the whole family to share.  My wonderful friend, Becky, sent this cookbook to me as a gift to me and Olive, and she put sticky notes all throughout the book with comments she made about which recipes looked good, which she wanted to try, etc.  It made me miss her so much and long for my genius-in-the-kitchen friend to be beside me, cooking and enjoying these recipes with me.  I’d recommend doing that to any cookbook you buy for someone – it just made it seem like she was here with me as I looked through it.

The tartar sauce recipe comes from the Bonne Femme cookbook and I swear to you, this is THE best tartar sauce I’ve ever had.  It puts every other tartar sauce to shame.  Makes them seem like a joke.  Like mayo with pickles.  This has tang and zip and crunch and so much flavor, I really will never feel satisfied eating any other tartar sauce, ever again.  (Dramatic, much?)  I’ve made two batches since last week and turned the latest batch into a potato salad.  Amazing.  You can’t go wrong with these recipes and I feel that this would even be an acceptable meal for a kid who does not like everything.  Surely on this plate, any kid could find SOMETHING they were happy to eat!

fish and taters004

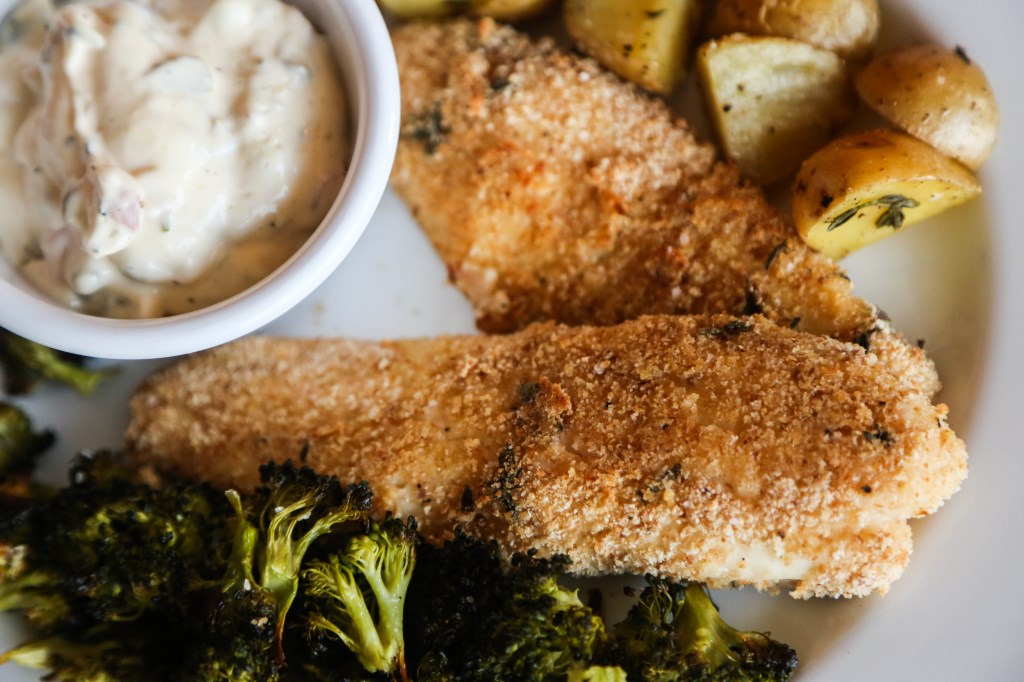
Oven Baked Fish Sticks with Roasted Potatoes
serves 4

1/2 cup buttermilk
1 lb cod or tilapia fillets, cut into 1 inch wide fingers
1 cup panko breadcrumbs (I ran out of panko and used plain and it worked fine)
2 tsp fresh thyme leaves
Salt and freshly ground pepper
1 lb assorted baby potatoes, scrubbed and quartered
2 tbs olive oil

Preheat the oven to 400F.  Line two rimmed baking sheet with parchment paper.

Pour buttermilk into a large bowl.  Add the fish pieces and turn to coat.  In another bowl, stir together the panko, thyme, and salt and pepper to taste.  Dredge each fish finger in the breadcrumbs to coat completely and arrange on a baking sheet.

Combine the potatoes (and broccoli pieces, or asparagus or green beans – whatever other green veg you want!) in a bowl and drizle with the oil.  Toss to coat thoroughly, then arrange the vegetables on the other baking sheet.  Bake the fish and vegetables, turning once, until the fish fingers are golden, about 15 minutes.  The potatoes may need longer.  If so, simply take the fish out when they’re done and tent with foil to stay warm.

Serve fish (and potatoes, really) with tartar sauce!

fish and taters012

fish and taters005

Tartar Sauce
makes about a cup

3/4 cup high-quality mayonnaise (we think, aside from homemade, that Hellmans REAL mayo is the best.  No low-fat or miracle whip crap.)
2 tablespoons chopped cornichons (small sour French pickles)
1 small shallot or 1 scallion (white part and some tender green tops), minced (about 2 tablespoons)
1 tablespoon finely chopped fresh parsley or fresh parsley and chives
2 teaspoons Dijon mustard
2 teaspoons capers, drained and chopped
2 teaspoons white wine vinegar or fresh lemon juice
2 teaspoons finely chopped fresh tarragon or chervil
Salt and freshly ground black pepper to taste

In a bowl, gently fold the mayonnaise, cornichons, shallot, parsley, mustard, capers, vinegar, and tarragon together (don’t mix too vigorously, or your sauce will be too smooth). Season with salt and pepper. Cover and refrigerate for at least 1 hour, and preferably 2 hours, before serving. Store, covered, in the refrigerator for up to 1 week.

fish and taters008

Food Memories: Chicken n’ Noodles

food-7

Many of us have memories of being little and watching our moms or dads or grandmas cook or bake for the family.  The first memory that comes to mind for me is watching my mom cut out biscuits with an old green chili can she had cut the top and bottom off of (it’s the perfect biscuit size!) and then slap each side of the biscuit in vegetable oil, then slide the disc in line with the others to fill up an entire pizza pan.  There is something methodically calming about watching someone cook.  I always felt like I was helping, even if I never touched anything.  I felt involved, because mom let me stand there or sit on the counter across from her and talk to her while she worked.  I will always be thankful that she let me hang around the kitchen.  She was always so busy doing a thousand things for our family that it was the one moment when things were somewhat calm and we could just be together and I could count on it every night because I (thankfully) had a mom that cooked dinner 6 out of the 7 days of the week.  You really can’t replace that kind of experience with anything else.  Those memories stick.

My dear friend, Louise Shoemaker, shared a memory and a meal with me last week that seemed so fitting for my blog and for what I love about cooking for my family and eating together.  She is one of the best writers I know, (she was my 10th grade English teacher – how lucky I am to still be friends with her!) so I asked her to write a little blurb about the recipe and the memory that went along with it.  My favorite part about this recipe was consulting her every 5 minutes to make sure I was doing things right.  She had driven up to Lubbock for the day and ate this meal with us!  I’d never made noodles from scratch, and technically, neither had she, but she’d watched her mother so much that she knew.  Here is what she had to say about the chicken noodle soup that made a permanent home in her memory:

RGBBounce
L
ouise and her Mother

It’s funny that a food memory starts with a sharp, clear visual. The bright yellow Pyrex bowl and the red-handled Daisy egg beater swirling the rich gold of fresh yolks. I’ll never forget the 50’s color scheme of the kitchen: pink walls, turquoise cabinet doors, chocolate brown trim. I can still see the white enamel-on-steel kitchen table and my mom in her long, slim dress with the apron tied smartly and the scarf pulled back over her careful bobby-pin curls. It’s as clear in my eye today as it was in those days 50-some years ago.

It must have been a Wednesday. Two days until payday and five mouths to feed on a budget stretched to the last nickel. So, a plump (cheap!) boiling hen, a dozen eggs, a pile of flour, a splash of water, and we knew we’d make it till Friday.

Chicken’n Noodles: made-from-scratch pasta boiled in rich, fresh stock, with chunks of chicken so tender it fell off the bone. A silky thickened sauce, glistening with a bit of butter, and thick, rustic slabs of slightly chewy noodles curling on a plate. YUMM!

The aroma of that meal is the smell of childhood, and it takes me right back there to that kitchen watching my mom pour the beaten eggs into the crater of the flour volcano and mix and knead and roll the dough out to a four-foot circle. I can see her boning a mountain of chicken, dropping heaping handfuls of raw noodles into bubbling broth. Cooking this meal was a production, an infrequent event. I’ve savored the memory of Chicken and Noodles for decades. It was amazing to re-create it with Alisa. And Olive.

I like to think of them cooking together for years to come, Olive sharing with her mother an experience so rich and elemental and, in today’s environment, rare. You’re a lucky (impossibly adorable) munchkin, Ollie! And your mama is pretty awesome, too!

food-6

I am giving you the recipe I did – I only added a few things to the stock, the rest, I followed Louise’s mom’s story-like recipe as best I could.  With pointers from Louise along the way…

Chicken’n Noodles

For the stock:
1 chicken, cut into pieces (8 pieces, bone still in: wings, breasts, legs, thighs)
Water
Salt
1 onion, chopped into quarters
3 carrots, chopped into thirds
2 bay leaves
3 sprigs of thyme

Put the chicken pieces into a large stock pot and cover with water until covered by about 2 inches.  Add a couple tablespoons of salt along with the onion, carrot, bay leaves and thyme.  Bring to a boil, skimming any foam off the top as it comes.  Reduce to a simmer and maintain a simmer (I left my burner on about a 3-4) for 1 and a half to 2 hours.
Remove the chicken from the pan and let it cool.  Then, remove skin, bones and any fat that remains.  Chop or hand-shred the chicken and set aside in a bowl in the fridge while you make the noodles.  Skim the stock of as much fat as you can, but don’t fuss too much.  Remove the carrots, onion and herbs and discard so you’re left with a (mostly) clear broth.  Keep the broth at a simmer with the lid on while you make the noodles.

For the noodles:

3 eggs
a big ol’ mound of flour (maybe 4-6  cups)
salt
elbow grease

Pour a mound of flour on a clean work space and create a hole in the center, volcano-style.  Make it deep enough so that when added, the eggs don’t spill over the side. Leave flour on the floor of the volcano so you can’t see your counter.  Crack the eggs into the hole and with your hand or a fork, whip up the eggs, incorporating flour as you go from the sides.  You won’t use all the flour, of course.  Keep incorporating flour to the eggs, stirring all the while, until you are left with a ball of dough that isn’t very sticky anymore.  Knead the ball for a good 10 minutes until you’re left with a very smooth ball of dough.  Trade off with a friend if you get tired:

food-1 food-2

Clean your hands and insert your finger into the center of the dough.  If it comes back super sticky, add more flour and knead some more.  Cover your dough with a towel and let it rest for 10 minutes.

food-3

Clean off your work space and if you’ve worked clean, you can save most of the flour you didn’t use.

Roll out the dough on a lightly floured surface till it’s an 1/8th of an inch thin.  Or thinner.  You may need to let the dough rest a few times throughout this process because it will start to shrink back up.  Once you get it thin enough, cut it into whatever shapes you like.  I chose squares because I have a kiddo that needs everything cut up, anyway.  Louise remembers her mom cutting looooooooong, thick strips, which would be wonderful, too.  You could even get cute and cut out little shapes from tiny cookie cutters.  Once you get all the dough cut, make sure each piece is coated in flour and bring at least a cup more flour with you to the stove to boil and put this dish together.

Making it Into Soup:

Get your stock to a rolling boil.  Dump your noodles in a handful at a time until they’re all in the pot, stirring as you go so they don’t stick.  This is the vague portion of our program.  Once the noodles are al dente, add the chicken back in and bring it back up to a simmer over medium-low heat.  While stirring, add a sprinkling of flour – maybe 1/4 cup – and stir until fully incorporated.  Keep adding flour till a good consistency is reached.  You’re wanting an opaque sauce that’s neither soupy nor gravy – somewhere in the middle.  If it coats the back of a spoon, it’s probably ready.  Adjust the seasoning with salt until it sings of chicken goodness.  Ladle up, top with a good sprinkle of freshly ground black pepper and enjoy.  We had ours with a wonderful Chardonnay and some crusty challah bread with butter.  Really – it does NOT get better than that.  The baby went crazy for this soup, too, and ate her entire bowl, plus some of ours.

food-5

food-4

Creamy Rice with Peas and Asparagus

pea asparagus rice

There is a beautiful quarterly cookbook/magazine called Canal House cooking.  It is founded by two friends who meet together every day to talk about what they had for dinner the night before, and then they get cooking.  They decided to start writing down their recipes and what resulted was this beautiful magazine book.  I like to try recipes out that are in season, and so I am currently going through their Spring issue.  And even though there aren’t a  lot of fresh peas in our produce bins, I know that they are currently in season somewhere out there in lands where it rains, so I felt this was still an appropriate recipe for an overcast May day.  Asparagus is also in season, so I added some chopped up that I had roasted a few nights before and it was a really excellent addition.  Canal House calls this dish Risi E Bisi  (rice and peas) and it’s just that simple.

This is an excellent dish for little ones.  The comfort of soft rice and cheese and the addition of greens and a dab of butter makes this dish all-inclusive. For smaller, toothless ones, this would be so simple to pulse a few times with an immersion blender!  Olive still doesn’t like asparagus, but I think I’ve only given it to her 5 times.  I’m going to try at least 15 more times before I determine that she does not, in fact, love asparagus.  I challenge any  mom out there to do the same!  Case in point: I had nearly determined that Olive didn’t like peas until I hadn’t given them to her for a week or so, and then tried again and she gobbled them up.  I realized that familiarity equals good for a child.  So if you make a wide variety of vegetables simply familiar to a child, the enthusiasm will soon follow.  I believe this with all my heart, even on days where Olive spits out anything green.  One day she won’t, and I’ll be glad I didn’t let her under-developed, under-exposed palate determine her food preferences!

green rice

Creamy Rice with Peas and Asparagus
serves 6

2 tbs extra virgin olive oil
4 tbs butter
1 onion, finely chopped
2 cups fresh peas (you could also use frozen, as I did and it turned out great)
salt
6 cups hot chicken or vegetable stock
1 1/2 cups arborio rice, or other short grain rice.  I didn’t have any on hand, so I used plain long grain white and it was just fine.
1/2 cup freshly grated parmigiano-reggiano
pepper to taste
1 bunch asparagus, roasted at 400 with olive oil, salt and pepper until tender

Heat the olive oil and 2 tbs of the butter together in a heavy medium pot over medium heat.  Add the onions and cook until soft and golden, 5-10 minutes.  Add the peas and season with salt.  Cook for a minute or two, then add 1 cup of the hot stock.

Cover the pot, reduce the heat to medium-low, and simmer the peas until they begin to soften, about 5 minutes.

Stir in the rice and 4 cups of the remaining hot stock. Cover the pot and adjust the heat to maintain a gentle boil.  Cook the rice, stirring occasionally, until tender, about 20 minutes.

Remove the pot from the heat and moisten the rice and peas (if needed and too thick) with the remaining cup of stock (I didn’t do this step – my rice didn’t absorb as much as arborio would have) Stir in the remaining 2 tbs of butter and half of the cheese.  Fold in the chopped, roasted asparagus if you want.  Season with salt and pepper and serve sprinkled with remaining cheese.

The Ultimate Meatball and Taking Food to a Friend

meatball and marinara

We’ve been on the receiving end of food donations twice in our life and both times, we were touched by others’ thoughtfulness, great recipes and the comfort that was passed to us through the dishes they made.  It takes a bit of humbling to bring food to someone who can’t cook for themselves, or simply don’t want to or don’t have the time.  You worry if they’ll like what you made.  You worry if they will critique the preparation or that you brought store-bought cookies instead of homemade.  If I could only convince you that anything you bring is wonderful and welcome, I would.  If they can’t eat it right away or they have duplicates, they can freeze what you brought!  To worry too much about what to bring, or to worry the recipient about what you brought, shifts the focus off the deserving and on to you.  Keep the focus where it belongs, ask if they have any requests or food allergies, and get cooking!  Homemade is always nice, but I will admit, I did not turn away store-bought cookies, chocolate or coffee! 🙂

My wonderful, life-long friend, Summer, had her second baby almost two weeks ago.  A beautiful, darling girl!  I immediately began to think of what I would bring for Summer and Phil to eat.  Summer is my food buddy.  I trust her cooking as much as my own.  Her sense of taste is far beyond most people, almost to a fault.  We used to live together in college, and I think one of our first food-bonding moments was throwing chicken patties off the balcony of our apartment because they were just so disgusting.  They were pre-cooked, breaded chicken patties and they tasted like…gray.  Or sweat.  It wasn’t good.  We both were actually offended.  How could you screw up a breaded piece of chicken, and worse, sell it to poor college students?! In our act of defiance against badly cooked food, we became unofficial food critics in our own right.  We were each other’s taste-testers. A favorite game throughout our friendship is Guess the Ingredient! in which we excitedly wait while the other tastes and see if they guess right.  I love that no matter what time of day, I can text Summer a description of something I made or want to make, and she will react with an appropriate amount of shock, enthusiasm and awe.

We joke that Summer always says her FAVORITE thing in the ENTIRE world is whatever I last cooked for her.  True to the accusation, I asked if she had any requests for what I could bring for them, and she requested the last meal I made for her, which was the BEST meatball recipe I’ve ever run across.  It’s tough to get a meatball right.  They can be too dry or too mealy or rubbery from being over cooked, or simply too greasy.  This recipe is perfect.  And even more perfect, it came to me via fashion designer, Michael Kors in his appearance on Martha Stewart Living.  So they’re both delicious AND fashionable.  Win-win.

The secret ingredient to these meatballs is the water.  Smooshing all these ingredients together, especially with the water, is not for the faint of heart.  My mother would die a thousand deaths before making this recipe.  She has a thing with texture.  However, I like playing with my food, so it’s rather enjoyable for me.  The meat mixture is very delicate, so be gentle as you turn them while cooking.  I usually use two spatulas to help me turn them without smashing them apart.  Getting a good crust on each side is key.  Then, there will still be a slight crust, even after they’ve stewed in the sauce for a while.  Oh, and serving this with spaghetti is up to you. It’s not tradition – the Italians eat their meatballs in a bowl with crusty bread.  But, the recipe makes enough sauce that even after we finish up the meatballs, I have plenty of sauce left to toss with noodles the next day.  Olive absolutely adores these.  She ate two, 3 inch meatballs by herself before slowing down.  They are so soft, you could easily smash it up for a little one.  And they get better the next day!

meatball

Frankie’s Meatballs in Rao’s Marinara Sauce

  • 1 pound lean ground beef
  • 1 pound ground pork
  • 1 1/2 cloves garlic
  • 2 large eggs
  • 1 cup freshly grated Pecorino Romano cheese
  • 1 1/2 tablespoons chopped fresh Italian parsley
  • Coarse salt and freshly ground pepper
  • 2 cups plain dry bread crumbs
  • 2 cups water, room temperature
  • 1 cup olive oil
  1. In a large bowl, combine beef and pork using your hands. Mince 1/2 clove garlic and add to meat mixture along with the eggs, cheese, and parsley; season with salt and pepper. Continue mixing with your hand until well combined. Add bread crumbs and mix well. Add water, 1 cup at a time, and continue mixing until mixture is quite moist.
  2. Shape mixture into 2 1/2-to-3-inch balls. Heat oil in a large skillet over medium-high heat. Smash remaining clove of garlic with the back of a knife and add to skillet. Cook until lightly browned and fragrant, 1 to 2 minutes; remove with a slotted spoon and discard. Working in batches, add meatballs to skillet. Cook until browned and cooked through, turning, about 10 minutes. Drain on paper towels and serve immediately.
  3. Meanwhile, bring marinara sauce to a boil in a large nonreactive saucepan. Reduce heat to a simmer and add meatball. Let meatballs cook in sauce about 20 minutes; serve immediately with pasta, if desired.

Rao’s Marinara Sauce
Makes 7 cups

  • Four 28-ounce cans whole tomatoes with basil, preferably San Marzano
  • 1/2 cup olive oil
  • 6 tablespoons minced onion
  • 4 cloves garlic, peeled and minced
  • Coarse salt and freshly ground pepper
  • 12 leaves fresh basil, torn (optional)
  • Pinch of dried oregano
  1. Remove tomatoes from can and place in a large bowl, reserving juices. Crush tomatoes using your hands; remove and discard the hard core from stem end, and any skin and tough membrane; set aside. (Wear an apron and keep your hand submerged as you crush.  This is messy business, but kind of therapeutic  .)
  2. Place oil in a large, nonreactive saucepan over medium-low heat. Add onion, and cook until soft and just beginning to brown, about 3 minutes. Stir in garlic, and cook until softened, about 30 seconds. Stir in tomatoes and reserved juices; season with salt. Increase heat and bring to a boil. Immediately reduce heat to low and simmer until slightly thickened, about 1 hour.
  3. Stir in basil, if using, oregano, and season with pepper; continue cooking 1 minute more. Remove from heat and serve.

*Recipes taken directly from Martha Stewart Living.  They can not be improved upon.

frankie's meatsauce