Asparagus Tart – Roasting is still the best way to eat vegetables

asparagus tart 3

I know I said I’d write about what got the most requests on my question last week, but I haven’t had time to do a good job with the requests I got, so that will come at a later post.  The top requests were for kale.  Honestly, I’m a bit stumped.  What, exactly, is the mystery?  Put it in stuff?  Ha!  That would be my suggestion.  Stir it into soups, toss it in salads and wilt it a bit with warm roasted chicken or hot bacon.  However, I don’t want to be flippant, so I will look up some good uses for kale, the sad-replacement-for-chips, and get back to you.  The other suggestion that intrigued me was for proper hash browns.  My friend, Maria, said that she had tried them several times and hadn’t gotten that good, diner-esque texture to them.  Honestly, I haven’t, either.  So I am interested to look up ways to cook hash browns well and that will most definitely be a post, as it will be a learning process for me, as well.

Today I wanted to simply give you an awesome recipe that we had last night for dinner, as our “starter” dish.  A beautiful use of asparagus (hey, Tracey, you asked for asparagus recipes, too!) and a lovely and exciting way to serve them that feels indulgent (bet you’ve never used that word in association with asparagus) and fun for children, and even doable for one-year-olds learning to eat bigger chunks of food.  Olive ate about 6 bits of this tart and then she was done. I consider that a success.

Having a box of frozen puff pastry in your freezer at all times is a good move.  This stuff can make you look like a fabulous cook in about 20 minutes.  You can top it with anything and bake and have great appetizers, desserts, or a crust for a savory tart, like this one.

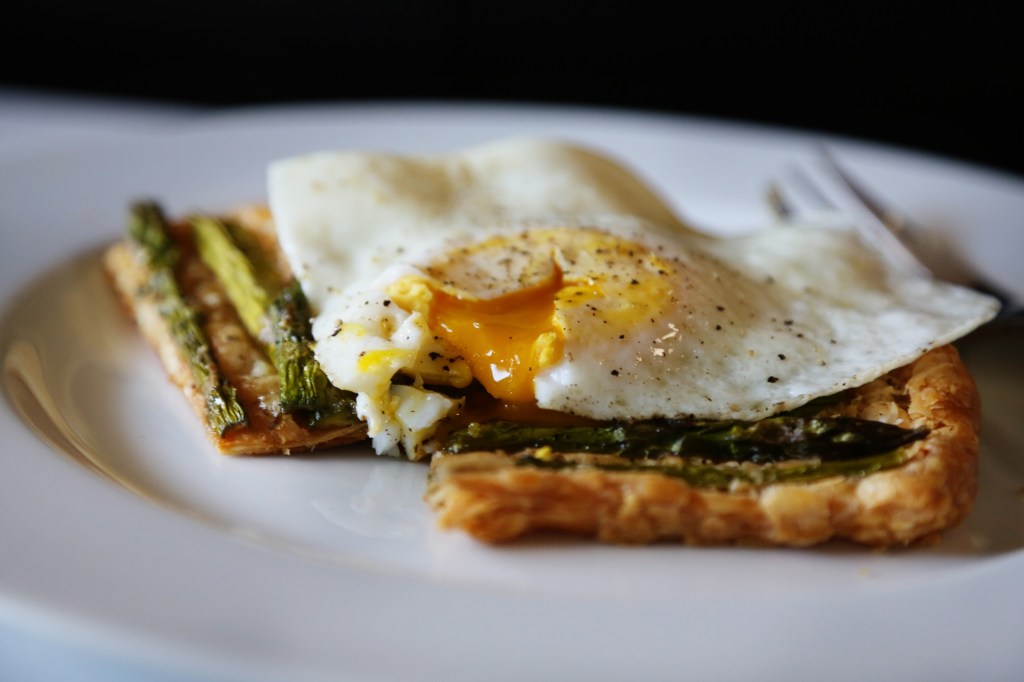
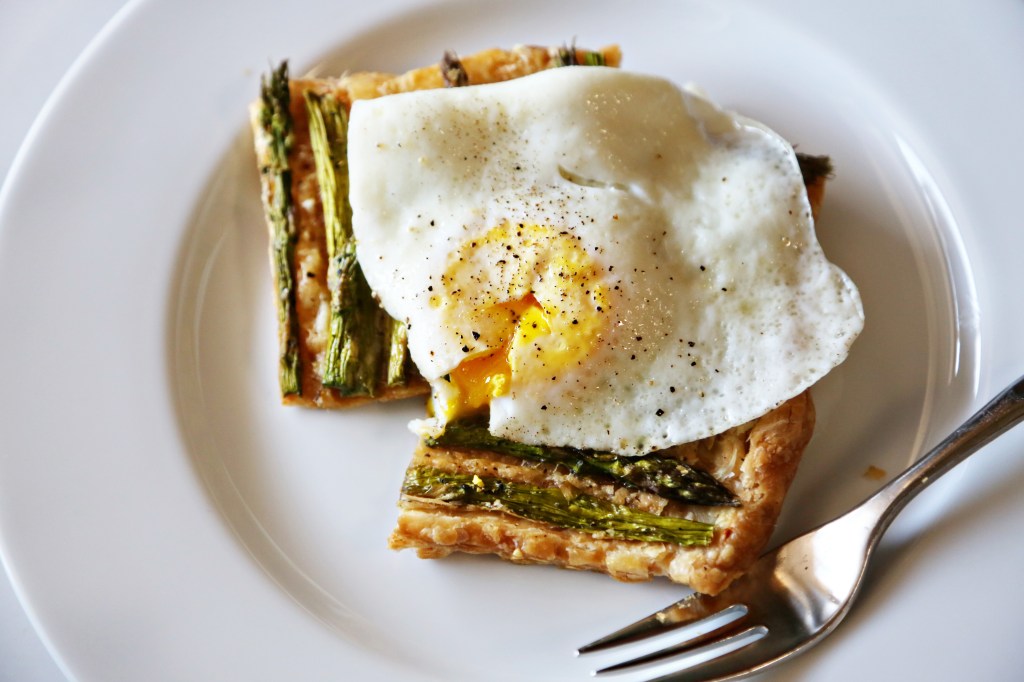
Also, I wanted to mention my deep love and perhaps borderline obsession with using up leftovers.  My goal at the end of most weeks is for my fridge to be empty, save condiments and milk.  It’s good to think of ways to use up your leftovers and I know no better way than to use eggs to achieve almost-better-than-the original-meal leftovers.  This morning, I took leftover pieces of the asparagus tart and fried an egg and put it on top.  Lots of fresh ground pepper and a few drops of hot sauce.  So good.

breakfast2

Asparagus Tart

serves 4

1 sheet of puff pastry, thawed
1 bundle of fresh asparagus, ends snipped and cut in half, length-wise (I found that this helped them cook faster than the original recipe)
Olive oil to coat the asparagus – 2 tbs
Freshly ground pepper and kosher salt
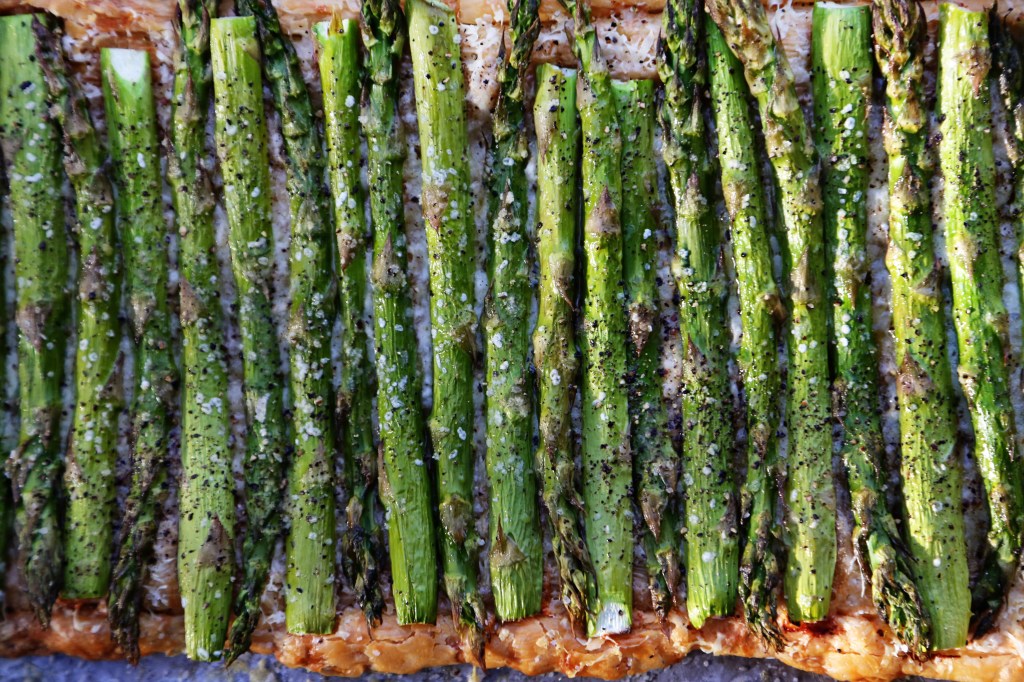
2 oz shredded Manchego cheese – Parmesan or Swiss would also work

Preheat the oven to 400F.  On a greased, rimmed baking sheet, roll out your puff pastry to about 9×13″ rectangle.  Poke all over the bottom with a fork and bake for 15 minutes, until golden.  Toss your asparagus in olive oil. When the pastry comes out, it will have shrunk.  It’s okay, I swear.  Cover the tart in the shredded cheese and lay your asparagus spears side by side, touching, and alternating head to toe (this just makes more asparagus fit and it looks prettier.)

asparagus tart 1


Sprinkle the top of the tart with salt and pepper.  If you have leftover asparagus spears, just place them, cut side down, on the baking sheet around the tart.  They turned out to be gloriously crispy when they came out.  Bake for 25 minutes until the asparagus is nicely wilted and slightly browned.  Let cool slightly, cut with a sharp knife into squares and serve!

In the morning, heat leftovers in a 350F oven and fry an egg to place on top.  Enjoy with a cup of coffee and try not to think about the fact that it’s only Wednesday.

asparagus tart 2

breakfast

*original recipe from Martha Stewart Living

Confession Time and a Side Dish You Never Thought You’d Love

roasted broccoli

I said I’d be honest on this blog and today is just such a post.  Last week, a sweet friend of mine said, ” You are officially one of those moms that makes me question my ability to fully parent and live well/completely.” I wasn’t exactly sure what to do with that comment, but I think I know, now.  It’s time to be honest!  Last week wasn’t good.  Olive got sick on Tuesday with her first stomach bug in her little year on this earth.  It wrecked her appetite, needless to say, and she subsisted for the rest of the week on mostly bananas, bits of bread, small bites of chicken and forced bites of a few benign vegetables like carrots and…carrots.  My little super-eater turned into the “picky eater” kid and even today, isn’t back at full steam.  She plays fine, acts fine, but when it comes to eating – it’s a fight.

I tried my best to stay the course; don’t force her, don’t get stressed, if she doesn’t eat much at lunch, she’ll catch up at dinner – but I was fearful all week that this stomach bug would make her afraid of food, of eating, of trying new things and in one week, all would be lost.  You think I’m exaggerating for the sake of this blog.  I wish I was.  I guess, today, my confession is that I try too dadgum hard to make things go perfectly, and when they don’t, I feel like an utter failure.  Perhaps this isn’t the day to write because last night I slept maybe three hours (my inability to turn my brain off and relax) but I thought about my friend’s comment on my status, and I just wanted to tell her that we only show our best online.  We only write statuses we are either proud of or find ironically funny.  So no one heard all week how scared I was that Olive was sick, or how miserable I felt when she wouldn’t eat a bite all day for a couple days in a row.  And of course I didn’t write statuses about how I got angry with her and made her cry because she kept dropping food off the side of the high chair.  I don’t like writing about that part of life.  The hard part.  The part that makes you question if you’re doing everything wrong and will, inevitably, scar your child when it’s all said and done.  I thought, “How much would everyone love if Olive ended up hating a variety of food just because I want her to love food so much?”  And it’s sad, but I really do feel that most of the people I know would secretly laugh if that happened.  And I can’t say that I blame them.  I’m very passionate about cooking and food and banning “kid-food” and teaching children to eat well and have manners at the table.  I wouldn’t say that I have much camaraderie in that area, at least not locally.  Or maybe I just don’t feel it because I’m not admitting to the hard parts that happen, as well.  I’m only telling you that she ate baby bok choy with fish sauce vinaigrette last week and loved it.  Not that she cried big, fat tears today because I wouldn’t let her hold a fork while she ate (she’d just throw it or poke herself in the face).  Sigh.

Our hard week came to a head this morning as Olive had her one year check up and got 5 shots in her little legs.  So, I made a soup for her for lunch.  Cream of celery, and I pureed the heck out of it so that there’d be no chunks.  I just didn’t feel like challenging her today. She ate fine.  Not as much as last week, but enough.  And I will continue to do what I know in my heart to be best.  Let her be a person with feelings and a new found opinion on things, and try not to force her to like something just because I do.  She’ll come around.  And if today, she only wants the texture of soups and yogurt, then that’s fine.  Maybe tomorrow she’ll eat something more challenging.  The point, I think, is to get back to the heart of what makes food and cooking beautiful: it’s something to be shared.  Eating, first, should be enjoyable.  Not nutritious, not organic – but delicious.  Good for the soul.  Shared with family and friends.  Happy.  Stress-free.  Not another lesson to pass or fail.  I vow to back off in my intensity for success at having a “good eater” a bit and get back to what makes food so amazing.  It’s good.

An incredible way to enjoy a couple of vegetables that might not be everyone’s favorite is first: roast them till they’re a little crispy.  And second: toss them in a vinaigrette!  In today’s recipe, that vinaigrette is one that contains fish sauce and it’s incredible.  I know you wouldn’t typically put “fish sauce” and “incredible” in the same sentence, but you’ll start to once you try this.  Also, it’s from David Chang’s genius book, Momofuku, and I’m pretty sure he’s never made anything bad in his life.  It’s so simple and the vinaigrette recipe makes a lot, so you can save it in your fridge to toss with pretty much any roasted vegetable.  The original recipe called to toss it with roasted brussels sprouts, which is a vegetable most think they don’t like.  But I’m pretty convinced you’re always just one recipe away from liking something you thought you never would.  So!  Try this today and let me know what you think.  Fish sauce can be found in most Asian sections of supermarkets near all the soy sauce, but if you have trouble, you can definitely find it at any Asian mart in town.

roasted broccoli and brussels sprouts


Roasted Broccoli and Cauliflower with Fish Sauce Vinagrette

1 medium head broccoli
1/2 head cauliflower
Olive oil
Salt and pepper to taste
4 tbs Fish Sauce Vinaigrette (recipe follows)

Preheat oven to 400F.  Cut up the broccoli and cauliflower into small, bite sized pieces.  I trim the “trees” in half so that they roast better.  You want to aim to make the size of your vegetables all nearly the same so they cook at the same rate.  Toss in a couple tablespoons of olive oil and spread out on a large rimmed baking sheet.  Don’t crowd the pan.  Put it on two pans if you need to.  Sprinkle with salt and pepper and roast for about 20 minutes, or until they start to get kinda crispy and browned on the edges like in the photo above.  When they’re done, toss in a large bowl with the vinaigrette and serve immediately.  For some reason, broccoli gets cold faster than any other vegetable known to man.

Fish Sauce Vinaigrette

1/2 cup fish sauce
1/4 cup water
2 tbs rice wine vinegar
Juice of 1 lime
1/4 cup sugar
1 garlic clove, minced
1 to 3 red bird’s-eye chilies, thinly sliced

Combine everything in a large mason jar with a tight fitting lid.  Or any container with a tight fitting lid that won’t leak.  Shake it all around until the sugar dissolves.  Keep in the fridge for up to a week.

A First Birthday Cake

olive-00171

Exactly one year ago, this pic was taken.  Olive was just 6 days old and we were home, out on our porch, having a glass of wine and marveling at this red headed little girl in our arms.  Matt made a birth DAY cake that we had when we got home from the hospital with friends and family to celebrate her actual birth and the only thing that changed this year was the cake and the size of the red head.

482407_10151518156698265_1304279150_n

We’ve had such a wonderful year with Olive.  It’s been amazing to watch her discover things, develop likes and dislikes (kitties, peas – respectively) and one of the most enjoyable activities in my life this year has been showing her food.  It’s crazy to realize that these little creatures don’t know what ANYTHING is.  They don’t know a peach from a mango from a pear from a plate of spaghetti.  They don’t know how garlic smells while roasting or the magic that is mire poix sizzling away in butter.  It’s our JOY to get to show them!  For

“…no matter what they think, we know: We are the ones who have tasted and seen how gracious it all is.” 

In this spirit of education, Matt and I contemplated what we wanted Olive to try for her first birthday.  She’d had many fruits so I considered a lemon layer cake, strawberry shortcake, something with banana cream.  Matt really wanted her to have chocolate for the first time and REALLY GOOD chocolate, at that.  So we combined forces and created a Neapolitan-esque cake with a flourless chocolate cake as the base, a white chocolate mousse in the middle and topped with a thick, strawberry whipped cream.  The chocolate cake is by far the best chocolate “cake” I’ve ever had.  Taken from the brilliant Dave Lebovitz, it’s nearly like a truffle center, or the best fudge of your life.  The white chocolate mousse was taken from Annie’s Eats, which I’d used on a cake for Matt for Valentine’s day this year, which he was crazy about.  And then the strawberry whipped cream was just a last minute sort of creation by me for Olive.  Because she loves strawberries and I figured if she didn’t like the rest, she’d at least like a third of her cake and we wouldn’t look like complete fools when it came show time.

Olive's Birthday Cake

For the bottom layer, Matt baked it in a 9″ round cake pan.  We had a hard time getting the cake out (panic moment) and so I crumbled it all up and pressed it tightly into a spring form pan.  Then I lined the pan with a couple layers of acetate strips, stacked on top of each other and taped on the outside, to get that tall form for piping in the other two layers.  All you do is pipe in the white chocolate mousse on top of the chocolate cake, let it sit in the fridge while you make the whipped cream, and then pipe in the whipped cream and wrap plastic wrap across the top of the tube so it doesn’t dry out and let it sit in the fridge over night, or for an hour in the freezer.  This makes it much easier to cut.

Chocolate Cake (Orbit Cake)

14 tablespoons unsalted butter, cut into 1/4″ cubes, plus more for the pan
10 ounces 62% semisweet chocolate, finely chopped (our FAVORITE dark chocolate, which we exclusively used for this cake, is Lindt’s 70% dark chocolate bars.  Heaven.)
5 large eggs
1 cup granulated sugar

Position rack in the middle of the oven and preheat to 350F. Lightly butter a 9×2″ round cake pan and line the bottom with parchment paper (if you do this easy step, you won’t have to mush it all into a spring-form pan like I did.)
Place the butter and chocolate in a glass bowl and microwave at 30 second increments, stirring after each, until the chocolate is completely  melted, glassy, and incorporated with the butter.
In a large bowl, whisk together the eggs and sugar.  Gradually whisk in the melted chocolate mixture and continue whisking until thoroughly combined.
Pour batter into the prepared pan.  Place the pan in a larger roasting pan, and cover the top of the cake pan with foil.  Add enough hot water to the baking pan to come halfway up the sides of the cake pan and bake for 1 hour and 15 minutes to 1 hour and 30 minutes until the cake has set.  To test, touch the center of the cake lightly with your finger: the surface will be slightly tacky, but your fingers should come away clean.
Carefully remove the cake pan from the water bath and place on a cooling rack to cool completely.
Cover the pan with plastic wrap and refrigerate for at least 2 hours – up to 3 days.
To assemble with the mousse, run a knife around the edges of the cake to loosen the sides.  Invert onto a serving plate, wrap in the acetate strips (or wax paper – tape doesn’t stick to parchment) and get on with making the next step.

White Chocolate Mousse

1 1/2 tsp powdered gelatin
2 tbs water
12 oz white chocolate chips (don’t use almond bark – it won’t taste right)
3 cups heavy cream

Sprinkle the gelatin over the water in a small bowl and let stand at least 5 minutes to soften.  Place the white chocolate in a medium bowl.  Bring 1 cup of the cream to a boil in a small saucepan.  Remove the pan from the heat, add the gelatin mixture and stir until dissolved.  Pour the hot cream mixture over the white chocolate and let stand about 1 minute.  Whisk until the mixture is smooth.  Cool to room temperature, about 5-8 minutes, stirring occasionally.

In the clean bowl of a stand mixer fitted with the whisk attachment, whip the remaining 2 cups of cream at medium speed until it begins to thicken.  Increase the speed to high and whip until soft peaks form when the whisk is lifted.  Using a whisk, mix one-third of the whipped cream to the white chocolate mixture to lighten it.  Fold in the remaining whipped cream gently with a rubber spatula until no streaks remain.  Spoon the white chocolate mousse into the pan over the chocolate cake.  Smooth the top with an offset spatula.

Strawberry Whipped Cream

1 jar of strawberry jam – the fancier the better
3 cups heavy cream

Scrap the jar of jam into a small saucepan over low heat and add about 1/4 cup of water.  Heat it just enough so that it incorporates with the water and you break up any lumps with a whisk and the jam is smooth.  Transfer it to a bowl and let it cool about 30 minutes, stirring occasionally to help it cool.
In a stand mixer with a whisk attachment, stir the cream on medium for a while until it starts to thicken.  Then whip on medium high while you gently let the jam stream into the edge of the bowl, careful to not hit the whisk in the middle, until completely incorporated.  Whip until a little firmer than soft peaks.  At this point, I added a little red food coloring (just a few drops) to make it more pink and folded it in with a spatula until fully incorporated. Do what you will with that.  I just wanted it to be pink to truly look Neapolitan. Transfer cream to a piping bag fitted with a large star tip and pipe, pipe, pipe until you can’t pipe any more.  Have fun with it.  Make zigzags and peaks and star flowers – whatever you want.  Just fill in all the gaps and sprinkle the top with extra crunchy sugar for effect.

serves at least 20

Cod with Brussels Sprouts and a Garlic Cream Sauce

codsprouts

I ran across a wonderful blog the other day that is an answer to a question I’d been asking myself since I first read Bringing up Bebe and French Kids Eat Everything.  What is a good example of a weekly menu that a typical Frenchie would have in their home, every day, WITH a baby?  Behold, the lovely blog, French Foodie Baby, written by a French woman who lives in L.A.  At the beginning of the week, she posts a menu of what they’ll be eating for lunch, snack (gouter) and dinner.  I love how adventurous she is with her cooking and while she has the luxury of living in a city with tons of markets and options, I have found that I can adapt the recipes pretty well for us.

French kids only have one snack per day and it’s usually at 4 p.m.  We’ve already started this habit in our house with Olive that she doesn’t eat anywhere but the table, and she only gets one snack around 3 or 4.  If she acts hungry 30 minutes before dinner, either Matt or I will go distract her in the other room by playing until dinner is ready.  She is usually quite hungry for lunch and dinner and does pretty well at restaurants because she’s hungry and will eat as long as we do (while turning 360’s in her high chair to check out the scene, of course.) As two moms at a restaurant pointed out the other night, “She’s been sitting here for an hour! Well, just wait till she’s two…”  Ah, the “just you wait” threat.  Moms give it to me on a weekly basis.  I am fully aware that a year old is way different than two, and that we will have to be extremely diligent in our efforts at mealtimes, but I’m confident that starting now, instead of at two, or whenever the eating issues arise, will make things much easier for us in the future.

This fish recipe was taken from the French Foodie Baby blog nearly word for word.  We enjoyed it very much, but I will warn that if this is the first time your baby has had roasted garlic, go easy.  (she suggests the baby be 8-10 months old for trying this for the first time.  We gave Olive’s portion a rough chop so they’d all be bite-sized pieces) Olive’s diaper the next day was…epic.  My fault.  She’d had plenty of garlic before, but maybe it was just too much?  Anyway, I would suggest straining out the garlic clove before preparing a small portion for your baby.

codsproutscream

Cod with Brussels Sprouts and Garlic Cream Sauce

Serves 4

1 lb Brussels sprouts

5 garlic cloves
1 1/4 cup heavy cream
1 lb cod fillets (this turned into two large filets for me, but I cut it down into 4 portions)
4 thin slices of pancetta (I had proscuitto in the fridge and it worked just fine)
4 pinches of caraway seeds
Salt & pepper
Preheat the oven at 350°F.
Bring a large pot of salted water to a boil. Quarter the Brussels sprouts and wash them. Plunge them in the boiling water for two minutes, drain them and cool them off under cold running water. Set them aside on a kitchen towel.
Wrap the garlic cloves (unpeeled) in parchment paper and bake them for 15 minutes.
Remove the skin and mash them with a fork. Combine with the heavy cream in a small saucepan and set aside.
Cut the cod into four pieces, and cut 4 squares of parchment papers.
On each square of paper, place a bed of Brussels sprouts, a piece of black cod and a slice of pancetta on top. Sprinkle with pepper and some caraway seeds.
Wrap the parcels and tie each end with kitchen string.  (Note: you can make these ahead of time and keep them in the fridge until ready to bake)
Place the four parcels directly on the bottom of the oven and bake 12-15 minutes.
Place the saucepan with the garlic and cream over low heat. Add a sprinkle of salt and some pepper. Bring to a low simmer.
Place each parcel on a plate, open it and pour the cream of garlic over the fish.
codsprouts finished

Caramelized Banana Chocolate Chip Muffins

bananachocolate2

When I think of a true indulgence, I think about baked goods.  During my time of extra strict sugar restriction while I get my remaining baby weight off, I give myself one day a week to indulge in items that would really not even be allowed in moderation for me during the week.  I have to have that day.  It keeps me going during the week to think about all the scones and muffins and other breads I can have on Saturday.

When I was pregnant with Olive, I craved sugar constantly.  Matt likes to joke that Olive is mostly made out of Oreos and cereal.  I ate other things, but yes, carbs were king.  I made baked goods all the time, especially in the last trimester during the coldest part of winter.  For weeks, I kept us stocked up with various muffins for breakfast.  The combination of banana and chocolate chip became Matt’s favorite, and so when we were discussing a post I could do for Friday, he suggested I do banana chocolate chip muffins.  Banana’s Foster has been a favorite dessert (a favorite – there are many) of mine for a while, now, and so when I know there’s potential for bananas AND brown sugar AND melted butter in a recipe, I want to make it as bananas-fostery as possible.  So for this recipe, (adapted from allrecipes.com)  that meant browning the butter (duh) and letting it bubble away with the mashed bananas and substituting some of the white sugar for brown sugar.  I didn’t add rum, but that’s only because I thought it would get lost with the addition of dark chocolate chips, anyway.  I’d really like to try this creation without the chocolate next time (maybe tomorrow?) and add some rum to see if I can taste my efforts at creating a Bananas Foster muffin a little bit better.

I made a “mistake” with my alterations to the recipe.  I didn’t wait for the batter to cool (it was quite hot from being on the stove, turning into caramelized bananas) before I added the chocolate chips, so naturally, they melted.  I was unhappy with my dumb mistake at first, but decided to go with it and when they came out of the oven, I was happy to see a little swirly effect in the batter, which I thought was quite pretty.  I topped the muffins with a slice of banana and brown sugar and some with extra chocolate chips while in the oven.  The brown sugar that melted into goo on top of the bananas was a nice touch.  These muffins are definitely more dessert than breakfast, so maybe you should have them for afternoon snack time with a cup of coffee, instead of breakfast.  I wouldn’t want you to have to take a mid-morning nap or anything…

Caramelized Banana Chocolate Chip Muffins
yield: 1 dozen

1 1/2 cups all-purpose flour
1 teaspoon baking soda
1 teaspoon baking powder
1/2 teaspoon salt
1/2 teaspoon cinnamon
3 super duper ripe bananas, mashed, plus one banana for slicing as the topper for the muffins
1/2 cup white sugar
1/2 cup packed brown sugar
1 egg, lightly beaten
1/3 cup butter, melted and browned, if you know what’s good for you
1 cup chocolate chips

Preheat the oven to 375F.  Spray 12 muffin papers with non-stick spray and place into muffin tin.
In a large bowl, mix together the flour, baking soda, baking powder, salt and cinnamon.
On the stove, in a medium sauce pan, melt the butter until it begins to brown (you’ll see those grainy butter solids settling at the bottom of the pan) and add the bananas and sugars and let it bubble away for about 10 minutes on medium low heat, stirring periodically.  Remove from heat and let cool slightly and then scrape every last gooey drop into your flour mixture.  Mix well (I just used a fork) and then add your egg and mix just until incorporated.  At this point, if you want your chocolate to remain chips, let your batter cool for a while.  A trick to keep your chocolate chips from settling to the bottom of your muffins is to lightly coat them in flour before mixing them into your batter.  After the batter has cooled, gently fold the chips into the batter and spoon into the muffin liners.  I didn’t let my batter cool, so I was left with melted chocolate worked throughout.  I didn’t totally mix it up so it left a neat swirly effect in the muffins.  You just do whatever makes you happy.
Top the muffins with slices of banana and sprinkle extra brown sugar on top of each slice.
Bake in preheated oven for 18-25 minutes (mine took 23) until a toothpick comes out clean.

bananachocolate1


Enjoy your weekend, lovely folks.  See you Monday with a light recipe to start things off right.

Chicken Pot Pies – for you and baby

cpp3

Making baby food purees is a really fun phase of having a new baby.  Whether you start them at 4 months or 6 months, you have about 3-6 months of making purees out of just about everything.  Over the past few months, I’ve pureed coconut curry soup, chicken fricassee, beef ragu – you name it.  I’d tote along little containers of food when we’d go out to restaurants and even had a waitress warm one up in the microwave, once.  (It was on the road, the restaurant was dead, we were her only table.) As much of an adventure as this was, I will admit that I’m excited that Olive can now pretty much eat what we eat, only chopped up a little smaller.  So, when we go out to a restaurant, we can order her a couple of side dishes and she’s happy!

However, I don’t want to start her out on the ugly road of “kid food” and “kids’ menus.”  Sure, they might be nice, smaller portions, but I bet none of us would have to try very hard to name at least five items on any kid’s menu at any restaurant in America.  1. Grilled Cheese 2. Hot Dogs 3. Pizza (cheese or pepperoni only) 4. Chicken nuggets with fries 5. Macaroni and Cheese.
Do you see a horrible trend?  Where on earth are the vegetables and why on earth do we pick the worst foods with the poorest nutritional value and label them as “kid friendly” choices and then give them to little, growing bodies?  This trend isn’t likely to improve any time soon, so in the meantime, I want to suggest a different kind of “kid friendly” choice.

Soups!

We were at Jason’s Deli a couple weeks ago and noticed that their kids’ menu is exactly the same, only with “organic” thrown into the mix and “whole wheat” to disguise the literally 100% meat, cheese and bread menu.  So we ordered her a chicken pot pie soup and she absolutely loved it.  I also noticed that she didn’t have any problem at all eating the whole peas, where as at home, she began refusing pea puree.  I had a side of tomato basil soup and she loved that, too.  I will state right now before everyone chimes in, that I realize these soups are probably high in sodium.  Most soups are.  But let’s look back at the alternative kids’ choices for a minute…

I came home from Jason’s that night with a new thought for what to cook for Olive.  Grown up soups that I don’t have to puree!  I naturally looked through the cookbook I’ve been addicted to lately, the Bonne Femme Cookbook, and found a wonderful sounding Poulet Pot Pie.  The lovely author herself, Wini Moranville, commented on my post last week that I should try it (leaving out the cognac, of course, although I will be trying the grown-up version very soon.)  I absolutely loved the flavors in this recipe – the fresh tarragon and leeks were my favorite part, and Olive happily eats it without slowing down!   This is much less “soupy” than what you might be used to, but I think for a baby in the “I have a few teeth, now” phase, I think it’s perfect.  You could also improvise with adding in other, small-dice sized vegetables of your choice.

Poulet Pot Pie – for the whole family

4-6 servings

  • 1 sheet puff pastry
  • 2 cups cubed rotisserie chicken
  • 4 medium-sized carrots, peeled and cut into 1/2″ dice
  • 5 tablespoons unsalted butter
  • 4 medium-size leeks, halved lengthwise, rinsed, and thinly sliced crosswise (white and pale green parts only) about 2 cups
  • 1 small yellow onion, chopped (about 1/3 cup. Everything is bigger in Texas, I found. Our “small” onions are probably France’s “ginormous” onions, so just measure out 1/3 of a cup and put the other 2/3 cup in a plastic bag. I did exactly that, with exactly those measurements.  And it was the smallest onion I could find)
  • 2 garlic cloves, minced (if you don’t own a Microplane, you really should get one for anything minced.  I use mine constantly for cheese, ginger, garlic, etc.)
  • 1/3 cup all-purpose flour
  • 1 cup low-sodium chicken broth
  • 1/2 cup 2% or whole milk
  • 1/2 cup heavy cream
  • 1 tablespoon fresh tarragon, or 1/2 teaspoon dried tarragon, crushed and 1 tablespoon fresh parsley
  • Fresh ground black pepper and kosher salt, to taste

Thaw puff pastry according to package directions, set aside.
Place cubed up chicken in a large mixing bowl.
Preheat the oven to 400F
Bring a 2 quart saucepan of salted water to a boil.  Add the carrots, bring back to a boil and cook for 3 minutes.  Drain, rinse under cold water and drain again.  Add to the chicken in the bowl.
Melt the butter in a large saucepan over medium heat.  Add the leeks and onion and cook, stirring, until the onion is tender, but not brown, 4 to 5 minutes.  Add the garlic and cook, stirring, until fragrant, about 30 seconds more.  Stir in the flour, making sure all of the flour is moistened by the butter in the pan.  Cook and stir for 1 minutes.  Do not allow the flour mixture to brown.  Whisk in the chicken broth and milk.  Cook and stir until thickened and bubbly; cook and stir 1 minute more.  Stir in the cream.  Stir in the chicken and carrots, the tarragon, and salt and pepper.  Bring mixture to a boil, stirring occasionally.
You would then transfer the entire thing to a 2-quart casserole at this point, but I used little 4 oz ramekins and had enough leftover after filling up 6 ramekins to fill a large souffle dish for Matt and I to split.

cpp2

Look at all the pretty colors!

I used a large cookie cutter and cut out the puff pastry and placed it over the ramekins and sprayed the tops with olive oil cooking spray.  I put plastic wrap and then tin foil over the tops and froze 4 and then put two in the fridge.  To cook, I simply let the dish come to room temp from the fridge and baked at 400 until the puff pastry was nicely browned and the insides were bubbling, about 20 minutes.
cpp1

Enjoy exploring new soups for the family and for your new, little eaters!  If you want to check out my Pinterest Baby Food board for more ideas, you’ll find it’s just mostly good-looking soups 🙂 Remember: there’s no such thing as kid food!  It’s all food and it’s all good for everyone!

The Humble Omelet – if you have eggs, you have a meal.

It’s Monday.  In the fridge, there’s a half eaten container of fried rice, a tub of yogurt, some loosely covered bowl of something I ate last week in the very back and an almost empty container of milk.  I haven’t been to the store to stock up for my week of ambitious cooking at home but I don’t want to immediately admit defeat and head out to eat for lunch.  This happens every week.  And nearly every time I think there’s nothing good to eat for lunch, I realize that I have eggs.  If I have eggs, I have a meal.  Because there’s almost always some bits of cheese, unused herbs, bits of leftover meats or veggies or some leftover that can be incorporated into an egg dish.  If you have eggs and an onion and potato, you can make a hash.  If you have eggs and leftover veggies, you can make a frittata.  If you have eggs and nothing else but butter, you can make an amazing omelet.  Goodness, I’m glad I’m not a vegan.

Many esteemed chefs have done their share of obsessing over the simple preparations of an egg.  Chef Gordon Ramsay has the cooking of an egg as an exam, of sorts, for cooks aspiring to work in his restaurants.  Chef Wolfgang Puck had an omelet making contest as a qualifying exam for the most recent season of Top Chef.  Julia Child is famed for her demonstration of cooking a French omelet, much like the recipe I’ve written about here, and it was Jacques Pepin who taught my husband how to roll an omelet using just the pan.  Eggs are simple and beautiful and need hardly any embellishment to make a wonderful meal.  The recipe below is almost as simple as it gets.

omelet1

If you’d like to fill your omelet with more items, try bits of soft goat cheese, some shreds of Parmesan, crispy pieces of prosciutto or sauteed mushrooms.  Don’t overfill.  This is an IHOP move and it’s what we’re typically used to, but for this recipe, you’re not going for a burrito effect where the eggs act as a tortilla.  You’re really showcasing how a delicately seasoned and well cooked egg can be immensely satisfying and flavorful and not too filling.

A Simple Omelet – serves 1, even after looking in the fridge and determining there is nothing to eat.

3 eggs, room temp (set eggs in a bowl of warm water and they’ll be room temp in half the time)
Salt and pepper to taste
1 tablespoon unsalted butter
1 teaspoon fresh herbs, roughly chopped (we primarily use thyme and chives)

Crack your eggs into a separate bowl and whisk very well until no separation of whites and yolks remain.  Season with salt and pepper – really just about a 1/4 teaspoon and a few grinds of pepper.  Over-salting an egg is a grave mistake that you just can’t come back from.  It ruins them.
Heat the butter in a large, non-stick pan over medium heat (my skillet is a 10″.) Put two plates into a 200 degree oven to keep warm.  As we all know, eggs cool off REALLY quickly.  This helps.
Pour the eggs in and swirl the pan around to cover the bottom.  With a spatula, stir the eggs around in the center – don’t mess with the sides yet – create holes and shuffle things around for the first few seconds the eggs are in the pan.  As you shuffle and create holes and gaps, swirl the pan around and fill in the holes with the runny eggs.  Do this a few more times till the liquid in the egg starts to dissipate but still looks a little runny on top.  At this point, sprinkle your herbs over half the omelet.  Carefully, run your spatula around the edges of the pan and flip about a 1/4 of the omelet over itself from right to left.  If you’re deft with the pan skills, you can dump the egg onto your plate and roll the omelet up perfectly while doing so.  I don’t possess such skills yet, although I will continue to try.  I just use the spatula and continue to fold my omelet from right to left till it’s completely rolled up.  This creates nearly four folds.

omelet2

See the thin layers?  I must give credit where credit is due – Matt made this beautiful, delicate omelet.  The inside is cooked and yet still creamy and not dried out.

Garnish your omelet with extra herbs and enjoy!   Skip the 5 o’clock rush at the grocery store tonight and stay home.  If you have eggs, you have dinner.

Cherry Cream Doughnuts – not everything has to be perfect

When recipes don’t work out exactly as you’d hoped, it’s good to have a positive attitude.  Or, if you’re like me, you could furiously throw the item that didn’t work out as hard as you can into the sink so that it makes a nice splatter everywhere.  I wish I could say that this instance was the only time I’ve behaved in such a childish way.  But there was the hard-boiled egg-peeling incident of 2010…
I’m typically even keel.  I have seen a lot of hardship in my life and when chaos abounds,  I’m usually the calm in the storm.  However, when it comes to cooking,  and I do everything right, cut absolutely zero corners (which is counter to my nature) and it STILL doesn’t work out, I want to destroy something.  Usually the food in question.  The term “perfectionist” doesn’t imply that you do everything perfect – it implies that you wish like the dickens you could.  All the time.  Especially when it comes to peeling a hard-boiled egg.

Thomas Keller is a perfectionist.  I’m sure things have gone wrong for him with his recipes.  I’m sure he’s tested this doughnut recipe dozens of times, and goodness knows he expects perfection.  We own every cookbook he’s ever put out, starting with the first, truly intimidating set of recipes I’d ever seen in one place; The French Laundry Cookbook.  In all the times we’ve tried his recipes, we’ve done our utmost to follow his instruction to the letter.  We respect what he has worked so hard to achieve.  We’ve eaten at his restaurants and our lives have been changed for the better because of it.  We’ve become more disciplined in LIFE because we ate at Keller’s restaurant.  How many meals can have that power?

So it’s with all this respect for Keller and all he’s done to pave the way for perfection in recipes that for these doughnuts, I:
1. measured eggs for this recipe by weight, so I ended up using 2.2 eggs
2. cursed at a piping bag full of jam
3. still felt really proud, even though they didn’t look like the pretty picture in his Bouchon Bakery Cookbook, they tasted amazing.  The dough itself was astoundingly good in flavor.

You have to roll with things when they don’t go perfectly.  I’m sure I kneaded the dough too long or my fry oil was too hot, or not hot enough, but the texture of these doughnuts wasn’t as airy as I’d hoped.  They were dense like brioche, almost.  So I had a hard time filling them – in that the jam wouldn’t even go into the doughnut one centimeter – and that’s what led to the cursing and the soul searching, etc.  But my lovely, even-tempered, optimist husband told me that they could be saved and to just assemble them differently.  So, I cut the doughnuts in half, spread the jam I’d made (which was really good) in copious amounts, and piped the vanilla bean-flecked cream on top of the jam and called it a day!

(this photo is what I’d image they’d look like if they were actually filled doughnuts.  The true result is pictured below the recipes)
cherrycreamdonut3

Cherry Cream Doughnuts*

For the dough:

(I’m putting all these ingredients in grams.  Get a scale.  They’re cheap and it’ll make you a better baker.  If you don’t, then you’ll see conversions like this: 212 grams or 3/4 cup+1 1/2 tablespoons. Kill me now.)

518 grams AP flour
10 grams instant yeast
74 grams granulated sugar
9 grams kosher salt
212 grams whole milk (warmed in the microwave for 30 seconds)
2 large eggs or 3 small ones.  I can’t bear to tell you 111 grams of eggs.  But that’s how much he says to use.
9 grams vanilla paste – I also think weighing the vanilla is a little much.  It’s about 1 1/2 teaspoons
5 grams unsalted butter (barely a tablespoon)
Canola oil for deep-frying

Dust a surface on your counter with flour and spray a large bowl with  non stick spray.
Place the flour and yeast in the bowl of a stand mixer fitted with a dough hook and mix for about 15 seconds to distribute the yeast evenly.  Add all the remaining dough ingredients, except the butter and mix on low speed for 4 minutes to incorporate.  Continue to mix on low speed for 20 minutes.  Add the butter and fully incorporate.  Stop and scrape down the sides and push the dough off the hook.  Mix for 5 minutes more.
Run a bowl scraper around the sides and bottom of the bowl to release the dough and turn it out onto the work surface.  Gently pat the dough into a rectangular shape. Stretch the left side of the dough out and fold it over two-thirds of the dough, then stretch and fold it from the right side to the opposite side, as if you were folding a letter.  Repeat the process, working from the bottom and then the top.  Turn the dough over and place it seam side down into your prepared bowl.  Cover with a dish towel and let sit at room temp for 1 hour.
Return the dough to the work surface and gently but firmly pat the dough into a rectangle, pressing any large bubbles to the edges and then out of the dough.  Repeat the stretching and folding process and return the dough to the bowl, seam side down, cover with plastic wrap and refrigerate overnight.
Watch a recorded episode or two of Downton Abbey
Next day: roll out the dough on a lightly floured work surface into an 11 inch circle.  Line a sheet pan with parchment paper and lightly spray the parchment with non stick spray.  Using a 3″ round cookie cutter, cut 8 rounds from the dough, brush off any excess flour and place on the prepared pan.  Cover the baking sheet with plastic wrap or a towel and proof on the counter for 1-11/2 hours, until the doughnuts have doubled in size (they’re big boys) when the dough is pressed with a finger, the impression should remain.
Pour 3 inches of canola oil into a dutch oven or heavy stockpot, deep enough to allow the doughnuts to float freely.  Heat the oil to 335-345 and try your best to keep it in that range.  This is where I faltered.  I think if you have a fry-daddy or something like that, you’ll be better off.
Set a cooling rack over a baking sheet.  Gently lower three doughnuts into the oil and fry for 30 seconds without moving the doughnuts, to allow the dough to set.  Flip the doughnuts over and fry for 5 minutes, flipping them every 30 seconds or so, until they are rich, golden brown.  Transfer to the rack and cook remaining doughnuts in batches of 3.  Let doughnuts cool completely before filling.

For the filling:

I made Keller’s cherry jam.  Honestly, I don’t recommend doing this because the way he says to do it is to buy a cherry puree.  Well.  They don’t sell such things around here.  So I made my own puree.  And then I made jam out of it.  And then when I couldn’t get the dadgum jam inside the doughnuts, I questioned my reason for living and thought, “WHY DIDN’T I JUST BUY JAM?!”  So…my integrity will first tell you to make your own.  Then, my logical mom-side that only has two days a week she has help with the kid says not to waste a few precious hours making jam.  I’m torn.  Here’s a quick recipe, in case you want to have FULL dedication.  This is my own made-up recipe, not Keller’s.  But it was very tangy and lovely, all the same.

Quick Cherry Jam:

1 bag of frozen dark cherries
1/2 cup sugar
squeeze of lemon

Cook all that down in a stainless steel sauce pan and let it bubble over medium-low heat for about 15-20 minutes.  Transfer to a tall cup or deep bowl and blend with an immersion blender.  Strain over a bowl through a fine mesh strainer with a spatula until you’re just left with the cherry skins in the strainer.  Discard the skins and you have a pretty respectable jam in just a few minutes without messing with pectin.

For the whipped cream:

1 1/2 cups heavy cream
2 tablespoons powdered sugar
1 vanilla bean, split and seeds scraped.

Place the cream and sugar and vanilla seeds in a stand mixer fitted with the whisk attachment.  If you don’t have vanilla bean, substitute 1 tsp vanilla paste or extract.  Whisk at medium speed until the cream holds shape, or medium to stiff-peaks.  Don’t over whip.

To assemble:(My way) Cut each donut in half, spread a generous amount of jam on each half and pipe a tall mountain of whipped cream.  Drizzle more jam on top of the mountain and garnish with a cherry. Do assemble Keller’s way, assuming your doughnuts are light, fluffy and full of air pockets, put the jam in a piping bag, fitted with a round tip and stick in the side of the donut and fill slowly until the donut feels heavy.  Top with whipped cream and a cherry.

*recipe adapted from the Bouchon Bakery Cookbook, which is amazing and beautiful in every way.

cherrycreamdonut2

cherrycreamdonut1

Not too shabby.  Remember to have fun this weekend, indulge a bit, but make your indulgences worth every bite!  Check back Monday for a healthy, hearty recipe to start your week off right!

*(recipe adapted from the Bouchon Bakery Cookbook)

Roasted Butternut Squash with Brown Butter

Every time someone asks me how to cook any vegetable, my answer will 99% of the time be: roast it.  Olive oil, salt, pepper, done.  That’s all you need.  I have discovered a new, refreshed love for so many vegetables by simply roasting them.  Butternut squash is one that benefits from this cooking method more than most.  As King of the Squash (a term I deemed it worthy) the butternut squash is more dense, less watery and has a deeper flavor than most squash.  In the winter months, it’s the most perfect side dish for any meal, and since it can be pureed beautifully or left in small chunks, it is the perfect baby food for babies just starting out with solids, or graduating into finger foods.

I found the easiest way to cut up a butternut squash for this recipe is by cutting it into cross sections:

bns2

Once you scoop out all the seeds, begin cutting off the rind.  The rind so tough, no amount of cooking will really make it edible. I mean, it is edible, but it wouldn’t be enjoyable.

bns3

Once you get all the rind off, cube up the squash into about 1/2″ cubes.  It’s important to keep your cubes all the same size because when things are varying sizes, they cook at varying times, and it makes everything more difficult when trying to get dinner on the table to wait for a 1/3 of your squash to continue cooking.  So.  Be consistent in your chopping!

Now comes the easy part.  Spread out all the squash on a large, rimmed baking sheet and toss 2 tablespoons of oil till completely coated, and sprinkle with kosher salt and pepper.  Roast at 400 for 45 min to an hour.  I want to add that your baking sheet needs to be big enough so that your squash isn’t completely crowded and piled on top of each other.  I’ve roasted it that way and the squash just steams and you don’t get those nice, charred bits that add to the texture and depth of flavor of this dish.

bns4

So you want to bake it kind of past the point where you think you should.  I always wait till a few edge pieces look a little burnt.

When they’re out of the oven, immediately put them in a bowl to keep warm.  They’ll cool off pretty quick on the pan.  Now for the magic.  Take a tablespoon of butter (be generous, verging on two tablespoons) and put it on the stove on medium heat in a stainless steel pan.  Let the butter melt and swirl it around until the foam subsides.  Then, when it starts to smell rich and nutty and there are butter solids forming at the bottom of the pan (this is why you use stainless – you can’t see this happening in a black, non-stick pan) remove the butter from the heat, pour over your bowl of squash and sprinkle with cinnamon, Chinese 5 Spice, pumpkin pie spice – whatever strikes your mood!  My go-to is Vietnamese Cinnamon.

Let me tell you – this is magical stuff with the addition of the browned butter.  I deeply believe that butter in moderation like this is not only fine, but life-giving.  The richness of browned butter could make anyone feel like a king at the table.  Cooking for your family is all about making them feel loved, warmed and nurtured.  If you wanted to get creative, throw a sage leaf in with the butter while it’s browning. (By the way, that makes an amazing ravioli sauce)  And yes, I realize I’m putting a recipe that has browned butter under the category of “healthy meals.”  I’ll rant about that in another post, but let me just say that I think there’s a lot more to eating healthfully than counting calories.  And 1-2 tablespoons of fat (okay 3 counting the olive oil) is about a tablespoon of fat per serving.  We’re not going to kill anyone with those ratios. And we’ll have happy eaters!

bns1

When I cook for Olive, I don’t ever hold back on spices except for salt and extremely hot spice (and even then, I salt, just less than what I’d prefer, and I let her have a bit of something spicy to see if she likes it.)  She happily ate these little nuggets the entire time we ate.  So that meant a happy, quiet baby for nearly an hour of eating.  Is THAT motivation enough to make this for your baby?  If you have a baby who isn’t eating chunks yet, simply take about a half cup of the squash into a bowl, add a bit of low sodium chicken broth or water and puree with an immersion blender.  Add a bit more cinnamon or butter and you have an amazing puree for your little 4-6 month old!

Enjoy!  And don’t forget to let me know how it turns out.  I know I just basically wrote out the recipe, but I hate blogs who do that and then don’t put a straight-forward version down below for me to copy/paste.  So!

Roasted Butternut Squash with Browned Butter

1 butternut squash, 2-3 lbs
2 tablespoons olive oil
Kosher salt and fresh ground pepper to taste
1-2 tablespoons unsalted butter
Cinnamon or whatever spice you think sounds good!

Preheat your oven to 400.
Slice the butternut squash into 1″ cross sections.  Scoop out the seeds (I use a metal measuring spoon – they have sharper edges for scraping) and cut into 1/2″ cubes.
Arrange the squash on a large, rimmed baking sheet.  Drizzle with olive oil until thoroughly coated and then sprinkle with salt and pepper.
Roast in the oven until some pieces begin to brown, about an hour.  Check the cooking at 30 minutes and stir the squash around to ensure even baking.  I know my oven has hot spots and I assume yours does, too.
Once the squash is done roasting, place it in a bowl to keep warm.
In a small saute pan, heat butter over medium heat until foam subsides and brown bits start to form on the bottom of the pan.  You’ll want to swirl the pan a few times and really watch.  There’s a HUGE difference between browned butter and burnt butter and you don’t want the latter.  I think the whole process takes about 5 minutes, but it will vary so once you smell that intoxicating nuttiness, you’re done.
Pour butter over squash and adjust seasoning as you like.

Enjoy!  Serves 4 as a side dish.  Or package it all up into freezable portions for baby, if you can part with it.

Fruit Cobblers – cooking for baby

cherrybowl

One of my favorite things to make for Olive is various fruity “cobblers.”  During the winter months in this part of the country, the fruit that is in season is apples, pears, oranges, primarily.  I try my best to cook fresh produce that’s in season.  The biggest reason is obviously, freshness and quality.  But another BIG factor is price.  You think it’s too expensive to eat healthy?  That’s probably because you’re trying to buy berries in December, or fresh corn in February.  Fruits and vegetables in season just taste better, too.  The apples and pears this time of year are awesome.  And we’ve eaten plenty of them!  But it starts to get old and pretty soon I start eyeing those hot-house blueberries, tempted to pay the $4.99 just to have something different.

That’s where frozen fruit comes in to save the day.  Fruits that have been frozen are usually picked at the peak of ripeness and flash frozen.  This means really great, concentrated flavor.  So during the winter, if you’re planning on cooking the fruit anyway, buy frozen.  I really try to offer Olive something new every couple days, but the girl is well-versed in apples and pears.  So to branch out, I buy frozen bags of raspberries, blueberries, blackberries, mango, and I mix them with oatmeal or yogurts for a naturally sweetened treat.

Olive is not a fan of plain oatmeal.  But tell me, who is?!  So here’s what I do with the frozen fruit and this makes at least six- 2 ounce portions of baby food in one whack:

Fruit “Cobbler” 

One bag of frozen fruit (in this picture, I used black cherries)
2 tbs salted butter
1/2 cup rolled oats (I used Quaker Old Fashioned)
cinnamon
1/2tsp lemon juice

Empty the bag of frozen fruit into a large skillet.  I use my non-stick fry pan that’s about 10″ in diameter.  Turn the heat to medium and put the salted butter in with the fruit and let it all come up to a simmer.  I use salted butter in most things I make for Olive because I don’t add extra salt.  I find that it gives enough flavor while going easy on the salt intake.  I add a few dashes of cinnamon while it’s bubbling away, but really, you could add any spice you want – nutmeg, clove, orange peel.  Whatever you think would be good!  For that cobbler effect, a few squeezes of lemon juice really brings out the flavor of the fruit.  When the fruit has bubbled for a while and is thickening up a bit, I add about a half cup of oatmeal.  If it looks too thick, I add in some water.  Too thin, more oatmeal. But it’s rarely too thin. I don’t really let the oats cook, because I find that once they sit in the fruit and juices from the fruit and lemon, that they absorb and have the right consistency when you warm it up to serve after at least a day in the fridge or freezer.

I then transfer the mixture to a tall container and pulse it a few times with my immersion blender.  The immersion blender has made making baby food a breeze with minuscule clean up.  Then, I just transfer to 2 oz. containers and save one or two for the fridge and put the rest in the freezer.  Buying those cute little plastic baby food containers is fine, and I have a few sets of them and use them all the time (they’re great for taking in your purse to a restaurant!)  but I’ve found the easiest thing is to use a tin-foil muffin tin that can be found at any grocery store for about a dollar, and they are conveniently 2 ounce portions.  I just freeze the food in those, then pop them out, put them into a ziplock bag and done!

I’ve made this recipe with blackberries, raspberries, blueberry banana (the best ever that I may or may not have eaten myself), black cherry, mango, pear and apple.  I’m addicted to the simplicity, the variety and knowing that Olive is getting good stuff and trying something new.  I have also cooked down fruit and mixed it in with plain, full fat yogurt.  She loves it all, so far!

olive-ten-months

As you can see, she is serious when it comes to eating.

cherry cobbler