Weekend Fare: Pork Carnitas with Fire Roasted Salsa

carnitas-00006

Every time we have someone over for dinner, we think a few days ahead of what we should make.  If it’s someone we are not 100% sure we’ve cooked for or not, we almost always ask each other, “Have we made them carnitas, yet?”  The answer is usually “yes…but I’m sure it’d be okay to make them, again.”  This is the kind of recipe that is so easy it feels like cheating, and people always ask, “What did you put on these?!” and it’s awesome to be able to say, “salt.”  And that’s it.  Salt, water, pork.  This is yet another example of how amazing pigs are.  And, this recipe makes a TON.  So you can feed at least 8 people if you have a couple side dishes and some tortillas.

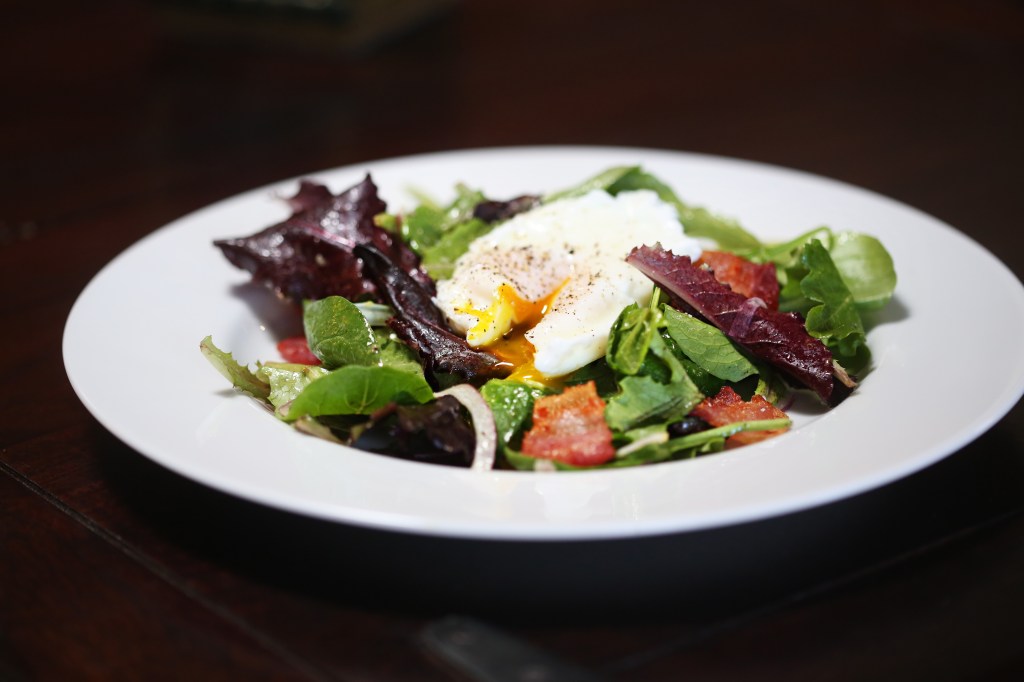
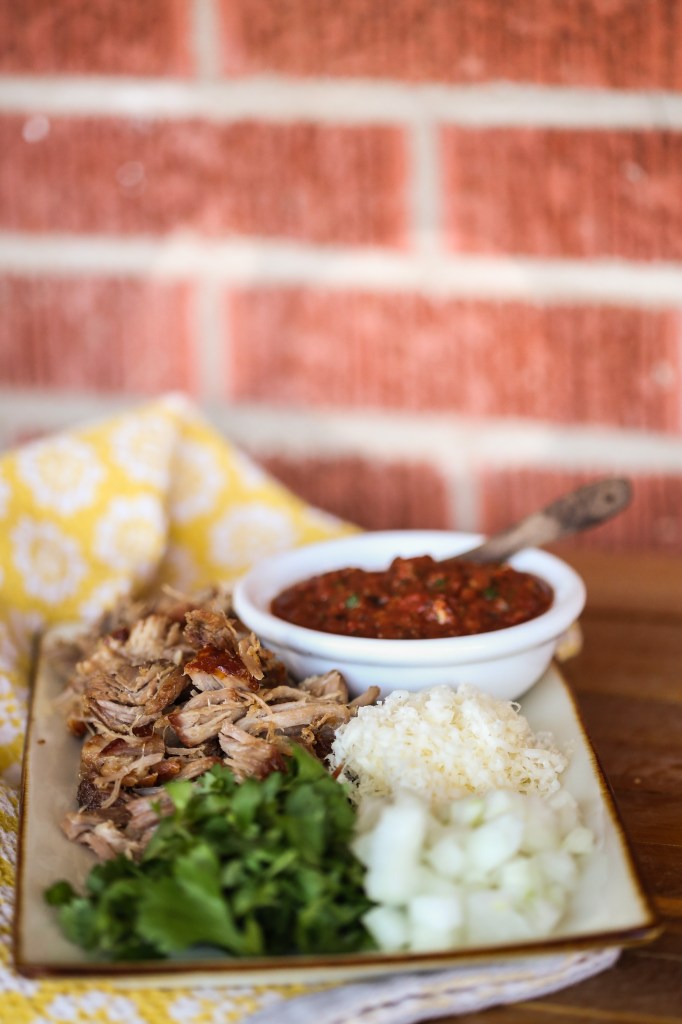
The weather is looking more and more like summer, and while it’s not quite grilling weather, this recipe is about as close as it gets to being full-blown patio summer-fare.  We always have a little mise-en-place set up to go with these soft tacos: chopped onion and cilantro (necessities) and here I have pictured some shredded sharp white cheddar and a fire roasted salsa.  (not pictured, but always in my heart is my ultimate guacamole recipe, which deserves its own blog post.  And it will get it)

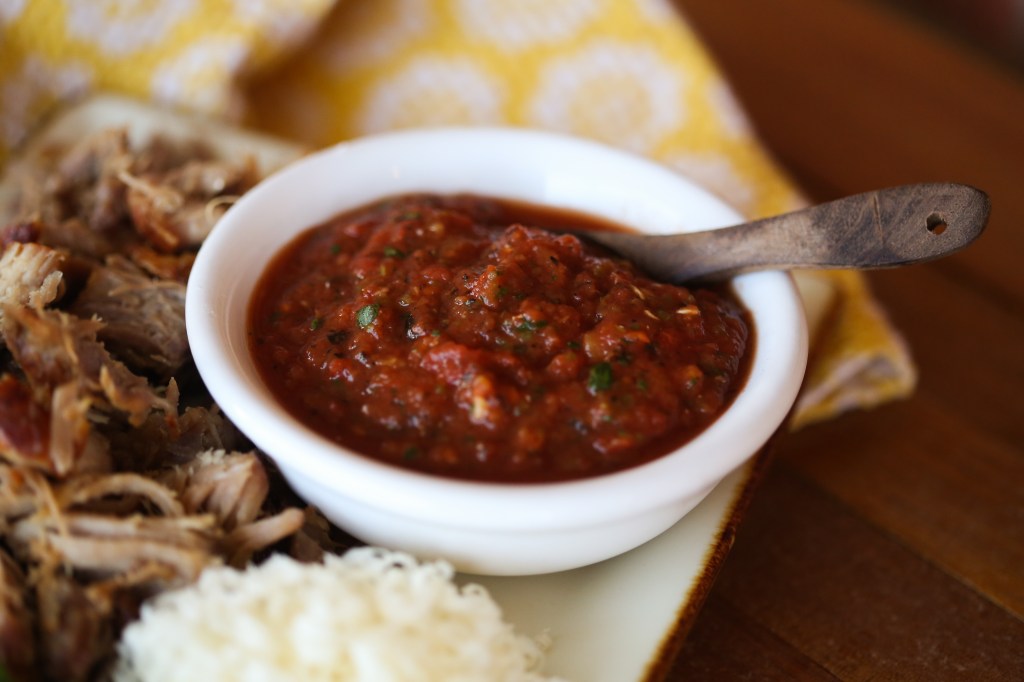
This salsa is also our go-to homemade salsa.  Beats anything out of a jar by a mile and is completely able to be altered to your heat preference or even your cilantro preference.  There’s two people in this world.  Those who think cilantro is the greatest and goes well on anything from Thai to Mexican cuisine, and those who think cilantro tastes like soap.  I’m very glad I wasn’t born in the second camp.  My brother was, and he’s made this exact salsa recipe without cilantro and swears it’s the greatest he’s ever made.  So there you go.  Not coincidentally, both of these recipes are from Rick Bayless.  He’s our absolute go-to for Mexican cuisine.  Not only is he an amazing chef and cookbook author, but he COULD be the nicest person to ever appear on television, and probably in real life as well.  One day, we will go to Chicago and spend the week doing nothing but eating at his various restaurants.  Until then, we’ll live vicariously…

carnitas-00005

Pork Carnitas

4 pounds bone-in pork shoulder, cut into 1 1/2- to 2-inch slabs
Salt

Moist cooking.   Heat the oven to 375 degrees. Cut each slab of pork in half and lay the pieces in a baking dish (they should fit into a 13 x 9-inch baking dish without being crowded).  Liberally sprinkle with salt (about 1 teaspoon) on all sides.  Pour 1/3 cup water around the meat, cover tightly with foil, and bake for 1 hour.

Dry cooking.   Raise the oven temperature to 450 degrees.  Uncover the meat and cook until the liquid has completely reduced and only the rendered fat remains, about 30 minutes.  Now, roast, carefully turning the meat every 7 or 8 minutes, until lightly browned, about 20 minutes longer.  Break the meat into large pieces and serve on a warm platter, sprinkled with salt.

carnitas-00002

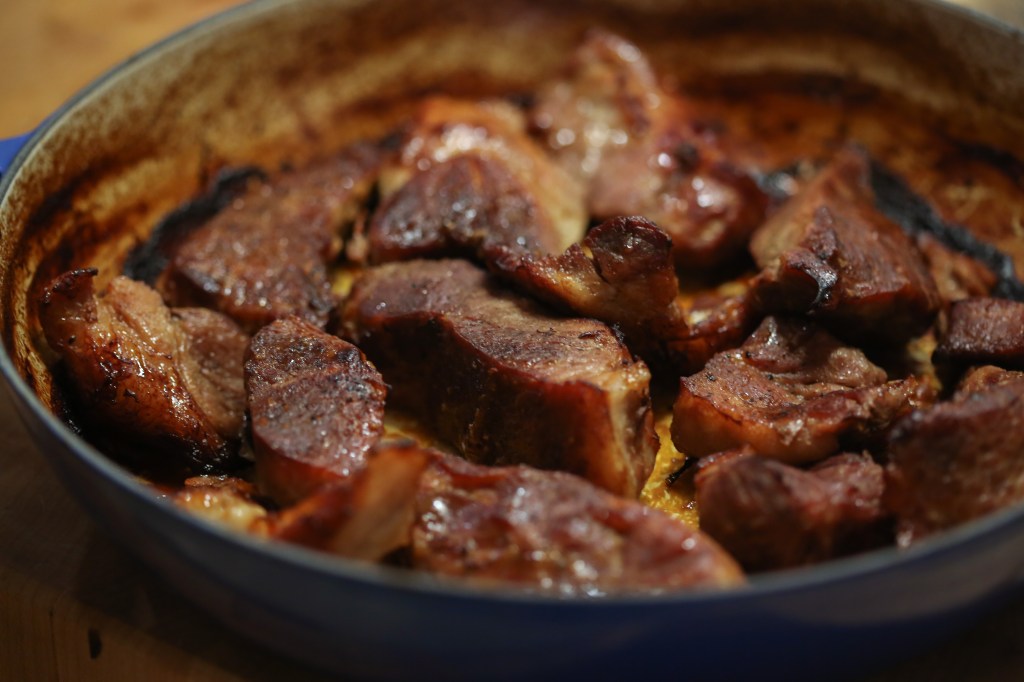
This is what the meat should look like before you shred it.  Nice and glistening in its own fatty juices and caramelized from the oven.

carnitas-00007

Fire Roasted Salsa

1 to 2 fresh jalapeño chiles
3 garlic cloves, unpeeled
1 15-ounce can diced tomatoes in juice, preferably fire roasted
1/4 cup (loosely packed) chopped fresh cilantro
2 tablespoons fresh lime juice
Salt

In a small ungreased skillet over medium heat, roast the chiles and garlic, turning regularly, until they are soft and blotchy brown, about 10 minutes for the chiles, 15 minutes for the garlic.

carnitas-00001

Cool until handleable, then pull the stem(s) off the chile(s) and roughly chop.  Peel the skin off the garlic.  Scoop into a tall measuring cup and pulse with an immersion blender until smooth (or in a regular blender, but this is so much cleaner.  I hate cleaning my blender.  I hate my blender.)

Add the tomatoes with their juice.  Pulse until you have a coarse puree.  Scrape into a serving dish.  Stir in the cilantro and lime juice.  Taste and season with salt, usually about 1/2  teaspoon.  You’re ready to serve.

carnitas-00004


Try to keep a list of everyone you make this for, as to not appear a one-trick pony like we have numerous times.  We can cook more than this, we swear…we just don’t want to.

Green on Green Salad

green on green 2

It’s the first day of Spring!  I used to be a complete fall/winter gal, and as far as loving cardigans to a fault, I still am.  But the new mother side of my life has made me  crave warmer weather, the ability to leave the screen door open so we can hear the birds, and not worrying if my kid is constantly too cold.  This time last year, I had a two week old baby in the house.  We were scared and bewildered, yet happy to have her as a part of our pack.  It’s been such a learning process.  Is there a “right” way to do things?  Well, if there is, I was sure on the hunt this year.  I asked every person I knew who might have an ounce of understanding or empathy, what they thought the “right” way was to feed/sleep/play/instruct my baby.  I’m sure they, like me, are breathing a sigh of slight relief that along with her first birthday passing, so has a large amount of my questions.  I think part of me craves that close knit village type atmosphere of raising a baby.  Mothers, grandmothers, aunts, cousins; all within arms reach of advice.  While that isn’t our reality, I am very thankful for technology that has made virtual villages out of our spread-apart lives.

One of my favorite parts of this “virtual village” is the way in the short time this blog has been up and running, I’ve been able to answer questions of fellow moms across several states on the basics of cooking, what to cook for baby, where on earth do you get Chinese 5 Spice?! and so on.  I love cooking so much and I hope that along the way, I can make at least one other person excited to cook a meal for their family or try something new.  I love when someone tells me, “I salt my pasta water because of you” (which is funny because at least three people have told me this, and I learned it from Mario Batali. Salty like the ocean!) I feel useful, even though I might be stuck in this house (or feel stuck from time to time), I feel knit together with so many by a common ambition for the quest for good food and a simple sense of accomplishment.

This salad is once again, from THE best cookbook of my year, so far, The Bonne Femme cookbook.  I served this salad with the broccoli and cauliflower recipe from Monday and seared chicken breasts with a simple pan sauce  (butter, chicken stock, pan drippings, reduce, reduce, reduce) and sliced, toasted almonds.  Very filling meal, very heart healthy – no one felt deprived!  (baby side note: Olive didn’t try this.  She was still sickly when I made it.  Will try again with her soon)

Green on Green Salad

serves 4

1 garlic clove, minced
Salt and freshly ground black pepper (about 1/4 tsp each)
2 tablespoons fresh lime juice
4 tablespoons extra virgin olive oil
2 teaspoons honey
a few drops of Tabasco, Cholula, Tapatio, or whatever peppe sauce you like best
4 cups baby arugula or just a bag of mixed greens
1/2 cup, halved, thinly sliced cucumber
1/4 cup thinly sliced scallions
1 avocado, peeled and sliced

In a small bowl, use the back of a spoon (or I use a drink muddler) to mash the garlic clove with the salt and pepper.  Add the lime juice and whisk until the salt is dissolved.  Add the olive oil, whisking until incorporated.  Whisk in the honey and red pepper sauce.

In a large bowl, toss the greens with enough dressing to make the leaves coated, but not too heavy.  Arrange the arugula on a large platter.  Toss the cucumber and scallions with a bit of the dressing and arrange them on top of the greens.  Arrange the avocado slices across the top of the salad.  Drizzle just a little more dressing on top of the avocado and serve.

green on green 3


Confession Time and a Side Dish You Never Thought You’d Love

roasted broccoli

I said I’d be honest on this blog and today is just such a post.  Last week, a sweet friend of mine said, ” You are officially one of those moms that makes me question my ability to fully parent and live well/completely.” I wasn’t exactly sure what to do with that comment, but I think I know, now.  It’s time to be honest!  Last week wasn’t good.  Olive got sick on Tuesday with her first stomach bug in her little year on this earth.  It wrecked her appetite, needless to say, and she subsisted for the rest of the week on mostly bananas, bits of bread, small bites of chicken and forced bites of a few benign vegetables like carrots and…carrots.  My little super-eater turned into the “picky eater” kid and even today, isn’t back at full steam.  She plays fine, acts fine, but when it comes to eating – it’s a fight.

I tried my best to stay the course; don’t force her, don’t get stressed, if she doesn’t eat much at lunch, she’ll catch up at dinner – but I was fearful all week that this stomach bug would make her afraid of food, of eating, of trying new things and in one week, all would be lost.  You think I’m exaggerating for the sake of this blog.  I wish I was.  I guess, today, my confession is that I try too dadgum hard to make things go perfectly, and when they don’t, I feel like an utter failure.  Perhaps this isn’t the day to write because last night I slept maybe three hours (my inability to turn my brain off and relax) but I thought about my friend’s comment on my status, and I just wanted to tell her that we only show our best online.  We only write statuses we are either proud of or find ironically funny.  So no one heard all week how scared I was that Olive was sick, or how miserable I felt when she wouldn’t eat a bite all day for a couple days in a row.  And of course I didn’t write statuses about how I got angry with her and made her cry because she kept dropping food off the side of the high chair.  I don’t like writing about that part of life.  The hard part.  The part that makes you question if you’re doing everything wrong and will, inevitably, scar your child when it’s all said and done.  I thought, “How much would everyone love if Olive ended up hating a variety of food just because I want her to love food so much?”  And it’s sad, but I really do feel that most of the people I know would secretly laugh if that happened.  And I can’t say that I blame them.  I’m very passionate about cooking and food and banning “kid-food” and teaching children to eat well and have manners at the table.  I wouldn’t say that I have much camaraderie in that area, at least not locally.  Or maybe I just don’t feel it because I’m not admitting to the hard parts that happen, as well.  I’m only telling you that she ate baby bok choy with fish sauce vinaigrette last week and loved it.  Not that she cried big, fat tears today because I wouldn’t let her hold a fork while she ate (she’d just throw it or poke herself in the face).  Sigh.

Our hard week came to a head this morning as Olive had her one year check up and got 5 shots in her little legs.  So, I made a soup for her for lunch.  Cream of celery, and I pureed the heck out of it so that there’d be no chunks.  I just didn’t feel like challenging her today. She ate fine.  Not as much as last week, but enough.  And I will continue to do what I know in my heart to be best.  Let her be a person with feelings and a new found opinion on things, and try not to force her to like something just because I do.  She’ll come around.  And if today, she only wants the texture of soups and yogurt, then that’s fine.  Maybe tomorrow she’ll eat something more challenging.  The point, I think, is to get back to the heart of what makes food and cooking beautiful: it’s something to be shared.  Eating, first, should be enjoyable.  Not nutritious, not organic – but delicious.  Good for the soul.  Shared with family and friends.  Happy.  Stress-free.  Not another lesson to pass or fail.  I vow to back off in my intensity for success at having a “good eater” a bit and get back to what makes food so amazing.  It’s good.

An incredible way to enjoy a couple of vegetables that might not be everyone’s favorite is first: roast them till they’re a little crispy.  And second: toss them in a vinaigrette!  In today’s recipe, that vinaigrette is one that contains fish sauce and it’s incredible.  I know you wouldn’t typically put “fish sauce” and “incredible” in the same sentence, but you’ll start to once you try this.  Also, it’s from David Chang’s genius book, Momofuku, and I’m pretty sure he’s never made anything bad in his life.  It’s so simple and the vinaigrette recipe makes a lot, so you can save it in your fridge to toss with pretty much any roasted vegetable.  The original recipe called to toss it with roasted brussels sprouts, which is a vegetable most think they don’t like.  But I’m pretty convinced you’re always just one recipe away from liking something you thought you never would.  So!  Try this today and let me know what you think.  Fish sauce can be found in most Asian sections of supermarkets near all the soy sauce, but if you have trouble, you can definitely find it at any Asian mart in town.

roasted broccoli and brussels sprouts


Roasted Broccoli and Cauliflower with Fish Sauce Vinagrette

1 medium head broccoli
1/2 head cauliflower
Olive oil
Salt and pepper to taste
4 tbs Fish Sauce Vinaigrette (recipe follows)

Preheat oven to 400F.  Cut up the broccoli and cauliflower into small, bite sized pieces.  I trim the “trees” in half so that they roast better.  You want to aim to make the size of your vegetables all nearly the same so they cook at the same rate.  Toss in a couple tablespoons of olive oil and spread out on a large rimmed baking sheet.  Don’t crowd the pan.  Put it on two pans if you need to.  Sprinkle with salt and pepper and roast for about 20 minutes, or until they start to get kinda crispy and browned on the edges like in the photo above.  When they’re done, toss in a large bowl with the vinaigrette and serve immediately.  For some reason, broccoli gets cold faster than any other vegetable known to man.

Fish Sauce Vinaigrette

1/2 cup fish sauce
1/4 cup water
2 tbs rice wine vinegar
Juice of 1 lime
1/4 cup sugar
1 garlic clove, minced
1 to 3 red bird’s-eye chilies, thinly sliced

Combine everything in a large mason jar with a tight fitting lid.  Or any container with a tight fitting lid that won’t leak.  Shake it all around until the sugar dissolves.  Keep in the fridge for up to a week.

Time for Spring

We have less than ideal weather conditions in this region.  Lubbock has some of the worst dirt storms imaginable, the worst wind and the hottest summers.  We’ve been suffering through a drought the past 3 years and two years ago it was the worst we’d seen in nearly a century.  No rain that year from January till April of the next year (and even when the rain did come, it was one or two light showers).  Trees died and were uprooted, everyone’s yards were yellow like straw.  Farmers had to look for employment elsewhere, wildfires burned up homes, livestock, and thousands of acres of land.  Everywhere there were severe water restrictions and the people who cheated could be seen a mile away with their green, foot-thick sod yards that they clearly watered around the clock.  Needless to say, things haven’t been growing very well for aspiring back-yard farmers lately.  But with a few inches of rain last year and a few inches of snow this winter, we are more hopeful for the spring.  There’s still watering restrictions – we can only water on Tuesdays and Fridays, using either drip irrigation or standing there, holding a hose, but we are optimistic that maybe this year, something can grow.

Seeing growth is healing.  When you sow a seed and water it and leave, trusting that it will grow, you have faith in the purest form.  And when that faith is rewarded by a tiny, green shoot popping out of the dirt (and it’s not a weed) it gives such a rush that you want to do it again and again.  I’ve never been a successful gardener (rain helps) but this year, I’m going to try my best.  Choosing vegetables that say “full sun” is a start, and I’m focusing on herbs, which are used most frequently and are the most pricey per-ounce at the store.  And since nearly every single recipe in my most recent cookbook obsession calls for parsley, chives, tarragon, or chervil, and chervil is no where to be found in this town, I’m going to just grow my own.  (Lord willing.)

After working in the yard today and feeling the warmth creeping in the air, I decided to keep dinner light tonight.  I chose a green lentil, leek and endive salad and roasted some free sausages Matt got as a thanks from the butcher for buying a good cut of beef on Saturday.  Odd, but hey, we’ll take it.  And you’re welcome, Mr. Butcher.  Thank YOU for carrying dry-aged USDA prime.  Oh, and Olive wasn’t a fan of the texture of this salad.  She immediately scraped her tongue with her fingers to get every last lentil off.  Ah well, at least she tried it! green lentil salad 2 green lentil salad1

Green Lentil, Leek and Endive Salad

serves 4 to 6

1 cup green lentils
3 cups water
3 tbs extra-virgin olive oil
1 leek (white and pale green parts only), halved lengthwise, rinsed, and thinly sliced
1 garlic clove, minced
1 large head Belgian endive (or two small), root trimmed off and leaves sliced
1 tbs snipped fresh chives
2 tbs heavy cream
1 tbs white wine vinegar
Salt and pepper to taste

Rinse, drain and pick through the lentils to discard any debris.
Place the lentils in a large saucepan with the water and bring to a boil.  Reduce the heat and simmer, partially covered, until the lentils are tender but still firm, about 15 minutes.  Drain, rinse with cool water, and drain again.  Transfer the lentils to a serving bowl.
Heat 1 tbs of the olive oil in a small saucepan over medium heat.  Add the leeks and cook, stirring, until they are slightly wilted but still have some crunch, about 2 minutes.  Add the garlic and cook, stirring, about 30 seconds more.  Add the leeks and garlic to the bowl with the lentils, along with the sliced endive and chives.
In a small bowl, whisk together the remaining 2 tablespoons olive oil, the heavy cream, vinegar, and salt and pepper.  Add this dressing to the lentils.  Toss to combine.


Serve the salad immediately at room temp.  Sear off some sausages for a full meal.

Baby Food – Creamed Spinach and Basil

spinach

Yesterday was one of those days when things just weren’t quite right.  I was getting over a stomach virus so I was getting nothing done and Olive refused to eat any part of a dish I cooked because it had peas (a dish she’s eaten before with much gusto), and thus, ate only orange foods and milk all day.  I really haven’t quite figured out days like that.  I try not to put too much thought into it and move on to the next meal, assuming she’ll eat more at dinner if she didn’t eat much at lunch and vice versa.  It’s hard to remember that babies aren’t little robots you can program as you like.  Some days I don’t feel like eating much for lunch, but I’m ravenous at dinner.  Some days I feel like bacon and eggs and toast and jam for breakfast and some days I’m just in the mood for coffee.  I only assume children are the same (maybe not the coffee part.)  I think it’s important in these seemingly picky-eating times to remain consistent.  Don’t start a bad habit just to get through a rough patch.  If through the picky days, we remain calm and smiling and say, “These two things are for lunch – take them or leave them” I think children will catch on a lot quicker that meal times are directed by mom and dad – and not by them.  A world where a baby dictates what we have for dinner – Lord, help us all…

Today was a little bit better.  Olive ate a two ounce portion of this spinach basil dish, and some leftover mango from yesterday – that was lunch!  Oh, and bits of our chicken, after we thought she had enough to eat 🙂

This is, by far, one of my favorite side dishes, and one of my favorite ways to cook/eat/enjoy spinach.  Matt and I found this recipe from watching an episode of Martha Stewart Living, where the great Jean-Georges Vongerichten cooked his amazing chicken and potatoes (where the potatoes are better than the chicken) and served this spinach on the side.  What a warm, comforting, indulgent family meal!  We have made both of these recipes multiple times over the past few years and each time, they feel new and exciting.  The spinach and basil would be absolutely perfect at Thanksgiving as a side dish.  There’s something about the basil that adds so much depth of flavor to the dish.  The cream helps with that, too…

Today, I didn’t have any fennel or serrano peppers, so I left them out of the original recipe, (which I highly recommend)  but I found it to still be wonderful and ideal for a baby in the 8 month and up range.  To make this for a baby just introduced to solids, simply blend with a couple tablespoons of water or chicken stock.

Creamed Spinach and Basil

serves 4 small portions.  Or 2 and a hungry baby

  • Coarse salt and freshly ground white pepper to taste
  • 3 cups tightly packed spinach leaves
  • 3 cups tightly packed basil leaves
  • 1 tablespoon olive oil
  • 4 tablespoons finely chopped shallots
  • 2 teaspoons finely chopped garlic
  • 3 tablespoons very finely chopped celery
  • 1 1/2 cups heavy cream
  1. Bring a large pot of salted water to a boil. Add spinach and basil and cook until wilted. Immediately transfer to an ice-water bath. Drain and squeeze dry; coarsely chop and set aside. (It looks like there’s hardly enough for one person – it spreads out and thickens up with the addition of the other ingredients, promise.)

  2. Heat oil in a medium skillet over medium-high heat. Add garlic and shallots and cook until golden. Add celery and continue cooking until soft and translucent.

  3. Add cream and let reduce until thickened, about 10 to 15 minutes. Add spinach and basil and stir to combine. Cook until warmed through. Season with salt and pepper; serve immediately.


Spinach and Basil 2


A little side note for any moms out there who might have a similar issue to me – Olive eats more…diligently…if she is holding something in her hand.  I am not a fan of letting her try to feed herself, yet, and letting her hold a toy is too distracting.  Most things are too distracting, but if we find that she can’t focus on the meal, I usually offer her one of her “salt and pepper” shakers.  She can hold them in her hands and it almost seems the instant she grabs one, she will happily take several more bites.  So, these are her salt and pepper shakers.  Filled with white and long grain black rice, respectively.  They make a nice shaking sound, the rice stays IN the container, and later, as she develops, she can even pretend to season her food.  Although we will certainly teach her to not season before she tastes, as a courtesy to the chef. 😉

spinach and basil 4


spinach and basil 3


7G9A0510

Bye-bye, Papa (said every day after lunch when he goes back to work – she’s going to be one tomorrow – how on earth did we get to this point?)


Poached Egg Salad with Bacon and Sherry Dijon Vinaigrette

Poached Egg Salad with Bacon and Sherry Dijon Vinaigrette

Everything about this salad is good.  The vinaigrette is simple to make and extremely satisfying to me, a reformed cream-based dressings only kind of person.  I’m from Portales, NM – we like ranch dressing more than we should.  Any time Matt would order a vinaigrette at a restaurant, I would scoff as if he were simply trying to make a point that I should choose a healthier option because how could he really prefer a vinaigrette?  Well, I think you could easily prefer this one.  This salad has enough richness from the bacon (just one strip per person) and the poached egg that when it’s all combined, everything balances out perfectly.  This recipe is again, from the genius and simple, Bonne Femme Cookbook.  I think I’m unintentionally cooking my way through this book.  I made a diversion last week and cooked out of the Everyday Food magazine and while all the recipes were good, once I started this week cooking out of Bonne Femme again, I think Matt and I were both secretly relieved.  I can’t quite put my finger on why all the recipes work so well – I haven’t screwed up one, yet, and I’ve made nearly a dozen different recipes!  Maybe the mystery is that the French like everything to have a sauce?  It certainly creates a warmth for every meal that would be lacking otherwise.  And even with all these sauces, I’m still losing weight (down two more last week)  Woohoo!

So here’s to a salad with a sauce all its own when the yolk combines with the vinaigrette.  I made it a bit heartier by roasting some asparagus to have along side.  Asparagus and runny egg yolks are best friends, by the way.

Scared to poach an egg?  Well, you can buy one of those insert things that you put into a pot on your stove, or what I did was bring a medium saucepan to an active simmer (not boiling – I left my burner on medium heat), crack your egg into a small bowl first and then get your water swirling in a tornado fashion and then dump your egg into the middle of the swirling water.  It will look like a walleyed mess at first, but after 3-4 minutes, you can check the egg with a slotted spoon and if your whites are done and your yolk still feels jiggly to the touch, then it’s good to go.  The recipe suggests putting two tablespoons of white wine vinegar into your water to keep the whites from scattering so much. I forgot to do this, but am anxious to try again, soon.

Poached Egg Salad with Bacon and Sherry-Dijon Vinaigrette
serves 4

4 slices thick cut bacon, but into 1-inch pieces
3 cups torn mixed greens
1/2 cup sliced red onion
4 large eggs
1 recipe Sherry Mustard Vinaigrette (recipe follows)
Salt and pepper to taste

Cook the bacon in a skillet over medium heat until crisp; remove from the skillet and drain on paper towels.
Toss the greens and red onion in a medium sized salad bowl.
Poach your eggs to desired done-ness, adding 2 tbs of vinegar to the water before adding the eggs.  Here’s another tutorial on how to poach an egg.
When the eggs are almost done, toss the bacon in the bowl with the greens and add enough vinaigrette to coat the leaves well – you may not need the whole recipe and less is more – an over dressed salad gets soggy  and gross really quick.
Arrange the salad among four serving plates and top each with a poached egg.  Season the egg with salt and pepper and serve immediately.  If you want to serve it with the asparagus, I’ve got the recipe for you below.

Sherry-Mustard Vinaigrette

In a small bowl, combine 1 clove of minced garlic with salt and freshly ground black pepper to taste.  Mash them together with the back of a spoon to make a rough paste.  Add 1 tablespoon sherry vinegar; whisk with a fork until the salt is dissolved.  Whisk in 2 teaspoons Dijon mustard.  Slowly add 3 tablespoons extra-virgin olive oil, whisking until incorporated.

Simple Roasted Asparagus

Wash and trim your asparagus.  Coat all the stalks in 2 tablespoons of olive oil.  Sprinkle evenly with salt and pepper.  Roast in a preheated 400F oven for 15 minutes.  Squeeze a few drops of lemon juice over and serve!

Roasted Butternut Squash with Brown Butter

Every time someone asks me how to cook any vegetable, my answer will 99% of the time be: roast it.  Olive oil, salt, pepper, done.  That’s all you need.  I have discovered a new, refreshed love for so many vegetables by simply roasting them.  Butternut squash is one that benefits from this cooking method more than most.  As King of the Squash (a term I deemed it worthy) the butternut squash is more dense, less watery and has a deeper flavor than most squash.  In the winter months, it’s the most perfect side dish for any meal, and since it can be pureed beautifully or left in small chunks, it is the perfect baby food for babies just starting out with solids, or graduating into finger foods.

I found the easiest way to cut up a butternut squash for this recipe is by cutting it into cross sections:

bns2

Once you scoop out all the seeds, begin cutting off the rind.  The rind so tough, no amount of cooking will really make it edible. I mean, it is edible, but it wouldn’t be enjoyable.

bns3

Once you get all the rind off, cube up the squash into about 1/2″ cubes.  It’s important to keep your cubes all the same size because when things are varying sizes, they cook at varying times, and it makes everything more difficult when trying to get dinner on the table to wait for a 1/3 of your squash to continue cooking.  So.  Be consistent in your chopping!

Now comes the easy part.  Spread out all the squash on a large, rimmed baking sheet and toss 2 tablespoons of oil till completely coated, and sprinkle with kosher salt and pepper.  Roast at 400 for 45 min to an hour.  I want to add that your baking sheet needs to be big enough so that your squash isn’t completely crowded and piled on top of each other.  I’ve roasted it that way and the squash just steams and you don’t get those nice, charred bits that add to the texture and depth of flavor of this dish.

bns4

So you want to bake it kind of past the point where you think you should.  I always wait till a few edge pieces look a little burnt.

When they’re out of the oven, immediately put them in a bowl to keep warm.  They’ll cool off pretty quick on the pan.  Now for the magic.  Take a tablespoon of butter (be generous, verging on two tablespoons) and put it on the stove on medium heat in a stainless steel pan.  Let the butter melt and swirl it around until the foam subsides.  Then, when it starts to smell rich and nutty and there are butter solids forming at the bottom of the pan (this is why you use stainless – you can’t see this happening in a black, non-stick pan) remove the butter from the heat, pour over your bowl of squash and sprinkle with cinnamon, Chinese 5 Spice, pumpkin pie spice – whatever strikes your mood!  My go-to is Vietnamese Cinnamon.

Let me tell you – this is magical stuff with the addition of the browned butter.  I deeply believe that butter in moderation like this is not only fine, but life-giving.  The richness of browned butter could make anyone feel like a king at the table.  Cooking for your family is all about making them feel loved, warmed and nurtured.  If you wanted to get creative, throw a sage leaf in with the butter while it’s browning. (By the way, that makes an amazing ravioli sauce)  And yes, I realize I’m putting a recipe that has browned butter under the category of “healthy meals.”  I’ll rant about that in another post, but let me just say that I think there’s a lot more to eating healthfully than counting calories.  And 1-2 tablespoons of fat (okay 3 counting the olive oil) is about a tablespoon of fat per serving.  We’re not going to kill anyone with those ratios. And we’ll have happy eaters!

bns1

When I cook for Olive, I don’t ever hold back on spices except for salt and extremely hot spice (and even then, I salt, just less than what I’d prefer, and I let her have a bit of something spicy to see if she likes it.)  She happily ate these little nuggets the entire time we ate.  So that meant a happy, quiet baby for nearly an hour of eating.  Is THAT motivation enough to make this for your baby?  If you have a baby who isn’t eating chunks yet, simply take about a half cup of the squash into a bowl, add a bit of low sodium chicken broth or water and puree with an immersion blender.  Add a bit more cinnamon or butter and you have an amazing puree for your little 4-6 month old!

Enjoy!  And don’t forget to let me know how it turns out.  I know I just basically wrote out the recipe, but I hate blogs who do that and then don’t put a straight-forward version down below for me to copy/paste.  So!

Roasted Butternut Squash with Browned Butter

1 butternut squash, 2-3 lbs
2 tablespoons olive oil
Kosher salt and fresh ground pepper to taste
1-2 tablespoons unsalted butter
Cinnamon or whatever spice you think sounds good!

Preheat your oven to 400.
Slice the butternut squash into 1″ cross sections.  Scoop out the seeds (I use a metal measuring spoon – they have sharper edges for scraping) and cut into 1/2″ cubes.
Arrange the squash on a large, rimmed baking sheet.  Drizzle with olive oil until thoroughly coated and then sprinkle with salt and pepper.
Roast in the oven until some pieces begin to brown, about an hour.  Check the cooking at 30 minutes and stir the squash around to ensure even baking.  I know my oven has hot spots and I assume yours does, too.
Once the squash is done roasting, place it in a bowl to keep warm.
In a small saute pan, heat butter over medium heat until foam subsides and brown bits start to form on the bottom of the pan.  You’ll want to swirl the pan a few times and really watch.  There’s a HUGE difference between browned butter and burnt butter and you don’t want the latter.  I think the whole process takes about 5 minutes, but it will vary so once you smell that intoxicating nuttiness, you’re done.
Pour butter over squash and adjust seasoning as you like.

Enjoy!  Serves 4 as a side dish.  Or package it all up into freezable portions for baby, if you can part with it.