Cappuccino Chocolate Cake

cappcake3

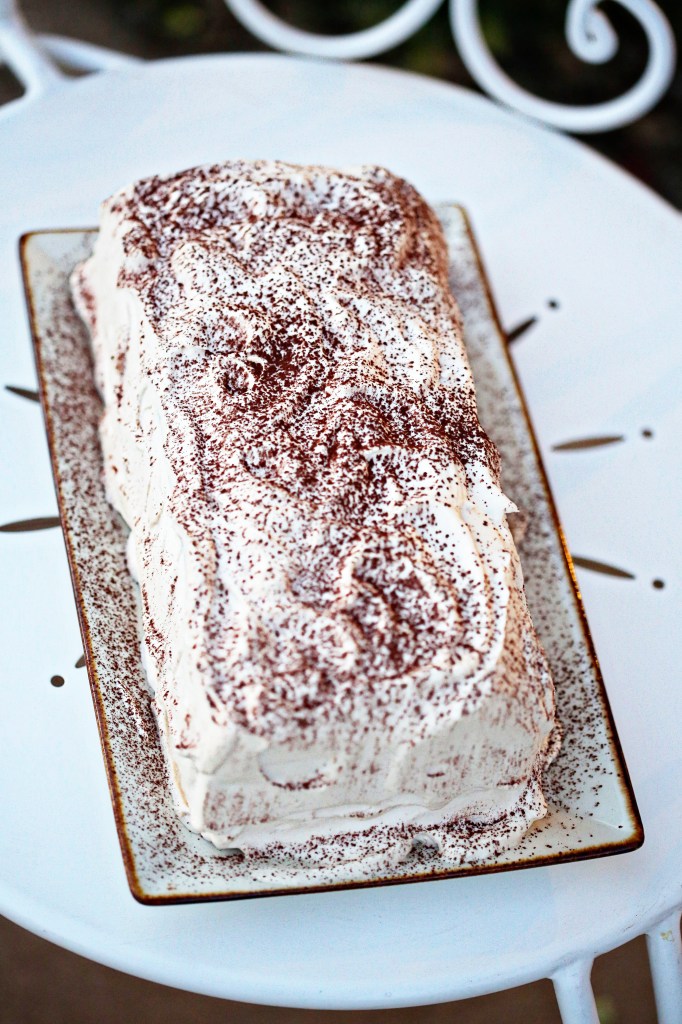
Some things get better with time: wine, cheese, beards…this cake.  I made it on Sunday afternoon and we had a piece and it was extremely good, but we wrapped it up and let it sit in the fridge for a few days and THEN it was something to behold.  The layers meld into one another after a couple days in the fridge.  The whipped cream softens the layers of chocolate cake and it transforms into a Swiss Cake Roll/Tirimisu kinda thing and it’s amazing.  Good news: it’s a really great cake if you eat it instantly.  Greater news: it only gets better from there.

The recipe comes from Fran Bigelow’s wonderful book, Pure Chocolate.  I learned how to make truffles from this book with much sweat, tears and good results.  Fran is the expert when it comes to chocolate and none of her recipes have steered me wrong.  Her truffles and chocolate tempering require huge amounts of patience.  They simply can’t be rushed.  And when I have about 2 days, I want to try her recipe for dark chocolate brandied apricot torte.  But I didn’t have that much time and saw that this cake took only a couple hours. It delivered rich chocolate and creamy coffee flavors and honestly, what is better than that combination?  This is the perfect party cake or good to have in your fridge (since it lasts all week) to whip out with a cup of coffee when a friend stops by.  Given that friends still stop by in your neck of the woods.  Oh, to live in Mayberry…

cappcake


Cappuccino Chocolate Cake
serves 10-12

6 ounces bittersweet chocolate (70% is preferable), finely chopped
6 large eggs, separated
1/2 cup plus 1 tbs sugar
3 tablespoons brewed cooled espresso
Cappuccino Whipped Cream (recipe below)
dark cocoa powder for dusting

With a rack positioned in the middle of the oven, preheat to 325F.

Lightly butter a 9×13″ or quarter sheet pan and line with parchment paper.  Lightly butter the parchment paper.

In a glass bowl set over a sauce pan of barely simmering water (I prefer this to a double boiler, as my DB always heats too quickly and scorches the chocolate = sad Alisa) and melt the chocolate.  Remove when nearly melted and continue stirring until smooth.  Set aside.

In a mixer fitted with the whisk attachment or using a hand mixer, combine the egg yolks and half the sugar and whip on medium high speed.  Once combined, scrape the sides of the bowl and increase the speed to high.  Continue whipping until the mixture becomes thick, pale yellow in color, and the sugar has dissolved, 5 to 6 minutes.

Clean the whisk and in another clean bowl, begin whipping the egg whites on medium high speed, increasing the speed until frothy.  Slowly add the remaining sugar and continue whipping until the peaks are stiff but not dry.

Pour the cooled coffee into the melted chocolate all at once and quickly stir together to prevent seizing.  If it does thicken and start to separate, don’t worry.  Constant stirring will make it smooth and creamy.

Lighten the chocolate mixture by folding in one-third of the yolks.  Then add the lightened chocolate mixture to the remaining yolks and gently fold.  The mixture will become light and airy with large air bubbles where some traces of yolk remain.  That’s okay and kind of pretty, anyway.

Lighten the yolk mixture by quickly folding in one-quarter of the whites, then gently fold in the remaining whites in 3 parts, trying not to over mix and lose the volume.

Pour the glossy dark chocolate batter into the prepared pan, smoothing the top.  The pan will be more than three-quarters full.  Bake for 20-25 minutes, until the top is slightly domed in the center and dry to the touch.  A tester inserted will come out dry and clean with a few crumbs.  Let cool in the pan at room temp.  The layer will pull away from the sides of the pan as it cools.

Have ready the Cappuccino Whipped Cream filling in the fridge.  Remove the cooled cake by running a thin bladed knife around the edges of the pan.  Place the bottom of the baking sheet lined with parchment over the cake and invert.  Peel the parchment paper off.

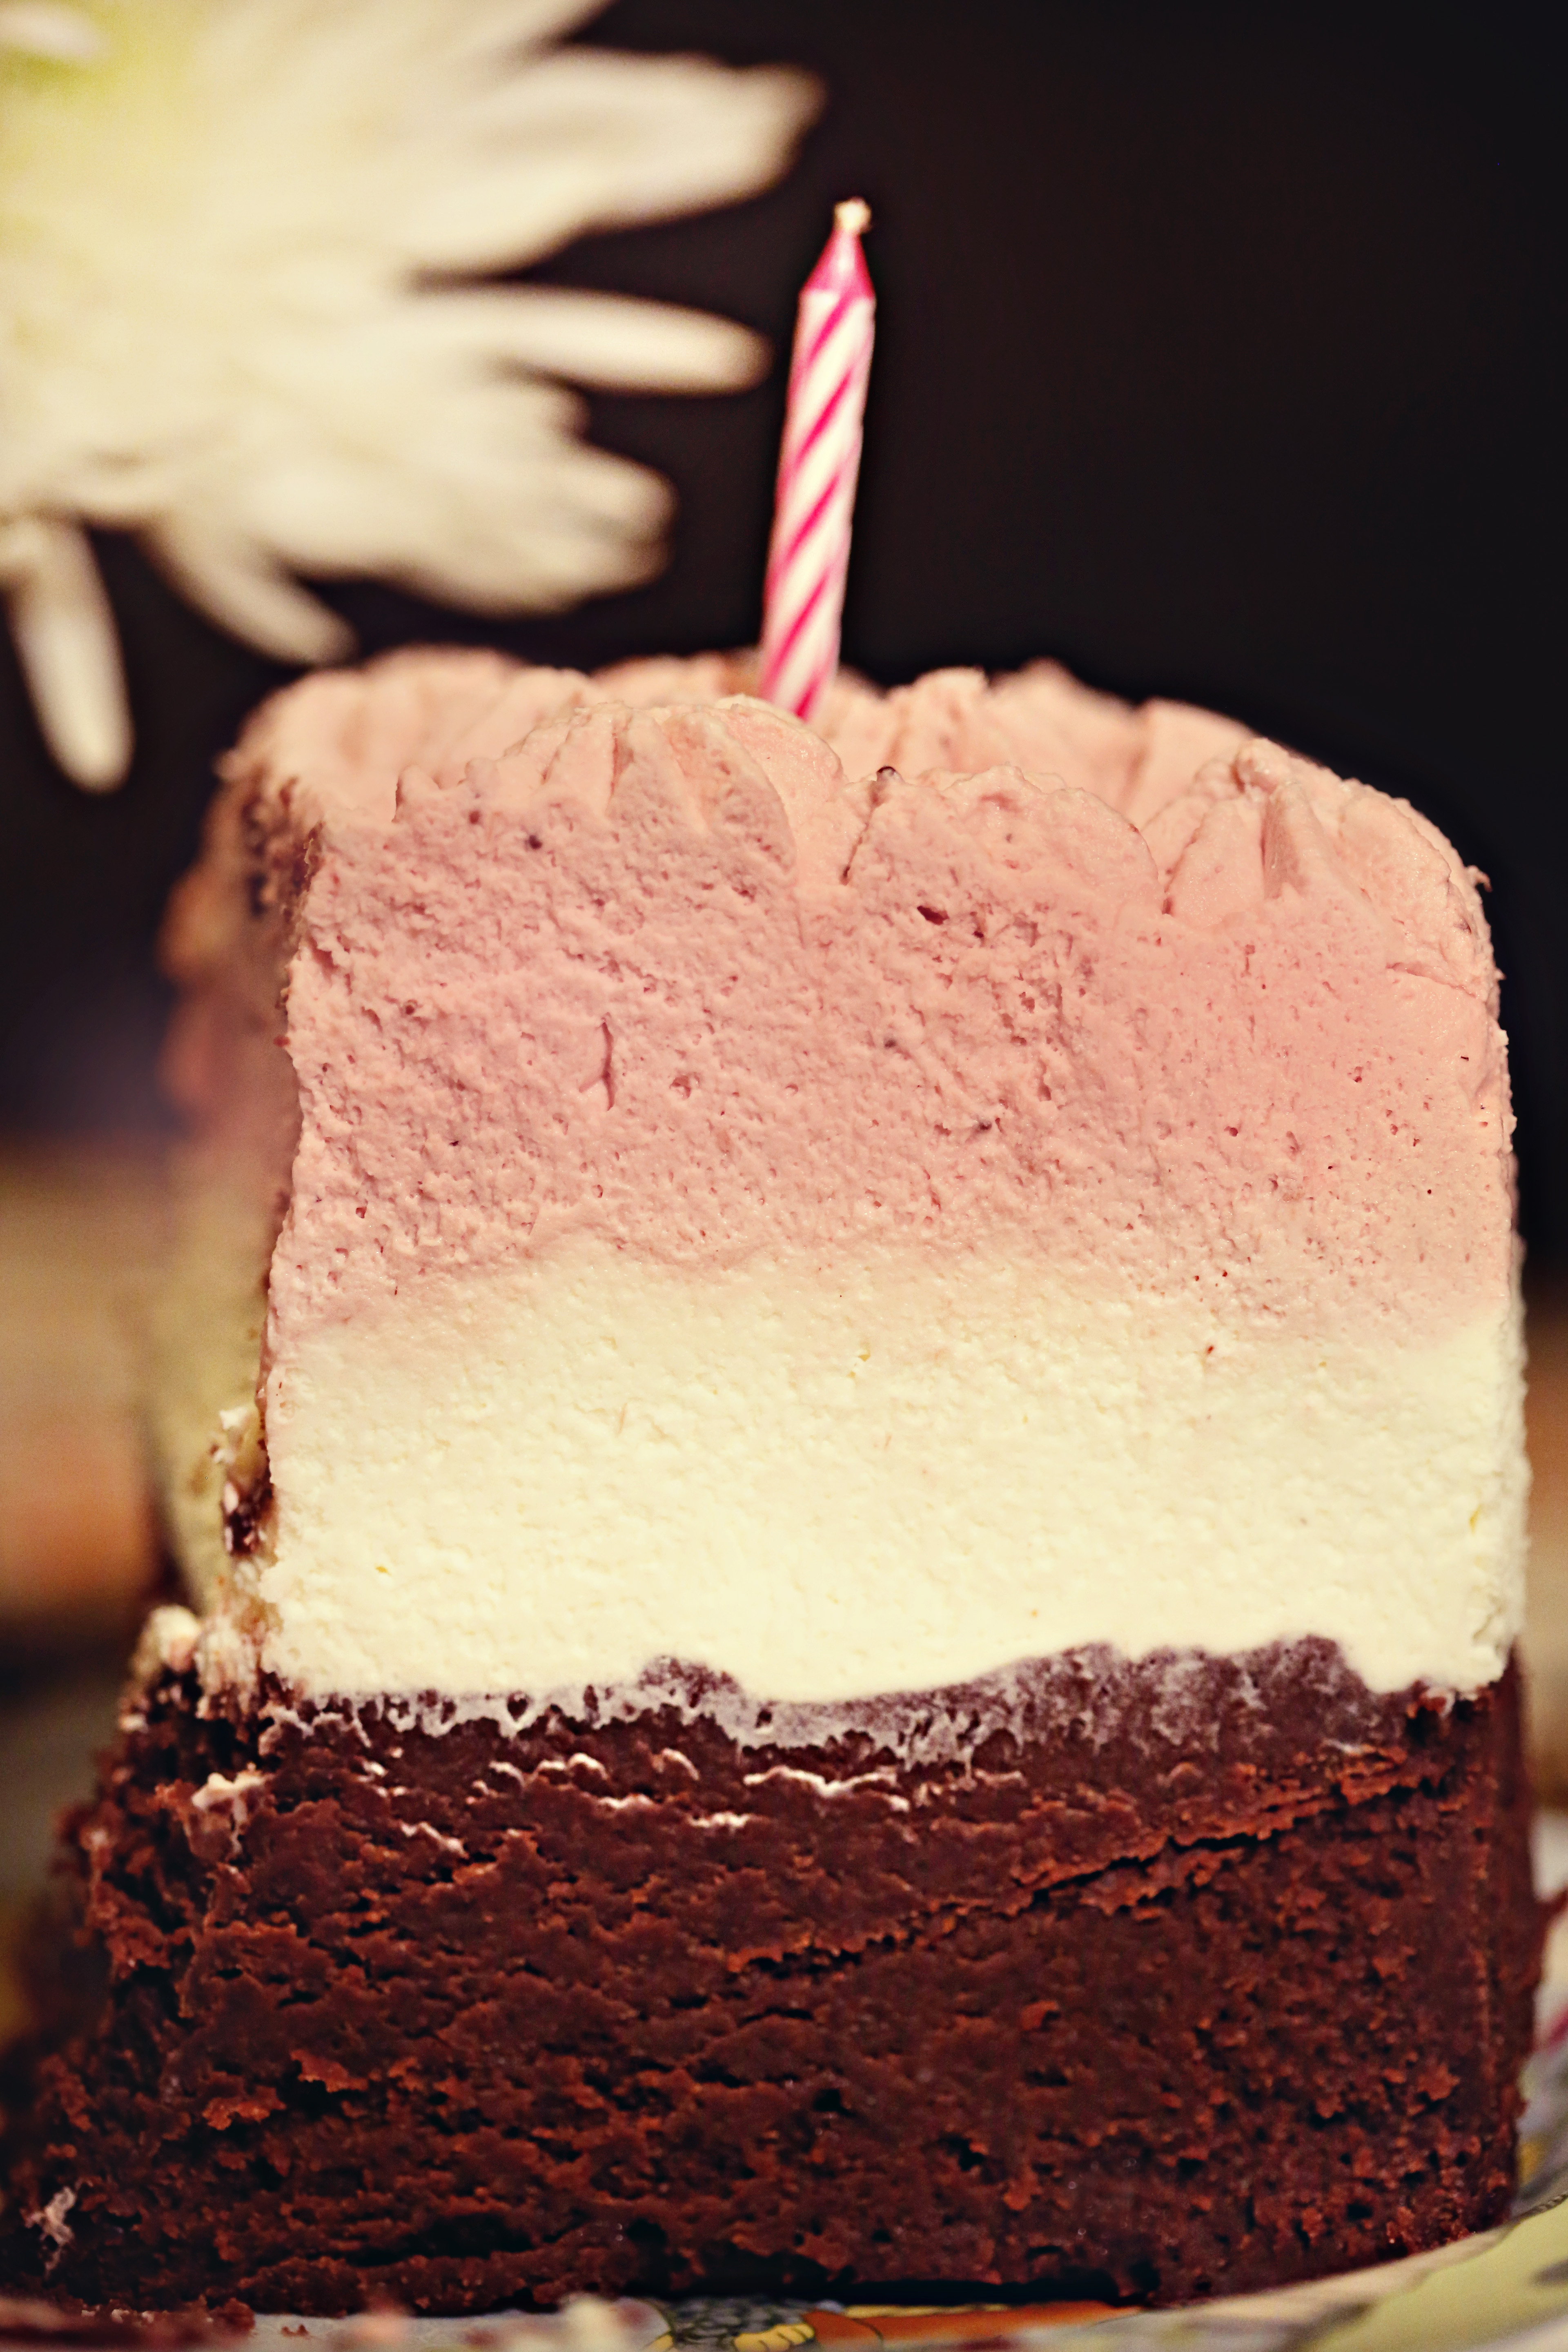
Using a ruler and the tip of a paring knife, mark the cake into 3 equal sections across the width.  Cut the cake with a serrated blade to make 3 layers about 4 inches wide each.

Place one chilled cake layer on a serving plate.  With a metal spatula, spread one third of the filling over the layer, generously overlapping the edges.  Repeat with second layer and a layer of filling. (The layers should be equal in height to each other.)  Top with the last chilled cake layer.  Be careful not to overwork the cream and frost the top and sides.  Refrigerate at least 4 to 6 hours to set the cake an meld the flavors.  Before serving, dust with cocoa powder.  Can be stored in the fridge for up to 2 days (or a week, if you’re us)

Variation: to make this child-friendly(er): just omit the espresso from the whipped cream.

Cappuccino Whipped Cream
makes 3 1/2 cups

1/4 cup plus 2 tbs sugar
3 tbs brewed espresso
2 cups heavy cream, chilled

In a stand mixer fit with the whisk attachment, whisk together the sugar and coffee until frothy.  The sugar will begin to dissolve.  Add the cream and whisk until thoroughly combined and soft peaks form.  Take care not to over whip the cream as it may begin to lose its creamy texture.  Store in the fridge till ready to use.

cappcake2

Asparagus Tart – Roasting is still the best way to eat vegetables

asparagus tart 3

I know I said I’d write about what got the most requests on my question last week, but I haven’t had time to do a good job with the requests I got, so that will come at a later post.  The top requests were for kale.  Honestly, I’m a bit stumped.  What, exactly, is the mystery?  Put it in stuff?  Ha!  That would be my suggestion.  Stir it into soups, toss it in salads and wilt it a bit with warm roasted chicken or hot bacon.  However, I don’t want to be flippant, so I will look up some good uses for kale, the sad-replacement-for-chips, and get back to you.  The other suggestion that intrigued me was for proper hash browns.  My friend, Maria, said that she had tried them several times and hadn’t gotten that good, diner-esque texture to them.  Honestly, I haven’t, either.  So I am interested to look up ways to cook hash browns well and that will most definitely be a post, as it will be a learning process for me, as well.

Today I wanted to simply give you an awesome recipe that we had last night for dinner, as our “starter” dish.  A beautiful use of asparagus (hey, Tracey, you asked for asparagus recipes, too!) and a lovely and exciting way to serve them that feels indulgent (bet you’ve never used that word in association with asparagus) and fun for children, and even doable for one-year-olds learning to eat bigger chunks of food.  Olive ate about 6 bits of this tart and then she was done. I consider that a success.

Having a box of frozen puff pastry in your freezer at all times is a good move.  This stuff can make you look like a fabulous cook in about 20 minutes.  You can top it with anything and bake and have great appetizers, desserts, or a crust for a savory tart, like this one.

Also, I wanted to mention my deep love and perhaps borderline obsession with using up leftovers.  My goal at the end of most weeks is for my fridge to be empty, save condiments and milk.  It’s good to think of ways to use up your leftovers and I know no better way than to use eggs to achieve almost-better-than-the original-meal leftovers.  This morning, I took leftover pieces of the asparagus tart and fried an egg and put it on top.  Lots of fresh ground pepper and a few drops of hot sauce.  So good.

breakfast2

Asparagus Tart

serves 4

1 sheet of puff pastry, thawed
1 bundle of fresh asparagus, ends snipped and cut in half, length-wise (I found that this helped them cook faster than the original recipe)
Olive oil to coat the asparagus – 2 tbs
Freshly ground pepper and kosher salt
2 oz shredded Manchego cheese – Parmesan or Swiss would also work

Preheat the oven to 400F.  On a greased, rimmed baking sheet, roll out your puff pastry to about 9×13″ rectangle.  Poke all over the bottom with a fork and bake for 15 minutes, until golden.  Toss your asparagus in olive oil. When the pastry comes out, it will have shrunk.  It’s okay, I swear.  Cover the tart in the shredded cheese and lay your asparagus spears side by side, touching, and alternating head to toe (this just makes more asparagus fit and it looks prettier.)

asparagus tart 1


Sprinkle the top of the tart with salt and pepper.  If you have leftover asparagus spears, just place them, cut side down, on the baking sheet around the tart.  They turned out to be gloriously crispy when they came out.  Bake for 25 minutes until the asparagus is nicely wilted and slightly browned.  Let cool slightly, cut with a sharp knife into squares and serve!

In the morning, heat leftovers in a 350F oven and fry an egg to place on top.  Enjoy with a cup of coffee and try not to think about the fact that it’s only Wednesday.

asparagus tart 2

breakfast

*original recipe from Martha Stewart Living

A First Birthday Cake

olive-00171

Exactly one year ago, this pic was taken.  Olive was just 6 days old and we were home, out on our porch, having a glass of wine and marveling at this red headed little girl in our arms.  Matt made a birth DAY cake that we had when we got home from the hospital with friends and family to celebrate her actual birth and the only thing that changed this year was the cake and the size of the red head.

482407_10151518156698265_1304279150_n

We’ve had such a wonderful year with Olive.  It’s been amazing to watch her discover things, develop likes and dislikes (kitties, peas – respectively) and one of the most enjoyable activities in my life this year has been showing her food.  It’s crazy to realize that these little creatures don’t know what ANYTHING is.  They don’t know a peach from a mango from a pear from a plate of spaghetti.  They don’t know how garlic smells while roasting or the magic that is mire poix sizzling away in butter.  It’s our JOY to get to show them!  For

“…no matter what they think, we know: We are the ones who have tasted and seen how gracious it all is.” 

In this spirit of education, Matt and I contemplated what we wanted Olive to try for her first birthday.  She’d had many fruits so I considered a lemon layer cake, strawberry shortcake, something with banana cream.  Matt really wanted her to have chocolate for the first time and REALLY GOOD chocolate, at that.  So we combined forces and created a Neapolitan-esque cake with a flourless chocolate cake as the base, a white chocolate mousse in the middle and topped with a thick, strawberry whipped cream.  The chocolate cake is by far the best chocolate “cake” I’ve ever had.  Taken from the brilliant Dave Lebovitz, it’s nearly like a truffle center, or the best fudge of your life.  The white chocolate mousse was taken from Annie’s Eats, which I’d used on a cake for Matt for Valentine’s day this year, which he was crazy about.  And then the strawberry whipped cream was just a last minute sort of creation by me for Olive.  Because she loves strawberries and I figured if she didn’t like the rest, she’d at least like a third of her cake and we wouldn’t look like complete fools when it came show time.

Olive's Birthday Cake

For the bottom layer, Matt baked it in a 9″ round cake pan.  We had a hard time getting the cake out (panic moment) and so I crumbled it all up and pressed it tightly into a spring form pan.  Then I lined the pan with a couple layers of acetate strips, stacked on top of each other and taped on the outside, to get that tall form for piping in the other two layers.  All you do is pipe in the white chocolate mousse on top of the chocolate cake, let it sit in the fridge while you make the whipped cream, and then pipe in the whipped cream and wrap plastic wrap across the top of the tube so it doesn’t dry out and let it sit in the fridge over night, or for an hour in the freezer.  This makes it much easier to cut.

Chocolate Cake (Orbit Cake)

14 tablespoons unsalted butter, cut into 1/4″ cubes, plus more for the pan
10 ounces 62% semisweet chocolate, finely chopped (our FAVORITE dark chocolate, which we exclusively used for this cake, is Lindt’s 70% dark chocolate bars.  Heaven.)
5 large eggs
1 cup granulated sugar

Position rack in the middle of the oven and preheat to 350F. Lightly butter a 9×2″ round cake pan and line the bottom with parchment paper (if you do this easy step, you won’t have to mush it all into a spring-form pan like I did.)
Place the butter and chocolate in a glass bowl and microwave at 30 second increments, stirring after each, until the chocolate is completely  melted, glassy, and incorporated with the butter.
In a large bowl, whisk together the eggs and sugar.  Gradually whisk in the melted chocolate mixture and continue whisking until thoroughly combined.
Pour batter into the prepared pan.  Place the pan in a larger roasting pan, and cover the top of the cake pan with foil.  Add enough hot water to the baking pan to come halfway up the sides of the cake pan and bake for 1 hour and 15 minutes to 1 hour and 30 minutes until the cake has set.  To test, touch the center of the cake lightly with your finger: the surface will be slightly tacky, but your fingers should come away clean.
Carefully remove the cake pan from the water bath and place on a cooling rack to cool completely.
Cover the pan with plastic wrap and refrigerate for at least 2 hours – up to 3 days.
To assemble with the mousse, run a knife around the edges of the cake to loosen the sides.  Invert onto a serving plate, wrap in the acetate strips (or wax paper – tape doesn’t stick to parchment) and get on with making the next step.

White Chocolate Mousse

1 1/2 tsp powdered gelatin
2 tbs water
12 oz white chocolate chips (don’t use almond bark – it won’t taste right)
3 cups heavy cream

Sprinkle the gelatin over the water in a small bowl and let stand at least 5 minutes to soften.  Place the white chocolate in a medium bowl.  Bring 1 cup of the cream to a boil in a small saucepan.  Remove the pan from the heat, add the gelatin mixture and stir until dissolved.  Pour the hot cream mixture over the white chocolate and let stand about 1 minute.  Whisk until the mixture is smooth.  Cool to room temperature, about 5-8 minutes, stirring occasionally.

In the clean bowl of a stand mixer fitted with the whisk attachment, whip the remaining 2 cups of cream at medium speed until it begins to thicken.  Increase the speed to high and whip until soft peaks form when the whisk is lifted.  Using a whisk, mix one-third of the whipped cream to the white chocolate mixture to lighten it.  Fold in the remaining whipped cream gently with a rubber spatula until no streaks remain.  Spoon the white chocolate mousse into the pan over the chocolate cake.  Smooth the top with an offset spatula.

Strawberry Whipped Cream

1 jar of strawberry jam – the fancier the better
3 cups heavy cream

Scrap the jar of jam into a small saucepan over low heat and add about 1/4 cup of water.  Heat it just enough so that it incorporates with the water and you break up any lumps with a whisk and the jam is smooth.  Transfer it to a bowl and let it cool about 30 minutes, stirring occasionally to help it cool.
In a stand mixer with a whisk attachment, stir the cream on medium for a while until it starts to thicken.  Then whip on medium high while you gently let the jam stream into the edge of the bowl, careful to not hit the whisk in the middle, until completely incorporated.  Whip until a little firmer than soft peaks.  At this point, I added a little red food coloring (just a few drops) to make it more pink and folded it in with a spatula until fully incorporated. Do what you will with that.  I just wanted it to be pink to truly look Neapolitan. Transfer cream to a piping bag fitted with a large star tip and pipe, pipe, pipe until you can’t pipe any more.  Have fun with it.  Make zigzags and peaks and star flowers – whatever you want.  Just fill in all the gaps and sprinkle the top with extra crunchy sugar for effect.

serves at least 20

Poached Egg Salad with Bacon and Sherry Dijon Vinaigrette

Poached Egg Salad with Bacon and Sherry Dijon Vinaigrette

Everything about this salad is good.  The vinaigrette is simple to make and extremely satisfying to me, a reformed cream-based dressings only kind of person.  I’m from Portales, NM – we like ranch dressing more than we should.  Any time Matt would order a vinaigrette at a restaurant, I would scoff as if he were simply trying to make a point that I should choose a healthier option because how could he really prefer a vinaigrette?  Well, I think you could easily prefer this one.  This salad has enough richness from the bacon (just one strip per person) and the poached egg that when it’s all combined, everything balances out perfectly.  This recipe is again, from the genius and simple, Bonne Femme Cookbook.  I think I’m unintentionally cooking my way through this book.  I made a diversion last week and cooked out of the Everyday Food magazine and while all the recipes were good, once I started this week cooking out of Bonne Femme again, I think Matt and I were both secretly relieved.  I can’t quite put my finger on why all the recipes work so well – I haven’t screwed up one, yet, and I’ve made nearly a dozen different recipes!  Maybe the mystery is that the French like everything to have a sauce?  It certainly creates a warmth for every meal that would be lacking otherwise.  And even with all these sauces, I’m still losing weight (down two more last week)  Woohoo!

So here’s to a salad with a sauce all its own when the yolk combines with the vinaigrette.  I made it a bit heartier by roasting some asparagus to have along side.  Asparagus and runny egg yolks are best friends, by the way.

Scared to poach an egg?  Well, you can buy one of those insert things that you put into a pot on your stove, or what I did was bring a medium saucepan to an active simmer (not boiling – I left my burner on medium heat), crack your egg into a small bowl first and then get your water swirling in a tornado fashion and then dump your egg into the middle of the swirling water.  It will look like a walleyed mess at first, but after 3-4 minutes, you can check the egg with a slotted spoon and if your whites are done and your yolk still feels jiggly to the touch, then it’s good to go.  The recipe suggests putting two tablespoons of white wine vinegar into your water to keep the whites from scattering so much. I forgot to do this, but am anxious to try again, soon.

Poached Egg Salad with Bacon and Sherry-Dijon Vinaigrette
serves 4

4 slices thick cut bacon, but into 1-inch pieces
3 cups torn mixed greens
1/2 cup sliced red onion
4 large eggs
1 recipe Sherry Mustard Vinaigrette (recipe follows)
Salt and pepper to taste

Cook the bacon in a skillet over medium heat until crisp; remove from the skillet and drain on paper towels.
Toss the greens and red onion in a medium sized salad bowl.
Poach your eggs to desired done-ness, adding 2 tbs of vinegar to the water before adding the eggs.  Here’s another tutorial on how to poach an egg.
When the eggs are almost done, toss the bacon in the bowl with the greens and add enough vinaigrette to coat the leaves well – you may not need the whole recipe and less is more – an over dressed salad gets soggy  and gross really quick.
Arrange the salad among four serving plates and top each with a poached egg.  Season the egg with salt and pepper and serve immediately.  If you want to serve it with the asparagus, I’ve got the recipe for you below.

Sherry-Mustard Vinaigrette

In a small bowl, combine 1 clove of minced garlic with salt and freshly ground black pepper to taste.  Mash them together with the back of a spoon to make a rough paste.  Add 1 tablespoon sherry vinegar; whisk with a fork until the salt is dissolved.  Whisk in 2 teaspoons Dijon mustard.  Slowly add 3 tablespoons extra-virgin olive oil, whisking until incorporated.

Simple Roasted Asparagus

Wash and trim your asparagus.  Coat all the stalks in 2 tablespoons of olive oil.  Sprinkle evenly with salt and pepper.  Roast in a preheated 400F oven for 15 minutes.  Squeeze a few drops of lemon juice over and serve!

Caramelized Banana Chocolate Chip Muffins

bananachocolate2

When I think of a true indulgence, I think about baked goods.  During my time of extra strict sugar restriction while I get my remaining baby weight off, I give myself one day a week to indulge in items that would really not even be allowed in moderation for me during the week.  I have to have that day.  It keeps me going during the week to think about all the scones and muffins and other breads I can have on Saturday.

When I was pregnant with Olive, I craved sugar constantly.  Matt likes to joke that Olive is mostly made out of Oreos and cereal.  I ate other things, but yes, carbs were king.  I made baked goods all the time, especially in the last trimester during the coldest part of winter.  For weeks, I kept us stocked up with various muffins for breakfast.  The combination of banana and chocolate chip became Matt’s favorite, and so when we were discussing a post I could do for Friday, he suggested I do banana chocolate chip muffins.  Banana’s Foster has been a favorite dessert (a favorite – there are many) of mine for a while, now, and so when I know there’s potential for bananas AND brown sugar AND melted butter in a recipe, I want to make it as bananas-fostery as possible.  So for this recipe, (adapted from allrecipes.com)  that meant browning the butter (duh) and letting it bubble away with the mashed bananas and substituting some of the white sugar for brown sugar.  I didn’t add rum, but that’s only because I thought it would get lost with the addition of dark chocolate chips, anyway.  I’d really like to try this creation without the chocolate next time (maybe tomorrow?) and add some rum to see if I can taste my efforts at creating a Bananas Foster muffin a little bit better.

I made a “mistake” with my alterations to the recipe.  I didn’t wait for the batter to cool (it was quite hot from being on the stove, turning into caramelized bananas) before I added the chocolate chips, so naturally, they melted.  I was unhappy with my dumb mistake at first, but decided to go with it and when they came out of the oven, I was happy to see a little swirly effect in the batter, which I thought was quite pretty.  I topped the muffins with a slice of banana and brown sugar and some with extra chocolate chips while in the oven.  The brown sugar that melted into goo on top of the bananas was a nice touch.  These muffins are definitely more dessert than breakfast, so maybe you should have them for afternoon snack time with a cup of coffee, instead of breakfast.  I wouldn’t want you to have to take a mid-morning nap or anything…

Caramelized Banana Chocolate Chip Muffins
yield: 1 dozen

1 1/2 cups all-purpose flour
1 teaspoon baking soda
1 teaspoon baking powder
1/2 teaspoon salt
1/2 teaspoon cinnamon
3 super duper ripe bananas, mashed, plus one banana for slicing as the topper for the muffins
1/2 cup white sugar
1/2 cup packed brown sugar
1 egg, lightly beaten
1/3 cup butter, melted and browned, if you know what’s good for you
1 cup chocolate chips

Preheat the oven to 375F.  Spray 12 muffin papers with non-stick spray and place into muffin tin.
In a large bowl, mix together the flour, baking soda, baking powder, salt and cinnamon.
On the stove, in a medium sauce pan, melt the butter until it begins to brown (you’ll see those grainy butter solids settling at the bottom of the pan) and add the bananas and sugars and let it bubble away for about 10 minutes on medium low heat, stirring periodically.  Remove from heat and let cool slightly and then scrape every last gooey drop into your flour mixture.  Mix well (I just used a fork) and then add your egg and mix just until incorporated.  At this point, if you want your chocolate to remain chips, let your batter cool for a while.  A trick to keep your chocolate chips from settling to the bottom of your muffins is to lightly coat them in flour before mixing them into your batter.  After the batter has cooled, gently fold the chips into the batter and spoon into the muffin liners.  I didn’t let my batter cool, so I was left with melted chocolate worked throughout.  I didn’t totally mix it up so it left a neat swirly effect in the muffins.  You just do whatever makes you happy.
Top the muffins with slices of banana and sprinkle extra brown sugar on top of each slice.
Bake in preheated oven for 18-25 minutes (mine took 23) until a toothpick comes out clean.

bananachocolate1


Enjoy your weekend, lovely folks.  See you Monday with a light recipe to start things off right.

The Humble Omelet – if you have eggs, you have a meal.

It’s Monday.  In the fridge, there’s a half eaten container of fried rice, a tub of yogurt, some loosely covered bowl of something I ate last week in the very back and an almost empty container of milk.  I haven’t been to the store to stock up for my week of ambitious cooking at home but I don’t want to immediately admit defeat and head out to eat for lunch.  This happens every week.  And nearly every time I think there’s nothing good to eat for lunch, I realize that I have eggs.  If I have eggs, I have a meal.  Because there’s almost always some bits of cheese, unused herbs, bits of leftover meats or veggies or some leftover that can be incorporated into an egg dish.  If you have eggs and an onion and potato, you can make a hash.  If you have eggs and leftover veggies, you can make a frittata.  If you have eggs and nothing else but butter, you can make an amazing omelet.  Goodness, I’m glad I’m not a vegan.

Many esteemed chefs have done their share of obsessing over the simple preparations of an egg.  Chef Gordon Ramsay has the cooking of an egg as an exam, of sorts, for cooks aspiring to work in his restaurants.  Chef Wolfgang Puck had an omelet making contest as a qualifying exam for the most recent season of Top Chef.  Julia Child is famed for her demonstration of cooking a French omelet, much like the recipe I’ve written about here, and it was Jacques Pepin who taught my husband how to roll an omelet using just the pan.  Eggs are simple and beautiful and need hardly any embellishment to make a wonderful meal.  The recipe below is almost as simple as it gets.

omelet1

If you’d like to fill your omelet with more items, try bits of soft goat cheese, some shreds of Parmesan, crispy pieces of prosciutto or sauteed mushrooms.  Don’t overfill.  This is an IHOP move and it’s what we’re typically used to, but for this recipe, you’re not going for a burrito effect where the eggs act as a tortilla.  You’re really showcasing how a delicately seasoned and well cooked egg can be immensely satisfying and flavorful and not too filling.

A Simple Omelet – serves 1, even after looking in the fridge and determining there is nothing to eat.

3 eggs, room temp (set eggs in a bowl of warm water and they’ll be room temp in half the time)
Salt and pepper to taste
1 tablespoon unsalted butter
1 teaspoon fresh herbs, roughly chopped (we primarily use thyme and chives)

Crack your eggs into a separate bowl and whisk very well until no separation of whites and yolks remain.  Season with salt and pepper – really just about a 1/4 teaspoon and a few grinds of pepper.  Over-salting an egg is a grave mistake that you just can’t come back from.  It ruins them.
Heat the butter in a large, non-stick pan over medium heat (my skillet is a 10″.) Put two plates into a 200 degree oven to keep warm.  As we all know, eggs cool off REALLY quickly.  This helps.
Pour the eggs in and swirl the pan around to cover the bottom.  With a spatula, stir the eggs around in the center – don’t mess with the sides yet – create holes and shuffle things around for the first few seconds the eggs are in the pan.  As you shuffle and create holes and gaps, swirl the pan around and fill in the holes with the runny eggs.  Do this a few more times till the liquid in the egg starts to dissipate but still looks a little runny on top.  At this point, sprinkle your herbs over half the omelet.  Carefully, run your spatula around the edges of the pan and flip about a 1/4 of the omelet over itself from right to left.  If you’re deft with the pan skills, you can dump the egg onto your plate and roll the omelet up perfectly while doing so.  I don’t possess such skills yet, although I will continue to try.  I just use the spatula and continue to fold my omelet from right to left till it’s completely rolled up.  This creates nearly four folds.

omelet2

See the thin layers?  I must give credit where credit is due – Matt made this beautiful, delicate omelet.  The inside is cooked and yet still creamy and not dried out.

Garnish your omelet with extra herbs and enjoy!   Skip the 5 o’clock rush at the grocery store tonight and stay home.  If you have eggs, you have dinner.