Happy Thanksgiving!

Santa's Little Helper2

This is the Super Bowl of a cook’s world.  I love this holiday and I certainly don’t want to skip over it in a rush to get to Christmas!  Since Matt and I began developing our love of cooking almost 10 years ago, we have looked forward to Thanksgiving a little more each year.  I think, in a way, we are trying to create our own family traditions this year, with a little family of our own.  We realized with a hint of despair the other day that we may not get to host our own family Thanksgiving until our children are in college!  So we decided that along with trying out new recipes each year and saving some old favorites, we’d have our own Thanksgiving at our home, before heading out of town to spend time with our extended families.

This was our Pre-Thanksgiving!  I printed off each recipe and kept the stack on our counter to refer to as I did my prep.  I couldn’t sleep Monday morning, so I got up around 5 and started chopping leeks, mushrooms and Brussels sprouts.  We had a few friends over who each brought an amazing pie and some blue ribbon biscuits from our friend, Rod, who still won’t share that recipe, almost 20 years later.  🙂 I didn’t get pictures of everything, nor was I trying to do a post on any one particular recipe.  I just took some pics that I could and let the rest go – this was about having a great time with friends and not about styling a plate of food. However, I did get links to the recipes for everything we did.  Everything turned out really fantastic – loved the Brussels Sprouts and the Cheesy Squash Cassrole and that cocktail made everything just a little more sparkly. 😉

brussels sprouts with blue cheese and bacon
Brussels Sprouts with Blue Cheese and Bacon

cranberry orange relish
Cranberry Orange Relish
pimento cheese twice baked potatoes
Twice Baked Pimento Cheese Potatoes

Santa's Little Helper
The cocktail of the evening that made EVERYONE happy – Santa’s Little Helper.  This will be making a repeat appearance. turkey porcetta
Turkey Porcetta

Dishes I made but failed to get a photo of:
Mushroom and Bacon Stuffing
Cheesy Squash Casserole

Again, everything was wonderful and we had a great time with our friends!  Happy Thanksgiving to everyone – have safe travels and we’ll see you back here next week with a report on all the goodies we make at my parents’ house in New Mexico.  There’s a S’mores pie I’ve been wanting to create…


Homemade Creamy Tomato Soup

tomato soup for a cold dayTomato Soup buried

It’s a beautiful, cold fall day!  Yesterday it was dark and very cold and it called for a cup of soup in hand and little else.  When Matt makes us his pizza on the weekends, I am always left with about 9/10ths of a can of tomatoes and inevitably during the week, that gets turned into tomato soup.  I keep adding a spice here or there, fresh basil if I happen to have it, and no matter how I tweak it, it always turns out great.  For this version, I had some stale bread from Matt’s weekly baking that I turned into croutons. I hate wasting his bread, even the stale stuff, so it gets turned into croutons, breadcrumbs or savory stuffings every time.  The good thing about breads that are as plain and rustic as his, is that they don’t mold very quickly – they just dry out.  Perfect!  The croutons were tooth-shatteringly hard, but after a few minutes in the soup, they were extremely flavorful little sponges.

Happy Fall – it’s in the air!  It’s marvelous!  There’s a faint scent of wood burning in our neighborhood and it’s a treat to get to walk outside.  It’s a treat to be alive, today, really.  Tomorrow doesn’t exist, don’t spin all day for it.  Yesterday can’t be changed, don’t regret it.  Live today and today only!  Yesterday I recalled one of my favorite quotes,“Those who make the worst use of their time are the first to complain of its brevity.”
― Jean de La BruyèreLes caractères.  This quote challenges me to not waste my day thinking about what all I have to do, or what all I didn’t get done yesterday.  It helps me to not sit around wasting time on my phone and it helps me to realize that time with 1 and a half year old Olive is extremely rare and won’t be here for long.  So we make a mess drinking our soup and we laugh and I try to take her up on her offers while I’m working to, “mama pay? mama do somting?” a little more frequently.

Homemade Tomato Soup

Creamy Tomato Soup from Scratch
serves 3-4

1-28oz can whole tomatoes (I love Cento brand!)
1 tbs red wine vinegar
1 garlic clove, crushed
1 tbs olive oil
Whatever herbs you like – dried thyme, rosemary, sage, oregano – they’re all good and they all work.  Stick to about a teaspoon.
A splash of cream – eh, if I had to measure, I’d say 1/8th of a cup
Salt and fresh cracked pepper, to taste

Put the olive oil in a medium saucepan and add the garlic clove.  Saute over medium heat until starting to brown.  Add in the entire can of tomatoes, red wine vinegar, herbs and stir to combine.  With an immersion blender, pulse until completely blended and smooth.  Add in the cream, stir to incorporate and adjust the seasoning with salt and pepper.  Let it simmer on the stove for about 10 minutes and serve hot with crackers, croutons, or the classic grilled cheese.  Enjoy!

tomato soup face tomato soup tomato baby

Shocking Red Pasta – just in time for Halloween

Pink Pasta

I’ve been busy working on a post about my week in food.  By request, a few of you expressed interest in seeing the “normal, everyday” recipes we do around here, so every night since my Sweet Potato Pie post (below), I’ve been taking pics of some element of what we’ve eaten at most meals.  There’s a few keeper recipes in there, so stay tuned!

For today – RED pasta!  It looks almost gruesome.  I got the recipe from Clotilde’s amazing vegetarian cookbook, The French Market Cookbook.  She called it Shocking Pink Pasta, but mine was just not pink, it was straight-up RED.  I wasn’t a huge fan of the addition of the cumin (no offense to the original recipe – it’s not you, it’s me,)  so I swapped out dried thyme (in my head) and I think it would go great with the other flavors.  This is a good use of beets, once again.  I just love them.  This dish had great flavor, was a stretch for the imagination and was actually pretty fun – not exactly the most common words you’d use to describe a simple dinner that took 20 minutes to make, was healthy and included beets.  If I were you, I’d serve this for dinner on Halloween night.  Then you could sit back and eat a side of leftover candy and not feel too much remorse with your blood, I mean beet-stained hands 🙂  Bwahahaha…

Shocking Red Pasta
serves 4

2 cups beets, about 4 medium – peeled and cubed
1 cup light whipping cream
1 garlic clove
1 teaspoon kosher salt
1 teaspoon ground thyme
1 pound pasta
Freshly ground black pepper
1/2 cup chopped fresh flat-leaf parsley
2⁄3 cup almonds, toasted

In a food processor or blender, combine the beets, cream, garlic, salt, and thyme. Process until smooth.  Bring salted water to a boil in a large pot. Add the pasta and cook until it’s al dente. Drain, return the pasta to the pot, and fold in the sauce. Return to medium heat and cook until heated through, about 1 minute.  Divide among warm bowls, sprinkle with pepper, and top with the parsley and almonds. Serve immediately.

Pot Roast Pies

Pot Roast Pie
It’s official.  I’m in fall-cooking mode.  Bring on the orange vegetables and the slow cooked meats and the braising liquids.  Bring on the pies with custard fillings and mulled wine.  Let the apples stew in cider and the cinnamon sticks abound, we have officially fallen into the best time of year!  I love how the natural seasons for foods are meant to put a little extra meat on your bones to survive the cold winter months.  Even though most of us have climate controlled air year round, I still appreciate the way shopping seasonally will naturally guide you through the year.  I am jumping the gun just a tad, but since the 10 day forecast has us in the 40s at night and the 70s in the day, I’m embracing the way things feel.  I have waiting a long, hot summer to start dreaming of stews and caramelized butternut squash.  I’m ready.

Let’s start with bringing back the Sunday pot roast.  Matt and I want to have that tradition for our family.  Growing up, we both regularly had pot roast on Sunday afternoons after church.  It’s the natural ease of letting something cook on the stove or in a slow cooker while you’re at church.  Mom always make yeast wheat rolls to go with it.  Some of my favorite food memories came from that meal and I will feature her winning recipe on this blog soon!  Matt has made a few amazing versions and I tried a recipe I saw on Pinterest yesterday and it was remarkably easy and very flavorful!  Then, today for lunch, I played with the leftovers and came up with little pot roast hand pies, covered in pan juices.

Pot Roast Pie with Pan Juices

This was a good move in all directions.  Leftover pot roast from yesterday with potatoes and carrots.  Chopped up a few pieces of each component and tucked spoonfuls into the only pie dough worth memorizing and baked.  I didn’t want to add too much of the leftover cooking liquid from the roast inside the pies because I didn’t want them to be soggy as they cooked and leak out everywhere.  So, once the pies came out, I ladled warm, beefy pot roast juices over the pie itself and it soaked up just enough for the crust to not be too dry, yet it remained crispy and flaky and buttery.  Best. Fall. Lunch. Ever.  Too bad the baby wouldn’t partake.  She really missed out.  Too many eggs for breakfast, I guess.  Although, I think on a day when she is super hungry, she will really like this.  I can just see her cute little hands holding a tiny pie.  Ah, well.  Maybe next time!

Sunday Pot Roast Pie

Balsamic Orange Pot Roast*
serves 4-6

4 – 5 Lbs of Beef Chuck Roast
2 cups water
1/2 Cup Light Brown Sugar
1/4 Cup Balsamic Vinegar
1 Tbs of Soy Sauce
1 Tsp of Salt
1/4 Tsp of Red Pepper Flakes
3 Cloves of Fresh Garlic – Pressed
Zest of one orange
a few fingerling potatoes
4 large carrots, peeled and chopped into 2″ pieces

Put the roast in your slow cooker and surround with the potatoes and carrots.  Mix all the other ingredients together and pour over the roast.  Cook on low for 8 hours.  Eat and enjoy and the next day…

The Best Pie Crust Ever
2 sticks of cold butter, chopped into little pieces
2 cups of flour
1 tsp kosher salt
1/8 cup ice water

Put a cup of flour in your stand mixer with a paddle attachment and add the salt.  Mix to blend.  Add half the butter by small handfuls, beating on low until all the butter is fully incorporated into that cup of flour.  Then, add the next cup of flour and beat on low until completely blended.  Then, add the water sprinkle by sprinkle until the dough comes together and stays together when pressed with your fingers.  Separate into two discs, wrap in plastic and let chill for at least an hour.  Take out 20 minutes before making the hand pies so they will roll out easy.

Assemble!

Take a few components from the leftovers – a bit of roast, some carrots and potatoes.  Chop well!  Heat up the juice from the leftovers on low on your stove.  Roll out your pie dough and cut out 4″ circles.  Fill the circles with 2 heaping tablespoons of roast mixture.  Place another 4″ round of dough on top and crimp the edges.  Brush with a beaten egg and bake at 375F for 30-40 minutes, until the crust is nicely browned.

Place a hand pie into a shallow bowl and ladle a warmed cup of leftover pot roast juice over the pie and serve immediately!

*recipe adapted from The Chic Site

Parsnip Puree with Coriander Brown Butter

parsnip002

I remember the months of making Olive’s baby food with great fondness and happy farewells.  While it was fun to show her new foods, I was all too glad to stop blending and pureeing things like chicken pot pie or beef stroganoff.  Because while certain foods look nice pureed, others look like…gray.  And gray just isn’t an appealing color in the food world.

Whenever I see recipes for purees, I instantly think, “That’s baby food” because it was to me.  I never followed the rules of how to feed your baby what at what age, except for the standard “biggies” like honey, peanut butter and strawberries.  I just always blended up whatever we were having and it always worked out great.  Her first foods weren’t bland cereals, but full flavored vegetables.  Olive ate and enjoyed nearly everything my trusty immersion blender wanted to create and I think, because of that, she isn’t very averse to strong flavors, spices and seasonings.  I always seasoned her baby food.  I’d hold back on the salt more than what my palette would prefer, but I felt that her food should taste good and that if we enjoyed it, she’d enjoy it!

Today’s recipe fits a lot of current trends.  Substitutions for those evil, fear-inducing potatoes?  Check.  Browned Butter?  Check.  Calling baby food a puree and feeling fancy while serving it for dinner?  Check.  I made this dish last night as a side to lamb chops and roasted broccoli.  (Olive gnawing on the lamb chop ranks up there with Greatest Moments Ever.)  We all enjoyed it and I think it will make an appearance again during the fall season.  Those crusty bits that Olive called bacon?  Yeah, that’s roasted garlic.  Totally awesome.  If I could do anything, I’d make parsnips not so sweet.  And then, by George, they’d actually taste like mashed potatoes!  🙂

parsnip003

Parsnip Puree with Coriander Brown Butter*
serves 4-6 as a side

2 lbs parsnips, peeled and chopped into 1 inch pieces
5 TBS unsalted butter
2-4 TBS milk
Salt and fresh ground pepper
1/4 tsp ground coriander
2 cloves chopped garlic

Boil the chopped parsnips in salted water until tender.  Transfer to a food processor, or to a large bowl if using an immersion blender.  Add two tablespoons of butter, the milk and salt and pepper and blend until smooth and creamy and no chunks remain.  Add a dash more milk if you want.  Adjust the seasoning with salt and pepper to taste.

In a stainless steel skillet over medium heat, add the remaining three tablespoons of butter, coriander and chopped garlic.  Swirl the butter around until bubbling and starting to brown.  Keep the garlic moving around so it doesn’t burn.  Remove from heat and pour over the parsnip puree to serve!

*recipe from Real Simple magazine this month, in which they gave us four entire weeks of dinner planning.  I’m not going to squander that work done for me, so we’re eating through Week 1 and enjoying it very much.  Especially the lack of effort part.

Crustless Asparagus Quiche and the End of All Dieting

asparagus custard

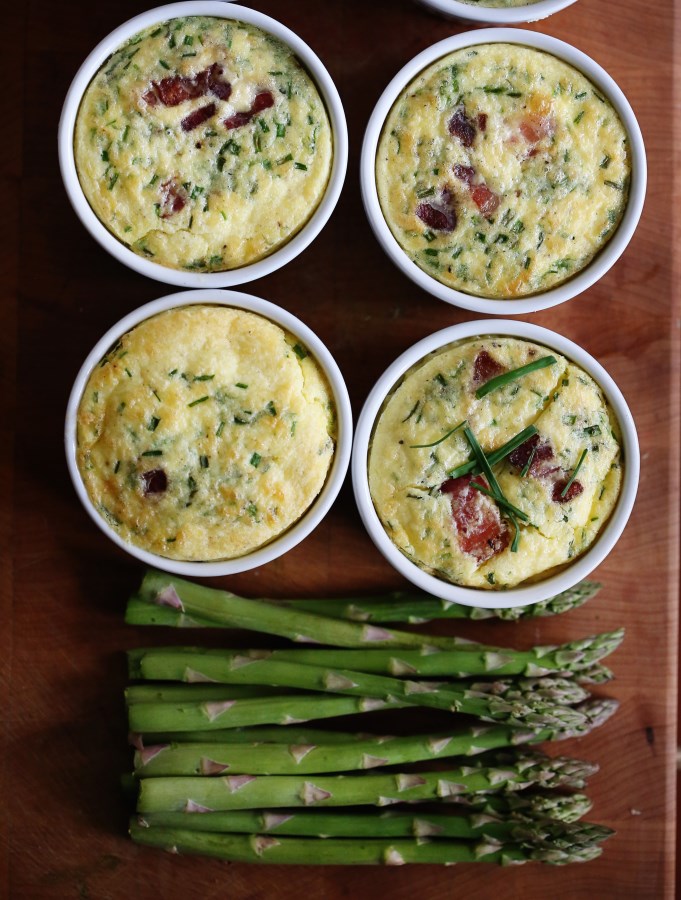
I was first introduced to a savory custard by the wonderful food blogger, Helene Garcia of French Foodie Baby.  The first savory custard I made was her leek and chive flan and I was a bit afraid at first because we just have ingrained in our minds that custards and flans are supposed to be sweet, but this was a very happy and luxurious surprise.  Basically, in American terms, this is a crustless quiche.  Only waaaaay better of a texture than the quiche of your childhood.  Please do refer back to my quiche post on how its texture should be.  I was happy that it was such a silky texture and that Olive could eat it just fine with her limited spoon wielding skills.

I stumbled upon this asparagus and bacon custard in a book called French Women Don’t Get Fat, which I’m reading and working my way through the steps to reshape my life and my patterns of eating.  The book presents a bit of a strict start (a cleanse, which I don’t think is totally necessary for success, just optional) followed by three months of self evaluation of the patterns you’ve made over the years and ways in which you could cut back without feeling deprived.  After three months, by the book, you should only be HALF WAY to your goal weight.  If you are, then she advises to add back a few more pleasures and get on with your life!  If not, then keep going with the plan, making additional adjustments if necessary.

I’m happy to have finally found a book that doesn’t restrict you, doesn’t say that a particular food or food group is bad, and doesn’t push supplements.  I’m DONE with that vicious cycle of crash dieting and then giving up, gaining back and doing it all over again because every new diet makes a new promise.  Why do we keep doing this to ourselves?  I found myself having an epiphany the other day that a diet that promises you’ll lose all the weight you need to lose in a few weeks will only work if it only took you a few weeks to gain that weight.  And like me, I’m sure most of us with serious weight issues have struggled a BIT longer than weeks or even years with our weight.  So why does it not register in our minds that in order to keep a good, healthy weight, we should logically change the way we do things for 10-15 years at least?  Personally speaking, I’ve struggled with my weight for about twenty two years and most of that time was wasted, going through diet after diet that restricted too much, left me wanting and frustrated and ultimately, feeling like I am a loser and can never succeed.

After 11 days of following this book and eating what I personally feel was a bit too indulgent of a menu, I’m down seven pounds.  I know what you’re thinking: all water weight, and besides, wasn’t she just preaching that weight loss shouldn’t be sudden?!  You’re right, it shouldn’t.  But for one, I have a lot to lose and the more you have to lose, generally, the quicker you will drop pounds (at first).  Second, I’ve completely cut out all snacking and all second helpings.  Man, that adds up to a lot with just those two bad habits!  Especially if you snack several times a  day!  The only other thing I’ve given up has been cream in my coffee and that, for me, was the biggest challenge because I love my coffee.  But, for these first three months of “readjusting” how I do things, I don’t consider it that much of a burden to give up roughly 200 calories a day that used to be dedicated to cream in my coffee!  I have even started to prefer it black with just a little sweetner (stevia, for those concerned).  I haven’t been stressed about working out – I just have been taking more walks and enjoying the new, cooler fall weather and I’ve been pulling a few weeds here and there.  This is my new life.  I was done with diets a few years ago, but I was still engaging in bad habits.  It’s hard to undo years of emotional eating, but I’ve found that the distraction of Olive is a grand one.  Or, if I just HAVE to ingest something in the afternoon, I make a cup of cinnamon tea (it’s naturally sweet) and get productive!

This custard recipe was breakfast for a few days last week.  Again, I know what you will say.  This has cream, eggs, bacon AND it’s in a “diet” book?  Yep.  Moderation + Fulfilling Meals = Success.  Moderation + Drab, Restrictive Meals = Failure. I really recommend you picking up this book IF and only if you are done yo-yo dieting,  if you like to cook and you are ready to stop restricting yourself and feeling guilty for eating things like butter.  I’ll keep you posted on my progress and I hope that I can encourage some of you to stop the fad madness and just start “eating real food, not too much, mostly plants.” (from the omnivore’s dilemma) 🙂

Asparagus custards

Asparagus Custard (crustless quiche, if it makes you feel better to call it that)
makes 6 – 1 cup ramekin servings

16 asparagus spears, tough ends cut off and peeled
4 ounces bacon, coarsely chopped
8 eggs
2 cups milk
1 cup heavy cream
8 sprigs chives, minced
1/4 teaspoon salt
1/4 teaspoon black pepper

Preheat oven to 350F. Boil the asparagus in salted water for 5 minutes. Drain and let cool. Chop each stalk into a small dice and set aside.  Saute the bacon in a nonstick frying pan till crisp. Drain on paper towel and set aside.  Mix remaining ingredients in a large bowl (reserving some chives for garnish). Pour the egg mixture into individual ramekins. Sprinkle in the asparagus and bacon. Bake for 15-20 minutes till the custard is set but not dried out.  Serve with pieces of toast, crackers, or with some fresh fruit and enjoy your day!

Zucchini Bruschetta – Hold Off on Cardigans a Little Longer…

Zucchini Bruschetta detail

The summer seems to be winding down, although I wouldn’t be surprised if we had 100 degree days well into October.  I’m getting in that cozy fall mood, already, though, and it’s dangerous because I want to wear cardigans and listen to jazz and eat pumpkin flavored things and it’s still 98 and muggy outside.  Sometimes if the summer goes on a little too long, I start protesting by wearing my sweaters, regardless of the temp.  I consider it my adult fussypants-ness.  Everyone’s got a cross to bear – mine is shorts-weather.

This recipe keeps me mildly okay with the fact that it’s still summer.  It’s so fresh and happy and has such bright, bold flavors and colors that it makes the perfect appetizer when your friends are keeping you company in the kitchen as you finish roasting the pig…or whatever it is you cook for your friends.  This is also a great way to use up the only thing you got to grow in your garden, this year.  What is it about zucchini?  Why does it:
1. Always grow
2. Grows as big as a Great Dane
3. Give you more yield than any one family could ever consume?

Zucchini gives false hope.  “Hey, you can grow me!  Now let’s see how you do with carrots!  Go on!  I want to see you try!  Loser.”

Or that’s how my zucchini plant makes ME feel…

zucchini bruschetta appetizers

Zucchini and Olive Bruschetta*
serves 6-8 appetizer sized portions

1 baguette, cut into 1/4″ slices
2 tbs olive oil, plus more for drizzling
4 small zucchini (about 12 ounces)
1 large avocado (ripe, duh)
zest and juice from one lemon
12 large mint leaves, chopped
1/3 cup toasted almonds or any nut, really
1/3 cup chopped catamala olives, or whatever floats your boat
2 ounces pecorino romano, parmesan or other firm cheese you enjoy

Heat oven to 375°F and arrange a rack in the middle.  Slice zucchini lengthwise into 1/3” slices and then stack the slices and cut into 1/3 “ matchsticks lengthwise. Once all the zucchini are sliced, cut them lengthwise into 1” pieces.

Place the zucchini in a colander and toss with ½ teaspoon of kosher salt, and set aside to drain for 20 minutes. Meanwhile, brush the bread on both sides with olive oil. Place on a baking sheet and bake until crusty and brown, about 10 to 12 minutes. Turn once halfway through to toast evenly. Remove and cool.

Peel and pit avocado then cut into 1/2-inch dice. Place in a medium bowl and toss with lemon juice and zest. Roughly chop mint leaves and add to avocados.

Line a large plate with paper towels and spread out salted zucchini. Lay another layer of paper towels on top and pat off excess moisture. Add to the avocado bowl along with the almonds and olives and mix thoroughly. Taste and adjust salt to your liking.

Top each crostini with a heaping spoonful of the zucchini mixture. Drizzle over olive oil and fresh cracked pepper. Using a peeler thinly shave cheese and top each crostini with a few slices and serve.

*recipe adapted from aidamollenkamp.com

Chicken Fricassee, Deconstructed

chicken fricassee 2

Chicken Fricassee was one of the first meat dishes I made for Olive when she was a baby, just starting out on solids.  (The first meat she had was homemade beef ragu – I kinda threw the rule books out when it came to feeding her and I haven’t regretted it a single day.)  I made the dish from that month’s Martha Stewart Magazine and took a little bit of each component and blended it up with a little extra chicken stock. Olive consume it with a great fury.  The flavors are so simple and so rich – it truly is a comfort food dish.  And if you think it’s “fancy” because it has a French name, fear not – it’s basically a chicken pot pie without the pie.  All those amazingly comforting flavors of chicken soup, thyme, carrots, peas, cream gravy, butter – they’re all there.  You serve it over rice or pasta and revel in the comfort.  It’s not difficult and it tastes like pure love.

I’ve made that Martha Stewart version several times, but for this recipe, I worked out of the Bonne Femme cookbook and decided to deconstruct it because Olive is able to eat each component just chopped up small, but not big enough to tackle chicken still on the bone.  So I cooked the chicken, shredded it after it had cooled, and then assembled, garnishing with the pan gravy at the very end for an easy to eat version that everyone really loved.

chicken fricassee

chicken fricassee 3

chicken fricassee 2

Deconstructed Chicken Fricassee*
serves 4

2.5-3 lbs bone-in, skin-on chicken parts (legs, thighs, breasts, whatever – I used the whole chicken in pieces)
salt and pepper
2 tbs vegetable oil
1/2 a white onion, chopped fine
1/2 cup low-sodium chicken broth
1/2 cup dry white wine (or more chicken broth, if you don’t have any)
1 bay leaf
4 carrots, peeled and cut into 1/4 x 2″ sticks
1/2 cup frozen pearl onions
2 tbs unsalted butter
2 tbs AP flour
1/4 to 1/2 cup milk
2 tbs chopped fresh tarragon
1/4 cup chopped fresh parsley
2 tbs fresh lemon juice

Pat the chicken pieces dry with paper towels and season with salt and pepper on both sides.  Heat the oil in a large, deep skillet or stock pot over medium-high heat until it shimmers.  Add the chicken and cook, turning occasionally, until brown on all sides, 10-15 minutes.  Transfer the chicken to a plate and drain off all but a tbs of fat from the pan.

Add the onion to the pan and cook briefly, stirring, until fragrant.  Add the chicken broth and wine, stirring to loosen any browned bits from the bottom of the pan.  Return the chicken to the pan.  Add the bay leaf and bring to a boil, then reduce heat.  Cover and simmer for 25 minutes.  Then, scatter the carrots and pearl onions around the chicken; cover and simmer until the chicken is done (internal temp should register 170 on an instant read thermometer), about 15 minutes more.

With a slotted spoon, transfer the chicken and vegetables to a large bowl; cover with foil to keep warm.  Discard the bay leaf.  Pour the pan juices into a measuring cup and set aside.  Melt the butter in the pan over medium heat.  Stir in the flour with a wire whisk to make a smooth paste.  Cook and stir for one minute.  Slowly add the pan juices back to the pan, stirring with a wire whisk until smooth.  Cook the mixture until it boils and thickens, then continue to cook for one minute more.  Whisk in enough milk to make a sauce of the desired consistency and bring to a simmer.  Stir in the tarragon, parsley and lemon juice.

I then shredded up the chicken by hand, scattered an equal amount into each bowl over a heap of rice, arranged the vegetables on top of the chicken and then spooned my pan sauce over everything and cracked a lot of black pepper on top of that!  There’s something magical about fresh black pepper and a rich chicken dish.  It’s just perfect.

Enjoy!

*adapted from the Bonne Femme cookbook, which is perfect

Beautiful Beets and Second Chances

beets008

This is a perfect Monday post because no one really reads my Monday posts so I can be as nerdy as I want.  Here it comes…

beets012 beets013 beets006

I took a lot of pictures of beets the other today.  They’re beautiful.  Why aren’t they more popular in this country?  A PINK food?  Come on! Kids should be all over these.  They stain worse than food coloring.  They roast up sweet and savory.  I think a lot of people in this country have been scarred by canned or pickled beets.  That’s the taste they have in their minds.  I can understand why that wouldn’t be the most appealing taste memory.  But think about this – what if someone decided a long time ago that the best way to eat a potato would be to brine it?  Everyone would say, “Eww, potatoes.”  THINK ABOUT THAT!  So, my determination is to try previously unappealing foods in different ways than they are known for.  Roasting is almost always the best way to cook a root vegetable.  It works with just about anything from asparagus to parsnips to turnips.  It’s good to give foods with a bad reputation a  second chance. You never know if you’re one recipe away from your new favorite food.

This post is really just for showing the pics I took of beets.  And if you are curious, peel them, chop them into cubes, coat them in olive oil, sprinkle with salt and pepper and roast them for 30 minutes at 400F until tender.  No brainer.

beets002 beets003 beets004 beets007 beets001 beets015
Ready for roasting

My family looking at me as if I’d gone crazy while I took pictures of beets for 30 minutes.
beets014


Summer Corn Chowder – perfect for a rainy day

Corn Chowder and Cornbread

I hope you’re getting rain.  We got a little bit last night and it’s threatening to rain, today.  The clouds are hanging low and the wind is a cool 65 and I feel for a minute that it could be late September instead of the middle of July.  I live for cold weather and I’m still a little perplexed by why I live here, in the desert.  I grew up around here – maybe that’s it.  We long for things unfamiliar or for the relief we feel on the rare occasions we get a break from our usual reality.  I hear people in Seattle long for the beach.  I bet they don’t long for the desert, though!

Another comforting thing about food is the ability to transport myself into a feeling or a mood simply by the dish I prepare.  Caprese salad makes me long for summer nights, spice cakes make me wish for Christmas, chocolate chip cookies make me think of home.  A warm bowl of chowder with a thick slice of cornbread and a cold slab of butter puts me in the mood for a cloudy day and cooler temps.  So, in the middle of the heat of the summer, on this cooler week with cloudy days and threatening rain, let’s make a memory with a warm bowl of corn chowder and pray the rain stays a while.

Summer Corn Chowder and the Perfect Cornbread*
serves 6

4 teaspoons bacon, cut into 1/4-inch dice
1 small onion, cut into 1/4-inch dice (1 cup)
2 ribs celery,cut into 1/2-inch dice (3/4 cup)
8 sprigs thyme
Salt and freshly ground pepper
3 cups homemade or low-sodium canned chicken stock
3 ears yellow corn, kernels removed (about 2 1/2 cups)
5 ounces small fingerling potatoes, cut into 1/2-inch-thick slices
1 poblano chile, seeded and cut into 1/2-inch dice
1 1/2 cups half-and-half

Place bacon in small stockpot over medium-high heat. Cook, stirring occasionally, until bacon is deep golden brown and all the fat has been rendered, about 4 minutes. Remove bacon with slotted spoon, transfer to paper towel, and set aside. Discard all but 2 tablespoons of bacon fat.

Add onions, celery, thyme, and salt and pepper to taste to stockpot; cook over medium-low heat until translucent, about 8 minutes. Add stock; bring to a boil. Reduce heat to medium; simmer 15 minutes.

Add corn, potatoes, and chile; cook until potatoes are tender, 10-20 minutes. Remove and discard thyme. Add half-and-half, and simmer until soup is hot. Adjust seasoning with salt and pepper, and garnish with the reserved crisp bacon pieces.

*recipe adapted from Martha Stewart Living

Cornbread


We only make one cornbread recipe, anymore.  The New Best Recipe is a wonderful encyclopedia of how to make every recipe basically, perfect.  We love this book and it never steers us wrong.  It’s quite bulky, but all the recipes are tested extensively and done in a myriad of ways, and they give a background as to why the recipes work.  It’s very trust-worthy and a definite go-to in times of need of a solid recipe!  Their Golden Northern Cornbread is our go-to cornbread recipe.  It’s light, fluffy, moist and slightly sweet.  Holds together beautifully to be a base for your bowl of soup, or just on the side with some cold butter.

The Best Golden Cornbread
makes 9 servings

2 tbs unsalted butter, melted, plus more for greasing the pan
1 cup (5 ounces) yellow cornmeal, preferably stone-ground
1 cup (5 ounces) AP flour
2 tsp baking powder
1/2 tsp baking soda
4 tsp sugar
1/2 tsp salt
2 large eggs
2/3 cup buttermilk
2/3 cup milk

Adjust an oven rack to the center position and heat the oven to 425 degrees.  Grease a 9 inch square baking pan with butter.

Whisk the cornmeal, flour, baking powder, baking soda, sugar and salt together in a large bowl.  Push the dry ingredients up the sides of the bowl to make a well.

Crack the eggs into the well and stir lightly with a wooden spoon, then add the buttermilk and milk.  Stir the wet and dry ingredients quickly until almost combined.  Add the melted butter and stir until the ingredients are just combined.

Pour the batter into the greased pan (we actually love to use our cast-iron skillet for this recipe). Bake until the top of the cornbread is golden brown and lightly cracked and the edges have pulled away from the sides of the pan, about 25 minutes.

Transfer the pan to a wire rack to cool slightly, 10 minutes.  Cut and serve warm!