Corn Cookies

momofuku corn cookies

momofuku corn cookies 3

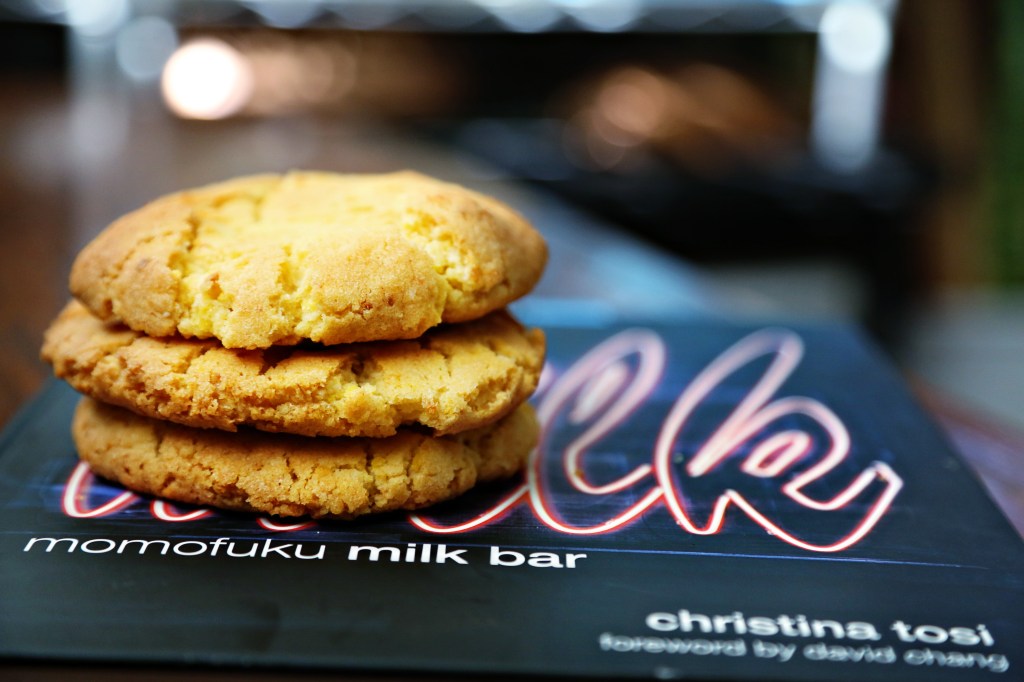
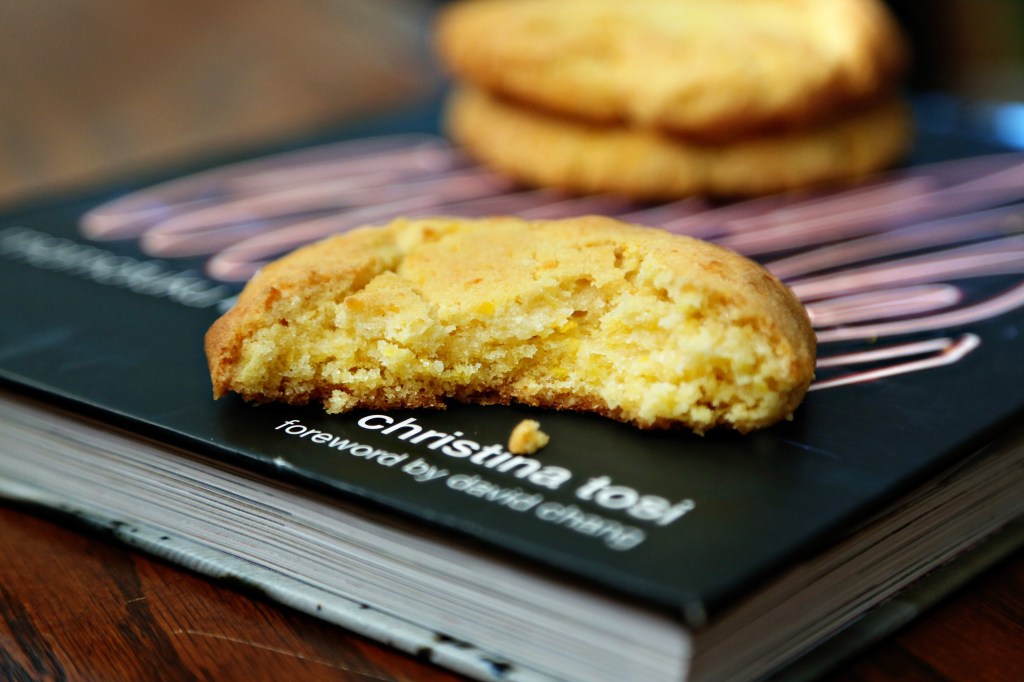
This is one of the best cookies I’ve ever had in my entire life.  Crispy on the outside, chewy and soft in the middle.  Sweet, salty, and incredibly buttery.  It uses a mystery ingredient: corn powder. All you do (and believe me, slackers, this ingredient is worth whatever effort you don’t want to put forth) is buy a bag of freeze dried corn off Amazon and pulse it in your blender or food processor till it looks like powder.  Then, you’ll have enough for a few batches of these amazing cookies.  The corn powder adds to the incredible butter flavor and if you don’t tell anyone, they won’t be able to pick out the secret ingredient.  They’ll just sit and marvel that they are enjoying the greatest cookie (that doesn’t include chocolate) of their life.

This recipe is from the wonderful Momofuku Milk Bar cookbook.  Matt made Olive’s first birth-day (made it when we came home from the hospital with her) cake from this book, my birthday cake and the Crack Pie that we’ve made a few times and won a smallish award (in a contest created by us) for best non-fruit pie at our Pie Bake-Off.  Christina Tosi is undoubtedly a genius, as Momofuku  Milk Bar’s creative pastry chef.  It’s only her hummingbird-like brain that could come up with such nostalgic, creative, sugar-rush kind of desserts.  She is a child at heart, which shows so evidently throughout this cookbook.

Word of caution: if you like to get in and out of the kitchen quick, this book isn’t for you.  (the cookies were easy enough but the rest…) My birthday cake had Matt in the kitchen for two days and involved around 5 different recipes for one cake alone.  However, it was the best cake ever.  I don’t need to reiterate that good things are worth the hard work, but I will.  To quote Bob Kelso, “Nothing in this world worth having comes easy.”

And every recipe from Momofuku Milk Bar is worth having.

momofuku corn cookies 2

Corn Cookies
yield: 13-15 cookies

*225 g butter, at room temp (2 sticks)
300 g sugar (1.5 cups)
1 egg
225 g flour (1 1/3 cups)
45 g corn flour (1/4 cup – if you don’t have corn flour, which I didn’t, mix 1/4 flour and 4 tsp corn powder)
65 g freeze dried corn powder (2/3 cup)
3 g baking powder (3/4 tsp
1.5 g baking soda (1/4 tsp)
6 g kosher salt (1.5 tsp)

1. Combine the butter and sugar in the bowl of a stand mixer fitted with the paddle attachment and cream together on medium for 2 to 3 minutes.  Scrape down the sides of the bowl, add the egg, and beat for 7 to 8 minutes (this is important.  This long mixing process is what gives the cookies their amazing texture)

2. Reduce the mixer speed to low and add the flour, corn flour, corn powder, baking powder, baking soda, and salt.  Mix just until the dough comes together, no longer than 1 minutes.  Scrape down the sides of the bowl.

3. Using a 1/3 cup measuring scoop, portion out the dough onto a parchment-lined sheet pan.  Pat the tops of the cookie dough domes flat.  Wrap the sheet pan tightly in plastic wrap and refrigerate for at least one hour.  Do NOT baking your cookies from room temp – they WILL NOT bake properly.

4. Heat oven to 350F.

5. Arrange the chilled dough a minimum of 4 inches apart on parchment or silpat-lined sheet pans.  Bake for 18 minutes (Mine looked perfect in exactly 18 min. They know their stuff) The cookies will puff, crackle, and spread.  After 18 minutes, they should be faintly browned on the edges yet still bright yellow in the center; give them an extra minute if not.

6. Cool the cookies completely ON the sheet pans before transferring to a plate or your mouth (yeah right, you know you’ll eat a warm one and you SHOULD).  At room temp, the cookies will keep fresh in an air-tight container for 5 days.  But I really doubt they’ll last that long.

*I think measuring your flour, corn flour and corn powder by weight is really important.  Reason:  I first did it by volume and measured out 1 1/3 cups.  Then, to double check, I weighed the flour I’d measured and it was only something like 210 grams.  That’s enough of a difference to matter in the final result.  Just FYI!

momofuku corn cookies 5

Kale Paneer

7G9A1648

I received several requests for kale recipes when I asked a couple weeks ago for ideas for this blog.  I wanted to do something a little more challenging or interesting than the typical things you see for kale in the sea of Pinterest such as kale chips, kale salads, wilted kale, etc.  Basically, all the things you could use spinach for, if you were less ambitious.  I’m still not altogether familiar with kale’s flavor profile, but after turning a big bunch of it into creamy, soul-satisfying Indian food, I’m dedicated to finding ways to use this super food.

One of our favorite things to order at our local Indian restaurant is spinach paneer.  Creamy spinach with warm cubes of Indian cheese that doesn’t melt, but spreads wonderfully on a piece of garlic naan.  Truly a comfort food.  I saw this recipe for kale paneer and so I decided to try it for myself.  This girl calls for making a cream by boiling a cup of cashews soaked in hot water.  That sounded like a vegan move and I didn’t really want to buy a cup of cashews (hello, expensive) so I just subbed in  heavy cream, which I always seem to have on hand, and it turned out wonderful.  I also decided after tasting it that the cashews would have added a certain sweetness, so I added in two tablespoons of brown sugar and it was the right move – just enough sweetness to offset the bitterness of the kale and all the spices and it mellowed everything out really well.

For all of you who were wishing I’d do something a little more healthy with kale, like I said; there’s always next time.  But especially on this snowy day (wha?!) I think this recipe fits the bill.  If you lack the myriad of spices this recipe calls for, (I had them all! Proud moment) don’t waste your money at a regular grocery store.  Please go to Ghandi Bazar if you live in Lubbock, (or come to my house; seriously) and if you live elsewhere, I’m sure you can find an Indian market on some back street in your own town.  They know their spices and they’re cheaper than you’d EVER find at a chain grocery store.  Oh, and I didn’t go to Ghandi Bazar to find the paneer.  I was at United and looked up that Queso Blanco (or queso fresco) is very similar to paneer as it won’t melt and has very similar flavors.  It turned out great and got better with each day!

Kale Paneer*
1 medium yellow onion
2 – 3 Garlic Cloves
1 tbsp Minced Ginger
1 tbsp Sunflower or Canola oil
1 1/2 tsp Turmeric
1 1/2 tsp Ground Cumin
1 tsp Black Mustard Seeds
1 tsp Cumin Seeds
1/2 tsp Ground Coriander
1/2 tsp Garam Masala
1/4 – 1/2 tsp Ground Indian Chili Powder OR Cayenne (depending on how spicy you want it to be)
6 cups Chopped Curly Green Kale, packed
1 cup Plain Yogurt
1/4 cup heavy cream
2 tbs brown sugar
8 oz Paneer* OR Queso Blanco
Salt, to taste

Roughly chop the onion, garlic, and ginger. Heat a large pot over low-medium heat, add oil, then the onion, garlic, and ginger. Saute over low-medium heat until the onions begin to brown, at least 5 minutes. Once browned, add all of the spices and saute for another 1 or 2 minutes.
Add the chopped kale to the pot and saute until bright green.
Add the heavy cream to the kale mixture along with the yogurt and brown sugar, and stir in. Begin pureeing the curry with an immersion blender (or in batches in the regular blender) until smooth and no lumps remain, then transfer to a large bowl.
Once the entire curry has been pureed continue to cook over low heat, stirring occasionally.
Slice the cheese into small cubes and add to the simmering curry. Keep cooking, uncovered, stirring occasionally, until the curry thickens. If you prefer a thinner sauce, or you find the curry has gotten too thick, just add more water until it reaches your desired consistency. Season with salt, to taste, and more brown sugar, if necessary.

*recipe adapted from the adorable blog, Noms for the Poor (what a great name)

Asparagus Tart – Roasting is still the best way to eat vegetables

asparagus tart 3

I know I said I’d write about what got the most requests on my question last week, but I haven’t had time to do a good job with the requests I got, so that will come at a later post.  The top requests were for kale.  Honestly, I’m a bit stumped.  What, exactly, is the mystery?  Put it in stuff?  Ha!  That would be my suggestion.  Stir it into soups, toss it in salads and wilt it a bit with warm roasted chicken or hot bacon.  However, I don’t want to be flippant, so I will look up some good uses for kale, the sad-replacement-for-chips, and get back to you.  The other suggestion that intrigued me was for proper hash browns.  My friend, Maria, said that she had tried them several times and hadn’t gotten that good, diner-esque texture to them.  Honestly, I haven’t, either.  So I am interested to look up ways to cook hash browns well and that will most definitely be a post, as it will be a learning process for me, as well.

Today I wanted to simply give you an awesome recipe that we had last night for dinner, as our “starter” dish.  A beautiful use of asparagus (hey, Tracey, you asked for asparagus recipes, too!) and a lovely and exciting way to serve them that feels indulgent (bet you’ve never used that word in association with asparagus) and fun for children, and even doable for one-year-olds learning to eat bigger chunks of food.  Olive ate about 6 bits of this tart and then she was done. I consider that a success.

Having a box of frozen puff pastry in your freezer at all times is a good move.  This stuff can make you look like a fabulous cook in about 20 minutes.  You can top it with anything and bake and have great appetizers, desserts, or a crust for a savory tart, like this one.

Also, I wanted to mention my deep love and perhaps borderline obsession with using up leftovers.  My goal at the end of most weeks is for my fridge to be empty, save condiments and milk.  It’s good to think of ways to use up your leftovers and I know no better way than to use eggs to achieve almost-better-than-the original-meal leftovers.  This morning, I took leftover pieces of the asparagus tart and fried an egg and put it on top.  Lots of fresh ground pepper and a few drops of hot sauce.  So good.

breakfast2

Asparagus Tart

serves 4

1 sheet of puff pastry, thawed
1 bundle of fresh asparagus, ends snipped and cut in half, length-wise (I found that this helped them cook faster than the original recipe)
Olive oil to coat the asparagus – 2 tbs
Freshly ground pepper and kosher salt
2 oz shredded Manchego cheese – Parmesan or Swiss would also work

Preheat the oven to 400F.  On a greased, rimmed baking sheet, roll out your puff pastry to about 9×13″ rectangle.  Poke all over the bottom with a fork and bake for 15 minutes, until golden.  Toss your asparagus in olive oil. When the pastry comes out, it will have shrunk.  It’s okay, I swear.  Cover the tart in the shredded cheese and lay your asparagus spears side by side, touching, and alternating head to toe (this just makes more asparagus fit and it looks prettier.)

asparagus tart 1


Sprinkle the top of the tart with salt and pepper.  If you have leftover asparagus spears, just place them, cut side down, on the baking sheet around the tart.  They turned out to be gloriously crispy when they came out.  Bake for 25 minutes until the asparagus is nicely wilted and slightly browned.  Let cool slightly, cut with a sharp knife into squares and serve!

In the morning, heat leftovers in a 350F oven and fry an egg to place on top.  Enjoy with a cup of coffee and try not to think about the fact that it’s only Wednesday.

asparagus tart 2

breakfast

*original recipe from Martha Stewart Living

Chicken Saute with Sweet Potatoes and Rosemary

sweetchick3


march2013-00008

My little eater is back.  She had a week of not wanting to eat much at all and being rather scared of texture and new things, but we are officially back in the game.  It’s a relief, really.  I spend the majority of my days figuring out what to cook next.  I will clean up from breakfast and think about what I need to do for lunch.  After Olive’s afternoon snack, I clean up and think of what I need to start for dinner.  I really love it (thank goodness), but when you spend that much time preparing food, you naturally want everyone at the table to consume it.

Our food structure in the day is this:  Breakfast (usually oatmeal with some kind of fruit and milk), Lunch, snack around 3:30-4, Dinner, a little milk at bedtime.  That’s the only times Olive eats.  She doesn’t snack on anything between breakfast and lunch, or between lunch and 4 or between 4 and 7ish.  I really think that when you’re trying your best to get your children to eat a variety of good foods, it’s just shooting yourself in the foot if you let them snack around the clock.  In my (very short) experience so far, when Olive is hungry at meal times, there is rarely a fight over what is served.  She is rarely picky.  I think if she’d had a snack an hour before sitting down, it would be a lot easier for her to reject something new (tonight was roasted beets, pan fried fish and a tomato/bell pepper sauce).  And it’s happened before when she’s had a TON of milk before a meal.  Won’t eat.  Personally, I can’t handle going to the trouble of  cooking and having someone at the table refuse it and then beg for a snack 30 minutes after dinner is over.  The master chef, Fernand Pointe said, “Hunger is the best sauce” and I really love that imagery.  A sauce is a finishing touch – usually the part of the dish that makes it a little indulgent, a little special.  If you are hungry for a meal, everything is just a little more delicious than if you were merely eating because it was mealtime.  I’m not afraid of Olive being hungry.  I think it’s one of the very first lessons in delayed gratification that desperately needs to be instilled at an early age.  So many life lessons are learned by cooking and eating together, and this in my opinion, is one of the most basic.  Wait.  And how wonderful that you have at least 3 times a day to reiterate that important rule.  You wait to be served.  You wait on others before you start eating.  You wait and ask before getting down from the table.  You wait while others are talking before you talk.  It’s beautiful to me how sharing food can teach so much, and not only to children, but to adults as well.

This simple meal comes, once again, from Wini Moranville’s book, The Bonne Femme Cookbook.  A simple chicken dish and the sweet potatoes are an excellent finger food for little eaters.  I choose a baked tomato dish from the book as an extra side for this meal.  Everyone at the table enjoyed it all.  Olive liked the baked tomatoes the least and the chicken the most (but she tried everything) 🙂

sweetchick2

Chicken Saute with Sweet Potatoes and Rosemary
serves 4

2 slices thick-cut bacon
Vegetable oil
2 1/2 tbs unsalted butter
2 to 3 large sweet potatoes, peeled and cut into 1/2″ dice (4 cups)
Salt and pepper to taste
1 large shallot, sliced (about 1/4 cup)
1 tbs chopped fresh rosemary
4 boneless, skinless chicken breast halves
1/2 cup low sodium chicken broth
1/4 cup Calvados (apple brandy – can be found at most liquor stores) or 1/4 cup apple juice and 1/4 cup dry white wine
1/2 cup heavy cream

Preheat the oven to 300F.
Cook the bacon in an ovenproof skillet over medium heat until crisp; remove with a slotted spoon and drain on paper towels.  Measure the drippings from the skillet and add enough vetetable oil to equal 1 1/2 tablespoons.  Reduce the heat to medium and melt 1 1/2 tablespoons of the butter with the drippings and oil.  Add the sweet potatoes and salt and pepper.  Cook the potatoes, stirring occasionally, until browned and softened, about 15 minutes; add the shallot and rosemary to the pan after 5 minutes.  Transfer the skillet to the oven to keep warm.

Meanwhile, place the chicken breasts, one at a time, between two sheets of plastic wrap and pound to 1/4 inch thickness.  Season both sides with salt and pepper.

In another large skillet, melt the remaining 1 tablespoon of butter over medium high heat.  Add the chicken in batches and cook, turning once, until no longer pink inside, 6-8 minutes.  Transfer the chicken to a large platter and cover with foil to keep warm.

Remove the pan from the heat and add the chicken broth and Calvados, taking care not to let the liquid splatter.  Stir with a whisk to loosen any browned bits from the bottom of the pan.  Return the pan to the heat, bring to a boil, and boil until the liquid is reduced to 1/3 cup – this should take about 2 minutes, depending on the heat and your pan size; it will take closer to 4 minutes if you’ve substituted apple juice and wine for the Calvados.  Whisk in the cream and cook to a desired consistency.  Adjust salt and pepper to taste.

Crumble the bacon and stir it into the sweet potatoes.  Arrange the chicken on four dinner plates, arrange the potatoes around the chicken, spoon the sauce over the chicken and serve with Tomatoes au Four (recipe below).

Tomatoes au Four

Tomatoes au Four
makes 4 to 8 servings

4 medium-sized ripe tomatoes, cored, halved and seeded
1/2 cup panko bread crumbs
1 small shallot, finely minced (about 2 tbs)
1 large garlic clove, minced
2 tablespoons finely chopped fresh parsley
1 teaspoon snipped fresh thyme, or 1/4 tsp dried thyme, crushed
Salt and pepper to taste
2 tbs extra virgin olive oil

Preheat the oven to 400F. Lightly oil a baking dish large enough to hold the tomatoes without too much crowding.  Place the tomatoes, cut sides up, in the baking dish.

In a small bowl, combine the bread crumbs, shallow, garlic, parsley, thyme and salt and pepper.  Stir in the olive oil.  Spoon this mixture evenly over the tomatoes.

Bake until the tomatoes are hot and the bread crumbs are lightly browned, about 15 minutes.


Green on Green Salad

green on green 2

It’s the first day of Spring!  I used to be a complete fall/winter gal, and as far as loving cardigans to a fault, I still am.  But the new mother side of my life has made me  crave warmer weather, the ability to leave the screen door open so we can hear the birds, and not worrying if my kid is constantly too cold.  This time last year, I had a two week old baby in the house.  We were scared and bewildered, yet happy to have her as a part of our pack.  It’s been such a learning process.  Is there a “right” way to do things?  Well, if there is, I was sure on the hunt this year.  I asked every person I knew who might have an ounce of understanding or empathy, what they thought the “right” way was to feed/sleep/play/instruct my baby.  I’m sure they, like me, are breathing a sigh of slight relief that along with her first birthday passing, so has a large amount of my questions.  I think part of me craves that close knit village type atmosphere of raising a baby.  Mothers, grandmothers, aunts, cousins; all within arms reach of advice.  While that isn’t our reality, I am very thankful for technology that has made virtual villages out of our spread-apart lives.

One of my favorite parts of this “virtual village” is the way in the short time this blog has been up and running, I’ve been able to answer questions of fellow moms across several states on the basics of cooking, what to cook for baby, where on earth do you get Chinese 5 Spice?! and so on.  I love cooking so much and I hope that along the way, I can make at least one other person excited to cook a meal for their family or try something new.  I love when someone tells me, “I salt my pasta water because of you” (which is funny because at least three people have told me this, and I learned it from Mario Batali. Salty like the ocean!) I feel useful, even though I might be stuck in this house (or feel stuck from time to time), I feel knit together with so many by a common ambition for the quest for good food and a simple sense of accomplishment.

This salad is once again, from THE best cookbook of my year, so far, The Bonne Femme cookbook.  I served this salad with the broccoli and cauliflower recipe from Monday and seared chicken breasts with a simple pan sauce  (butter, chicken stock, pan drippings, reduce, reduce, reduce) and sliced, toasted almonds.  Very filling meal, very heart healthy – no one felt deprived!  (baby side note: Olive didn’t try this.  She was still sickly when I made it.  Will try again with her soon)

Green on Green Salad

serves 4

1 garlic clove, minced
Salt and freshly ground black pepper (about 1/4 tsp each)
2 tablespoons fresh lime juice
4 tablespoons extra virgin olive oil
2 teaspoons honey
a few drops of Tabasco, Cholula, Tapatio, or whatever peppe sauce you like best
4 cups baby arugula or just a bag of mixed greens
1/2 cup, halved, thinly sliced cucumber
1/4 cup thinly sliced scallions
1 avocado, peeled and sliced

In a small bowl, use the back of a spoon (or I use a drink muddler) to mash the garlic clove with the salt and pepper.  Add the lime juice and whisk until the salt is dissolved.  Add the olive oil, whisking until incorporated.  Whisk in the honey and red pepper sauce.

In a large bowl, toss the greens with enough dressing to make the leaves coated, but not too heavy.  Arrange the arugula on a large platter.  Toss the cucumber and scallions with a bit of the dressing and arrange them on top of the greens.  Arrange the avocado slices across the top of the salad.  Drizzle just a little more dressing on top of the avocado and serve.

green on green 3


Confession Time and a Side Dish You Never Thought You’d Love

roasted broccoli

I said I’d be honest on this blog and today is just such a post.  Last week, a sweet friend of mine said, ” You are officially one of those moms that makes me question my ability to fully parent and live well/completely.” I wasn’t exactly sure what to do with that comment, but I think I know, now.  It’s time to be honest!  Last week wasn’t good.  Olive got sick on Tuesday with her first stomach bug in her little year on this earth.  It wrecked her appetite, needless to say, and she subsisted for the rest of the week on mostly bananas, bits of bread, small bites of chicken and forced bites of a few benign vegetables like carrots and…carrots.  My little super-eater turned into the “picky eater” kid and even today, isn’t back at full steam.  She plays fine, acts fine, but when it comes to eating – it’s a fight.

I tried my best to stay the course; don’t force her, don’t get stressed, if she doesn’t eat much at lunch, she’ll catch up at dinner – but I was fearful all week that this stomach bug would make her afraid of food, of eating, of trying new things and in one week, all would be lost.  You think I’m exaggerating for the sake of this blog.  I wish I was.  I guess, today, my confession is that I try too dadgum hard to make things go perfectly, and when they don’t, I feel like an utter failure.  Perhaps this isn’t the day to write because last night I slept maybe three hours (my inability to turn my brain off and relax) but I thought about my friend’s comment on my status, and I just wanted to tell her that we only show our best online.  We only write statuses we are either proud of or find ironically funny.  So no one heard all week how scared I was that Olive was sick, or how miserable I felt when she wouldn’t eat a bite all day for a couple days in a row.  And of course I didn’t write statuses about how I got angry with her and made her cry because she kept dropping food off the side of the high chair.  I don’t like writing about that part of life.  The hard part.  The part that makes you question if you’re doing everything wrong and will, inevitably, scar your child when it’s all said and done.  I thought, “How much would everyone love if Olive ended up hating a variety of food just because I want her to love food so much?”  And it’s sad, but I really do feel that most of the people I know would secretly laugh if that happened.  And I can’t say that I blame them.  I’m very passionate about cooking and food and banning “kid-food” and teaching children to eat well and have manners at the table.  I wouldn’t say that I have much camaraderie in that area, at least not locally.  Or maybe I just don’t feel it because I’m not admitting to the hard parts that happen, as well.  I’m only telling you that she ate baby bok choy with fish sauce vinaigrette last week and loved it.  Not that she cried big, fat tears today because I wouldn’t let her hold a fork while she ate (she’d just throw it or poke herself in the face).  Sigh.

Our hard week came to a head this morning as Olive had her one year check up and got 5 shots in her little legs.  So, I made a soup for her for lunch.  Cream of celery, and I pureed the heck out of it so that there’d be no chunks.  I just didn’t feel like challenging her today. She ate fine.  Not as much as last week, but enough.  And I will continue to do what I know in my heart to be best.  Let her be a person with feelings and a new found opinion on things, and try not to force her to like something just because I do.  She’ll come around.  And if today, she only wants the texture of soups and yogurt, then that’s fine.  Maybe tomorrow she’ll eat something more challenging.  The point, I think, is to get back to the heart of what makes food and cooking beautiful: it’s something to be shared.  Eating, first, should be enjoyable.  Not nutritious, not organic – but delicious.  Good for the soul.  Shared with family and friends.  Happy.  Stress-free.  Not another lesson to pass or fail.  I vow to back off in my intensity for success at having a “good eater” a bit and get back to what makes food so amazing.  It’s good.

An incredible way to enjoy a couple of vegetables that might not be everyone’s favorite is first: roast them till they’re a little crispy.  And second: toss them in a vinaigrette!  In today’s recipe, that vinaigrette is one that contains fish sauce and it’s incredible.  I know you wouldn’t typically put “fish sauce” and “incredible” in the same sentence, but you’ll start to once you try this.  Also, it’s from David Chang’s genius book, Momofuku, and I’m pretty sure he’s never made anything bad in his life.  It’s so simple and the vinaigrette recipe makes a lot, so you can save it in your fridge to toss with pretty much any roasted vegetable.  The original recipe called to toss it with roasted brussels sprouts, which is a vegetable most think they don’t like.  But I’m pretty convinced you’re always just one recipe away from liking something you thought you never would.  So!  Try this today and let me know what you think.  Fish sauce can be found in most Asian sections of supermarkets near all the soy sauce, but if you have trouble, you can definitely find it at any Asian mart in town.

roasted broccoli and brussels sprouts


Roasted Broccoli and Cauliflower with Fish Sauce Vinagrette

1 medium head broccoli
1/2 head cauliflower
Olive oil
Salt and pepper to taste
4 tbs Fish Sauce Vinaigrette (recipe follows)

Preheat oven to 400F.  Cut up the broccoli and cauliflower into small, bite sized pieces.  I trim the “trees” in half so that they roast better.  You want to aim to make the size of your vegetables all nearly the same so they cook at the same rate.  Toss in a couple tablespoons of olive oil and spread out on a large rimmed baking sheet.  Don’t crowd the pan.  Put it on two pans if you need to.  Sprinkle with salt and pepper and roast for about 20 minutes, or until they start to get kinda crispy and browned on the edges like in the photo above.  When they’re done, toss in a large bowl with the vinaigrette and serve immediately.  For some reason, broccoli gets cold faster than any other vegetable known to man.

Fish Sauce Vinaigrette

1/2 cup fish sauce
1/4 cup water
2 tbs rice wine vinegar
Juice of 1 lime
1/4 cup sugar
1 garlic clove, minced
1 to 3 red bird’s-eye chilies, thinly sliced

Combine everything in a large mason jar with a tight fitting lid.  Or any container with a tight fitting lid that won’t leak.  Shake it all around until the sugar dissolves.  Keep in the fridge for up to a week.