A Blueberry Morning

Blueberry Muffins


It’s super cold – winter blew in last night leaving everything gray and bone-chillingly cold.  We are having a lazy day inside and all I can think about are these warm blueberry muffins with cold butter and hot blueberry syrup soaking into every crumb.  My mom made this combination quite frequently for us, growing up.  I associate them with cold, Sunday mornings. We needed something rather fast while getting ready for church, yet warming at the same time.  Something Mom could pop in the oven and then have time to get ready, herself!  She would boil the blueberry liquid and add a little sugar to make a wonderful blueberry syrup to pour on top of the muffins.  That was always my favorite part.  Just HOW blue can I make this muffin?

So when I saw a can of wild Maine blueberries in the grocery store, my mind went instantly to these muffins and I had to make them for us.  Mom’s were better, but that’s to be expected 🙂  Stay warm, today, Lubbock!

Blueberry Muffins with Butter Blueberry Muffins with Blueberry Syrup

Blueberry Muffins with Blueberry Syrup*
makes 12-16 muffins

12 1/2 ounces cake flour
1 teaspoon baking soda
2 teaspoons baking powder
Heavy pinch salt
1 cup sugar
1/2 cup vegetable oil
1 egg
1 cup yogurt
1 1/2 cups blueberries (fresh, frozen or I used a can of blueberries packed in water – that part is important if you use canned)

Preheat the oven to 375F. Line 16 muffin tins with papers and spray the papers with non stick spray.  Whisk the cake flour, baking soda, powder and salt in a large bowl.  In another bowl, whisk the sugar, oil, egg and yogurt until smooth.  Add the dry ingredients and stir just until combined.  Reserve the juice that comes in the can of blueberries and put it on the stove in a small saucepan with 1/4 cup sugar and let it come to a boil.  Reduce the heat and simmer during the baking time of the muffins.

Fold the blueberries into the batter and divide among the muffin cups.  Bake for 20-25 minutes, until the tops are golden brown.  Remove and remove from the pan, letting them cool upside down for about 10 minutes.  Split, add a copious amount of salted butter and drown in blueberry syrup.  Cheers.

*adapted from Alton Brown’s Blueberry muffin recipe

Lemon Cream Crepe Cake with Pomegranate Seeds

crepe cake with lemon buttercream and pomegranate seeds 2Crepe Cake with fuilltine and lemon buttercream

So yesterday, I got myself all in a fluster about crepe cakes – talked too much about it and had to go make one.  Tough plight.  I had some pomegranate seeds from a spectacular sale at the grocery store this week – two HUGE ones for $3, and thought they’d be so pretty on top of a cake.  I sweetened up Alton Brown’s crepe batter and made a lemon zest butter cream that went perfectly with the delicate crepes and tart pomegranate seeds.  I think this would be such a wonderful addition to a Christmas party spread – it’s so bright and happy!  Those flecks of brown in the butter cream are a baker’s pantry staple called feuilletine, a ginger-snappy flavored crisp that is used for crunch in various confections at Momofuku Milk Bar.  I remember it being a huge mess to make, and we had about 4 cups of it, just sitting there, unused, so I decided to add it in the cake for crunch and I really loved the addition!  This step can be left out OR you could crumble up actual ginger snaps and I think that would be fabulous!

This cake is for a frosting lover.  The buttercream makes a lot and I used all of it. Think: very slender, ladylike slices and you won’t be overwhelmed.  Plus some black coffee or tea and you’ll have yourself an amazing bridal brunch/wedding shower/baby shower show stopper!
Crepe Cake with Lemon Buttercream and Pomegranate Seeds Crepe Cake with Lemon Buttercream, topped with Pomegranate Seeds

Vanilla Crepe Cake with Lemon Butter cream and Pomegranate Seeds
makes about a 20 layer cake

2 large eggs
3/4 cup milk
1/2 cup water
1 tbs vanilla extract
1 cup flour
2 tbs sugar
3 tablespoons melted butter
Butter, for coating the pan

1 cup ginger snaps, crushed fine
1 cup pomegranate seeds from one large pomegranate

In a large cup, place all ingredients except the butter and blend with an immersion blender for a full minute, making sure all the flour is incorporated.  Then drizzle in the melted butter. Place the crepe batter in the refrigerator for 1 hour.

Heat a small non-stick pan over medium high. Add butter to coat. Pour 1/4 cup of batter into the center of the pan and swirl to spread evenly. This takes a bit of practice and your crepes might look like mine and have tiny fingers coming off the sides.  They’ll taste the same, promise. Cook the first side for about a minute until edges brown and you can run your spatula around the edges to loosen.  Slide your spatula under the crepe and flip over.  Cook for another 10 seconds and set aside in a stack to cool for assembly.

For the Butter cream:

1 cup butter, softened
3 1/2 cups confectioners’ sugar
1 lemon – zest and juice
1 teaspoon vanilla bean paste or extract
1/4 teaspoon kosher salt

1 cup butter, softened
3 3/4 cups confectioners’ sugar
1 lemon, juice and zest of
1 teaspoon vanilla extract
1/8 teaspoon salt

Combine butter, sugar and salt and beat till well combined and fluffy, about 2 minutes.  Add lemon juice, zest and vanilla and continue to beat for another 3 to 5 minutes.

Assemble!
Place a crepe on a cake stand on top of a dot of buttercream to hold it in place.  Spread about an 1/8th of a cup of frosting on the crepe, evenly spreading.  If using, sprinkle with crumbled cookies and top with another crepe and repeat the process until you’re left with one crepe.  Top with remaining buttercream and coat the top of the buttercream evenly with pomegranate seeds.  Freeze, uncovered, for about 30 minutes for ease of slicing!  Wrap before storing in the fridge, but the buttercream will keep the cake quite moist.  ENJOY!

vanilla crepe cake

Sweet Potato Pie with Butter Rum Sauce

7G9A3567

Last weekend we were invited to our friends’ house for a dinner party.  The theme was Cajun and so Matt made a humongous pot of gumbo, which has been many meals this week and is very good, and I made this sweet potato pie that was obliterated by the end of the night and I sadly didn’t have any leftovers for breakfast.  I’m actually glad it got gobbled up because that’s instant portion control. I shared one slice of this pie with Olive, she ate most of it, and I enjoyed every bit.   I had a lady at church last night say, “I’d love to live in your house so that I could eat your food, but then I’d be 7,000 pounds.”  I’m not exactly sure this blog is conveying the truth if that’s the overall sentiment!   I’m also not sure I’m conveying properly the amounts of these foods I DON’T eat.  I made three batches of The Cinnamon Rolls over the course of two weeks and I think overall, I ate two whole cinnamon rolls, maybe three.  But it wasn’t a couple each batch, or “the whole pan” like a lot of people swear they’d eat if they made it themselves at home.  I don’t think people give themselves enough credit.  Of course you wouldn’t eat the whole pan.  How on earth would that be enjoyable to have a stomach ache because of something you baked?  Maybe that’s the whole problem with portion control with indulgent foods.  People get a feeling like they need to “eat the whole thing” to pretend like it never happened, to remove it from sight and further temptation.  They feel “bad” eating it in the first place and so why not eat it badly?!  Whatever the reason, it’s a wrong mindset.  And one I hope to never impose on Olive-that rich foods are somehow bad and we should feel guilty or gain 7,000 pounds for eating them on a weekly basis.

During the week, we eat simply.  Bowls full of beans, rice, sauteed chard and potatoes and steamed fish, beet pasta, roasted carrots, butternut squash soup-that was this week.  These do not make the most riveting blog posts, nor do I always remember to take pictures of “regular” meals.  Perhaps I should!  Maybe it would help balance out peoples’ fear of the occasional pie or butter sauce.  My hope for myself and anyone who loves to cook is that we find a good balance and that we effectively remove all GUILT from eating.  Find a way.  Whether that’s eating smaller portions or just meals made from fresh, good ingredients that couldn’t live in a box if they tried.  Maybe if that was the norm, and eating at home was what we did 6 days out of the week, than a crazy good, gooey brownie on the weekend or a night out at a restaurant would seem like the treat it is, instead of the impending portion of guilt that it’s come to be.

7G9A3572

This pie was light and fluffy almost like a souffle.  It wasn’t overly sweet and so it went AMAZINGLY well with the butter rum sauce I decided to make at the last minute.   I think it would be perfect without the sauce, but it was the gilding of the lily for a festive occasion like a dinner get-together.   I also adore the website I adapted this from – The Gumbo Pages!  That is the best website name, possibly ever.  And the recipe was clearly from someone who never had to write it down.  A lot of “approximate” measurements and “about this much” kinda talk.  I love the nature of a recipe like that.  And I love that this recipe came from someone with the nickname “Pie Man.”  Honestly, how can you go wrong with that combination?

7G9A3576

Sweet Potato Pie with Butter Rum Sauce
makes one, 9″ pie

3 cups cooked, peeled and mashed sweet potatoes (about 3 medium potatoes)
2 eggs
2 tablespoons melted butter
1/4 teaspoon cinnamon
1/8 teaspoon nutmeg
1/2 cup cream
1/2 teaspoon lemon juice
2 teaspoons vanilla
dash of salt
1/2 cup sugar

Boil the potatoes whole in plenty of water (covering them by about two inches) for about 30 minutes, until tender all the way through.  Peel them after they’ve cooled a bit and give them a rough dice.  Mix the potatoes in a stand mixer with the paddle attachment until they are smooth and very few lumps remain.  Mix the eggs with the cream and spices, lemon juice and vanilla until smooth and gradually mix it into the potatoes.  Add the salt and sugar and let the mixture blend on medium for about 5 minutes. Pour filling into UNbaked 9″ pie shell, bake for 40-45 minutes at 350-325.  Serve with butter rum sauce or whipped cream!

Butter Rum Sauce

1 stick of butter
1/3 cup heavy cream
1/2 cup sugar
a few pinches of kosher salt to taste
2 tbs rum

Let the butter melt with the cream and sugar and stir until the sugar is completely dissolved.  Add salt until it tastes right to you – let it take some of the sweetness away and give it some depth.  Add the rum and mix well and serve!

Pot Roast Pies

Pot Roast Pie
It’s official.  I’m in fall-cooking mode.  Bring on the orange vegetables and the slow cooked meats and the braising liquids.  Bring on the pies with custard fillings and mulled wine.  Let the apples stew in cider and the cinnamon sticks abound, we have officially fallen into the best time of year!  I love how the natural seasons for foods are meant to put a little extra meat on your bones to survive the cold winter months.  Even though most of us have climate controlled air year round, I still appreciate the way shopping seasonally will naturally guide you through the year.  I am jumping the gun just a tad, but since the 10 day forecast has us in the 40s at night and the 70s in the day, I’m embracing the way things feel.  I have waiting a long, hot summer to start dreaming of stews and caramelized butternut squash.  I’m ready.

Let’s start with bringing back the Sunday pot roast.  Matt and I want to have that tradition for our family.  Growing up, we both regularly had pot roast on Sunday afternoons after church.  It’s the natural ease of letting something cook on the stove or in a slow cooker while you’re at church.  Mom always make yeast wheat rolls to go with it.  Some of my favorite food memories came from that meal and I will feature her winning recipe on this blog soon!  Matt has made a few amazing versions and I tried a recipe I saw on Pinterest yesterday and it was remarkably easy and very flavorful!  Then, today for lunch, I played with the leftovers and came up with little pot roast hand pies, covered in pan juices.

Pot Roast Pie with Pan Juices

This was a good move in all directions.  Leftover pot roast from yesterday with potatoes and carrots.  Chopped up a few pieces of each component and tucked spoonfuls into the only pie dough worth memorizing and baked.  I didn’t want to add too much of the leftover cooking liquid from the roast inside the pies because I didn’t want them to be soggy as they cooked and leak out everywhere.  So, once the pies came out, I ladled warm, beefy pot roast juices over the pie itself and it soaked up just enough for the crust to not be too dry, yet it remained crispy and flaky and buttery.  Best. Fall. Lunch. Ever.  Too bad the baby wouldn’t partake.  She really missed out.  Too many eggs for breakfast, I guess.  Although, I think on a day when she is super hungry, she will really like this.  I can just see her cute little hands holding a tiny pie.  Ah, well.  Maybe next time!

Sunday Pot Roast Pie

Balsamic Orange Pot Roast*
serves 4-6

4 – 5 Lbs of Beef Chuck Roast
2 cups water
1/2 Cup Light Brown Sugar
1/4 Cup Balsamic Vinegar
1 Tbs of Soy Sauce
1 Tsp of Salt
1/4 Tsp of Red Pepper Flakes
3 Cloves of Fresh Garlic – Pressed
Zest of one orange
a few fingerling potatoes
4 large carrots, peeled and chopped into 2″ pieces

Put the roast in your slow cooker and surround with the potatoes and carrots.  Mix all the other ingredients together and pour over the roast.  Cook on low for 8 hours.  Eat and enjoy and the next day…

The Best Pie Crust Ever
2 sticks of cold butter, chopped into little pieces
2 cups of flour
1 tsp kosher salt
1/8 cup ice water

Put a cup of flour in your stand mixer with a paddle attachment and add the salt.  Mix to blend.  Add half the butter by small handfuls, beating on low until all the butter is fully incorporated into that cup of flour.  Then, add the next cup of flour and beat on low until completely blended.  Then, add the water sprinkle by sprinkle until the dough comes together and stays together when pressed with your fingers.  Separate into two discs, wrap in plastic and let chill for at least an hour.  Take out 20 minutes before making the hand pies so they will roll out easy.

Assemble!

Take a few components from the leftovers – a bit of roast, some carrots and potatoes.  Chop well!  Heat up the juice from the leftovers on low on your stove.  Roll out your pie dough and cut out 4″ circles.  Fill the circles with 2 heaping tablespoons of roast mixture.  Place another 4″ round of dough on top and crimp the edges.  Brush with a beaten egg and bake at 375F for 30-40 minutes, until the crust is nicely browned.

Place a hand pie into a shallow bowl and ladle a warmed cup of leftover pot roast juice over the pie and serve immediately!

*recipe adapted from The Chic Site

Bananas Foster Tart Tatin

bananatatin001 bananatatin003


My mom and dad got me an awesome tart tatin pan for my birthday this year and I couldn’t wait to use it.  I had a recipe from Martha Stewart saved on my phone for the longest time and hadn’t gotten around to making it, but when I received this pan in the mail and looked at my five mysteriously mushy bananas on my counter, I knew what had to be done.  Okay, so the mysteriously mushy bananas – I bought a perfectly yellow, no bruise bunch that were on the top of the pile, and a day later, I went to cut up one for Olive and they felt like bags full of jelly.  ALL OF THEM.  Still perfectly yellow, still no bruises, but all mush.  What in the world?!  I thought maybe since I’d put them beside tomatoes, that maybe the gasses from the tomatoes instantly ripened the bananas?  So a day later, I bought another bunch and put one banana with the tomatoes and the rest far away from them and the banana that was with the tomatoes was fine.  So, the mystery remains.  Maybe they were on the bottom of the truck since they were on the top of the pile!

Despite their mushy texture, the bananas worked out perfectly for this recipe and I was glad to be able to use them.  The French love their tart tatins.  They basically do it with every fruit in season.  And my theory is that the French use fancy terms to make ordinary dishes sound fancy.  Like tartines.  Tartines are various toppings on toast.  That’s it.  Some might call it bruschetta, some call it toast.  It’s all the same.  Or how about this tart tatin?  Yeah, it’s an upside down cake/tart.  They typically use puff pastry instead of cake batter, so the result is a crispy, almost turnover texture with caramelized fruit on the top.  It’s a wonderful way to use up old fruit and to do something really simple in a hurry for guests.  And you should always keep frozen puff pastry on hand.  It’s a freezer staple for me.  You can use it in so many ways from topping little strips with shredded cheese or sausage or peppers for an instant appetizer to using it as a base for a cobbler, strawberry shortcake or whatever you can dream up!

bananatatin005 bananatatin004

Bananas Foster Tart Tatin*
serves 8

  • All-purpose flour, for work surface
  • 1 sheet frozen puff pastry, thawed
  • 6 tablespoons unsalted butter
  • 3/4 cup packed light-brown sugar
  • 1/2 teaspoon ground cinnamon
  • 1/8 teaspoon salt
  • 5 large ripe bananas, peeled, halved lengthwise
  • 1 teaspoon pure vanilla extract
  • 2 tablespoons dark rum
  • 1 cup creme fraiche, for serving

Preheat oven to 400 degrees. Roll out pastry on a lightly floured work surface to a 13 1/2-inch square. Using a large skillet as a guide, cut out a 12-inch round. Transfer pastry round to a baking sheet lined with parchment paper, and refrigerate until firm, about 15 minutes. Make three 1/2-inch slits in center of round; set pastry aside at room temperature.

Melt butter in a 12-inch skillet over medium-high heat. Stir in sugar, cinnamon, and salt. Cook, swirling skillet occasionally, until mixture turns medium amber, about 3 minutes.

Arrange bananas in skillet, overlapping slightly. Cook, without stirring, 3 minutes. Drizzle vanilla and rum over bananas, and cook until most of the rum has evaporated and liquid has thickened, about 1 1/2 minutes. Remove from heat.

Place pastry round on top of bananas, and transfer to oven. Bake until pastry is golden brown and puffed, about 25 minutes. Remove from oven, and carefully invert the tart onto a serving plate. Whisk creme fraiche until fluffy, about 3 minutes. Serve dessert warm or at room temperature with the creme fraiche.

*I didn’t adapt this Martha Stewart recipe at all, except that my tatin pan was 9″ instead of the 12 the recipe calls for.  I didn’t have too many bananas – it worked out perfectly.

Strawberry Pots de Creme

Strawberry Pots de Creme

Here’s a beautifully simple dessert that is silky and rich and bright with the last memories of summer strawberries.  Fresh is always best if you can find good ones, but if they’re out, or have already sky-rocketed in price, frozen would work just fine.  It’s a custard kind of week here on the Family Meal blog.  I get good use out of my cute little ramekins and I have really embraced them as they are a perfect little size for toddler hands.  Oh yeah, and that spoon is part of this set, which I really just couldn’t resist.  I love them for Olive and for dips and jams and even my morning coffee.  Plus, what little girl wouldn’t feel excited to get to eat her oatmeal in the morning with a gold glitter spoon?  Olive couldn’t really care less.  It’s for me.  🙂

Strawberry Cream Pots


Strawberry Pots de Creme (pronounced: poh-duh-crem)
makes 4-6 depending on your vessels

  • 8 ounces strawberries (7 or 8 large berries), hulled
  • 3 tablespoons superfine sugar
  • 4 large egg yolks
  • 1 1/2 cups heavy cream
  • 1 tsp vanilla bean paste (or extract)
  • 1 tsp Cointreau (I left this out for Ollie)

Preheat oven to 275 degrees. In a tall cup or blender, combine strawberries, sugar and egg yolks. Process with your handy immersion blender (or regular blender) until pureed.

Bring a kettle of water to a boil. Pour the strawberry mixture into a large bowl.  Add 1 cup cream and the vanilla and Cointreau if using. Mix well. Divide mixture evenly among four 1-cup ramekins. Place ramekins in a baking dish, and add enough boiling water to come halfway up the sides of ramekins.

Place baking dish in the oven, and bake until the custard is just set, about 1 hour. Check by jiggling the pan – if they still look pretty liquidy in the center, rotate the pan and let it go another 15-20 minutes. Remove from the oven; place ramekins on a rack, and cool. Cover with foil or plastic wrap, and refrigerate at least 6 hours. To serve, top with diced strawberries or whipped cream and enjoy with your sparkle spoons!  🙂


Cherry Almond Scones

Cherry Almond Scones with butter

Dear goodness, I love a good scone.  Some people think they are too dry or would prefer a muffin, instead.  Cake is cake so there’s really no comparing it with a muffin.  Scones are meant to be enjoyed warm, with a sliver of cold butter and a hot cup of coffee or tea.  How very English.  Their merit of being on the verge of dry is that they pair well with butter and a warm drink.  And like their fluffy muffin-cousins, the varieties are endless.  I love a savory scone with cheddar and onion just as much as a sweet variety.  These particular scones have a magical pairing – almond and cherries!  I bought some hippie soap this weekend with that combination and I didn’t intend to buy soap if I hadn’t smelled it, but there it was, cherry almond soap, screaming, “I’M SO COMFORTING!  INHALE ME WHILE YOU DRIVE HOME!”  And so I did.  And it was a really great car ride.

When I received my copy of King Arthur Flour magazine, one of the first scone mixes inside was cherry almond.  I knew I had to make these on my own, instead of waiting on a mix to arrive on my doorstep.  So, I looked up the nearest recipe online and adapted it to be more almondy (there really is never enough almond-flavored things in the world) and got to baking!  They turned out soft on the inside and crispy on the outside – perfect!  I want to make them again, soon, and figure out a way to make them a little more cherry, too.  Perhaps a swirl of homemade cherry preserves in the dough!  They’re really great as is, though – just don’t forget the (real) butter!

Happy Beginning of the Week!

Cherry Almond Scones with Vanilla Bean

Cherry Almond Scones*
makes 8-10 scones, depending on the cut

3 cups all-purpose flour
1 cup sugar
1 tablespoon baking powder
Pinch salt
1 teaspoon ground cinnamon
1 1/2 sticks cold butter, cut into pea size pieces
1 cup dried cherries, roughly chopped
1/2 cup toasted sliced almonds
1/2 cup milk with a tsp of vanilla and a tsp of almond extract mixed in!

In a small bowl, combine the flour, sugar, baking powder, salt and cinnamon. Add in the butter and rub with your fingers into the dry ingredients until a coarse meal forms. Add in the cherries and almonds. Add the milk and extracts and combine it into the butter flour mixture.

Form the dough into a 1-inch thick disk and cut it into 8 rounds with a biscuit cutter (You can really cut them however you like.)  Transfer the scones to a greased cookie sheet and bake in the preheated oven for 17 to 18 minutes, turning the pan halfway through.

*Adapted from Anne Burrell

Espresso Chocolate Cake with Cinnamon Cream

Espresso Chocolate Cake with Cinnamon Whipped Cream
I’m a pretty big fan of the combination of chocolate and cinnamon.  They compliment each other so well in baked goods and the combination nearly exudes warmth.  This flourless indulgence boasts the rich flavors of espresso, as well.  And if there’s anything the first year of motherhood has taught me, it’s that coffee is from the Good Lord.  Chocolate is, as well, but coffee has really become a friend in need this year.  Together, they have become our go-to desserts.  This cake should be enjoyed with coffee if you are into that kind of supreme happiness.  The original recipe doesn’t call for cinnamon, but lately I’ve been adding it to just about everything including the fresh whipped cream I made for this cake.  I put more cinnamon than I thought I should and it turned out perfect.  And then I sprinkled it with cinnamon.  Maybe I have a deficiency?

Either way – try this cake.  And don’t leave out the whipped cream.  It was extra special.  Happy weekend and happy baking!

Flourless Espresso Chocolate Cake

Flourless Espresso Chocolate Cake with Cinnamon Cream*
makes one, 9″ round cake

  • 3 tablespoons unsalted butter, plus more for cake pan
  • 6 ounces bittersweet chocolate, preferably 70 percent cacao, chopped
  • 6 large eggs, separated, room temperature
  • 1 cup sugar, divided
  • 3 tablespoons instant-espresso powder
  • 1 tsp cinnamon
  • 1/4 teaspoon coarse salt
  • 1 tablespoon pure vanilla extract
  • 2 cups heavy cream
  • 2 tbs cinnamon

Preheat oven to 350 degrees. Butter the sides and bottom of a springform pan. Melt butter and chocolate in a glass or other heat proof bowl in the microwave at 30 second increments until melting and stir together to fully melt and incorporate.  Set aside.

Beat together egg yolks and 1/2 cup sugar with a mixer on medium-high speed until thick and pale, about 3 minutes. Add espresso powder, 1 tsp cinnamon and salt; beat until combined, about 1 minute. Add vanilla and melted-chocolate mixture; beat about 1 minute more.

In another bowl, beat egg whites on medium-high speed until foamy. Increase speed to high; gradually add remaining 1/2 cup sugar, beating until stiff peaks form, about 5 minutes. Fold into chocolate mixture in 3 batches. Transfer batter to pan and bake until set, 40 to 45 minutes. Let cake cool completely in pan on a wire rack. Remove side of pan; transfer cake to a serving plate. Serve whipped cream alongside cake.  To make the whipped cream, beat the heavy cream in a mixer on medium-high until soft peaks form.  Sprinkle in the cinnamon and whip a little longer, but not too long – you want the cream to stay soft, not get clumpy (which happens from too much whipping.)  Serve with coffee and be sure and save some for yourself for breakfast tomorrow!

*adapted from Martha Stewart Living

Cinnamon Oatmeal and Yogurt Pancakes

Cinnamon Oat Pancakes

I don’t believe in labeling food as “healthy” or “not healthy.”  I believe in good habits and bad habits.  I think it’s a bad habit to eat lots of refined sugar and processed junk that lives in a box on a shelf on a daily basis.  I think it’s a good habit to enjoy a totally sugar-laden cupcake once or twice a month and really enjoy the cuss out of it.  I think it’s a bad habit to eat fast food multiple times a week.  I think it’s a good habit to enjoy an amazing cheeseburger and fries on a weekend and have no regrets!   I think it’s a bad habit to let kids snack between meals on junk like salty fish shaped crackers and candy posing as “fruit.”  I think it’s a good habit to let your kids know what snack food is and that it is to be eaten once in a while and not every day and certainly not in place of a meal.  Good habits and bad habits – to heck with worrying about good foods and bad foods or worrying that I’m bad for having refined flour and sugar in the house.  If you really believe in the adage of “everything in moderation” you won’t run from these ingredients.  You’ll just put them in their time and place.

Because of the awesome blog by Dina Rose that I read on a regular basis, I am coming more and more into the understanding of focusing on conquering habits instead of worrying about the nutrition of each individual meal I cook.  I’ve developed a few habits I’m proud of and I’m working on changing the habits I’m not so proud to admit.  A bad habit I’m working on is eliminating my “adult right” to snacking throughout the day.  I have been bad about this in the past.  A piece of chocolate here, a cracker and cheese or seven there…I don’t want Olive to grow up snacking between meals and having her around has really shed light on my bad habits for randomly and mindlessly eating.  I’ve been tackling that problem this week and it’s getting easier and easier to wait till the next meal – just like I expect her to learn.

A good habit I really love is cooking a bit more indulgently on the weekends.  This Saturday it was just us girls as Matt was somewhere in the Colorado wilderness hiking and eating freeze dried gravy.  I love not camping.  So for breakfast, before Olive woke up, I looked up a recipe for yogurt pancakes and modified the one I found to have cinnamon, oatmeal and a splash of sweetened milk I had in the fridge from the tres leches cakes I made a couple weeks ago.  It was the best stack of pancakes I’ve ever made.  They were wonderful. These pancakes are by no means “healthy” in that you should eat them all the time, but they are filled with good ingredients and that just adds a bonus to getting to dig into a stack of pancakes on a weekend.  I topped them with banana slices and a bit of my favorite syrup – dark amber agave nectar (tastes like caramel) – and they were awesome.  And filling.  I threw the leftovers in the toaster this morning before church and they were magical all over again.  Three cheers for refined flour weekends and learning good habits!

Cinnamon Oatmeal Yogurt Pancakes


Cinnamon Oatmeal Pancakes
made about 8, 3 inch pancakes

1/2 cup flour
1/2 cup rolled oats
1/2 tsp baking soda
1/4 tsp salt
1/2 tsp cinnamon
1 cup plain yogurt
2 eggs
2 tbs melted butter
2 tbs milk or heavy cream or evaporated milk (I had leftover tres leches concoction in my fridge)

Heat a griddle or a non-stick frying pan over medium high heat.  Combine all the dry ingredients into a large mixing bowl.  Then, in a separate bowl, combine all the wet ingredients and whip up the eggs in the mixture until smooth.  Pour the wet ingredients into the dry and blend with a fork until fully incorporated.  Spray the skillet with spray oil with each batch of pancakes and cook till browned on both edges, 2-3 minutes per side.

Serve with sliced bananas or peanut butter and syrup – whatever makes you happy!

Cinnamon Oatmeal Pancakes

Buffalo Chicken Sandwiches with Blue Cheese Slaw

Buffalo Chicken Sandwiches with Blue Cheese and Celery Cole Slaw
In the Palmer house, we like to do things from scratch.  Sometimes we even go so far as to make the contraption that makes the food (thank you, Alton Brown).  But I would say our current favorite food-past time is eating a dish at a restaurant and saying, “I bet we could make a better version of this at home” and then going home and trying it out.  One of our favorite restaurants here in town is Crafthouse Gastropub.  They always have good brews on tap and they have a creative menu and generally execute things pretty well.  Matt was really excited to try their buffalo chicken sandwich and had been anticipating it for a long time, but it fell kinda short when we finally had it.  Maybe it was because we had this idea in our heads of what it would be and it wasn’t that way – sometimes you can really cheat a restaurant by doing this.  The slaw was really wet and ran down his arm and pooled onto the plate.  The chicken wasn’t “buffalo” enough and was also too big, so it was really hard to eat.  It was a good enough sandwich for what it was, but we said then and there that we’d try this one at home.

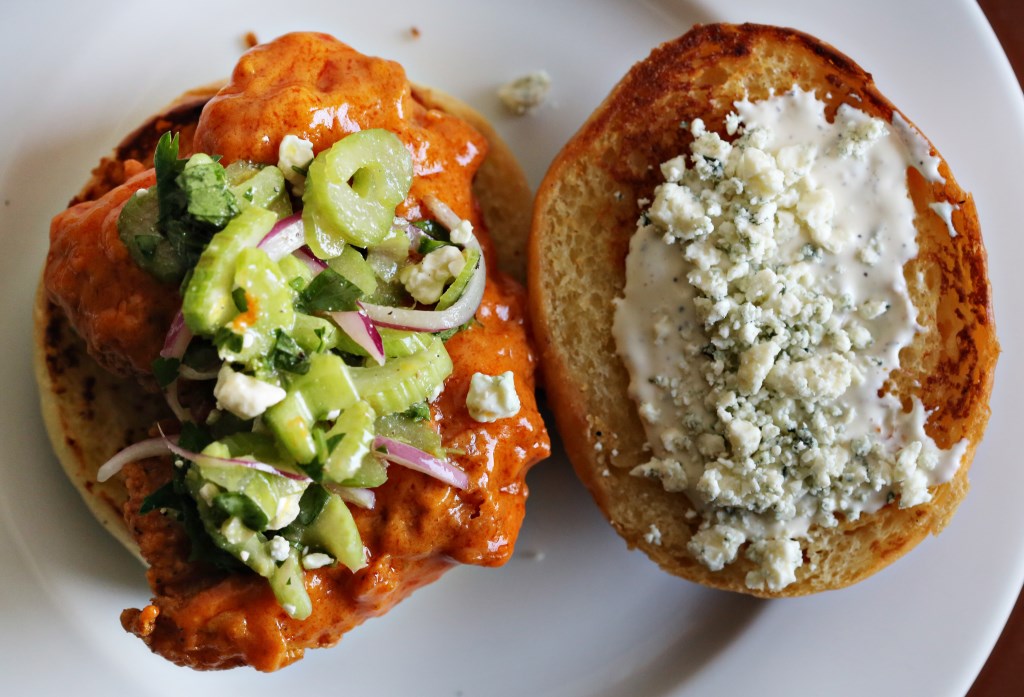
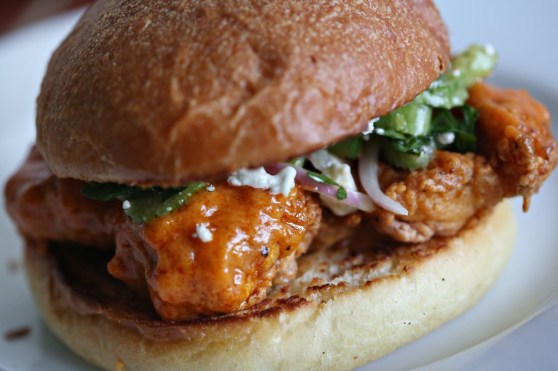
So we did.  And it was tremendous.  We used the recipe for the fried chicken sandwich from Serious Eats and I think they really have a perfect process.  Using chicken thighs instead of the breast makes for a smaller patty and a more flavorful one, and it’s easier to eat.  We used our very favorite buffalo sauce and Matt thickened it with a bit of roux and it worked perfectly.  We didn’t want the drippy situation and making the sauce thicker like buffalo gravy – if you will – was the right move.  Matt found a slaw recipe online from a girl who really knows her stuff, Carla Hall from Top Chef, that had celery and blue cheese.  What is more perfect with buffalo chicken than blue cheese and celery?  Then, we totally cheated and bought a nice jar of ranch dressing and mixed in some chunky blue cheese crumbles for the sauce.  And to finish everything off, Matt made outrageous potato rolls for the buns.  It was, by every definition, the perfect chicken sandwich.  Right size, right proportions, right flavor – right on.

I’ll post our thickened buffalo sauce recipe below, as well as Matt’s potato rolls.  There’s a lot of components to this sandwich, but you can improvise on pretty much all of it if you want.  I’d highly recommend keeping the fried chicken thigh the same, though.  I can’t imagine how to improve it.

Buffalo Chicken Sandwich

The Perfect Buffalo Sauce 

  • 1 1/2 tablespoons white vinegar
  • 1/4 teaspoon cayenne pepper
  • 1/8 teaspoon garlic powder
  • 1/4 teaspoon Worcestershire sauce
  • 1 teaspoon Tabasco sauce
  • 1/4 teaspoon salt
  • 6 tablespoons Frank’s hot sauce
  • 6 tablespoons unsalted butter

Mix all the ingredients together in a medium saucepan over low to medium heat until well combined and heated through.  To thicken, like we did for our sandwiches, take two tablespoons of unsalted softened butter in a small dish and add about two tablespoons of flour to form into a paste (an uncooked roux).  Throw this little ball of buttery flour into your buffalo sauce and whisk until fully incorporated and thickened.  We dunked each crispy chicken patty into the buffalo sauce before assembling our sandwiches.

Buffalo Chicken Sandwiches

Potato Buns*
makes 8 sandwich-sized buns

  • 1 russet potato (big enough to make 1/2 cup mashed potato), peeled and chopped
  • 1/3 cup unsalted butter, softened
  • 1 tbsp. honey or agave nectar
  • 1/2 tsp. salt
  • 1 egg
  • 1/2 cup milk, warmed
  • 1 1/8 tsp. instant yeast
  • 1/4 cup reserved potato water
  • 2 1/2 – 3 cups bread flour
  • 2 tbs salted butter, melted, for brushing the buns


Boil potato until tender.  Drain cooking water, reserving 1/4 cup for use in the rolls.  Finely mash the potato and measure out 1/2 cup.  Let cool to nearly room temperature.

In the bowl of a stand mixer fitted with the paddle attachment, mix together the mashed potato, butter, honey, salt and egg.  Mix together on medium speed for about 2 minutes.  Combine the yeast with the warm milk and reserved potato water, and pour into the mixer bowl.  Mix on low speed until incorporated.  Gradually add the flour, about 1/2 cup at a time, until a soft dough forms.  Switch to the dough hook attachment on knead on low speed for 5 minutes, adding more flour if necessary to achieve a soft dough that is slightly tacky but not sticky.  Transfer the dough to a lightly oiled bowl, turning once to coat.  Cover with plastic wrap and let rise in a warm place until doubled in bulk, about 60-90 minutes.

Line a baking sheet with parchment paper.  Turn the down out onto a lightly floured surface and punch it down.  Separate into 8 equal pieces and shape into buns.   Place the buns on the prepared baking sheet, about 1 1/2 inches apart.  Brush each bun with melted butter.  Cover with a clean kitchen towel and let the dough rise again until the rolls have grown into each other, about 30-45 minutes.  Meanwhile, preheat the oven to 400 degrees F.

Bake in the preheated oven for about 15 minutes, until golden.  We started checking the buns for doneness around 12 minutes.  Serve warm.

*recipe adapted from Annies-Eats where we made bigger rolls, left out the sugar and brushed with butter instead of dusting with flour to make extra soft buns.