Parsnip Puree with Coriander Brown Butter

parsnip002

I remember the months of making Olive’s baby food with great fondness and happy farewells.  While it was fun to show her new foods, I was all too glad to stop blending and pureeing things like chicken pot pie or beef stroganoff.  Because while certain foods look nice pureed, others look like…gray.  And gray just isn’t an appealing color in the food world.

Whenever I see recipes for purees, I instantly think, “That’s baby food” because it was to me.  I never followed the rules of how to feed your baby what at what age, except for the standard “biggies” like honey, peanut butter and strawberries.  I just always blended up whatever we were having and it always worked out great.  Her first foods weren’t bland cereals, but full flavored vegetables.  Olive ate and enjoyed nearly everything my trusty immersion blender wanted to create and I think, because of that, she isn’t very averse to strong flavors, spices and seasonings.  I always seasoned her baby food.  I’d hold back on the salt more than what my palette would prefer, but I felt that her food should taste good and that if we enjoyed it, she’d enjoy it!

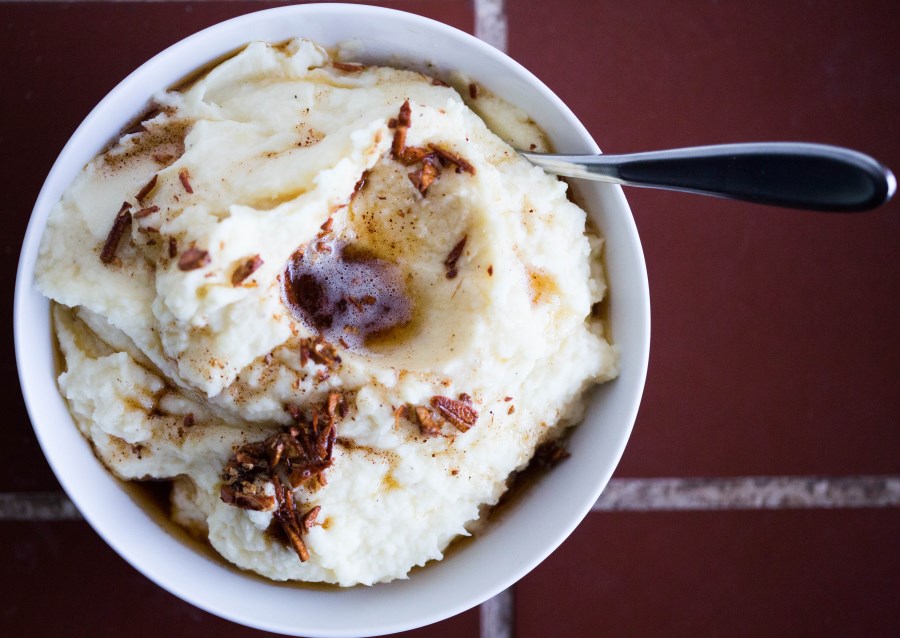
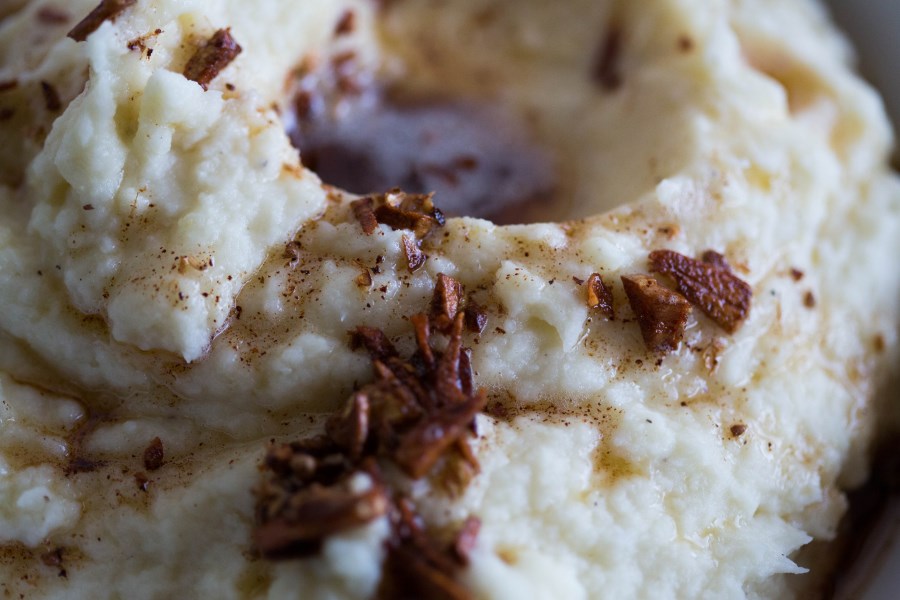
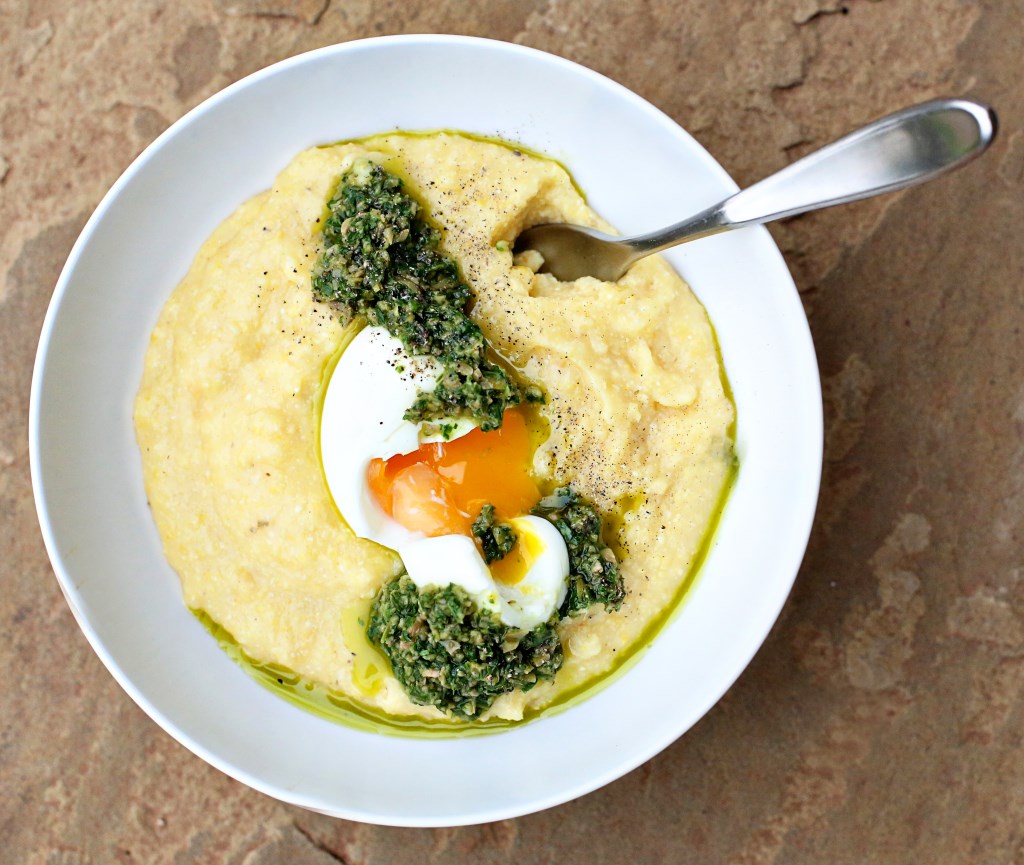
Today’s recipe fits a lot of current trends.  Substitutions for those evil, fear-inducing potatoes?  Check.  Browned Butter?  Check.  Calling baby food a puree and feeling fancy while serving it for dinner?  Check.  I made this dish last night as a side to lamb chops and roasted broccoli.  (Olive gnawing on the lamb chop ranks up there with Greatest Moments Ever.)  We all enjoyed it and I think it will make an appearance again during the fall season.  Those crusty bits that Olive called bacon?  Yeah, that’s roasted garlic.  Totally awesome.  If I could do anything, I’d make parsnips not so sweet.  And then, by George, they’d actually taste like mashed potatoes!  🙂

parsnip003

Parsnip Puree with Coriander Brown Butter*
serves 4-6 as a side

2 lbs parsnips, peeled and chopped into 1 inch pieces
5 TBS unsalted butter
2-4 TBS milk
Salt and fresh ground pepper
1/4 tsp ground coriander
2 cloves chopped garlic

Boil the chopped parsnips in salted water until tender.  Transfer to a food processor, or to a large bowl if using an immersion blender.  Add two tablespoons of butter, the milk and salt and pepper and blend until smooth and creamy and no chunks remain.  Add a dash more milk if you want.  Adjust the seasoning with salt and pepper to taste.

In a stainless steel skillet over medium heat, add the remaining three tablespoons of butter, coriander and chopped garlic.  Swirl the butter around until bubbling and starting to brown.  Keep the garlic moving around so it doesn’t burn.  Remove from heat and pour over the parsnip puree to serve!

*recipe from Real Simple magazine this month, in which they gave us four entire weeks of dinner planning.  I’m not going to squander that work done for me, so we’re eating through Week 1 and enjoying it very much.  Especially the lack of effort part.

Crustless Asparagus Quiche and the End of All Dieting

asparagus custard

I was first introduced to a savory custard by the wonderful food blogger, Helene Garcia of French Foodie Baby.  The first savory custard I made was her leek and chive flan and I was a bit afraid at first because we just have ingrained in our minds that custards and flans are supposed to be sweet, but this was a very happy and luxurious surprise.  Basically, in American terms, this is a crustless quiche.  Only waaaaay better of a texture than the quiche of your childhood.  Please do refer back to my quiche post on how its texture should be.  I was happy that it was such a silky texture and that Olive could eat it just fine with her limited spoon wielding skills.

I stumbled upon this asparagus and bacon custard in a book called French Women Don’t Get Fat, which I’m reading and working my way through the steps to reshape my life and my patterns of eating.  The book presents a bit of a strict start (a cleanse, which I don’t think is totally necessary for success, just optional) followed by three months of self evaluation of the patterns you’ve made over the years and ways in which you could cut back without feeling deprived.  After three months, by the book, you should only be HALF WAY to your goal weight.  If you are, then she advises to add back a few more pleasures and get on with your life!  If not, then keep going with the plan, making additional adjustments if necessary.

I’m happy to have finally found a book that doesn’t restrict you, doesn’t say that a particular food or food group is bad, and doesn’t push supplements.  I’m DONE with that vicious cycle of crash dieting and then giving up, gaining back and doing it all over again because every new diet makes a new promise.  Why do we keep doing this to ourselves?  I found myself having an epiphany the other day that a diet that promises you’ll lose all the weight you need to lose in a few weeks will only work if it only took you a few weeks to gain that weight.  And like me, I’m sure most of us with serious weight issues have struggled a BIT longer than weeks or even years with our weight.  So why does it not register in our minds that in order to keep a good, healthy weight, we should logically change the way we do things for 10-15 years at least?  Personally speaking, I’ve struggled with my weight for about twenty two years and most of that time was wasted, going through diet after diet that restricted too much, left me wanting and frustrated and ultimately, feeling like I am a loser and can never succeed.

After 11 days of following this book and eating what I personally feel was a bit too indulgent of a menu, I’m down seven pounds.  I know what you’re thinking: all water weight, and besides, wasn’t she just preaching that weight loss shouldn’t be sudden?!  You’re right, it shouldn’t.  But for one, I have a lot to lose and the more you have to lose, generally, the quicker you will drop pounds (at first).  Second, I’ve completely cut out all snacking and all second helpings.  Man, that adds up to a lot with just those two bad habits!  Especially if you snack several times a  day!  The only other thing I’ve given up has been cream in my coffee and that, for me, was the biggest challenge because I love my coffee.  But, for these first three months of “readjusting” how I do things, I don’t consider it that much of a burden to give up roughly 200 calories a day that used to be dedicated to cream in my coffee!  I have even started to prefer it black with just a little sweetner (stevia, for those concerned).  I haven’t been stressed about working out – I just have been taking more walks and enjoying the new, cooler fall weather and I’ve been pulling a few weeds here and there.  This is my new life.  I was done with diets a few years ago, but I was still engaging in bad habits.  It’s hard to undo years of emotional eating, but I’ve found that the distraction of Olive is a grand one.  Or, if I just HAVE to ingest something in the afternoon, I make a cup of cinnamon tea (it’s naturally sweet) and get productive!

This custard recipe was breakfast for a few days last week.  Again, I know what you will say.  This has cream, eggs, bacon AND it’s in a “diet” book?  Yep.  Moderation + Fulfilling Meals = Success.  Moderation + Drab, Restrictive Meals = Failure. I really recommend you picking up this book IF and only if you are done yo-yo dieting,  if you like to cook and you are ready to stop restricting yourself and feeling guilty for eating things like butter.  I’ll keep you posted on my progress and I hope that I can encourage some of you to stop the fad madness and just start “eating real food, not too much, mostly plants.” (from the omnivore’s dilemma) 🙂

Asparagus custards

Asparagus Custard (crustless quiche, if it makes you feel better to call it that)
makes 6 – 1 cup ramekin servings

16 asparagus spears, tough ends cut off and peeled
4 ounces bacon, coarsely chopped
8 eggs
2 cups milk
1 cup heavy cream
8 sprigs chives, minced
1/4 teaspoon salt
1/4 teaspoon black pepper

Preheat oven to 350F. Boil the asparagus in salted water for 5 minutes. Drain and let cool. Chop each stalk into a small dice and set aside.  Saute the bacon in a nonstick frying pan till crisp. Drain on paper towel and set aside.  Mix remaining ingredients in a large bowl (reserving some chives for garnish). Pour the egg mixture into individual ramekins. Sprinkle in the asparagus and bacon. Bake for 15-20 minutes till the custard is set but not dried out.  Serve with pieces of toast, crackers, or with some fresh fruit and enjoy your day!

Citrus Cured Salmon

7G9A1929


It’s Monday – time to scale back.  Drink more water, take a walk after dinner.  Eat lighter, eat simpler.  Undo what might have been done over the weekend of eating out with friends, drinks with co-workers or quick meals eaten on the run out of paper bags.  I am currently in a very scaled-back mindset.  This blog obviously has the most popularity when I post sugar and flour concoctions (don’t worry, there’s plenty in the queue) but for this week, I’m going to write about simple, clean, mindfully healthy recipes that are also incredibly fulfilling and delicious.

Over the weekend I dipped into Michael Ruhlman’s cookbook, “Ruhlman’s Twenty” and tackled the citrus cured salmon.  This is not the type of recipe that calls my name. I love cured salmon in the form of lox, but this type of do-it-from-scratch recipe is a direct influence of my husband.  He has made me see the joy in cooking for cooking’s sake.  Not just eating the food, but enjoying the process.  I can honestly say I thought he was crazy when I first heard him say, “I don’t even need to eat what I made, as long as I taste it and see that it came out well, I can move on.”  I used to think this was ridiculous because I used to be a quantity over quality type eater.  I used to think more was more.  More mediocre food is better than less high-quality food.  This is a mindset of an over-eater.  As Matt taught me the joy of the process of cooking, I began to see what he meant.  Just tasting that something you spent hours making came out well is beginning to be enough of a pay-off for me. And when you don’t eat as much, you have more to share.  Which puts you in the middle of what food should be: communal.

I know what you’re thinking: this stuff is pretty easy to buy in the store.  However, I never want to buy it because how old is that fish, anyway?  And where did it come from?  All these questions  are answered simply if you just do it yourself.  So, we bought a pound of salmon from the fresh fish counter, I grated lots and lots of zest and dumped kosher salt on it.  24 hours later – perfectly cured salmon with a HUGE citrus flavor.  Amazing with cream cheese and capers and diced shallots on top of Matt’s homemade, toasted bread.  This is eating simply and without regret!

Happy Zesty Monday.

Citrus Cured Salmon

Citrus Cured Salmon*

1.5 lb salmon filet
1 tsp orange zest
2 tsp lemon zest
1 tsp lime zest
1/2 cup kosher salt
1/4 cup sugar

In a small bowl, combine the salt and sugar and stir to distribute the sugar throughout the salt.  In another bowl, combine the citrus zests.  (Buy a Microplane.)

Lay a sheet of aluminum foil large enough to extend beyond the length of the salmon.  Spread a third of the salt mixture in the center of the foil to serve as a bed for the salmon.  Place the salmon skin-side down on the salt.  Distribute the zest evenly across the salmon.  Pour the remaining salt mixture over the salmon.  It should be covered.  Fold the foil up to contain the salt.  Place another sheet of foil over the salmon and crimp the sheets together firmly.  The idea is to have a tight package in which the salt mixture is in contact with all surfaces of the salmon.

Set the foil package on a baking sheet.  Set another baking sheet or dish on top of the salmon and weight it down with a brick or a few cans from your pantry.  This will help press the water out of the salmon as it cures.  Refrigerate the salmon for 24 hours.

Unwrap the salmon and remove it from the cure, discarding the foil and the cure.  Rinse the salmon and pat dry with paper towels.  To remove the skin, place the salmon skin-side down on a cutting board.  Holding a sharp, thin, flexible knife at about a 30-degree angle, cut between the flesh and the skin.  When you can get a grip on the skin, pull it back and forth against the knife to separate it from the flesh.  Set the salmon on a rack or on paper towels on a tray and refrigerate for 8 to 24 hours, to allow the salt concentration to equalize and to dry the salmon out further.  Wrap the salmon in parchment and store in the fridge for up to 2 weeks.

Serve sliced extremely thin on crackers, bagels, or with scrambled eggs for a hearty breakfast – the options are up to your tastes!

*adapted from Rhulman’s book in that we could only find 1.5lb filets of salmon and his recipe called for 2-3lbs.

lox

Spicy Roasted Chickpeas

Spicy Roasted Chickpeas
I‘ve seen this recipe around the Pinterest/Facebook/Blog world for a while, now and the first time I tried it, it was one of those moments when I bitterly complained that what I made didn’t look at ALL like the picture.  Ever feel that way?  I think the second time around, without a recipe, I just followed my nose and used the spices I like and let them roast much longer and I had SUCCESS!  They turned out super crunchy, wonderfully spiced and a great little starter for our meal, which Olive claimed as the favorite part of her meal and kept saying, “Mes, hickpeas?”  over and over and over.  I really think she ate about a half cup.  I wouldn’t recommend that to other moms, but that’s what happened and since they were part of the meal, I let it slide.  But yeah, they eat like a snack and I would recommend this to anyone for a healthier option for a party snack, during a movie, etc.  And you can have fun with whatever spice blend you want!  Happy Monday and I hope everyone had a wonderful weekend!

Spicy Roasted Chickpeas

2 cans chickpeas, drained and rinsed
2 tbs olive oil
1/2 tsp each of:
salt, pepper, onion powder, paprika
a sprinkle of garlic powder

Preheat the oven to 375. Spread out the drained, rinsed chickpeas on paper towels and dry those suckers out WELL.  Place the chickpeas on a rimmed baking sheet and add the olive oil.  Mess them around with your hands till every last wee pea is coated in oil.  Sprinkle the spice blend over the peas and roll them all around till they are all coated.  Place the chickpeas in the oven for 25-35 minutes until they are golden and when the pan is shaken, they sound hard and roll around easy.

Let them cool for a bit before transferring them to a bowl, just because you don’t want to enthusiastically grab a handful of glowing-hot peas.

Serve at the beginning of the meal or for a snack and enjoy!

Zucchini Bruschetta – Hold Off on Cardigans a Little Longer…

Zucchini Bruschetta detail

The summer seems to be winding down, although I wouldn’t be surprised if we had 100 degree days well into October.  I’m getting in that cozy fall mood, already, though, and it’s dangerous because I want to wear cardigans and listen to jazz and eat pumpkin flavored things and it’s still 98 and muggy outside.  Sometimes if the summer goes on a little too long, I start protesting by wearing my sweaters, regardless of the temp.  I consider it my adult fussypants-ness.  Everyone’s got a cross to bear – mine is shorts-weather.

This recipe keeps me mildly okay with the fact that it’s still summer.  It’s so fresh and happy and has such bright, bold flavors and colors that it makes the perfect appetizer when your friends are keeping you company in the kitchen as you finish roasting the pig…or whatever it is you cook for your friends.  This is also a great way to use up the only thing you got to grow in your garden, this year.  What is it about zucchini?  Why does it:
1. Always grow
2. Grows as big as a Great Dane
3. Give you more yield than any one family could ever consume?

Zucchini gives false hope.  “Hey, you can grow me!  Now let’s see how you do with carrots!  Go on!  I want to see you try!  Loser.”

Or that’s how my zucchini plant makes ME feel…

zucchini bruschetta appetizers

Zucchini and Olive Bruschetta*
serves 6-8 appetizer sized portions

1 baguette, cut into 1/4″ slices
2 tbs olive oil, plus more for drizzling
4 small zucchini (about 12 ounces)
1 large avocado (ripe, duh)
zest and juice from one lemon
12 large mint leaves, chopped
1/3 cup toasted almonds or any nut, really
1/3 cup chopped catamala olives, or whatever floats your boat
2 ounces pecorino romano, parmesan or other firm cheese you enjoy

Heat oven to 375°F and arrange a rack in the middle.  Slice zucchini lengthwise into 1/3” slices and then stack the slices and cut into 1/3 “ matchsticks lengthwise. Once all the zucchini are sliced, cut them lengthwise into 1” pieces.

Place the zucchini in a colander and toss with ½ teaspoon of kosher salt, and set aside to drain for 20 minutes. Meanwhile, brush the bread on both sides with olive oil. Place on a baking sheet and bake until crusty and brown, about 10 to 12 minutes. Turn once halfway through to toast evenly. Remove and cool.

Peel and pit avocado then cut into 1/2-inch dice. Place in a medium bowl and toss with lemon juice and zest. Roughly chop mint leaves and add to avocados.

Line a large plate with paper towels and spread out salted zucchini. Lay another layer of paper towels on top and pat off excess moisture. Add to the avocado bowl along with the almonds and olives and mix thoroughly. Taste and adjust salt to your liking.

Top each crostini with a heaping spoonful of the zucchini mixture. Drizzle over olive oil and fresh cracked pepper. Using a peeler thinly shave cheese and top each crostini with a few slices and serve.

*recipe adapted from aidamollenkamp.com

Beautiful Beets and Second Chances

beets008

This is a perfect Monday post because no one really reads my Monday posts so I can be as nerdy as I want.  Here it comes…

beets012 beets013 beets006

I took a lot of pictures of beets the other today.  They’re beautiful.  Why aren’t they more popular in this country?  A PINK food?  Come on! Kids should be all over these.  They stain worse than food coloring.  They roast up sweet and savory.  I think a lot of people in this country have been scarred by canned or pickled beets.  That’s the taste they have in their minds.  I can understand why that wouldn’t be the most appealing taste memory.  But think about this – what if someone decided a long time ago that the best way to eat a potato would be to brine it?  Everyone would say, “Eww, potatoes.”  THINK ABOUT THAT!  So, my determination is to try previously unappealing foods in different ways than they are known for.  Roasting is almost always the best way to cook a root vegetable.  It works with just about anything from asparagus to parsnips to turnips.  It’s good to give foods with a bad reputation a  second chance. You never know if you’re one recipe away from your new favorite food.

This post is really just for showing the pics I took of beets.  And if you are curious, peel them, chop them into cubes, coat them in olive oil, sprinkle with salt and pepper and roast them for 30 minutes at 400F until tender.  No brainer.

beets002 beets003 beets004 beets007 beets001 beets015
Ready for roasting

My family looking at me as if I’d gone crazy while I took pictures of beets for 30 minutes.
beets014


Cajun Shrimp and Potato Bake

shrimp and potatoes002

This is a fantastically easy, hearty, well-rounded meal that is wonderful for the whole family.  I love cutting corn cobs into sundials – it’s not only very pretty to look at, but it makes it very easy for little hands to pick up and dig in!  I created this meal after determining we had nothing to eat 🙂  I had a few fingerling potatoes, 3 cobs of corn, and about 12 shrimp in the freezer.  Oh, and a shallot.  I had a shallot.  It really is remarkable what you can create when your laziness for going to the store beats out your laziness for cooking.  I chopped up everything, roasted them, and served it all in bowls with plenty of hot sauce!

This meal was made possible by the previously stated freezer staple, frozen shrimp, and a strong desire to stay home and out of the heat.  We had leftovers for a few days from this, and for what was probably $5 total, I’d consider that a success.

shrimp and potatoes004

Cajun Shrimp and Potato Bake
serves 4

1 lb fingerling potatoes, or small, new potatoes, chopped into 1″ pieces
3 cobs of corn, cut into 1″ cross-sections
1 large shallot, or 1/2 a medium onion, cut into thin half-moons
1/2 lb peeled, deveined, frozen shrimp (about 6-8 per person, if they are big)
1 tsp Cajun seasoning (or Old Bay would work great)
Olive oil (about 3-4 tablespoons total)
Kosher salt and fresh cracked pepper

Preheat the oven to 375. Run cold water over the frozen shrimp to thaw and leave it in the colander while you cut up the vegetables.  Toss the potatoes, corn and onion with about 2 tablespoons of the olive oil and sprinkle well with salt and pepper.  Roast for 25-30 minutes, until corn turns golden and potatoes are tender, stirring once or twice during cooking time.  While the vegetables are roasting, rinse the shrimp again and then lay them out on paper towels, blot dry and sprinkle with salt and pepper and Cajun seasoning on both sides.

When the vegetables are almost done, take the tray out and lay the shrimp on top of the vegetables and drizzle with olive oil.  Bake for 10 minutes, or until the shrimp are opaque.  Toss everything together in a big bowl and serve with hot sauce of choice!

Happy 4th of July Weekend!

photo

It’s strange when a holiday falls in the middle of the week.  People have to go back to work the next day, so it’s this little blip in the week that makes you WANT the full, extended weekend, but few actually get it.  I figure since people might be celebrating all weekend, a recipe for a few burger-accompaniments would be in order.  I might even post, again, tomorrow with what we cook, tonight.  Maybe I’ll post on Sunday, too, with what happens on Saturday.  I love a good excuse to celebrate the summer all weekend long.  We really don’t need an excuse, but when festivities are high and people are cooking and grilling, it’s a wonderful time to try out new recipes and make the old, beloved standards.

We’ve been Top Chef fans since its debut seven years ago.  We developed a love-hate relationship with Spike during his season and bought his cookbook and now that relationship is all love.  He really understands how to do comfort food and takes nostalgia (burgers, shakes) to a new level.  So he is the go-to for summer time recipes!  I highly recommend his cookbook, The Good Stuff Cookbook and especially his recipe for the Good Stuff sauce that we now have to have on every burger we grill!  It’s a perfect blend of sweet, tangy and savory and it is perfect for burger toppings or a dip for fries!

goodstuff002

Good Stuff burger sauce*
makes about 2 cups

2 cups homemade or Hellman’s mayonnaise
2 tbs ketchup
2 tbs molasses
2 tbs rice vinegar
1 tsp salt

Add all ingredients to a food processor or blender (or in a cup with an immersion blender) and puree until smooth.  The sauce can be refrigerated in an airtight container for up to 1 week.

*taken directly from The Good Stuff cookbook

We also are addicted, lately to caramelized onions.  There’s really nothing difficult about making them, and they completely improve everything they touch.  I’ve added them to omelets, sandwiches, wraps, burgers, stir-fry, beans, rice dishes – EVERYTHING!  Here is my simple method:

Caramelized Onions
makes 2 cups – can easily be scaled down

6 white onions, halved and then sliced thin
2 tablespoons neutral oil like Canola
Kosher salt

Heat the oil in a 12″ cast iron pan till it shimmers.  Dump all the onions in at once and let it sit there for a few minutes.  Then, gradually start flipping and stirring the onions around till they all get coated with the oil.  Your pan will be VERY full if you used all 6 onions.  Turn the heat down to medium low and cook, stirring occasionally for at least 30 minutes.  You want a deep, rich brown color on all the onions.  They will greatly reduce in size till you’re left with about 2 cups of onions.  We keep ours in the fridge and scoop out portions for everything under the sun, but most recently, they were an AMAZING topping to our burgers this weekend, complete with smoked gouda, pickles and the Good Stuff sauce.  Oh, heavens…

The last recipe I’ll impart is a very classic deviled egg recipe that includes a good amount of olive oil and the result is the most silky texture to the filling and the perfect balance of acid and richness from the egg yolks.  The recipe is adapted from the Serious Eats site, which, if you haven’t become addicted or receive their weekly emails, you will and you must.  So many great recipes come from their extensive research and trial and error!

goodstuff004

Deviled Eggs
makes about 18

1 dozen large eggs, not too fresh
2 tablespoons mayonnaise, preferably home made
1 tablespoon dijon mustard
Up to 1 tablespoon white wine vinegar
1/2 teaspoon Frank’s Red Hot sauce
2 tbs extra virgin olive oil
Kosher salt
Freshly ground black pepper
3 tablespoons thinly sliced chives
Crushed red pepper or hot paprika

Place eggs in a large saucepan and cover with 2 quarts cold water. Place over high heat, bring to a boil, cover, remove from heat, and let stand ten minutes. Drain eggs and peel under cool running water. Slice each egg in half lengthwise.

Place all of the yolks in the bowl of a food processor. Select 16 of the best looking egg white halves and set aside. Reserve the remaining 8 for another use. Add mayonnaise, mustard, half of vinegar, and hot sauce to food processor and process until smooth, scraping down sides of bowl as necessary.

With machine running, slowly drizzle in 2 tablespoons of olive oil. Season mixture to taste with salt and remaining vinegar (if desired). Transfer to zipper-lock bag. Filling and egg white halves can be stored in the refrigerator up to overnight before filling and serving.

Cut off corner of ziplock bag and pipe filling mixture into egg whites, overstuffing each hole. Drizzle with extra olive oil, sprinkle with black pepper, chives, crushed red pepper, and sea salt. Serve immediately.

Cheesy Grits with Olive Pesto and a Soft-Boiled Egg

Cheesy Grits with Olive Pesto and a Poached Egg

Grits, Polenta, Cornmeal – whatever you call it and however you prepare it, it can take on many forms and flavors.  To us, slow-cooked grits is about as comfy as comfort food gets.  When done right, grits can be amazing.  Too often, people associate grits with the translucent, gel-like, flavorless substance they encounter at cheap breakfast houses the world over.  I often say that if you don’t like a particular food, you might have just had a bad version. I was this way with grits, apple pie, turnips, pork chops, just to name a few.  When I had a GOOD bowl of cheesy, smooth grits, I was hooked.  When I had an apple pie that was distinctly apple and had a good, buttery crust and wasn’t watery, I understood the appeal.  Sometimes you just have to give a dish a few tries before putting it in the “dislike” category.

This recipe for grits is one of my favorites, so far.  This basic, creamy grit recipe stays the same – just the toppings change.  This makes it one of the easiest weeknight meals to prepare because the grits cook for about an hour, which you inadvertently stir while you’re doing other things.  Then, when it’s time for dinner, you just spoon out helpings, add toppings of choice, and dig in.  I honestly think that it’s a healthy meal, too, because the grits are cooked with chicken stock and you don’t even have to add cheese for amazing depth of flavor, if you use good grits.  I use Lamb’s stone ground grits, (you can find these at United) and they are amazing.  Just a little seasoning and they are perfect.  So, the indulgence level is up to you with this beautiful, blank canvas!

I found a recipe for an olive pesto on this beautiful blog, and with the poached egg, she had me sold.  Only, I didn’t poach mine, I did a pretty fool-proof method of soft boiling the eggs, letting them cool, and then carefully peeling them.  Not so fresh eggs work best with this method.  I will post my own pesto recipe on this blog, soon, as I’ve made it quite frequently and it’s one of those things, like guacamole, that you should just know how to do and do well.  And by “well” I mean, keep it pure and simple!

Cheesy Grits with Poached Egg and Olive Pesto

Cheesy Grits with Olive Pesto and a Soft Boiled Egg*

For the Polenta:
2 cups stone ground grits (do NOT use instant grits)
8 cups water/chicken stock (I did half and half)
1/2 cup shredded Parmesan cheese, or any other hard cheese
Salt and Pepper to taste

Get the water and/or chicken stock boiling on the stove.  Gradually whisk in the grits, careful to break up all the clumps.  Lower the water to a simmer and stir, occasionally, for about an hour.  You can test to see if they need more cooking by tasting a bit for crunchiness.  Shouldn’t be too crunchy – think of it like cooking rice.  Stir in the cheese till it melts and adjust seasoning with salt and pepper.  Cover and set the burner on low and get on with your toppings.

For the Pesto:
1/3 cup olive oil
1/2 cup green olives, coarsely chopped
1 cup fresh basil
1/2 cup fresh oregano or marjoram (I discovered they are wickedly similar)
1/4 cup fresh thyme, coarsely chopped

Put all this stuff in a blender, food processor, or tall cup with an immersion blender and pulse till chunky and well combined.

For the Eggs:
1 egg per person, room temp (To make them room temp quickly, simply put them in lukewarm water for about 10 minutes)
a big ol’ pot of water
tablespoon of white vinegar
salt

Get a big pot boiling with water and salt it and add the vinegar.  Carefully lower the eggs into the boiling water.  Boil for 5 minutes.  Remove from the water and let them sit in lukewarm water till cool enough to handle.  Veeeerrrrrry carefully peel the eggs and set aside.

Assemble!

Spoon grits into each bowl (they may need to be stirred a bit from sitting there.  They form a skin, but it’s okay, it stirs back up just great) and top with a poached egg, a spoon of pesto and extra pepper.

*adapted from thekitchn.com

Rosemary Crusted Pork Chop with Coconut Milk Braised Carrots

Rosemary Pork and Carrots006

This is a good meal for many reasons.  The pork chops were actually a good thickness, and lean, and were buy one pack, get another pack for free (4 really thick chops in each package.  I get ridiculously excited for discounts in the meat department.)   I bought a 5 pound bag of carrots two weeks ago, and so I am currently looking for different ways to prepare them, and found a stunningly simple and flavorful way on one of my favorite blogs, French Foodie Baby.  Say what you will about my French obsession, but those people KNOW their food, and from a very loving depth that centers around family and love of pure ingredients.  Helene, from FFB, is one of the best writers in the myriad of food blogs out there. I literally exhale with relaxation when I read her posts.  She challenges me and inspires me and makes me want to be better at being thoughtful about what I put on the plate for my family.

The braised carrots in coconut milk was from her blog and I just took the concept and did it in a much bigger batch on my stove so that I’d have leftover finger foods for Olive for the week.  And so I could use up the never ending bag of carrots.  I swear that thing is multiplying.

I don’t know much, but I do know that pork and rosemary are best friends.  So when I saw that Helene put rosemary in with her coconut milk to braise the carrots, I thought: instant pan sauce!  And it turned out wonderful!  The extra sauce from the carrots made an amazing garnish for a thick, crispy, rosemary-infused pork chop!  I was happy with this meal and wanted to share its simplicity and comfort-food qualities with you today!

Rosemary Pork and Carrots002


Rosemary Pork and Carrots005

Rosemary Crusted Pork Chop with Coconut Milk Braised Carrots
serves 4-6

4 boneless pork chops, thick cut, if you can find them (the ones I found were about an inch thick)
1/4 cup flour
Salt and pepper – about a half teaspoon of each
2 tbs chopped fresh rosemary – I would think dried would be fine, but it wouldn’t be as aromatic
4 tbs butter or olive oil for pan frying the chops

For the carrots:
1 lb carrots, peeled and chopped into half inch rounds
1 can of coconut milk
2 cloves of garlic, crushed but left mostly in tact
two sprigs of fresh rosemary
salt and pepper to taste

Get the carrots on the stove to braise first, as they take the longest.  In a deep skillet, heat the coconut milk over medium heat along with the cloves of crushed garlic and the rosemary sprigs.  Add in the carrots and let it simmer on the stove until the carrots are tender, about 20 minutes.  I put a lid on halfway through as to not lose too much moisture.  When the carrots are done, remove the pan from the heat and set aside.

For the chops: pat them dry with paper towels and season both sides with salt and pepper.  Put the flour and rosemary and a few dashes more of salt and pepper in a bowl and toss well to combine.  Coat each side of the chops in the flour mixture and set aside.  Heat the butter or olive oil in a non-stick skillet over medium heat until shimmering (or bubbling if using butter) and add in the chops, cooking about 5-6 minutes per side.  If they are browning too quickly, reduce the heat after you get a good sear/crust on each side of the chop.  If your chops are really thick, you may need to transfer them to a preheated oven to finish cooking.  I had to do this for one of the chops because it was way bigger than the rest and wouldn’t cook through without burning the crust.  At any rate, you need a meat thermometer for this because we no longer have to cook our pork to death to be safe.  Some farmer told me that no one’s gotten sick from pork in years, but everyone is still cooking it like they could.  A pink center is fine – I made sure mine got up to 150-160 and called it good, regardless of how the centers looked.

Place the chops on plates and for the sauce garnish, move the carrots to a bowl, reserving about a 1/2 cup of the coconut milk in the pan.  Taste for salt and season as necessary.  Remove the rosemary sprigs and the cloves of garlic and spoon the sauce over each chop and serve alongside the carrots.  If you don’t cook the chops too much, they will be soft enough for a baby to chew, given she has at least 3 molars, which mine does.  She loved the carrots (she’s 15 months old) and ate a few pieces of pork and called it good.  And lately, that has to be good enough for me!  For smaller babies, the carrots would be IDEAL pureed or just left in tact for finger foods.  They are so soft, sweet and a little salty – perfect! I would have blended up the pork with some coconut milk back in the 6-9 month days for Olive.

Enjoy!