Dark Chocolate and Ricotta Pancakes

dark chocolate ricotta pancakes


Chocolate or coffee?  Which ingredient controls my mind the most?  Coffee may win out just a hair with its zero-calorie-yet-complex-and-indulgent attribute, but chocolate comes in at a close second.  I received an amazing cookbook for Christmas from Matt.  The Mast Brothers Chocolate cookbook.  It’s stunning.  A voyage in pictures and recipes in the lives of Rick and Michael Mast – two brothers who make and sell chocolate in New York City.  The pictures are dark and stunning and the stories are as wholesome and exciting as the product they sell.  Everything from a sustainable source, every ingredient in their chocolate from a farmer they literally know and have probably had dinner with.  Nothing they do is the easy way out and it’s an amazing way of life to aspire to, and a joy of a book to read through like a novel.

One of the recipes that caught both Matt’s and my eye was the dark chocolate and ricotta pancakes.  I’m usually on the lookout for something special to fix us for breakfast on Saturday and that recipe just jumped off the page.  The picture showed these nearly-burned pancakes (although not burned – just super dark chocolate) and browned butter frothing around the edges.  Sold.  All the recipes in this book (if you can procure some really great chocolate) are simple and straight-forward.  Hardly any recipe takes up more than a paragraph and so it all seems so accessible.  I used Lindt 70%, our favorite dark chocolate that you can actually find in a grocery store.  The results were amazing – your classic chocolate chip pancake bumped up a notch.  Enjoy and take your Saturday morning a bit slower!

Dark Chocolate Ricotta Pancakes*
makes 10-12 small pancakes

3 eggs, separated
1 cup ricotta cheese
1/3 cup whole milk
3 tablespoons sugar
1 pinch kosher salt
2/3 cup AP flour
3 ounces dark chocolate, finely chopped
6 tablespoons unsalted butter

In a medium bowl, whisk egg yolks with ricotta cheese, milk, sugar, and salt.  Add flour and chocolate and combine.
In a separate bowl using a handheld mixer, beat egg whites to soft peaks.  Fold the egg whites into the flour-ricotta mixture.

Melt one tablespoon of butter for each batch of pancakes in a large cast iron skillet over medium heat.  Ladle batter onto pan in 4-inch circles.  When the edges brown and batter bubbbles, flip pancakes.  They are pretty messy, so just do your best.

Serve with maple syrup and a cup of black coffee and rejoice.

*adapted from Mast Brothers Chocolate: A Family Cookbook

Easy Breakfast for the Week – Baked Peanut Butter Oatmeal

baked peanut butter oatmeal


I love the blogging world.  Especially the FOOD blogging world.  So many people in so  many different parts of the world, all coming together over good recipes  that bring comfort and ease to the day.  I  did a quick search for oatmeal recipes last week, because I had purchased a gigantor box of rolled oats and felt compelled to do something new with it, besides my same ol’ breakfast options.  Blogger Elsa of The Whinery (great blog name) came up in my search with her amazing Peanut Butter Banana Oatmeal (say  no more) and since I had every single item the recipe called for, I hopped to it!  It was simply amazing.  Tasted like an oatmeal cookie in a bowl. With cream.  I swapped out cherries for cranberries and dusted the top with extra demerara sugar (raw), which gave everything a lovely molasses flavor.  I’m in love.  I’ll be making this again, for sure.  It was so easy!  I think it would work great with any milk and I thought it needed an extra splash of milk to make it palatable for my wee one.  I could have eaten the entire thing out of the pan as it was.  Thank you, Elsa, for making the world just a little bit sweeter with this recipe!

Enjoy!

baked oatmeal

Baked Peanut Butter Banana Oatmeal
serves 2-4

  • 1 cup (old-fashioned) rolled oats
  • 1 tablespoon raw sugar
  • 1/2 teaspoon baking powder
  • 1/4 teaspoon salt
  • 1 teaspoon cinnamon
  • 1/2 teaspoon nutmeg
  • 1 cup almond milk or whatever you have on hand
  • 1/4 cup peanut butter
  • 1 tablespoon butter, melted & cooled
  • 1/2 teaspoon vanilla extract
  • 1 large banana, sliced
  • A handful of dried cherries, cranberries, etc.

    Preheat oven to 350F.  Combine the oats, sugar, baking powder, salt, cinnamon, and nutmeg in a casserole dish or deep baking pan.  Whisk milk, peanut butter, melted butter and vanilla together in a small bowl.  Add banana slices and dried cherries to the oats and pour milk mixture over it. Stir gently until all oats are covered.  I had to add about an extra 1/2 cup to ease my mind.
    Bake for 25 – 35 until the top is nicely golden and the oatmeal has set.
    Let it cool and serve in bowls with extra milk and sugar, if desired!


Mexican Dark Chocolate Waffles with Cinnamon Whipped Cream

Mexican Chocolate Waffles with Cinnamon Cream

As I was drifting off to sleep after our New Year’s Eve party, I suddenly shouted out, “Mexican chocolate waffles!  Wouldn’t that be great?! And served with cinnamon whipped cream!”  “or dulce de leche,” Matt said.  YES! It was one of those ideas I knew would work.  I had some Mexican chocolate in our pantry that I hadn’t used, yet, and I usually like to think of a fun breakfast when we are all home together.  So New Years Day seemed like the perfect morning for a fun breakfast, laced with chocolate.

It worked as good as it did in my dream-like state at 1:30 a.m.  The chunks of Mexican chocolate gave the waffles a chocolate/spice/sugar grit throughout, and the waffles were crispy and as I brushed them with melted butter, I knew we had a winner.  I’d recommend these for any time you want something a little out of the ordinary.  The girls at the grocery store seemed to think me mad for buying Ibarra brand instead of Nestle’s Abuelita.  I really am not well versed in Mexican chocolate, but next time, I’ll avoid the scorn and buy Abuelita brand.  However, for tasty little chunks in a dark chocolate waffle, Ibarra worked just great 🙂

You can serve these with the simple cinnamon vanilla whipped cream, or like Matt suggested, I think some warmed dulce de leche would be amazing.  Or even some simple chocolate syrup.  No matter what you do, these waffles stand delicious on their own!

Mexican Chocolate Waffles

Mexican Dark Chocolate Waffles with Cinnamon Whipped Cream*
makes about 6-8 small waffles, or 4-6 Belgian

3-1/2 oz AP flour (about 1/2-3/4 cup)
1 oz. (1/4 cup) cornstarch
1/2 tsp salt
1/2 tsp. baking powder
1/4 tsp baking soda
2 TBS dark cocoa powder
1 tsp cinnamon
3/4 cup buttermilk
1/4 cup milk
6 Tbs. vegetable oil
1 large egg, separated
1 Tbs. sugar
1/2 tsp vanilla extract
1/2 cup Ibarra Mexican chocolate (half a baking bar), chopped fine

Cinnamon Whipped Cream
1 cup heavy cream
1 TBS cinnamon
1 tsp vanilla bean paste or vanilla extract
1 tsp sugar

Preheat the oven to 200F.

Combine all the dry ingredients in a large bowl with a whisk and set aside.  In a separate bowl, combine the milks, oil, egg yolk, sugar and vanilla extract and blend well.  In a separate bowl, whip the egg white with a pinch of salt until stiff peaks form.   Set aside.  Mix the wet ingredients into the dry with a few simple stirs, then mix in the chopped chocolate and then gently fold in the egg white until fully incorporated.  Don’t overmix!  The egg white makes these waffles crisp!

Cook the waffles according to your waffle maker directions.  I use a stove-top waffle maker and it takes about 1-2 minutes per side over medium high heat and I use about 1/2 cup waffle batter spread over my waffle iron per batch.

As you bake, place the finished waffles directly on your oven rack to keep crisp and warm until ready to serve.

For the whipped cream: In a tall cup with an immersion blender, or in a stand mixer with the whisk attachment, blend the heavy cream, cinnamon, vanilla bean paste and sugar until soft to medium peaks form.  Give a generous dollop per waffle and top with shaved chocolate or cinnamon.  Enjoy!

*base waffle recipe adapted from Fine Cooking

Banana Chocolate Bread

Banana Bread with Dark Chocolate
We are experts at wasting bananas.  I blame it on the Redhead.  She always says she wants one, takes one or two bites, and then plays with the peel and leaves the rest.  She sometimes takes a bite out of the SIDE of the entire banana, then is done.  I usually cut up the bananas beforehand, but I feel like I’m always a bit of a chump when she asks me for “a big one!” and I give her a whole banana and the situation mentioned above happens every single time.  So, I very often turn left-over bananas into smoothies with a bit of plain yogurt, but by the time I’ve been played twice, I give up offering her bananas, and at least three turn brown before the week is over.

Enter banana bread.  This recipe called for exactly three, old, brown bananas!  I wanted to use up our produce and stuff in the fridge before we left town for Christmas travels because I hate wasting food, and banana bread helped use up those old bananas, my yogurt that was about to go bad, a couple eggs and some milk.  We enjoyed this bread going down the road to Tulsa for snacks and breakfast and it was one of the best banana bread recipes I’ve used.  Obviously, as it came from Cooks Illustrated’s awesome cookbook, The New Best Recipe.  I always feel safe using their recipes.  They had a variation for adding chocolate to their banana bread, and as you may have seen on this blog, I won’t pass up an opportunity to use chocolate in a baked good.

Banana Chocolate Bread

Banana Chocolate Bread
makes one 9″ loaf

2 cups (10 ounces) AP flour, plus more for dusting the pan
10 tablespoons sugar
3/4 teaspoon baking soda
1/2 teaspoon salt
2 1/2 ounces bittersweet chocolate, chopped very fine
3 very ripe, large bananas, mashed well (about 1 1/2 cups)
1/4 cup plain yogurt
2 large eggs, lightly beaten
6 tablespoons unsalted butter, melted and cooled a bit
1 teaspoon vanilla extract

Adjust oven rack to the lower-middle position and heat the oven to 350 degrees.  Grease the bottom and sides of a 9 x 5″ loaf pan; dust with flour, tapping out excess.

Whisk the flour, sugar, baking soda, salt and chocolate together in a large bowl; set aside.

Mix the mashed bananas, yogurt, eggs, butter, and vanilla with a whisk in a medium bowl.  Lightly fold the banana mixture into the dry ingredients with a rubber spatula until just combined and the batter looks thick and chunky.  Scrape the batter into the prepared loaf pan.

Bake until the loaf is golden brown and a toothpick inserted in the center comes out clean, about an hour.  Cool in the pan for 5 minutes, then transfer to a wire rack.  Bread can be wrapped with plastic wrap and stored at room temp for up to 3 days.

Chocolate Banana Bread

A Blueberry Morning

Blueberry Muffins


It’s super cold – winter blew in last night leaving everything gray and bone-chillingly cold.  We are having a lazy day inside and all I can think about are these warm blueberry muffins with cold butter and hot blueberry syrup soaking into every crumb.  My mom made this combination quite frequently for us, growing up.  I associate them with cold, Sunday mornings. We needed something rather fast while getting ready for church, yet warming at the same time.  Something Mom could pop in the oven and then have time to get ready, herself!  She would boil the blueberry liquid and add a little sugar to make a wonderful blueberry syrup to pour on top of the muffins.  That was always my favorite part.  Just HOW blue can I make this muffin?

So when I saw a can of wild Maine blueberries in the grocery store, my mind went instantly to these muffins and I had to make them for us.  Mom’s were better, but that’s to be expected 🙂  Stay warm, today, Lubbock!

Blueberry Muffins with Butter Blueberry Muffins with Blueberry Syrup

Blueberry Muffins with Blueberry Syrup*
makes 12-16 muffins

12 1/2 ounces cake flour
1 teaspoon baking soda
2 teaspoons baking powder
Heavy pinch salt
1 cup sugar
1/2 cup vegetable oil
1 egg
1 cup yogurt
1 1/2 cups blueberries (fresh, frozen or I used a can of blueberries packed in water – that part is important if you use canned)

Preheat the oven to 375F. Line 16 muffin tins with papers and spray the papers with non stick spray.  Whisk the cake flour, baking soda, powder and salt in a large bowl.  In another bowl, whisk the sugar, oil, egg and yogurt until smooth.  Add the dry ingredients and stir just until combined.  Reserve the juice that comes in the can of blueberries and put it on the stove in a small saucepan with 1/4 cup sugar and let it come to a boil.  Reduce the heat and simmer during the baking time of the muffins.

Fold the blueberries into the batter and divide among the muffin cups.  Bake for 20-25 minutes, until the tops are golden brown.  Remove and remove from the pan, letting them cool upside down for about 10 minutes.  Split, add a copious amount of salted butter and drown in blueberry syrup.  Cheers.

*adapted from Alton Brown’s Blueberry muffin recipe

Overnight Steel-Cut Oatmeal


Back when I was still a fairly new mom and my night’s sleep was a fun game of Russian Roulette, I started putting my breakfast on the stove the night before so that I wouldn’t have to use my brain in the morning. I bought these fancy steel cut oats and the side of the can said that they would take 40-60 minutes to cook, but THEN, at the very end of the directions, it said, “For quick-cooking method, let the oats soak in water overnight and then boil for 10 minutes.”  This was the answer to needing breakfast after a who-knows-how-much-sleep kinda night!  I would literally add everything to the pot the night before – the butter, the pinch of salt and even stuck my stirring spatula in there so that I would not have to use even one iota of brain cells to make breakfast.

I’ve been doing this a few times a week ever since!  On days that I run out of steel cut, I just use plain rolled oats, except I don’t soak them overnight.  I just like the steel cut – they are chewy and interesting and they don’t turn to glue and mush after they go cold, so they are perfect for making a big batch on Monday and then warming them up with a splash of milk the next day – it’s always a great texture!  Most commonly, I make chocolate oatmeal.  It’s Olive’s favorite and I love hearing her request it the first second she sees me in her room in the morning “Chock-ate oatMEEEEL?!”  I’ll add that recipe to the end of this one for those who saw it in my Week in the Life post!

For today I recreated my favorite dessert bread at our grocery store – Apricot White Chocolate!  I had a little of everything and so I went for it, and it was amazing!  What’s fun about oatmeal is the various toppings you can add – so if you have guests for the weekend, make a huge pot and set out an array of dried fruits, nuts, fresh fruits or syrups and let them add what they want!  Great for kids, for people watching their diet and for picky eaters!
apricot and white chocolate oatmeal

Overnight Oatmeal with
White Chocolate, Apricot and Toasted Walnuts

2 cups water
1/2 cup steel cut oats (or one cup of rolled oats and skip the night before step)
pinch of salt
1 tsp of vanilla extract
tablespoon of fat – I use butter, but it’s GREAT with coconut oil and it’s probably just fine without it)
splash of milk or cream
1/4 cup white chocolate chips
1/4 cup dried apricots, chopped
1/4 cup toasted walnuts, pecans, almonds – whatever you have on hand

Right after Top Chef is over, before you check Facebook for the 75th time, put a large saucepan on the stove and add the steel cut oats, water, butter, vanilla and salt.  Place a rubber spatula in the pot, too, so you won’t have to think at all in the morning.  Go to bed.
First thing in the morning, or 10 minutes after your toddler starts talking in her crib, turn on the burner to medium-high heat and bring oats to a boil.  Lower the heat to medium and continue to simmer for 10-15 minutes, stirring occasionally until the liquid is absorbed.  Add a splash of milk or cream if it gets too thick and taste for texture.  If it’s to your liking, remove from heat, place a small portion in a bowl and stick it in the fridge to cool a bit for the toddler while you assemble yours.  Stir in the white chocolate chips till they melt and then top with the dried apricots and walnuts.  Take the kid’s portion out of the fridge, stir again, and then add a few chips so she can stir them around or pick them out herself and discard the rest.  That’s at least how it happened to me.

Chocolate OatMEEEEEEL version:

same as above, except add:

1/4 cup dark chocolate chips
1 tsp cinnamon
sliced banana or dried cranberries

I love banana and chocolate.  Near the end of the cooking time, I add the cinnamon to the pot and stir to incorporate.  I take the pot off the heat and stir in the chocolate chips until an adequate darkness is achieved.  This may call for more chocolate.  Because I use 70%, I have no guilt and no shame.  Top with sliced bananas and eat! Sometimes I shake it up and stir in dried cranberries.  The cranberry/chocolate or banana/chocolate combo is always a winner.  Do what you feel with the toppings, but more often than not, we just do plain chocolate oatmeal!  Olive is never disappointed.

Mexican Chocolate and Horchata Risotto

Horchata Risotto
I really can’t think of a better day to make this dish than today.  It’s cold, cloudy and all I want to do is eat complex carbs, sprinkle cinnamon on them and then take a nap.  The other day, I found a recipe in my cute little French non-diet diet book for a simple chocolate rice pudding.  I started improvising and adding cinnamon.  Then more cinnamon.  Then some cream, then more vanilla.  It started tasting exactly like horchata, my favorite Mexican beverage, and I was happy.  I even thought, “Why ruin this horchata by adding the chocolate the recipe calls for?”  So I ladled out half of the rice pudding and added the chocolate to the other half.  Woah.  Insanely good.  The intense cinnamon and vanilla, mixed with the dark chocolate was a revelation.  Such a depth of flavor you wouldn’t really expect from something as seemingly bland as a rice pudding.  It was amazing.  And with just a little extra cream to loosen up the consistency, it was exactly the way risotto should be, only sweet!  Dessert risotto – you heard it here first, folks.  I think it should be a “thing” if it isn’t already.  It’s going to be a “thing” in this house, at least!

Mexican Chocolate Risotto

Horchata/Mexican Chocolate Risotto
serves 4 as a dessert

2 cups milk
1/4 cup sugar
Pinch of salt
1 cup Arborio rice (this is risotto rice that plumps up and absorbs a lot of moisture.  I’d really recommend not using any other kind)
1 tsp vanilla bean paste
1 tbs cinnamon
– then, for Mexican Chocolate, stir in 3 ounces dark chocolate chips (the darker the better – I used 70%)

Pour the milk, sugar and salt into a saucepan and bring to a boil over medium heat.  Add the rice and cook for 20 minutes, stirring occasionally, until the milk is absorbed.  You may need to add  a few more splashes of milk or cream to keep the rice creamy.  It may take more time and more milk in order for the rice to not be crunchy anymore.

Stir in the vanilla and cinnamon and taste.  Revel.  Feel happy.  Then, when you’re ready, add in the chocolate to the entire batch or just half, like I did.  Stir until fully melted and incorporated.  Sprinkle with extra cinnamon and a sprinkle of cayenne if you dare.  Serve with a warm cup of hot chocolate and be sure you’re wearing fuzzy slippers.

Enjoy.

Literal Banana Bread

Banana Oat Bread
We always have bananas around here.  I realize my last post was about bananas and I apologize for the redundancy.  They are the most logical, good-in-a-pinch snack or breakfast for a little one.  I cut them up and put them in oatmeal most mornings, so one day when I had a lot of ripe ones and it was cloudy out, I thought that I’d do a literal banana bread and mix banana into the dough and add a lot of oatmeal to kinda make a bread version of my daily breakfast.  I really loved how rustic it turned out.  It was really great warmed with butter and sprinkled with cinnamon – as most things are.  I always think of how I could improve something the second it comes out of the oven.  With this, I think thick slices dipped in batter and turned into banana French toast would be amazing.

Banana Oat Loaf

Banana Oat Bread*
makes two loaves

3 cups whole wheat flour
2 tsp salt
1/2 oz yeast
1/2 stick butter, softened
generous 1 1/4 cups water
2 large bananas, chopped
1 bowl of oatmeal, muesli or granola

Put the flour, salt, yeast and butter into a bowl.  Slowly add water to the bowl and mix carefully by hand until the dough becomes elastic.  Knead the dough for 5 minutes, then cover the bowl and set aside to rest for two hours.

Divide the dough into two, then add a chopped banana to each, using your hands to mash the banana into the mixture.  This makes the dough crazy sticky, so add enough oatmeal to each to regain the original texture.

Line a baking sheet with parchment or a silpat.  Roll each dough into a ball, then press into the bowl of oats, so that the dough becomes completely coated.  Place the loaves on a baking sheet and let rise for 1-2 hours.

Preheat the oven to 400F.  Using a knife, deeply score the top of each ball into 8 sections.  Bake the loaves for 25-30 minutes, then transfer to a wire rack to cool.

*adapted from the amazing book, 100 Great Breads by Paul Hollywood.  

Crustless Asparagus Quiche and the End of All Dieting

asparagus custard

I was first introduced to a savory custard by the wonderful food blogger, Helene Garcia of French Foodie Baby.  The first savory custard I made was her leek and chive flan and I was a bit afraid at first because we just have ingrained in our minds that custards and flans are supposed to be sweet, but this was a very happy and luxurious surprise.  Basically, in American terms, this is a crustless quiche.  Only waaaaay better of a texture than the quiche of your childhood.  Please do refer back to my quiche post on how its texture should be.  I was happy that it was such a silky texture and that Olive could eat it just fine with her limited spoon wielding skills.

I stumbled upon this asparagus and bacon custard in a book called French Women Don’t Get Fat, which I’m reading and working my way through the steps to reshape my life and my patterns of eating.  The book presents a bit of a strict start (a cleanse, which I don’t think is totally necessary for success, just optional) followed by three months of self evaluation of the patterns you’ve made over the years and ways in which you could cut back without feeling deprived.  After three months, by the book, you should only be HALF WAY to your goal weight.  If you are, then she advises to add back a few more pleasures and get on with your life!  If not, then keep going with the plan, making additional adjustments if necessary.

I’m happy to have finally found a book that doesn’t restrict you, doesn’t say that a particular food or food group is bad, and doesn’t push supplements.  I’m DONE with that vicious cycle of crash dieting and then giving up, gaining back and doing it all over again because every new diet makes a new promise.  Why do we keep doing this to ourselves?  I found myself having an epiphany the other day that a diet that promises you’ll lose all the weight you need to lose in a few weeks will only work if it only took you a few weeks to gain that weight.  And like me, I’m sure most of us with serious weight issues have struggled a BIT longer than weeks or even years with our weight.  So why does it not register in our minds that in order to keep a good, healthy weight, we should logically change the way we do things for 10-15 years at least?  Personally speaking, I’ve struggled with my weight for about twenty two years and most of that time was wasted, going through diet after diet that restricted too much, left me wanting and frustrated and ultimately, feeling like I am a loser and can never succeed.

After 11 days of following this book and eating what I personally feel was a bit too indulgent of a menu, I’m down seven pounds.  I know what you’re thinking: all water weight, and besides, wasn’t she just preaching that weight loss shouldn’t be sudden?!  You’re right, it shouldn’t.  But for one, I have a lot to lose and the more you have to lose, generally, the quicker you will drop pounds (at first).  Second, I’ve completely cut out all snacking and all second helpings.  Man, that adds up to a lot with just those two bad habits!  Especially if you snack several times a  day!  The only other thing I’ve given up has been cream in my coffee and that, for me, was the biggest challenge because I love my coffee.  But, for these first three months of “readjusting” how I do things, I don’t consider it that much of a burden to give up roughly 200 calories a day that used to be dedicated to cream in my coffee!  I have even started to prefer it black with just a little sweetner (stevia, for those concerned).  I haven’t been stressed about working out – I just have been taking more walks and enjoying the new, cooler fall weather and I’ve been pulling a few weeds here and there.  This is my new life.  I was done with diets a few years ago, but I was still engaging in bad habits.  It’s hard to undo years of emotional eating, but I’ve found that the distraction of Olive is a grand one.  Or, if I just HAVE to ingest something in the afternoon, I make a cup of cinnamon tea (it’s naturally sweet) and get productive!

This custard recipe was breakfast for a few days last week.  Again, I know what you will say.  This has cream, eggs, bacon AND it’s in a “diet” book?  Yep.  Moderation + Fulfilling Meals = Success.  Moderation + Drab, Restrictive Meals = Failure. I really recommend you picking up this book IF and only if you are done yo-yo dieting,  if you like to cook and you are ready to stop restricting yourself and feeling guilty for eating things like butter.  I’ll keep you posted on my progress and I hope that I can encourage some of you to stop the fad madness and just start “eating real food, not too much, mostly plants.” (from the omnivore’s dilemma) 🙂

Asparagus custards

Asparagus Custard (crustless quiche, if it makes you feel better to call it that)
makes 6 – 1 cup ramekin servings

16 asparagus spears, tough ends cut off and peeled
4 ounces bacon, coarsely chopped
8 eggs
2 cups milk
1 cup heavy cream
8 sprigs chives, minced
1/4 teaspoon salt
1/4 teaspoon black pepper

Preheat oven to 350F. Boil the asparagus in salted water for 5 minutes. Drain and let cool. Chop each stalk into a small dice and set aside.  Saute the bacon in a nonstick frying pan till crisp. Drain on paper towel and set aside.  Mix remaining ingredients in a large bowl (reserving some chives for garnish). Pour the egg mixture into individual ramekins. Sprinkle in the asparagus and bacon. Bake for 15-20 minutes till the custard is set but not dried out.  Serve with pieces of toast, crackers, or with some fresh fruit and enjoy your day!

Brown Butter Vanilla Bean Cinnamon Rolls

Brown Butter Vanilla Bean Cinnamon Rolls

RECIPE UPDATED!  I made some changes and they’re even better, now!  Go make these, QUICK!

For the South Plains Fair this year, I decided to enter the cinnamon roll category, if for no other reason than to de-throne my friend, Rod from his previous win in the category.  A little healthy rivalry makes everything more fun and I KNOW his are amazing.  But in the night, right before drifting off, I came up with what I figured would be a wonderful way to make the filling for the cinnamon rolls and the icing.  The dough, I figured, could be altered to fit in with the rest.  So I got kind of excited to embark on the process and after killing the yeast in my dough from boiling hot butter in the first round, I ended up with a good second batch of dough and proceeded with the plan!  I think the secret to anything truly delicious in a baked good is butter.  And I figure everyone knows, but in case you don’t, browned butter is the goodness of butter x 1,000,000.  So at every turn, I turned the butter into browned butter and I formed a paste with the filling instead of doing the traditional method of smearing on a lot of butter and then dumping sugar and cinnamon, which, when rolled up and cut, inevitably dumps out a little on your cutting board.

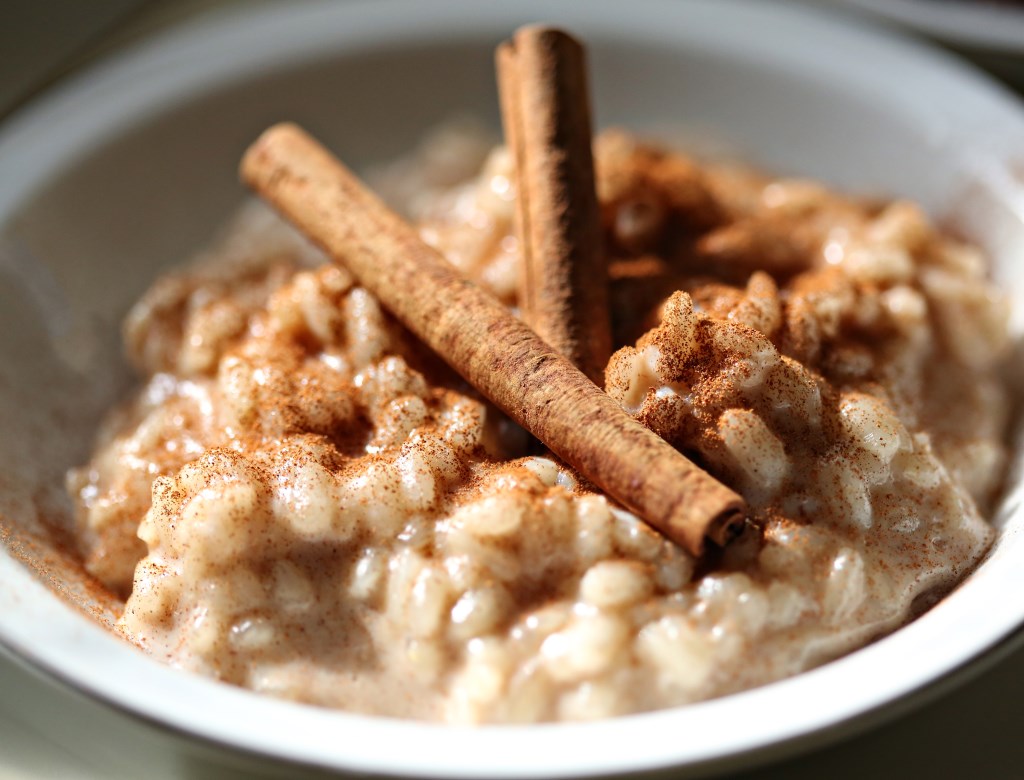
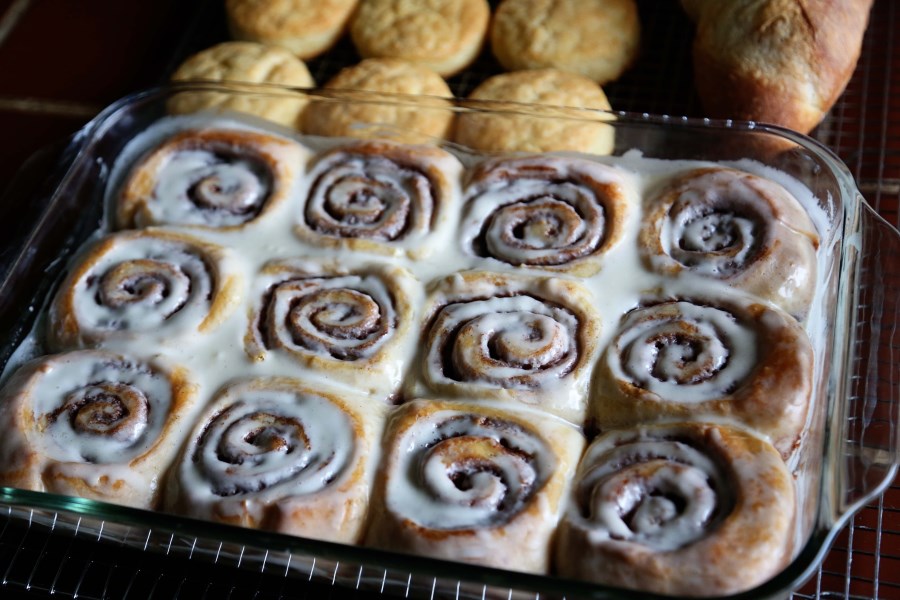
The paste. was. genius.  I’m not even going to act humble about this.  I browned the butter with two vanilla beans that were split (holy mother that was a great smell) and once browned, I combined the sugar and a little less cinnamon than the original recipe called for and formed this amazing smelling liquid that I let firm up in the fridge a bit so that it would harden up enough to be spread like jam instead of being liquid.  It made the filling so incredibly easy to get perfectly uniform so that each cinnamon roll had exactly the same amount of filling.

And then…The Icing.  I’m definitely not one of those people who says something is “too sweet” when it comes to desserts.  Desserts are supposed to be sweet.  However, the traditional powdered sugar and milk icings for cinnamon rolls can be just SUGAR and nothing else and I thought a cream cheese icing would be too strong a flavor for the delicate brown butter and vanilla beans.  So I used heavy cream, milk, powdered sugar, vanilla bean paste (so it would be pretty and flecked) and THEN I gradually added tiny pinches of kosher salt and stirred after each addition, until the edge of the sweetness was taken off and it was perfect.  I will henceforth salt all my icings.  Just a bit – it MATTERS!  I was amazed at how good these turned out and….

TA-DA!  Blue Ribbon!  I was quite giddy!

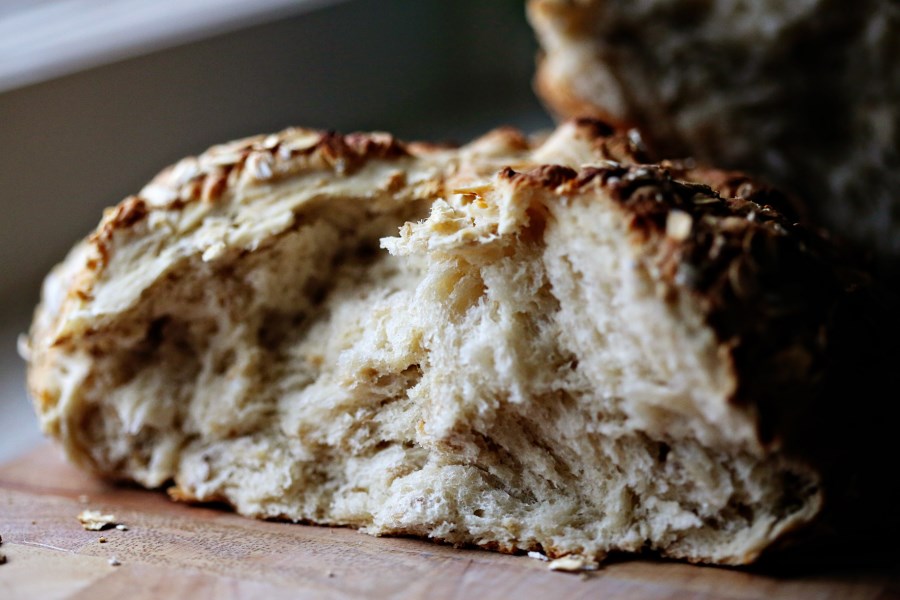
And then sad, because my husbands absolutely perfect bread didn’t place and my thoughts were that it was too sophisticated and the fair is a veritable sugar bomb.  I think it just depends on what you respect when it comes to traditional bread, and Matt is a purest.  4 or 5 ingredients at the most.  This guy is the most amazing baker I know!  Anyone can make a good bread if it’s slathered in sugar and butter, but only a true baker can make a bread SING with only 4 ingredients.
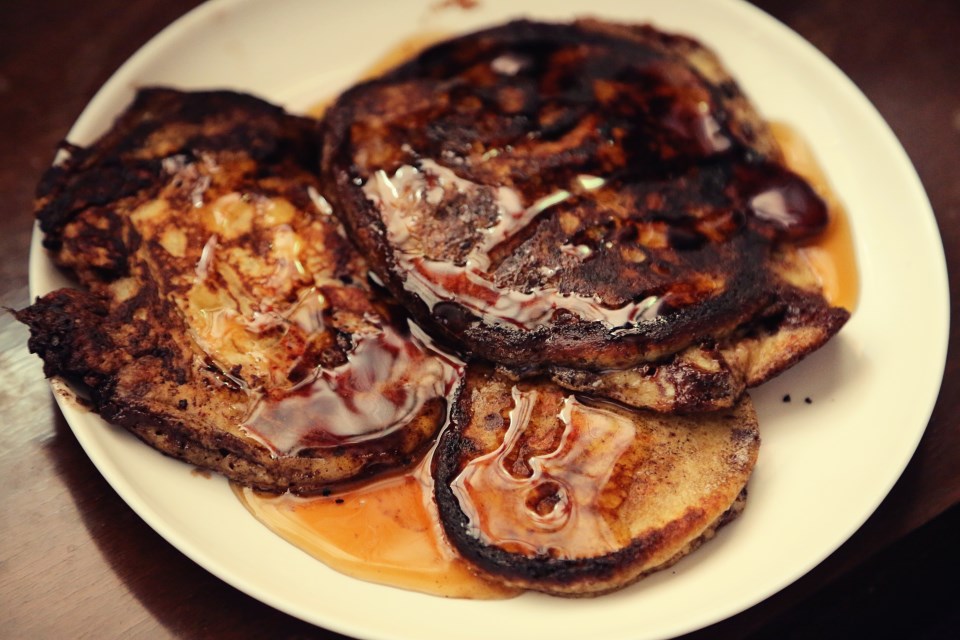
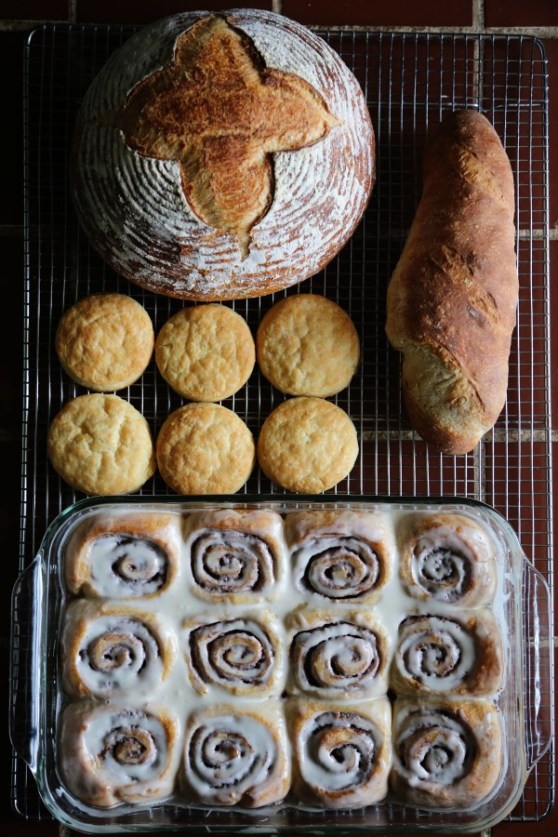
These were our submissions – Matt submitted his biscuits, baguette and traditional boule.  All perfect and the best I’ve tried, but sometimes in a sea of bundt cakes and chocolate sugar loaves, plain bread doesn’t get noticed. A shame, really.
Smorgasbord

Brown Butter Vanilla Bean Cinnamon Rolls with Vanilla Cream Icing
makes about 16 rolls, depending on how thick you slice them

For the Dough:

1 cup whole milk
2 1/2 teaspoons active dry yeast (bread machine yeast
1/4 cup sugar
4 TBS unsalted butter, browned and cooled
2 large egg yolks
2 tsp vanilla bean paste
2 3/4 cups AP flour
3/4 tsp salt

For the Filling:
12 TBS unsalted butter, browned with two split vanilla beans
1/2 cup granulated sugar
2 TBS cinnamon

For the Icing:
1 heaping cup powdered sugar
1/4 cup heavy cream
1 tsp vanilla bean paste
2-3 TBS whole milk
a few pinches of kosher salt

Make your Filling first!  Brown the butter in a large, stainless steel skillet (non stick you can’t see the butter browning) with the split vanilla beans, mushing them around as they warm up to release their seeds.  Once browned, remove from heat and stir in your sugar until fully incorporated.  Then add in the cinnamon, stirring to combine.  You can do this a day in advance – you want this paste to be slightly firmed up so put it in the fridge and stir it once in a while until it’s the consistency of wet sand.

For the dough: brown your butter on the stove by swirling it around in the pan over medium heat until solids begin to form at the bottom and it’s giving off a nutty aroma.  Remove from heat and place in a medium bowl and let it cool for a few minutes.  Once cooled (about 5 minutes), add the milk, the egg yolks and vanilla paste.  Whisk to combine.  Then whisk in the yeast.
Whisk the flour, sugar and salt in the bowl of a stand mixer.  Make a well in the center and pour in the milk mixture.  Mix on low speed with a dough hook until thick and slightly sticky.  Knead on medium speed until the dough gathers around the hook, adding up to 2 more tablespoons of flour to get a nice, smooth texture.  Don’t beat it to death.

Remove the dough and shape into a ball.  Butter the mixing bowl and return the dough to the bowl, turning to coat in the butter.  Cover with a towel and put it in a warmish place (like on your dryer) for a couple hours until doubled in size.  This is a pretty slow-rising dough.  Don’t lose hope.

Roll out the dough on a floured work surface to a shape of about 10″ x 16″ (about 1/4″ thick all around).  Now comes the fun part!  Spread your filling all over the dough with an offset spatula until completely covered, leaving about 1/4″ all around clean for ease of rolling up the dough.  Starting on the long side, roll the dough up tight and then slice about 1.5″ slices and arrange them on a buttered, double lined rimmed baking sheet (if you don’t have one, you can always stack pans together to form a double wall) and cover with loose plastic wrap and set in that same warm place to rise about an hour until doubled.

Preheat the oven to 325 and bake about 30 minutes, until golden brown (mine were done in about 28 min).  Cool in the pan 15 minutes.  Meanwhile, make the icing by adding the cream to the sugar in a bowl and whisking till smooth.  Then add the vanilla and milk until a nice, smooth texture is achieved.  Then, little by little, tasting along the way, add pinches of salt till it tastes right.  I can’t really tell you how much I added.  Probably two and a half pinches!  Stir till fully incorporated and pour over the rolls!

Enjoy!