Healthy Weeknight Dinner – White Beans with Crispy Kale

White Beans with Kale, Onion and Bacon
Yet another beautifully simple dish inspired by Tyler Florence’s book, Start Fresh (I very loosely followed the recipe).  I’d recommend this book to anyone who likes cooking, but especially those who are cooking for babies or toddlers and desiring to show them a variety of foods at an early age.  I was talking to a friend just last night who said that because of the picky way she ate when she was little, she has such a hard time trying new foods as an adult.  Consequently, she is sure she hates cauliflower but is going to try it for the first time this week.  Hooray!  There are many ways to enjoy new vegetables and one of the best ways is by roasting them. So simple, so fresh and brings out a whole host of flavors you won’t get by steaming or boiling.

This recipe calls for kale, onion and bacon to roast together in the oven.  The kale gets super crispy and the bacon adds enough fat to take the dish to comfort-food level.  If I were feeding this to a baby, I’d simply take a bit of each component and blend it up with a little water or stock!  It’s totally easy to let the babies eat what you eat – just cook good food for YOU and blend it or mash it up for THEM!  This is the essence of Start Fresh and if you want an all-inclusive book for babies through toddler years and older, this is the book for you!

White Beans and Kale with Bacon

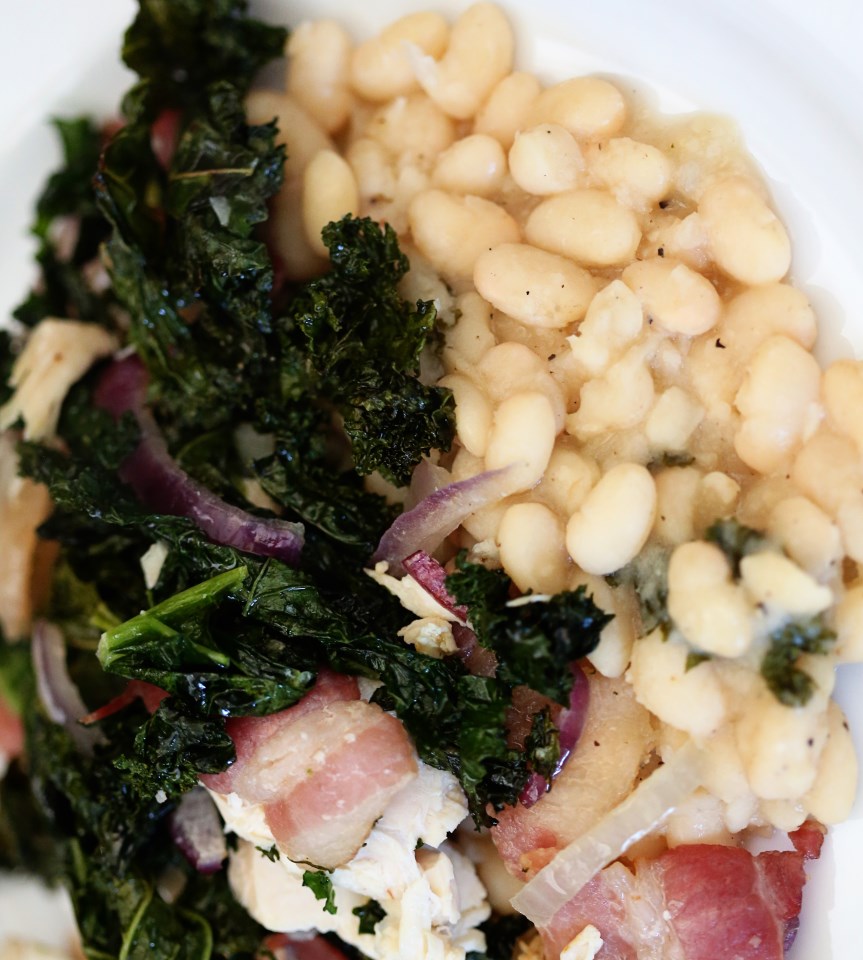
White Beans with Kale, Shallot and Bacon*
serves 4 to 6

1 large bunch of kale leaves, ribs removed and cut into 1-inch pieces
2 small shallots, cut into strips
3 slices thick cut bacon, cut into 1-inch pieces
3 tablespoons pine nuts
2 cans white beans, drained and rinsed
2 tbs olive oil
1 clove garlic
1 cup chicken stock
Salt and pepper to taste

On a baking sheet, arrange the kale, bacon, shallot and pine nuts and bake at 350F until the bacon is crisp, about 25 minutes.  Stir a few times as it bakes to ensure nothing burns and the bacon cooks evenly.  In a medium saucepan, heat the olive oil and crush the clove of garlic and add to the oil and when it begins to sizzle and turn brown, add the beans and stir to combine, add the stock and reduce the heat to low and let the beans simmer.  Salt and pepper the beans to taste and discard the garlic clove.  Serve the beans with the kale mixture on top and enjoy!

*inspired by a recipe from Start Fresh.  He made a risotto and I used beans 🙂  Work with what you have!

Superbowl Food: Roasted Sweet Peppers with Goat Cheese and Proscuitto

sweet cherry peppers with goat cheese and proscuitto
This made an excellent little appetizer bite tonight for a get-together we went to with some of our friends.  We decided to cook based on a theme and that theme was “stuffed” since our dear friend, Cali, will have her baby in about three weeks.  I made these roasted peppers and some high-class pigs in a blanket and a truly college-essence PopTart cake, which I’ll post pics of tomorrow.  The peppers were a hit.  I tried them first with bacon and it was too greasy.  The proscuitto was just right, a perfect blend of salty and sweet and were gone in minutes.  I think it would make a great addition to a Superbowl spread so I’m giving you the simple recipe here!

stuffed sweet peppers
Sweet Peppers with Goat Cheese and Proscuitto

1 jar Mezzetta Sweet Cherry Peppers, or something similar
1, 8oz log goat cheese
1 tablespoon garlic oil or olive oil with 1 clove minced garlic
1 package thin sliced proscuitto, cut into 4 strips each

Get the goat cheese up to room temp and in a medium bowl, add the garlic oil, or olive oil and minced garlic and stir well to combine.  Drain the peppers and dry on lots of paper towels and fill each pepper with goat cheese until full.  I used a spreader and it worked great.  Take a thin strip of proscuitto and wrap around the peppers and place on a greased baking rack fitted on top of a rimmed baking sheet and bake at 375 until proscuitto crisps up, about 20 minutes (check to make sure they don’t burn).  Also: try to keep the top of the peppers up – the goat cheese will melt and drip mostly out if you don’t!

Serve immediately!


Superbowl Food – Nacho Grits!

nacho grits


Super Bowl?  Super bowl!  Super good idea in a bowl.  Nacho grits? Not yo grits!  I’m done.

You take all the things you love about nachos and you cook a big pot of grits (which are just liquid corn chips if you think about it) and you put out bowls and let people top their grits with whatever combination they love the most!  Provide chips, too, because what jerk makes people crave nachos and then doesn’t have that as an option?  Not this gal.  After making all the toppings, I REALLY wanted super-cheesy nachos!  But the nacho grits was an awesome idea, so we had to create it.  And it was tremendously filling and amazing.

For my bowl, I went with chorizo, black olive, scallion, shredded asadero cheese, Ro-tel, cilantro and Mexican crema.  I incorporated cheese and garlic into the grits, so they already had that “nacho cheese” flavor.  Really quite delicious!  I’d recommend very small bowls for this magical side dish at the big game because it will fill your guests up very quickly!

nacho grit spread


Click here to see my recipe for grits and let your imagination run wild with all your favorite nacho toppings!

Superbowl Food – Korean Fried Chicken Wings with a Celery and Blue Cheese Slaw

celery blue cheese slaw and korean fried chicken

This is the best fried chicken I’ve ever had.  We only  make fried chicken about twice a year and when we do, it has to be this recipe.  Crispy, light batter doesn’t overwhelm the chicken and it’s SO crunchy, you’d think it was double coated.  Koreans know what they’re doing with fried chicken, and I think if you did this preparation to some chicken wings on Game Day, you would definitely be the hero of the hour.  The blue cheese celery salad is an amazing side for the chicken.  Crunchy and tangy and creamy – the perfect slaw/salad for fried chicken!

korean fried chicken

Korean Fried Chicken*

Kosher salt
3/4 cups corn starch
1 teaspoon baking powder
2 pounds chicken wings (about 12 whole wings)
2 quarts peanut oil or vegetable shortening
1/2 cup all-purpose flour
1/2 cup cold water
1/2 cup vodka

Combine 2 teaspoons kosher salt, 1/4 cup cornstarch, and 1/2 teaspoon baking powder in a large bowl and whisk until homogenous. Add chicken wings and toss until every surface is coated. Transfer wings to a wire rack set in a rimmed baking sheet, shaking vigorously as you go to get rid if excess coating. Transfer to refrigerator and let rest, uncovered, for at least 30 minutes and up to overnight.

When ready to fry, preheat oil to 350°F in a large wok, Dutch oven, or deep fryer.  We used a wok on the stove.

Combine remaining 1/2 cup cornstarch, 1/2 teaspoon baking powder, flour, and 2 teaspoons kosher salt in a large bowl and whisk until homogenous. Add water and vodka and whisk until a smooth batter is formed, adding up to 2 tablespoons additional water if batter is too thick. It should have the consistency of thin paint and fall off of the whisk in thin ribbons that instantly disappear as they hit the surface of the batter in the bowl.

Add half of the wings to the batter. Working one at a time, lift one wing and allow excess batter to drip off, using your finger to get rid of any large pockets or slicks of batter. Carefully lower wing into hot oil. Repeat with remaining wings in first batch. Fry, using a metal spider or slotted spatula to rotate and agitate wings as they cook until evenly golden brown and crisp all over, about 8 minutes. Transfer to a paper towel-lined plate and season immediately with salt. Keep warm while you fry the remaining wings.

We dipped ours into traditional buffalo sauce, which we love.  The chicken is so gloriously crispy that we didn’t want to totally coat it in sauce.  Do as you please.  The original recipe calls for a mighty fine sweet soy sauce that I highly recommend.

*absolutely did not mess with this perfect recipe from Serious Eats

slaw

Celery and Blue Cheese Slaw*

Celery Ribs (thinly sliced at an angle)
1/2 Red Onion (very thinly sliced; 1/2 cup)
1/2 cup fresh Flat-Leaf Parsley leaves (chopped)
1 tablespoon Sherry Vinegar
1 tablespoon plus 1 teaspoon Extra Virgin Olive Oil
1/2 teaspoon freshly grated Lemon Zest
1/4 teaspoon Kosher Salt
1/8 teaspoon freshly ground Black Pepper
1/4 cup crumbled Blue Cheese

In a large skillet, add one tablespoon of butter and saute the celery and onion until just beginning to soften, but still crunchy, about 5 minutes.  In a large bowl, toss the parsley, vinegar, olive oil, lemon zest, salt, and pepper and whisk to combine.  Fold in the celery, onion and blue cheese and serve!

*adapted from Carla Hall’s recipe

Sweet Pea Salad with Leek and Bacon

Pea and Leek Salad
This is just a fantastic side dish for any meal, any night of the week!  It’s fast, it’s adaptable to what you have on hand, and it’s tasty warm or cold!  So it’s perfect as a lunch box addition, or great warmed as a side for a hearty meal like pot roast, which is what I served this with yesterday at lunch (yay, leftovers!)

With just a touch of mayo to add richness, this isn’t a heavy dish at all.  I added leek because I think leeks improve just about any dish.  Brightness from rice wine vinegar cut what could have been a bland dish.  I’m happy with how it turned out, the girl seemed to enjoy it (as peas are a wonderfully natural finger-food for little hands) and it made a great side multiple days in a row.  Can’t ask more out of frozen peas than that!
Leek and Pea Salad

Sweet Pea Salad with Leek and Bacon

3 cups frozen green peas
1 leek, split in two and chopped fine and washed well (they’re dirty suckers)
4 slices of bacon, cut into 1/2″ strips
2 tablespoons mayo
2 tablespoons rice wine vinegar
salt and pepper to taste

Bring a large pot of salted water to boil and boil the peas until tender but still firm, about 10 minutes.  Rinse them under cold water in a colander and set aside.

Crisp the bacon in a pan and remove with a slotted spoon and set aside on paper towels to drain.  Remove all but 1 tablespoon of the bacon grease from the pan and saute the leeks until tender.

Put the peas, bacon and leeks in a large mixing bowl and add the mayo and vinegar and toss well to evenly coat everything.  Taste and season with salt and pepper, and maybe even more vinegar if you feel it still needs some brightness and serve at room temp or cold!  Or warm!  It’s all good 🙂


Creamy White Bean Soup

White Bean and Celery Cream Soup


So these days, I’m either making soups, roasting something, caramelizing something, or melting chocolate.  Tis’ the season, right?  I found another gem in Homemade Winter of an incredibly filling, rich soup loaded with protein, fiber and veggies.  As a pureed soup, Olive had no problem drinking it from her little soup cup, and as I’ve said before, I think soups are THE easiest and most efficient way for toddlers to try a myriad of vegetables, flavors and colors.  And how easy they are to convert to “baby food”!  Back when I was making baby food, I would make a batch of vegetable soup, and after pureeing it, I could fill nearly a dozen jars.  Try buying a dozen jars of baby food in the store vs. a butternut squash and some chicken stock.  The price difference says it all!

Olive has been very into “sauce!” lately, no matter what it is.  She covets it, even though she doesn’t like any of it except “tomato sauce” (ketchup).  Any time we have Srirracha or Tapatio or mustard – whatever – she wants it.  So we give her tastes of anything she requests.  She usually raises her eyebrows and fusses a bit, especially if it’s spicy, but hey, that’s how she learns!  This soup has a smoky chili oil drizzled on top, and I thought it was a genius addition.   I didn’t have any celeriac, and it was one of those super cold days where I didn’t want to run out to the store for one ingredient, so I used the celery I had in my fridge, and I thought it worked great.

More, yes, MORE post from Homemade Winter to come.  It’s so perfect for this season, it’s unbelievable.  Enjoy this soup!

Creamy White Bean Soup* – START THIS SOUP A DAY AHEAD
makes a lot

1 1/2 cups dried white beans
1/4 cup olive oil
2 leeks, white and light green parts, washed well and finely chopped
4 stalks of celery, diced
2 cloves of garlic, minced
6 1/2 cups chicken or vegetable broth (I used chicken)
2 tsp  minced fresh rosemary, or 1 tsp dried
salt and ground black pepper
juice of 1/2 lemon
drizzle of chili oil – I bought mine at an Asian Mart, but I think you could find it in the Asian section of any grocery store

Soak the beans overnight in enough water to cover them by 2 inches.

Heat the oil in a large saucepan or stock pot and add the leeks and celery.  Saute, stirring constantly, until the leeks are soft.  Add the garlic, stir for a bit, and then add the broth.

Drain the beans and add them to the saucepan.  Add the rosemary and season with salt and pepper.  Slowly bring to a boil.  Reduce the heat and let the soup simmer over low heat with the lid partway on for 2 hours.

Puree the soup with an immersion blender or in several batches in a regular blender (why on earth haven’t you bought an immersion, yet?!)  Stir in the lemon juice and taste for salt and pepper.  Serve hot with a drizzle of chili oil or Srirracha would be great, too!

*Homemade Winter adaptation


Cheesy Cauliflower and Rice Bake

Cheesy Cauliflower & Rice Bake
I always look for interesting sides to put with lunch and dinner every day.  It has been a challenge for me as the typical American cook to think of vegetables as a main component to meals.  For most of us, vegetables are exactly as we call them – a side dish (a side thought!) and we obligingly scrounge a bag of vegetables from the freezer to make our meals “complete” when we very rarely enjoy those components and most of them, if we are honest, get put in a leftover container and saved until we no longer have guilt about throwing them away.

Maybe this is just me.  I’ve wanted and tried this year to think of vegetables as the main component and meats and carbs as a side dish.  To balance the plate in the opposite direction.  This. Is. Hard.  I will be the first to admit that I know how to cook meats, starches and carbs MUCH better than I know how to cook a vegetable.  But I’m trying!  And I’ve looked to cuisines that tend to focus on vegetables as main dishes for inspiration.  Indian cuisine is wonderful for this approach, but even I tire of the cumin/cardamom/curry combination of flavors pretty quick.  There needs to be a balance to the approach of getting more vegetables on your dinner plate, and so for me, I’m taking winter as a wonderful excuse to make some slightly more indulgent and comforting vegetable dishes to get me in the habit of seeing them as the star of the show, instead of a side act.

Speaking of winter: I am in love with a new cookbook.  Well, I suppose it isn’t exactly new, but it’s new to me, and it’s called Homemade Winter by Yvette Van Boven.  I absolutely love when a cookbook has recipes listed by seasonal availability.  This cookbook is ALL about winter – sure, winter in Holland, but STILL!  Most winter vegetables in this hemisphere are available and relatively fresh no matter where you reside, and so this cookbook has introduced me to a season of cooking that has previously been nothing but soups and stews and squash.  Goodness, how many times can I eat squash?!

Enter: cauliflower and rice baked with swiss into a creamy but not-too-heavy dish.  I made this yesterday for our lunch and it was the main component.  In her cookbook, Yvette calls it a risotto, but I didn’t have arborio rice and so I made it with what I had – plain ol’ white, short-grain rice – and it worked beautifully.  I love a recipe that is accessible and works, no matter what you have on hand.  A lot of home cooks don’t have arborio in the pantry, yet most people have regular white rice!  The only splurge for this dish was some good Comte cheese, but I believe it could be just as flavorful with nearly any cheese you have in the fridge.

We loved it – it was warm, filling and satisfying as a main dish and perfect for a freezing day like today.  In fact, I turned the leftovers into cauliflower rice fritters today for lunch and served them along side a white bean soup I will blog about very soon, and it was an awesome lunch!  Hope you all stay warm, today and have an extra cup of coffee with me!

Cauliflower & Rice Bake

Cheesy Cauliflower Rice Bake
serves 6-8 as a side or 4-6 as a main

1 small head cauliflower
1 TBS olive oil
1 large onion, diced
2 garlic cloves, minced
1 cup shredded cheese such as Comte, Emmentaler or Gruyere – would work with any hard cheese, though
1 cup of white, short-grain rice
2 3/4 cups chicken or vegetable broth
1/2 cup panko or plain bread crumbs
drizzle of olive oil

Boil the cauliflower for 10 minutes until tender.  Drain and set aside.

Preheat the oven to 350F. Heat the oil in a large skillet (12″ at least). Add the onion and saute for about 5 minutes.  Add the garlic and cook for one minute more, then add the rice and stir to combine.  Saute all this for another 2 minutes or so.  Add the broth and bring to a boil.  Stir in the cauliflower and cheese and cover the skillet with a lid and bake in the oven for 25 minutes until all liquid has absorbed.

Remove from the oven and let sit for 5 minutes before uncovering.  Sprinkle the bread crumbs and drizzle the top with olive oil and bake until the breadcrumbs are toasted, or just stick it under the broiler for 5 minutes.

Serve in bowls with lots of cracked pepper!

Happy Thanksgiving!

Santa's Little Helper2

This is the Super Bowl of a cook’s world.  I love this holiday and I certainly don’t want to skip over it in a rush to get to Christmas!  Since Matt and I began developing our love of cooking almost 10 years ago, we have looked forward to Thanksgiving a little more each year.  I think, in a way, we are trying to create our own family traditions this year, with a little family of our own.  We realized with a hint of despair the other day that we may not get to host our own family Thanksgiving until our children are in college!  So we decided that along with trying out new recipes each year and saving some old favorites, we’d have our own Thanksgiving at our home, before heading out of town to spend time with our extended families.

This was our Pre-Thanksgiving!  I printed off each recipe and kept the stack on our counter to refer to as I did my prep.  I couldn’t sleep Monday morning, so I got up around 5 and started chopping leeks, mushrooms and Brussels sprouts.  We had a few friends over who each brought an amazing pie and some blue ribbon biscuits from our friend, Rod, who still won’t share that recipe, almost 20 years later.  🙂 I didn’t get pictures of everything, nor was I trying to do a post on any one particular recipe.  I just took some pics that I could and let the rest go – this was about having a great time with friends and not about styling a plate of food. However, I did get links to the recipes for everything we did.  Everything turned out really fantastic – loved the Brussels Sprouts and the Cheesy Squash Cassrole and that cocktail made everything just a little more sparkly. 😉

brussels sprouts with blue cheese and bacon
Brussels Sprouts with Blue Cheese and Bacon

cranberry orange relish
Cranberry Orange Relish
pimento cheese twice baked potatoes
Twice Baked Pimento Cheese Potatoes

Santa's Little Helper
The cocktail of the evening that made EVERYONE happy – Santa’s Little Helper.  This will be making a repeat appearance. turkey porcetta
Turkey Porcetta

Dishes I made but failed to get a photo of:
Mushroom and Bacon Stuffing
Cheesy Squash Casserole

Again, everything was wonderful and we had a great time with our friends!  Happy Thanksgiving to everyone – have safe travels and we’ll see you back here next week with a report on all the goodies we make at my parents’ house in New Mexico.  There’s a S’mores pie I’ve been wanting to create…


Savory Crepes

savory crepes

I am a lover of crepes.  They are so versatile, the batter always makes enough for 4 or more people, and you can fill them with virtually anything.  I’ve been slightly obsessed with making crepe cakes and made one for Matt for his birthday last year that had chocolate crepes layered with caramel buttercream and chocolate ganache.  It was pretty fantastic and I think it was about 25 layers.  I want to go bigger!  The only thing is that those cakes are hard to cut unless they are semi-frozen, and even harder to eat!  But I find it fun to peel away the layers one by one, enjoying each piece!  That recipe will come soon.  Very soon.  Because I was inspired by my reflecting on crepe cakes, that I had to go make one – an hour ago.

So yeah..I just did.  It’s pretty awesome.  Post coming tomorrow or Sunday!

THESE crepes, however, were also wonderful.  Stuffed with gruyere cheese, bits of leftover brown sugar ham and fresh chives, they were the perfect lunch.  They fed me, my baby, my sweet friend, Katrina, and her baby!  And he’s been known to pack away a man-sized meal 🙂

Make your batter an hour in advance and you’ll have much more pretty crepes that don’t fall apart!

savory crepes with ham and gruyere

Savory Crepes*

2 large eggs
3/4 cup milk
1/2 cup water
1 cup flour
3 tablespoons melted butter
Butter, for coating the pan

Fillings:
1 cup shredded gruyere cheese – any melting cheese will be great!
1/2 cup diced ham
2 tbs fresh chopped chives

In a large cup, place all ingredients except the butter and blend with an immersion blender for a full minute, making sure all the flour is incorporated.  Then drizzle in the melted butter. Place the crepe batter in the refrigerator for 1 hour.

Heat a small non-stick pan over medium high. Add butter to coat. Pour 1/4 cup of batter into the center of the pan and swirl to spread evenly. This takes a bit of practice and your crepes might look like mine and have tiny fingers coming off the sides.  They’ll taste the same, promise. Cook the first side for about a minute until edges brown and you can run your spatula around the edges to loosen.  Slide your spatula under the crepe and flip over.  Cook for another 10 seconds and fill the crepes with desired stuffings, fold into half circles and then in half again and place on a baking sheet in a 200 degree oven to keep warm until done with the rest and ready to eat!

*adapted from Alton Brown’s crepe recipe on Food Network

Homemade Creamy Tomato Soup

tomato soup for a cold dayTomato Soup buried

It’s a beautiful, cold fall day!  Yesterday it was dark and very cold and it called for a cup of soup in hand and little else.  When Matt makes us his pizza on the weekends, I am always left with about 9/10ths of a can of tomatoes and inevitably during the week, that gets turned into tomato soup.  I keep adding a spice here or there, fresh basil if I happen to have it, and no matter how I tweak it, it always turns out great.  For this version, I had some stale bread from Matt’s weekly baking that I turned into croutons. I hate wasting his bread, even the stale stuff, so it gets turned into croutons, breadcrumbs or savory stuffings every time.  The good thing about breads that are as plain and rustic as his, is that they don’t mold very quickly – they just dry out.  Perfect!  The croutons were tooth-shatteringly hard, but after a few minutes in the soup, they were extremely flavorful little sponges.

Happy Fall – it’s in the air!  It’s marvelous!  There’s a faint scent of wood burning in our neighborhood and it’s a treat to get to walk outside.  It’s a treat to be alive, today, really.  Tomorrow doesn’t exist, don’t spin all day for it.  Yesterday can’t be changed, don’t regret it.  Live today and today only!  Yesterday I recalled one of my favorite quotes,“Those who make the worst use of their time are the first to complain of its brevity.”
― Jean de La BruyèreLes caractères.  This quote challenges me to not waste my day thinking about what all I have to do, or what all I didn’t get done yesterday.  It helps me to not sit around wasting time on my phone and it helps me to realize that time with 1 and a half year old Olive is extremely rare and won’t be here for long.  So we make a mess drinking our soup and we laugh and I try to take her up on her offers while I’m working to, “mama pay? mama do somting?” a little more frequently.

Homemade Tomato Soup

Creamy Tomato Soup from Scratch
serves 3-4

1-28oz can whole tomatoes (I love Cento brand!)
1 tbs red wine vinegar
1 garlic clove, crushed
1 tbs olive oil
Whatever herbs you like – dried thyme, rosemary, sage, oregano – they’re all good and they all work.  Stick to about a teaspoon.
A splash of cream – eh, if I had to measure, I’d say 1/8th of a cup
Salt and fresh cracked pepper, to taste

Put the olive oil in a medium saucepan and add the garlic clove.  Saute over medium heat until starting to brown.  Add in the entire can of tomatoes, red wine vinegar, herbs and stir to combine.  With an immersion blender, pulse until completely blended and smooth.  Add in the cream, stir to incorporate and adjust the seasoning with salt and pepper.  Let it simmer on the stove for about 10 minutes and serve hot with crackers, croutons, or the classic grilled cheese.  Enjoy!

tomato soup face tomato soup tomato baby