Corn Cookies

momofuku corn cookies

momofuku corn cookies 3

This is one of the best cookies I’ve ever had in my entire life.  Crispy on the outside, chewy and soft in the middle.  Sweet, salty, and incredibly buttery.  It uses a mystery ingredient: corn powder. All you do (and believe me, slackers, this ingredient is worth whatever effort you don’t want to put forth) is buy a bag of freeze dried corn off Amazon and pulse it in your blender or food processor till it looks like powder.  Then, you’ll have enough for a few batches of these amazing cookies.  The corn powder adds to the incredible butter flavor and if you don’t tell anyone, they won’t be able to pick out the secret ingredient.  They’ll just sit and marvel that they are enjoying the greatest cookie (that doesn’t include chocolate) of their life.

This recipe is from the wonderful Momofuku Milk Bar cookbook.  Matt made Olive’s first birth-day (made it when we came home from the hospital with her) cake from this book, my birthday cake and the Crack Pie that we’ve made a few times and won a smallish award (in a contest created by us) for best non-fruit pie at our Pie Bake-Off.  Christina Tosi is undoubtedly a genius, as Momofuku  Milk Bar’s creative pastry chef.  It’s only her hummingbird-like brain that could come up with such nostalgic, creative, sugar-rush kind of desserts.  She is a child at heart, which shows so evidently throughout this cookbook.

Word of caution: if you like to get in and out of the kitchen quick, this book isn’t for you.  (the cookies were easy enough but the rest…) My birthday cake had Matt in the kitchen for two days and involved around 5 different recipes for one cake alone.  However, it was the best cake ever.  I don’t need to reiterate that good things are worth the hard work, but I will.  To quote Bob Kelso, “Nothing in this world worth having comes easy.”

And every recipe from Momofuku Milk Bar is worth having.

momofuku corn cookies 2

Corn Cookies
yield: 13-15 cookies

*225 g butter, at room temp (2 sticks)
300 g sugar (1.5 cups)
1 egg
225 g flour (1 1/3 cups)
45 g corn flour (1/4 cup – if you don’t have corn flour, which I didn’t, mix 1/4 flour and 4 tsp corn powder)
65 g freeze dried corn powder (2/3 cup)
3 g baking powder (3/4 tsp
1.5 g baking soda (1/4 tsp)
6 g kosher salt (1.5 tsp)

1. Combine the butter and sugar in the bowl of a stand mixer fitted with the paddle attachment and cream together on medium for 2 to 3 minutes.  Scrape down the sides of the bowl, add the egg, and beat for 7 to 8 minutes (this is important.  This long mixing process is what gives the cookies their amazing texture)

2. Reduce the mixer speed to low and add the flour, corn flour, corn powder, baking powder, baking soda, and salt.  Mix just until the dough comes together, no longer than 1 minutes.  Scrape down the sides of the bowl.

3. Using a 1/3 cup measuring scoop, portion out the dough onto a parchment-lined sheet pan.  Pat the tops of the cookie dough domes flat.  Wrap the sheet pan tightly in plastic wrap and refrigerate for at least one hour.  Do NOT baking your cookies from room temp – they WILL NOT bake properly.

4. Heat oven to 350F.

5. Arrange the chilled dough a minimum of 4 inches apart on parchment or silpat-lined sheet pans.  Bake for 18 minutes (Mine looked perfect in exactly 18 min. They know their stuff) The cookies will puff, crackle, and spread.  After 18 minutes, they should be faintly browned on the edges yet still bright yellow in the center; give them an extra minute if not.

6. Cool the cookies completely ON the sheet pans before transferring to a plate or your mouth (yeah right, you know you’ll eat a warm one and you SHOULD).  At room temp, the cookies will keep fresh in an air-tight container for 5 days.  But I really doubt they’ll last that long.

*I think measuring your flour, corn flour and corn powder by weight is really important.  Reason:  I first did it by volume and measured out 1 1/3 cups.  Then, to double check, I weighed the flour I’d measured and it was only something like 210 grams.  That’s enough of a difference to matter in the final result.  Just FYI!

momofuku corn cookies 5

The Creme Brulee of Lemon Bars

7G9A1687

I’ve stuck to this recipe for a few years now.  I love lemon desserts and my only complaint is that something claiming to be a lemon dessert isn’t ever lemony enough.  I want a ZINGER of a lemon shock.  I know this may cause several of you to stop reading, but given the choice between a GOOD lemon bar and a brownie, I’d choose the lemon bar.  Not every time.  Like I said, it’d have to be good.  Not too eggy, just enough curd, just enough crust, big time lemon flavor and another thing: don’t dust your lemon bars with confectioners’ sugar.  I’ll give you a few reasons:

1. Lemon bars usually have at least two cups of sugar.  So..there’s enough sugar.  Why would you dust something with more sugar that is already shockingly sweet? (I’m not complaining – lemon and sugar need each other)

2. I don’t like inhaling powdered sugar with each bite.  It kind of ruins the whole eating experience to have to hack on powder.

So that’s really only two reasons.  With the right recipe, you don’t need a dusting of sugar to cover up the weird, sometimes sticky top of a lemon bar.  This recipe is so wonderful because the top gets crunchy like a creme brulee.  I’m not sure why.  Maybe because I mix up the filling while the crust is baking, so by the time the crust is ready for the filling, the filling has sat and separated a bit.  I whip it up really good, too, so maybe it’s the airy texture?  Or maybe the key is to let them cool completely before cutting and don’t cover them up if you’re not serving them right away, lest the top get soft.  That way you get that good crunch on the top, the velvety curd in the middle and the buttery crumble of the crust all together.  This is adapted from Paula Deen’s recipe, and to me, it’s the perfect lemon bar recipe.  The only one you need.

Creme Brulee Lemon Bars

Crust
2 cups all-purpose flour
1 cup confectioners’ sugar, plus more for dusting
2 tbs lemon zest (just zest the lemons you will use for the filling)
pinch of salt
2 sticks butter, at room temperature, plus more for greasing

Filling
4 eggs
2 cups granulated sugar
6 tablespoons all-purpose flour
6 tablespoons fresh lemon juice

Preheat the oven to 350F.  Grease a 9x13x2″ pan.  Cover the bottom in parchment paper and let it hang off the sides (just along the long edge) so that you can remove it for cutting better.)
Make the crust by combining flour, confectioners’ sugar, zest and salt in a large bowl.  Cut in the butter to make a crumbly mixture.  Press the mixture into the prepared pan.  You may need to dip your fingers into a little flour or confectioners’ sugar to keep the dough from sticking to your fingers.  Bake for 15-20 minutes.

Meanwhile, to make the filling, mix the eggs, granulated sugar, flour, and lemon juice.  Pour this over the baked crust and bake for 25 minutes longer.  Don’t sprinkle with confectioners’ sugar. Run a knife around the edges to loosen the bars, and then carefully, by the parchment overhang, lift the entire pan of bars out of the pan and transfer to a cutting board to cut.  I like to cut off the very edge of the bars so that each one will be perfectly smooth, cut, squared edges (obsessive) but that’s really up to you.  No one said you couldn’t eat the trimmings and no one would have to know they ever existed.

Cappuccino Chocolate Cake

cappcake3

Some things get better with time: wine, cheese, beards…this cake.  I made it on Sunday afternoon and we had a piece and it was extremely good, but we wrapped it up and let it sit in the fridge for a few days and THEN it was something to behold.  The layers meld into one another after a couple days in the fridge.  The whipped cream softens the layers of chocolate cake and it transforms into a Swiss Cake Roll/Tirimisu kinda thing and it’s amazing.  Good news: it’s a really great cake if you eat it instantly.  Greater news: it only gets better from there.

The recipe comes from Fran Bigelow’s wonderful book, Pure Chocolate.  I learned how to make truffles from this book with much sweat, tears and good results.  Fran is the expert when it comes to chocolate and none of her recipes have steered me wrong.  Her truffles and chocolate tempering require huge amounts of patience.  They simply can’t be rushed.  And when I have about 2 days, I want to try her recipe for dark chocolate brandied apricot torte.  But I didn’t have that much time and saw that this cake took only a couple hours. It delivered rich chocolate and creamy coffee flavors and honestly, what is better than that combination?  This is the perfect party cake or good to have in your fridge (since it lasts all week) to whip out with a cup of coffee when a friend stops by.  Given that friends still stop by in your neck of the woods.  Oh, to live in Mayberry…

cappcake


Cappuccino Chocolate Cake
serves 10-12

6 ounces bittersweet chocolate (70% is preferable), finely chopped
6 large eggs, separated
1/2 cup plus 1 tbs sugar
3 tablespoons brewed cooled espresso
Cappuccino Whipped Cream (recipe below)
dark cocoa powder for dusting

With a rack positioned in the middle of the oven, preheat to 325F.

Lightly butter a 9×13″ or quarter sheet pan and line with parchment paper.  Lightly butter the parchment paper.

In a glass bowl set over a sauce pan of barely simmering water (I prefer this to a double boiler, as my DB always heats too quickly and scorches the chocolate = sad Alisa) and melt the chocolate.  Remove when nearly melted and continue stirring until smooth.  Set aside.

In a mixer fitted with the whisk attachment or using a hand mixer, combine the egg yolks and half the sugar and whip on medium high speed.  Once combined, scrape the sides of the bowl and increase the speed to high.  Continue whipping until the mixture becomes thick, pale yellow in color, and the sugar has dissolved, 5 to 6 minutes.

Clean the whisk and in another clean bowl, begin whipping the egg whites on medium high speed, increasing the speed until frothy.  Slowly add the remaining sugar and continue whipping until the peaks are stiff but not dry.

Pour the cooled coffee into the melted chocolate all at once and quickly stir together to prevent seizing.  If it does thicken and start to separate, don’t worry.  Constant stirring will make it smooth and creamy.

Lighten the chocolate mixture by folding in one-third of the yolks.  Then add the lightened chocolate mixture to the remaining yolks and gently fold.  The mixture will become light and airy with large air bubbles where some traces of yolk remain.  That’s okay and kind of pretty, anyway.

Lighten the yolk mixture by quickly folding in one-quarter of the whites, then gently fold in the remaining whites in 3 parts, trying not to over mix and lose the volume.

Pour the glossy dark chocolate batter into the prepared pan, smoothing the top.  The pan will be more than three-quarters full.  Bake for 20-25 minutes, until the top is slightly domed in the center and dry to the touch.  A tester inserted will come out dry and clean with a few crumbs.  Let cool in the pan at room temp.  The layer will pull away from the sides of the pan as it cools.

Have ready the Cappuccino Whipped Cream filling in the fridge.  Remove the cooled cake by running a thin bladed knife around the edges of the pan.  Place the bottom of the baking sheet lined with parchment over the cake and invert.  Peel the parchment paper off.

Using a ruler and the tip of a paring knife, mark the cake into 3 equal sections across the width.  Cut the cake with a serrated blade to make 3 layers about 4 inches wide each.

Place one chilled cake layer on a serving plate.  With a metal spatula, spread one third of the filling over the layer, generously overlapping the edges.  Repeat with second layer and a layer of filling. (The layers should be equal in height to each other.)  Top with the last chilled cake layer.  Be careful not to overwork the cream and frost the top and sides.  Refrigerate at least 4 to 6 hours to set the cake an meld the flavors.  Before serving, dust with cocoa powder.  Can be stored in the fridge for up to 2 days (or a week, if you’re us)

Variation: to make this child-friendly(er): just omit the espresso from the whipped cream.

Cappuccino Whipped Cream
makes 3 1/2 cups

1/4 cup plus 2 tbs sugar
3 tbs brewed espresso
2 cups heavy cream, chilled

In a stand mixer fit with the whisk attachment, whisk together the sugar and coffee until frothy.  The sugar will begin to dissolve.  Add the cream and whisk until thoroughly combined and soft peaks form.  Take care not to over whip the cream as it may begin to lose its creamy texture.  Store in the fridge till ready to use.

cappcake2

Weekend Fare: Pork Carnitas with Fire Roasted Salsa

carnitas-00006

Every time we have someone over for dinner, we think a few days ahead of what we should make.  If it’s someone we are not 100% sure we’ve cooked for or not, we almost always ask each other, “Have we made them carnitas, yet?”  The answer is usually “yes…but I’m sure it’d be okay to make them, again.”  This is the kind of recipe that is so easy it feels like cheating, and people always ask, “What did you put on these?!” and it’s awesome to be able to say, “salt.”  And that’s it.  Salt, water, pork.  This is yet another example of how amazing pigs are.  And, this recipe makes a TON.  So you can feed at least 8 people if you have a couple side dishes and some tortillas.

The weather is looking more and more like summer, and while it’s not quite grilling weather, this recipe is about as close as it gets to being full-blown patio summer-fare.  We always have a little mise-en-place set up to go with these soft tacos: chopped onion and cilantro (necessities) and here I have pictured some shredded sharp white cheddar and a fire roasted salsa.  (not pictured, but always in my heart is my ultimate guacamole recipe, which deserves its own blog post.  And it will get it)

This salsa is also our go-to homemade salsa.  Beats anything out of a jar by a mile and is completely able to be altered to your heat preference or even your cilantro preference.  There’s two people in this world.  Those who think cilantro is the greatest and goes well on anything from Thai to Mexican cuisine, and those who think cilantro tastes like soap.  I’m very glad I wasn’t born in the second camp.  My brother was, and he’s made this exact salsa recipe without cilantro and swears it’s the greatest he’s ever made.  So there you go.  Not coincidentally, both of these recipes are from Rick Bayless.  He’s our absolute go-to for Mexican cuisine.  Not only is he an amazing chef and cookbook author, but he COULD be the nicest person to ever appear on television, and probably in real life as well.  One day, we will go to Chicago and spend the week doing nothing but eating at his various restaurants.  Until then, we’ll live vicariously…

carnitas-00005

Pork Carnitas

4 pounds bone-in pork shoulder, cut into 1 1/2- to 2-inch slabs
Salt

Moist cooking.   Heat the oven to 375 degrees. Cut each slab of pork in half and lay the pieces in a baking dish (they should fit into a 13 x 9-inch baking dish without being crowded).  Liberally sprinkle with salt (about 1 teaspoon) on all sides.  Pour 1/3 cup water around the meat, cover tightly with foil, and bake for 1 hour.

Dry cooking.   Raise the oven temperature to 450 degrees.  Uncover the meat and cook until the liquid has completely reduced and only the rendered fat remains, about 30 minutes.  Now, roast, carefully turning the meat every 7 or 8 minutes, until lightly browned, about 20 minutes longer.  Break the meat into large pieces and serve on a warm platter, sprinkled with salt.

carnitas-00002

This is what the meat should look like before you shred it.  Nice and glistening in its own fatty juices and caramelized from the oven.

carnitas-00007

Fire Roasted Salsa

1 to 2 fresh jalapeño chiles
3 garlic cloves, unpeeled
1 15-ounce can diced tomatoes in juice, preferably fire roasted
1/4 cup (loosely packed) chopped fresh cilantro
2 tablespoons fresh lime juice
Salt

In a small ungreased skillet over medium heat, roast the chiles and garlic, turning regularly, until they are soft and blotchy brown, about 10 minutes for the chiles, 15 minutes for the garlic.

carnitas-00001

Cool until handleable, then pull the stem(s) off the chile(s) and roughly chop.  Peel the skin off the garlic.  Scoop into a tall measuring cup and pulse with an immersion blender until smooth (or in a regular blender, but this is so much cleaner.  I hate cleaning my blender.  I hate my blender.)

Add the tomatoes with their juice.  Pulse until you have a coarse puree.  Scrape into a serving dish.  Stir in the cilantro and lime juice.  Taste and season with salt, usually about 1/2  teaspoon.  You’re ready to serve.

carnitas-00004


Try to keep a list of everyone you make this for, as to not appear a one-trick pony like we have numerous times.  We can cook more than this, we swear…we just don’t want to.

Deep Dish Strawberry Pie

Strawberry Pie

Yesterday was Pi day, and there’s really no reason to need an excuse to make a pie, but I took the excuse and ran with it.  Spring is creeping in on us.  Warmer days and cool breezes in the evening and there’s this smell in the air that smells like Easter and wet grass and being a kid again, all rolled into one, deep inhale.  I love the longer days and the way the sunlight stretches across the grass until nearly 8 p.m.  On the days when it isn’t blowing 50 mph in this town, and it’s not yet 100+ degrees, it’s nearly sinful to stay inside and miss it.  These perfect days are fleeting.

I had 5 lbs of strawberries on my counter top yesterday and decided to use part of them for a pie.  I knew exactly the two books to consult: Sweety Pies and Bouchon.  Bouchon has the perfect, and I mean PERFECT pie crust recipe.  It’s actually the crust recipe for a deep dish quiche, but I use it for pies and it’s perfect.  It rolls out and stays together so well, you can pick the entire thing up once it’s rolled out and move it like a towel.  It’s flaky and tastes like butter, because that’s all the fat that’s used!  I have gone down the road of lard crusts and half butter/half crisco, and none have held up as well as this recipe.  So, if you’re struggling with your pie crust at this juncture in your life, struggle no more.  As always, Keller, or in this case, his pastry chef, has done the dirty work for us.

For the filling, I consulted the amazing and funny book, Sweety Pies: An Uncommon Collection of Womanish Observations.  Every recipe has a story and a unique woman behind it. I strongly recommend buying this book.  Every pie I’ve tried from it has been wonderful and the stories are hilarious and make you wish you were a Southern woman with a fiercely defended pie recipe to make all your other Southern friends jealous.  To be honest, though, the crust recipes included don’t hold up for me (cracked, crumbled, cried-I’m sure it was my fault), so that is why I use the crust from Bouchon.  Because I hate failing with a recipe that’s supposed to be a comfort.

This pie is more like a cobbler.  The recipe even says to just put the crust on top.  But I’m a crust-gal and it’s my favorite part, especially if it’s a good crust.  The crust recipe makes just enough for a deep dish pie plate plus a little extra.  I used the little extra to cut out hearts for the top.  You’d probably have enough to do a lattice top, or even a thin shell for the top, especially if you didn’t use such a deep pan.  The filling is quite syrupy, so I’d suggest serving it in bowls with vanilla ice cream.

Strawberry Pie 3

Strawberry Pie 4

Strawberry Pie

For the crust:

2 cups AP flour, plus extra for rolling out
1 tsp kosher salt
8 ounces chilled, unsalted butter, cut into 1/4″ pieces
1/4 cup ice water

Place 1 cup of the flour and the salt in the bowl of a heavy-duty mixer fitted with a paddle attachment.  Turn the mixer to low and add the butter a small handful at a time.  When all the butter has been added, increase the speed to medium and mix until the butter is completely blended with the flour.  Reduce the speed, add the remaining flour, and mix just to combine.  Add the water and mix until incorporated.  The dough will come around the paddle and should feel smooth, not sticky, to the touch.
Remove the dough from the mixer and check to be certain that there are no visible pieces of butter remaining.  Pat the dough into a 7-8″ disk and wrap in plastic wrap.  Refrigerate for at least 1 hour, up to a day.

For the filling:

3/4 cup sugar, plus more for sprinkling
1/4 cup AP flour
1/8 tsp salt
1/8 tsp cinnamon
1/8 tsp ground cloves
6 cups hulled and halved, fresh strawberries
2 tbs unsalted butter, cut into small pieces
1 egg, beaten

Preheat the oven to 375 degrees.
Roll out your pie crust to about a 12″ circle.  Fit into the pie plate and trim off the excess and roll up into a ball and let rest.
In a large bowl, combine the sugar, flour, salt, cinnamon, and cloves and mix thoroughly.  Add the strawberries and toss gently until well combined.  Let stand for 15 minutes, then toss again and spoon into a 9″ deep dish pie plate.  Dot the filling with the butter.  Roll out the excess of your dough and cut into hearts and arrange on top of the filling.  I folded the edges of my crust over because the filling didn’t come up all the way to the surface of my dish, and connected the edges a bit with the tips of the hearts.  Do what you like – be creative!  Brush the crust with the beaten egg and sprinkle with coarse sugar if you like!
Place the pie on the center rack of the oven and bake until the pastry is golden – 30-45 minutes.  I tented my pie with foil so that the bottom of my crust would be cooked through but the top wouldn’t burn, and I probably left the pie in there for a total of one hour, the last 20 minutes with it tented.
Let cool completely and serve in bowls with scoops of vanilla ice cream.  Use the juice from the pie as a syrup on your ice cream.  Be happy.

Strawberry Pie 5

That lovely, crunchy sugar is from King Arthur Flour.  I love that company and all the fun things you can get for your baking adventures!

Strawberry Pie 2

A First Birthday Cake

olive-00171

Exactly one year ago, this pic was taken.  Olive was just 6 days old and we were home, out on our porch, having a glass of wine and marveling at this red headed little girl in our arms.  Matt made a birth DAY cake that we had when we got home from the hospital with friends and family to celebrate her actual birth and the only thing that changed this year was the cake and the size of the red head.

482407_10151518156698265_1304279150_n

We’ve had such a wonderful year with Olive.  It’s been amazing to watch her discover things, develop likes and dislikes (kitties, peas – respectively) and one of the most enjoyable activities in my life this year has been showing her food.  It’s crazy to realize that these little creatures don’t know what ANYTHING is.  They don’t know a peach from a mango from a pear from a plate of spaghetti.  They don’t know how garlic smells while roasting or the magic that is mire poix sizzling away in butter.  It’s our JOY to get to show them!  For

“…no matter what they think, we know: We are the ones who have tasted and seen how gracious it all is.” 

In this spirit of education, Matt and I contemplated what we wanted Olive to try for her first birthday.  She’d had many fruits so I considered a lemon layer cake, strawberry shortcake, something with banana cream.  Matt really wanted her to have chocolate for the first time and REALLY GOOD chocolate, at that.  So we combined forces and created a Neapolitan-esque cake with a flourless chocolate cake as the base, a white chocolate mousse in the middle and topped with a thick, strawberry whipped cream.  The chocolate cake is by far the best chocolate “cake” I’ve ever had.  Taken from the brilliant Dave Lebovitz, it’s nearly like a truffle center, or the best fudge of your life.  The white chocolate mousse was taken from Annie’s Eats, which I’d used on a cake for Matt for Valentine’s day this year, which he was crazy about.  And then the strawberry whipped cream was just a last minute sort of creation by me for Olive.  Because she loves strawberries and I figured if she didn’t like the rest, she’d at least like a third of her cake and we wouldn’t look like complete fools when it came show time.

Olive's Birthday Cake

For the bottom layer, Matt baked it in a 9″ round cake pan.  We had a hard time getting the cake out (panic moment) and so I crumbled it all up and pressed it tightly into a spring form pan.  Then I lined the pan with a couple layers of acetate strips, stacked on top of each other and taped on the outside, to get that tall form for piping in the other two layers.  All you do is pipe in the white chocolate mousse on top of the chocolate cake, let it sit in the fridge while you make the whipped cream, and then pipe in the whipped cream and wrap plastic wrap across the top of the tube so it doesn’t dry out and let it sit in the fridge over night, or for an hour in the freezer.  This makes it much easier to cut.

Chocolate Cake (Orbit Cake)

14 tablespoons unsalted butter, cut into 1/4″ cubes, plus more for the pan
10 ounces 62% semisweet chocolate, finely chopped (our FAVORITE dark chocolate, which we exclusively used for this cake, is Lindt’s 70% dark chocolate bars.  Heaven.)
5 large eggs
1 cup granulated sugar

Position rack in the middle of the oven and preheat to 350F. Lightly butter a 9×2″ round cake pan and line the bottom with parchment paper (if you do this easy step, you won’t have to mush it all into a spring-form pan like I did.)
Place the butter and chocolate in a glass bowl and microwave at 30 second increments, stirring after each, until the chocolate is completely  melted, glassy, and incorporated with the butter.
In a large bowl, whisk together the eggs and sugar.  Gradually whisk in the melted chocolate mixture and continue whisking until thoroughly combined.
Pour batter into the prepared pan.  Place the pan in a larger roasting pan, and cover the top of the cake pan with foil.  Add enough hot water to the baking pan to come halfway up the sides of the cake pan and bake for 1 hour and 15 minutes to 1 hour and 30 minutes until the cake has set.  To test, touch the center of the cake lightly with your finger: the surface will be slightly tacky, but your fingers should come away clean.
Carefully remove the cake pan from the water bath and place on a cooling rack to cool completely.
Cover the pan with plastic wrap and refrigerate for at least 2 hours – up to 3 days.
To assemble with the mousse, run a knife around the edges of the cake to loosen the sides.  Invert onto a serving plate, wrap in the acetate strips (or wax paper – tape doesn’t stick to parchment) and get on with making the next step.

White Chocolate Mousse

1 1/2 tsp powdered gelatin
2 tbs water
12 oz white chocolate chips (don’t use almond bark – it won’t taste right)
3 cups heavy cream

Sprinkle the gelatin over the water in a small bowl and let stand at least 5 minutes to soften.  Place the white chocolate in a medium bowl.  Bring 1 cup of the cream to a boil in a small saucepan.  Remove the pan from the heat, add the gelatin mixture and stir until dissolved.  Pour the hot cream mixture over the white chocolate and let stand about 1 minute.  Whisk until the mixture is smooth.  Cool to room temperature, about 5-8 minutes, stirring occasionally.

In the clean bowl of a stand mixer fitted with the whisk attachment, whip the remaining 2 cups of cream at medium speed until it begins to thicken.  Increase the speed to high and whip until soft peaks form when the whisk is lifted.  Using a whisk, mix one-third of the whipped cream to the white chocolate mixture to lighten it.  Fold in the remaining whipped cream gently with a rubber spatula until no streaks remain.  Spoon the white chocolate mousse into the pan over the chocolate cake.  Smooth the top with an offset spatula.

Strawberry Whipped Cream

1 jar of strawberry jam – the fancier the better
3 cups heavy cream

Scrap the jar of jam into a small saucepan over low heat and add about 1/4 cup of water.  Heat it just enough so that it incorporates with the water and you break up any lumps with a whisk and the jam is smooth.  Transfer it to a bowl and let it cool about 30 minutes, stirring occasionally to help it cool.
In a stand mixer with a whisk attachment, stir the cream on medium for a while until it starts to thicken.  Then whip on medium high while you gently let the jam stream into the edge of the bowl, careful to not hit the whisk in the middle, until completely incorporated.  Whip until a little firmer than soft peaks.  At this point, I added a little red food coloring (just a few drops) to make it more pink and folded it in with a spatula until fully incorporated. Do what you will with that.  I just wanted it to be pink to truly look Neapolitan. Transfer cream to a piping bag fitted with a large star tip and pipe, pipe, pipe until you can’t pipe any more.  Have fun with it.  Make zigzags and peaks and star flowers – whatever you want.  Just fill in all the gaps and sprinkle the top with extra crunchy sugar for effect.

serves at least 20

Ossobuco and Saffron Risotto – destined to be your next wonderful food memory

Osso Bucco

I feel like this recipe isn’t right for the kind of weather we’re having this week, but you never know – in Lubbock it’s sunny and 70 one day and the next day it snows 4″ (true story).  So maybe by the time you read this, it will be frosty, again.

I had ossobuco for the first time six years ago in our tiny apartment, cooked by Matt, and ate it sitting on the floor, pulled up to a coffee table watching t.v.  I shamefully write that, but at the time, I don’t believe we had a dining table.  Hard to remember why else we’d eat such a nice meal on the coffee table, so dangerously close to our dog.  What I do remember is how amazed I was at the flavor of the braised meat and how strange I thought it was that Matt said you were supposed to sprinkle this parsley junk on top.  The “parsley junk” was actually gremolada and it’s actually really perfect to cut the richness of the dish.  Parsley, lemon peel and garlic cut right through the melting texture of the veal shank.  I instantly loved the combination.  We made a lot of food discoveries in that apartment.  Neither of us grew up with a whole lot of adventurous cooking in the house, but when we got married, the adventure began. Neither of us knew what we were doing (I knew the basics and how to navigate the kitchen and Matt can follow a recipe to a fault) but we had an obsession with the then-better Food Network and cookbooks and chef biographies and eating and really, you need little else in order to get on with your own cooking adventure.

Matt and I have a saying about pizza that there’s really no bad pizza.  Cardboard frozen pizza, pizza pockets, bagel bites – we’ll eat any of it.  And I feel the same way about risotto, ossobuco’s best friend.  We’ve made it too thick and we’ve made it too crunchy and we’ve made it too thin and I’ve even been at a restaurant where they FRIED it, and in the confession booth, I would have to admit that I loved it all.  It’s just…comforting.  It’s a rice dish that could very well be as comforting as mac and cheese, and that’s saying something coming from an American.

Since I’d been to the lovely Ghandi Bazaar a few weeks ago and bought some ridiculously cheap saffron, we decided that for this meal, we’d just do it up right (we’d always omitted the expensive ingredient) and use the saffron.  If you need to borrow a pinch and you live close, drop on in.  Or go see the lovely people at the Ghandi Bazaar on 34th and Quaker.  They keep it behind the counter.

Ossobuco – Braised Veal Shanks, Milanese Style*
(serves 6-8)

1 cup onion, chopped fine
2/3 cup carrot, chopped fine
2/3 cup celery, chopped fine
4 tbs butter
1 tsp garlic, you guessed it, chopped fine
2 strips lemon peel (I just took a carrot peeler to it and cut two, long strips off the length of the lemon
1/3 cup vegetable oil
8 – 11/2 inch thick slices of veal shank, tied tightly with string around the middle (you may need to ask the butcher to cut these, but they nearly always have them in the back)
Flour, spread on a plate
1 cup dry white wine
1 cup beef broth
1 1/2 cups canned plum tomatoes, chopped with juice
1/2 tsp fresh thyme or 1/4 tsp dried
2 bay leaves
2 or 3 sprigs of parsley
Black pepper and salt

1 recipe Gremolada (follows)
1 recipe Milanese style saffron risotto (follows)

Preheat the oven to 350.
In a heavy bottomed dutch oven or stock pot, heat to medium and throw in the onion, carrot, celery and butter and cook for 6 to 7 minutes.  Add the chopped garlic and lemon peel and cook for another 2 to 3 minutes until the vegetables soften and wilt.  Remove from heat.
Put the vegetable oil in a separate skillet and turn on the heat to meium high.  Turn the veal shanks in the flour, coating them all over and shaking off the excess.  Don’t do this ahead of time or they will get soggy.  When the oil is shimmering hot, add the shanks in two batches of four (they should cover the bottom of the pan but not be crowded) and brown evenly on all sides.  Remove them from the skillet and place them side by side over the chopped vegetables in the dutch oven.
Tip the skillet and spoon away all but a little bit of the oil.  Add the wine, reduce it by simmering it over medium heat while scraping loose with a wooden spooon the residues that get stuck to the bottom and sides.  pour the skillet juices over the veal in the pot.
Pout the broth in the skillet, bring to a simmer, and add it to the pot.  Also add the chopped tomatoes with their juices, the thyme, bay leaves, parsley, pepper and salt.  The broth should have come up two-thirds of the way up the sides of the shanks.  If it does not, add a little more.
Bring the liquids in the pot to a simmer, cover the pot tightly, and place it in the lower third of a preheated oven.  Cook for about 2 hours or until the meat feels very tender when prodded with a fork and a dense sauce has formed.  Don’t be in a rush – more cooking is better than not enough.
When the ossobuco is done, transfer it to a warm platter, removing the trussing strings, pour the sauces in the pot over them and serve at once on top of a bed of risotto and garnished (on the side) with gremolada.

Gremolada*

1 tsp grated lemon peel (buy a Microplane)
1/4 tsp minced garlic (buy a Microplane)
1 tbs chopped parsley

Mix ’em all up.

Saffron Risotto

Saffron Risotto, Milanese Style*
(serves 6)

1 cup canned beef broth, diluted with 4 cups water
2 tbs diced pancetta
3 tbs butter
2 tbs vegetable oil
2 tbs onion, chopped fine
2 cups Arborio rice
1/2 tsp saffron threads dissolved in one cup of broth
Black pepper
1/3 cup parmigiano-reggiano cheese, grated fresh
Salt, if needed

Bring the broth to a slow, steady simmer on a burner near where you’ll be cooking the risotto.
Put the diced pancetta, one tbs butter and vegetable oil, and the chopped onion in a broad sturdy pot (we use this one – our go-to risotto pan) and turn on the heat to medium high.  Cook and stir the onion until it becomes translucent, then add the rice.  Stir quickly and thoroughly until the grains are coated well.
Add 1/2 cup of simmering broth, and cook, stirring, until all the liquid has mostly evaporated before adding another ladle.  Keep doing this over and over and over and over, stirring all the while.
When the rice has cooked for 15 minutes, add half the dissolved saffron liquid.  Continue to stir, and when there is no more liquid in the pot, add remaining saffron liquid.
Finish cooking the rice, tasting for doneness.  The rice shouldn’t be crunchy any more, but shouldn’t be mushy, either.  Go for that nice al dente, much like pasta.
Off the heat, add a few grindings of pepper, the remaining butter, all the Parmesan and stir thoroughly until the cheese melts and clings to the rice.  Taste and correct for salt.  Serve with ossobuco!

*all recipes come from the wonderful book, Essentials of Classic Italian Cooking.  Go buy it!

Remembering Paris: Cassoulet

paris-00402

Paris at night
paris-00410


There are some dishes that stay with you forever.  My mind is there right now: evening in Paris. Sitting on the patio of a corner bistro, watching people go by, hearing a street performer play an accordion in the distance, sipping a glass of wine and waiting for our meal to arrive.  I ordered Cassoulet – a rich dish of slow braised sausages, duck confit, bacon, white beans and magic.  Yes, magic.  We had dozens of great meals in our two weeks in France, but this one, as humble as it might appear, was in my top 5.  And that list includes a meal at the #11 restaurant in the world.  I can’t explain the richness of this dish, the depth of flavor, the smokiness of the charred bacon, the sweetness of the sausages and the duck confit, which seems to be one of the most common menu items in France and the first real meal we ordered in France after our first day car wreck fiasco.   Cassoulet is  just a perfect representation of the love the French have for food and for sharing that love with others.  When you taste this dish, you taste soul.  It’s not simply a list of ingredients.  It’s time, thought, care and enthusiasm for ingredients, all wrapped up into one, steamy bowl of goodness.

Just in case you want to go there for dinner tonight. 😉 You don’t need a reservation, but please don’t be an American dummy and show up before 8:30 for dinner: Brasserie de l’Île St-Louis – 55 Quai Bourbon, 75004 Paris, France 33 1 43 54 02 59 ‎

I was happy to try the Bonne Femme’s version of cassoulet yesterday.  I knew, with the spirit of this cookbook, that it probably wouldn’t call for duck confit (thank goodness – we just ran out) 😉 and that I could probably accomplish it in one afternoon.  I was right! This recipe is totally accessible to the home cook and I happily got to serve it to both Matt, Olive, and my parents, who were in town visiting for the day.  My mom sent me a text after they got back home and said, “You need to write about that dish.”  So here you go:

cassoulet

Pork and White Bean Cassoulet Ce Soir*
serves 6

2 cups Great Northern beans, rinsed and picked over
2 to 2.5 lbs bone-in country-style ribs, cut in half (the butcher might do this for you if you ask nicely and have a cute baby with you)
salt and freshly ground pepper
1 tablespoon, plus 2 teaspoons extra virgin olive oil
3 slices thick-cut bacon, cut into 1 inch pieces (we like Wright’s)
1 red bell pepper, cored, seeded and chopped
1 small onion, chopped
3 large garlic cloves, minced (have you bought a Microplane, yet?)
1/2 teaspoon dried herbes de Provence, crushed
1/2 cup dry sherry
3 cups low-sodium chicken broth
1 (14 oz) can diced tomatoes, drained
12 oz sweet Italian sausage, pricked with a fork all over and cut into 6 pieces

  • Soak the beans overnight in enough water to cover them about 2 inches deep; drain and set aside.  OR bring them to a boil for 2 minutes, remove from heat, cover and let stand for one hour.
  • Season ribs with salt and pepper. Heat 1 tablespoon of the olive oil over medium-high heat in a large Dutch oven (a large stainless steal stock pot with a heavy bottom works, too).  Add the ribs and cook, turning occasionally, until brown on all sides, about 10 minutes.  Transfer the ribs to a plate.  Cook the bacon in the pan until crisp.  Transfer the bacon to paper towels to drain.
  • Drain off all but 1 tablespoon of the fat from the pan.  Add the bell pepper and onion and cook, stirring, until tender, about 5 minutes.  Add the garlic and herbes de Provence and cook, stirring until fragrant, about 30 seconds.
  • Remove the pan from the heat.  Add the sherry and return the pan to the heat (this is to keep you from burning your eyebrows off, should the sherry decide to ignite on your stove.) Bring to a boil and boil, stirring to loosen all the good stuff from the bottom of the pan, until the sherry is reduced by half, about 1 minute.  Add the beans, bacon, chicken broth, and drained tomatoes to the pan; top with the ribs.  Bring to a boil.  Reduce the heat, cover tightly and simmer for about 1 hour (the ribs won’t be done at this point).
  • After the pot has been simmering for about 45 minutes, heat the remaining two teaspoons of olive oil in a medium-sized skillet over medium-high heat.  Cook the sausage pieces, turning to brown evenly, for about 5 minutes (the sausage won’t be cooked through, but that’s okay).
  • Add the sausage pieces to the pan, pushing them down into the stew so that they are fully submerged.  Bring back to a boil.  Reduce the heat, cover, and simmer until the sausage is cooked through, the ribs are nearly tender, and the beans are tender, about 15 minutes more.  At this point, I went to Target with my mom and left the pot on the stove at the lowest setting.  So it bubbled away for probably an extra hour, but not at a simmer. It just stayed warm.  I really think you could do this if you made the dish too early or wanted to leave it on your stove for the afternoon, just staying warm.  I think if anything, it just made the meat more tender.
  • Uncover the pot and increase the heat so that the stew comes to an active simmer.  Cook, stirring occasionally, until the liquid is reduced, the ribs are tender, and the stew has thickened, 10 to 15 minutes.  Taste and adjust the seasonings.
  • Serve in wide, shallow bowls, with a piece of sausage, a piece of pork and plenty of beans in each bowl.  The Southerner in me made cornbread to serve with cold butter on the side to help soak up the extra juices.

*almost word for word from page 200 of The Bonne Femme Cookbook, except, of course, the part about Target.

Caramelized Banana Chocolate Chip Muffins

bananachocolate2

When I think of a true indulgence, I think about baked goods.  During my time of extra strict sugar restriction while I get my remaining baby weight off, I give myself one day a week to indulge in items that would really not even be allowed in moderation for me during the week.  I have to have that day.  It keeps me going during the week to think about all the scones and muffins and other breads I can have on Saturday.

When I was pregnant with Olive, I craved sugar constantly.  Matt likes to joke that Olive is mostly made out of Oreos and cereal.  I ate other things, but yes, carbs were king.  I made baked goods all the time, especially in the last trimester during the coldest part of winter.  For weeks, I kept us stocked up with various muffins for breakfast.  The combination of banana and chocolate chip became Matt’s favorite, and so when we were discussing a post I could do for Friday, he suggested I do banana chocolate chip muffins.  Banana’s Foster has been a favorite dessert (a favorite – there are many) of mine for a while, now, and so when I know there’s potential for bananas AND brown sugar AND melted butter in a recipe, I want to make it as bananas-fostery as possible.  So for this recipe, (adapted from allrecipes.com)  that meant browning the butter (duh) and letting it bubble away with the mashed bananas and substituting some of the white sugar for brown sugar.  I didn’t add rum, but that’s only because I thought it would get lost with the addition of dark chocolate chips, anyway.  I’d really like to try this creation without the chocolate next time (maybe tomorrow?) and add some rum to see if I can taste my efforts at creating a Bananas Foster muffin a little bit better.

I made a “mistake” with my alterations to the recipe.  I didn’t wait for the batter to cool (it was quite hot from being on the stove, turning into caramelized bananas) before I added the chocolate chips, so naturally, they melted.  I was unhappy with my dumb mistake at first, but decided to go with it and when they came out of the oven, I was happy to see a little swirly effect in the batter, which I thought was quite pretty.  I topped the muffins with a slice of banana and brown sugar and some with extra chocolate chips while in the oven.  The brown sugar that melted into goo on top of the bananas was a nice touch.  These muffins are definitely more dessert than breakfast, so maybe you should have them for afternoon snack time with a cup of coffee, instead of breakfast.  I wouldn’t want you to have to take a mid-morning nap or anything…

Caramelized Banana Chocolate Chip Muffins
yield: 1 dozen

1 1/2 cups all-purpose flour
1 teaspoon baking soda
1 teaspoon baking powder
1/2 teaspoon salt
1/2 teaspoon cinnamon
3 super duper ripe bananas, mashed, plus one banana for slicing as the topper for the muffins
1/2 cup white sugar
1/2 cup packed brown sugar
1 egg, lightly beaten
1/3 cup butter, melted and browned, if you know what’s good for you
1 cup chocolate chips

Preheat the oven to 375F.  Spray 12 muffin papers with non-stick spray and place into muffin tin.
In a large bowl, mix together the flour, baking soda, baking powder, salt and cinnamon.
On the stove, in a medium sauce pan, melt the butter until it begins to brown (you’ll see those grainy butter solids settling at the bottom of the pan) and add the bananas and sugars and let it bubble away for about 10 minutes on medium low heat, stirring periodically.  Remove from heat and let cool slightly and then scrape every last gooey drop into your flour mixture.  Mix well (I just used a fork) and then add your egg and mix just until incorporated.  At this point, if you want your chocolate to remain chips, let your batter cool for a while.  A trick to keep your chocolate chips from settling to the bottom of your muffins is to lightly coat them in flour before mixing them into your batter.  After the batter has cooled, gently fold the chips into the batter and spoon into the muffin liners.  I didn’t let my batter cool, so I was left with melted chocolate worked throughout.  I didn’t totally mix it up so it left a neat swirly effect in the muffins.  You just do whatever makes you happy.
Top the muffins with slices of banana and sprinkle extra brown sugar on top of each slice.
Bake in preheated oven for 18-25 minutes (mine took 23) until a toothpick comes out clean.

bananachocolate1


Enjoy your weekend, lovely folks.  See you Monday with a light recipe to start things off right.

Cherry Cream Doughnuts – not everything has to be perfect

When recipes don’t work out exactly as you’d hoped, it’s good to have a positive attitude.  Or, if you’re like me, you could furiously throw the item that didn’t work out as hard as you can into the sink so that it makes a nice splatter everywhere.  I wish I could say that this instance was the only time I’ve behaved in such a childish way.  But there was the hard-boiled egg-peeling incident of 2010…
I’m typically even keel.  I have seen a lot of hardship in my life and when chaos abounds,  I’m usually the calm in the storm.  However, when it comes to cooking,  and I do everything right, cut absolutely zero corners (which is counter to my nature) and it STILL doesn’t work out, I want to destroy something.  Usually the food in question.  The term “perfectionist” doesn’t imply that you do everything perfect – it implies that you wish like the dickens you could.  All the time.  Especially when it comes to peeling a hard-boiled egg.

Thomas Keller is a perfectionist.  I’m sure things have gone wrong for him with his recipes.  I’m sure he’s tested this doughnut recipe dozens of times, and goodness knows he expects perfection.  We own every cookbook he’s ever put out, starting with the first, truly intimidating set of recipes I’d ever seen in one place; The French Laundry Cookbook.  In all the times we’ve tried his recipes, we’ve done our utmost to follow his instruction to the letter.  We respect what he has worked so hard to achieve.  We’ve eaten at his restaurants and our lives have been changed for the better because of it.  We’ve become more disciplined in LIFE because we ate at Keller’s restaurant.  How many meals can have that power?

So it’s with all this respect for Keller and all he’s done to pave the way for perfection in recipes that for these doughnuts, I:
1. measured eggs for this recipe by weight, so I ended up using 2.2 eggs
2. cursed at a piping bag full of jam
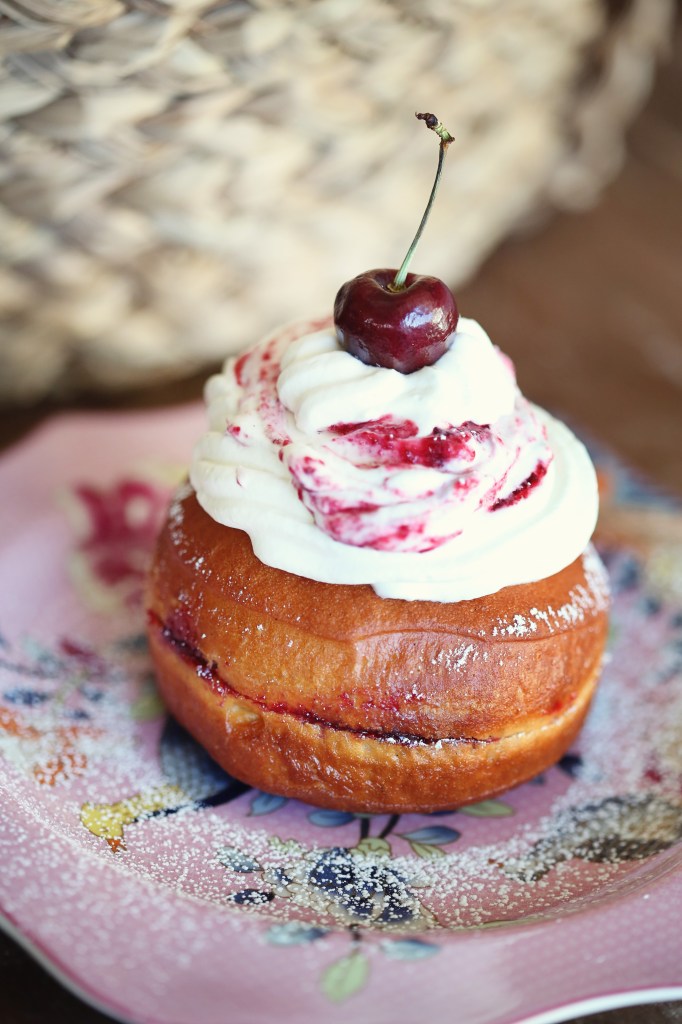
3. still felt really proud, even though they didn’t look like the pretty picture in his Bouchon Bakery Cookbook, they tasted amazing.  The dough itself was astoundingly good in flavor.

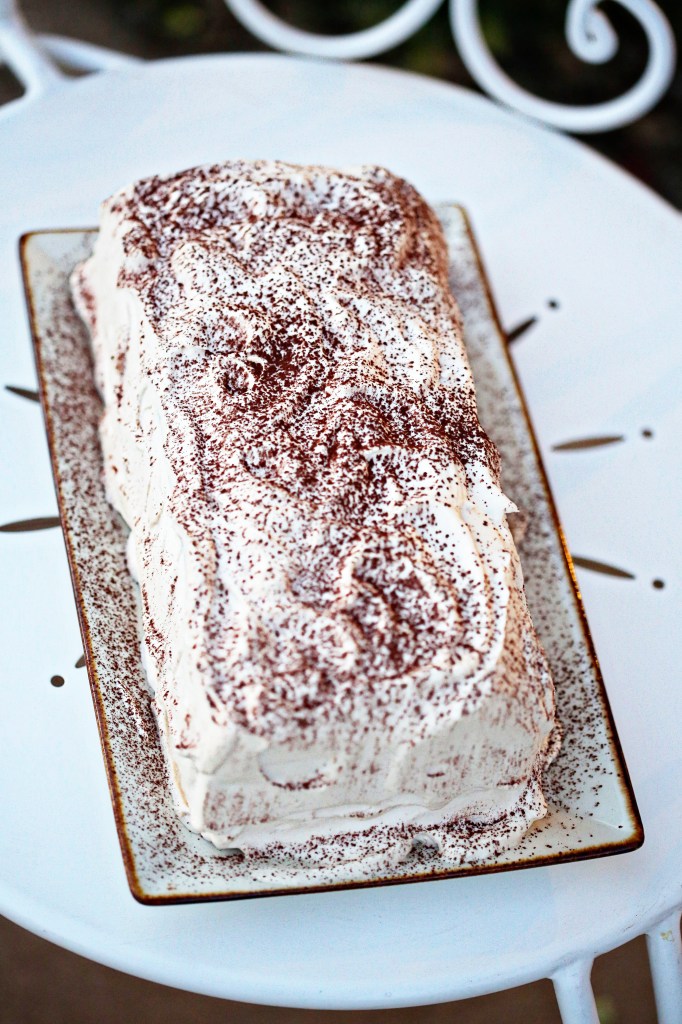
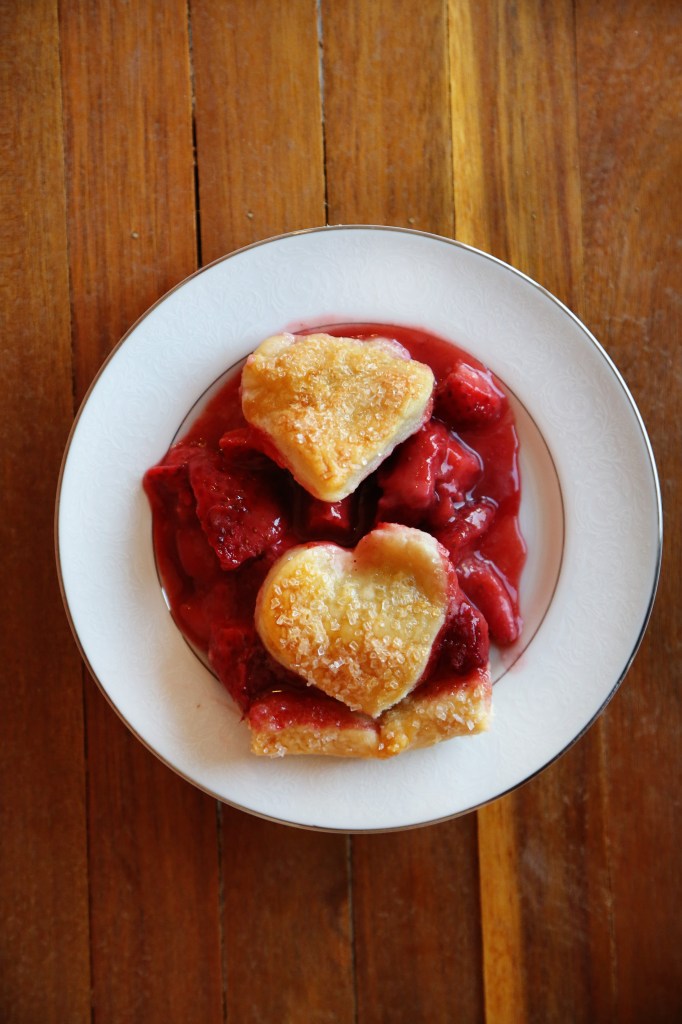
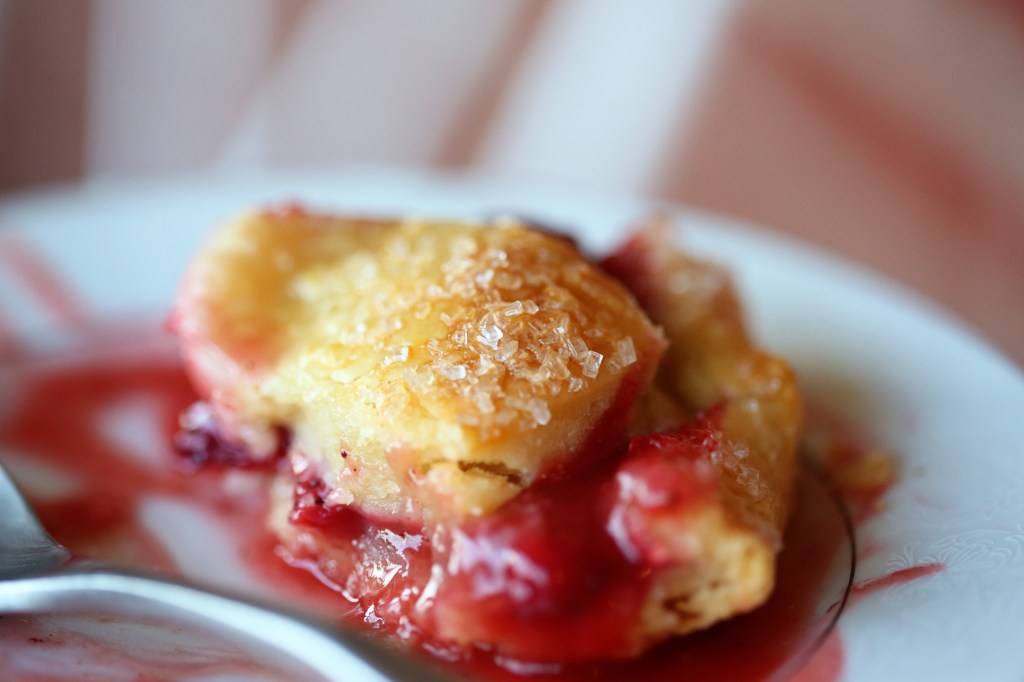
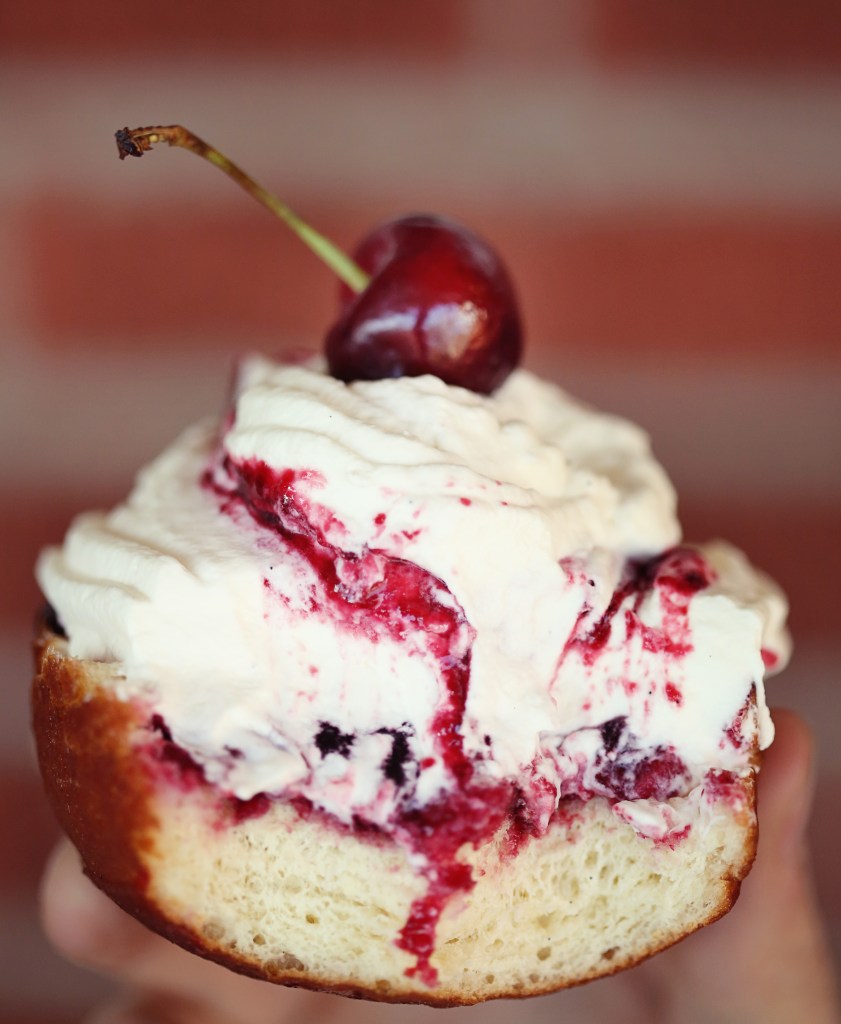
You have to roll with things when they don’t go perfectly.  I’m sure I kneaded the dough too long or my fry oil was too hot, or not hot enough, but the texture of these doughnuts wasn’t as airy as I’d hoped.  They were dense like brioche, almost.  So I had a hard time filling them – in that the jam wouldn’t even go into the doughnut one centimeter – and that’s what led to the cursing and the soul searching, etc.  But my lovely, even-tempered, optimist husband told me that they could be saved and to just assemble them differently.  So, I cut the doughnuts in half, spread the jam I’d made (which was really good) in copious amounts, and piped the vanilla bean-flecked cream on top of the jam and called it a day!

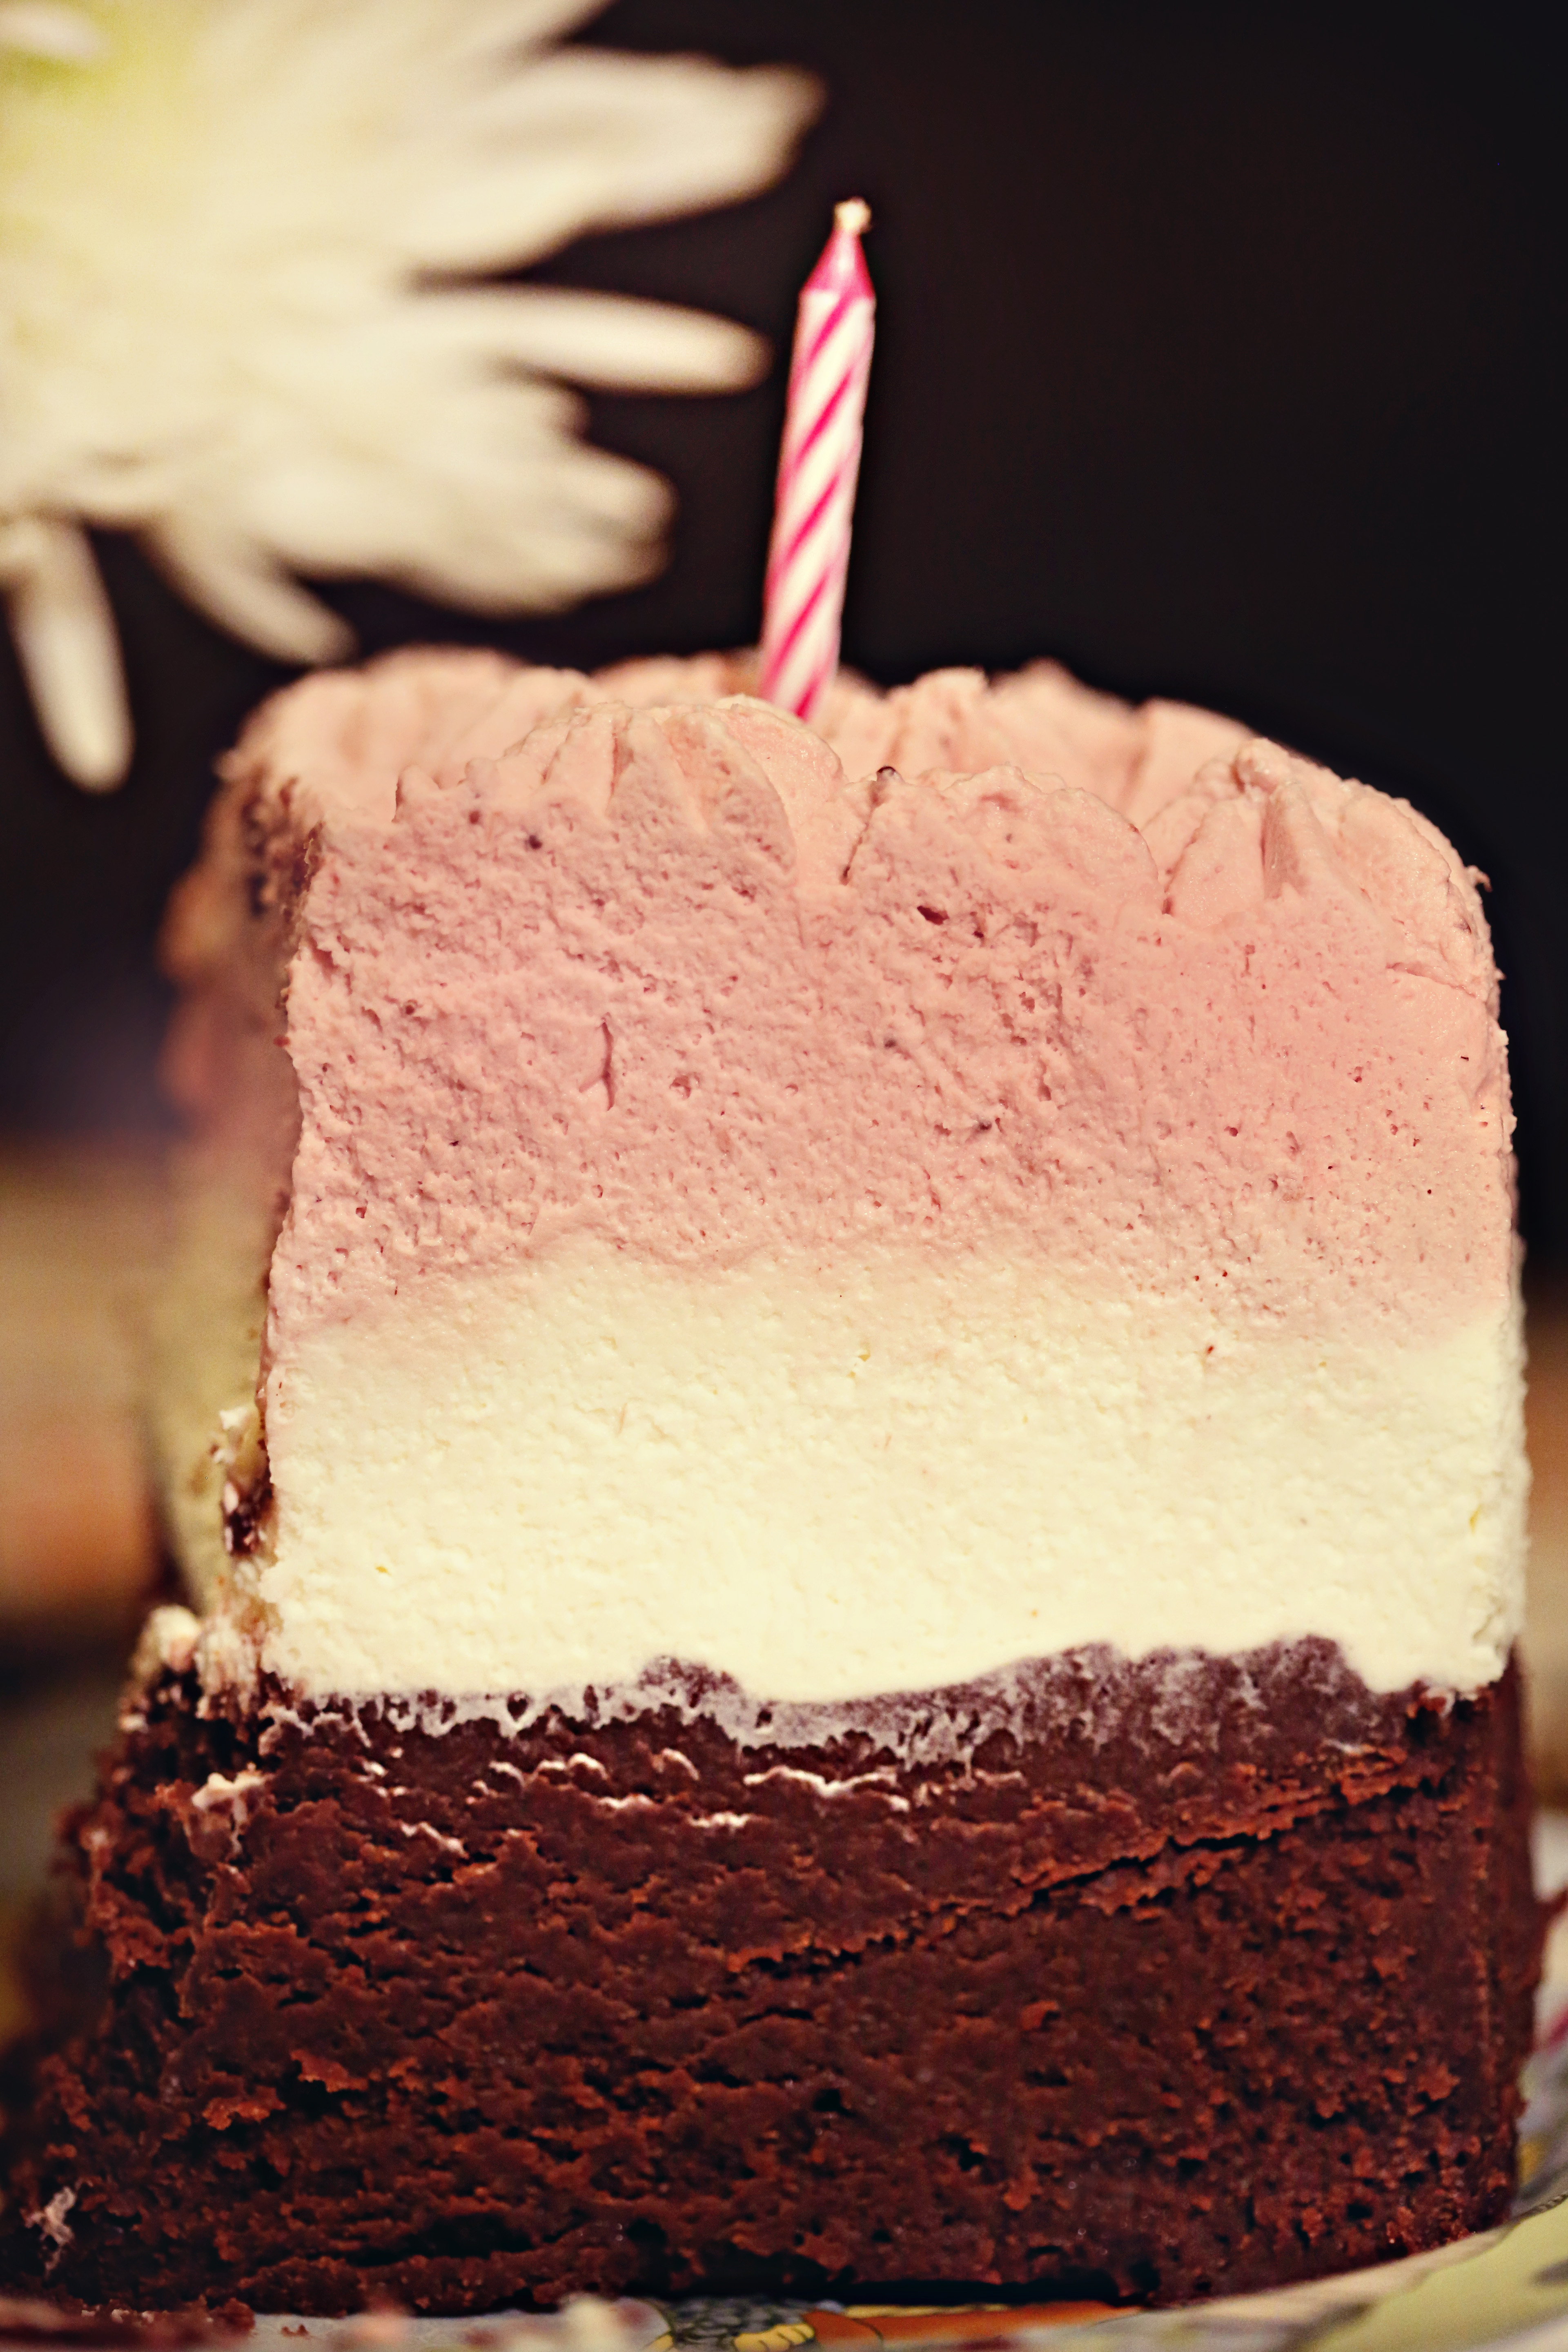
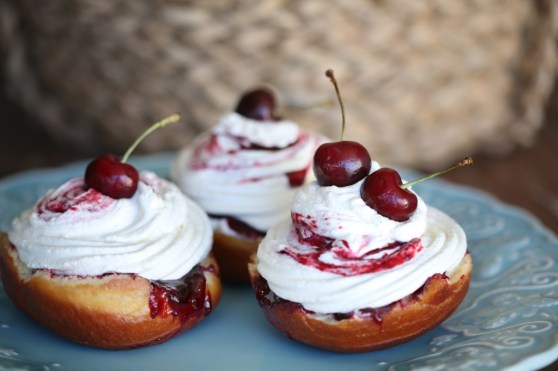
(this photo is what I’d image they’d look like if they were actually filled doughnuts.  The true result is pictured below the recipes)
cherrycreamdonut3

Cherry Cream Doughnuts*

For the dough:

(I’m putting all these ingredients in grams.  Get a scale.  They’re cheap and it’ll make you a better baker.  If you don’t, then you’ll see conversions like this: 212 grams or 3/4 cup+1 1/2 tablespoons. Kill me now.)

518 grams AP flour
10 grams instant yeast
74 grams granulated sugar
9 grams kosher salt
212 grams whole milk (warmed in the microwave for 30 seconds)
2 large eggs or 3 small ones.  I can’t bear to tell you 111 grams of eggs.  But that’s how much he says to use.
9 grams vanilla paste – I also think weighing the vanilla is a little much.  It’s about 1 1/2 teaspoons
5 grams unsalted butter (barely a tablespoon)
Canola oil for deep-frying

Dust a surface on your counter with flour and spray a large bowl with  non stick spray.
Place the flour and yeast in the bowl of a stand mixer fitted with a dough hook and mix for about 15 seconds to distribute the yeast evenly.  Add all the remaining dough ingredients, except the butter and mix on low speed for 4 minutes to incorporate.  Continue to mix on low speed for 20 minutes.  Add the butter and fully incorporate.  Stop and scrape down the sides and push the dough off the hook.  Mix for 5 minutes more.
Run a bowl scraper around the sides and bottom of the bowl to release the dough and turn it out onto the work surface.  Gently pat the dough into a rectangular shape. Stretch the left side of the dough out and fold it over two-thirds of the dough, then stretch and fold it from the right side to the opposite side, as if you were folding a letter.  Repeat the process, working from the bottom and then the top.  Turn the dough over and place it seam side down into your prepared bowl.  Cover with a dish towel and let sit at room temp for 1 hour.
Return the dough to the work surface and gently but firmly pat the dough into a rectangle, pressing any large bubbles to the edges and then out of the dough.  Repeat the stretching and folding process and return the dough to the bowl, seam side down, cover with plastic wrap and refrigerate overnight.
Watch a recorded episode or two of Downton Abbey
Next day: roll out the dough on a lightly floured work surface into an 11 inch circle.  Line a sheet pan with parchment paper and lightly spray the parchment with non stick spray.  Using a 3″ round cookie cutter, cut 8 rounds from the dough, brush off any excess flour and place on the prepared pan.  Cover the baking sheet with plastic wrap or a towel and proof on the counter for 1-11/2 hours, until the doughnuts have doubled in size (they’re big boys) when the dough is pressed with a finger, the impression should remain.
Pour 3 inches of canola oil into a dutch oven or heavy stockpot, deep enough to allow the doughnuts to float freely.  Heat the oil to 335-345 and try your best to keep it in that range.  This is where I faltered.  I think if you have a fry-daddy or something like that, you’ll be better off.
Set a cooling rack over a baking sheet.  Gently lower three doughnuts into the oil and fry for 30 seconds without moving the doughnuts, to allow the dough to set.  Flip the doughnuts over and fry for 5 minutes, flipping them every 30 seconds or so, until they are rich, golden brown.  Transfer to the rack and cook remaining doughnuts in batches of 3.  Let doughnuts cool completely before filling.

For the filling:

I made Keller’s cherry jam.  Honestly, I don’t recommend doing this because the way he says to do it is to buy a cherry puree.  Well.  They don’t sell such things around here.  So I made my own puree.  And then I made jam out of it.  And then when I couldn’t get the dadgum jam inside the doughnuts, I questioned my reason for living and thought, “WHY DIDN’T I JUST BUY JAM?!”  So…my integrity will first tell you to make your own.  Then, my logical mom-side that only has two days a week she has help with the kid says not to waste a few precious hours making jam.  I’m torn.  Here’s a quick recipe, in case you want to have FULL dedication.  This is my own made-up recipe, not Keller’s.  But it was very tangy and lovely, all the same.

Quick Cherry Jam:

1 bag of frozen dark cherries
1/2 cup sugar
squeeze of lemon

Cook all that down in a stainless steel sauce pan and let it bubble over medium-low heat for about 15-20 minutes.  Transfer to a tall cup or deep bowl and blend with an immersion blender.  Strain over a bowl through a fine mesh strainer with a spatula until you’re just left with the cherry skins in the strainer.  Discard the skins and you have a pretty respectable jam in just a few minutes without messing with pectin.

For the whipped cream:

1 1/2 cups heavy cream
2 tablespoons powdered sugar
1 vanilla bean, split and seeds scraped.

Place the cream and sugar and vanilla seeds in a stand mixer fitted with the whisk attachment.  If you don’t have vanilla bean, substitute 1 tsp vanilla paste or extract.  Whisk at medium speed until the cream holds shape, or medium to stiff-peaks.  Don’t over whip.

To assemble:(My way) Cut each donut in half, spread a generous amount of jam on each half and pipe a tall mountain of whipped cream.  Drizzle more jam on top of the mountain and garnish with a cherry. Do assemble Keller’s way, assuming your doughnuts are light, fluffy and full of air pockets, put the jam in a piping bag, fitted with a round tip and stick in the side of the donut and fill slowly until the donut feels heavy.  Top with whipped cream and a cherry.

*recipe adapted from the Bouchon Bakery Cookbook, which is amazing and beautiful in every way.

cherrycreamdonut2

cherrycreamdonut1

Not too shabby.  Remember to have fun this weekend, indulge a bit, but make your indulgences worth every bite!  Check back Monday for a healthy, hearty recipe to start your week off right!

*(recipe adapted from the Bouchon Bakery Cookbook)