Curried Potato Pockets with Lemon Dill Cream

curry potato puffs with dill cream

This was an incredibly flavorful dinner for us last Tuesday night.  It was one of those meals that came from a lack of motivation to go to the store.  I had two large potatoes, an onion and some puff pastry and I knew – there’s a meal there, somewhere.  With just a little prep, I had a meal on the table in about an hour.  I made these with left-over pie crust, as well, but everyone, including Olive, preferred the ones with puff pastry.  Buttery and flaky with that smoky curry spice went exceptionally well with the tang of the yogurt and dill.

This meal included one of those moments where I wasn’t giving Olive any sort of chance and declared that she wouldn’t like the yogurt sauce and so I didn’t offer her any.  After we had eaten a few bites, she said, “I want the sauce?!” and so I put some on her plate and she ate it all!  Yet another lesson in giving your kids a chance to prove you wrong. You never know when they’ll surprise you!

curried potato puffs

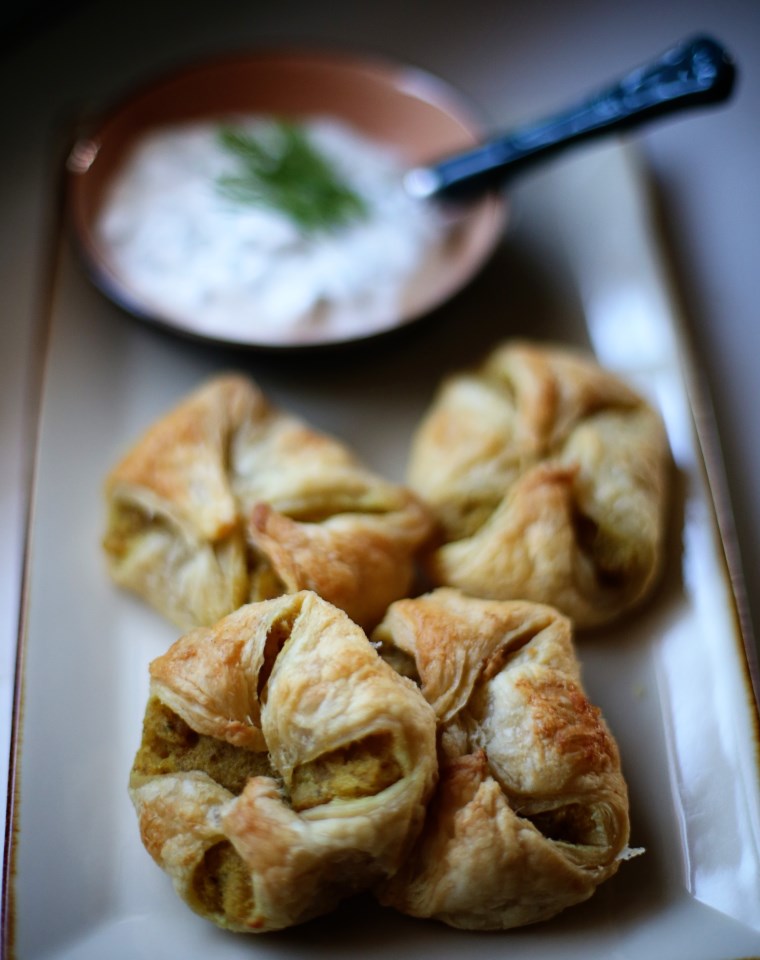
Curry Potato Pockets with Lemon Dill Cream
makes 9 puff pockets with plenty of filling to spare

2 medium russet potatoes, cleaned, skinned and diced small
1 large yellow onion, diced small
4 tbs butter
1 tbs curry powder
1/2 tsp ground cumin
salt and pepper to taste
1 sheet frozen puff pastry, thawed and cut into 9 squares
2 tbs cream for brushing the pastry
1/2 cup plain, full fat yogurt
squeeze of one lemon
2 tbs chopped fresh dill
salt to taste

In a large skillet over medium heat, melt the butter and once it starts to froth, add in the onion and potato.  Stir around until the potato begins to soften and then cover with a lid and cook for about 10 minutes.  Remove the lid and add in the curry, cumin and salt and pepper.  Continue cooking over low heat until the potatoes are completely soft.  Remove mixture from stove and set aside.

Set your oven at 400F.  Mash the potato/onion mixture in a bowl until mostly smooth and adjust the seasoning as desired.

Cut the puff pastry into 9 squares and put a heaping tablespoon of filling in the middle of each square.  Dip your finger in the cream and dab along the edges and pinch/fold them together into little letters – really, however you pinch and fold is up to you, as long as they have a fighting chance of staying closed while baking! Place on a greased cookie sheet and repeat until all the squares are filled.  Brush the tops with the remaining cream and bake for about 30 minutes, or until golden brown.

For the yogurt dipping sauce: simply chop the dill and squeeze the lemon into the yogurt and stir till combined.  Adjust with a little salt and serve along side the pastries.  Personally, I don’t like this sauce on its own, but with the curry pockets, it’s just an amazing balance of flavors.

Enjoy!

Spicy Roasted Chickpeas

Spicy Roasted Chickpeas
I‘ve seen this recipe around the Pinterest/Facebook/Blog world for a while, now and the first time I tried it, it was one of those moments when I bitterly complained that what I made didn’t look at ALL like the picture.  Ever feel that way?  I think the second time around, without a recipe, I just followed my nose and used the spices I like and let them roast much longer and I had SUCCESS!  They turned out super crunchy, wonderfully spiced and a great little starter for our meal, which Olive claimed as the favorite part of her meal and kept saying, “Mes, hickpeas?”  over and over and over.  I really think she ate about a half cup.  I wouldn’t recommend that to other moms, but that’s what happened and since they were part of the meal, I let it slide.  But yeah, they eat like a snack and I would recommend this to anyone for a healthier option for a party snack, during a movie, etc.  And you can have fun with whatever spice blend you want!  Happy Monday and I hope everyone had a wonderful weekend!

Spicy Roasted Chickpeas

2 cans chickpeas, drained and rinsed
2 tbs olive oil
1/2 tsp each of:
salt, pepper, onion powder, paprika
a sprinkle of garlic powder

Preheat the oven to 375. Spread out the drained, rinsed chickpeas on paper towels and dry those suckers out WELL.  Place the chickpeas on a rimmed baking sheet and add the olive oil.  Mess them around with your hands till every last wee pea is coated in oil.  Sprinkle the spice blend over the peas and roll them all around till they are all coated.  Place the chickpeas in the oven for 25-35 minutes until they are golden and when the pan is shaken, they sound hard and roll around easy.

Let them cool for a bit before transferring them to a bowl, just because you don’t want to enthusiastically grab a handful of glowing-hot peas.

Serve at the beginning of the meal or for a snack and enjoy!

Zucchini Bruschetta – Hold Off on Cardigans a Little Longer…

Zucchini Bruschetta detail

The summer seems to be winding down, although I wouldn’t be surprised if we had 100 degree days well into October.  I’m getting in that cozy fall mood, already, though, and it’s dangerous because I want to wear cardigans and listen to jazz and eat pumpkin flavored things and it’s still 98 and muggy outside.  Sometimes if the summer goes on a little too long, I start protesting by wearing my sweaters, regardless of the temp.  I consider it my adult fussypants-ness.  Everyone’s got a cross to bear – mine is shorts-weather.

This recipe keeps me mildly okay with the fact that it’s still summer.  It’s so fresh and happy and has such bright, bold flavors and colors that it makes the perfect appetizer when your friends are keeping you company in the kitchen as you finish roasting the pig…or whatever it is you cook for your friends.  This is also a great way to use up the only thing you got to grow in your garden, this year.  What is it about zucchini?  Why does it:
1. Always grow
2. Grows as big as a Great Dane
3. Give you more yield than any one family could ever consume?

Zucchini gives false hope.  “Hey, you can grow me!  Now let’s see how you do with carrots!  Go on!  I want to see you try!  Loser.”

Or that’s how my zucchini plant makes ME feel…

zucchini bruschetta appetizers

Zucchini and Olive Bruschetta*
serves 6-8 appetizer sized portions

1 baguette, cut into 1/4″ slices
2 tbs olive oil, plus more for drizzling
4 small zucchini (about 12 ounces)
1 large avocado (ripe, duh)
zest and juice from one lemon
12 large mint leaves, chopped
1/3 cup toasted almonds or any nut, really
1/3 cup chopped catamala olives, or whatever floats your boat
2 ounces pecorino romano, parmesan or other firm cheese you enjoy

Heat oven to 375°F and arrange a rack in the middle.  Slice zucchini lengthwise into 1/3” slices and then stack the slices and cut into 1/3 “ matchsticks lengthwise. Once all the zucchini are sliced, cut them lengthwise into 1” pieces.

Place the zucchini in a colander and toss with ½ teaspoon of kosher salt, and set aside to drain for 20 minutes. Meanwhile, brush the bread on both sides with olive oil. Place on a baking sheet and bake until crusty and brown, about 10 to 12 minutes. Turn once halfway through to toast evenly. Remove and cool.

Peel and pit avocado then cut into 1/2-inch dice. Place in a medium bowl and toss with lemon juice and zest. Roughly chop mint leaves and add to avocados.

Line a large plate with paper towels and spread out salted zucchini. Lay another layer of paper towels on top and pat off excess moisture. Add to the avocado bowl along with the almonds and olives and mix thoroughly. Taste and adjust salt to your liking.

Top each crostini with a heaping spoonful of the zucchini mixture. Drizzle over olive oil and fresh cracked pepper. Using a peeler thinly shave cheese and top each crostini with a few slices and serve.

*recipe adapted from aidamollenkamp.com

Caramelized Onion Dip

pan fried onion dip

Every summer, certain things tend to become a trend.  We nearly always have an official corn dish, a certain way we assemble a burger from the grill, a particular drink we make over and over, or a particular ice cream flavor we bring to parties. It’s so much fun looking forward to the hot summer months by way of what we’ll be cooking.  It really helps utilize what’s in season (think: guacamole, caprese salad from REAL tomatoes and backyard basil, etc) and this summer, I think I’ve found the official dip/spread!

This dip would be amazing as a burger spread, a dip for tortilla chips, crackers, etc.  A wonderful topping for baked potatoes, a dip for fries – the options are endless.  I’ve always been a fan of the tubs of French Onion dip in the grocery stores, but this homemade version blows any of the store bought options out of the water.  It has a sweet smokiness from the caramelized onions, a super creaminess from the addition of the cream cheese and my addition, a tablespoon of red wine vinegar, really makes the flavors come alive and gives it a bite that cuts through all the richness.  It’s perfect.  I also decided to spin all the ingredients in my food processor a few times because I liked the idea of the onions being finely chopped instead of left in long slivers.  I think for me, it’s a more pleasing texture as a dip.

However you decide to make it, just promise me you’ll try this one at your next BBQ.

onion dip


Caramelized Onion Dip*
makes about 2 cups

2 large yellow onions
4 tablespoons unsalted butter
1/4 cup vegetable oil
1/4 teaspoon ground cayenne pepper
1 tbs red wine vinegar (really, any vinegar you have on hand will do just fine!)
1 teaspoon kosher salt
1/2 teaspoon freshly ground black pepper
4 ounces cream cheese, room temperature
1/2 cup sour cream
1/2 cup good mayonnaise (we use Hellman’s original)

Cut up the onions into very thin slices.  Place in a large skillet with the butter, vegetable oil, salt and cayenne and let it cook over medium low heat until the onions turn golden, and caramelize, about 30 minutes.  You really want to err on the side of TOO caramelized instead of not enough.  The flavors get so intense as the onions break down.  Let the onions cool and set aside.

Add the vinegar, salt and pepper, cream cheese, sour cream and mayo to your food processor and pulse a few times to combine.  Then add the onions and pulse until fully incorporated.  If you don’t have a food processor, just dice your onions before you cook them, and then take all the ingredients to a bowl or mixer and mix until smooth.

Adjust the seasonings and serve with…anything!

*recipe adapted from this site, who took the recipe from The Barefoot Contessa cookbook.


Homemade Salted Butter with Fresh Thyme

butter002

Since we found Pereira Pastures Dairy a couple months ago, I suddenly had access to raw cream and milk, which fulfills my dream of having a milk man.  It doesn’t arrive on my porch in cute, glass bottles, but it does come from a friendly man in Abernathy who does his best every day with the land and beautiful Jersey cows God gave him to make the best product he can.  He treats those cows so well and it shows in his product.  I ordered a couple bottles of cream over the past two weeks and I’m telling you, this cream is legit.  There was only a half inch at the bottom of the bottle where the cream had separated from the rest of the milk.  THAT much raw cream just screams to be made into butter.  So, after being inspired by a story in the May issue of Martha Stewart Living magazine about Diane St. Clair, who makes butter for the French Laundry and Per Se, I decided to make my own.  I went a simpler route than the recipe featured in the magazine and just basically whipped the cream into oblivion until it separated into buttermilk and butter.  I then kneaded it, washed it (washing it makes it last longer) added some salt and sprigs of fresh thyme from my “garden” and voila – I had made my very own compound raw butter.

Making compound butters (essentially butter with stuff mixed in to flavor it) is really easy.  When the butter is at room temp, simply mix in herbs, seasonings, whatever you want and then wrap it up in plastic wrap and chill until firm.  Then, like my salted thyme butter, use it on fish or chicken or just bread for something really wonderful.  Sure, buying butter is so much easier.  And less expensive.  And less messy and time consuming. However, I think doing things from scratch offers a natural inclination for satisfaction and moderation that you just can’t buy.  How much slower you’ll eat butter you made than stuff you can scoop out of a tub!

raw butter001


First, dump cream (I used two cups) into the bowl of a stand mixer fitted with a paddle attachment.  Then, whip on medium high until whipped cream forms.  Then, really, just let that sucker whip until it suddenly separates.  This process can take anywhere from 10-15 minutes of solid whipping.  You should have something that looks like this:

butter001


Strain the buttermilk out and save it to make pancakes or biscuits!

butter004


Then, gather the butter solids and knead them in your hands under running water, squeezing the excess buttermilk out.  Then, you can either leave it alone for plain butter, or mix in salt and herbs, like I did here:

butter003


Then, transfer to a sheet of plastic wrap, form into a log and refrigerate until firm.  Or leave it out on the counter if you’ll be using it right away.

butter005


And for a simple approach, just slice it and eat it on a cracker 🙂

raw butter001

Homemade Goat Cheese

pure goat cheese

Good Monday Morning to you all!  I’ve been meaning to blog about homemade goat cheese for several weeks, now.  I stumbled upon this process because I’d bought a quart of goat’s milk when Olive was starting to wean and I read or heard or saw somewhere that goat’s milk digests easier than cow’s milk, so I figured I’d give it a shot.  I naturally tasted it before I gave it to her.  It tasted like liquid goat cheese.  I wouldn’t personally want to drink that, but I let her try it in the name of not pushing my personal tastes onto my child.  She wouldn’t take more than one sip.  Actually cried (this was around 9 months) so I bought a quart of whole cow’s milk instead and we haven’t looked back.  So I turned the goat’s milk into a nice, creamy 4 ounce log of goat cheese with garlic and herbs.  It was delicious.

I guess I’ll take this time to tell you that I don’t believe in eating something just because it has health benefits.  Eating grass straight from the yard is probably beneficial in some way, but that doesn’t mean I’m going to do it.  I believe things should have flavor, seasoning, and should taste wonderful in addition to however many antioxidants they might have.  So this, I suppose, ties in to the way I have always cooked for Olive.  I haven’t ever given her something without seasoning.  From 6 months, whatever she’s eaten has been seasoned with something (yes, less salt than I’d prefer, don’t worry.) And now that she’s eating from the table, it’s game ON.  Welcome to the wonderful world of food, Ollie.  We have chocolate!

Making goat cheese is easier than making bread, but the two go together quite nicely.  I don’t personally think that it’s easier or cheaper than buying goat cheese at the store.  I think a quart of goat’s milk is comparable to a cheap log of goat cheese.  However, it’s fun to do stuff from scratch, it’s creamier, tastier and gives you a sense of self satisfaction that you did something the old way.  Isn’t that reason enough to at least give it a try?


DIY Goat Cheese – adapted from Serious Eats
makes one, 4 oz log of goat cheese

1 quart of full fat goat’s milk (I bought this brand)
1/4 cup freshly squeezed lemon juice (from one large lemon, maybe two)
1/2 clove freshly grated garlic
a few pinches of salt
Herbs – whatever sounds good to you (rosemary, chives, herbs de Provence, non herbs like honey, chopped dried fruits, etc.  Possibilities are endless.  If you use something sweet, omit the garlic)

Fill a medium saucepan with goat’s milk.  Heat gradually until it reaches 180F.  Watch closely.  It shouldn’t take more than 15 minutes.  A candy thermometer works nice in this situation, but I used a probe meat thermometer the second time because it was more accurate (pictured here was my first attempt.)
cooking goat milk

Once it hits the magical temperature, remove from heat and stir in lemon juice. Let stand until milk starts to curdle, about 20 seconds. Don’t expect curdles, like cottage cheese curdles. Slight clumping will occur, but nothing too drastic. You can add a few extra droplets if nothing is actually happening.

Line a colander with a thin, flour sack kitchen towel.  Or lots and lots of layers of cheese cloth that you probably don’t have on hand.  Most of you have a thin kitchen towel that you can almost see through. As long as there aren’t holes, use it.  It’s efficient, it works great and just remember to wash it quickly and don’t throw it in the used-towel bin for a week all wadded up in a sweaty goat cheese smelling ball.  Like I did.

Set your lined colander over a deep bowl and ladle in the milk.  It will seem like it’s all seeping through, but don’t fret. Tie up the ends of the towel and suspend over the bowl and let it drain for about 2 hours.
straining goats milk

Transfer the cheese to a bowl and mix in seasonings to taste.  The first time I did it, I added the grated garlic, salt and about a teaspoon of herbs de Provence.  The second time, I roasted my garlic and added in olive oil.  SO GOOD. This time, I left out the garlic and stirred in some raw honey and a little salt and used it in a salad recipe from the Bonne Femme cookbook.  Amazing results.  Have fun with it!

After you mix in your flavors, if you want to be able to cut it or have some sort of shape, wrap it up in plastic wrap and leave in the fridge for a couple hours to let it firm up.  (see below) then you can cut it for bread or whatever you like.

goat cheese with baguette and raw honey


With just bread and extra honey it’s basically a dessert!

goat cheese honey salad


On top of baguette slices, broiled and then drizzled with extra honey.  Set on top of a mixed greens salad with toasted pine nuts and a sherry vinaigrette.  An excellent lunch!