Chocolate Covered Espresso Brownies

Chocolate Covered Espresso Brownies

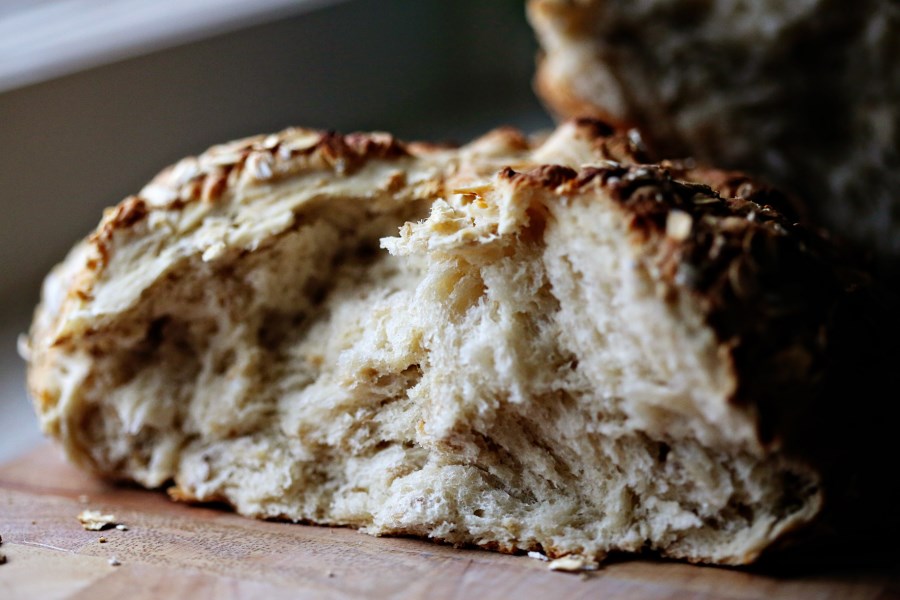
I was paid $25 to make this recipe.  Well, technically,  I was paid about $12.50, because Matt was paid the other half to make a loaf of his awesome bread.  Why?  Because an old co worker from his previous job had a Christmas party to go to and a twenty-five dollar limit to spend on a gift.  So he contacted us and said, “Make a couple things.”  The fun thing about these office party gift-exchanges is that the person whose gift got the most steals, or trades in the game, wins $100.

Gary won.  🙂 So I guess you could say these are $75 brownies.  Or $37.50.   Or probably less, because as I well know, it was most certainly Matt’s bread that won the contest.  Hey, Matt – guess what?  You won 1st place for your bread.  Only this time, instead of a $6 check like at the fair, some other guy got $100.  That’s better, right? 😉

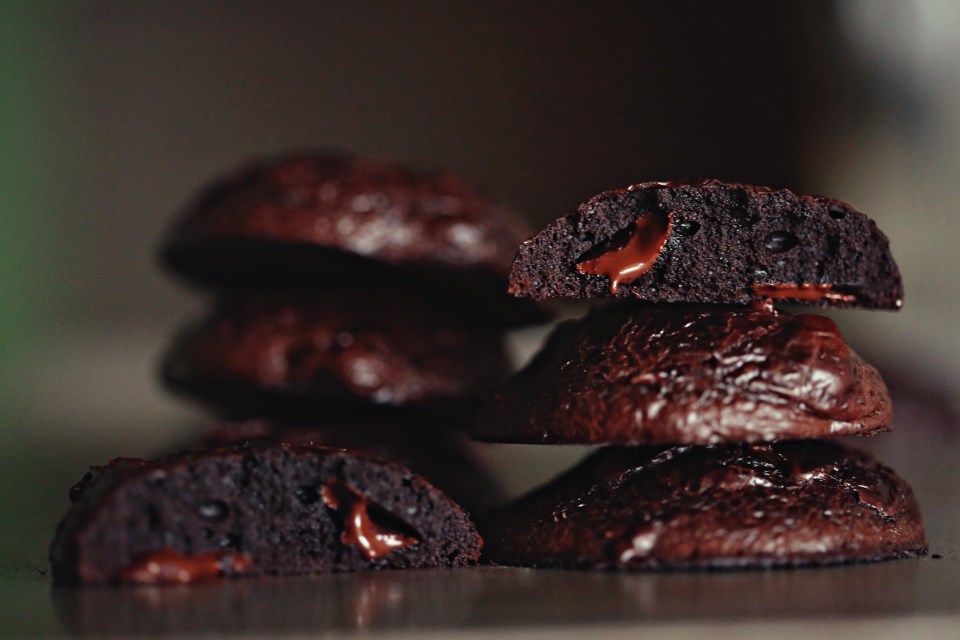
The brownies were indeed, great.  I followed a recipe from Fat Witch Brownies (a most awesome brownie book) for an espresso brownie, and then I thought, “What could make this more show-worthy for a gift exchange?”  Covering it in a rich chocolate ganache!  Then, with some sprinkles of cocoa nibs, these brownies become a huge version of a chocolate-covered espresso bean, which in my opinion, is the ultimate adult candy.  They’re like one big “congratulations” for getting older.

And so are these brownies!  Enjoy!

Dark Chocolate Covered Espresso Brownies

Chocolate Covered Espresso Brownies*
worth $37.50

7 tablespoons unsalted butter
1/2 cup bittersweet chocolate chips
2 large eggs
3/4 cup granulated sugar
1 teaspoon vanilla extract
2 tablespoons instant espresso powder
1 tablespoon hot water
1 cup AP flour
1/2 teaspoon salt
1 recipe dark chocolate ganache (see below)
cocoa nibs or crushed up coffee beans for sprinkling

Grease a 9×9″ baking dish with butter.  Dust with flour.  Or use that awesome flour spray.  Preheat oven to 350F.

Melt butter and chocolate in a microwave safe bowl at 30 second increments, stirring with a rubber spatula after each time, until smooth and melted.

Cream the eggs, sugar, and vanilla in a large bowl until smooth, then add the cooled chocolate mixture and continue beating until incorporated.

In a small dish, mix the espresso powder with the hot water until dissolved.  Add it to the chocolate mixture and continue to beat until well combined.

Measure the flour and salt and then sift together directly into the batter.  Mix the batter gently until well combined.

Spread the batter evenly in the prepared pan and bake for 25 minutes or until a toothpick inserted in the center comes out clean.

Remove from the oven and cool on a rack for 1 hour.  Make your ganache while the brownies cool.  After they cool, cut them into 16 squares and gently remove and place on a drying rack, or on sheets of waxed or parchment paper.

Dark Chocolate Ganache*
makes 1 cup of goodness from the heavens

1/2 cup bittersweet chocolate chips
1/2 cup heavy cream

Over medium heat, place the heavy cream in a saucepan and bring to a boil.  Remove the saucepan from the heat immediately after it has just started to boil.  Pour the hot cream over the chocolate chips and let them sit for a minute.  Then, with a rubber spatula, gently begin mixing the chocolate in tiny circles in the center of the bowl.  You will think it will never incorporate.  Keep mixing.  You will think your cream wasn’t hot enough.  Keep mixing.  Chocolate demands patience.  Then, just like magic, the chocolate will deepen its color instantly and you will only have a few more stirs, incorporating the sides and scooping down to the bottom of the bowl, to end up with one, big, glossy, gorgeous bowl of thick, dark chocolate ganache.  Take this and spread over the tops and sides of your cut brownies and sprinkle the tops of your brownies with the nibs or crushed beans and let it cool till the ganache firms up.

*both recipes adapted only very slightly from Fat Witch Brownies.  Go buy this book for someone for Christmas.

EAT! ENJOY!

Flourless Double Chocolate Cookies

Double Chocolate Flourless Cookies
I’m going to post about chocolate, again on Saturday, most likely.  Because a friend from Matt’s old job just paid us $25 to bake him something for their company Christmas party.  We thought it would be last Friday, so I made these flourless chocolate cookies.  You can win any gift exchange or White Elephant situation with chocolate.  Unfortunately (but fortunately) the party was cancelled due to ice and so I had to make a different chocolate indulgence today.  It was hard, but I got through it.

These cold days beckon rich, dark, warm chocolate.  One of my favorite things in the cooking world is the moment when you’re stirring hot cream into chocolate chips and you think it’s never going to melt the chocolate, but then suddenly, a rich pool of blackness forms in the center of the bowl and in about ten more seconds, the whole bowl is transformed into ganache.  This happened, today, as I was making the ganache to go on top of my little brownie creation (to be posted this weekend!) and I found myself grinning like an idiot.  Transforming something good into something even better is one of the perks of working with chocolate.  It never fails to please.

Like these little cookie gems!  Flourless, fudgy, dense, chewy and melty bits of chocolate throughout.  My one and only friend with celiac disease will be so happy 🙂 You’re welcome, Heather.  I can’t imagine a world without flour, but if I had to, these cookies would be repeat visitors to my kitchen, for sure.

Flourless Chocolate Cookies

Flourless Double Chocolate Cookies*

makes about 2 dozen
2 1/4 cups confectioners’ sugar
1/4 teaspoon salt
1 teaspoon espresso powder, optional but good
1 cup Dutch process cocoa powder
3 large egg whites
2 teaspoons vanilla extract

Preheat the oven to 350°F. Lightly grease two baking sheets. Stir together all of the ingredients till smooth. This is hard.  The batter gets so gluey, you will be certain you have made a mistake.  You haven’t.  Just keep stirring.  If I could do it over, again, I’d use a stand mixer. Scrape the bottom and sides of the bowl, and stir again till smooth.
Drop the batter-like dough onto the prepared baking sheets by heaping tablespoons.
Bake the cookies for 8 minutes; they should spread, although mine didn’t much, become somewhat shiny, and develop faintly crackly tops.

Remove the cookies from the oven, and allow them to cool on the pan.

*recipe from King Arthur Flour

S’mores Pie

S'mores Pie

I had a wonderful Thanksgiving and I hope you did, too!  I got to spend it with my whole family!  Both my brothers came down with their children and with them and my parents, there were 16 of us bedding down in our old childhood home! I got to see my grandmother and my sweet Aunt Mary, too!  I really don’t think I’ve seen that much family in one weekend in several years. It was good for the soul and I don’t feel like I even overate as much as I usually do, which enabled me to enjoy the heck out of this pie I created on Friday night.

S’mores pie!  When we showed Olive s’mores for the first time this summer, we made them with dark chocolate.  I loved the balance the dark chocolate gave to the super sweet marshmallow and graham cracker.  So when thinking of a pie to make for Thanksgiving, I thought of doing the darkest chocolate pie I knew how to do and topping it with my favorite meringue and then torch the heck out of the top.

Best.  Chocolate Pie. Ever.

Seriously, if you want to win some kind of chocolate pie award, this is your pie.  Make it with a traditional crust and serve it with soft whipped cream and that is all you’ll need for ultimate bragging rights.  I nearly skipped out on the meringue, but I wanted that dramatic torched effect so I went with it.  I think if I were to do this pie over, I would give it more s’moresy flavor by just dumping a bunch of marshmallows on top and burning them to a crisp.  Because I’m that s’mores gal – the one who likes to eat slightly sweet bits of char instead of marshmallows.  I’d say most people aren’t like this or don’t have a coal deficiency or whatever, so I erred on the side of not-too-burnt.  The results were great and I will definitely make this pie again at Christmas!

torching the smores pie helping torch the pie
My nephew, Landon, helped me torch it!

aerial s'mores pie

S’mores Pie

2 eggs, beaten
1-5 ounce can of evaporated milk
1 cup white sugar
1/4 cup brown sugar
2 TBS cocoa powder
1 TBS instant coffee granules
3.5 ounces dark chocolate, chopped
1/4 cup butter
2 TBS corn meal
For the crust:
1 and a half packages of graham crackers, crushed fine (12 large)
2 TBS sugar
4 TBS butter, melted
2 TBS water
pinch of salt
Preheat oven to 350 degrees.  Combine the crushed graham crackers, sugar, salt and butter until it’s well combined.  If it doesn’t hold together when you press it between your fingers, add the tablespoons of water.  Press into a 9″ pie plate and set aside.
Combine the eggs, evaporated milk and sugars until smooth.  Put the cocoa powder and instant coffee in a small cup and add a tablespoon of water and whip it into a paste.  Whisk this paste into the egg/milk mixture.  Melt the dark chocolate and butter together in a microwave at 30 second increments, stirring after each time until completely smooth and glossy.  Add the chocolate and butter to the egg mixture and then whisk in the corn meal until smooth.
Pour into the pie shell and place your pie on a rimmed baking sheet and bake for 45 minutes to an hour, until the middle doesn’t jiggle anymore.  Let the pie come to room temp before making the meringue!
For the meringue:
5 egg whites, room temp (room temp is important)
1 cup of sugar
1/3 cup water
Place the sugar and water in a small saucepan and bring to a gentle boil till the temp reaches 250 on a candy thermometer.  While it’s boiling, put the egg whites in a mixer at medium speed and beat with a pinch of salt until soft peaks form.  When the sugar is up to temp, remove from heat and while the mixer is going on medium, drizzle the syrup in a very thin stream until completely incorporated and then increase speed to high and whip until the bowl cools down.  This takes a while so be patient.
Assemble!
Dump ALL the meringue on top of your ROOM TEMP pie and with a blow torch (such a great addition to any kitchen) or a dainty creme brulee torch (not as fun) torch the meringue until evenly browned.  If you have neither, you can brown it in the oven under the broiler but you have to be VIGILANT as to not burn the meringue.  A broiler works scary fast.

A Blueberry Morning

Blueberry Muffins


It’s super cold – winter blew in last night leaving everything gray and bone-chillingly cold.  We are having a lazy day inside and all I can think about are these warm blueberry muffins with cold butter and hot blueberry syrup soaking into every crumb.  My mom made this combination quite frequently for us, growing up.  I associate them with cold, Sunday mornings. We needed something rather fast while getting ready for church, yet warming at the same time.  Something Mom could pop in the oven and then have time to get ready, herself!  She would boil the blueberry liquid and add a little sugar to make a wonderful blueberry syrup to pour on top of the muffins.  That was always my favorite part.  Just HOW blue can I make this muffin?

So when I saw a can of wild Maine blueberries in the grocery store, my mind went instantly to these muffins and I had to make them for us.  Mom’s were better, but that’s to be expected 🙂  Stay warm, today, Lubbock!

Blueberry Muffins with Butter Blueberry Muffins with Blueberry Syrup

Blueberry Muffins with Blueberry Syrup*
makes 12-16 muffins

12 1/2 ounces cake flour
1 teaspoon baking soda
2 teaspoons baking powder
Heavy pinch salt
1 cup sugar
1/2 cup vegetable oil
1 egg
1 cup yogurt
1 1/2 cups blueberries (fresh, frozen or I used a can of blueberries packed in water – that part is important if you use canned)

Preheat the oven to 375F. Line 16 muffin tins with papers and spray the papers with non stick spray.  Whisk the cake flour, baking soda, powder and salt in a large bowl.  In another bowl, whisk the sugar, oil, egg and yogurt until smooth.  Add the dry ingredients and stir just until combined.  Reserve the juice that comes in the can of blueberries and put it on the stove in a small saucepan with 1/4 cup sugar and let it come to a boil.  Reduce the heat and simmer during the baking time of the muffins.

Fold the blueberries into the batter and divide among the muffin cups.  Bake for 20-25 minutes, until the tops are golden brown.  Remove and remove from the pan, letting them cool upside down for about 10 minutes.  Split, add a copious amount of salted butter and drown in blueberry syrup.  Cheers.

*adapted from Alton Brown’s Blueberry muffin recipe

Happy Halloween!

hallow010


These cute little pumpkin tarts took about 30 minutes.  I had leftover pie crust in the fridge, and I only had enough to make three of these little guys.  But that’s all we needed, anyway!  Today was fun – lots of fall-ish events, the festival at the church, trick-or-treating at our friends house, having a greasy bacon cheese burger at Spanky’s – okay, so that last part wasn’t necessarily fall, but I associate that place with football season!

These little tarts could be made with any shape cookie cutter and of course, after tonight, jack-o-lanterns will be out! So use a leaf or circle and cut out some cute shapes – whatever you do, these are seriously fun and delicious!
hallow014 hallow011 hallow013

Pumpkin Tarts

half a recipe of pie crust (or just store bought – one circle)
1/2 cup pure pumpkin puree
3 tbs brown sugar
1/2 tsp pumpkin pie spice

Mix the puree with the sugar and spice and set aside.  Roll out your dough, cut into shapes and run your finger dipped in water around the edge of the bottom layer.  Place one to two tablespoons of filling on the bottom layer (will depend how big your shapes are).  Slightly roll out the top layer a little more than the bottom, cut out designs that you wish, and place on top of the filled bottom layer, pressing down the edges.  Brush melted butter on the tops of the tarts and sprinkle with coarse sugar, or any kind of sprinkles!  Bake at 400 for 20 minutes, or until golden brown around the edges.

hallow012 hallow017


Sweet Potato Pie with Butter Rum Sauce

7G9A3567

Last weekend we were invited to our friends’ house for a dinner party.  The theme was Cajun and so Matt made a humongous pot of gumbo, which has been many meals this week and is very good, and I made this sweet potato pie that was obliterated by the end of the night and I sadly didn’t have any leftovers for breakfast.  I’m actually glad it got gobbled up because that’s instant portion control. I shared one slice of this pie with Olive, she ate most of it, and I enjoyed every bit.   I had a lady at church last night say, “I’d love to live in your house so that I could eat your food, but then I’d be 7,000 pounds.”  I’m not exactly sure this blog is conveying the truth if that’s the overall sentiment!   I’m also not sure I’m conveying properly the amounts of these foods I DON’T eat.  I made three batches of The Cinnamon Rolls over the course of two weeks and I think overall, I ate two whole cinnamon rolls, maybe three.  But it wasn’t a couple each batch, or “the whole pan” like a lot of people swear they’d eat if they made it themselves at home.  I don’t think people give themselves enough credit.  Of course you wouldn’t eat the whole pan.  How on earth would that be enjoyable to have a stomach ache because of something you baked?  Maybe that’s the whole problem with portion control with indulgent foods.  People get a feeling like they need to “eat the whole thing” to pretend like it never happened, to remove it from sight and further temptation.  They feel “bad” eating it in the first place and so why not eat it badly?!  Whatever the reason, it’s a wrong mindset.  And one I hope to never impose on Olive-that rich foods are somehow bad and we should feel guilty or gain 7,000 pounds for eating them on a weekly basis.

During the week, we eat simply.  Bowls full of beans, rice, sauteed chard and potatoes and steamed fish, beet pasta, roasted carrots, butternut squash soup-that was this week.  These do not make the most riveting blog posts, nor do I always remember to take pictures of “regular” meals.  Perhaps I should!  Maybe it would help balance out peoples’ fear of the occasional pie or butter sauce.  My hope for myself and anyone who loves to cook is that we find a good balance and that we effectively remove all GUILT from eating.  Find a way.  Whether that’s eating smaller portions or just meals made from fresh, good ingredients that couldn’t live in a box if they tried.  Maybe if that was the norm, and eating at home was what we did 6 days out of the week, than a crazy good, gooey brownie on the weekend or a night out at a restaurant would seem like the treat it is, instead of the impending portion of guilt that it’s come to be.

7G9A3572

This pie was light and fluffy almost like a souffle.  It wasn’t overly sweet and so it went AMAZINGLY well with the butter rum sauce I decided to make at the last minute.   I think it would be perfect without the sauce, but it was the gilding of the lily for a festive occasion like a dinner get-together.   I also adore the website I adapted this from – The Gumbo Pages!  That is the best website name, possibly ever.  And the recipe was clearly from someone who never had to write it down.  A lot of “approximate” measurements and “about this much” kinda talk.  I love the nature of a recipe like that.  And I love that this recipe came from someone with the nickname “Pie Man.”  Honestly, how can you go wrong with that combination?

7G9A3576

Sweet Potato Pie with Butter Rum Sauce
makes one, 9″ pie

3 cups cooked, peeled and mashed sweet potatoes (about 3 medium potatoes)
2 eggs
2 tablespoons melted butter
1/4 teaspoon cinnamon
1/8 teaspoon nutmeg
1/2 cup cream
1/2 teaspoon lemon juice
2 teaspoons vanilla
dash of salt
1/2 cup sugar

Boil the potatoes whole in plenty of water (covering them by about two inches) for about 30 minutes, until tender all the way through.  Peel them after they’ve cooled a bit and give them a rough dice.  Mix the potatoes in a stand mixer with the paddle attachment until they are smooth and very few lumps remain.  Mix the eggs with the cream and spices, lemon juice and vanilla until smooth and gradually mix it into the potatoes.  Add the salt and sugar and let the mixture blend on medium for about 5 minutes. Pour filling into UNbaked 9″ pie shell, bake for 40-45 minutes at 350-325.  Serve with butter rum sauce or whipped cream!

Butter Rum Sauce

1 stick of butter
1/3 cup heavy cream
1/2 cup sugar
a few pinches of kosher salt to taste
2 tbs rum

Let the butter melt with the cream and sugar and stir until the sugar is completely dissolved.  Add salt until it tastes right to you – let it take some of the sweetness away and give it some depth.  Add the rum and mix well and serve!

Literal Banana Bread

Banana Oat Bread
We always have bananas around here.  I realize my last post was about bananas and I apologize for the redundancy.  They are the most logical, good-in-a-pinch snack or breakfast for a little one.  I cut them up and put them in oatmeal most mornings, so one day when I had a lot of ripe ones and it was cloudy out, I thought that I’d do a literal banana bread and mix banana into the dough and add a lot of oatmeal to kinda make a bread version of my daily breakfast.  I really loved how rustic it turned out.  It was really great warmed with butter and sprinkled with cinnamon – as most things are.  I always think of how I could improve something the second it comes out of the oven.  With this, I think thick slices dipped in batter and turned into banana French toast would be amazing.

Banana Oat Loaf

Banana Oat Bread*
makes two loaves

3 cups whole wheat flour
2 tsp salt
1/2 oz yeast
1/2 stick butter, softened
generous 1 1/4 cups water
2 large bananas, chopped
1 bowl of oatmeal, muesli or granola

Put the flour, salt, yeast and butter into a bowl.  Slowly add water to the bowl and mix carefully by hand until the dough becomes elastic.  Knead the dough for 5 minutes, then cover the bowl and set aside to rest for two hours.

Divide the dough into two, then add a chopped banana to each, using your hands to mash the banana into the mixture.  This makes the dough crazy sticky, so add enough oatmeal to each to regain the original texture.

Line a baking sheet with parchment or a silpat.  Roll each dough into a ball, then press into the bowl of oats, so that the dough becomes completely coated.  Place the loaves on a baking sheet and let rise for 1-2 hours.

Preheat the oven to 400F.  Using a knife, deeply score the top of each ball into 8 sections.  Bake the loaves for 25-30 minutes, then transfer to a wire rack to cool.

*adapted from the amazing book, 100 Great Breads by Paul Hollywood.  

Bananas Foster Tart Tatin

bananatatin001 bananatatin003


My mom and dad got me an awesome tart tatin pan for my birthday this year and I couldn’t wait to use it.  I had a recipe from Martha Stewart saved on my phone for the longest time and hadn’t gotten around to making it, but when I received this pan in the mail and looked at my five mysteriously mushy bananas on my counter, I knew what had to be done.  Okay, so the mysteriously mushy bananas – I bought a perfectly yellow, no bruise bunch that were on the top of the pile, and a day later, I went to cut up one for Olive and they felt like bags full of jelly.  ALL OF THEM.  Still perfectly yellow, still no bruises, but all mush.  What in the world?!  I thought maybe since I’d put them beside tomatoes, that maybe the gasses from the tomatoes instantly ripened the bananas?  So a day later, I bought another bunch and put one banana with the tomatoes and the rest far away from them and the banana that was with the tomatoes was fine.  So, the mystery remains.  Maybe they were on the bottom of the truck since they were on the top of the pile!

Despite their mushy texture, the bananas worked out perfectly for this recipe and I was glad to be able to use them.  The French love their tart tatins.  They basically do it with every fruit in season.  And my theory is that the French use fancy terms to make ordinary dishes sound fancy.  Like tartines.  Tartines are various toppings on toast.  That’s it.  Some might call it bruschetta, some call it toast.  It’s all the same.  Or how about this tart tatin?  Yeah, it’s an upside down cake/tart.  They typically use puff pastry instead of cake batter, so the result is a crispy, almost turnover texture with caramelized fruit on the top.  It’s a wonderful way to use up old fruit and to do something really simple in a hurry for guests.  And you should always keep frozen puff pastry on hand.  It’s a freezer staple for me.  You can use it in so many ways from topping little strips with shredded cheese or sausage or peppers for an instant appetizer to using it as a base for a cobbler, strawberry shortcake or whatever you can dream up!

bananatatin005 bananatatin004

Bananas Foster Tart Tatin*
serves 8

  • All-purpose flour, for work surface
  • 1 sheet frozen puff pastry, thawed
  • 6 tablespoons unsalted butter
  • 3/4 cup packed light-brown sugar
  • 1/2 teaspoon ground cinnamon
  • 1/8 teaspoon salt
  • 5 large ripe bananas, peeled, halved lengthwise
  • 1 teaspoon pure vanilla extract
  • 2 tablespoons dark rum
  • 1 cup creme fraiche, for serving

Preheat oven to 400 degrees. Roll out pastry on a lightly floured work surface to a 13 1/2-inch square. Using a large skillet as a guide, cut out a 12-inch round. Transfer pastry round to a baking sheet lined with parchment paper, and refrigerate until firm, about 15 minutes. Make three 1/2-inch slits in center of round; set pastry aside at room temperature.

Melt butter in a 12-inch skillet over medium-high heat. Stir in sugar, cinnamon, and salt. Cook, swirling skillet occasionally, until mixture turns medium amber, about 3 minutes.

Arrange bananas in skillet, overlapping slightly. Cook, without stirring, 3 minutes. Drizzle vanilla and rum over bananas, and cook until most of the rum has evaporated and liquid has thickened, about 1 1/2 minutes. Remove from heat.

Place pastry round on top of bananas, and transfer to oven. Bake until pastry is golden brown and puffed, about 25 minutes. Remove from oven, and carefully invert the tart onto a serving plate. Whisk creme fraiche until fluffy, about 3 minutes. Serve dessert warm or at room temperature with the creme fraiche.

*I didn’t adapt this Martha Stewart recipe at all, except that my tatin pan was 9″ instead of the 12 the recipe calls for.  I didn’t have too many bananas – it worked out perfectly.

Brown Butter Vanilla Bean Cinnamon Rolls

Brown Butter Vanilla Bean Cinnamon Rolls

RECIPE UPDATED!  I made some changes and they’re even better, now!  Go make these, QUICK!

For the South Plains Fair this year, I decided to enter the cinnamon roll category, if for no other reason than to de-throne my friend, Rod from his previous win in the category.  A little healthy rivalry makes everything more fun and I KNOW his are amazing.  But in the night, right before drifting off, I came up with what I figured would be a wonderful way to make the filling for the cinnamon rolls and the icing.  The dough, I figured, could be altered to fit in with the rest.  So I got kind of excited to embark on the process and after killing the yeast in my dough from boiling hot butter in the first round, I ended up with a good second batch of dough and proceeded with the plan!  I think the secret to anything truly delicious in a baked good is butter.  And I figure everyone knows, but in case you don’t, browned butter is the goodness of butter x 1,000,000.  So at every turn, I turned the butter into browned butter and I formed a paste with the filling instead of doing the traditional method of smearing on a lot of butter and then dumping sugar and cinnamon, which, when rolled up and cut, inevitably dumps out a little on your cutting board.

The paste. was. genius.  I’m not even going to act humble about this.  I browned the butter with two vanilla beans that were split (holy mother that was a great smell) and once browned, I combined the sugar and a little less cinnamon than the original recipe called for and formed this amazing smelling liquid that I let firm up in the fridge a bit so that it would harden up enough to be spread like jam instead of being liquid.  It made the filling so incredibly easy to get perfectly uniform so that each cinnamon roll had exactly the same amount of filling.

And then…The Icing.  I’m definitely not one of those people who says something is “too sweet” when it comes to desserts.  Desserts are supposed to be sweet.  However, the traditional powdered sugar and milk icings for cinnamon rolls can be just SUGAR and nothing else and I thought a cream cheese icing would be too strong a flavor for the delicate brown butter and vanilla beans.  So I used heavy cream, milk, powdered sugar, vanilla bean paste (so it would be pretty and flecked) and THEN I gradually added tiny pinches of kosher salt and stirred after each addition, until the edge of the sweetness was taken off and it was perfect.  I will henceforth salt all my icings.  Just a bit – it MATTERS!  I was amazed at how good these turned out and….

TA-DA!  Blue Ribbon!  I was quite giddy!

And then sad, because my husbands absolutely perfect bread didn’t place and my thoughts were that it was too sophisticated and the fair is a veritable sugar bomb.  I think it just depends on what you respect when it comes to traditional bread, and Matt is a purest.  4 or 5 ingredients at the most.  This guy is the most amazing baker I know!  Anyone can make a good bread if it’s slathered in sugar and butter, but only a true baker can make a bread SING with only 4 ingredients.
These were our submissions – Matt submitted his biscuits, baguette and traditional boule.  All perfect and the best I’ve tried, but sometimes in a sea of bundt cakes and chocolate sugar loaves, plain bread doesn’t get noticed. A shame, really.
Smorgasbord

Brown Butter Vanilla Bean Cinnamon Rolls with Vanilla Cream Icing
makes about 16 rolls, depending on how thick you slice them

For the Dough:

1 cup whole milk
2 1/2 teaspoons active dry yeast (bread machine yeast
1/4 cup sugar
4 TBS unsalted butter, browned and cooled
2 large egg yolks
2 tsp vanilla bean paste
2 3/4 cups AP flour
3/4 tsp salt

For the Filling:
12 TBS unsalted butter, browned with two split vanilla beans
1/2 cup granulated sugar
2 TBS cinnamon

For the Icing:
1 heaping cup powdered sugar
1/4 cup heavy cream
1 tsp vanilla bean paste
2-3 TBS whole milk
a few pinches of kosher salt

Make your Filling first!  Brown the butter in a large, stainless steel skillet (non stick you can’t see the butter browning) with the split vanilla beans, mushing them around as they warm up to release their seeds.  Once browned, remove from heat and stir in your sugar until fully incorporated.  Then add in the cinnamon, stirring to combine.  You can do this a day in advance – you want this paste to be slightly firmed up so put it in the fridge and stir it once in a while until it’s the consistency of wet sand.

For the dough: brown your butter on the stove by swirling it around in the pan over medium heat until solids begin to form at the bottom and it’s giving off a nutty aroma.  Remove from heat and place in a medium bowl and let it cool for a few minutes.  Once cooled (about 5 minutes), add the milk, the egg yolks and vanilla paste.  Whisk to combine.  Then whisk in the yeast.
Whisk the flour, sugar and salt in the bowl of a stand mixer.  Make a well in the center and pour in the milk mixture.  Mix on low speed with a dough hook until thick and slightly sticky.  Knead on medium speed until the dough gathers around the hook, adding up to 2 more tablespoons of flour to get a nice, smooth texture.  Don’t beat it to death.

Remove the dough and shape into a ball.  Butter the mixing bowl and return the dough to the bowl, turning to coat in the butter.  Cover with a towel and put it in a warmish place (like on your dryer) for a couple hours until doubled in size.  This is a pretty slow-rising dough.  Don’t lose hope.

Roll out the dough on a floured work surface to a shape of about 10″ x 16″ (about 1/4″ thick all around).  Now comes the fun part!  Spread your filling all over the dough with an offset spatula until completely covered, leaving about 1/4″ all around clean for ease of rolling up the dough.  Starting on the long side, roll the dough up tight and then slice about 1.5″ slices and arrange them on a buttered, double lined rimmed baking sheet (if you don’t have one, you can always stack pans together to form a double wall) and cover with loose plastic wrap and set in that same warm place to rise about an hour until doubled.

Preheat the oven to 325 and bake about 30 minutes, until golden brown (mine were done in about 28 min).  Cool in the pan 15 minutes.  Meanwhile, make the icing by adding the cream to the sugar in a bowl and whisking till smooth.  Then add the vanilla and milk until a nice, smooth texture is achieved.  Then, little by little, tasting along the way, add pinches of salt till it tastes right.  I can’t really tell you how much I added.  Probably two and a half pinches!  Stir till fully incorporated and pour over the rolls!

Enjoy!

Cherry Almond Scones

Cherry Almond Scones with butter

Dear goodness, I love a good scone.  Some people think they are too dry or would prefer a muffin, instead.  Cake is cake so there’s really no comparing it with a muffin.  Scones are meant to be enjoyed warm, with a sliver of cold butter and a hot cup of coffee or tea.  How very English.  Their merit of being on the verge of dry is that they pair well with butter and a warm drink.  And like their fluffy muffin-cousins, the varieties are endless.  I love a savory scone with cheddar and onion just as much as a sweet variety.  These particular scones have a magical pairing – almond and cherries!  I bought some hippie soap this weekend with that combination and I didn’t intend to buy soap if I hadn’t smelled it, but there it was, cherry almond soap, screaming, “I’M SO COMFORTING!  INHALE ME WHILE YOU DRIVE HOME!”  And so I did.  And it was a really great car ride.

When I received my copy of King Arthur Flour magazine, one of the first scone mixes inside was cherry almond.  I knew I had to make these on my own, instead of waiting on a mix to arrive on my doorstep.  So, I looked up the nearest recipe online and adapted it to be more almondy (there really is never enough almond-flavored things in the world) and got to baking!  They turned out soft on the inside and crispy on the outside – perfect!  I want to make them again, soon, and figure out a way to make them a little more cherry, too.  Perhaps a swirl of homemade cherry preserves in the dough!  They’re really great as is, though – just don’t forget the (real) butter!

Happy Beginning of the Week!

Cherry Almond Scones with Vanilla Bean

Cherry Almond Scones*
makes 8-10 scones, depending on the cut

3 cups all-purpose flour
1 cup sugar
1 tablespoon baking powder
Pinch salt
1 teaspoon ground cinnamon
1 1/2 sticks cold butter, cut into pea size pieces
1 cup dried cherries, roughly chopped
1/2 cup toasted sliced almonds
1/2 cup milk with a tsp of vanilla and a tsp of almond extract mixed in!

In a small bowl, combine the flour, sugar, baking powder, salt and cinnamon. Add in the butter and rub with your fingers into the dry ingredients until a coarse meal forms. Add in the cherries and almonds. Add the milk and extracts and combine it into the butter flour mixture.

Form the dough into a 1-inch thick disk and cut it into 8 rounds with a biscuit cutter (You can really cut them however you like.)  Transfer the scones to a greased cookie sheet and bake in the preheated oven for 17 to 18 minutes, turning the pan halfway through.

*Adapted from Anne Burrell