Cooking on the Road

map

They made up their minds, and they started packing.
They left before the sun came up that day.
An exit to eternal summer slacking,
But where were they going without ever knowing the way?

muffins009

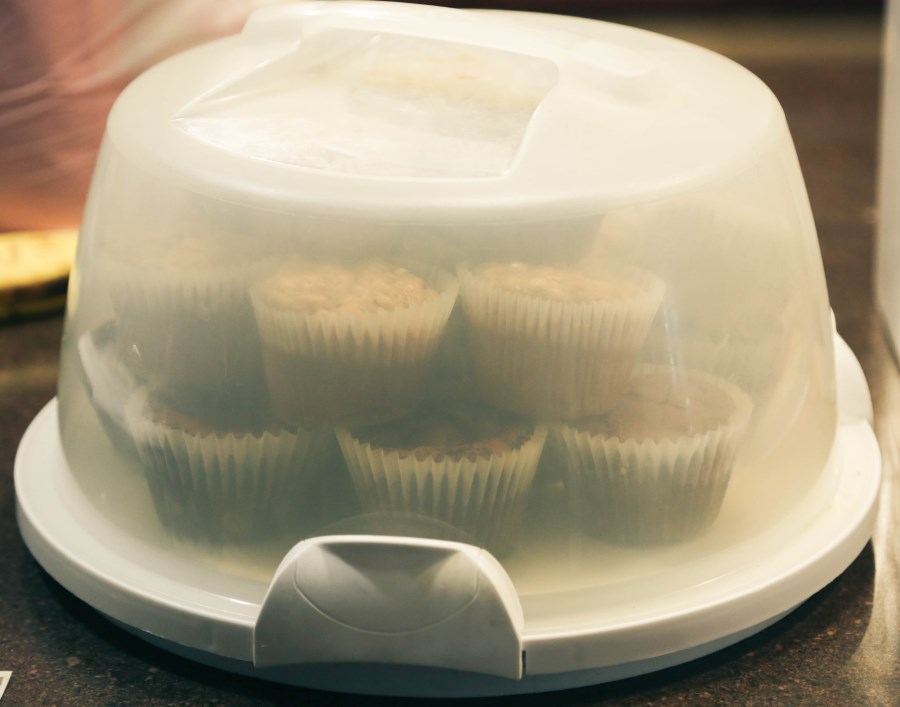
I think we might be crazy.  But we’ve made up our minds to drive from here to Seattle in an RV with some really good friends, good music, and good food.  We’re bringing the coffee maker, some good quality beans and our guitars, so I think we may survive. 🙂  We have  friends who live in Seattle, and so we decided to make the trip part of the vacation.  In preparation for a few days on the road, I decided to get to baking.  No one likes to decide what to have for breakfast, so I took it upon myself to make it a no-brainer.  I consulted Annie’s Eats, of course, because that woman knows how to prepare for anything.  She has a wonderful selection of baked goods on her blog, and when I grow up, I want to be just like her.  (I may be older but that’s not the issue, here.)

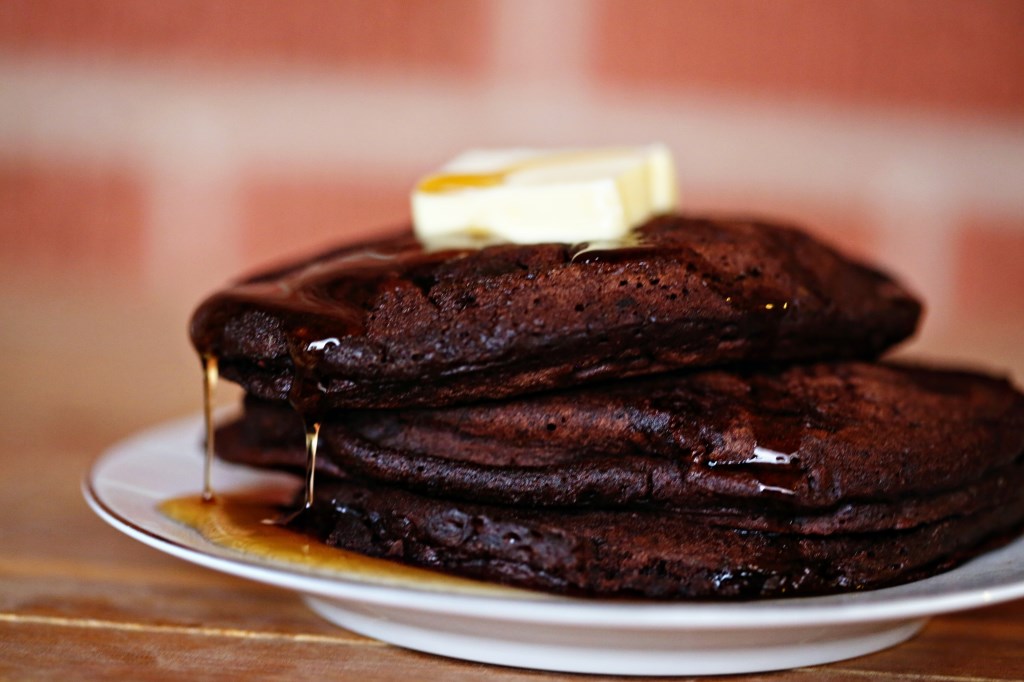
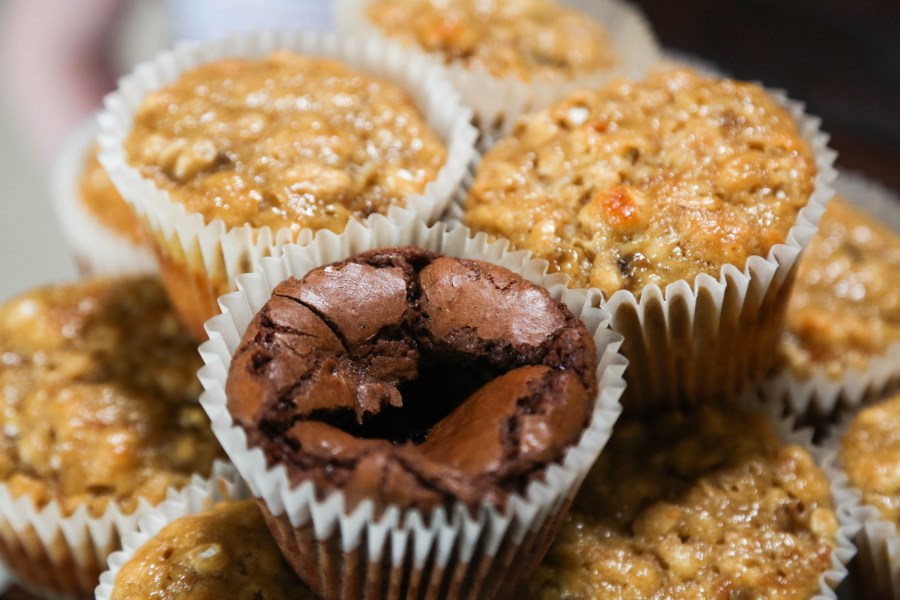
I chose from her blog, the peanut butter banana oatmeal muffins,(they looked so great but I refrained from taste-testing) the chocolate cherry muffins and the bacon and cheddar scones.  We were forced to taste-test the chocolate muffins because they looked too chocolately for their own good and so what else were we going to do?  Leave it to chance?!  They can hardly be called muffins, in my opinion.  They are nearly flourless chocolate cakes, but just enough flour to make them decadent brownies.  In fact, next time I want to make brownies, I’m using this recipe.  So they might be more for snack time instead of breakfast.

muffins003

Chocolate Cherry Muffins*
(I doubled the recipe and it turned out great)

6 oz. bittersweet chocolate, finely chopped
6 tbs. unsalted butter, cut into small pieces
½ cup all-purpose flour
½ tsp. baking powder
¼ tsp. salt
2 eggs
2/3 cup sugar
1 tsp. vanilla extract
2/3 cup dried cherries, chopped if desired

Directions:
Preheat an oven to 350º F. Line a muffin pan with muffin cups or grease wells.

In a small heatproof bowl, combine the chocolate and butter. Set the bowl over but not touching simmering water in a small saucepan and melt the chocolate and butter, stirring occasionally, until smooth and blended. Let cool slightly.

In a small bowl, stir together the flour, baking powder and salt. In another bowl, whisk together the egg, sugar and vanilla until light in color and doubled in volume. Whisk in the chocolate mixture and then the flour mixture just until combined. Stir in the dried cherries. Divide the batter evenly among the wells of the prepared pan and smooth the tops. Bake until a toothpick inserted into the center of a muffin comes out with a few moist crumbs attached, about 25-30 minutes.

Makes 7-8 muffins.

*didn’t adapt this at all from Annie’s Eats, except for doubling it and using half dark chocolate, half milk because that’s what I had on hand!

muffins008

The scones I prepared up until baking and just froze them raw.  Then, I will put them in that tiny RV oven and add a few minutes on to baking time and we will have an amazing breakfast heading down the road!  I can’t wait for our adventure and I can’t wait for all the amazing food we will try and the sites we’ll see and the memories we will make.  And with any luck, we’ll all still like each other when we get home.  🙂  I’ll be sure and take lots of REAL, non-iPhone pictures and have a few posts about our gastronomical adventures when I return.

Bacon Cheddar Scones*
makes 8-10

For the scones:
3 cups bread flour
1 tbsp. baking powder
1 tsp. salt
1-2 tsp. ground black pepper (depending on your preference)
8 tbsp. cold unsalted butter, cut into small cubes
1½ cups grated cheddar cheese
1/4 cup chopped fresh chives
10 slices bacon, cooked and chopped or crumbled into small pieces
1 cup buttermilk (plus up to ½ cup extra, if needed)

For the egg wash:
1 large egg
2 tbsp. water

Preheat the oven to 400˚ F.  In the bowl of an electric mixer fitted with the paddle attachment, combine the flour, baking powder, salt and black pepper; mix briefly to combine.  Add the cubes of butter and mix on low speed until the mixture is crumbly and the butter pieces are about the size of small peas.  (Alternatively, this can be done in a regular mixing bowl, using a pastry blender or two knives to cut the butter into the dry ingredients.)  Add in the grated cheese and mix just until incorporated.

Mix in the green onions, bacon, and 1 cup of the buttermilk into the flour-butter mixture.  Stir by hand just until all the ingredients are incorporated.  If the dough is too dry to come together, mix in the remaining buttermilk a tablespoon or two at a time until the dough can be formed into a ball.  Transfer the dough to a lightly floured surface and pat the dough into an 8-inch disk.  Cut with a 3″ biscuit cutter into 12 circles, place on a greased cookie sheet, wrap in plastic and freeze till ready to eat.  Before baking, remove from freezer, brush with egg wash and bake for 25-30 minutes until golden brown.

*slightly adapted from Annie’s Eats

muffins002

Summer Corn Chowder – perfect for a rainy day

Corn Chowder and Cornbread

I hope you’re getting rain.  We got a little bit last night and it’s threatening to rain, today.  The clouds are hanging low and the wind is a cool 65 and I feel for a minute that it could be late September instead of the middle of July.  I live for cold weather and I’m still a little perplexed by why I live here, in the desert.  I grew up around here – maybe that’s it.  We long for things unfamiliar or for the relief we feel on the rare occasions we get a break from our usual reality.  I hear people in Seattle long for the beach.  I bet they don’t long for the desert, though!

Another comforting thing about food is the ability to transport myself into a feeling or a mood simply by the dish I prepare.  Caprese salad makes me long for summer nights, spice cakes make me wish for Christmas, chocolate chip cookies make me think of home.  A warm bowl of chowder with a thick slice of cornbread and a cold slab of butter puts me in the mood for a cloudy day and cooler temps.  So, in the middle of the heat of the summer, on this cooler week with cloudy days and threatening rain, let’s make a memory with a warm bowl of corn chowder and pray the rain stays a while.

Summer Corn Chowder and the Perfect Cornbread*
serves 6

4 teaspoons bacon, cut into 1/4-inch dice
1 small onion, cut into 1/4-inch dice (1 cup)
2 ribs celery,cut into 1/2-inch dice (3/4 cup)
8 sprigs thyme
Salt and freshly ground pepper
3 cups homemade or low-sodium canned chicken stock
3 ears yellow corn, kernels removed (about 2 1/2 cups)
5 ounces small fingerling potatoes, cut into 1/2-inch-thick slices
1 poblano chile, seeded and cut into 1/2-inch dice
1 1/2 cups half-and-half

Place bacon in small stockpot over medium-high heat. Cook, stirring occasionally, until bacon is deep golden brown and all the fat has been rendered, about 4 minutes. Remove bacon with slotted spoon, transfer to paper towel, and set aside. Discard all but 2 tablespoons of bacon fat.

Add onions, celery, thyme, and salt and pepper to taste to stockpot; cook over medium-low heat until translucent, about 8 minutes. Add stock; bring to a boil. Reduce heat to medium; simmer 15 minutes.

Add corn, potatoes, and chile; cook until potatoes are tender, 10-20 minutes. Remove and discard thyme. Add half-and-half, and simmer until soup is hot. Adjust seasoning with salt and pepper, and garnish with the reserved crisp bacon pieces.

*recipe adapted from Martha Stewart Living

Cornbread


We only make one cornbread recipe, anymore.  The New Best Recipe is a wonderful encyclopedia of how to make every recipe basically, perfect.  We love this book and it never steers us wrong.  It’s quite bulky, but all the recipes are tested extensively and done in a myriad of ways, and they give a background as to why the recipes work.  It’s very trust-worthy and a definite go-to in times of need of a solid recipe!  Their Golden Northern Cornbread is our go-to cornbread recipe.  It’s light, fluffy, moist and slightly sweet.  Holds together beautifully to be a base for your bowl of soup, or just on the side with some cold butter.

The Best Golden Cornbread
makes 9 servings

2 tbs unsalted butter, melted, plus more for greasing the pan
1 cup (5 ounces) yellow cornmeal, preferably stone-ground
1 cup (5 ounces) AP flour
2 tsp baking powder
1/2 tsp baking soda
4 tsp sugar
1/2 tsp salt
2 large eggs
2/3 cup buttermilk
2/3 cup milk

Adjust an oven rack to the center position and heat the oven to 425 degrees.  Grease a 9 inch square baking pan with butter.

Whisk the cornmeal, flour, baking powder, baking soda, sugar and salt together in a large bowl.  Push the dry ingredients up the sides of the bowl to make a well.

Crack the eggs into the well and stir lightly with a wooden spoon, then add the buttermilk and milk.  Stir the wet and dry ingredients quickly until almost combined.  Add the melted butter and stir until the ingredients are just combined.

Pour the batter into the greased pan (we actually love to use our cast-iron skillet for this recipe). Bake until the top of the cornbread is golden brown and lightly cracked and the edges have pulled away from the sides of the pan, about 25 minutes.

Transfer the pan to a wire rack to cool slightly, 10 minutes.  Cut and serve warm!


Greek Yogurt and Almond Butter Cheesecake

yogurt cheesecake002
I made this cheesecake last weekend for the 4th of July festivities.  By festivities, I mean meals.  Olive has been consuming a lot of yogurt lately (plain, full fat awesome stuff sweetened with a little bit of honey) and I did one of those “I thought we were out” mistakes and bought a huge container to come home and realize we already had a huge container.  I hate wasting and so I have been putting Greek yogurt in a lot of stuff , lately.  This morning I made yogurt and oatmeal waffles (really good, I’ll post about those, soon) and when I ran across a recipe that called for 2 cups of yogurt in a cheesecake, I knew I’d found my way to not waste!  Oh, how humble of me to eat a cheesecake in order to not waste yogurt.  It’s a hard life.

This is the no-bake type of cheesecake I grew up eating.  I love the kind you bake and there’s a place for that (that place is anywhere) but for these super hot summer days, a lighter, fluffier, doesn’t-heat-up-your-kitchen dessert is the way to go.  And using those strawberries I almost ALWAYS let rot on my counter is a plus, too!  For the topping, I chopped up almost-bad strawberries, a few blueberries and mixed them up with a bit of honey and let it sit out while I made the cheesecake.  By the time everything was ready, the topping was perfect.

The addition of almond butter adds such a wonderful flavor.  I think if I make this again, I’d try using peanut butter, just to see what it would be like!  The original blogger of this recipe said that it was “healthy” and could be eaten for breakfast because it has yogurt and granola in the crust.  I think that’s a marvelous way to feel like taking a nap at about 10:30, so I wouldn’t recommend it (this is based on experience).  Just because something has granola and yogurt doesn’t make it healthy.  This is perhaps lighter than most cheesecakes, but it also has cream cheese and whipping cream, so you do the math.  Or don’t do math.  Just enjoy dessert and stop thinking about whether it’s healthy or not. Of course you shouldn’t eat it every day.  If you want to, then sure, obsess over calories.  If you only eat stuff like this on weekends, then by all means, go for the gold.

photo (1)
This little hand loved every bite.

yogurt cheesecake003

Greek Yogurt and Almond Butter Cheesecake*

For the Granola:
1 cup rolled or old-fashioned oats
1/4 cup finely shredded coconut
1/4 cup chopped cashews
1/8 tsp kosher salt
1 tbsp coconut oil (or butter would work fine – just make sure it’s soft and at room temp)
1/4 cup honey

Crust:
1 1/2 cups granola you just made
4 whole grain honey graham crackers
4 tbsp unsalted butter, melted

Cheesecake Filling:
8 oz cream cheese, room temp
3/4 cup + 1/4 cup sugar, divided
1 tsp vanilla extract
1/4 cup almond butter
2 cups plain greek yogurt – full fat, y’all
1/2 cup heavy whipping cream

Preheat oven to 350 degrees. In a mixing bowl, combine the oats, coconut, and nuts. In a measuring cup or separate bowl, whisk together the salt, coconut oil, and honey. Pour this mixture over the oats, and stir to completely coat the ingredients. Spread the mixture into an even layer on a baking sheet, and bake at 350 degrees for 12-15 minutes. Flip granola around with a spatula every 3-4 minutes to prevent burning and to get an even golden-brown crisp. After baking, set granola aside to cool.

Once the granola is cool to the touch, combine the granola and graham crackers in a food processor. Puree for 60-90 seconds, until a very fine and crumb-like texture. Pour in melted butter, and stir to combine evenly. Next, spread the crust mixture into the bottom of an 9-in round springform pan. Press down to compact into an even layer. Bake at 350 degrees for 3-4 minutes. (Do not let it burn!) Set aside to cool.

To make the filling, add the cream cheese and 3/4 of a cup of sugar to the bowl of a mixer fitted with the whisk attachment. Beat the cheese and sugar together until smooth and fluffy. Add the vanilla and almond butter, and beat until incorporated. Then, remove the bowl from the mixer, and fold in the Greek yogurt with a spatula. (Scrape the sides and bottom of the bowl!)

In a separate bowl, whisk the heavy cream with the remaining 1/4 cup of sugar until stiff peaks form. Fold the whipped cream into the cheesecake filling. Finally, pour the filling into the cooled granola crust, and spread into an even layer with a spatula. Cover with foil or plastic wrap, and freeze overnight.

To serve, run a paring knife around the edges of the cheesecake to loosen the sides from the pan. Then, unlatch the springform pan. Transfer the cheesecake to a cake stand or serving platter and garnish with fresh fruit.

*adapted from the adorable Mangoes and Palm Trees blog

Cajun Shrimp and Potato Bake

shrimp and potatoes002

This is a fantastically easy, hearty, well-rounded meal that is wonderful for the whole family.  I love cutting corn cobs into sundials – it’s not only very pretty to look at, but it makes it very easy for little hands to pick up and dig in!  I created this meal after determining we had nothing to eat 🙂  I had a few fingerling potatoes, 3 cobs of corn, and about 12 shrimp in the freezer.  Oh, and a shallot.  I had a shallot.  It really is remarkable what you can create when your laziness for going to the store beats out your laziness for cooking.  I chopped up everything, roasted them, and served it all in bowls with plenty of hot sauce!

This meal was made possible by the previously stated freezer staple, frozen shrimp, and a strong desire to stay home and out of the heat.  We had leftovers for a few days from this, and for what was probably $5 total, I’d consider that a success.

shrimp and potatoes004

Cajun Shrimp and Potato Bake
serves 4

1 lb fingerling potatoes, or small, new potatoes, chopped into 1″ pieces
3 cobs of corn, cut into 1″ cross-sections
1 large shallot, or 1/2 a medium onion, cut into thin half-moons
1/2 lb peeled, deveined, frozen shrimp (about 6-8 per person, if they are big)
1 tsp Cajun seasoning (or Old Bay would work great)
Olive oil (about 3-4 tablespoons total)
Kosher salt and fresh cracked pepper

Preheat the oven to 375. Run cold water over the frozen shrimp to thaw and leave it in the colander while you cut up the vegetables.  Toss the potatoes, corn and onion with about 2 tablespoons of the olive oil and sprinkle well with salt and pepper.  Roast for 25-30 minutes, until corn turns golden and potatoes are tender, stirring once or twice during cooking time.  While the vegetables are roasting, rinse the shrimp again and then lay them out on paper towels, blot dry and sprinkle with salt and pepper and Cajun seasoning on both sides.

When the vegetables are almost done, take the tray out and lay the shrimp on top of the vegetables and drizzle with olive oil.  Bake for 10 minutes, or until the shrimp are opaque.  Toss everything together in a big bowl and serve with hot sauce of choice!

Happy 4th of July Weekend!

photo

It’s strange when a holiday falls in the middle of the week.  People have to go back to work the next day, so it’s this little blip in the week that makes you WANT the full, extended weekend, but few actually get it.  I figure since people might be celebrating all weekend, a recipe for a few burger-accompaniments would be in order.  I might even post, again, tomorrow with what we cook, tonight.  Maybe I’ll post on Sunday, too, with what happens on Saturday.  I love a good excuse to celebrate the summer all weekend long.  We really don’t need an excuse, but when festivities are high and people are cooking and grilling, it’s a wonderful time to try out new recipes and make the old, beloved standards.

We’ve been Top Chef fans since its debut seven years ago.  We developed a love-hate relationship with Spike during his season and bought his cookbook and now that relationship is all love.  He really understands how to do comfort food and takes nostalgia (burgers, shakes) to a new level.  So he is the go-to for summer time recipes!  I highly recommend his cookbook, The Good Stuff Cookbook and especially his recipe for the Good Stuff sauce that we now have to have on every burger we grill!  It’s a perfect blend of sweet, tangy and savory and it is perfect for burger toppings or a dip for fries!

goodstuff002

Good Stuff burger sauce*
makes about 2 cups

2 cups homemade or Hellman’s mayonnaise
2 tbs ketchup
2 tbs molasses
2 tbs rice vinegar
1 tsp salt

Add all ingredients to a food processor or blender (or in a cup with an immersion blender) and puree until smooth.  The sauce can be refrigerated in an airtight container for up to 1 week.

*taken directly from The Good Stuff cookbook

We also are addicted, lately to caramelized onions.  There’s really nothing difficult about making them, and they completely improve everything they touch.  I’ve added them to omelets, sandwiches, wraps, burgers, stir-fry, beans, rice dishes – EVERYTHING!  Here is my simple method:

Caramelized Onions
makes 2 cups – can easily be scaled down

6 white onions, halved and then sliced thin
2 tablespoons neutral oil like Canola
Kosher salt

Heat the oil in a 12″ cast iron pan till it shimmers.  Dump all the onions in at once and let it sit there for a few minutes.  Then, gradually start flipping and stirring the onions around till they all get coated with the oil.  Your pan will be VERY full if you used all 6 onions.  Turn the heat down to medium low and cook, stirring occasionally for at least 30 minutes.  You want a deep, rich brown color on all the onions.  They will greatly reduce in size till you’re left with about 2 cups of onions.  We keep ours in the fridge and scoop out portions for everything under the sun, but most recently, they were an AMAZING topping to our burgers this weekend, complete with smoked gouda, pickles and the Good Stuff sauce.  Oh, heavens…

The last recipe I’ll impart is a very classic deviled egg recipe that includes a good amount of olive oil and the result is the most silky texture to the filling and the perfect balance of acid and richness from the egg yolks.  The recipe is adapted from the Serious Eats site, which, if you haven’t become addicted or receive their weekly emails, you will and you must.  So many great recipes come from their extensive research and trial and error!

goodstuff004

Deviled Eggs
makes about 18

1 dozen large eggs, not too fresh
2 tablespoons mayonnaise, preferably home made
1 tablespoon dijon mustard
Up to 1 tablespoon white wine vinegar
1/2 teaspoon Frank’s Red Hot sauce
2 tbs extra virgin olive oil
Kosher salt
Freshly ground black pepper
3 tablespoons thinly sliced chives
Crushed red pepper or hot paprika

Place eggs in a large saucepan and cover with 2 quarts cold water. Place over high heat, bring to a boil, cover, remove from heat, and let stand ten minutes. Drain eggs and peel under cool running water. Slice each egg in half lengthwise.

Place all of the yolks in the bowl of a food processor. Select 16 of the best looking egg white halves and set aside. Reserve the remaining 8 for another use. Add mayonnaise, mustard, half of vinegar, and hot sauce to food processor and process until smooth, scraping down sides of bowl as necessary.

With machine running, slowly drizzle in 2 tablespoons of olive oil. Season mixture to taste with salt and remaining vinegar (if desired). Transfer to zipper-lock bag. Filling and egg white halves can be stored in the refrigerator up to overnight before filling and serving.

Cut off corner of ziplock bag and pipe filling mixture into egg whites, overstuffing each hole. Drizzle with extra olive oil, sprinkle with black pepper, chives, crushed red pepper, and sea salt. Serve immediately.

Dark Chocolate Chip-Pecan Pancakes

Chocolate Chocolate Chip Pancake stack

I opened up this recipe this week with the intention of pinning it to my Pinterest recipe board.  Then I went to my recipe board and discovered that I’d pinned this exact recipe four times over the last 2 years.  My subconscious must really want these pancakes.  I decided, no more pining for a pin!  I made these bad boys this morning for breakfast, right when the clouds rolled in and it started raining.  We enjoyed the rest of our coffee on the front porch while watching the rain and I’d be lying if I said it wasn’t the perfect way to spend the morning.

These pancakes are intense, rich, but not too sweet.  I accidentally left out the melted butter from the batter (believe me that I would never do that intentionally) and they turned out just fine!   Matt had pancake syrup on his and I had creme fraiche sweetened with a bit of honey on mine and I will proudly say that my way was the best.  But his way photographed better 🙂 Whatever you decide to put on top of these pancakes, be it whipped cream, syrup, powdered sugar, yogurt, it’s going to be the right decision.  The baby girl loved them, too and called them “panpays”, which was nearly the cutest thing I’d heard all week.

Enjoy your weekend!  Hope you find time to make these desert-like pancakes at some point!

Chocolate Chocolate Chip Pancakes

Chocolate Pecan Pancakes*
makes about 10 pancakes

  • 1 cup all-purpose flour
  • 1/3 cup granulated sugar
  • 1/3 cup Dutch-process cocoa powder
  • 1 1/2 teaspoons baking powder
  • 1/4 teaspoon salt
  • 1 cup milk
  • 1 large egg
  • 4 tablespoons unsalted butter, melted
  • 1 teaspoon vanilla extract
  • 1/2 cup mini chocolate chips
  • 1/4 cup chopped pecans
  • 4 tablespoons vegetable oilPreheat oven to 225 degrees. In a large mixing bowl, whisk together flour, granulated sugar, cocoa, baking powder, and salt. In another bowl, whisk together milk, egg, melted butter, and vanilla; pour over flour mixture, whisking to combine. Fold in chocolate chips and pecans; let batter stand until slightly thickened, 5 to 10 minutes.

    In a large nonstick skillet, heat 1 tablespoon oil over medium heat until a water droplet sizzles; swirl to coat bottom of pan with oil. Reduce heat to medium-low. Spoon four small mounds (1 heaping tablespoon each) of batter into skillet. Cook until bubbles appear in center, 3 to 4 minutes. With a thin spatula, flip pancakes; continue cooking until set, 3 to 4 minutes more.

    Transfer to a baking sheet; cover loosely with foil; place in oven to keep warm. Repeat with remaining oil and batter in three more batches (adjust heat as necessary to avoid overbrowning).

    Stack ’em up and enjoy, topped with anything you’d like!

*recipe adapted from Martha Stewart Living

Stack of Chocolate Pancakes

Cheesy Grits with Olive Pesto and a Soft-Boiled Egg

Cheesy Grits with Olive Pesto and a Poached Egg

Grits, Polenta, Cornmeal – whatever you call it and however you prepare it, it can take on many forms and flavors.  To us, slow-cooked grits is about as comfy as comfort food gets.  When done right, grits can be amazing.  Too often, people associate grits with the translucent, gel-like, flavorless substance they encounter at cheap breakfast houses the world over.  I often say that if you don’t like a particular food, you might have just had a bad version. I was this way with grits, apple pie, turnips, pork chops, just to name a few.  When I had a GOOD bowl of cheesy, smooth grits, I was hooked.  When I had an apple pie that was distinctly apple and had a good, buttery crust and wasn’t watery, I understood the appeal.  Sometimes you just have to give a dish a few tries before putting it in the “dislike” category.

This recipe for grits is one of my favorites, so far.  This basic, creamy grit recipe stays the same – just the toppings change.  This makes it one of the easiest weeknight meals to prepare because the grits cook for about an hour, which you inadvertently stir while you’re doing other things.  Then, when it’s time for dinner, you just spoon out helpings, add toppings of choice, and dig in.  I honestly think that it’s a healthy meal, too, because the grits are cooked with chicken stock and you don’t even have to add cheese for amazing depth of flavor, if you use good grits.  I use Lamb’s stone ground grits, (you can find these at United) and they are amazing.  Just a little seasoning and they are perfect.  So, the indulgence level is up to you with this beautiful, blank canvas!

I found a recipe for an olive pesto on this beautiful blog, and with the poached egg, she had me sold.  Only, I didn’t poach mine, I did a pretty fool-proof method of soft boiling the eggs, letting them cool, and then carefully peeling them.  Not so fresh eggs work best with this method.  I will post my own pesto recipe on this blog, soon, as I’ve made it quite frequently and it’s one of those things, like guacamole, that you should just know how to do and do well.  And by “well” I mean, keep it pure and simple!

Cheesy Grits with Poached Egg and Olive Pesto

Cheesy Grits with Olive Pesto and a Soft Boiled Egg*

For the Polenta:
2 cups stone ground grits (do NOT use instant grits)
8 cups water/chicken stock (I did half and half)
1/2 cup shredded Parmesan cheese, or any other hard cheese
Salt and Pepper to taste

Get the water and/or chicken stock boiling on the stove.  Gradually whisk in the grits, careful to break up all the clumps.  Lower the water to a simmer and stir, occasionally, for about an hour.  You can test to see if they need more cooking by tasting a bit for crunchiness.  Shouldn’t be too crunchy – think of it like cooking rice.  Stir in the cheese till it melts and adjust seasoning with salt and pepper.  Cover and set the burner on low and get on with your toppings.

For the Pesto:
1/3 cup olive oil
1/2 cup green olives, coarsely chopped
1 cup fresh basil
1/2 cup fresh oregano or marjoram (I discovered they are wickedly similar)
1/4 cup fresh thyme, coarsely chopped

Put all this stuff in a blender, food processor, or tall cup with an immersion blender and pulse till chunky and well combined.

For the Eggs:
1 egg per person, room temp (To make them room temp quickly, simply put them in lukewarm water for about 10 minutes)
a big ol’ pot of water
tablespoon of white vinegar
salt

Get a big pot boiling with water and salt it and add the vinegar.  Carefully lower the eggs into the boiling water.  Boil for 5 minutes.  Remove from the water and let them sit in lukewarm water till cool enough to handle.  Veeeerrrrrry carefully peel the eggs and set aside.

Assemble!

Spoon grits into each bowl (they may need to be stirred a bit from sitting there.  They form a skin, but it’s okay, it stirs back up just great) and top with a poached egg, a spoon of pesto and extra pepper.

*adapted from thekitchn.com

Rosemary Crusted Pork Chop with Coconut Milk Braised Carrots

Rosemary Pork and Carrots006

This is a good meal for many reasons.  The pork chops were actually a good thickness, and lean, and were buy one pack, get another pack for free (4 really thick chops in each package.  I get ridiculously excited for discounts in the meat department.)   I bought a 5 pound bag of carrots two weeks ago, and so I am currently looking for different ways to prepare them, and found a stunningly simple and flavorful way on one of my favorite blogs, French Foodie Baby.  Say what you will about my French obsession, but those people KNOW their food, and from a very loving depth that centers around family and love of pure ingredients.  Helene, from FFB, is one of the best writers in the myriad of food blogs out there. I literally exhale with relaxation when I read her posts.  She challenges me and inspires me and makes me want to be better at being thoughtful about what I put on the plate for my family.

The braised carrots in coconut milk was from her blog and I just took the concept and did it in a much bigger batch on my stove so that I’d have leftover finger foods for Olive for the week.  And so I could use up the never ending bag of carrots.  I swear that thing is multiplying.

I don’t know much, but I do know that pork and rosemary are best friends.  So when I saw that Helene put rosemary in with her coconut milk to braise the carrots, I thought: instant pan sauce!  And it turned out wonderful!  The extra sauce from the carrots made an amazing garnish for a thick, crispy, rosemary-infused pork chop!  I was happy with this meal and wanted to share its simplicity and comfort-food qualities with you today!

Rosemary Pork and Carrots002


Rosemary Pork and Carrots005

Rosemary Crusted Pork Chop with Coconut Milk Braised Carrots
serves 4-6

4 boneless pork chops, thick cut, if you can find them (the ones I found were about an inch thick)
1/4 cup flour
Salt and pepper – about a half teaspoon of each
2 tbs chopped fresh rosemary – I would think dried would be fine, but it wouldn’t be as aromatic
4 tbs butter or olive oil for pan frying the chops

For the carrots:
1 lb carrots, peeled and chopped into half inch rounds
1 can of coconut milk
2 cloves of garlic, crushed but left mostly in tact
two sprigs of fresh rosemary
salt and pepper to taste

Get the carrots on the stove to braise first, as they take the longest.  In a deep skillet, heat the coconut milk over medium heat along with the cloves of crushed garlic and the rosemary sprigs.  Add in the carrots and let it simmer on the stove until the carrots are tender, about 20 minutes.  I put a lid on halfway through as to not lose too much moisture.  When the carrots are done, remove the pan from the heat and set aside.

For the chops: pat them dry with paper towels and season both sides with salt and pepper.  Put the flour and rosemary and a few dashes more of salt and pepper in a bowl and toss well to combine.  Coat each side of the chops in the flour mixture and set aside.  Heat the butter or olive oil in a non-stick skillet over medium heat until shimmering (or bubbling if using butter) and add in the chops, cooking about 5-6 minutes per side.  If they are browning too quickly, reduce the heat after you get a good sear/crust on each side of the chop.  If your chops are really thick, you may need to transfer them to a preheated oven to finish cooking.  I had to do this for one of the chops because it was way bigger than the rest and wouldn’t cook through without burning the crust.  At any rate, you need a meat thermometer for this because we no longer have to cook our pork to death to be safe.  Some farmer told me that no one’s gotten sick from pork in years, but everyone is still cooking it like they could.  A pink center is fine – I made sure mine got up to 150-160 and called it good, regardless of how the centers looked.

Place the chops on plates and for the sauce garnish, move the carrots to a bowl, reserving about a 1/2 cup of the coconut milk in the pan.  Taste for salt and season as necessary.  Remove the rosemary sprigs and the cloves of garlic and spoon the sauce over each chop and serve alongside the carrots.  If you don’t cook the chops too much, they will be soft enough for a baby to chew, given she has at least 3 molars, which mine does.  She loved the carrots (she’s 15 months old) and ate a few pieces of pork and called it good.  And lately, that has to be good enough for me!  For smaller babies, the carrots would be IDEAL pureed or just left in tact for finger foods.  They are so soft, sweet and a little salty – perfect! I would have blended up the pork with some coconut milk back in the 6-9 month days for Olive.

Enjoy!

Chocolate Mousse

15ollie012

French Kids Eat Everything was the second book I read in my brainwashing of French food culture (the first was Bringing Up Bebe) and it was the best one in the trend of “the French know what you’re doing wrong”, in my opinion.  In the book, the author, Karen Le Billon, describes her struggle raising her two little girls on the streets of Paris, trying to fit in to a food culture so different from our own.  She noticed toddlers sitting in restaurants for an hour meal without making a peep and eating the entire time.  She never saw public temper tantrums in grocery stores over a product not bought, even if desired (kids know they can’t have snacks unless it’s 4 p.m. and even then, most are not used to packaged food aisle-fare).  She wanted to know how the French managed to raise children who ate peacefully and in turn, made having a meal together actually appear fun for the adults, as well!

There are a lot of great take-away tips in this book and one of them is to make the 4p.m. snack (or 3ish, in our case) really good – something a child won’t mind waiting for.  The French have an appointed time for snacks in the afternoon because between noon and 8 is a long time to wait for food (although they expect adults to wait!  Snacks only apply to children – dang it).  So I’ve been trying to find fun things to make and at the back of the book, there are some real recipes found in the daycare systems in Paris, as well as in every day homes.  One of those recipes is for a simple chocolate mousse.  I had procured some amazingly fresh eggs from my dear friend, Katrina, and I thought there would be no more honorable way to consume them than to eat them raw.

I just lost some readers.

Seriously, though, eating eggs from a reliable source, from happy chickens whose eggs are only a few days old – you would more likely get eaten by a goat than get sick from eggs like this.  I’ve never been one to shy away from a raw egg in cookie dough, even with the old eggs from the store, but for a recipe that calls for 6 whole eggs, I don’t think I would have been too comfortable eating them if I didn’t know how old they really were.  And I knew, in this case, because Katrina gathered them from the hen house a day before I took them home.  You all should hook up with a friend who has chickens.  They can never eat as many eggs as they end up getting!  And if you have chickens, this type of recipe is great for using up excess eggs!

This mousse is light, fluffy and has an amazing texture and flavor with the added zing of orange zest.  You must eat it very very cold or the texture gets a little too loose.  But straight from the fridge, they are amazing and Olive enjoyed it a LOT, and I exercised my patience with messy eating and happily took pictures of the chocolate chaos.

15ollie013 15ollie010

chocolate mousse001

Chocolate Mousse
Serves 6

1/2 pound semi-sweet Baker’s chocolate (I actually used Ghirardelli 60% chips)
4 teaspoons butter (oh, just use two tablespoons)
6 eggs, whites and yolks separated
Zest of half an orange (I also think a 1/4 tsp almond extract would be awesome!)
Pinch of salt

Melt the chocolate and butter in a double boiler on the stove over low heat.  Quick method: melt in the microwave on 30 second increments, stirring gently until melted and smooth.  When the chocolate is melted and cooled a bit, add in the egg yolks and orange zest and stir well. Set aside.

In a stand mixer with the whisk attachment (or in a large metal bowl with metal whisk, by hand, if you know what you’re made of) beat the egg whites until they reach stiff peaks (adding a pinch of salt at the start will help them stiffen).

Gently fold one-third of the egg whites into the chocolate mixture.  Mix gently, then fold in the other half, mixing very gently.  Spoon the mousse into little serving dishes and chill for 2 to 3 hours or over night until firm.

chocolate mousse002

Turkey Meatball Stroganoff

turkeystroganoff003

For your Monday family meal, I am presenting something truly comforting, low in fat and wonderfully flavorful.  Coming, again, from Tyler Florence’s book, Start Fresh, this recipe appears at the back of the book where a few dishes are listed that the whole family can enjoy and be modified for any stage eater.  If I were feeding this to 9 month old Olive, I would smash up a meatball into tiny pieces (they are really soft, anyway) and I would take some of the sauce and pulse it a few times with a few noodles.  I’d even have taken a bit of everything for 6 month old Olive and blended it all up with some extra sauce!  I was never too worried about feeding her a huge variety at an early age.  For 15 month old Olive, this meal is a free-for-all.  I’m really strict when it comes to what and when she eats, but as for how, I still cringe, but I do let her eat with her hands, smash things in her face and even try and “smell” everything (which results in food up the nose).  I know I have a lot of guidelines, so I try my best to not stress too much about the mess.  I still won’t dump a scoop of spaghetti onto her try and leave her to it.  I have boundaries, you know.  🙂  But I think WHAT she eats and the way we treat mealtimes is more important than having to hose down the high chair.  (I’m preaching to myself.  This is a life lesson for me and my need to control things too much!)

turkeystroganoff002

Turkey Meatball Stroganoff*
Serves 4 to 6

1 slice multigrain bread (I used rye) or about 1/2 cup plain breadcrumbs
1.5lbs ground turkey
2 tbs whole milk
1/2 cup yellow onion, minced
1/2 tsp caraway seeds, crushed (just dump some in a plastic bag and roll over them with a rolling pin if you don’t have a mortar and pestle)
Pinch of kosher salt
2 tbs extra virgin olive oil
1 garlic clove, chopped
6 ounces sliced mushrooms (any kind)
1 sprig fresh thyme
1 tbs AP flour
1.5 cups low sodium chicken stock
2 tbs sour cream or unsweetened yogurt (I used the latter cause that’s what I had on hand!)
2 tsp Dijon mustard
8 ounces cooked egg noodles (I like the extra wide for baby hands to grasp!)
2 tbs chopped fresh parsley

Chop or pulse the bread in your food processor (or with a knife) until very small and crumbly.  In a large bowl, mix the turkey together with the bread, milk, onion, caraway seeds, and salt until combined (err on the side of too wet and add more milk if it seems dry).  Shape the turkey mixture into about fifteen 2-inch meatballs.

In a large skillet, heat the oil over medium heat until shimmering.  Add the meatballs and cook, turning often, until browned, 5 to 7 minutes (I have to use a meat thermometer for turkey and make sure I get the centers up to 160).  Transfer the meatballs to a plate.

Add the garlic to the same skillet and cook over medium heat for a minute or two.  Add the mushrooms and thyme and continue to cook, turning often, until the mushrooms are golden.  Sprinkle the flour over the mushrooms and stir to coat.  Stir in the chicken stock and cook, stirring, until the sauce has thickened, 5 to 7 minutes.

Whisk in the sour cream and mustard until smooth, then return the meatballs to the pan.  Turn to coat with the sauce.

Spoon the meatballs and sauce over the noodles and serve garnished with parsley.  I didn’t think this recipe made enough sauce, just FYI, so I think next time, I’d double the parts for the sauce.  Word to the wise!  I like leftover sauce and for the noodles to be absolutely coated!

*recipe adapted from Start Fresh