Homemade Challah – a Family Guest Post

challah

Guest post today from Matt Palmer, a.k.a, The Bread Man.  He will be talking about Challah and I think this may be my second favorite bread he makes, next to his plain country bread.  It’s an indulgent bread made with lots of eggs and sugar and it is amazing with jam or turned into French toast (you better believe that’ll be a future post!) He has flavored the bread with orange zest, honey, vanilla, plain sugar – they have all turned out wonderful.  I can’t remember a time he did this recipe and it flopped, and he’s made it a half dozen times!  I’ll let him talk about it:

A new bakery opened in town a while ago and I was excited to check it out, because I had heard they had “fresh baked bread.” You’d think that would be common (or even implied) for bakeries, but it seems “bakery” has become synonymous with “cakery” these days. When we visited, I found they indeed did have fresh baked bread: banana bread, corn bread, and other technically-classified-as-bread baked items I can’t remember. I like banana bread, but I think it’s a little misleading to just call it “bread.” Bread is flour, water, salt, and yeast – “the staff of life.” Banana bread is not “bread,” it’s “banana bread.” It’s like how Elvis is Elvis, and Elvis Costello is Elvis Costello.

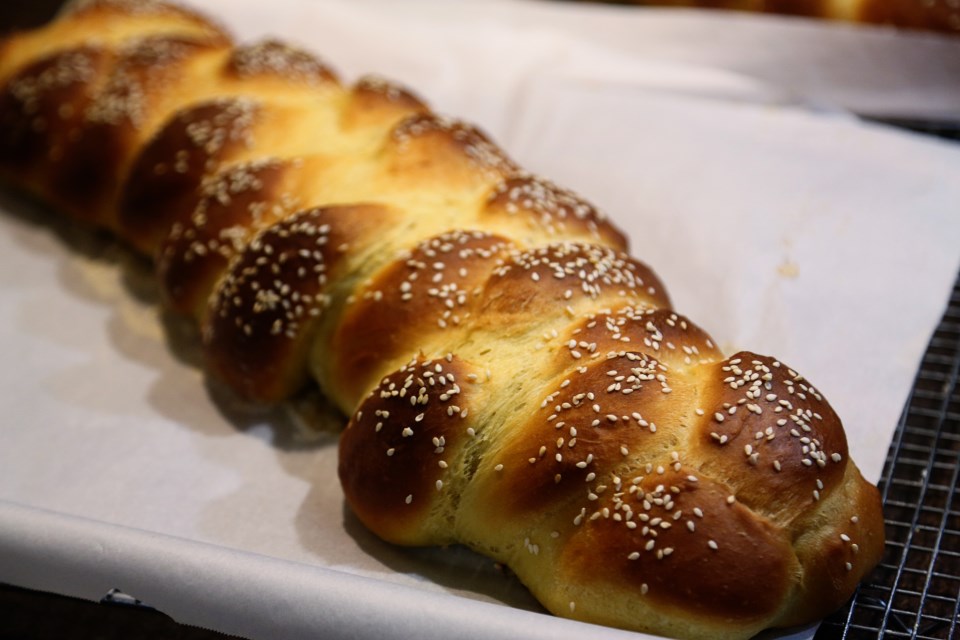
That’s not to say all enriched doughs are inferior – a good brioche is almost as much a work of art as a great baguette. My favorite enriched bread to make though, is challah. It’s easy to work with, fun to braid in all sorts of different ways, and the color is amazing, with a creamy yellow crumb and a rich brown crust.
Challah is traditionally a Jewish Sabbath bread, and I think it’s a great weekend activity. You can have a great loaf of bread in just a few hours on Saturday and turn the leftovers into French toast for Sunday brunch.
I followed the recipe from Peter Reinhart and will post pretty much directly from Michael Ruhlman’s blog when he did the hard work and wrote out the recipe for me.
challah fresh out of the oven
Challah
Makes 2 large loaves or 4 small ones
2 ½ cups/510 grams lukewarm water about 95 degrees F
1 ½ tablespoons/14 grams instant yeast
8–10 egg yolks or 170 grams depending on weight of yolks
5 tablespoons/71 grams vegetable oil
6 tablespoons/85 grams sugar
1 tablespoon/21 grams vanilla extract (optional)
7 ½ cups/964 grams unbleached bread flour
2 ½ teaspoons/19 grams salt or 4 teaspoons/20 grams coarse kosher salt
1 egg white for egg wash
2 tablespoons/30 grams water for egg wash
2 tablespoons/20 grams sesame or poppy seeds for garnish
  • Combine the water and the yeast in a mixing bowl or the bowl of a 5-quart mixer and whisk together to dissolve.  Add the egg yolks, oil, sugar, and vanilla, if using, and whisk together to break up then add the flour and salt.
  • Using the paddle attachment, mix the dough for 2 minutes on the lowest speed.  Let the dough rest for 5 minutes.
  • Switch to the dough hook and mix on medium low for 4 minutes.
  • Use a floured bowl scraper or floured hands to transfer the dough to a lightly floured surface, sprinkle the top lightly with flour and knead by hand for a couple of minutes until the dough is soft and supple.  It should be tacky but not sticky.
  • Place the dough in a lightly oiled bowl, or divide the dough in half or in as many portions as you plan to bake,  and place in oiled bowls.  Cover and immediately place in the refrigerator.  The dough should rest at least overnight and can be kept refrigerated for up to 4 days.

On Baking Day:

  • Remove the dough from the fridge approximately 2 hours before you plan to bake.  Transfer it to a lightly floured surface and cut it into the desired number of braids you want to use or shape into loaves, or dinner rolls.
  • If you are braiding, flatten each piece with your hand, then roll into cigar shaped lengths.  Roll each piece once, then return to the first piece to roll it into a rope approximately 10 to 14 inches/25-36 centimeters long.  Make sure it will fit on your baking sheet!
    braiding challah
    shaping challah
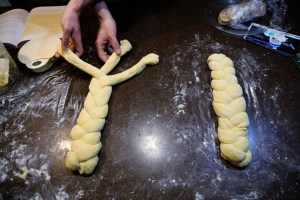
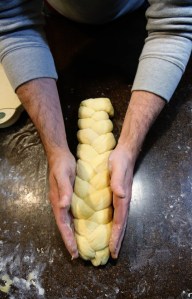
  • Roll each piece to the same length then braid.  Place the loaves on sheet pans lined with parchment paper.
  • Make the egg wash and brush each loaf with the wash.   Reserve the rest of the wash in the fridge, and let the loaves rise uncovered for about an hour. They will not have risen much at this point.  Brush the loaves again with the egg wash and sprinkle with poppy seeds or sesame seeds or a combination of both.
  • Let the loaves rise for another hour until they increase to about 1 ½ times their size.

rising challah

  • 15 minutes before baking, pre-heat the oven to 350 degrees F./177 degrees C. or 300 degrees F./149 degrees C. for convection.
  • Bake for 20 minutes, then rotate the pan and bake for another 15 to 30 minutes, until the loaves sound hollow when thumped on the bottom and the internal temp is around 190 degrees F./88 degrees C. in the center.  If you used a whole egg wash, the crust will get darker than with the egg white wash, so don’t be fooled into thinking the bread is done until it passes the thump and temperature test.
  • Cool on a wire rack for at least 45 minutes before slicing and serving.

Cooking Basics: Homemade Chicken Stock

dark chicken stock
Homemade chicken stock-not as difficult as it sounds, although it takes some forethought.  Next time you roast a chicken or make chicken wings or anything like that, clean and bag up those bones and throw them in the freezer!  The more bones you have, the better and richer your stock will be.  I made today’s batch with just one bird – all bones including the neck.  It wasn’t perfectly clean (meaning there was still some skin/meat on the bones) but with just a little extra straining and skimming, it turned into amazing stock and made more than a gallon!

Step one: get a large stock pot, add vegetable oil to the bottom, get it smoking over medium high heat (like a 7 out of 10) and roast the bones for about 10-25 minutes until deep brown, stirring to ensure it doesn’t just burn:
brown and roast the bones
While the bones are roasting, chop carrots, celery and onion:
roughly chop the vegetables
After the bones are really good and roasted, add in the vegetables. You’ll notice I didn’t peel the carrots.  Keep it simple – you won’t be eating these vegetables – they’re just for flavor!  A rough chop should do it.  I threw in three garlic cloves, too, just for fun.
roast the vegetables and bones together
Let the vegetables roast with the bones until the carrots begin to soften.
create your herb packet
Make a bouquet garni (a little herb packet).  Don’t have cheesecloth?  Use a coffee filter!  I added thyme, bay leaves and peppercorns.  Tie it all up with string and throw it into the pot along with enough water to cover everything by about 4 inches:
tie up the packet in twine
Let it simmer for a long time.  Bring the whole pot to a boil and then reduce it to a simmer and let it sit there all day.  Four or five hours.  When it’s done, strain out all the vegetables and anything that escaped your herb packet.
strain and strain and strain again
Strain again.  And again.  And again.  I got crazy and strained through a coffee filter.  This took way too long…
strain
Be smart like my husband and chill the stock in the fridge and the fat will rise to the top and solidify and you can just scrape it off.  Genius.  That’s why I keep him around.
Homemade Chicken Stock
Voila – beautiful chicken stock!  And very very little sodium.  I didn’t salt this stock so all the salt you add to your soups can be YOUR doing and not hidden somewhere in the stock!  Like I said, this batch made over a gallon and I used it for soups, pan sauces, pasta dishes, risotto, etc.  You can freeze in large muffin tins that hold a cup each and take out a cup each time you need it!  Ours doesn’t last that long, but if you don’t cook with stock really frequently, you might want to freeze it, as most stocks will last about two weeks before getting funky.

Happy Birthday, Family Meal Blog!

one year

I posted my first recipe on this day last year.  It was about a fruity oatmeal “cobbler” I’d make for Olive when I was in the thick of making baby food in huge batches each week.  That’s really what started this blog – well, it’s what propelled it.  I began my journey with cooking when I was about 10 years old and I would cook lunches every day for my family during the summer.  My mom worked and my dad and brothers worked outside in dad’s woodworking shop all day and I was in the house doing the laundry, cleaning and cooking.  Mom had taught me the basics; how to boil water for pasta, how to brown meat, how to not burn the house down, and from there I began enjoying putting a meal together for my family.  I really didn’t care about food until I was married and Matt and I became obsessed with chef culture and technique and the origins of recipes and how to do something from scratch.  Then, I really didn’t pursue cooking until we had Olive. And by pursue I mean, cook every single meal, every single day of the week except for Saturdays.  I started to feel like my biggest source of joy and peace was found in the kitchen.  I feel more confident there than I do anywhere else.  Cooking, for the most part, makes sense to me, and it makes people happy and heals sickness and just generally brings people closer together.

In the past year, I’ve posted 132 times, I’ve had one recipe pinned over a thousand times on Pinterest and I even got to shoot a little segment on a local access show called 24 Frames, which I am dying to share with everyone once it becomes available online.  When I started this blog, I gave myself the goal of posting a couple times a week for one year and I am happy to have met that goal!  I plan on continuing and I’m happy no matter what happens.  If everyone stops caring about this blog tomorrow, I will carry on because I love cooking, I’m cooking every day, anyway, so why not photograph and document it, and I love having a history of recipes from my family to look back on.  This coming year holds many new adventures, as well, and I’m looking forward to them as they develop!

Thank you for the fun ride, for making me feel super special and a special thank you to my friend, Katrina, who said over one year ago, “Um, why aren’t you writing a food blog, already?”  Love you, Katrina.  🙂

Superbowl Food – Nacho Grits!

nacho grits


Super Bowl?  Super bowl!  Super good idea in a bowl.  Nacho grits? Not yo grits!  I’m done.

You take all the things you love about nachos and you cook a big pot of grits (which are just liquid corn chips if you think about it) and you put out bowls and let people top their grits with whatever combination they love the most!  Provide chips, too, because what jerk makes people crave nachos and then doesn’t have that as an option?  Not this gal.  After making all the toppings, I REALLY wanted super-cheesy nachos!  But the nacho grits was an awesome idea, so we had to create it.  And it was tremendously filling and amazing.

For my bowl, I went with chorizo, black olive, scallion, shredded asadero cheese, Ro-tel, cilantro and Mexican crema.  I incorporated cheese and garlic into the grits, so they already had that “nacho cheese” flavor.  Really quite delicious!  I’d recommend very small bowls for this magical side dish at the big game because it will fill your guests up very quickly!

nacho grit spread


Click here to see my recipe for grits and let your imagination run wild with all your favorite nacho toppings!

Superbowl Food – Korean Fried Chicken Wings with a Celery and Blue Cheese Slaw

celery blue cheese slaw and korean fried chicken

This is the best fried chicken I’ve ever had.  We only  make fried chicken about twice a year and when we do, it has to be this recipe.  Crispy, light batter doesn’t overwhelm the chicken and it’s SO crunchy, you’d think it was double coated.  Koreans know what they’re doing with fried chicken, and I think if you did this preparation to some chicken wings on Game Day, you would definitely be the hero of the hour.  The blue cheese celery salad is an amazing side for the chicken.  Crunchy and tangy and creamy – the perfect slaw/salad for fried chicken!

korean fried chicken

Korean Fried Chicken*

Kosher salt
3/4 cups corn starch
1 teaspoon baking powder
2 pounds chicken wings (about 12 whole wings)
2 quarts peanut oil or vegetable shortening
1/2 cup all-purpose flour
1/2 cup cold water
1/2 cup vodka

Combine 2 teaspoons kosher salt, 1/4 cup cornstarch, and 1/2 teaspoon baking powder in a large bowl and whisk until homogenous. Add chicken wings and toss until every surface is coated. Transfer wings to a wire rack set in a rimmed baking sheet, shaking vigorously as you go to get rid if excess coating. Transfer to refrigerator and let rest, uncovered, for at least 30 minutes and up to overnight.

When ready to fry, preheat oil to 350°F in a large wok, Dutch oven, or deep fryer.  We used a wok on the stove.

Combine remaining 1/2 cup cornstarch, 1/2 teaspoon baking powder, flour, and 2 teaspoons kosher salt in a large bowl and whisk until homogenous. Add water and vodka and whisk until a smooth batter is formed, adding up to 2 tablespoons additional water if batter is too thick. It should have the consistency of thin paint and fall off of the whisk in thin ribbons that instantly disappear as they hit the surface of the batter in the bowl.

Add half of the wings to the batter. Working one at a time, lift one wing and allow excess batter to drip off, using your finger to get rid of any large pockets or slicks of batter. Carefully lower wing into hot oil. Repeat with remaining wings in first batch. Fry, using a metal spider or slotted spatula to rotate and agitate wings as they cook until evenly golden brown and crisp all over, about 8 minutes. Transfer to a paper towel-lined plate and season immediately with salt. Keep warm while you fry the remaining wings.

We dipped ours into traditional buffalo sauce, which we love.  The chicken is so gloriously crispy that we didn’t want to totally coat it in sauce.  Do as you please.  The original recipe calls for a mighty fine sweet soy sauce that I highly recommend.

*absolutely did not mess with this perfect recipe from Serious Eats

slaw

Celery and Blue Cheese Slaw*

Celery Ribs (thinly sliced at an angle)
1/2 Red Onion (very thinly sliced; 1/2 cup)
1/2 cup fresh Flat-Leaf Parsley leaves (chopped)
1 tablespoon Sherry Vinegar
1 tablespoon plus 1 teaspoon Extra Virgin Olive Oil
1/2 teaspoon freshly grated Lemon Zest
1/4 teaspoon Kosher Salt
1/8 teaspoon freshly ground Black Pepper
1/4 cup crumbled Blue Cheese

In a large skillet, add one tablespoon of butter and saute the celery and onion until just beginning to soften, but still crunchy, about 5 minutes.  In a large bowl, toss the parsley, vinegar, olive oil, lemon zest, salt, and pepper and whisk to combine.  Fold in the celery, onion and blue cheese and serve!

*adapted from Carla Hall’s recipe

English Muffins – Family Guest Post

English Muffins from Scratch
The guy that inspires me to do everything better in my life wrote this post today.  He is known affectionately by several of our friends as “The Bread Man” and rightfully so.  After deciding to cook through The Bread Baker’s Apprentice a few years back, he’s baked bread nearly every week since then.  All Matt wants to do in life is to enjoy the process.  It is a rare talent that I do not possess.  I care much more about the outcome than he does and every day I learn from him how to live in the moment, just a little bit better than the day before.  Without any more rambling, here’s Matt’s take on English Muffins…of which I ate six…

Homemade English Muffins

When we go out for dinner and Alisa asks me what I’m in the mood for the answer is frequently (when it’s not pizza) “barbecue or Asian,” so I guess it’s no surprise that I like David Chang so much. He’s become famous for smoky east-meets-west combinations like his bacon dashi. On his excellent series Mind of a Chef he made equally reverent visits to a top Japanese katsuobushi producer and Allan Benton’s Tennessee smokehouse, did an impressive tour of Tokyo ramen shops and drank an equally impressive amount of Kentucky bourbon.

He’s also no-nonsense about flavor, and every dish of his we’ve made has been great. The Brussels sprouts recipe from Momofuku made a believer out of my dad, a lifelong Brussels sprouts hater. From the simple (has ginger scallion sauce made an appearance on this blog yet?) to the complex – and some of his recipes can get mind-numbingly complex – many of his recipes have become household favorites for us.
What does this have to do with English muffins? This recipe actually comes from the Momofuku cookbook, and as a bread lover and general fan of everything Chang does, I’ve been wanting to try it for a while. I actually made this on a recent Sunday night, perhaps fueled by the return of Downton Abbey, and had to laugh when I realized I was cooking English muffins out of an Asian cookbook at midnight.
These are fun to make – the dough is very delicate, and there’s something really satisfying about laying them into a pan that barely seems warm and turning them gently until they seem somehow sturdier, then start to pick up the first hints of the golden brown color we associate with English muffins. As with every other recipe from this book, they were delicious, and as with every other bread recipe I’ve tried I feel like I could spend years trying to master it.
This recipe is actually from Chang’s chef, Milkbar genius, Christina Tossi.  Here’s a link to the chef herself making these, step by step.  There’s really no way to improve this recipe and we followed it to the letter.  Also, I don’t want to write out 16 steps.
English Muffins

Tilapia with Tomatoes, Butter Beans and Sweet Peppers

tilapia with tomato sauce and butter beans

This was dinner on Monday night.  Olive’s plate looked no different than ours, except I compartmentalized things so she could easily grab them.  She ate one piece of tomato, one bean and all her fish.  She tried and spit out one olive.  We also gave her a cracker and after she ate half, she declared herself “all done.”  That’s it!  We didn’t ask her to eat more, we didn’t get upset that she wouldn’t try any more beans, although I know she loves beans and would like them.  I wanted to but I didn’t.  It’s a hard resolution but we have vowed to stop messing with Olive during meal times.  I have resolved to respect her more and trust her to eat what she needs at the mealtimes provided.  She only has one snack a day, between lunch and dinner, as we usually don’t eat dinner until 7 or 7:30, and so for the most part, she is hungry at meals and will eat.  Lately, because she’s not growing as rapidly as she did around a year-18 months, she doesn’t have a big appetite.  She is fine after a few bites and will declare herself finished, sometimes way before I believe she’s had enough.  But what do I know?  And how exactly do I know how hungry she is when she is probably a tenth the size of me?  I have seen that when she knows she’s not going to be messed with, she acts more controlled, more independent, and she is more focused on her meal.  On the contrary, when she feels watched, observed (it’s hard not to look at a kid while they’re eating), she immediately starts acting out.  She drops things and bangs her spoon on the table and tries to get out of her chair, and if I’m honest, it’s probably because she doesn’t want to eat with someone who stares at her every move and intimidates her to take “one more bite.”  Would you want to eat with one person like that, much less two?!
So we’ve vowed to stop.  Before Matt and all Olive’s stuffed animals as witnesses, we both said we would simply present dinner, encourage her to try new things, and then back OFF.  I firmly believe that if we trust our children to eat well and make good decisions, they will, eventually.  It’s that eventually that I know so many of us parents struggle with.  We want our kids to eat like we do, right now.  And so we often fall back on what we know they’ll like (insert fried or bland food here). We don’t realize that good eating is a learned skill, just like anything else.  It takes time.  It takes a few meals of “I don’t like it” and a few times of eating two bites and declaring “all done.”  But we must stick to it and not abandon ship at the first sign of resistance.  Here are a few rules around eating that we adhere to, nearly every day:

1. Eat only at meal times and one snack a day (Olive is 22 months old, by the way, and I’ve been doing this since she she was about 15 months old.  I do let her have milk between meals, but about an hour before a meal, I cut her off and give her only water if she’s thirsty.)
2. Variety is offered, along with something she recognizes.
3. I serve the new thing to her first, and we all eat a little bit of it together as a “first course,” if you will, because what kid is going to eat Brussels sprouts when there’s chicken on the table?
4. After the new food is presented and at least tried (she doesn’t have to eat much of it, just a taste), then I bring out the rest of the food, I put a little bit of each thing on her plate, explain what everything is, and then back off.
5. No distractions during meals – no toys (well sometimes the stuffed animals eat with us, but they’re not used as a distraction from the food), no toys, a.k.a. iPhones for me and Matt, no answering texts or calls.  This helps.  It really does.  Because as soon as Olive spots a phone, she wants it, or suddenly becomes dissatisfied with her sitting-down-and-not-playing-instead situation.  We try to engage her in our conversation, as well as encourage her not to shout during ours 🙂 It’s a growing and a learning process and more often than not, it does NOT go perfectly, but I think it’s the consistency that is the key.
6. If there’s dessert, you don’t have to do anything special to get it.  Not even eat all your vegetables.  You simply have to wait for everyone to finish.  So, if Olive eats just a bit of dinner, but not much, and I have already planned on serving a dessert, I do NOT tell her she needs to eat more before she can have it.  She can have it if she stays at the table.  If she wants to get down, she can, but if she wants dessert, she must come back, sit down and be civilized to get it. Dessert must not be contingent on her being a “good girl” or eating her “bad broccoli.”  If I could banish one crippling habit in the world, it would be our habit of calling foods “good” or “bad” and rewarding or punishing ourselves accordingly.
7. We eat together.  She doesn’t start first just because she’s hungry.  She waits.  And then we all sit down together.  This teaches respect, patience, and a realization that she’s not the only one that needs consideration.

So before you declare yourself or your kids a failed attempt before even trying, let me remind you that Olive very often doesn’t like what I serve.  She very often will only eat one of four things presented. Sometimes she shocks me and eats EVERYTHING, including the stinky cheese.  But this is rare, and yet I let it be a glimpse and a proof that she likes food, she just doesn’t always want a lot of it.

This meal was from Jamie Oliver’s, Jamie Magazine Recipe Yearbook (on news stands now!).  It’s so full of great recipes and I can’t wait to try more.  We loved the flavors and it was a refreshing way to serve the same ol’ fish and beans 🙂

tilapia with tomatoes, olives and butter beans

Tilapia with Tomatoes, Butter Beans and Sweet Peppers*
serves 4

4 tablespoons olive oil
1 onion, finely diced
1 orange or red bell pepper, diced and seeded
2-4 sweet pickled red peppers (I got mine at the olive bar at our grocery store)
1-15 oz. can diced tomatoes
1/4 cup pitted olives
1 tablespoon tomato paste
1-15 oz. can butter beans, drained and rinsed
1/4 cup fresh dill, chopped
4 white fish fillets (sole, tilapia, swai)

For the sauce, heat half the oil in a medium pan and fry the onion for 5 minutes, or until soft.  Add the peppers and fry for 2 minutes.  Add the tomatoes, tomato paste and olives and season with salt and pepper.  Bring to a boil, then simmer, covered, for 10 minutes.
Add the beans and dill and heat for about a minute.  Set mixture aside.

Heat the remaining oil in a non-stick skillet over medium high heat and cook the fish about 2-3 minutes per side, until a nice golden brown is on each side.  Season with salt and pepper and arrange fillets over the tomato/bean mixture and serve with extra dill and a side of bread – dinner is served!

*adapted from Jamie Magazine Recipe Yearbook

Candied Apple Pie – a family recipe

slice of candied apple pie

My brother in law, Justin, is pretty amazing with a pie plate.  He’s been known to ship his cherry pies across the country just because someone requested it.  I tasted one the first year he was married to my sister in law, Julie, because he mailed one to us in Tulsa for Thanksgiving since he and Julie couldn’t come and were stuck working in Atlanta.  It was amazing and it made me doubly glad he married into the family. 🙂  He is a man of many talents and you’d never expect this hunter/carpenter/plumber/electrician type guy to be a whiz with baking, but he is!  And he loves it and you can tell.  There’s a pride in what he bakes that can literally be tasted.  Matt and I feel so fortunate that we have two more enthusiastic hands in the kitchen around the holidays in Justin and Julie.  We’re a family centered around the table with forks in hand!

This recipes was one he made over the Christmas break.  He first made a candied cherry pie and followed that up with this candied apple pie, which was so beautiful and rustic, I had to take pics and then, I had to have the recipe after I tasted it – amazing.  I know pie season is over and New Years Resolutions are done, but if you have room in your heart for one more pie this winter, make it this one.

candied apple pie

Candied Apple Pie
makes one, 10″ pie

For the crust:

2 1/2 cups flour
2 sticks of butter, very cold and in small cubes
1 tsp salt
1 tsp sugar
1/4 cup ice water, more or less as needed

In a stand mixer, add the first cup and a half of flour, the salt and sugar, and gradually beat in the butter by small handfuls until each addition is pretty well incorporated.  When all the butter has been added, add the last cup of flour and mix slowly to combine.  Add tablespoons of water until the dough just comes together when pressed between your fingers.  Wrap the dough in a plastic bag (I use a bread bag) and flatten out into a disc and let chill for at least 30 minutes.  When ready for the pie, take it out of the fridge and let it warm up a bit on a lightly floured counter space for about ten minutes, and then divide the dough, not exactly in half, but let one half be a bit bigger than the other.  You’ll use the slightly smaller half for the top of the pie.

For the Filling and Assembly:
3-5 lbs Granny Smith apples (or any firm, tart apple), cored, peeled, halved and sliced thin
1 cup brown sugar
1 stick of butter (8 tbs)
1 cup granulated sugar, plus extra for sprinkling
1 tablespoon cinnamon
1 egg white

In a 10″ cast iron skillet melt the butter and add the brown sugar. Stir until brown sugar is dissolved.  Set aside.

Peel and slice the apples (this little gadget is worth buying!). In a large mixing bowl,  stir 1 cup granulated sugar with the cinnamon and mix in the apples. Set aside.

Roll out the bigger of the two pie crusts and lay into the skillet, on top of your brown sugar/butter mixture.  Fill crust with apple mixture.  Roll out the smaller crust over the top and crimp edges and and trim any excess. Cut several single blade-width vent slots. Baste top with lightly whipped egg white then sprinkle with white sugar. Cook at 350 degrees for one hour.

Serve right out of the pan with ice cream or wait a bit for it to cool and the caramel in the bottom will be extra gooey.  It’s up to you.  If the bottom seems to be sticking and won’t come out, simply warm the skillet on a burner over low heat until the caramel melts and you can remove a slice.

Enjoy!

skilled apple pie

Sweet Pea Salad with Leek and Bacon

Pea and Leek Salad
This is just a fantastic side dish for any meal, any night of the week!  It’s fast, it’s adaptable to what you have on hand, and it’s tasty warm or cold!  So it’s perfect as a lunch box addition, or great warmed as a side for a hearty meal like pot roast, which is what I served this with yesterday at lunch (yay, leftovers!)

With just a touch of mayo to add richness, this isn’t a heavy dish at all.  I added leek because I think leeks improve just about any dish.  Brightness from rice wine vinegar cut what could have been a bland dish.  I’m happy with how it turned out, the girl seemed to enjoy it (as peas are a wonderfully natural finger-food for little hands) and it made a great side multiple days in a row.  Can’t ask more out of frozen peas than that!
Leek and Pea Salad

Sweet Pea Salad with Leek and Bacon

3 cups frozen green peas
1 leek, split in two and chopped fine and washed well (they’re dirty suckers)
4 slices of bacon, cut into 1/2″ strips
2 tablespoons mayo
2 tablespoons rice wine vinegar
salt and pepper to taste

Bring a large pot of salted water to boil and boil the peas until tender but still firm, about 10 minutes.  Rinse them under cold water in a colander and set aside.

Crisp the bacon in a pan and remove with a slotted spoon and set aside on paper towels to drain.  Remove all but 1 tablespoon of the bacon grease from the pan and saute the leeks until tender.

Put the peas, bacon and leeks in a large mixing bowl and add the mayo and vinegar and toss well to evenly coat everything.  Taste and season with salt and pepper, and maybe even more vinegar if you feel it still needs some brightness and serve at room temp or cold!  Or warm!  It’s all good 🙂


Cranberry Rosemary Biscotti

rosemary cranberry biscotti
As I type, I’m eating one of these merry little cookies.  The tart bite of the cranberry and the floral spring of the rosemary, combined with the sugary sweetness of white chocolate just tastes and looks like Christmas to me. More than the joy of eating these cookies is the tradition of making them.  I think holiday traditions are as comforting as coming in to a warm house from the cold.  Traditions are the glue that holds the holiday season together, no matter how hectic and scared we may get that Amazon Prime really won’t come in two days…

I’ve been doing too much, lately.  I got in over my head with a few embroidery projects because 1. I’m still new to the craft, but 2. I enjoy it so much that, 3. I think I am better than I really am, so 4. It takes me much longer to complete a project in real life than it does in my head.  I also feel that with a baby in the mix and a couple precious hours in the day to get things done, that I should have scaled back.  Baked less, bought fewer presents, gotten take-out a little more often.  But I felt compelled to keep the ship afloat and do everything I wanted to do, even if there was no time.

Amidst this feeling of being on a slowly sinking ship, I still hauled my tail into the kitchen yesterday morning and got the dough for this biscotti mixed up.  I don’t think I’ve ever made the same version of this recipe twice, but that stops this year.  I’ve finally found a combination of recipes that works and that tastes good.  I’ve tried everything you can imagine from a no-butter, all egg white recipe (sad) to a recipe that called for oil (weird) and switching between fresh cranberries or dried.  I don’t know why I tried so many variants when I knew in my heart that cookies need and deserve to be made with butter.  And after using dried cranberries every year, I tried fresh this year and I really love it.  It distinguishes the cranberry from what could have been any ol’ dried fruit.  Fresh cranberries tint the dough slightly swirly pink and with the flecks of green rosemary, these cookies just make me feel the season that much more.  Baking brings me closer to peace.  Being in the kitchen is a calm that I don’t feel anywhere else.  And so, even though Christmas seemed to come exactly 5.5 seconds after Thanksgiving this year, I found a pocket of time to keep the tradition going and bake my holiday anchor, also known as: Cranberry Rosemary Bisotti.

cranberry rosemary

Cranberry Rosemary Biscotti
makes about 2 dozen cookies

2 cups AP flour
1 1/2 teaspoons baking powder
3/4 cup sugar
1/2 cup  unsalted butter, room temp
1 teaspoon grated lemon zest
2 tablespoons chopped fresh rosemary
1/4 teaspoon salt
2 large eggs
1 1/2 cups fresh cranberries, cut in half
6 ounces white chocolate chips

Preheat the oven to 350F.  Line two baking sheets with parchment paper, or use a silpat.  Whisk the flour and baking powder in a medium bowl. Using an electric mixer, beat the sugar, butter, lemon zest, and salt in a large bowl till fluffy. Beat in the eggs 1 at a time. Add the flour mixture and beat just until blended. Stir in the rosemary and cranberries with a rubber spatula gently, until well incorporated.

Form the dough into two logs, side by side on a baking sheet.  Shape into long, flat strips, about 10″x 3″ by about 1/2″ high.  Bake for 30 minutes until firm and then let cool about 20 minutes before cutting.

Cut the logs into 1/2″ strips and arrange the slices on the baking sheets and bake for 30 minutes, flipping over once during baking.  Let the cookies cool completely on a rack before drizzling with white chocolate.

Melt the white chocolate chips in a microwave safe bowl at 30 second increments, stirring after each time, until just melted.  With a spatula, dunk into the chocolate and fling it around the kitchen with wild abandon.  Or, just drizzle it over the biscotti until completely used up and everything is a huge mess.  Let it dry before storing in an air tight container for about 2 weeks.  These cookies keep a while, so they’re great for gifts!

Ollie and her biscotti