Chewy Mexican Chocolate Cookies

Mexican Chocolate Cookies 3
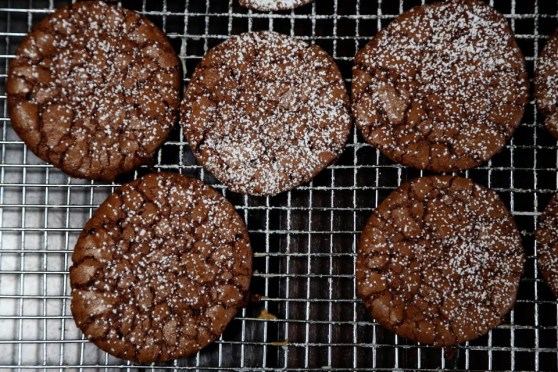
This is one of my most favorite cookie recipes.  I found it a few years ago in a baking issue of Cooking Light magazine.  I’ve made it several times and I always get requests for the recipe.  The original recipe is soft out of the oven but then it hardens up pretty fast and becomes sort of like a short bread or pecan sandy texture.  I love the original, crunchy, good-with-coffee version, but I’m a soft and chewy cookie kinda gal.  So I adapted the recipe a bit to make the cookies more flat and chewy and I LOVED the results!  Crispy along the edges, soft in the middle – with a bite from the pepper and cinnamon!  As you can tell, I’m a fan of the Mexican chocolate flavor and I hope, within my life, to incorporate it into as many baked goods as possible.

Chewy Mexican Chocolate Cookies
I hope you try this recipe out!  If you’d like the cookies to be the original crunchy style, leave out the extra egg and cut back to 4 TBS butter.  But I don’t think you will want that after you taste these 🙂

Chewy Mexican Chocolate Cookies
makes about 30 cookies

5 oz bittersweet chocolate, coarsely chopped (I use Ghirardelli 60% chips and skip the chopping)
3.4 oz AP flour (about 3/4 cup)
1/2 tsp ground cinnamon
1/4 tsp baking powder
1/4 tsp salt
a few grinds of black pepper
a pinch of cayenne
1 1/4 cups sugar
6 TBS butter, softened
2 eggs
1 tsp vanilla extract

Preheat the oven to 350F. Place the chocolate in a small glass bowl and microwave for one minute, stir and microwave 30 seconds more to fully melt.  Stir with a rubber spatula to full incorporate and ensure it’s all melted and set aside to cool.

Combine the flour, cinnamon, baking powder, salt, cayenne and black pepper and stir well with a whisk.

Combine sugar and softened butter in a large bowl and beat with a mixer or by hand until well blended.  Add the eggs and beat well.  Add the cooled chocolate and vanilla and beat until just blended.  Fold in the flour mixture until fully incorporated.

Drop by level tablespoons 2 inches apart on a baking sheet lined with parchment paper (I’ve tried it without and they will come off a regular sheet pan if you spray it with enough oil.) Bake at 350F for 12 minutes or until cracked on top and almost set.  Let the cookies cool on the pan for a couple minutes and then transfer to a wire rack until cooled completely.  Dust with powdered sugar if desired!

Mexican Chocolate Cookies 2

*recipe adapted from Cooking Light magazine, 2010

Banana Caramel Cream Pavlova

Bananas Foster Pavlova
This seems like a Sunday afternoon dessert.  Ethereal, light, comforting and sweet.  For many during the season of Lent, Sunday is a break from their chosen 40 day fast.  We had to break our fast this morning as we had family in town and went to church and then they had to get a quick lunch and get on the road.  So we had brunch out at our favorite place, Crafthouse.  Does it count if we didn’t pay for the meal? 🙂 Anyway, we are dedicated to our no-eating-out fast and will continue throughout the weeks and will not plan on breaking the fast on Sundays.

One of my plans for Lent is to plan meals that are more exciting than going out to eat – things we look forward to more than going to a restaurant!  This fancy-schmancy dessert could make anyone feel as if they were at a posh little bistro having dessert and coffee!  I’ve done a pavlova on this blog before, and I love how versatile they can be.  A few weeks ago I bought this yogurt in a moment of weakness.  I always buy plain yogurt and add my own sugar because flavored yogurts have SO MUCH SUGAR.  However, I couldn’t resist the flavor description: honey salted caramel?! After we tasted it, Matt suggested it would be awesome on a pavlova and that we could add bananas and have it be a shockingly all-white dessert.  Cloud like, from the Greek Gods themselves.  I added vanilla bean to my pavlova and torched raw sugar on top of the bananas and with the combination of the salted caramel tanginess of the yogurt, it made an incredible dessert!  It makes me want to try lots of different combinations with various yogurt flavors!  I’ll post my pavlova recipe for you, here, again and you can do whatever toppings you can dream up!

Vanilla Bean Pavlovas
makes 12-15 small meringues

1 1/2 teaspoons vanilla bean paste
1/2 teaspoon cream of tartar
1 1/2 Tbsp cornstarch
1 1/2 cups granulated sugar
5-6 (about 6 oz) large egg whites, room temperature
Pinch salt

Place rack in the middle of the oven and preheat the oven to 275°. Line a large baking sheet with parchment paper.  Stir the cornstarch into the sugar in a small bowl.

In a large bowl of a heavy-duty mixer, fitted with whisk attachment, whip egg whites, cream of tartar and salt, starting on low, increasing to medium speed until soft peaks start to become visible, approximately 2 to 3 minutes.

Increase speed to medium-high, slowly and gradually sprinkling in the sugar-cornstarch mixture. A few minutes after these dry ingredients are added, slowly pour in the vanilla.  Increase speed a bit and whip until meringue is glossy, and stiff peaks form when the whisk is lifted, 4 to 5 minutes.

Pipe or spoon the meringue into 8-10 large round mounds that are 3 inches wide on the parchment-lined baking sheet.  With the back of a spoon, create an indentation in the middle of the mound for holding the filling once meringue is baked.

Place baking sheet in the oven. Reduce oven temperature to 250°F. Bake for 50-60 minutes, or until the meringues are crisp, dry to the touch on the outside, and white — not tan-colored or cracked. The interiors should have a marshmallow-like consistency. Check on meringues at least once during the baking time. If they appear to be taking on color or cracking, reduce temperature 25 degrees, and turn pan around.

Gently lift from the baking sheet and cool on a wire rack. Will keep in a tightly sealed container at room temperature for a week.

Cooking Basics – Salted Caramel Sauce

Salted Caramel Sauce

This week is so busy with all the prep for our fundraiser dinner for Carpenter’s Church!  So, instead of an involved recipe, I decided to give you a simple kitchen basic that I have made about fifteen times in the past twenty-four hours as a topping for the banana bread pudding I’m doing for the dinner tomorrow.

Okay, okay, so maybe this isn’t the most basic kitchen skill to have.  It’s not exactly on par with the humble chicken stock. HOWEVER! It tastes outstanding and you have the ingredients in your house right now.  You could make a batch for ice cream, for brownies, as a topping for a cake or as a totally amazing sweet fondue for bread/fruit/a spoon.  You don’t need a reason.  You could jar this up and give it away as gifts at Christmas or any time.  You could make a few batches and keep them all to yourself – the only thing I know for sure is that if you try this recipe, you WILL be back for more…

Salted Caramel Sauce
makes about a cup

1 cup white sugar
1/4 cup water
1/2 cup warmed heavy cream (warm it in the microwave for a minute)
2 tablespoons unsalted butter
1 tablespoon vanilla bean paste (or extract)
3/4 teaspoon kosher salt

In a large saucepan over medium heat, add the sugar and water and stir with a spatula to fully incorporate.  Put a lid on the pot and let it come up to a simmer.  Have you ever read recipes that tell you to brush the sides of your pan with a wet basting brush to keep sugar crystals from forming while making caramel?  No more!  That’s tedious and I don’t like getting my fingers that close to boiling sugar.  The lid creates condensation that drips down and keeps all the sugar in place, instead of creeping up the sides like it will if the lid’s off.

Swirling occasionally while cooking, check for the color.  When it develops a nice golden amber color, remove it from the heat and stir in the heavy cream and vanilla.  This will bubble furiously, but just whisk, whisk, whisk until it calms down.  Add the butter and whisk to incorporate.  Then, add the salt and stir until dissolved.  Let it cool and taste test for salt level.  Store in jars on the counter for a week or in the fridge for a month.


Whole Wheat Banana Chocolate Chip Muffins

whole wheat banana chocolate chip muffins
I had an abundance of bananas and buttermilk.  I had been eating pretty great all week as far as variety of vegetables and fruits and had kept my portions reasonable and so I didn’t want to totally derail that train by having two dozen muffins in my house.  So I scratched the banana layer cake recipe I found and turned it into a whole wheat muffin made with fresh buttermilk and raw sugar.  I am typically not a whole wheat flour fan because I feel that it gives breads that hint of Play-Doh that has never really appealed to me, much.

The good news about these muffins?  No Play-Doh! The banana and buttermilk mask the whole wheat “thing” and the texture was fluffy and not too dense or heavy like you might expect.  Of course, I added dark chocolate chips because I am a fan of the banana/chocolate combination and think a few more antioxidants never hurt anyone 🙂

Starting today and extending into next week, I’ll be posting good, wholesome recipes that aren’t too indulgent, but will also not leave you feeling deprived, either.  You can have your cake and eat it too, so to speak!

whole wheat banana chocolate muffins


Whole Wheat Banana Chocolate Chip Muffins*
makes 2 dozen

2 1/4 cups whole wheat flour
3/4 teaspoon baking soda
1/2 teaspoon baking powder
1 tsp cinnamon
1/2 teaspoon salt
1 cup mashed very ripe banana (about 2 large)
1/4 cup buttermilk or plain yogurt (I used buttermilk)
1 teaspoon vanilla bean paste or extract
1 stick (1/2 cup) unsalted butter, softened
1 cup raw, demerara sugar  (can substitute any type)
2 large eggs
1 cup chocolate chips

Preheat oven to 350° F.  Line two muffin pans with papers and spray the papers with non-stick spray.

Into a bowl sift together flour, baking soda, baking powder, cinnamon and salt. In a small bowl whisk together mashed banana, buttermilk, and vanilla. In a large bowl with an electric mixer beat together butter and sugar until light and fluffy and beat in eggs 1 at a time, beating well after each addition. Stir in flour and banana mixtures alternately, beginning and ending with flour mixture and stirring after each addition until just combined. (Do not overmix or you’ll get tough muffins – a few lumps are okay.)  Gently fold in the chocolate chips.

Divide batter evenly among muffin cups and bake in upper and lower thirds of oven, switching position of pans halfway through baking, about 25 minutes total, or until a tester comes out clean. Turn the muffins out on a cooling rack immediately as sitting in the muffin tins will cause the bottoms to brown too much.  Let them cool most of the way before serving.

*recipe adapted from Epicurious

Dark Chocolate and Ricotta Pancakes

dark chocolate ricotta pancakes


Chocolate or coffee?  Which ingredient controls my mind the most?  Coffee may win out just a hair with its zero-calorie-yet-complex-and-indulgent attribute, but chocolate comes in at a close second.  I received an amazing cookbook for Christmas from Matt.  The Mast Brothers Chocolate cookbook.  It’s stunning.  A voyage in pictures and recipes in the lives of Rick and Michael Mast – two brothers who make and sell chocolate in New York City.  The pictures are dark and stunning and the stories are as wholesome and exciting as the product they sell.  Everything from a sustainable source, every ingredient in their chocolate from a farmer they literally know and have probably had dinner with.  Nothing they do is the easy way out and it’s an amazing way of life to aspire to, and a joy of a book to read through like a novel.

One of the recipes that caught both Matt’s and my eye was the dark chocolate and ricotta pancakes.  I’m usually on the lookout for something special to fix us for breakfast on Saturday and that recipe just jumped off the page.  The picture showed these nearly-burned pancakes (although not burned – just super dark chocolate) and browned butter frothing around the edges.  Sold.  All the recipes in this book (if you can procure some really great chocolate) are simple and straight-forward.  Hardly any recipe takes up more than a paragraph and so it all seems so accessible.  I used Lindt 70%, our favorite dark chocolate that you can actually find in a grocery store.  The results were amazing – your classic chocolate chip pancake bumped up a notch.  Enjoy and take your Saturday morning a bit slower!

Dark Chocolate Ricotta Pancakes*
makes 10-12 small pancakes

3 eggs, separated
1 cup ricotta cheese
1/3 cup whole milk
3 tablespoons sugar
1 pinch kosher salt
2/3 cup AP flour
3 ounces dark chocolate, finely chopped
6 tablespoons unsalted butter

In a medium bowl, whisk egg yolks with ricotta cheese, milk, sugar, and salt.  Add flour and chocolate and combine.
In a separate bowl using a handheld mixer, beat egg whites to soft peaks.  Fold the egg whites into the flour-ricotta mixture.

Melt one tablespoon of butter for each batch of pancakes in a large cast iron skillet over medium heat.  Ladle batter onto pan in 4-inch circles.  When the edges brown and batter bubbbles, flip pancakes.  They are pretty messy, so just do your best.

Serve with maple syrup and a cup of black coffee and rejoice.

*adapted from Mast Brothers Chocolate: A Family Cookbook

Candied Apple Pie – a family recipe

slice of candied apple pie

My brother in law, Justin, is pretty amazing with a pie plate.  He’s been known to ship his cherry pies across the country just because someone requested it.  I tasted one the first year he was married to my sister in law, Julie, because he mailed one to us in Tulsa for Thanksgiving since he and Julie couldn’t come and were stuck working in Atlanta.  It was amazing and it made me doubly glad he married into the family. 🙂  He is a man of many talents and you’d never expect this hunter/carpenter/plumber/electrician type guy to be a whiz with baking, but he is!  And he loves it and you can tell.  There’s a pride in what he bakes that can literally be tasted.  Matt and I feel so fortunate that we have two more enthusiastic hands in the kitchen around the holidays in Justin and Julie.  We’re a family centered around the table with forks in hand!

This recipes was one he made over the Christmas break.  He first made a candied cherry pie and followed that up with this candied apple pie, which was so beautiful and rustic, I had to take pics and then, I had to have the recipe after I tasted it – amazing.  I know pie season is over and New Years Resolutions are done, but if you have room in your heart for one more pie this winter, make it this one.

candied apple pie

Candied Apple Pie
makes one, 10″ pie

For the crust:

2 1/2 cups flour
2 sticks of butter, very cold and in small cubes
1 tsp salt
1 tsp sugar
1/4 cup ice water, more or less as needed

In a stand mixer, add the first cup and a half of flour, the salt and sugar, and gradually beat in the butter by small handfuls until each addition is pretty well incorporated.  When all the butter has been added, add the last cup of flour and mix slowly to combine.  Add tablespoons of water until the dough just comes together when pressed between your fingers.  Wrap the dough in a plastic bag (I use a bread bag) and flatten out into a disc and let chill for at least 30 minutes.  When ready for the pie, take it out of the fridge and let it warm up a bit on a lightly floured counter space for about ten minutes, and then divide the dough, not exactly in half, but let one half be a bit bigger than the other.  You’ll use the slightly smaller half for the top of the pie.

For the Filling and Assembly:
3-5 lbs Granny Smith apples (or any firm, tart apple), cored, peeled, halved and sliced thin
1 cup brown sugar
1 stick of butter (8 tbs)
1 cup granulated sugar, plus extra for sprinkling
1 tablespoon cinnamon
1 egg white

In a 10″ cast iron skillet melt the butter and add the brown sugar. Stir until brown sugar is dissolved.  Set aside.

Peel and slice the apples (this little gadget is worth buying!). In a large mixing bowl,  stir 1 cup granulated sugar with the cinnamon and mix in the apples. Set aside.

Roll out the bigger of the two pie crusts and lay into the skillet, on top of your brown sugar/butter mixture.  Fill crust with apple mixture.  Roll out the smaller crust over the top and crimp edges and and trim any excess. Cut several single blade-width vent slots. Baste top with lightly whipped egg white then sprinkle with white sugar. Cook at 350 degrees for one hour.

Serve right out of the pan with ice cream or wait a bit for it to cool and the caramel in the bottom will be extra gooey.  It’s up to you.  If the bottom seems to be sticking and won’t come out, simply warm the skillet on a burner over low heat until the caramel melts and you can remove a slice.

Enjoy!

skilled apple pie

Mexican Dark Chocolate Waffles with Cinnamon Whipped Cream

Mexican Chocolate Waffles with Cinnamon Cream

As I was drifting off to sleep after our New Year’s Eve party, I suddenly shouted out, “Mexican chocolate waffles!  Wouldn’t that be great?! And served with cinnamon whipped cream!”  “or dulce de leche,” Matt said.  YES! It was one of those ideas I knew would work.  I had some Mexican chocolate in our pantry that I hadn’t used, yet, and I usually like to think of a fun breakfast when we are all home together.  So New Years Day seemed like the perfect morning for a fun breakfast, laced with chocolate.

It worked as good as it did in my dream-like state at 1:30 a.m.  The chunks of Mexican chocolate gave the waffles a chocolate/spice/sugar grit throughout, and the waffles were crispy and as I brushed them with melted butter, I knew we had a winner.  I’d recommend these for any time you want something a little out of the ordinary.  The girls at the grocery store seemed to think me mad for buying Ibarra brand instead of Nestle’s Abuelita.  I really am not well versed in Mexican chocolate, but next time, I’ll avoid the scorn and buy Abuelita brand.  However, for tasty little chunks in a dark chocolate waffle, Ibarra worked just great 🙂

You can serve these with the simple cinnamon vanilla whipped cream, or like Matt suggested, I think some warmed dulce de leche would be amazing.  Or even some simple chocolate syrup.  No matter what you do, these waffles stand delicious on their own!

Mexican Chocolate Waffles

Mexican Dark Chocolate Waffles with Cinnamon Whipped Cream*
makes about 6-8 small waffles, or 4-6 Belgian

3-1/2 oz AP flour (about 1/2-3/4 cup)
1 oz. (1/4 cup) cornstarch
1/2 tsp salt
1/2 tsp. baking powder
1/4 tsp baking soda
2 TBS dark cocoa powder
1 tsp cinnamon
3/4 cup buttermilk
1/4 cup milk
6 Tbs. vegetable oil
1 large egg, separated
1 Tbs. sugar
1/2 tsp vanilla extract
1/2 cup Ibarra Mexican chocolate (half a baking bar), chopped fine

Cinnamon Whipped Cream
1 cup heavy cream
1 TBS cinnamon
1 tsp vanilla bean paste or vanilla extract
1 tsp sugar

Preheat the oven to 200F.

Combine all the dry ingredients in a large bowl with a whisk and set aside.  In a separate bowl, combine the milks, oil, egg yolk, sugar and vanilla extract and blend well.  In a separate bowl, whip the egg white with a pinch of salt until stiff peaks form.   Set aside.  Mix the wet ingredients into the dry with a few simple stirs, then mix in the chopped chocolate and then gently fold in the egg white until fully incorporated.  Don’t overmix!  The egg white makes these waffles crisp!

Cook the waffles according to your waffle maker directions.  I use a stove-top waffle maker and it takes about 1-2 minutes per side over medium high heat and I use about 1/2 cup waffle batter spread over my waffle iron per batch.

As you bake, place the finished waffles directly on your oven rack to keep crisp and warm until ready to serve.

For the whipped cream: In a tall cup with an immersion blender, or in a stand mixer with the whisk attachment, blend the heavy cream, cinnamon, vanilla bean paste and sugar until soft to medium peaks form.  Give a generous dollop per waffle and top with shaved chocolate or cinnamon.  Enjoy!

*base waffle recipe adapted from Fine Cooking

Red Velvet Cake – a family recipe

Red Velvet
This is the best red velvet cake I’ve ever tasted.  In general, I am not a fan of cream cheese frosting.  I feel it overwhelms a cake’s delicate flavors and just makes everything taste like cream cheese.  But on a red velvet cake, it’s the only conceivable option.  In fact, I get rather annoyed when bakeries sell red velvet cupcakes with a generic butter cream frosting.  Who are they kidding?  I feel lucky that I ran across this recipe and even MORE lucky that this recipe originates within my own family!  My sweet mother-in-law, Peggy, is the owner of this amazing cake recipe and the first time I had it, I was rather astonished with how perfect it was.  I guess it was one of those instances where I didn’t know what I was missing until I had something  better.  I didn’t know that all this time, I’d been having sub-par red velvet cakes, but when I tasted hers, I knew instantly this was the only recipe I’d ever use for red velvet, ever again!

You may be a little squeamish about using SO MUCH food coloring in this cake, but my thoughts on that are: 1. How often do you eat red velvet cake, anyway? and 2. You only need a small piece of this two-layer, rich cake to feel happy, anyway, and 3. get over it – it’s red velvet cake.  It’s supposed to be red!  If you still can’t take it, I’m pretty sure that someone out there has invented an organic red food coloring made out of beets – just ask Google and let me know how that goes.

My mother-in-law made this on Christmas Eve and I couldn’t help but feel, in that icy cold weather in northern Oklahoma with a fire going in the background, that this cake was extremely wintery and Christmassy.  We enjoyed it with a cup of coffee and the view of the woods covered in a thick layer of ice outside our window.  An experience to remember!  Merry Belated Christmas Cake to you all, and to all, a good night –

slice of red velvet cake
Red Velvet Cake*
makes a 9″-2 layer cake

2 1/2 cups AP flour
1 1/2 cups sugar
2 tsp cocoa powder
1 tsp salt
1 tsp baking soda
1 1/2 cups vegetable oil
1 cup whole milk
2 eggs
1 tsp vanilla
1 tablespoon + 1 tsp white vinegar
1 ounce red food coloring

Preheat oven to 350F.  Spray two, 9″ round baking pans with non stick spray and then line the bottoms with parchment paper.

In a small bowl, add the vinegar to the milk and set aside to curdle.  In a medium bowl, combine dry ingredients with a whisk until fully blended.  In a large mixing bowl, whisk all the wet ingredients except the food coloring until completely incorporated.  Gently fold in the dry ingredients until just combined, then add red food coloring until desired color.  For full-on red velvet awesomeness, add the entire bottle.  Don’t worry, you’re not eating the whole cake by yourself (I don’t think.)

Pour batter into pans and bake for 30-35 minutes until a toothpick inserted in the center comes out clean.  Remove from oven and let cool in the pan for 5 minutes, and then turn out on a cooling rack and let it cool COMPLETELY before assembling with the icing.

Cream Cheese Icing

16 ounces confectioners’ sugar
1 stick softened butter
1 – 8oz package of cream cheese, room temp
1 tsp vanilla extract

Cream butter and cream cheese and vanilla together until fluffy.  Add confectioner’s sugar in batches until thick and creamy.  Place one round of cake on a serving tray and spread a thick layer of icing on top.  Then, add the second layer and finish icing the whole cake and let it set, if you can, for at least an hour before cutting and serving.

*I’ve never actually seen Peggy make this cake, but I’ve eaten it several times.  Some of the info is my interpretation from her recipe card that was pretty concise.  The cake instructions literally said, “mix all the ingredients together and bake it for 30 min at 350.  So I added some more detailed instructions 🙂 The part about lining the bottoms of the pans with parchment is all me because I’ve learned the hard way, one too many times with my cakes getting stuck to the bottoms of pans.  But Peg, if you see anything that needs changed, let me know!  

Red Velvet Cake

Chocolate Covered Espresso Brownies

Chocolate Covered Espresso Brownies

I was paid $25 to make this recipe.  Well, technically,  I was paid about $12.50, because Matt was paid the other half to make a loaf of his awesome bread.  Why?  Because an old co worker from his previous job had a Christmas party to go to and a twenty-five dollar limit to spend on a gift.  So he contacted us and said, “Make a couple things.”  The fun thing about these office party gift-exchanges is that the person whose gift got the most steals, or trades in the game, wins $100.

Gary won.  🙂 So I guess you could say these are $75 brownies.  Or $37.50.   Or probably less, because as I well know, it was most certainly Matt’s bread that won the contest.  Hey, Matt – guess what?  You won 1st place for your bread.  Only this time, instead of a $6 check like at the fair, some other guy got $100.  That’s better, right? 😉

The brownies were indeed, great.  I followed a recipe from Fat Witch Brownies (a most awesome brownie book) for an espresso brownie, and then I thought, “What could make this more show-worthy for a gift exchange?”  Covering it in a rich chocolate ganache!  Then, with some sprinkles of cocoa nibs, these brownies become a huge version of a chocolate-covered espresso bean, which in my opinion, is the ultimate adult candy.  They’re like one big “congratulations” for getting older.

And so are these brownies!  Enjoy!

Dark Chocolate Covered Espresso Brownies

Chocolate Covered Espresso Brownies*
worth $37.50

7 tablespoons unsalted butter
1/2 cup bittersweet chocolate chips
2 large eggs
3/4 cup granulated sugar
1 teaspoon vanilla extract
2 tablespoons instant espresso powder
1 tablespoon hot water
1 cup AP flour
1/2 teaspoon salt
1 recipe dark chocolate ganache (see below)
cocoa nibs or crushed up coffee beans for sprinkling

Grease a 9×9″ baking dish with butter.  Dust with flour.  Or use that awesome flour spray.  Preheat oven to 350F.

Melt butter and chocolate in a microwave safe bowl at 30 second increments, stirring with a rubber spatula after each time, until smooth and melted.

Cream the eggs, sugar, and vanilla in a large bowl until smooth, then add the cooled chocolate mixture and continue beating until incorporated.

In a small dish, mix the espresso powder with the hot water until dissolved.  Add it to the chocolate mixture and continue to beat until well combined.

Measure the flour and salt and then sift together directly into the batter.  Mix the batter gently until well combined.

Spread the batter evenly in the prepared pan and bake for 25 minutes or until a toothpick inserted in the center comes out clean.

Remove from the oven and cool on a rack for 1 hour.  Make your ganache while the brownies cool.  After they cool, cut them into 16 squares and gently remove and place on a drying rack, or on sheets of waxed or parchment paper.

Dark Chocolate Ganache*
makes 1 cup of goodness from the heavens

1/2 cup bittersweet chocolate chips
1/2 cup heavy cream

Over medium heat, place the heavy cream in a saucepan and bring to a boil.  Remove the saucepan from the heat immediately after it has just started to boil.  Pour the hot cream over the chocolate chips and let them sit for a minute.  Then, with a rubber spatula, gently begin mixing the chocolate in tiny circles in the center of the bowl.  You will think it will never incorporate.  Keep mixing.  You will think your cream wasn’t hot enough.  Keep mixing.  Chocolate demands patience.  Then, just like magic, the chocolate will deepen its color instantly and you will only have a few more stirs, incorporating the sides and scooping down to the bottom of the bowl, to end up with one, big, glossy, gorgeous bowl of thick, dark chocolate ganache.  Take this and spread over the tops and sides of your cut brownies and sprinkle the tops of your brownies with the nibs or crushed beans and let it cool till the ganache firms up.

*both recipes adapted only very slightly from Fat Witch Brownies.  Go buy this book for someone for Christmas.

EAT! ENJOY!

Happy Thanksgiving!

Santa's Little Helper2

This is the Super Bowl of a cook’s world.  I love this holiday and I certainly don’t want to skip over it in a rush to get to Christmas!  Since Matt and I began developing our love of cooking almost 10 years ago, we have looked forward to Thanksgiving a little more each year.  I think, in a way, we are trying to create our own family traditions this year, with a little family of our own.  We realized with a hint of despair the other day that we may not get to host our own family Thanksgiving until our children are in college!  So we decided that along with trying out new recipes each year and saving some old favorites, we’d have our own Thanksgiving at our home, before heading out of town to spend time with our extended families.

This was our Pre-Thanksgiving!  I printed off each recipe and kept the stack on our counter to refer to as I did my prep.  I couldn’t sleep Monday morning, so I got up around 5 and started chopping leeks, mushrooms and Brussels sprouts.  We had a few friends over who each brought an amazing pie and some blue ribbon biscuits from our friend, Rod, who still won’t share that recipe, almost 20 years later.  🙂 I didn’t get pictures of everything, nor was I trying to do a post on any one particular recipe.  I just took some pics that I could and let the rest go – this was about having a great time with friends and not about styling a plate of food. However, I did get links to the recipes for everything we did.  Everything turned out really fantastic – loved the Brussels Sprouts and the Cheesy Squash Cassrole and that cocktail made everything just a little more sparkly. 😉

brussels sprouts with blue cheese and bacon
Brussels Sprouts with Blue Cheese and Bacon

cranberry orange relish
Cranberry Orange Relish
pimento cheese twice baked potatoes
Twice Baked Pimento Cheese Potatoes

Santa's Little Helper
The cocktail of the evening that made EVERYONE happy – Santa’s Little Helper.  This will be making a repeat appearance. turkey porcetta
Turkey Porcetta

Dishes I made but failed to get a photo of:
Mushroom and Bacon Stuffing
Cheesy Squash Casserole

Again, everything was wonderful and we had a great time with our friends!  Happy Thanksgiving to everyone – have safe travels and we’ll see you back here next week with a report on all the goodies we make at my parents’ house in New Mexico.  There’s a S’mores pie I’ve been wanting to create…