Espresso Chocolate Cake with Cinnamon Cream

Espresso Chocolate Cake with Cinnamon Whipped Cream
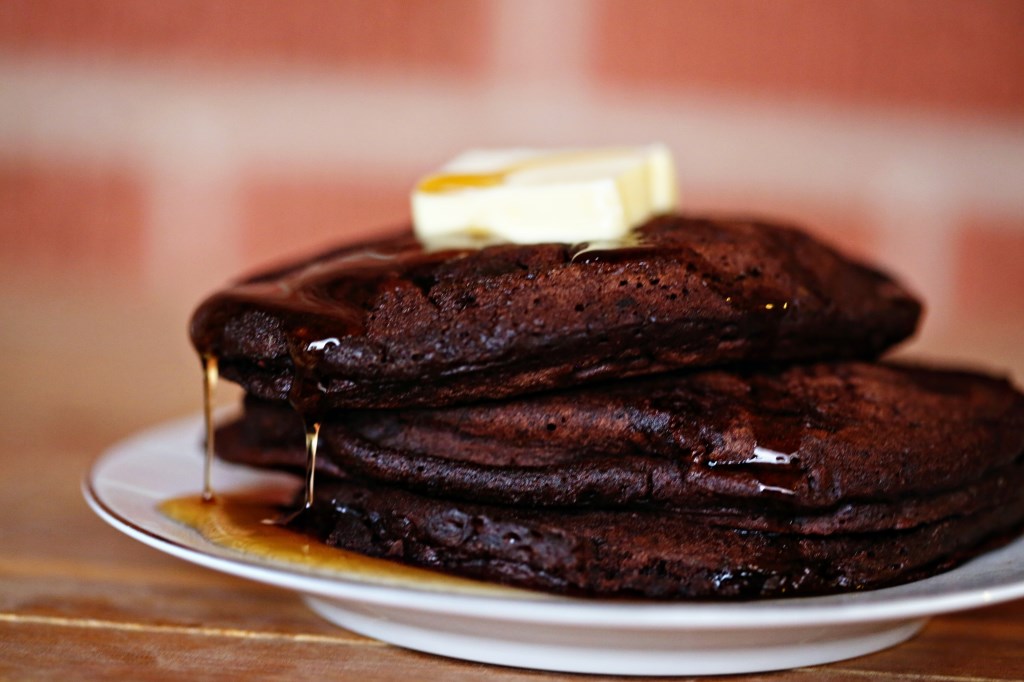
I’m a pretty big fan of the combination of chocolate and cinnamon.  They compliment each other so well in baked goods and the combination nearly exudes warmth.  This flourless indulgence boasts the rich flavors of espresso, as well.  And if there’s anything the first year of motherhood has taught me, it’s that coffee is from the Good Lord.  Chocolate is, as well, but coffee has really become a friend in need this year.  Together, they have become our go-to desserts.  This cake should be enjoyed with coffee if you are into that kind of supreme happiness.  The original recipe doesn’t call for cinnamon, but lately I’ve been adding it to just about everything including the fresh whipped cream I made for this cake.  I put more cinnamon than I thought I should and it turned out perfect.  And then I sprinkled it with cinnamon.  Maybe I have a deficiency?

Either way – try this cake.  And don’t leave out the whipped cream.  It was extra special.  Happy weekend and happy baking!

Flourless Espresso Chocolate Cake

Flourless Espresso Chocolate Cake with Cinnamon Cream*
makes one, 9″ round cake

  • 3 tablespoons unsalted butter, plus more for cake pan
  • 6 ounces bittersweet chocolate, preferably 70 percent cacao, chopped
  • 6 large eggs, separated, room temperature
  • 1 cup sugar, divided
  • 3 tablespoons instant-espresso powder
  • 1 tsp cinnamon
  • 1/4 teaspoon coarse salt
  • 1 tablespoon pure vanilla extract
  • 2 cups heavy cream
  • 2 tbs cinnamon

Preheat oven to 350 degrees. Butter the sides and bottom of a springform pan. Melt butter and chocolate in a glass or other heat proof bowl in the microwave at 30 second increments until melting and stir together to fully melt and incorporate.  Set aside.

Beat together egg yolks and 1/2 cup sugar with a mixer on medium-high speed until thick and pale, about 3 minutes. Add espresso powder, 1 tsp cinnamon and salt; beat until combined, about 1 minute. Add vanilla and melted-chocolate mixture; beat about 1 minute more.

In another bowl, beat egg whites on medium-high speed until foamy. Increase speed to high; gradually add remaining 1/2 cup sugar, beating until stiff peaks form, about 5 minutes. Fold into chocolate mixture in 3 batches. Transfer batter to pan and bake until set, 40 to 45 minutes. Let cake cool completely in pan on a wire rack. Remove side of pan; transfer cake to a serving plate. Serve whipped cream alongside cake.  To make the whipped cream, beat the heavy cream in a mixer on medium-high until soft peaks form.  Sprinkle in the cinnamon and whip a little longer, but not too long – you want the cream to stay soft, not get clumpy (which happens from too much whipping.)  Serve with coffee and be sure and save some for yourself for breakfast tomorrow!

*adapted from Martha Stewart Living

Buffalo Chicken Sandwiches with Blue Cheese Slaw

Buffalo Chicken Sandwiches with Blue Cheese and Celery Cole Slaw
In the Palmer house, we like to do things from scratch.  Sometimes we even go so far as to make the contraption that makes the food (thank you, Alton Brown).  But I would say our current favorite food-past time is eating a dish at a restaurant and saying, “I bet we could make a better version of this at home” and then going home and trying it out.  One of our favorite restaurants here in town is Crafthouse Gastropub.  They always have good brews on tap and they have a creative menu and generally execute things pretty well.  Matt was really excited to try their buffalo chicken sandwich and had been anticipating it for a long time, but it fell kinda short when we finally had it.  Maybe it was because we had this idea in our heads of what it would be and it wasn’t that way – sometimes you can really cheat a restaurant by doing this.  The slaw was really wet and ran down his arm and pooled onto the plate.  The chicken wasn’t “buffalo” enough and was also too big, so it was really hard to eat.  It was a good enough sandwich for what it was, but we said then and there that we’d try this one at home.

So we did.  And it was tremendous.  We used the recipe for the fried chicken sandwich from Serious Eats and I think they really have a perfect process.  Using chicken thighs instead of the breast makes for a smaller patty and a more flavorful one, and it’s easier to eat.  We used our very favorite buffalo sauce and Matt thickened it with a bit of roux and it worked perfectly.  We didn’t want the drippy situation and making the sauce thicker like buffalo gravy – if you will – was the right move.  Matt found a slaw recipe online from a girl who really knows her stuff, Carla Hall from Top Chef, that had celery and blue cheese.  What is more perfect with buffalo chicken than blue cheese and celery?  Then, we totally cheated and bought a nice jar of ranch dressing and mixed in some chunky blue cheese crumbles for the sauce.  And to finish everything off, Matt made outrageous potato rolls for the buns.  It was, by every definition, the perfect chicken sandwich.  Right size, right proportions, right flavor – right on.

I’ll post our thickened buffalo sauce recipe below, as well as Matt’s potato rolls.  There’s a lot of components to this sandwich, but you can improvise on pretty much all of it if you want.  I’d highly recommend keeping the fried chicken thigh the same, though.  I can’t imagine how to improve it.

Buffalo Chicken Sandwich

The Perfect Buffalo Sauce 

  • 1 1/2 tablespoons white vinegar
  • 1/4 teaspoon cayenne pepper
  • 1/8 teaspoon garlic powder
  • 1/4 teaspoon Worcestershire sauce
  • 1 teaspoon Tabasco sauce
  • 1/4 teaspoon salt
  • 6 tablespoons Frank’s hot sauce
  • 6 tablespoons unsalted butter

Mix all the ingredients together in a medium saucepan over low to medium heat until well combined and heated through.  To thicken, like we did for our sandwiches, take two tablespoons of unsalted softened butter in a small dish and add about two tablespoons of flour to form into a paste (an uncooked roux).  Throw this little ball of buttery flour into your buffalo sauce and whisk until fully incorporated and thickened.  We dunked each crispy chicken patty into the buffalo sauce before assembling our sandwiches.

Buffalo Chicken Sandwiches

Potato Buns*
makes 8 sandwich-sized buns

  • 1 russet potato (big enough to make 1/2 cup mashed potato), peeled and chopped
  • 1/3 cup unsalted butter, softened
  • 1 tbsp. honey or agave nectar
  • 1/2 tsp. salt
  • 1 egg
  • 1/2 cup milk, warmed
  • 1 1/8 tsp. instant yeast
  • 1/4 cup reserved potato water
  • 2 1/2 – 3 cups bread flour
  • 2 tbs salted butter, melted, for brushing the buns


Boil potato until tender.  Drain cooking water, reserving 1/4 cup for use in the rolls.  Finely mash the potato and measure out 1/2 cup.  Let cool to nearly room temperature.

In the bowl of a stand mixer fitted with the paddle attachment, mix together the mashed potato, butter, honey, salt and egg.  Mix together on medium speed for about 2 minutes.  Combine the yeast with the warm milk and reserved potato water, and pour into the mixer bowl.  Mix on low speed until incorporated.  Gradually add the flour, about 1/2 cup at a time, until a soft dough forms.  Switch to the dough hook attachment on knead on low speed for 5 minutes, adding more flour if necessary to achieve a soft dough that is slightly tacky but not sticky.  Transfer the dough to a lightly oiled bowl, turning once to coat.  Cover with plastic wrap and let rise in a warm place until doubled in bulk, about 60-90 minutes.

Line a baking sheet with parchment paper.  Turn the down out onto a lightly floured surface and punch it down.  Separate into 8 equal pieces and shape into buns.   Place the buns on the prepared baking sheet, about 1 1/2 inches apart.  Brush each bun with melted butter.  Cover with a clean kitchen towel and let the dough rise again until the rolls have grown into each other, about 30-45 minutes.  Meanwhile, preheat the oven to 400 degrees F.

Bake in the preheated oven for about 15 minutes, until golden.  We started checking the buns for doneness around 12 minutes.  Serve warm.

*recipe adapted from Annies-Eats where we made bigger rolls, left out the sugar and brushed with butter instead of dusting with flour to make extra soft buns.

Coffee Can Bread

Coffee Can Brown BreadBoston Brown Bread Loaf

I love this bread.  It’s definitely a bread meant for soup, butter, honey, a fried egg on top – something it can soak up.  It’s dense, smells like gingerbread and it bakes in an old coffee can.  How much more nostalgic or delightful can this get? We first made this recipe to accompany homemade clam chowder.  Both recipes came out of arguably the best issue of Bon Appetit in years – the November 2012 issue.  That issue had several recipes we’ve made countless times, AND an interview with Nick Offerman, a.k.a Ron Swanson.  Best issue ever.

This is called Boston Brown Bread.  It’s a classic recipe in New England and is typically made to go with clam chowder.  I love that it makes two loaves. I can freeze one right out of the oven, or give it away.  I think this time, it will travel with us this weekend to go see our friends, Matt and Anna in Dallas, who JUST found out they are having a baby GIRL in January.  We are so excited to go spend some time with our culinary soul mates and best friends.

So, call your nearest neighbor who you might suspect keeps everything and ask if they have any old coffee cans you can use.  I did exactly that with my friend, Ann, and she delivered.  🙂 One more thing that makes me happy when I make this bread – I think of Ann!

Have a wonderful weekend and bake something memorable!
Sliced Boston Brown Bread with Butter
Coffee Can Bread
makes two loaves

A few tablespoons of butter
2 cups whole milk
1/2 cup molasses
1/4 cup packed light brown sugar
1 tsp kosher salt
1 1/4 cups whole wheat flour
1 cup all-purpose flour
1 cup rye flour (this is the important one to not substitute – I think you could sub AP flour for the wheat and it would be just fine, but the rye imparts an important flavor to the bread)
1/3 cup cornmeal
1 tablespoon baking soda
1 tsp baking powder

2 – empty, clean coffee cans, 11-13 ounces

Preheat oven to 350F.  Cut two 6″ squares of foil.  Coat insides of the cans and one side of each piece of foil with butter.  Stir milk and brown sugar and salt in a small saucepan over low heat until sugar dissolves and mixture is just warmed (don’t boil).  Whisk whole wheat flour and the remaining ingredients in a large bowl.  Add milk mixture, whisking until smooth.  Divide batter between cans and smooth tops.  (note! if the cans still have a lip rim, simply take your can opener to the top and it will cut that lip right off).

Cover cans with foil, butter side down.  Secure foil with kitchen twine.  Place cans foil side up in a deep roasting pan or heavy, shallow pot.  Pour very hot water into pan to come about 2-3″ up the side of the cans.
Coffee Can Brown Bread out of the oven

Bake until a skewer inserted through the foil into the center of each loaf comes out clean, about 1.5 hours.  Transfer to a wire rack and let cool for 10 minutes.  Run a thin knife around the edges of the cans.  invert to release loaves onto a cooling rack.  Let cool for 20 minutes before slicing.  Serve with soft, salted butter and rejoice.

This is great salted butter.  We buy unsalted for baking, but for eating, salted is the way to go!
the only butter you need

Soft-Scrambled Eggs

Soft Scrambled Eggs

Everyone wants to be known for something.  We all strive to be important in some way and to matter to more than just ourselves.  Some of us get little snippets of fame from the jobs we do or the opinions we have or maybe from how cute our red-headed children happen to be.  Most of this attention is fleeting – it can last a day, an online minute or maybe as much as a year before the new wears off.  A good friend once put it so well, regarding our need for others’ acceptance: “You’re only as good as your last performance.”  This is a shockingly true statement that I would venture most of us, at one time or another in our lives, have felt.

Over the last year, I’ve worked through the book, The Divine Conspiracy.  It has flipped my world upside down.  Or maybe, finally, right-side up.  I’d recommend it to anyone searching for something they can’t quite put their finger on. One of the main points early on in the book is that we have this need to matter and to be unique and special because we were specifically designed to be that way.  We were designed by an infinitely unique and powerful creator who made us to be just like Him.  So, it’s not bad to strive to be noticed.  It’s just futile to strive for the approval of our peers – of anyone but the One who created us to be His unique treasures in the first place.  And as we all know, most of our days are spent in search of approval, recognition or acceptance from people online.  People we never see and from a strange sea of online crowds who are simply going about their day trying to be noticed, too.  It’s futile.  At times, I want to unplug from it all and just be important to my family and my very small circle of friends with whom I physically see on a regular basis.  It would be so much simpler to be special and to matter to just 20 people instead of trying to impress 200.

How on earth is this post going to be about scrambled eggs?!  Well, through my first year as a new mother, I really picked up the baton of cooking for my family.  I have embraced it with the foreknowledge that the recipes I cook now will be the stories and the comfort food Olive talks about when she’s in college, missing home cooked meals.  This is how I have come to matter (in my eyes) to my world.  I cook.  I provide food for Matt and Olive and occasionally friends and when I am lucky, family as well.  I usually cook new things, new recipes, Pinterest inspirations, but there are a few dishes that I can make whether I’m sleepy or not, paying attention to measurements or holding a kid on my hip.  Soft scrambled eggs is one of these recipes.  They are actually more of a skill than you might think.  But with a little extra effort and attention, these eggs will blow your mind.  We’ve all had the over-cooked rubbery eggs on breakfast buffets the world over.  These, by contrast, are super creamy, soft, flavorful (not sulfury) and are mind-blowing on top of a piece of buttered toast.  It’s the ultimate comfort breakfast food.  I have had people remark about these eggs like, “What on earth did you put in these?!  Cheese?  Cream?”  Nope.  Salt and Pepper!  And a tablespoon of butter.  That’s it.

I’ll be really detailed in the recipe so that you, too, can learn to do these right.  They just require a little more whisking and a little less heat than you’re probably used to. I hope they become part of your weekly recipe repertoire and I hope that you really enjoy at least one recipe you make on a regular basis.  It could be chocolate chip cookies or banana pancakes or even a simple roasted chicken.  But if you find something that you enjoy doing and you do it enough times to do it well, you will be an instant local-celebrity in the eyes of the people sitting around your table. And that, for me, is becoming more than enough. It’s good to matter to at least a few people in this life and I can think of no more worthwhile group of people than family.

Soft Scrambled Eggs with Pesto

Soft Scrambled Eggs
4 eggs serves two people

4 large eggs
about a teaspoon of kosher salt
fresh cracked pepper
1 tbs of unsalted butter.  If you use a butter substitute, I can’t help you

First, get your butter in a medium saucepan (like a good pan for soup) and turn on the heat to 3 or 4.  Seems low, but this is one of the tricks.  My stove’s lucky number is 4.  Yours might be hotter so adjust as you see fit.

While the butter is melting, crack the eggs into a big measuring cup and season with the salt and pepper like this:
seasoned eggs

Then, whisk whisk whisk until they are forming bubbles.  Like this:
well beaten eggs

By this point, your butter should nearly be on its way to getting frothy in the hot pan.  Pour in your eggs and start whisking.  I use a flat whisk (you can kinda see it in the pic) and it’s so excellent for getting into the edges of the pan.  Whisk almost constantly, occasionally lifting the pan away from the heat and scraping the bottom and sides of the pan, fully incorporating the eggs as they cook so that you maintain a very small curd, like cottage cheese sized bits of egg.  Continue doing this; on the heat, off the heat, on the heat, off the heat, until your eggs are nearly looking done, and more on the side of creamy, but no traces of whites remain.  Your eggs will look underdone to you if you’ve never done this method before.  But trust me, if the whites are all gone and you have a super creamy consistency, you are ready to eat.  Get the eggs out of the pan immediately into a bowl and serve at once.  This morning I put some leftover pesto, which became my own green eggs and ham and it was a breakfast fit for a king.  Or a toddler. 🙂

The pesto WILL be a future blog post.  It’s the best I’ve ever had and it came from an Italian grandmother so you know it has to be legit.

soft scrambled eggs and pesto in a homemade tortilla

Summer Corn Chowder – perfect for a rainy day

Corn Chowder and Cornbread

I hope you’re getting rain.  We got a little bit last night and it’s threatening to rain, today.  The clouds are hanging low and the wind is a cool 65 and I feel for a minute that it could be late September instead of the middle of July.  I live for cold weather and I’m still a little perplexed by why I live here, in the desert.  I grew up around here – maybe that’s it.  We long for things unfamiliar or for the relief we feel on the rare occasions we get a break from our usual reality.  I hear people in Seattle long for the beach.  I bet they don’t long for the desert, though!

Another comforting thing about food is the ability to transport myself into a feeling or a mood simply by the dish I prepare.  Caprese salad makes me long for summer nights, spice cakes make me wish for Christmas, chocolate chip cookies make me think of home.  A warm bowl of chowder with a thick slice of cornbread and a cold slab of butter puts me in the mood for a cloudy day and cooler temps.  So, in the middle of the heat of the summer, on this cooler week with cloudy days and threatening rain, let’s make a memory with a warm bowl of corn chowder and pray the rain stays a while.

Summer Corn Chowder and the Perfect Cornbread*
serves 6

4 teaspoons bacon, cut into 1/4-inch dice
1 small onion, cut into 1/4-inch dice (1 cup)
2 ribs celery,cut into 1/2-inch dice (3/4 cup)
8 sprigs thyme
Salt and freshly ground pepper
3 cups homemade or low-sodium canned chicken stock
3 ears yellow corn, kernels removed (about 2 1/2 cups)
5 ounces small fingerling potatoes, cut into 1/2-inch-thick slices
1 poblano chile, seeded and cut into 1/2-inch dice
1 1/2 cups half-and-half

Place bacon in small stockpot over medium-high heat. Cook, stirring occasionally, until bacon is deep golden brown and all the fat has been rendered, about 4 minutes. Remove bacon with slotted spoon, transfer to paper towel, and set aside. Discard all but 2 tablespoons of bacon fat.

Add onions, celery, thyme, and salt and pepper to taste to stockpot; cook over medium-low heat until translucent, about 8 minutes. Add stock; bring to a boil. Reduce heat to medium; simmer 15 minutes.

Add corn, potatoes, and chile; cook until potatoes are tender, 10-20 minutes. Remove and discard thyme. Add half-and-half, and simmer until soup is hot. Adjust seasoning with salt and pepper, and garnish with the reserved crisp bacon pieces.

*recipe adapted from Martha Stewart Living

Cornbread


We only make one cornbread recipe, anymore.  The New Best Recipe is a wonderful encyclopedia of how to make every recipe basically, perfect.  We love this book and it never steers us wrong.  It’s quite bulky, but all the recipes are tested extensively and done in a myriad of ways, and they give a background as to why the recipes work.  It’s very trust-worthy and a definite go-to in times of need of a solid recipe!  Their Golden Northern Cornbread is our go-to cornbread recipe.  It’s light, fluffy, moist and slightly sweet.  Holds together beautifully to be a base for your bowl of soup, or just on the side with some cold butter.

The Best Golden Cornbread
makes 9 servings

2 tbs unsalted butter, melted, plus more for greasing the pan
1 cup (5 ounces) yellow cornmeal, preferably stone-ground
1 cup (5 ounces) AP flour
2 tsp baking powder
1/2 tsp baking soda
4 tsp sugar
1/2 tsp salt
2 large eggs
2/3 cup buttermilk
2/3 cup milk

Adjust an oven rack to the center position and heat the oven to 425 degrees.  Grease a 9 inch square baking pan with butter.

Whisk the cornmeal, flour, baking powder, baking soda, sugar and salt together in a large bowl.  Push the dry ingredients up the sides of the bowl to make a well.

Crack the eggs into the well and stir lightly with a wooden spoon, then add the buttermilk and milk.  Stir the wet and dry ingredients quickly until almost combined.  Add the melted butter and stir until the ingredients are just combined.

Pour the batter into the greased pan (we actually love to use our cast-iron skillet for this recipe). Bake until the top of the cornbread is golden brown and lightly cracked and the edges have pulled away from the sides of the pan, about 25 minutes.

Transfer the pan to a wire rack to cool slightly, 10 minutes.  Cut and serve warm!


Black Plum and Blackberry Galette

black plum galette
I’m in love with this pie.  It’s a galette – a free-form pie that is usually very rustic and can be sweet or savory, or even resemble a thin pancake in some regions of France.  I love it because it eliminates the pressure to make a pretty pie crust.  So many people struggle with pie crust, and when the edges crack, it can make even the most tempered person lose their cool.  But the galette solves all that.  You simply roll out your dough, fill it up and fold the edges over.  If you add an egg wash and some crunchy sugar sprinkled over the dough, no one in the world will care that it isn’t in a pie plate!  We enjoyed plums and a few blackberries in this pie because they were ripe and in season and cheap!  I really don’t buy fruit if it isn’t on sale.  I just figure that sale price tells me what’s in abundance and that’s an easy way to know what’s in season!

I served this over the course of a few days to a few different friends.  I love that one dish can unite so many.  I believe five different friends, total, shared this pie at different times over the weekend.  This is my very favorite thing about cooking and sharing meals.  And yes, a plum galette and a cup of coffee is a meal 🙂 I think people stay longer and open up quicker and are more at ease if you have something to offer them to eat and drink.  I’m not always good about doing this, especially for the most frequent friends.  And how awful to treat the frequent friends less special!  It’s hard for those of us who can’t be trusted with baked goods in the house, to have them in the house during the week.  But, maybe you could consider it a bit of a social challenge for yourself to bake this pie and then see how many different friends you can get to share it with you.  🙂

plum galette

Plum and Blackberry Galette*

2 1/2 cups plus 2 tablespoons all-purpose flour (spooned and leveled), plus more for rolling
1 cup (2 sticks) cold unsalted butter, cut into pieces
5 tablespoons plus 1 teaspoon sugar
1 teaspoon salt
1/2 cup ice water
1/4 cup whole, skin-on almonds, toasted
5 to 6 plums, halved, pitted, and sliced 1/4 inch thick (keep slices together if possible – this was hard for me because my plums were cling and didn’t come away from the pit very easy.  I just sliced them as best I could – still pretty)
1 to 2 tablespoons heavy cream

In a food processor, combine 2 1/2 cups flour, butter, 1 teaspoon sugar, and salt; pulse until mixture resembles coarse meal. Sprinkle with 1/4 cup ice water. Pulse until dough is crumbly but holds together when squeezed (if necessary, add up to 1/4 cup remaining ice water, 1 tablespoon at a time). Don’t overmix! Remove dough from processor and shape into a disk; wrap in plastic and refrigerate 1 hour. Meanwhile, wipe bowl of food processor clean and add almonds, 3 tablespoons sugar, and 2 tablespoons flour; pulse until ground to a coarse meal.

Preheat oven to 350 degrees. On a floured surface, roll out dough to 1/4-inch thickness. Transfer to a parchment-lined baking sheet; sprinkle almond mixture over dough (this is necessary for absorbing the juices from the fruit so your crust won’t be a soggy mess.  Plus, it tastes great.)  With a spatula, transfer plums to dough; press lightly to fan out, leaving a 2-inch border. Fold edge of dough over fruit. Refrigerate 20 minutes (this is so your butter doesn’t leak out). Brush crust with cream (I used an egg); sprinkle galette with 2 tablespoons sugar (I used super crunchy sugar!)  Bake until crust is golden and underside is cooked through, about 70 minutes.

*I made this from Martha Stewart’s Pies and Tarts cookbook, which, is a book I could look at for hours on end, reading it like a novel.  That’s one way to get better at cooking, by the way – read cookbooks like they’re novels 🙂

Dark Chocolate Chip-Pecan Pancakes

Chocolate Chocolate Chip Pancake stack

I opened up this recipe this week with the intention of pinning it to my Pinterest recipe board.  Then I went to my recipe board and discovered that I’d pinned this exact recipe four times over the last 2 years.  My subconscious must really want these pancakes.  I decided, no more pining for a pin!  I made these bad boys this morning for breakfast, right when the clouds rolled in and it started raining.  We enjoyed the rest of our coffee on the front porch while watching the rain and I’d be lying if I said it wasn’t the perfect way to spend the morning.

These pancakes are intense, rich, but not too sweet.  I accidentally left out the melted butter from the batter (believe me that I would never do that intentionally) and they turned out just fine!   Matt had pancake syrup on his and I had creme fraiche sweetened with a bit of honey on mine and I will proudly say that my way was the best.  But his way photographed better 🙂 Whatever you decide to put on top of these pancakes, be it whipped cream, syrup, powdered sugar, yogurt, it’s going to be the right decision.  The baby girl loved them, too and called them “panpays”, which was nearly the cutest thing I’d heard all week.

Enjoy your weekend!  Hope you find time to make these desert-like pancakes at some point!

Chocolate Chocolate Chip Pancakes

Chocolate Pecan Pancakes*
makes about 10 pancakes

  • 1 cup all-purpose flour
  • 1/3 cup granulated sugar
  • 1/3 cup Dutch-process cocoa powder
  • 1 1/2 teaspoons baking powder
  • 1/4 teaspoon salt
  • 1 cup milk
  • 1 large egg
  • 4 tablespoons unsalted butter, melted
  • 1 teaspoon vanilla extract
  • 1/2 cup mini chocolate chips
  • 1/4 cup chopped pecans
  • 4 tablespoons vegetable oilPreheat oven to 225 degrees. In a large mixing bowl, whisk together flour, granulated sugar, cocoa, baking powder, and salt. In another bowl, whisk together milk, egg, melted butter, and vanilla; pour over flour mixture, whisking to combine. Fold in chocolate chips and pecans; let batter stand until slightly thickened, 5 to 10 minutes.

    In a large nonstick skillet, heat 1 tablespoon oil over medium heat until a water droplet sizzles; swirl to coat bottom of pan with oil. Reduce heat to medium-low. Spoon four small mounds (1 heaping tablespoon each) of batter into skillet. Cook until bubbles appear in center, 3 to 4 minutes. With a thin spatula, flip pancakes; continue cooking until set, 3 to 4 minutes more.

    Transfer to a baking sheet; cover loosely with foil; place in oven to keep warm. Repeat with remaining oil and batter in three more batches (adjust heat as necessary to avoid overbrowning).

    Stack ’em up and enjoy, topped with anything you’d like!

*recipe adapted from Martha Stewart Living

Stack of Chocolate Pancakes

Apricot Pine Nut Cakelettes

Apricot Pinenut Cakelettes004


I used to have a huge apricot tree in my front yard.  It was so wonderful throughout the seasons to see the blossoms appear in spring and the fruit appear around June and the leaves turn shockingly golden in October.  It was one of my favorite things about our house and it introduced me to jamming and gave me a passion for it.  Because of that tree, I learned to make apricot preserves and the first two years we had fruit, I canned nearly 100 jars of apricot jam variants. Vietnamese Cinnamon, Chinese 5 Spice, Bourbon Brown Sugar, Rosemary, Vanilla Bean (the best version) and even Crushed Red Pepper Apricot!  I gave them away as gifts and really just reveled in the sudden surge of domestic satisfaction I was getting from the process of gathering, cleaning, cooking and canning a resource from my own yard.  I felt like such a good steward of those little golden gifts!

new-00001


apricot018

To make a sweet story a bit sad, that tree fell victim to the terrible drought our area has been suffering the past three years.  The second year into the drought, the fruit on our tree was tiny but packed with flavor.  It was the last year it would bear fruit.  We had to chop it down last summer and I will admit, I mourned the loss of that tree for months.  We’ve tried planting replacement apricot trees twice, now, and borers got the second one (and the first – it was a borer/drought combo) and the second replacement got hit by two late frosts and never recovered (although I won’t call it officially gone till next spring).

So maybe it’s not meant to be?  Maybe the lesson learned is to make good use of what you have while you have it.  Revel in the gifts you’re getting now, because soon, they may not be available to you.  If you have a fruit tree and don’t have time to make anything from it, first, call me and I’ll come pick up every piece from your yard (I know there’s no fruit on trees in this area, yet – still, the sentiment always applies) and second, if nothing else, just eat from it!

This recipe is a wonderful, easy recipe that can be used with fresh, canned or even dried apricots (or any fruit, really).  I used dried apricots that I reconstituted in a bit of water, first, because I couldn’t find canned, as the recipe called for.  They turned out wonderful and they lasted for a week!  The cake part is a wonderful cake recipe and one that I plan on using for other purposes in the future.  It calls for buttermilk, and I happily used some raw buttermilk from our local dairy, Pereira Pastures.  They are suffering from the drought too, and could use your support if you are from this area and feel like making a donation and getting some amazing milk in the process!

Apricot Pinenut Cakelettes001


Apricot Pine Nut Cakelettes*
makes six cakes

1/4 cup pine nuts, toasted
6 tablespoons unsalted butter, divided
1/4 cup plus 1/3 cup packed light brown sugar
1 tablespoon water
8.5 ounces apricot halves, sliced
1 1/3 cups AP flour
1 1/2 teaspoons baking powder
1/4 teaspoon salt
1/3 cup sugar
1 large egg
1 teaspoon vanilla extract
1/2 cup buttermilk

Preheat oven to 350F. Butter six 6-oz ramekins and place them on a baking sheet with a shallow rim.

Divide the pine nuts evenly among the ramekins.

In a medium-sized saucepan, melt 2 tablespoons of the butter over medium-low heat.  Add 1/4 cup brown sugar and the water and cook, stirring, until the sugar is dissolved.  Add the apricots and stir gently until coated.  Divide the apricots and syrup evenly among the cups.

In a small bowl, stir together the flour, baking powder, and salt.  In the bowl of an electric mixer, or by hand, beat the remaining 4 tbs butter, 1/3 cup brown sugar, and the granulated sugar on medium speed until well blended.  Beat in the egg and the vanilla until combined.  With the mixer on low speed, mix half of the dry ingredients into the batter until just combined.  Mix in the buttermilk until combined.  Mix in the remaining dry ingredients until combined.  Divide the batter evenly among the ramekins and smooth the tops.

Bake until a toothpick inserted comes out clean, about 30 minutes (mine took more like 45).  Transfer the ramekins to a wire rack and cook for 10 minutes.  Run a knife around the edges of the ramekins to loosen the cakes.  Invert the cakes onto individual dessert plates and serve warm with fresh whipped cream, or a drizzle of amber agave nectar, like I’m currently obsessed with.  🙂

* recipe from the Bonne Femme Cookbook!

Apricot Pinenut Cakelettes006

Brown Butter Almond Brittle Ice Cream

almond brittle ice cream002

I promise you that this is the best ice cream you will ever make at home.  We stumbled on Jeni’s Splendid Ice Creams at Home a couple years ago and I believe the first recipes I made from this book were the Kona Stout  and the Roasted Strawberry and Buttermilk for Matt’s company picnic.  Both flavors got such rave reviews, that when I went to buy this book for my friend, Anna’s birthday, a week later, Barnes and Noble told us that they’d recently sold the rest of their copies – all to Matt’s co-workers, it turned out 🙂  I think the way Jeni makes ice cream is a revelation.  She combines a bit of cornstarch into the base and then adds just one and a half ounces of cream cheese per quart recipe, and the texture and consistency turns out amazing.  Perfectly creamy, freezes well, and her flavors are never too sweet – always a perfect balance.  The recipes in this book range from really unique (gouda and vodka plumped cranberries) to traditional (vanilla bean) to genius (sweet potato with torched marshmallows – gotta try this one, next).

Summer time is the perfect time to buy this book and try out a new recipe at each and every opportunity you get.  Our little ice cream maker will get a work out during these hot months to come!  But we have faith that it feels it is finally getting to do what it was created to do, thanks to Jeni’s Splendid ice creams and our not-so-splendid hundred degree days!

This week, I made three flavors out of this book:  Brown Butter Almond Brittle, Roasted Pistachio and Bourbon Butter Pecan.  All amazing.  The Almond Brittle was the most requested at our church get-together last night, and the most consumed (although I adore the pistachio), so I’ve written out the recipe for you here today.  It calls for almost a pound of butter.  ACTUALLY you only use a tablespoon of that pound of butter.  The solids that settle to the bottom of the pan after you brown butter is what gets mixed into the base and it creates a divinely nutty, roasted flavor in the ice cream base.  Yet another way brown butter makes the world a better place.

almond brittle ice cream004

Brown Butter Almond Brittle Ice Cream*
makes about 1 quart

for the base:
2 cups whole milk
1 tablespoon plus 1 teaspoon cornstarch
1.5 oz (3 tbs) softened cream cheese
1/8 tsp fine sea salt (I use kosher)
3/4 lb unsalted butter
1 1/4 cups heavy cream
2/3 cup sugar
2 tbs light corn syrup

1 cup crushed Almond Brittle (recipe below)

Mix about 2 tbs of the milk with the cornstarch in a small bowl to make a smooth slurry.  Whisk the cream cheese and salt in a large bowl until smooth.  Fill a large bowl with ice and water.

Melt the butter over medium heat in a 4 quart saucepan.  Bring to a boil and let bubble until the foam starts to subside and the butter is a rich dark brown (not black!).  Remove from the heat and let stand until the butter solids settle to the bottom of the pan, about 5 minutes.

Pour the clear butter oil into a storage container (once it solidifies you can use it as you normally would for cooking so it’s not a waste!) As you get closer to the butter solids in the bottom of the pan, use a teaspoon to remove as much liquid butter as you can.  You should have about 1 tablespoon of brown butter solids and a little bit of melted fat in the bottom of the pan (it’s impossible to remove all the fat).

Add the remaining milk, cream, sugar and corn syrup to the butter solids, bring to a rolling boil over medium-high heat and boil for 4 minutes.  Remove from the heat and gradually whisk in the cornstarch slurry (you’ll need to stir it up again as it will settle and solidify some).  Bring the mixture back to a boil over medium high heat and cook, stirring with a heatproof spatula or whisk, until slightly thickened, about 1 minute.  Remove from the heat.

Gradually whisk the hot milk mixture into the cream cheese mixture until smooth.  Pour the mixture into a 1 gallon Ziploc freezer bag and submerge the sealed bag in the ice bath.  Let stand, adding more ice as necessary, until cold, about 30 minutes.

Pour the ice cream base into the frozen canister of your ice cream maker and spin until thick and creamy.  Pack the ice cream into a storage container, folding in the chopped almond brittle as you go.  Press a sheet of parchment directly against the surface of the ice cream (this is important to avoid freezer burn and maintain a good consistency) and seal with an airtight lid.  Freeze until firm, at least 4 hours.

Almond Brittle*
makes about 2 cups

1 cup sugar
1/2 cup light corn syrup
1/4 cup water
3/4 teaspoon salt
1 stick of unsalted butter, cut into 1 inch pieces
2 cups slivered almonds
1/2 teaspoon baking soda

Generously oil a large baking sheet.

Combine the sugar, corn syrup, water, and salt in a 4 quart saucepan and bring to a boil over medium-high heat, stirring to dissolve the sugar. Insert a candy thermometer in the pan, add the butter, and bring back to a boil, then cook until the mixture reaches 300F.  Remove from the heat and immediately stir in the almonds and then the baking soda, working quickly but combining them thoroughly.

Pour the mixture out onto the oiled baking sheet, spreading it to a 1/4 inch thick layer.  Allow to cool completely before smashing to bits. 🙂

*recipes taken nearly word for word from Jeni’s book.

almond brittle ice cream005

Champagne Mangoes and a Glorious Mango Curd

mango curd macaron dish

When we were in Mexico City last year with our friends, Cali and Alex, we were introduced to the ultimate mango.  Small, lemon yellow and sweeter than a peach.  Cali showed us that there was a specific mango fork that you need to peel it properly, and then she went on to show the proper way to peel and dice up these golden nuggets of wonder. She is my unofficial mango-expert.  I will forever associate her with this wonderful fruit and every time I peel one, I always think, “Is this how Cali would do it?”   I had never experienced a mango like the ones in Mexico, before, and when we got back home, I was on the look out.  I was so excited to see one that looked very similar at the grocery store called Champagne mangoes, and the next time Cali came over, I had her confirm its validity.  We had a winner!  So now, whenever I see that they are in abundance at the store, I get a half dozen.  The last time I did, I let them go too long before eating them, and faced the fear of letting them go bad.

So, I decided that I wanted to make a mango curd.  I looked up a recipe and it called for 15 ounces of mango and that’s exactly how much I had.  The recipe turned out so well, I filled macarons with it and also filled citrus cupcakes with the curd and topped them in coconut cream cheese frosting.  Epic win for the cupcakes, epic fail on the macarons.  The macarons tasted great, but the cookie itself didn’t turn out very well.  They all went hollow!  I have made macaron cookies before and the best I can describe them is that they are the croissant of cookies.  Every batch is different, every recipe is different and their success depends on so many factors, it’s a little maddening. The quality of the ingredients, the humidity in your kitchen, the exact temp of your oven, etc, etc, etc.  I surprised myself and didn’t FREAK OUT when the first batch of cookies EXPLODED, the second batch was pretty perfect, and the third batch baked like the first.  A true testament to how baking is a fickle beast.  They at least looked pretty:

mango curd macarons

The cupcakes, on the other hand, were a no-brainer.  I took a basic yellow cake recipe and added in Fiori di Sicilia, then made a cream cheese frosting, added a bit of coconut extract and topped each with toasted coconut after filling the cupcakes with the mango curd.  Such a wonderful combination, that I wanted to share those recipes with you, today, but mainly, this mango curd is the winner.  A week later, I still had some in a jar so they were put on some buttermilk pancakes this morning with fresh blueberries and slices of Champagne mangoes, of course.

mango curd cupcakes

mango cupcakes

Champagne Mango Curd*

Makes 1 to 1.5 cups

15-ounces ripe mango, peeled, pitted, cut into 1/2-inch pieces (It took 5 Champagne mangoes)
1/3 cup sugar
3 tablespoons fresh lime juice
Pinch of salt
4 large egg yolks
1/4 cup (1/2 stick) unsalted butter, cut into small pieces

Puree mango, sugar, lime juice and salt in processor, scraping down sides of work bowl occasionally. Add yolks; puree 15 seconds longer. Strain through sieve set over large metal bowl, pressing on solids with back of spatula to release as much puree as possible. Discard solids in sieve.

Set metal bowl over saucepan of simmering water (do not allow bottom of bowl to touch water); whisk puree until thickened and thermometer registers 170°F., about 10 minutes. Remove from over water. Whisk in butter 1 piece at a time. Cover and refrigerate overnight.

*taken from Smitten Kitchen, who took it from Bon Appetit

Citrus Cupcakes*

1 stick unsalted butter, softened
2 cups all-purpose flour
1 tablespoon baking powder
1/2 teaspoon fine salt
1 1/2 cups granulated sugar
3 large eggs, room temperature
1 cup whole milk
1 teaspoon Fiori di Sicilia, or 1/2 tsp orange extract + 1/2 tsp vanilla

Preheat oven to 350 degrees. Butter and flour 12-16 muffin tins, or just line with cupcake liners and spray those with non-stick spray.  Whisk together flour, baking powder, and salt. Beat together butter and granulated sugar with a mixer on medium speed until combined, 1 to 2 minutes. Add eggs and beat well, scraping down sides of bowl as necessary. Reduce speed to low and gradually add flour mixture, beating until combined. Add milk and extracts and beat until just combined.
Divide batter among cups; smooth tops with an offset spatula. Bake until golden and a toothpick inserted into centers comes out clean, 25-30 minutes. Let cakes cool in pans on wire racks 15 minutes. Turn out cakes onto racks to cool completely before filling.

*adapted from Martha Stewart Living

Coconut Frosting*

1 stick unsalted butter, softened
4 ounces cream cheese, room temperature
5 cups confectioner’s sugar
1/4 teaspoon fine salt
1/4 cup whole milk
1/2 teaspoon pure vanilla extract
1/4 tsp coconut extract

1/2 cup coconut, toasted, for topping cupcakes

Beat together butter and cream cheese with a mixer on medium-high speed until pale and creamy, about 1 minute. Reduce speed to medium. Add confectioner’s sugar, 1 cup at a time, beating well after each addition. Add salt, milk, and vanilla, coconut extract and beat until fluffy, about 3 minutes. If not using immediately, cover surface of frosting with plastic wrap. Frosting can be refrigerated in an airtight container up to 1 week. Before using, bring to room temperature, then beat on low speed until smooth.

*adapted from Martha Stewart Living

To Assemble:

I used the large tip from my piping bag to cut out the centers of my cupcakes and I really went pretty much to the bottom of each cupcake with the cut.  The curd is pretty runny out of the piping bag, so I had to hold it up in the air between fillings.  I inserted the tip of the piping bag and slowly squeezed until the sides of the cupcake bulged a bit.  I like filling.  Then, I just smoothed the frosting on top of each cupcake and sprinkled with toasted coconut.

mango cupcake with coconut frosting