Cooking Basics: Homemade Chicken Stock

dark chicken stock
Homemade chicken stock-not as difficult as it sounds, although it takes some forethought.  Next time you roast a chicken or make chicken wings or anything like that, clean and bag up those bones and throw them in the freezer!  The more bones you have, the better and richer your stock will be.  I made today’s batch with just one bird – all bones including the neck.  It wasn’t perfectly clean (meaning there was still some skin/meat on the bones) but with just a little extra straining and skimming, it turned into amazing stock and made more than a gallon!

Step one: get a large stock pot, add vegetable oil to the bottom, get it smoking over medium high heat (like a 7 out of 10) and roast the bones for about 10-25 minutes until deep brown, stirring to ensure it doesn’t just burn:
brown and roast the bones
While the bones are roasting, chop carrots, celery and onion:
roughly chop the vegetables
After the bones are really good and roasted, add in the vegetables. You’ll notice I didn’t peel the carrots.  Keep it simple – you won’t be eating these vegetables – they’re just for flavor!  A rough chop should do it.  I threw in three garlic cloves, too, just for fun.
roast the vegetables and bones together
Let the vegetables roast with the bones until the carrots begin to soften.
create your herb packet
Make a bouquet garni (a little herb packet).  Don’t have cheesecloth?  Use a coffee filter!  I added thyme, bay leaves and peppercorns.  Tie it all up with string and throw it into the pot along with enough water to cover everything by about 4 inches:
tie up the packet in twine
Let it simmer for a long time.  Bring the whole pot to a boil and then reduce it to a simmer and let it sit there all day.  Four or five hours.  When it’s done, strain out all the vegetables and anything that escaped your herb packet.
strain and strain and strain again
Strain again.  And again.  And again.  I got crazy and strained through a coffee filter.  This took way too long…
strain
Be smart like my husband and chill the stock in the fridge and the fat will rise to the top and solidify and you can just scrape it off.  Genius.  That’s why I keep him around.
Homemade Chicken Stock
Voila – beautiful chicken stock!  And very very little sodium.  I didn’t salt this stock so all the salt you add to your soups can be YOUR doing and not hidden somewhere in the stock!  Like I said, this batch made over a gallon and I used it for soups, pan sauces, pasta dishes, risotto, etc.  You can freeze in large muffin tins that hold a cup each and take out a cup each time you need it!  Ours doesn’t last that long, but if you don’t cook with stock really frequently, you might want to freeze it, as most stocks will last about two weeks before getting funky.

Whole Wheat Banana Chocolate Chip Muffins

whole wheat banana chocolate chip muffins
I had an abundance of bananas and buttermilk.  I had been eating pretty great all week as far as variety of vegetables and fruits and had kept my portions reasonable and so I didn’t want to totally derail that train by having two dozen muffins in my house.  So I scratched the banana layer cake recipe I found and turned it into a whole wheat muffin made with fresh buttermilk and raw sugar.  I am typically not a whole wheat flour fan because I feel that it gives breads that hint of Play-Doh that has never really appealed to me, much.

The good news about these muffins?  No Play-Doh! The banana and buttermilk mask the whole wheat “thing” and the texture was fluffy and not too dense or heavy like you might expect.  Of course, I added dark chocolate chips because I am a fan of the banana/chocolate combination and think a few more antioxidants never hurt anyone 🙂

Starting today and extending into next week, I’ll be posting good, wholesome recipes that aren’t too indulgent, but will also not leave you feeling deprived, either.  You can have your cake and eat it too, so to speak!

whole wheat banana chocolate muffins


Whole Wheat Banana Chocolate Chip Muffins*
makes 2 dozen

2 1/4 cups whole wheat flour
3/4 teaspoon baking soda
1/2 teaspoon baking powder
1 tsp cinnamon
1/2 teaspoon salt
1 cup mashed very ripe banana (about 2 large)
1/4 cup buttermilk or plain yogurt (I used buttermilk)
1 teaspoon vanilla bean paste or extract
1 stick (1/2 cup) unsalted butter, softened
1 cup raw, demerara sugar  (can substitute any type)
2 large eggs
1 cup chocolate chips

Preheat oven to 350° F.  Line two muffin pans with papers and spray the papers with non-stick spray.

Into a bowl sift together flour, baking soda, baking powder, cinnamon and salt. In a small bowl whisk together mashed banana, buttermilk, and vanilla. In a large bowl with an electric mixer beat together butter and sugar until light and fluffy and beat in eggs 1 at a time, beating well after each addition. Stir in flour and banana mixtures alternately, beginning and ending with flour mixture and stirring after each addition until just combined. (Do not overmix or you’ll get tough muffins – a few lumps are okay.)  Gently fold in the chocolate chips.

Divide batter evenly among muffin cups and bake in upper and lower thirds of oven, switching position of pans halfway through baking, about 25 minutes total, or until a tester comes out clean. Turn the muffins out on a cooling rack immediately as sitting in the muffin tins will cause the bottoms to brown too much.  Let them cool most of the way before serving.

*recipe adapted from Epicurious

Happy Birthday, Family Meal Blog!

one year

I posted my first recipe on this day last year.  It was about a fruity oatmeal “cobbler” I’d make for Olive when I was in the thick of making baby food in huge batches each week.  That’s really what started this blog – well, it’s what propelled it.  I began my journey with cooking when I was about 10 years old and I would cook lunches every day for my family during the summer.  My mom worked and my dad and brothers worked outside in dad’s woodworking shop all day and I was in the house doing the laundry, cleaning and cooking.  Mom had taught me the basics; how to boil water for pasta, how to brown meat, how to not burn the house down, and from there I began enjoying putting a meal together for my family.  I really didn’t care about food until I was married and Matt and I became obsessed with chef culture and technique and the origins of recipes and how to do something from scratch.  Then, I really didn’t pursue cooking until we had Olive. And by pursue I mean, cook every single meal, every single day of the week except for Saturdays.  I started to feel like my biggest source of joy and peace was found in the kitchen.  I feel more confident there than I do anywhere else.  Cooking, for the most part, makes sense to me, and it makes people happy and heals sickness and just generally brings people closer together.

In the past year, I’ve posted 132 times, I’ve had one recipe pinned over a thousand times on Pinterest and I even got to shoot a little segment on a local access show called 24 Frames, which I am dying to share with everyone once it becomes available online.  When I started this blog, I gave myself the goal of posting a couple times a week for one year and I am happy to have met that goal!  I plan on continuing and I’m happy no matter what happens.  If everyone stops caring about this blog tomorrow, I will carry on because I love cooking, I’m cooking every day, anyway, so why not photograph and document it, and I love having a history of recipes from my family to look back on.  This coming year holds many new adventures, as well, and I’m looking forward to them as they develop!

Thank you for the fun ride, for making me feel super special and a special thank you to my friend, Katrina, who said over one year ago, “Um, why aren’t you writing a food blog, already?”  Love you, Katrina.  🙂

Butternut Squash and Celery Root Soup and trying something new

Butternut Squash Soup
This is one of the best soups I’ve made all winter.  Previously, butternut squash soups were borderline too sweet for me – I could never finish an entire batch and would guiltily throw the leftovers down the sink.  I’ve made this version three times, now, and each time, we eat it all!  It doesn’t get boring – the flavors are so complex and balanced, thanks to that crazy looking celery root.  It’s perfect!  It’s also incredibly filling and very low fat, so I think it’s quite possibly the most wonderful food to have when you’re watching what you eat, but don’t want to feel deprived.  It’s also perfect as a baby food!  With just two simple vegetables, it’s a great way to introduce flavors to a little one just starting out on solids, or a toddler who might eat soup better than they would eat a new vegetable.  For toddlers, I think the best way to serve soup is in a small, handled cup.  Fill it half way and let them sip at their own pace.  They love feeling in control and YOU will feel better with limited soup-spills as would occur most certainly if you handed them a spoon 🙂  This soup is also a great way to introduce YOU to a new vegetable!  Who here has bought and prepared celery root?  (also called celeriac)  If you haven’t, you don’t have to be afraid – it tastes like celery with the consistency of a sweet potato!

I’m happy to announce a little cooking segment I’ll be doing this year on my friend, Paul’s PBS show, 24 Frames!  (this soup makes an appearance!)  It’s very exciting to be a part of something creative and I’m deeply flattered that he included me in his show. I love talking about food more than anything, so once I get over the mortal fear of seeing myself talk on camera, I’ll finally start to enjoy watching my own segment.  Please tune in to 24 Frames every Saturday night at 9 p.m. Central on PBS!  The show should be available online very soon for those who don’t live in this area, and when it is, I’ll post a link!

Thank you all for watching and for reading my blog.  It’s very humbling and I hope you can feel a little more confident in the kitchen with every new recipe you try!

Butternut Squash and Celery Root Soup

Butternut Squash and Celery Root Soup
serves 6-8

 2 tablespoons olive oil
1 medium onion, diced
1 – 2lb butternut squash, peeled, seeded and diced
1 celery root, peeled, rinsed and diced
2 teaspoons kosher salt
2 teaspoons dried rosemary
4 cups low sodium chicken or vegetable stock, hot
black pepper and cream for garnish
1. Peel and chop the onion, celery root and butternut squash.
2. Heat the oil in a large stock pot.
3. Add the onion and cook, stirring often, until softened, about 5 minutes.
4. Stir the squash, celery root and salt into the pot and cook for about 10 minutes until the squash begins to soften.
5. Add the rosemary and chicken broth and bring to a boil.  Reduce heat and let simmer over medium heat, partially covered, for 20 minutes, or until vegetables are tender.
6. Using a blender in batches, or an immersion blender, puree the soup until completely smooth.  Adjust the seasoning with salt and pepper and thin out with cream or extra stock as desired.  Ladle into bowls and add a swirl of cream and a few dashes of fresh cracked pepper and serve!

Superbowl Food: Roasted Sweet Peppers with Goat Cheese and Proscuitto

sweet cherry peppers with goat cheese and proscuitto
This made an excellent little appetizer bite tonight for a get-together we went to with some of our friends.  We decided to cook based on a theme and that theme was “stuffed” since our dear friend, Cali, will have her baby in about three weeks.  I made these roasted peppers and some high-class pigs in a blanket and a truly college-essence PopTart cake, which I’ll post pics of tomorrow.  The peppers were a hit.  I tried them first with bacon and it was too greasy.  The proscuitto was just right, a perfect blend of salty and sweet and were gone in minutes.  I think it would make a great addition to a Superbowl spread so I’m giving you the simple recipe here!

stuffed sweet peppers
Sweet Peppers with Goat Cheese and Proscuitto

1 jar Mezzetta Sweet Cherry Peppers, or something similar
1, 8oz log goat cheese
1 tablespoon garlic oil or olive oil with 1 clove minced garlic
1 package thin sliced proscuitto, cut into 4 strips each

Get the goat cheese up to room temp and in a medium bowl, add the garlic oil, or olive oil and minced garlic and stir well to combine.  Drain the peppers and dry on lots of paper towels and fill each pepper with goat cheese until full.  I used a spreader and it worked great.  Take a thin strip of proscuitto and wrap around the peppers and place on a greased baking rack fitted on top of a rimmed baking sheet and bake at 375 until proscuitto crisps up, about 20 minutes (check to make sure they don’t burn).  Also: try to keep the top of the peppers up – the goat cheese will melt and drip mostly out if you don’t!

Serve immediately!


Superbowl Food – Nacho Grits!

nacho grits


Super Bowl?  Super bowl!  Super good idea in a bowl.  Nacho grits? Not yo grits!  I’m done.

You take all the things you love about nachos and you cook a big pot of grits (which are just liquid corn chips if you think about it) and you put out bowls and let people top their grits with whatever combination they love the most!  Provide chips, too, because what jerk makes people crave nachos and then doesn’t have that as an option?  Not this gal.  After making all the toppings, I REALLY wanted super-cheesy nachos!  But the nacho grits was an awesome idea, so we had to create it.  And it was tremendously filling and amazing.

For my bowl, I went with chorizo, black olive, scallion, shredded asadero cheese, Ro-tel, cilantro and Mexican crema.  I incorporated cheese and garlic into the grits, so they already had that “nacho cheese” flavor.  Really quite delicious!  I’d recommend very small bowls for this magical side dish at the big game because it will fill your guests up very quickly!

nacho grit spread


Click here to see my recipe for grits and let your imagination run wild with all your favorite nacho toppings!

Superbowl Food – Korean Fried Chicken Wings with a Celery and Blue Cheese Slaw

celery blue cheese slaw and korean fried chicken

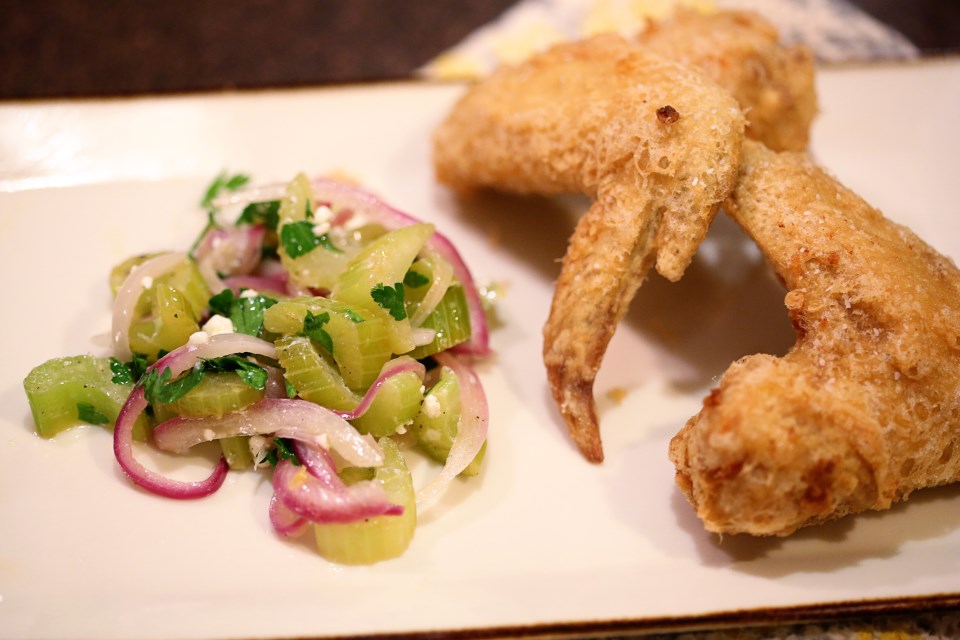
This is the best fried chicken I’ve ever had.  We only  make fried chicken about twice a year and when we do, it has to be this recipe.  Crispy, light batter doesn’t overwhelm the chicken and it’s SO crunchy, you’d think it was double coated.  Koreans know what they’re doing with fried chicken, and I think if you did this preparation to some chicken wings on Game Day, you would definitely be the hero of the hour.  The blue cheese celery salad is an amazing side for the chicken.  Crunchy and tangy and creamy – the perfect slaw/salad for fried chicken!

korean fried chicken

Korean Fried Chicken*

Kosher salt
3/4 cups corn starch
1 teaspoon baking powder
2 pounds chicken wings (about 12 whole wings)
2 quarts peanut oil or vegetable shortening
1/2 cup all-purpose flour
1/2 cup cold water
1/2 cup vodka

Combine 2 teaspoons kosher salt, 1/4 cup cornstarch, and 1/2 teaspoon baking powder in a large bowl and whisk until homogenous. Add chicken wings and toss until every surface is coated. Transfer wings to a wire rack set in a rimmed baking sheet, shaking vigorously as you go to get rid if excess coating. Transfer to refrigerator and let rest, uncovered, for at least 30 minutes and up to overnight.

When ready to fry, preheat oil to 350°F in a large wok, Dutch oven, or deep fryer.  We used a wok on the stove.

Combine remaining 1/2 cup cornstarch, 1/2 teaspoon baking powder, flour, and 2 teaspoons kosher salt in a large bowl and whisk until homogenous. Add water and vodka and whisk until a smooth batter is formed, adding up to 2 tablespoons additional water if batter is too thick. It should have the consistency of thin paint and fall off of the whisk in thin ribbons that instantly disappear as they hit the surface of the batter in the bowl.

Add half of the wings to the batter. Working one at a time, lift one wing and allow excess batter to drip off, using your finger to get rid of any large pockets or slicks of batter. Carefully lower wing into hot oil. Repeat with remaining wings in first batch. Fry, using a metal spider or slotted spatula to rotate and agitate wings as they cook until evenly golden brown and crisp all over, about 8 minutes. Transfer to a paper towel-lined plate and season immediately with salt. Keep warm while you fry the remaining wings.

We dipped ours into traditional buffalo sauce, which we love.  The chicken is so gloriously crispy that we didn’t want to totally coat it in sauce.  Do as you please.  The original recipe calls for a mighty fine sweet soy sauce that I highly recommend.

*absolutely did not mess with this perfect recipe from Serious Eats

slaw

Celery and Blue Cheese Slaw*

Celery Ribs (thinly sliced at an angle)
1/2 Red Onion (very thinly sliced; 1/2 cup)
1/2 cup fresh Flat-Leaf Parsley leaves (chopped)
1 tablespoon Sherry Vinegar
1 tablespoon plus 1 teaspoon Extra Virgin Olive Oil
1/2 teaspoon freshly grated Lemon Zest
1/4 teaspoon Kosher Salt
1/8 teaspoon freshly ground Black Pepper
1/4 cup crumbled Blue Cheese

In a large skillet, add one tablespoon of butter and saute the celery and onion until just beginning to soften, but still crunchy, about 5 minutes.  In a large bowl, toss the parsley, vinegar, olive oil, lemon zest, salt, and pepper and whisk to combine.  Fold in the celery, onion and blue cheese and serve!

*adapted from Carla Hall’s recipe

English Muffins – Family Guest Post

English Muffins from Scratch
The guy that inspires me to do everything better in my life wrote this post today.  He is known affectionately by several of our friends as “The Bread Man” and rightfully so.  After deciding to cook through The Bread Baker’s Apprentice a few years back, he’s baked bread nearly every week since then.  All Matt wants to do in life is to enjoy the process.  It is a rare talent that I do not possess.  I care much more about the outcome than he does and every day I learn from him how to live in the moment, just a little bit better than the day before.  Without any more rambling, here’s Matt’s take on English Muffins…of which I ate six…

Homemade English Muffins

When we go out for dinner and Alisa asks me what I’m in the mood for the answer is frequently (when it’s not pizza) “barbecue or Asian,” so I guess it’s no surprise that I like David Chang so much. He’s become famous for smoky east-meets-west combinations like his bacon dashi. On his excellent series Mind of a Chef he made equally reverent visits to a top Japanese katsuobushi producer and Allan Benton’s Tennessee smokehouse, did an impressive tour of Tokyo ramen shops and drank an equally impressive amount of Kentucky bourbon.

He’s also no-nonsense about flavor, and every dish of his we’ve made has been great. The Brussels sprouts recipe from Momofuku made a believer out of my dad, a lifelong Brussels sprouts hater. From the simple (has ginger scallion sauce made an appearance on this blog yet?) to the complex – and some of his recipes can get mind-numbingly complex – many of his recipes have become household favorites for us.
What does this have to do with English muffins? This recipe actually comes from the Momofuku cookbook, and as a bread lover and general fan of everything Chang does, I’ve been wanting to try it for a while. I actually made this on a recent Sunday night, perhaps fueled by the return of Downton Abbey, and had to laugh when I realized I was cooking English muffins out of an Asian cookbook at midnight.
These are fun to make – the dough is very delicate, and there’s something really satisfying about laying them into a pan that barely seems warm and turning them gently until they seem somehow sturdier, then start to pick up the first hints of the golden brown color we associate with English muffins. As with every other recipe from this book, they were delicious, and as with every other bread recipe I’ve tried I feel like I could spend years trying to master it.
This recipe is actually from Chang’s chef, Milkbar genius, Christina Tossi.  Here’s a link to the chef herself making these, step by step.  There’s really no way to improve this recipe and we followed it to the letter.  Also, I don’t want to write out 16 steps.
English Muffins

Basics – Roasted Garlic

garlic cloves in oil
There are few smells better than roasting garlic.  The top 5, according to me, of most heavenly, coma-inducing kitchen smells are:

1. Bread baking
2. Garlic roasting
3. Onions cooking in butter
4. Browning butter
5. Bacon sizzling in the pan

We have plenty of days where our house smells like baking bread, but I don’t have that smell of garlic roasting near enough.  Roasting garlic turns the garlic into an almost caramelized, savory paste that softens the intensity of raw garlic, mellows out the flavor and makes it perfect for dressings, soups, pasta dishes, breads, and that doesn’t even include the wonderful uses of the garlic oil that is produced from the roasting process.  Garlic oil=liquid gold.

So today, in the first of my series on cooking basics, I’ll show you my process for roasting a head of garlic and then below, a simple recipe for garlic aioli that can be used on sandwiches as an amazing spread alternative to mayo!

First, lop off the top of a head of garlic and place in a large piece of tin foil.  Put that little package in a small dish to catch leaking oil.  Generously salt and pepper the cut tops and drizzle with about four tablespoons of oil.
ready for roasting
Next, place both cut-side down, crimp the foil together to form a tent and place in a 400F oven for about 30 minutes.  Your garlic should look like this when it’s done:

roasted garlic
I checked mine about half-way through to make sure I wasn’t cooking it too fast.  Let the head of garlic cool to where you can handle it and then just pick it up and squeeze, popping out all the cloves.  You’ll end up with this:
roasted garlic cloves in oil
Place the cloves in a jar and fill up with oil to cover the cloves.  This allows your oil to become infused with garlic-goodness and it keeps the garlic cloves from drying out.  Store on the counter to use for anything you can think of!  We use the oil to make a quick aioli to spread on burgers, sandwiches, or as a dip for roasted potatoes – heaven!

garlic in oil

Garlic Aioli

1 large egg
1 tablespoon lemon juice
1/2 teaspoon salt
1/4 teaspoon fresh ground pepper
1/2 cup garlic infused oil

Place the egg, lemon juice, salt and pepper in the bottom of a tall immersion cup.  Add the oil and submerge your immersion blender to the very bottom of the cup.  Turn the immersion blender on and slowly lift as you blend.  The oil will combine with the rest of the ingredients and by the time you get to the top, you should have a smooth consistency.  If you are using a basic blender or food processor, add the ingredients except for the oil.  Turn on the blender and then slowly stream the oil until all the oil is added.  Adjust the seasoning with salt and pepper and keep in an airtight container in the fridge for up to two weeks.  But it probably won’t last that long!