Triple Layer Coconut Cake

Thomas Keller's Coconut Cake
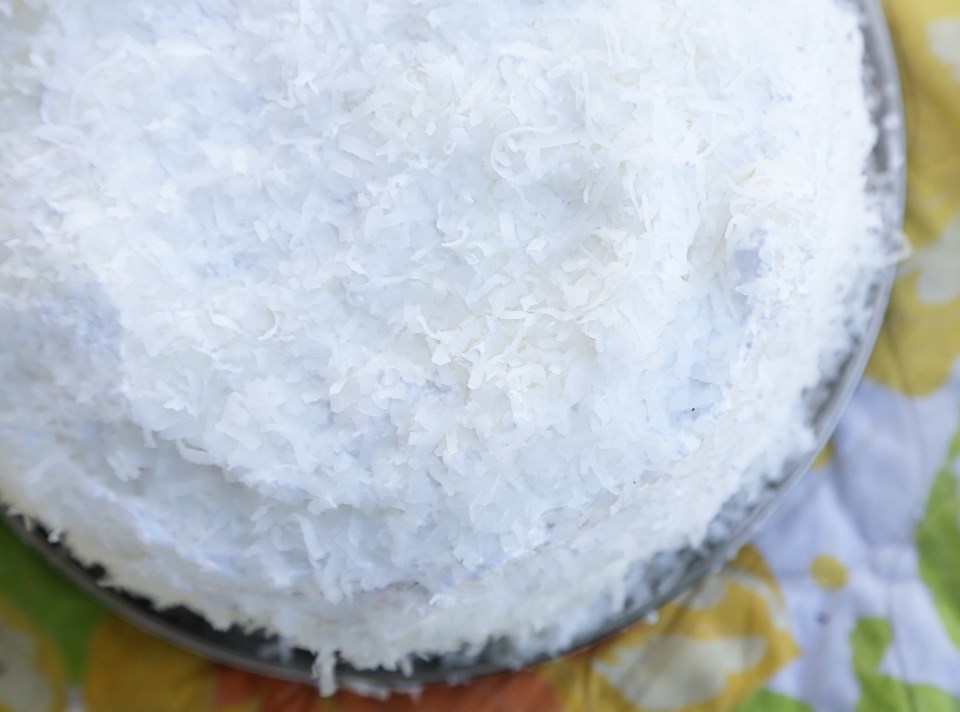
Amazingly dense, rich, saturated with coconut flavor with a light, fluffy, creamy frosting that only compliments and doesn’t overpower the rich, dense and super-moist cake.  Yes, of course, this was the best coconut cake we’ve ever had.  And why, is that? Because it’s Thomas Keller’s recipe, and as anyone who has ever heard of or seen one of his cookbooks will know, everything he touches is gold.  This recipe, however, is not found in any of his cookbooks, but was featured in an article on Saveur magazine online.  It was a recipe that took him back to his childhood, to having a cake very similar to this in a small town diner.  We had this recipe bookmarked for months and finally gave it a go.  While you can tell from the pictures that my layering techniques leave something to be desired, the flavors were amazing.  Spot on.  I even took it to a picnic in 80 degree weather and it held up (barely).  This cake needs to be chilled the adequate time recommended, for sure.  Even with my missteps and imperfect execution, it was one of the best cakes I’ve had in years.

Go forth!  Be bold!  Make this cake!  We changed nothing – this is just one of those “I made it, so can you” kind of posts,  so I’ll simply copy the recipe for you, here!  Happy Weekend!

Keller's Coconut Cake

Triple Layer Coconut Cake

FOR THE CAKE:
Unsalted butter, for greasing
2 cups flour
1 cup desiccated coconut
1 tsp. baking powder
1 tsp. kosher salt
1½ cups sugar
eggs, separated
1¼ cup mayonnaise
¾ cup coconut milk
½ cup, plus 1 tbsp. buttermilk
2 tsp. coconut extract
2 tsp. vanilla extract

FOR THE MERINGUE:
6 egg whites
1⅔ cups sugar
3 cups sweetened shredded coconut

INSTRUCTIONS

Make the cake: Heat oven to 325°. Grease three 9″ cake pans with butter and line with parchment paper; set aside. Whisk flour, desiccated coconut, baking powder, and salt in a bowl; set aside. Place sugar and egg yolks in the bowl of a stand mixer fitted with a paddle attachment; mix until fluffy. Add mayonnaise, coconut milk, buttermilk, coconut and vanilla extracts; mix until combined. With the motor running, slowly add dry ingredients until batter forms; transfer batter to a bowl and set aside. Clean stand mixer bowl and add egg whites; replace paddle with whisk attachment. Whip whites until soft peaks form; fold into cake batter. Divide batter between prepared pans, smoothing tops with a rubber spatula; drop pans lightly on a counter to expel large air bubbles. Bake until a toothpick inserted in middle comes out clean, about 25 minutes. Let cakes cool for 20 minutes in pans; invert onto wire racks and let cool.Make the meringue: Using an electric hand mixer, beat egg whites in a bowl until medium-stiff peaks form, 5–7 minutes; set aside. Bring sugar and ¼ cup water to a boil in a 2-qt. sauce pan fitted with a candy thermometer; cook, without stirring, until temperature reaches 250°, 4–5 minutes. With the mixer on low, slowly drizzle hot syrup into egg whites until combined. Increase speed to high; beat until meringue forms stiff peaks, about 3 minutes more.

Assemble the cake: Place one cake layer on a cake stand and spread 3 cups meringue over cake; sprinkle with ¼ cup coconut. Repeat with second layer. Place remaining layer on top; cover top and sides with remaining meringue and cover outside of cake with remaining coconut, pressing lightly to adhere. Chill cake 30 minutes to firm meringue; serve chilled or at room temperature.

copied from Saveur 
Coconut Cake

Buffalo Burgers with Rosemary Roasted Root Vegetables

Buffalo Burgers
Get your grill heated up this weekend – it’s supposed to be beautiful!  I actually don’t know that for sure, but I’m trying to stay positive.  I made these burgers for us this week after seeing a recipe for lamb burgers.  I couldn’t find ground lamb here and didn’t really want to pay to have some lamb loin ground up so I figured I’d go with something just as lean (the appeal of a lamb burger) and go with buffalo!  We have a very small section in our local grocery store and they have a few pounds of ground buffalo always available.  I know it’s really, really lean, so it can dry out really easily.  The trick is cooking it low and slow, so I’d suggest if you’re grilling, to keep it off the direct flame and give it some extra time.  I love chopped onion in my burgers, so I added some to these and also a little bit of grated Swiss cheese and a couple tablespoons of water – a trick I learned in making the best meatballs ever, that gives the meat that extra tender-juiciness without adding a bunch of fat.  We topped these burgers with sliced avocado, baby bell peppers, pickles and extra cheese – they were really wonderful and still juicy!

I served the burgers with some roasted carrots and potatoes.  I love roasting vegetables with rosemary and just a touch of olive oil, and had I had more root vegetables, I’d have added them right in!  I’ve done this before with beets, turnips and parsnips and I’ve loved them all!

roasted root vegetables

Buffalo Burgers with Roasted Root Vegetables

1 lb ground buffalo
1/2 cup diced white onion
1/2 cup shredded Swiss cheese
1 tsp kosher salt
1 tsp pepper
2 TBS water

In a large bowl, mix the buffalo and all the other ingredients until well incorporated and form into loose patties.  Salt and pepper both sides and cook on the stovetop over medium heat, or on the grill off direct heat for about 5 minutes per side, or until desired doneness is achieved.  I cooked mine until they were about 135F inside and that gave us a tiny bit of pink in the middle.  I served our burgers on toasted buns with mayo, sliced avocado, sliced baby bell peppers, sliced baby kosher pickles and extra Swiss cheese.  Top however you like!

For the root veggies:

A mix of carrots, potatoes, beets, turnips, etc (about 2-3 each)
2 TBS olive oil
2 TBS chopped fresh rosemary
salt and pepper

Heat your oven to 400F.  On a foil-lined baking sheet, toss the chopped vegetables with the olive oil and rosemary and sprinkle with salt and pepper.  Roast for about 30 minutes, or until the veggies start to get a little crispy along the edges.

Buffalo Burgers with Avocado and Swiss

Ginger Ale Poached Apricots over Warm Cinnamon Rice Pudding

Apricots Poached in Ginger Ale Poached Apricots with Cinnamon and Vanilla Bean
Simplicity.  I crave it, lately.  Maybe because I’m in a world filled with a bouncing-off-the-wall toddler and red-headed drama, or maybe it’s because the summer is heating up and I’m busy shooting weddings, all the while wondering who this little baby growing inside me will turn out to be.  I forget I’m pregnant most days.  Other than my sudden urge to rearrange all the furniture and the hair tie holding my pants together, it’s easy to forget while dealing with everything else.  That’s why I love cooking so much – it forces you to slow down and spend some time in thought.  Even if for just five minutes – there will be some point in meal prep where you must wait.  And in that waiting usually comes contemplation (if you can keep your phone out of reach).

Last week when I stood over my stove and smelled the tart sweetness of apricots stewing, I was transported back to the very first time I made jam.  It was about this time four years ago and the (now gone) huge, old apricot tree in our front yard decided to dump about 10 lbs of fruit on our lawn for a week straight.  I didn’t know what to do with all that fruit and I’d never made jam before, but I just started to create.  Took a base recipe and made all kinds of flavors: Vietnamese Cinnamon, Vanilla Bean, Red Pepper, Bourbon, Chinese 5 Spice – they were all amazing and I felt so good about not letting any of that fruit go to waste.  I also learned the simplicity of jamming.  The joy of tasting that fruit completely come ALIVE with just the addition of some sugar and a squeeze of lemon.  I never cared about apricots before that year, but since then, they’ve become one of my favorite fruits.
Poached Apricots in Ginger Syrup
I didn’t make jam with these store-bought apricots, but I did let them poach in some leftover ginger ale and a stick of cinnamon and vanilla bean.  The scent in my kitchen was as bright as the summer sun.  When the apricots were done poaching, I removed them from the liquid and let the ginger ale reduce until it was a syrup.  The apricots are sitting in that syrup in my fridge, now.  Waiting to be poured over ice cream or spooned over a warm biscuit with butter.  Or maybe just eaten straight out of the jar. Last week I made a cinnamon vanilla bean rice pudding for Olive’s snack time and added some poached apricots on top.  The combination was so comforting and for a few minutes, we both just ate and smiled at each other.

Coconut Milk Rice Pudding with Poached Apricots

Ginger Ale Poached Apricots with Cinnamon Rice Pudding

2 lbs of apricots, halved, pits removed
1 liter of ginger ale
two cinnamon sticks (or a tsp of ground cinnamon)
1 vanilla bean, split
1/4 cup sugar

Place the apricot halves in a large, non-reactive pot over medium-high heat.  Add the ginger ale, cinnamon, vanilla bean and sugar and let the mixture come to a boil.  After 10 minutes, remove the apricots with a slotted spoon and set them in a large bowl.  Allow the liquid to reduce to about 1-2 cups of liquid and pour over the apricots in the bowl.  Spoon apricots and syrup over rice pudding, ice cream, waffles, whatever you want!

Cinnamon Rice Pudding*
makes about 2 cups

1 cup coconut milk
1 1/2 cups whole milk
1/3 cup arborio rice (short grain rice)
1/4 cup dark brown sugar
1 tsp cinnamon
1 tsp vanilla bean paste
pinch of salt
1 egg

In a medium saucepan, heat the milks, rice and salt until the mixture boils.  Reduce heat and let the mixture cook about 20-25 minutes, stirring often, until the rice absorbs most of the liquid.  Remove from heat and in a smaller bowl, add the brown sugar, cinnamon, vanilla bean paste and egg and whip until smooth.  Add 1-2 tablespoons of the hot rice mixture to the egg mixture, stirring quickly to temper the egg.  Then, while whisking, add the egg/sugar mixture back into the pot of rice and let it cook over low heat until slightly thickened, about 10 more minutes.

Serve with poached apricots!

*adapted from this lovely recipe off Simply Recipes

Baking Challenge: Triple Berry Cinnamon Swirl Bread

Triple Berry Cinnamon Swirl Bread
I love a good challenge.  And Joy the Baker gave everyone a wonderful one!  She teamed up with King Arthur Flour (our favorite flour to use and the one Matt uses for all his bread) to create a baking challenge using four different flours from King Arthur’s extensive selection.  Go here to see the contest rules for yourself and be sure and watch the video – it’s so inspirational!  She makes everything look so easy 🙂

Matt chose two and I chose two – a true Family Meal collaboration!  He went first with the Triple Berry Cinnamon Swirl Bread.  It really didn’t seem that difficult for him and the recipe seems pretty forgiving.  I think no matter what your dough looks like when you put it in the pan raw, it’s going to bake up beautifully.  We brought this to our church class this morning and it tasted like one huge cinnamon roll filled with fruit.  In fact, I think if I were to redo this recipe, I would make them into berry cinnamon rolls with an orange icing.  Okay…that sounds awesome.  You heard it here first, folks.  That’s gonna happen.

Go take this challenge and have fun!  Post your pics on Instagram with the hashtag, “#bakingbootcamp”  and enjoy the process!

Triple Berry Bread Uncooked Triple Berry Cinnamon Swirl Bread

Click here for the very helpful recipe with photo tutorials!


Baked Double Chocolate Doughnuts

Chocolate Donuts
King Arthur Flour announced on their Facebook page that today is National Doughnut Day.  I was set up to post about a healthy snack today, but I was derailed by their incredible photos of this dark chocolate baked doughnut. I really hate frying things – not for any noble health reasons, but because I fright easily from splattering lava hot grease.  So these baked donuts were calling my name!  In the debate of cake vs raised doughnuts, I’m a cake gal.  I love the dense texture with the slightly crispy outside.  These baked doughnuts come mighty close to mimicking a fried cake doughnut and they were so easy to make!  I had fun with the different icings, too.  In the lineup were:

Espresso Double Chocolate Donuts
Espresso Glazed!  I don’t ever think I could pass up the coffee/chocolate combination if I tried, so I had to do this one.  My favorite, though, was…

Chocolate Chunk Donuts with Peanut Butter Frosting
Peanut Butter Frosted!  Thick, creamy peanut buttery frosting on a double chocolate doughnut?  Well, if you insist.  And then, my wildcard was inspired by Olivia the Pig’s favorite ice cream flavor, cherry chocolate chunk (my little girl watches one single episode all. the. time.) So I made cherry almond!  Because me and almond go way back…

Cherry Almond Chocolate Chunk Donuts
This was a super fun derailment and I hope you all enjoy some crave-worthy doughnut photos!  And try this super easy baked doughnut recipe!  I’ll add my frosting variations below!

Double Chocolate Baked Doughnuts*
makes 12-14 doughnuts

2/3 cup Dutch-process cocoa
1 3/4 cups King Arthur Unbleached All-Purpose Flour
1 1/4 cups light brown sugar
1 teaspoon baking powder
3/4 teaspoon espresso powder, optional
1 teaspoon cinnamon
pinch of cayenne
1 teaspoon baking soda
3/4 teaspoon salt
1 cup chocolate chips
2 large eggs
3/4 cup milk
2 teaspoons vanilla extract
2 teaspoons vinegar, white or cider
1/3 cup vegetable oil

Preheat the oven to 350°F. Lightly grease the wells of two standard doughnut pans. If you don’t have two pans, simply bake the batter in two batches. In a large mixing bowl, whisk together the cocoa, flour, sugar, baking powder, espresso powder, cinnamon, cayenne, baking soda, salt, and chocolate chips. Set aside.  (I added those other flavors because I’m addicted to Mexican chocolate).  In a large measuring cup or medium-sized mixing bowl, whisk together the eggs, milk, vanilla and vinegar.

Add the wet ingredients, along with the vegetable oil, to the dry ingredients, stirring to blend; there’s no need to beat the batter, just make sure everything is well-combined.
Spoon the batter into the prepared pan(s), filling them between 3/4 and full.
Bake the doughnuts for 12 to 15 minutes, or until a toothpick inserted into the center of one comes out clean.  Remove the doughnuts from the oven, and after 30 seconds or so, loosen their edges, turn the pan upside down over a rack, and gently let the doughnuts fall onto the rack.

*adapted from this recipe on King Arthur Flour

For the icings:

I filled three bowls with 1 cup of confectioner’s sugar each.  Then, I added 2-3 tablespoons of boiling water to each, whisking until smooth.

For the Peanut Butter Frosting:
To the sugar, I added 2 more tablespoons of boiling water and 2 tablespoons of creamy peanut butter.  I also added a teaspoon of vanilla bean paste because I have to add it to everything, and a pinch of salt.  Whisk until smooth.  If too thick, add more water.  If too thin, add more peanut butter.  You can’t lose.

For the Espresso Icing:
To the sugar, I added a teaspoon of espresso powder, a teaspoon of cocoa powder, a teaspoon of vanilla bean paste and whisked until smooth.  Thin out with more water if desired.

For the Cherry Almond Icing:
To the sugar, I added 2 tablespoons of boiling water to about 1/3 cup cherry preserves and whisked until smooth.  I added vanilla, a teaspoon of almond extract and a couple pinches of salt because it was just solid sweetness at first.

Let the doughnuts cool completely before dunking them halfway into the icing of your choice.  Enjoy!


Crunchy Cornslaw – a new twist on the same ol’ slaw

Crunchy Corn Slaw Fish Tacos with Corn Slaw
This weekend we had a cookout with some of our friends from church and decided we’d bring a good coleslaw to go with the bbq type meats everyone would be cooking.  So we decided to do a punny version of coleslaw and bring cornslaw.  I started dreaming it up because every summer for the past four or five years, Matt and I have inadvertently gravitated toward a Corn Dish of the Summer.  A few years ago it was an amazing creamed corn, a year after that it was Esquites (a bowl full of the equivalent of Mexican street corn) and last year it was this amazing miso buttered corn with scallions and bacon, a la Momofuku.

Now, I’m not saying this is THE corn dish of the summer of 2014, but it’s a start.  We really like it.  To compliment the sweetness of the corn, I added a Granny Smith apple and poppyseeds.  To offset the sweetness, I added plenty of purple cabbage and red onion and fresh poblano peppers – everything diced the same size (that’s important).  Then, I made my own mayo because we had just run out and I didn’t remember it the TWO times I’d been to the grocery store that day.  I was not going back.  So, homemade mayo with a little dijon and brown sugar and sherry vinegar – the perfect sauce for our perfect summer slaw!

Corn Cole Slaw
This stuff was fantastic as a side for smokey sausages on the grill (and grilled bread, of course!)  Tonight, I made fish tacos and made a little Srirracha mayo with the leftover batch of mayo from the slaw and topped our tacos with the still-crunchy slaw.  Amazing!  Welcome to summer, my friends!

Fish Tacos with Corn Slaw and Srirracha Mayo

Crunchy Cornslaw

4 large ears of corn
1/2 head purple cabbage, diced
2 poblano peppers, diced
1/2 cup red onion, diced
3 carrots, peeled and grated
1 Granny Smith apple, diced
1 TBS poppyseeds
1 cup of mayo (homemade or not – just don’t buy something fake or low fat or “miracle”)
2 TBS dijon mustard
2 TBS sherry vinegar
1 TBS brown sugar
salt and pepper to taste

In a large bowl, cut all the corn from the cobs directly into the bowl.  Add cabbage, peppers, onion, carrots, apple and poppyseeds and stir to combine.  In a smaller bowl, mix together the mayo, mustard, vinegar and brown sugar and fold into the corn mixture until everything is coated.  Season to your taste with salt and pepper.  If you want to make your own mayo, I’ll give you our super easy recipe below!  Happy cooking!

Homemade Mayo *
makes about 2 cups

2 large eggs
4 tsp dijon mustard
2 tsp white wine vinegar
1 tsp kosher salt
2 cups non-flavored oil like canola, grapeseed, vegetable

Add the eggs, mustard, vinegar and salt to a large cup and add the oil (if using an immersion blender). Start processing as you gradually lift the immersion blender up, letting the oil get sucked under in a steady stream.  If using a food processor, add everything except the oil to the processor or blender and blend for 30 seconds.  While running, slowly drizzle the oil in a thin, steady stream until all the oil is added and the mixture is smooth.

*adapted from Spike Mendelsohn’s awesome book, The Good Stuff


Fish Tacos 

2 fresh cod fillets or other firm, white fish
1 egg, beaten
1 cup panko breadcrumbs
1 tsp Old Bay seasoning
salt and pepper
olive oil for pan frying

Pat the fish fillets dry with paper towels and season each side with salt and pepper.  Cut into fish-stick sizes (mine were about 3-4″ sticks) by cutting the fillet across it’s width.  Put the beaten egg in a large bowl and the panko and seasoning mixed together in a separate bowl. Dip each stick into the beaten egg and then roll in the panko/Old Bay mixture and pat on all sides to fully coat.  Lay the coated fish sticks on a clean paper towel while you finish the others.

In a large, non-stick skillet over medium-high heat, add about 4 TBS of olive oil and let it heat till it shimmers.  Add the fish sticks without crowding (I had to do two batches) and fry till golden brown on each side.  Keep warm and crisp in a 250F oven until ready to assemble the tacos.

For assembly:

Dollop some srirracha mayo (there’s no recipe here – just add srirracha or any hot sauce to mayo and mix it up till it’s a heat level you like!  Mine was about 2 TBS per cup of mayo) along the center of a soft-taco sized tortilla.  Lay two fish sticks on top of the mayo and then top with the cornslaw.  Enjoy!

Blueberry Granola and Cinnamon Vanilla Yogurt Parfaits

Blueberry Granola and Cinnamon Yogurt Parfaits Yogurt and Granola Parfaits
This is a very simple snack that you can make ahead of time and have it ready to pull out of the fridge at any time during the week!  I had some blueberries in the freezer that needed to be used and so I created a soft granola that could be good cut into bars, or crumbled up like I did here, to add to yogurt, cereal, ice cream, whatever!  I love these little jam jar parfaits – I used the small 4 oz. size for Olive and used the bigger 6 oz. size for us big kids.  Layered with plain, rich Greek yogurt that I mixed with some cinnamon and vanilla bean paste – these are ready for my fridge and ready for a week of snack time, pregnancy cravings or a quick breakfast!

Sweetening plain yogurt with cinnamon and vanilla bean paste (which is slightly sweet) adds enough sweetness without adding several teaspoons of honey or sugar, like we all feel compelled to do with plain yogurt.  You’re getting plenty of sugar from granola (never let anyone tell you granola is a diet food) and so there’s no need to add even more by buying a pre-sweetened yogurt (which can have over 20 grams of sugar in each serving!) This recipe makes a really large batch of granola that’ll last you a while and I hope you enjoy the smell of your entire house while you make it!

blueberry granola parfaits

Blueberry Granola Parfaits
makes about 3 cups of granola

2 1/2 cups rolled oats
1 cup steel cut oats
1 cup flour
1/3 cup brown sugar
1 tsp baking soda
1 TBS cinnamon
1 TBS vanilla bean paste
1/2 cup honey
1 stick melted butter
1 cup frozen or fresh blueberries
1 cup toasted pecans, chopped
1/2 cup dried currants, raisins, whatever you like

In a large mixing bowl, combine the rolled oats, flour, brown sugar, baking soda and cinnamon.  In a medium bowl, combine the steel cut oats and 1 cup boiling water and let them soak for 20 minutes.  Drain and add to the other oat mixture.  If you don’t want to do this, simply add 2 more cups of regular rolled oats.  I liked the steel cut chewiness, but I’ve done this recipe with all rolled oats before and it works fine either way!

Add to the oat mixture the vanilla bean paste (can sub regular vanilla extract), melted butter and honey and stir well to combine everything.  Gently fold in the blueberries, currants and pecans (or any trifecta you desire).  Spread mixture out on a greased, rimmed baking sheet and bake at 350 for 20 minutes.  Take it out and let it cool and then break it all up and spread it out on the sheet again and let it bake at 250 for about 30 more minutes until it’s all golden brown.  If you want to make granola bars, increase your first bake time to 30 minutes and let it cool completely before cutting into bars.  While it’s cooling and still hot, I’d spread some white chocolate chips over the top and let them melt and then spread them all over for a topping for your granola bars, if you’re gonna swing that way.

Cinnamon Yogurt

1 cup Greek yogurt, plain
1 tsp vanilla bean paste
1 tsp cinnamon

Mix all ingredients together and whip up until fully blended.  Layer in cute little jars with the granola and top with fresh berries for the snack pictured here!  Garnishing with mint adds a wonderful flavor addition and brightens everything up.

*this can easily be made gluten-free by substituting the flour for coconut flour and insuring that your oats are gluten free.  Check the box – a lot of brands are, nowadays!

Cinnamon Yogurt and Blueberry Granola Parfaits

Summer Grilling: Romesco Sauce!

summer meal - romesco sauce
Ah, summer.  It’s upon us!  And even though I’m hoping no grilling will get done this weekend due to rain (please, oh please) we have fired up the grill several times already and hope to continue as the months continue to provide us with warm nights and light well into the 9 o’clock hour.  We had a truly noteworthy grilling session last weekend where the star of the show was that tasty little dollop of red pepper puree on the side of the asparagus called Romesco.

romesco sauce
Romesco is a blend of roasted red bell peppers, hazelnuts, almonds, garlic and roasted tomatoes.  I can’t explain how magical it all is when blended up together, but it is incredible as a topping for a grilled flank steak, a dip for asparagus, or even a spread for the grilled bread I’m hoping you’ll still try! We topped baked potatoes with our leftover romesco sauce this week and I just KNOW it would be fabulous on top of a simple omelet.  I love a sauce that can be so versatile because it won’t just sit in your fridge, unused.  There are literally endless options for this tasty sauce and I hope you will make this for your next summer meal!

grilled asparagus with romesco sauce

Romesco Sauce*
makes about 3 cups

4 Roma tomatoes, quartered
4 red bell peppers
6-8 cloves of garlic, still in their skins
3/4 cup olive oil, plus oil for roasting vegetables and toasting nuts
1/2 cup hazelnuts
1/2 cup almonds
1 cup day-old bread, cubed and toasted with olive oil
red wine vinegar
2 tsp Piment d’Esplette (or dried chili flakes)
salt and pepper to taste

Preheat the oven to 300F.  Season the tomatoes and peppers with 2 tablespoons of  olive oil, salt and pepper and place on a baking sheet. Bake the cloves of garlic along with the tomatoes and the peppers, until the garlic is soft, (remove them when they are to let the tomatoes and peppers finish) the tomatoes have begun to caramelize and the peppers are tender and beginning to blister, about 1 hour. Remove from the oven, cover the peppers with foil and set aside for 10 minutes, then peel the skin and remove the seeds and veins from the peppers.

In a small skillet set over medium heat, toast the almonds and hazelnuts with 1 teaspoon of the olive oil and salt.  

Remove the garlic cloves from their skins. In a food processor, combine the tomatoes, peppers, garlic, toasted nuts and bread. Add the Piment d’Esplette or chili flakes.  Slowly drizzle in the remaining ¾ cup of olive oil until the mixture forms a smooth paste. Season with red wine vinegar, salt and pepper until it’s to your liking.  We added about 2-3 tablespoons of vinegar and added about 2 tsp of kosher salt and some pepper.  Puree until very smooth, but the sauce will remain slightly chunky.  

Serve with grilled vegetables, meats, baked potatoes, bread, etc, etc, etc!

*we combined two recipes from Tasting Table to make our own version.


The Best Peach Cobbler: Food is Healing

Peach Cobbler over Vanilla Ice Cream
I grew up in Eastern New Mexico.  Which is basically West Texas.  Which is basically the South.  Basically.  And in the South, when someone is ailing, grieving, winging it as a single parent for a week with a house full of kids, or whatever – we bring food.  The more comforting the dish, the better.

Enter: homemade peach cobbler.  The BEST peach cobbler you’ll likely ever have.

My Aunt Mary could have been my grandmother.  The oldest in a family of eight children, Aunt Mary has acted like our grandmother as far back as I can remember.  She picked me up from school, she made a few dresses for me, she always gave away the best homemade treats at Halloween and she stood in place of my own ailing grandmother when I got married.  Did the same for both my brothers’ weddings, too.  Aunt Mary also brings food.  I would guess it is her first thought when she hears of someone’s suffering.

A few years ago my dad’s 20 year-old carpentry business and production shop burned to the ground in one night.  I remember us all sitting around the dining room table a couple days later, feeling numb and really not knowing what to say or do next.  It was as if a close family member had passed away.  Aunt Mary walked in holding this still-warm peach cobbler and a pint of vanilla ice cream.  We made a bowl and after the first bite,  I felt a little bit of weight released from my shoulders as my heart sank into those amazing flavors.  It was the food-equivalent of a hug.  It could have been the emotions of the day or the fact that we all love Aunt Mary so much, but I think it was the best peach cobbler, or any cobbler, I’d ever had in my life.

When my grandpa passed away a couple weeks ago, we were sitting around the house the afternoon after his funeral and Aunt Mary called.  She said, “I was just sitting here and realized that I NEVER brought over any food!”  I smiled and said quietly to myself, “please let it be peach-” at the same time she said, “I JUST made a peach cobbler. Can I drop by?”

And the same comfort washed over us, again.  This time my uncle had the first taste and in his quiet demeanor, he just nodded and said, “That IS the best cobbler I’ve ever had.”  And he’s a farmer.  He knows his cobbler.  I sat Aunt Mary down before she could leave and told her that this time, she HAD to tell me the recipe.  So, from memory she just told me how she did it.  I love recipes like that.  She even apologized and blushed a little when she told me how much sugar. 🙂

So I want to give this comforting recipe to you.  So you can give it to someone else.  Food, sometimes, is so much more than nourishment, calories, ingredients, fast or fancy restaurants.  It can be those words you don’t know how to say or that comfort you wish you could provide but  just don’t know how.

Classic Peach Cobbler

Peach Cobbler

serves 8-10

1 stick unsalted butter
2 – 28 oz cans of sliced peaches (don’t drain.  And the ounces may vary.  Aunt Mary just said, “Not the soup-can size – the bigger one! So I guessed.)
3 cups sugar (I know.  You might eat this once a year.  It’s okay.)
1 cup flour
1 tsp baking powder
1/4 tsp kosher salt (she told me 1/8 tsp salt, but kosher is bigger so I always double the amount if I’m using it)
1/2 cup milk

Preheat your oven to 400F.  In a 9×13 pan, melt the stick of butter in the oven.

In a large skillet over medium high heat, add the peaches with their syrup, two cups of sugar and let it start bubbling.  Meanwhile, mix flour and the remaining cup of sugar, baking powder and salt together in a bowl and then add the milk.

Pour the batter on top of the melted butter.  Then pour the peach mixture over the batter.  Bake about 40 minutes until the batter is a rich brown.  I’d really advise letting this cool down considerably before eating.  You’ll think there’s waaaaaay too much syrup, but it thickens upon cooling and you have this glorious syrup to pour over your ice cream. Worth it.

Peach Cobbler

Chicken Avocado Taquitos with Red Pepper Soup

chicken taquitos with green chili
These recipes jumped off the screen last Monday when I was looking for something quick, nutritious and slightly comforting to make for my family.  Both recipes come from the great world of Pinterest and they paired together like old friends.  The first was baked chicken taquitos and I improvised from the original recipe a bit and added avocado (because it improves nearly everything) and green chili powder instead of cayenne.  Both additions worked well and I’ll definitely make this recipe again!

The second recipe comes from a dear friend and fellow food blogger, Becky McGrew of Apronclad.com!  She made this roasted red pepper soup a while back and I have kept it in the back of my head as yet another wonderful soup to introduce new flavors to our little two-year old, Olive.  The soup made a wonderful dip for the taquitos and was obviously wonderful on its own as a starter/side dish for the meal.  It has some Italian herbs in it, which are awesome, but I think next time to match up a little better with the Mexican theme, I think I’d omit the basil and thyme and add in Mexican oregano and cilantro to finish.  Whatever you do, just make this soup.  It’s outstanding!  I didn’t mess with the recipe at all, so just go on over to Becky’s blog and get the recipe there, plus very nice step-by-step instructions!

chicken taquitos

Baked Chicken Avocado Taquitos*

2 boneless skinless chicken breasts, pounded to ½ inch thickness
½ teaspoon garlic salt
1 teaspoon green chili powder
½ teaspoon onion powder
1 teaspoon cumin
8 6-inch flour tortillas
1 cup shredded mexican blend or cheddar cheese
1 large, ripe avocado
Preheat oven to 450. Line a baking sheet with nonstick foil and spray heavily with cooking spray.

In a small bowl whisk together garlic salt, green chili powder, onion powder and cumin. Rub seasoning into both sides of chicken breasts. Spray a large pan or skillet with cooking spray and cook chicken over medium heat about 8-10 minutes or until cooked through. Chop chicken up into small cubes. Divide chicken evenly among all tortillas, spreading the chicken into a strip down the middle of each tortilla. Top chicken with about 2 tablespoons of shredded cheese and a few pieces of avocado. Tightly roll each tortilla into a taquito. Place end side down on prepared baking sheet. Spray taquitos heavily with cooking spray. Bake 10-15 minutes until tortilla edges begin to brown/blacken and cheese is melty. We dipped ours into the soup and also our favorite – Mexican crema!  Seriously, so much more flavor than sour cream!

*adapted from Creme de la Crumb