Espresso Chocolate Cake with Cinnamon Cream

Espresso Chocolate Cake with Cinnamon Whipped Cream
I’m a pretty big fan of the combination of chocolate and cinnamon.  They compliment each other so well in baked goods and the combination nearly exudes warmth.  This flourless indulgence boasts the rich flavors of espresso, as well.  And if there’s anything the first year of motherhood has taught me, it’s that coffee is from the Good Lord.  Chocolate is, as well, but coffee has really become a friend in need this year.  Together, they have become our go-to desserts.  This cake should be enjoyed with coffee if you are into that kind of supreme happiness.  The original recipe doesn’t call for cinnamon, but lately I’ve been adding it to just about everything including the fresh whipped cream I made for this cake.  I put more cinnamon than I thought I should and it turned out perfect.  And then I sprinkled it with cinnamon.  Maybe I have a deficiency?

Either way – try this cake.  And don’t leave out the whipped cream.  It was extra special.  Happy weekend and happy baking!

Flourless Espresso Chocolate Cake

Flourless Espresso Chocolate Cake with Cinnamon Cream*
makes one, 9″ round cake

  • 3 tablespoons unsalted butter, plus more for cake pan
  • 6 ounces bittersweet chocolate, preferably 70 percent cacao, chopped
  • 6 large eggs, separated, room temperature
  • 1 cup sugar, divided
  • 3 tablespoons instant-espresso powder
  • 1 tsp cinnamon
  • 1/4 teaspoon coarse salt
  • 1 tablespoon pure vanilla extract
  • 2 cups heavy cream
  • 2 tbs cinnamon

Preheat oven to 350 degrees. Butter the sides and bottom of a springform pan. Melt butter and chocolate in a glass or other heat proof bowl in the microwave at 30 second increments until melting and stir together to fully melt and incorporate.  Set aside.

Beat together egg yolks and 1/2 cup sugar with a mixer on medium-high speed until thick and pale, about 3 minutes. Add espresso powder, 1 tsp cinnamon and salt; beat until combined, about 1 minute. Add vanilla and melted-chocolate mixture; beat about 1 minute more.

In another bowl, beat egg whites on medium-high speed until foamy. Increase speed to high; gradually add remaining 1/2 cup sugar, beating until stiff peaks form, about 5 minutes. Fold into chocolate mixture in 3 batches. Transfer batter to pan and bake until set, 40 to 45 minutes. Let cake cool completely in pan on a wire rack. Remove side of pan; transfer cake to a serving plate. Serve whipped cream alongside cake.  To make the whipped cream, beat the heavy cream in a mixer on medium-high until soft peaks form.  Sprinkle in the cinnamon and whip a little longer, but not too long – you want the cream to stay soft, not get clumpy (which happens from too much whipping.)  Serve with coffee and be sure and save some for yourself for breakfast tomorrow!

*adapted from Martha Stewart Living

Coffee Can Bread

Coffee Can Brown BreadBoston Brown Bread Loaf

I love this bread.  It’s definitely a bread meant for soup, butter, honey, a fried egg on top – something it can soak up.  It’s dense, smells like gingerbread and it bakes in an old coffee can.  How much more nostalgic or delightful can this get? We first made this recipe to accompany homemade clam chowder.  Both recipes came out of arguably the best issue of Bon Appetit in years – the November 2012 issue.  That issue had several recipes we’ve made countless times, AND an interview with Nick Offerman, a.k.a Ron Swanson.  Best issue ever.

This is called Boston Brown Bread.  It’s a classic recipe in New England and is typically made to go with clam chowder.  I love that it makes two loaves. I can freeze one right out of the oven, or give it away.  I think this time, it will travel with us this weekend to go see our friends, Matt and Anna in Dallas, who JUST found out they are having a baby GIRL in January.  We are so excited to go spend some time with our culinary soul mates and best friends.

So, call your nearest neighbor who you might suspect keeps everything and ask if they have any old coffee cans you can use.  I did exactly that with my friend, Ann, and she delivered.  🙂 One more thing that makes me happy when I make this bread – I think of Ann!

Have a wonderful weekend and bake something memorable!
Sliced Boston Brown Bread with Butter
Coffee Can Bread
makes two loaves

A few tablespoons of butter
2 cups whole milk
1/2 cup molasses
1/4 cup packed light brown sugar
1 tsp kosher salt
1 1/4 cups whole wheat flour
1 cup all-purpose flour
1 cup rye flour (this is the important one to not substitute – I think you could sub AP flour for the wheat and it would be just fine, but the rye imparts an important flavor to the bread)
1/3 cup cornmeal
1 tablespoon baking soda
1 tsp baking powder

2 – empty, clean coffee cans, 11-13 ounces

Preheat oven to 350F.  Cut two 6″ squares of foil.  Coat insides of the cans and one side of each piece of foil with butter.  Stir milk and brown sugar and salt in a small saucepan over low heat until sugar dissolves and mixture is just warmed (don’t boil).  Whisk whole wheat flour and the remaining ingredients in a large bowl.  Add milk mixture, whisking until smooth.  Divide batter between cans and smooth tops.  (note! if the cans still have a lip rim, simply take your can opener to the top and it will cut that lip right off).

Cover cans with foil, butter side down.  Secure foil with kitchen twine.  Place cans foil side up in a deep roasting pan or heavy, shallow pot.  Pour very hot water into pan to come about 2-3″ up the side of the cans.
Coffee Can Brown Bread out of the oven

Bake until a skewer inserted through the foil into the center of each loaf comes out clean, about 1.5 hours.  Transfer to a wire rack and let cool for 10 minutes.  Run a thin knife around the edges of the cans.  invert to release loaves onto a cooling rack.  Let cool for 20 minutes before slicing.  Serve with soft, salted butter and rejoice.

This is great salted butter.  We buy unsalted for baking, but for eating, salted is the way to go!
the only butter you need

Coffee Infused Tres Leches Cake

manyleches005


There are three things that make a dessert experience truly great:
1. The occasion
2. The company who helps you eat it
3. The number of leches involved

This particular dessert experience was one I will always remember.  My friend, Becky came into town for a few short days and because of her husband’s nomadic ways, they have traveled far away from Lubbock, I fear, never to return.  I cherish the times she comes back into town and actually spends some good, quality time over at our house.  I shot Becky and Trevor’s wedding four years ago and we became fast friends, immediately glued together by our love of food and cooking.  I was elated when she said she’s spend the better part of the day with me, so the first question we naturally discussed was, “What are we going to bake?!”

Becky is one of those people who knows how to cook.  It’s in her soul – she was taught from a very early age how to work her way around a kitchen, learning from her father and grandmother.  Becky’s happy place is in the kitchen, and so naturally, we both had a zen-like afternoon baking together.  We shared stories, we complained about bad food and we ATE our creation with gusto and silent, head-nodding approval between bites.  It was perfect.

We decided to do Rick Bayless’ Coffee Infused Tres Leches Cake that I’d recently seen on his show, Mexico, One Plate at a Time.  Rick Bayless is one of those safe names in the cooking world.  If the recipe is from his show, or from one of his many restaurants, or amazing cookbooks, you can rest assured the recipe will work, and will become one of your favorites to return to again and again.  This has happened to me many times and this cake happily joins the ranks.

This cake is intense.  It should be paired with a strong cup of black coffee and nothing else.  The addition of the coffee in the milk mixture is pure genius.  It cuts the richness just right and adds depth where there might just be a generic sweetness.  It has this incredibly creamy texture with hints of cinnamon and coffee.  It’s the best tres leches cake I’ve ever had.  (And I grew up around here – I’ve had plenty.)  It made me think of the wonderful flavors of horchata, and I think next time I make this, I’ll replace horchata for the heavy cream.

manyleches006

Coffee Tres Leches Cake*
serves 6

For the cake:
1 cup all purpose flour
¾ cup sugar
1 ½ teaspoons baking powder
Salt
4 eggs at room temperature
¼ cup vegetable oil
¼ teaspoon vanilla extract, preferably Mexican
½ teaspoon cream of tartar

For the milk mixture:
1 cup heavy cream
1 12-ounce can evaporated milk
1 14-ounce can sweetened condensed milk
½ cup freshly brewed espresso or strongly brewed coffee
1 teaspoon vanilla extract, preferably Mexican
¼ teaspoon cinnamon
1 cup sugar
5 egg whites at room temperature
½ teaspoon cream of tartar
extra cinnamon for dusting (or cocoa powder – or espresso powder would be good, too!)

Heat the oven to 350 degrees. Line a muffin pan that makes 6 large muffins with muffin papers. Or, I don’t have a huge muffin pan, so I used little ramekins and lined the bottom of each with parchment.  Just do it and you won’t be sad, scraping your cake off the bottom of the dish.
Place the flour, 6 tablespoons of the sugar, the baking powder and a pinch of salt in a large bowl and whisk to combine. Separate the eggs, dropping the whites into the bowl of a mixer and the yolks into a medium bowl.  Add the oil, vanilla and 2 tablespoons of water to the yolks and mix well. Beat the egg whites with the cream of tartar until they start to thicken and form soft peaks.  Gradually add the remaining 6 tablespoons of sugar and continue to beat until stiff peaks form.
Add 1/3 of the flour mixture to the egg yolks and mix well. Gently fold in 1/3 of the beaten egg whites. Repeat, alternating the flour mixture and egg whites until everything is thoroughly combined.  Scoop the fluffy batter into the prepared muffin tins, place in the hot oven and bake until the tops spring back when touched, 20 to 22 minutes. Allow to cool slightly, then take the individual cakes out of the dishes and invert them into a deep 13×9 inch baking dish.

Combine the heavy cream, evaporated milk, condensed milk, coffee, vanilla, cinnamon and a pinch of salt in a bowl and mix well. Slowly pour the mixture over the cakes, soaking them thoroughly. Cover with plastic wrap and refrigerate for 1 hour to allow the milks to be absorbed into the cakes.  It actually took longer than that for mine to absorb.  We spooned the mixture over the cakes and poked extra holes in them so they’d soak up more milk.  In the end, I still had some leftover, so don’t worry about that.

Combine the sugar with 1/3 cup water in a small (2-quart) saucepan and bring to a boil over high heat, swirling the pan gently until all the sugar is dissolved.  Dip a brush in water and use it to clean the sides of the pan so no sugar crystals remain.  (This is an important step in keeping the syrup from recrystallizing.) Lower the heat to medium and boil the syrup until it reaches soft ball stage (about 240 degrees).
While the syrup is boiling, beat the egg whites with the cream of tartar and a pinch of salt until the whites form soft peaks.  Drizzle in the hot sugar syrup very slowly while the mixer is running.  Continue to beat until the bottom of the bowl is cool.  This takes forever, so do what Becky does and place ice packs on the outside of your bowl.  Or peas.
To serve, place each soaked cake on a plate, decorate with a big dollop of meringue, toasting the peaks with a kitchen torch.  Sprinkle with the cinnamon or cocoa and eat with great gusto!

*only slightly adapted from the original recipe

manyleches003 manyleches007 manyleches009


Thank you for that afternoon, Becky.  It will sustain me for months to come.  Until next time!  XOXO

Oatmeal Cookies – Welcome Home

Oatmeal Cookie and Milk

We’re back from a two week vacation that spanned Moab, UT, to the northern most part of Washington, where from the top of a mountain, I could see Canada.  We drove all the way to Seattle in a rented RV with two of our best friends and our little redhead.  Once we were in Seattle, the worst case scenario happened to our traveling partners – a death in the family – and they had to drive the RV home early and we booked a flight for later in the week to come home on our own.  We sorely missed their company but had an amazing time with the friends we went to see – John and Courtney and their amazing children.  They graciously welcomed us into their home and gave up their beds and their schedules and the order of how they normally go about life and made us feel so welcome, we felt more honored than family!  I just feel so lucky to have such friends in my life.  Olive has such wonderful people to look up to and strive to become.

I will post a LOT of recipes in the coming days about our trip and mostly recipes INSPIRED by our trip.  Recipes that immediately come to mind will be: Raspberry Pavlova, Chocolate Cayenne Mousse, a traditional crab boil, the ultimate potato salad, and a traditional poutine, just to name a few.  I can’t wait to share these recipes with you.

But today is about coming home.  Coming home to familiarity, to the warmth of being in your own space with the view out the window you remember (let’s not talk about what our yard looks like after 2 weeks of neglect).  When I think about coming home, I think about oatmeal cookies.  They scream comfort and familiarity and nourishment.  And the recipe today is kind of perfect.  The original recipe card I had is from a generic set of cookie recipes that came in a funny little box that just says COOKIES.  Each card is a different recipe.  It’s a pretty fun jumbo-sized deck of cards for Olive to play with and I can imagine when she gets older, picking out a card for our weekend baking adventures.  I modified the recipe because it seemed extremely void of liquid.  The original recipe didn’t call for any egg, so if you want to leave it out, know that you’ll just have to work the dough a little more so that it holds together because it’s pretty crumbly.  Either modification is good, but the addition of the egg makes a softer fluffier cookie, which worked out really well for my gap-toothed toddler.

Enjoy being home.  Everything is fleeting.

Oatmeal Cookie

Oatmeal and Golden Raisin Cookies
makes 2 dozen cookies

1 1/4 cups AP flour
2/3 cup sugar
1 cup rolled oats
1 cup shredded coconut
1/2 cup golden raisins
1/2 cup unsalted butter
2 tbs light corn syrup
1 tsp baking soda
1 TBS boiling water
1 egg

Preheat the oven to 325F.  Line two large cookie sheets with parchment paper, or spray well with spray oil.

Sift the flour into a large bowl.  Stir in the sugar, oats, coconut, and raisins.  Make a well in the center.

In a small saucepan, melt the butter and syrup over low heat.  In a small bowl, dissolve the baking soda in boiling water; stir immediately into the butter.

Pour the butter mixture into the well in the flour mixture.  With a fork, mix thoroughly.  Mix in the egg until well incorporated.

Drop heaping tablespoons of the dough onto the cookie sheets about 2 inches apart.  Bake until lightly browned, 15-20 minutes.  Cool a few minutes on the sheet and then transfer to a wire rack to cool completely.

Serve with milk.

Oatmeal Cookies and Milk

Cooking on the Road

map

They made up their minds, and they started packing.
They left before the sun came up that day.
An exit to eternal summer slacking,
But where were they going without ever knowing the way?

muffins009

I think we might be crazy.  But we’ve made up our minds to drive from here to Seattle in an RV with some really good friends, good music, and good food.  We’re bringing the coffee maker, some good quality beans and our guitars, so I think we may survive. 🙂  We have  friends who live in Seattle, and so we decided to make the trip part of the vacation.  In preparation for a few days on the road, I decided to get to baking.  No one likes to decide what to have for breakfast, so I took it upon myself to make it a no-brainer.  I consulted Annie’s Eats, of course, because that woman knows how to prepare for anything.  She has a wonderful selection of baked goods on her blog, and when I grow up, I want to be just like her.  (I may be older but that’s not the issue, here.)

I chose from her blog, the peanut butter banana oatmeal muffins,(they looked so great but I refrained from taste-testing) the chocolate cherry muffins and the bacon and cheddar scones.  We were forced to taste-test the chocolate muffins because they looked too chocolately for their own good and so what else were we going to do?  Leave it to chance?!  They can hardly be called muffins, in my opinion.  They are nearly flourless chocolate cakes, but just enough flour to make them decadent brownies.  In fact, next time I want to make brownies, I’m using this recipe.  So they might be more for snack time instead of breakfast.

muffins003

Chocolate Cherry Muffins*
(I doubled the recipe and it turned out great)

6 oz. bittersweet chocolate, finely chopped
6 tbs. unsalted butter, cut into small pieces
½ cup all-purpose flour
½ tsp. baking powder
¼ tsp. salt
2 eggs
2/3 cup sugar
1 tsp. vanilla extract
2/3 cup dried cherries, chopped if desired

Directions:
Preheat an oven to 350º F. Line a muffin pan with muffin cups or grease wells.

In a small heatproof bowl, combine the chocolate and butter. Set the bowl over but not touching simmering water in a small saucepan and melt the chocolate and butter, stirring occasionally, until smooth and blended. Let cool slightly.

In a small bowl, stir together the flour, baking powder and salt. In another bowl, whisk together the egg, sugar and vanilla until light in color and doubled in volume. Whisk in the chocolate mixture and then the flour mixture just until combined. Stir in the dried cherries. Divide the batter evenly among the wells of the prepared pan and smooth the tops. Bake until a toothpick inserted into the center of a muffin comes out with a few moist crumbs attached, about 25-30 minutes.

Makes 7-8 muffins.

*didn’t adapt this at all from Annie’s Eats, except for doubling it and using half dark chocolate, half milk because that’s what I had on hand!

muffins008

The scones I prepared up until baking and just froze them raw.  Then, I will put them in that tiny RV oven and add a few minutes on to baking time and we will have an amazing breakfast heading down the road!  I can’t wait for our adventure and I can’t wait for all the amazing food we will try and the sites we’ll see and the memories we will make.  And with any luck, we’ll all still like each other when we get home.  🙂  I’ll be sure and take lots of REAL, non-iPhone pictures and have a few posts about our gastronomical adventures when I return.

Bacon Cheddar Scones*
makes 8-10

For the scones:
3 cups bread flour
1 tbsp. baking powder
1 tsp. salt
1-2 tsp. ground black pepper (depending on your preference)
8 tbsp. cold unsalted butter, cut into small cubes
1½ cups grated cheddar cheese
1/4 cup chopped fresh chives
10 slices bacon, cooked and chopped or crumbled into small pieces
1 cup buttermilk (plus up to ½ cup extra, if needed)

For the egg wash:
1 large egg
2 tbsp. water

Preheat the oven to 400˚ F.  In the bowl of an electric mixer fitted with the paddle attachment, combine the flour, baking powder, salt and black pepper; mix briefly to combine.  Add the cubes of butter and mix on low speed until the mixture is crumbly and the butter pieces are about the size of small peas.  (Alternatively, this can be done in a regular mixing bowl, using a pastry blender or two knives to cut the butter into the dry ingredients.)  Add in the grated cheese and mix just until incorporated.

Mix in the green onions, bacon, and 1 cup of the buttermilk into the flour-butter mixture.  Stir by hand just until all the ingredients are incorporated.  If the dough is too dry to come together, mix in the remaining buttermilk a tablespoon or two at a time until the dough can be formed into a ball.  Transfer the dough to a lightly floured surface and pat the dough into an 8-inch disk.  Cut with a 3″ biscuit cutter into 12 circles, place on a greased cookie sheet, wrap in plastic and freeze till ready to eat.  Before baking, remove from freezer, brush with egg wash and bake for 25-30 minutes until golden brown.

*slightly adapted from Annie’s Eats

muffins002

Black Plum and Blackberry Galette

black plum galette
I’m in love with this pie.  It’s a galette – a free-form pie that is usually very rustic and can be sweet or savory, or even resemble a thin pancake in some regions of France.  I love it because it eliminates the pressure to make a pretty pie crust.  So many people struggle with pie crust, and when the edges crack, it can make even the most tempered person lose their cool.  But the galette solves all that.  You simply roll out your dough, fill it up and fold the edges over.  If you add an egg wash and some crunchy sugar sprinkled over the dough, no one in the world will care that it isn’t in a pie plate!  We enjoyed plums and a few blackberries in this pie because they were ripe and in season and cheap!  I really don’t buy fruit if it isn’t on sale.  I just figure that sale price tells me what’s in abundance and that’s an easy way to know what’s in season!

I served this over the course of a few days to a few different friends.  I love that one dish can unite so many.  I believe five different friends, total, shared this pie at different times over the weekend.  This is my very favorite thing about cooking and sharing meals.  And yes, a plum galette and a cup of coffee is a meal 🙂 I think people stay longer and open up quicker and are more at ease if you have something to offer them to eat and drink.  I’m not always good about doing this, especially for the most frequent friends.  And how awful to treat the frequent friends less special!  It’s hard for those of us who can’t be trusted with baked goods in the house, to have them in the house during the week.  But, maybe you could consider it a bit of a social challenge for yourself to bake this pie and then see how many different friends you can get to share it with you.  🙂

plum galette

Plum and Blackberry Galette*

2 1/2 cups plus 2 tablespoons all-purpose flour (spooned and leveled), plus more for rolling
1 cup (2 sticks) cold unsalted butter, cut into pieces
5 tablespoons plus 1 teaspoon sugar
1 teaspoon salt
1/2 cup ice water
1/4 cup whole, skin-on almonds, toasted
5 to 6 plums, halved, pitted, and sliced 1/4 inch thick (keep slices together if possible – this was hard for me because my plums were cling and didn’t come away from the pit very easy.  I just sliced them as best I could – still pretty)
1 to 2 tablespoons heavy cream

In a food processor, combine 2 1/2 cups flour, butter, 1 teaspoon sugar, and salt; pulse until mixture resembles coarse meal. Sprinkle with 1/4 cup ice water. Pulse until dough is crumbly but holds together when squeezed (if necessary, add up to 1/4 cup remaining ice water, 1 tablespoon at a time). Don’t overmix! Remove dough from processor and shape into a disk; wrap in plastic and refrigerate 1 hour. Meanwhile, wipe bowl of food processor clean and add almonds, 3 tablespoons sugar, and 2 tablespoons flour; pulse until ground to a coarse meal.

Preheat oven to 350 degrees. On a floured surface, roll out dough to 1/4-inch thickness. Transfer to a parchment-lined baking sheet; sprinkle almond mixture over dough (this is necessary for absorbing the juices from the fruit so your crust won’t be a soggy mess.  Plus, it tastes great.)  With a spatula, transfer plums to dough; press lightly to fan out, leaving a 2-inch border. Fold edge of dough over fruit. Refrigerate 20 minutes (this is so your butter doesn’t leak out). Brush crust with cream (I used an egg); sprinkle galette with 2 tablespoons sugar (I used super crunchy sugar!)  Bake until crust is golden and underside is cooked through, about 70 minutes.

*I made this from Martha Stewart’s Pies and Tarts cookbook, which, is a book I could look at for hours on end, reading it like a novel.  That’s one way to get better at cooking, by the way – read cookbooks like they’re novels 🙂

Apricot Pine Nut Cakelettes

Apricot Pinenut Cakelettes004


I used to have a huge apricot tree in my front yard.  It was so wonderful throughout the seasons to see the blossoms appear in spring and the fruit appear around June and the leaves turn shockingly golden in October.  It was one of my favorite things about our house and it introduced me to jamming and gave me a passion for it.  Because of that tree, I learned to make apricot preserves and the first two years we had fruit, I canned nearly 100 jars of apricot jam variants. Vietnamese Cinnamon, Chinese 5 Spice, Bourbon Brown Sugar, Rosemary, Vanilla Bean (the best version) and even Crushed Red Pepper Apricot!  I gave them away as gifts and really just reveled in the sudden surge of domestic satisfaction I was getting from the process of gathering, cleaning, cooking and canning a resource from my own yard.  I felt like such a good steward of those little golden gifts!

new-00001


apricot018

To make a sweet story a bit sad, that tree fell victim to the terrible drought our area has been suffering the past three years.  The second year into the drought, the fruit on our tree was tiny but packed with flavor.  It was the last year it would bear fruit.  We had to chop it down last summer and I will admit, I mourned the loss of that tree for months.  We’ve tried planting replacement apricot trees twice, now, and borers got the second one (and the first – it was a borer/drought combo) and the second replacement got hit by two late frosts and never recovered (although I won’t call it officially gone till next spring).

So maybe it’s not meant to be?  Maybe the lesson learned is to make good use of what you have while you have it.  Revel in the gifts you’re getting now, because soon, they may not be available to you.  If you have a fruit tree and don’t have time to make anything from it, first, call me and I’ll come pick up every piece from your yard (I know there’s no fruit on trees in this area, yet – still, the sentiment always applies) and second, if nothing else, just eat from it!

This recipe is a wonderful, easy recipe that can be used with fresh, canned or even dried apricots (or any fruit, really).  I used dried apricots that I reconstituted in a bit of water, first, because I couldn’t find canned, as the recipe called for.  They turned out wonderful and they lasted for a week!  The cake part is a wonderful cake recipe and one that I plan on using for other purposes in the future.  It calls for buttermilk, and I happily used some raw buttermilk from our local dairy, Pereira Pastures.  They are suffering from the drought too, and could use your support if you are from this area and feel like making a donation and getting some amazing milk in the process!

Apricot Pinenut Cakelettes001


Apricot Pine Nut Cakelettes*
makes six cakes

1/4 cup pine nuts, toasted
6 tablespoons unsalted butter, divided
1/4 cup plus 1/3 cup packed light brown sugar
1 tablespoon water
8.5 ounces apricot halves, sliced
1 1/3 cups AP flour
1 1/2 teaspoons baking powder
1/4 teaspoon salt
1/3 cup sugar
1 large egg
1 teaspoon vanilla extract
1/2 cup buttermilk

Preheat oven to 350F. Butter six 6-oz ramekins and place them on a baking sheet with a shallow rim.

Divide the pine nuts evenly among the ramekins.

In a medium-sized saucepan, melt 2 tablespoons of the butter over medium-low heat.  Add 1/4 cup brown sugar and the water and cook, stirring, until the sugar is dissolved.  Add the apricots and stir gently until coated.  Divide the apricots and syrup evenly among the cups.

In a small bowl, stir together the flour, baking powder, and salt.  In the bowl of an electric mixer, or by hand, beat the remaining 4 tbs butter, 1/3 cup brown sugar, and the granulated sugar on medium speed until well blended.  Beat in the egg and the vanilla until combined.  With the mixer on low speed, mix half of the dry ingredients into the batter until just combined.  Mix in the buttermilk until combined.  Mix in the remaining dry ingredients until combined.  Divide the batter evenly among the ramekins and smooth the tops.

Bake until a toothpick inserted comes out clean, about 30 minutes (mine took more like 45).  Transfer the ramekins to a wire rack and cook for 10 minutes.  Run a knife around the edges of the ramekins to loosen the cakes.  Invert the cakes onto individual dessert plates and serve warm with fresh whipped cream, or a drizzle of amber agave nectar, like I’m currently obsessed with.  🙂

* recipe from the Bonne Femme Cookbook!

Apricot Pinenut Cakelettes006

Champagne Mangoes and a Glorious Mango Curd

mango curd macaron dish

When we were in Mexico City last year with our friends, Cali and Alex, we were introduced to the ultimate mango.  Small, lemon yellow and sweeter than a peach.  Cali showed us that there was a specific mango fork that you need to peel it properly, and then she went on to show the proper way to peel and dice up these golden nuggets of wonder. She is my unofficial mango-expert.  I will forever associate her with this wonderful fruit and every time I peel one, I always think, “Is this how Cali would do it?”   I had never experienced a mango like the ones in Mexico, before, and when we got back home, I was on the look out.  I was so excited to see one that looked very similar at the grocery store called Champagne mangoes, and the next time Cali came over, I had her confirm its validity.  We had a winner!  So now, whenever I see that they are in abundance at the store, I get a half dozen.  The last time I did, I let them go too long before eating them, and faced the fear of letting them go bad.

So, I decided that I wanted to make a mango curd.  I looked up a recipe and it called for 15 ounces of mango and that’s exactly how much I had.  The recipe turned out so well, I filled macarons with it and also filled citrus cupcakes with the curd and topped them in coconut cream cheese frosting.  Epic win for the cupcakes, epic fail on the macarons.  The macarons tasted great, but the cookie itself didn’t turn out very well.  They all went hollow!  I have made macaron cookies before and the best I can describe them is that they are the croissant of cookies.  Every batch is different, every recipe is different and their success depends on so many factors, it’s a little maddening. The quality of the ingredients, the humidity in your kitchen, the exact temp of your oven, etc, etc, etc.  I surprised myself and didn’t FREAK OUT when the first batch of cookies EXPLODED, the second batch was pretty perfect, and the third batch baked like the first.  A true testament to how baking is a fickle beast.  They at least looked pretty:

mango curd macarons

The cupcakes, on the other hand, were a no-brainer.  I took a basic yellow cake recipe and added in Fiori di Sicilia, then made a cream cheese frosting, added a bit of coconut extract and topped each with toasted coconut after filling the cupcakes with the mango curd.  Such a wonderful combination, that I wanted to share those recipes with you, today, but mainly, this mango curd is the winner.  A week later, I still had some in a jar so they were put on some buttermilk pancakes this morning with fresh blueberries and slices of Champagne mangoes, of course.

mango curd cupcakes

mango cupcakes

Champagne Mango Curd*

Makes 1 to 1.5 cups

15-ounces ripe mango, peeled, pitted, cut into 1/2-inch pieces (It took 5 Champagne mangoes)
1/3 cup sugar
3 tablespoons fresh lime juice
Pinch of salt
4 large egg yolks
1/4 cup (1/2 stick) unsalted butter, cut into small pieces

Puree mango, sugar, lime juice and salt in processor, scraping down sides of work bowl occasionally. Add yolks; puree 15 seconds longer. Strain through sieve set over large metal bowl, pressing on solids with back of spatula to release as much puree as possible. Discard solids in sieve.

Set metal bowl over saucepan of simmering water (do not allow bottom of bowl to touch water); whisk puree until thickened and thermometer registers 170°F., about 10 minutes. Remove from over water. Whisk in butter 1 piece at a time. Cover and refrigerate overnight.

*taken from Smitten Kitchen, who took it from Bon Appetit

Citrus Cupcakes*

1 stick unsalted butter, softened
2 cups all-purpose flour
1 tablespoon baking powder
1/2 teaspoon fine salt
1 1/2 cups granulated sugar
3 large eggs, room temperature
1 cup whole milk
1 teaspoon Fiori di Sicilia, or 1/2 tsp orange extract + 1/2 tsp vanilla

Preheat oven to 350 degrees. Butter and flour 12-16 muffin tins, or just line with cupcake liners and spray those with non-stick spray.  Whisk together flour, baking powder, and salt. Beat together butter and granulated sugar with a mixer on medium speed until combined, 1 to 2 minutes. Add eggs and beat well, scraping down sides of bowl as necessary. Reduce speed to low and gradually add flour mixture, beating until combined. Add milk and extracts and beat until just combined.
Divide batter among cups; smooth tops with an offset spatula. Bake until golden and a toothpick inserted into centers comes out clean, 25-30 minutes. Let cakes cool in pans on wire racks 15 minutes. Turn out cakes onto racks to cool completely before filling.

*adapted from Martha Stewart Living

Coconut Frosting*

1 stick unsalted butter, softened
4 ounces cream cheese, room temperature
5 cups confectioner’s sugar
1/4 teaspoon fine salt
1/4 cup whole milk
1/2 teaspoon pure vanilla extract
1/4 tsp coconut extract

1/2 cup coconut, toasted, for topping cupcakes

Beat together butter and cream cheese with a mixer on medium-high speed until pale and creamy, about 1 minute. Reduce speed to medium. Add confectioner’s sugar, 1 cup at a time, beating well after each addition. Add salt, milk, and vanilla, coconut extract and beat until fluffy, about 3 minutes. If not using immediately, cover surface of frosting with plastic wrap. Frosting can be refrigerated in an airtight container up to 1 week. Before using, bring to room temperature, then beat on low speed until smooth.

*adapted from Martha Stewart Living

To Assemble:

I used the large tip from my piping bag to cut out the centers of my cupcakes and I really went pretty much to the bottom of each cupcake with the cut.  The curd is pretty runny out of the piping bag, so I had to hold it up in the air between fillings.  I inserted the tip of the piping bag and slowly squeezed until the sides of the cupcake bulged a bit.  I like filling.  Then, I just smoothed the frosting on top of each cupcake and sprinkled with toasted coconut.

mango cupcake with coconut frosting

Mini Cherry Pies with Brown Sugar Meringue

cherry meringue mini pies-23

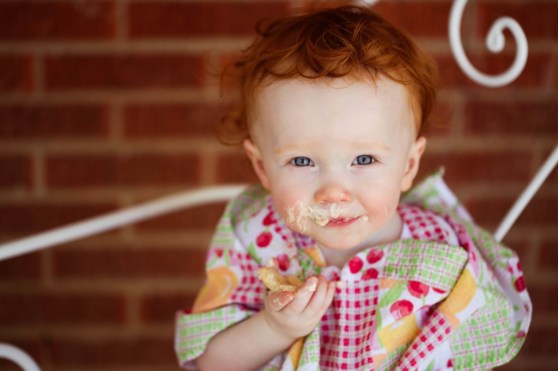
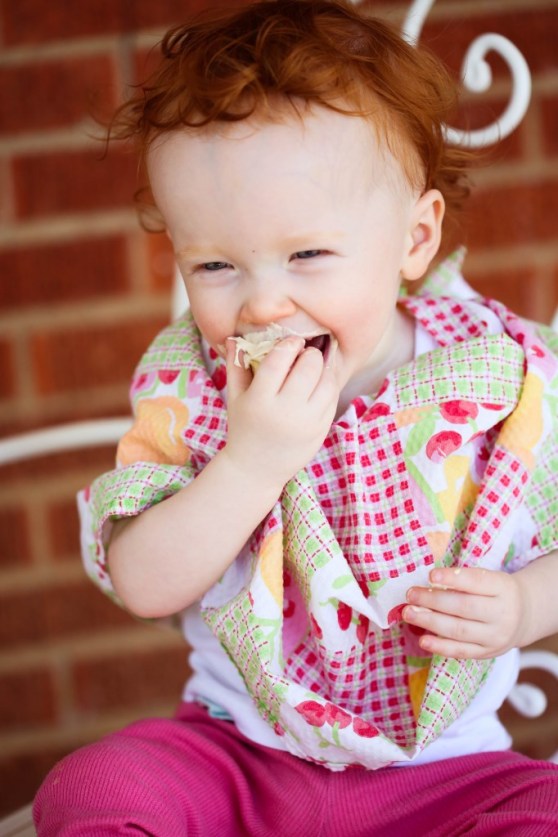
I fulfilled a little dream, today.  I baked with my daughter.  And she even wore a mini-apron. In just a few more months, she’ll be able to stand beside me on her stool and really help.  Today, she got to sit on the counter, play with the rolling pin, say, “row, row, row” as she rolled the dough and even properly sneaked little bites of the raw dough to eat.  This girl knows how to live.  And I’m so happy that she’s teaching me how to live mine, all over again.

image_1 photo

I found cherries on sale for $2.97, regularly over $7!  Cherries are in season in May, so I really hope they stay cheap for a few more weeks!  I did a couple things with my purchase.  First, I put a few whole in a jar and covered them with bourbon.

cherry meringue mini pies-20

A great addition to cocktails in a few weeks, I’m sure!  Or a grown up ice cream Sunday.  Or, a merciful substitution for those horrid Maraschino circles of candy that call themselves cherries.

cherry meringue mini pies-19

For my second act, I overcooked a batch of cherry pie filling so much that it resembled bits of dried cherries, resting comfortably in glue.  (I’d left it on the stove to “simmer” while I went to see my friend in the hospital.  Um, don’t ask why I did that.)  Matt rescued my near-break down by going and getting me another pound at 10:00 last night, then helped me pit every last one of them so I could start over.  That’s true love.

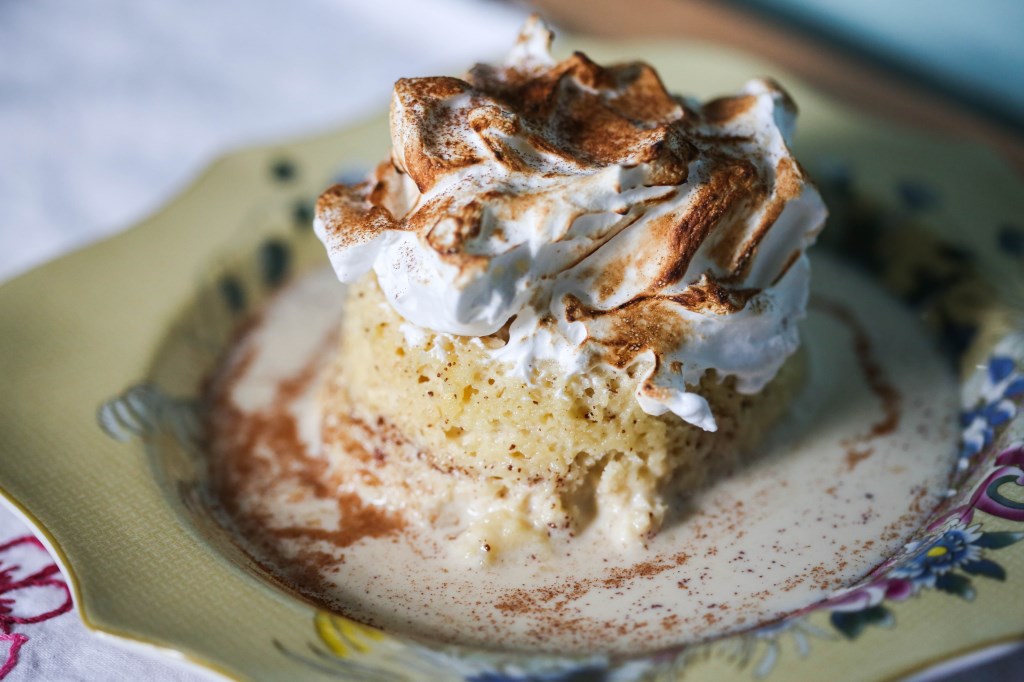
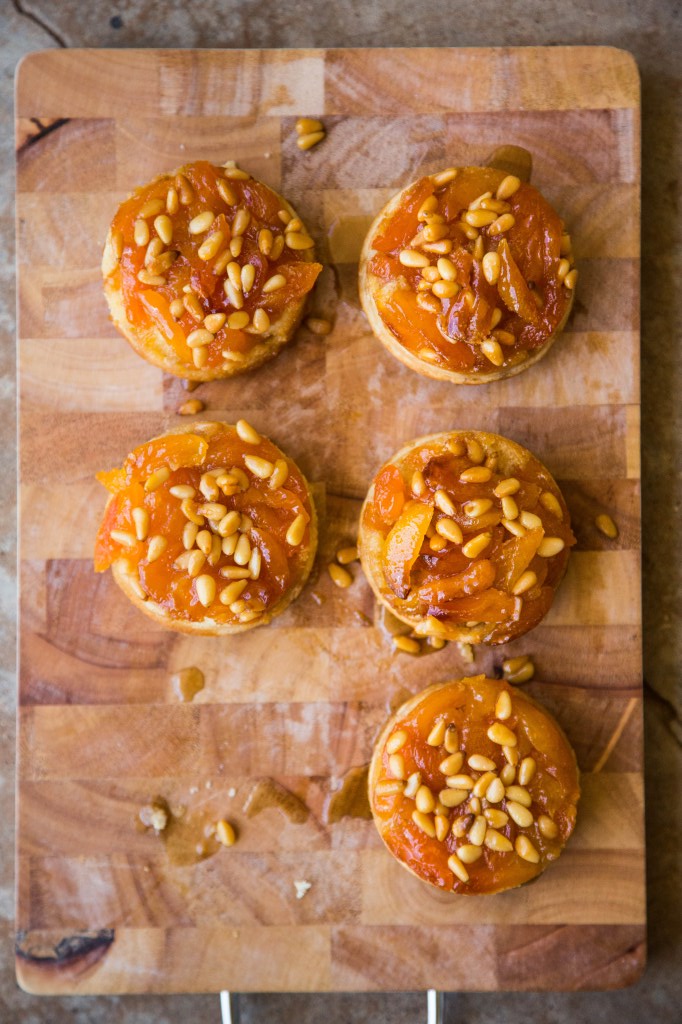
So I had a vague vision of what I wanted to do.  I wanted to make mini pies, fill them with tart cherry filling and use a brown sugar meringue that I’ve used before and wanted to make again because it’s close to perfection and is SO SWEET that it can really only be paired with something tart.  So these little devils are a combination of three recipes: Martha Stewart’s hand pie dough, My Baking Addiction’s cherry pie filling and Cindy Pawlcyn’s brown sugar meringue that she uses on her mile high lemon meringue pie at her amazing restaurant, Mustards Grill in Napa Valley (we went! we ate! we went into a food coma!)

The results were pretty great.  I think next time, I’d use my tried and true pie crust recipe and just add lemon zest to it.  Other than that, this recipe is a winner!  Especially for this super hot weekend that reminds us all too well that we live in the desert and it is officially summer.

cherry meringue mini pies-1

Mini Cherry Pies with Brown Sugar Meringue
makes two dozen

For the Crust

3 cups AP flour
1/4 tsp baking soda
1 tsp baking powder
1/2 tsp salt
2 tsp lemon zest (this microplane works best!)
1 stick of butter (1/2 cup, room temp)
1 cup sugar
1 large egg
3 oz. cream cheese at room temp
2 tbs buttermilk
1 tsp vanilla extract

In a medium bowl, whisk together the flour, baking soda, baking powder, salt and zest.

With an electric mixer on high speed (I used my stand mixer with the paddle attachment), beat butter and sugar until pale and fluffy, about 5 minutes.  Add the egg and beat until just combined.  Add cream cheese, buttermilk, and vanilla; beat until well combined.  Add reserved flour mixture, and beat until smooth.  Form dough into a ball and cover with plastic wrap and flatten into a disc.  Refrigerate 1 hour, up to overnight or freeze up to 1 month.

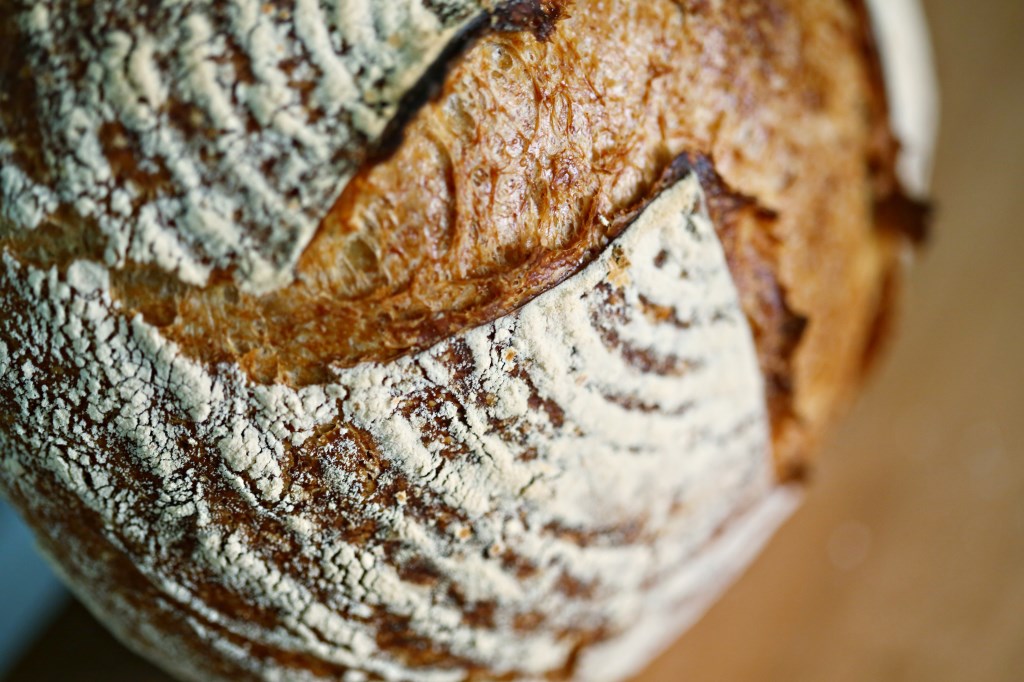
Let the dough come up to room temp and then roll out into a circle about 1/4 inch thick.  Cut out 4″ rounds and press them into a standard muffin tin, making sure to patch up any holes that form.  This dough is kind of crackly, so don’t fret.  It patches up pretty easily.  Prick the bottom of each pie with a fork and bake in a preheated 375 degree oven for 15 minutes, or until golden brown.  Some of the bottoms of the pies will puff up, but when they’ve cooled just press the puffed up centers down a bit before filling.  I wasn’t about to cut 24 parchment rounds and fill each cup with pie weights.  I’m not THAT dedicated to perfection.

For the Filling

5 to 6 cups fresh, pitted cherries
1/2 cup water
2 tbs lemon juice (fresh!)
2/3 cup sugar
4 tbs constarch
1/2 tsp almond extract

In a saucepan over medium heat, combine the cherries, water, lemon juice, sugar and cornstarch.  Bring to a boil; reduce heat to low and cook, stirring frequently, for about 10 minutes.  Stir in the almond extract and cool slightly before using.

image

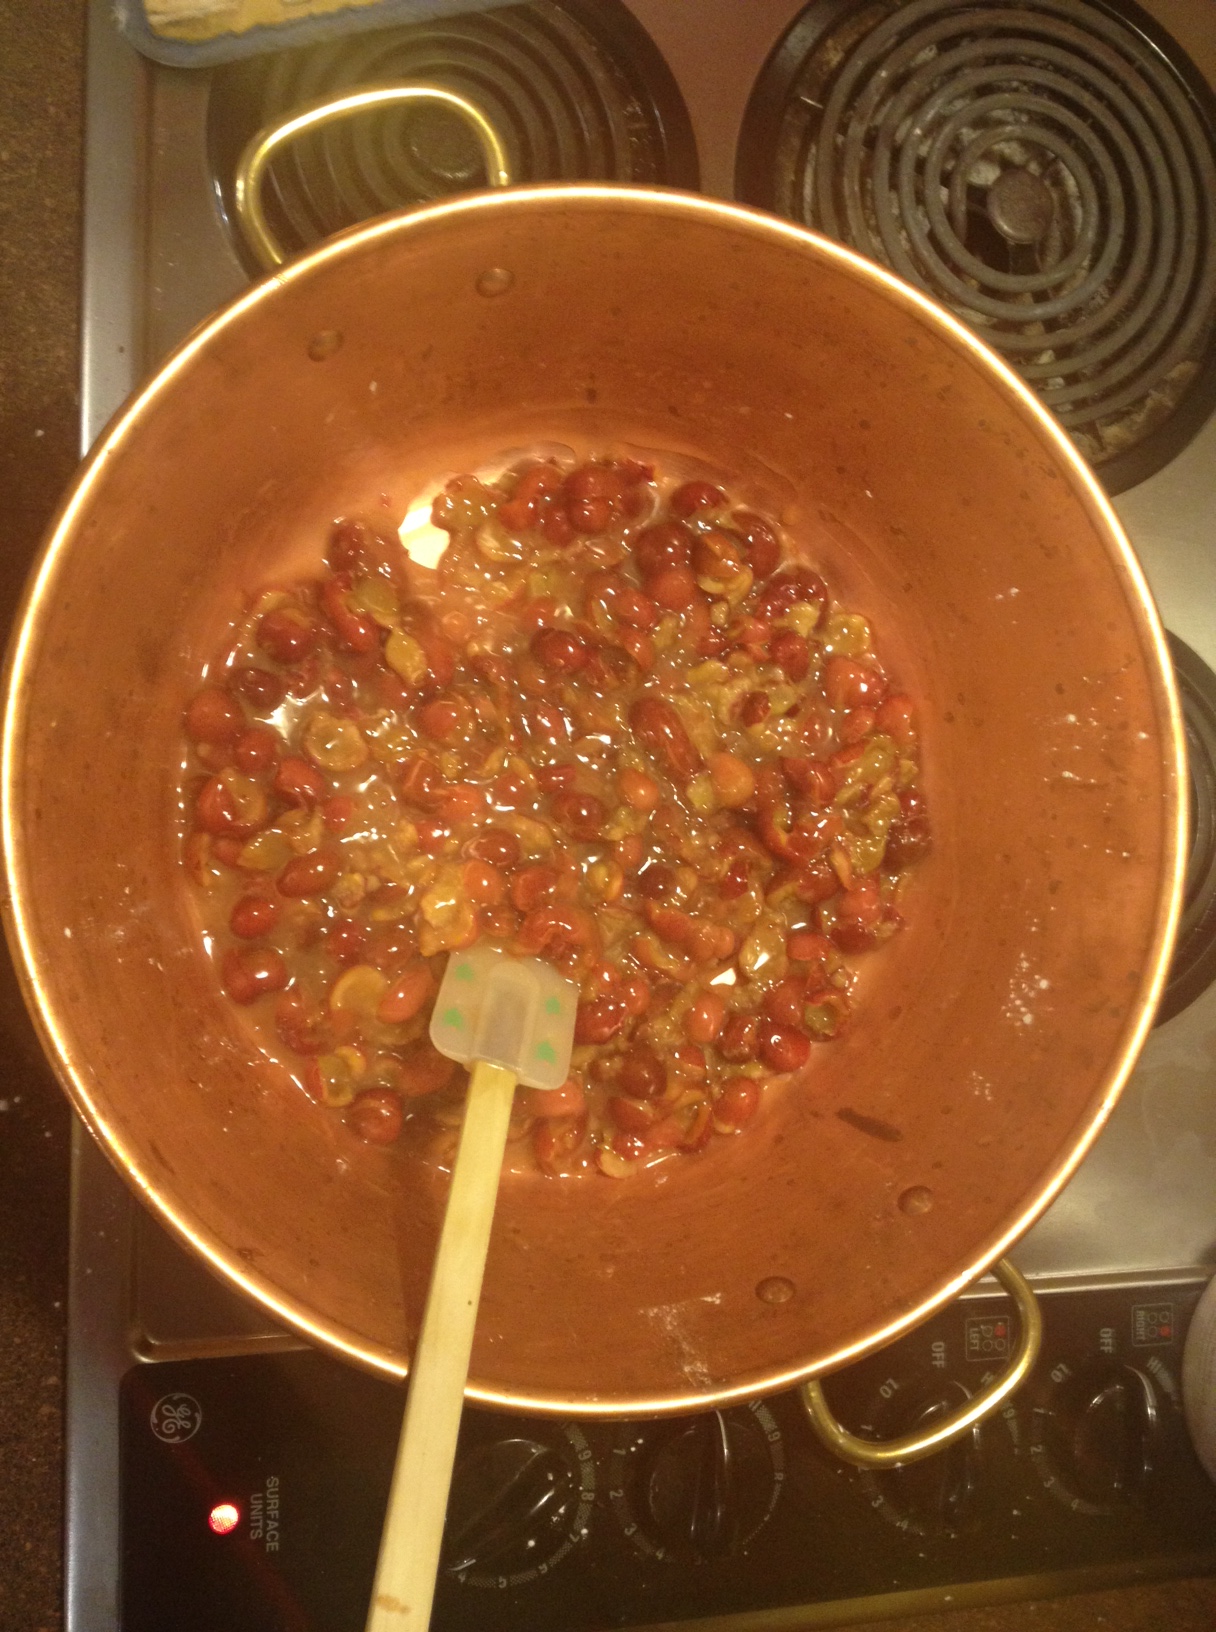
I really love using my copper jam pot – (pardon the iPhone pic) The copper heats up almost instantly, as do the sides, so it cooks jam more evenly.  There are lovely, affordable ones here!
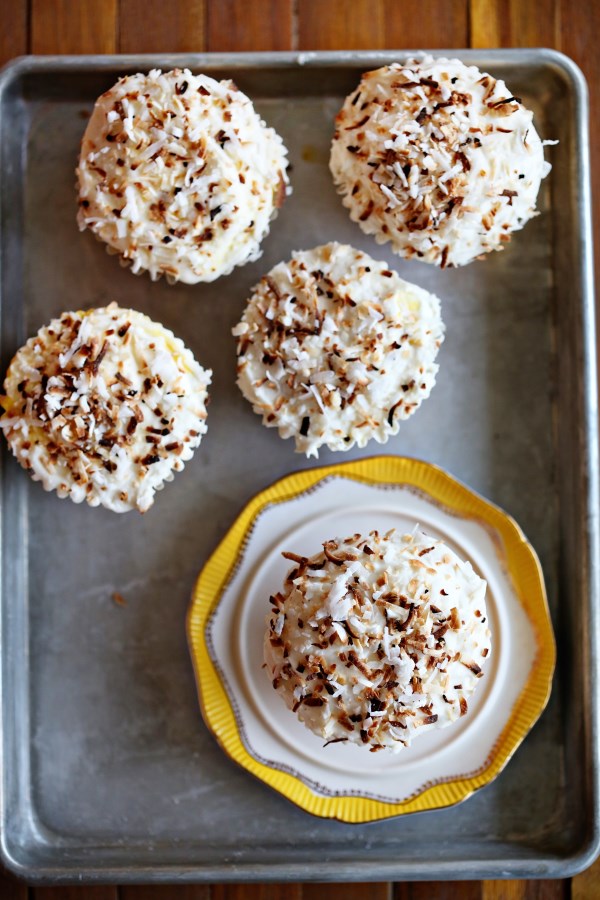
For the Meringue:

3/4 cup egg whites (about 6 large)
1/4 teaspoon cream of tartar
1 1/2 cups firmly packed brown sugar

Place the egg whites and cream of tartar in an electric mixer fitted with the whip attachment. Place the brown sugar in a medium, heavy saucepan with high sides (that sugar will boil up and scare the meringue right out of you if you have a small pan), add water to cover, attach a candy thermometer to the pan, and turn the heat on high. When the sugar is at about 240 degrees, start whipping the whites on high speed (they should be foamy and starting to thicken before you add the sugar). When the sugar is at the high soft-ball stage (245 degrees), remove the thermometer from the sugar and, with the mixer still running, carefully avoiding the whip, pour the sugar into the egg whites in a thin stream. When steam starts to come off the whites, add the sugar more quickly. When all sugar has been added, continue whipping until firm but soft peaks form.
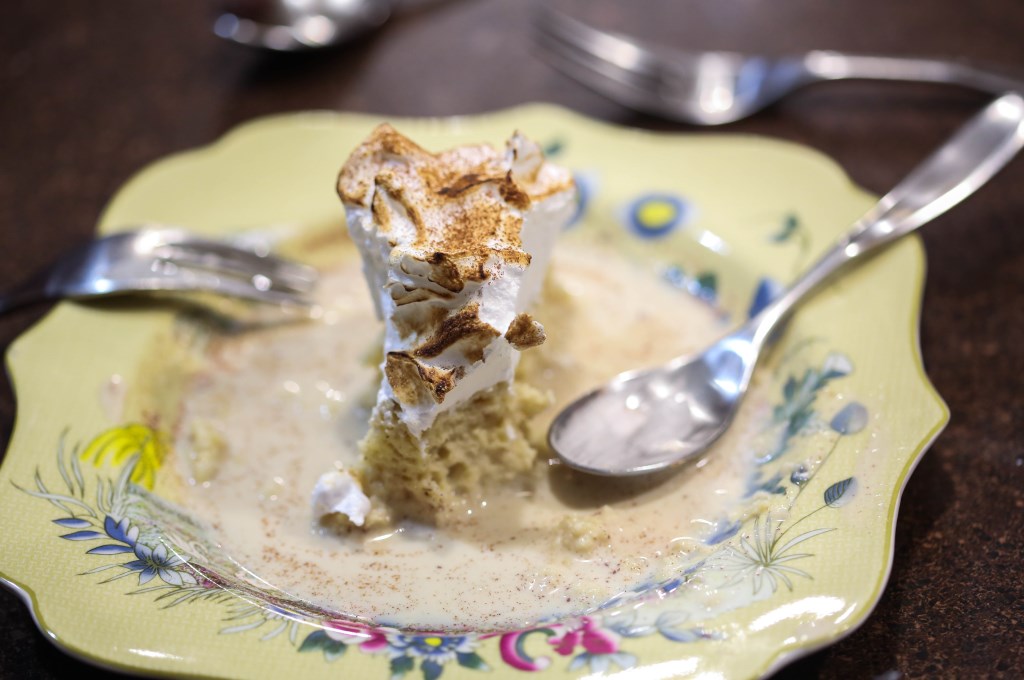
Assemble!

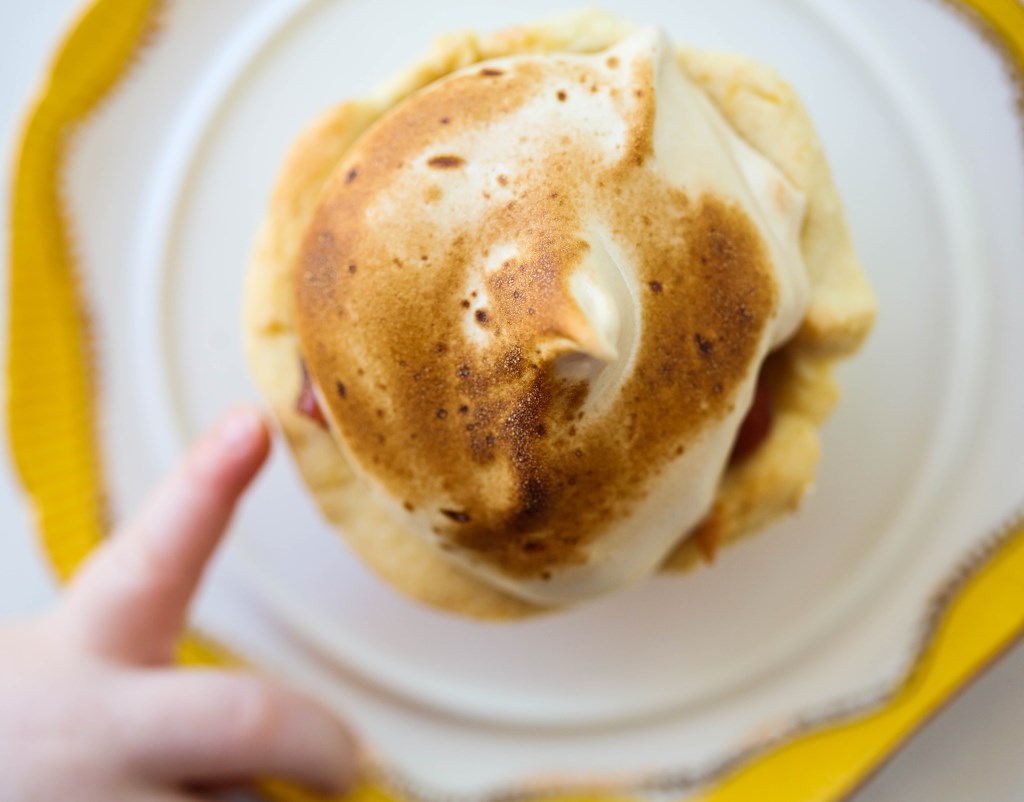
Fill each pie shell with the filling.  Then top each with a generous dollop of meringue (you’ll have leftover meringue) and then get a torch and torch those suckers.  I don’t like toasting meringue in my oven because I inevitably scorch them and that makes me feel like a failure and I try to avoid that feeling whenever possible.  It’s all about setting yourself up to succeed in the kitchen that will keep you coming back.

I think these are best served with iced coffee because that’s what you need on a 100 degree day like today!

cherry meringue mini pies-6


Little fingers are very curious 🙂


cherry meringue mini pies-8


cherry meringue mini pies-17


JOY!

Bread: Guest post from Matt Palmer, a.k.a. The Bread Man

Alisa: I wanted Matt to write about the bread that he’s made countless times in the past seven years.  He started on a quest to learn to bake at the same time he wanted to become more likable at his office (to improve his performance review, which, the only thing that was negative was, “Matt’s kind of intimidating”) and so the two tasks naturally went hand in hand.  After one year of bringing bread in to the office every Friday, not surprisingly, there wasn’t a negative comment on his next review 🙂  Bread is the great equalizer.  This loaf, in particular, is beautiful in its simplicity, flavor, crusty exterior and soft, spongy interior.  Frankly, it’s the perfect loaf.  I think life has a lot of challenges, but if you could say that you could turn out a loaf of bread like this (given a day’s notice) any time it was needed, well, I’d consider that success.

Country loaf close up

Matt: I like making things from scratch. I enjoy learning how things work, and with cooking you usually end up with something better than what you can get at the store – and it’s cheaper, better for you, and you even get a night’s entertainment out of it. So I guess it was just a matter of time before I got into baking. I’ve been making bread pretty regularly for a few years now, and I’ve certainly gotten better, but I’m still an amateur. Bread is one of those things that you could devote your life to (think Jiro Dreams of Sushi) and still find things to improve on.

That’s part of why I love it, but if that sounds disheartening to you, the good news is that even the poorest homemade loaf is better than anything you can get at the store. With a little bit of practice you can make bread better than you can get anywhere (unless you happen to live in San Francisco, New York, or a country that still cares about good bread). It’s kinda like chocolate chip cookies – the best bread you can buy where I live is essentially the bread equivalent of Chips Ahoy. Maybe you live somewhere with a bakery that sells something other than cupcakes, but unless the guy behind the counter looks like this, I’m guessing the bread there is still a Soft Batch at best. I’m sure the worst batch of homemade chocolate chip cookies that came out of your mom’s oven blows either of those away. The bread that will soon come from your oven is the same – once you’ve tried it, you’ll be hooked.
 Plain bread
Bread
21 oz bread flour (or AP flour if you prefer)
14 oz water (66%, for the bread nerds out there)
1 tsp instant/rapid rise yeast
2 tsp salt
Mix up the dry ingredients (you are using a scale, aren’t you?) and then add the water. Mix until the flour is all hydrated then cover it and set it aside for twenty minutes. (Or I could just say autolyse. See, you should become a baker, we have our own secret language.)
Stretch the dough out and fold it back up in thirds like you would a letter. Turn the dough 90 degrees and repeat, then put it seam side down in an oiled bowl. Wait ten minutes, then repeat. After three of these stretch-and-fold sessions your dough is probably developed. Put the dough back in the bowl and cover it and place it in the fridge overnight, or for up to 2-3 days (you might use less yeast if you know you’re going to wait several days to bake).
About two hours before you want to bake, take the dough out and let it warm up on the counter for a bit. Press it out into a circle (gently, we’re not making pie), then gather each side up to form a ball. Roll the ball in small circles on the counter to develop surface tension. This is a lot easier to understand when you see it, so you might want to watch a video.
Put the dough (now a boule, if you want to talk the talk) into a bowl lined with a floured towel. I use a basket called a banneton, which I flour directly, and it leaves little rings of flour on the loaf.
Leave the dough covered, on the counter to rise. This will probably take about an hour and a half, but you can tell if a loaf is still rising by poking it gently – if it springs back quickly, leave it to rise some more. If the indention stays, you’re ready to bake.
About a half hour before baking, preheat your oven to 450, with your baking stone, Dutch oven, or preferred baking device inside. You can bake on a sheet pan, and if that’s your plan you don’t need to preheat for very long. I recommend a Lodge cast iron combo cooker, which gives you the added heat while also trapping steam, and you can put dough into it without getting second degree burns, which is tough to do in a normal Dutch oven.
When the dough is ready, remove your preheated Dutch oven and flip the bowl over to put the dough into the pan. Make a couple of cuts in the loaf so it doesn’t rupture when it rises in the oven (this is called scoring), then put the lid on the Dutch oven and return it to the oven for thirty minutes.
Remove the lid from the Dutch oven and bake another 30 minutes.
Remove the loaf from the oven (the interior of the loaf should be around 200 degrees, if you want to make sure it’s done) and put it on a rack to cool. Lean in close and I bet you can hear the loaf “sing.” It’s tempting to cut into it right away, but I promise it’s better if you let it sit and finish cooking – think of it like resting a steak.
plain country bread loaf