Green Chile and Corn Chowder

green chile and corn chowder
Matt’s been talking for a few weeks, now, about the corn chowder I made around this time last year.  I made a curried corn chowder when we lived in our apartment a few years ago and it was definitely something to write home about, although no one wrote about it and we just enjoyed it, as people tended to do before Facebook.  Last year, the chowder was more traditional, but nonetheless delicious, and for some reason, so summery, despite its warmth and chowdery-ness.  Sweet summer corn, smoked bacon, and this year: the addition of roasted green chiles.

The joys of making a soup or stew, for me, are in the slow development of flavors, and figuring out the best way to go about that process.  This time, I knew I wanted to really preserve that sweet corn flavor while at the same time, bring in a little heat and umami that a roasted green chile can provide.  So,  at the beginning of cooking, I let the chilies and half the corn roast together and I let the trimmed corn cobs boil in the broth the entire time, to draw out the sweet milkiness that is left after you trim the corn off the cobs.  I pureed half the ingredients to blend up the chile skins, which I left on for flavor, and then added more chilies and fresh corn at the end, along with super smoky bacon to round everything out.  The results were pretty balanced;  just enough heat from the chilies, sweetness from the corn, and perfect with a crusty piece of bread to soak up all those flavors.

Summer is winding down and even if you miss out on making this soup while everything is still fresh, the method of cooking will give you wonderful flavors well into the winter soup months.  Enjoy!

green chile corn chowder
Roasted Green Chile and Corn Chowder
serves 6-8

4 strips of thick cut bacon, cut into 1/4″ strips
1 small onion, diced (about 1 cup)
2 ribs celery, diced (about a cup)
4 roasted green chilies (two whole, two peeled, seeded and diced)
4 ears of corn, kernels removed and cobs reserved
4 cups low-sodium chicken stock
5 ounces small, fingerling potatoes, cut into 1/2″ slices
1 1/2 cups half and half

Cook bacon in a large stock pot over medium-high heat until fat renders and bacon crisps.  Remove bacon with a slotted spoon and set aside on a paper towel to drain.

Add onions, celery, two whole green chilies (stems removed) and half the corn kernels to the pan and cook, stirring, until the onions are translucent.  Add chicken stock and corn cobs and bring to a boil.  Let simmer for 15-20 minutes.

Remove the cobs from the broth and discard.  Puree the soup with an immersion blender or in batches in a blender until very smooth.   If you used a blender, return the pureed soup back to the pot and add the remaining corn, potatoes and chilies and cook until the potatoes are tender, about 15-20 minutes.  Add half and half and adjust seasoning with salt and pepper.  Stir in the bacon and bring the soup back up to a simmer. You can also just use the bacon as a garnish if you want it to remain crispy. Serve with crusty, buttery bread and enjoy!


The Best Fresh Blueberry Muffins

Fresh Blueberry Muffins 3
Sorry for the delay in posts.  I can’t really blame it on anything except feeling bloated, it’s 100 degrees outside, I don’t feel like cooking anything that’s picture-worthy and I’m rearranging my entire house to make room for a little human that will only weigh about 7 pounds.  So here’s another indulgent baked goods recipe that both me and my little growing baby demand in spades these days (hey, I passed my glucose test almost too well.  This kid needs sugar!)
Blueberries are $1.30 for a pint at our local supermarket!  I bought a couple pints and plan on freezing some for those lonely winter months without a fresh berry in sight.  Plus, I need to start thinking about literally storing up for winter as we will have a brand new baby to feed around the clock during the holidays, on top of everything else that will need to be done!  I’m thinking these muffins will be perfect to freeze and gently warm in the oven when we need breakfast, yet don’t have the brain capacity to read a recipe.
Fresh Blueberry Muffins 2
I made these last week  from the New Best Recipe cookbook and they turned out magically perfect.  I used fresh instead of frozen, as the recipe suggests, and I indeed had “explosions of tart berries throughout the muffins” but I certainly didn’t mind.  Because the recipe was testing in the winter when blueberries were out of season.  The blueberries in the store now taste like…blueberries!  So grab them while you can and whip these up for breakfast tomorrow morning!  I brushed these with melted butter and sprinkled them with cinnamon sugar for a little extra love.  Fresh Blueberry Muffins with Cinnamon Sugar

The Best Fresh Blueberry Muffins*
makes a dozen

10 ounces (2 cups) unbleached AP flour (Gold Medal makes a softer muffin because it doesn’t have as much protein as King Arthur.)
1 TBS baking powder
1/2 tsp salt
1 large egg
7 ounces (1 cup) sugar
4 TBS unsalted butter, melted and cooled slightly
10 ounces (1 1/4 cups) sour cream
7-8 ounces (1 1/2 cups) frozen or fresh blueberries

Adjust oven rack to the middle position and heat the oven to 350 degrees.  Grease a 12 cup muffin tin or line with papers, like I do, because I live in terror of baked goods sticking.

Whisk the flour, baking powder, and salt in a medium bowl.  Whisk the egg in a separate medium bowl until well combined and light colored, about 20 seconds.  Add the sugar and whisk vigorously until thick and homogenous, about 30 seconds; add the melted butter in 2 or 3 additions, whisking to combine after each addition. Add the sour cream in 2 additions, whisking just to combine.

Add the berries to the dry ingredients and gently toss until they’re all coated.  Add the sour cream mixture and fold with a rubber spatula until the batter comes together and the berries are evenly distributed, 25-30 seconds.  Don’t overmix, some spots of flour will remain.

Scoop into the muffin cups about 3/4 of the way full.  Bake until muffins are light golden brown and a toothpick comes out clean, about 25-30 minutes, rotating the pan about halfway through baking time.  Dump the muffins onto a wire rack, stand the muffins upright and let them cool 5 minutes.  Serve as is, or brushed with butter and dipped into cinnamon sugar.  You win either way.

*taken from The Best New Recipe.  This cookbook will make you look so, so smart.

Homemade Banana Meringue Pudding

Banana Meringue Pudding
I’ve had a long-standing love for banana pudding.  Between it and Bananas Foster, I have a hard time choosing my favorite.  At one point, it was my favorite dessert on earth.  I bounce back and forth, now, between Sticky Toffee Pudding or Bananas Foster.  Or anything with lemon.  Or chocolate.

My favorite type of banana pudding, however, is the one that has the sweetened condensed milk and sour cream and extra Nilla wafers and all that awesome goodness, but I’m always up for trying a new version. (Matt made this version pictured, by the way).  I’ve seen pastry chefs putting meringue on more than just pies for a while.  So when we saw a meringue on top of a banana pudding in the latest issue of Bon Appetit, we knew it had to be a winner.  And it was!  However, I immediately knew a few tweaks I wanted to do to it once we tasted it.  First, the base custard just wasn’t banana-y enough.  We always keep a few black bananas in our freezer – when you want banana flavor, nothing beats an over-ripe banana.  It’s so concentrated that just one will do to amp up the flavor in a vanilla pudding to make it burst with sweet banana flavor.  Also, I would use a cooked meringue or a brown sugar meringue instead of the one from this recipe because the meringue wept too much, filling the leftovers up with water.  Ick.  Cooking your egg whites and sugar before whipping takes care of this problem.

However, for a eat-in-one-sitting recipe, the Bon Appetit version was great (but not banana-y enough, and leftovers got weird).  So as long as you have a crowd, this dessert will impress and satisfy!  (for the recipe below, I’ve included my favorite meringue and I’ve added a super-ripe banana, pureed into the base).

Banana Pudding with Meringue
Banana Meringue Pudding

4 large eggs
cup sugar
¼ cup cornstarch
4 cups whole milk
2 tablespoons unsalted butter
2 teaspoons vanilla extract
1 super ripe (black) banana
Pinch of kosher salt


Lightly whisk eggs in a large bowl just to blend. Whisk sugar and cornstarch in a medium saucepan. Gradually whisk milk into sugar mixture and heat over medium heat, whisking often, until very warm to the touch. Gradually whisk half of hot milk mixture into eggs, then whisk egg mixture back into milk mixture in saucepan.

Cook, whisking constantly, until thickened and whisk leaves a trail in pudding (it should be the consistency of mayonnaise), about 4 minutes. Remove from heat, add butter, vanilla, a super-duper ripe banana and salt and puree with an immersion blender until butter is melted and mixture is smooth.


Cover pudding with plastic wrap, pressing directly onto the surface. Chill until cool, about 2 hours.
For the meringue:

3 large egg whites (room temp)
1/8 teaspoon cream of tartar
3/4 cups firmly packed brown sugar

Place the egg whites and cream of tartar in an electric mixer fitted with the whip attachment. Place the brown sugar in a medium, heavy saucepan with high sides (that sugar will boil up and scare the meringue right out of you if you have a small pan), add water to cover, attach a candy thermometer to the pan, and turn the heat on high. When the sugar is at about 240 degrees, start whipping the whites on high speed (they should be foamy and starting to thicken before you add the sugar). When the sugar is at the high soft-ball stage (245 degrees), remove the thermometer from the sugar and, with the mixer still running, carefully avoiding the whip, pour the sugar into the egg whites in a thin stream. When steam starts to come off the whites, add the sugar more quickly. When all sugar has been added, continue whipping until firm but soft peaks form.

For Assembly:

1 box Nilla wafers
3 ripe bananas, sliced

Spread one third of the banana pudding into a casserole dish (9×9 or 9×13 will do fine).  Top with a layer of alternating bananas and cookies, then more pudding and repeat until most or all of your ingredients are used up.  Top with meringue and torch with a blow torch if that’s how you roll, or under a broiler with a very watchful eye (as in, don’t take your eyes off it).

Brown Butter Honey Ice Cream in Milk Toast Bowls

Japenese Milk Bread Bowl with Brown Butter Ice Cream
This recipe is insane.  What’s more insane than each component is the sum of its parts.  Matt saw a recipe for Japanese Brick Toast a few weeks ago and I had seen a similar recipe on Pinterest that looked downright heavenly.  He said in Japan they put ice cream with buttery toasted sweet bread as a dessert (…which is doubtful – I’ve seen Japanese people.  They don’t look like they eat ice cream in bread bowls).  Why has no one thought of doing a bread bowl for ICE CREAM?!  It’s genius.  The bread soaks up the melted ice cream and you’re left with this spongy cake-like texture when you get to eating the bread part.  This dessert demands to be shared.  Because if you don’t share it, you’ll feel like a dadgum glutton.  I mean, LOOK at that thing!

For the ice cream, we look no further than Jenni’s Splendid Ice Creams.  I posted about her Brown Butter Almond Brittle ice cream last year.  I’m a broken record when it comes to browned butter.  I can’t help it.  We began making ice cream out of her book about four years ago and haven’t even wasted our time with a different method.  She’s perfected the texture of homemade ice cream, in my opinion.  So for this recipe, I used her browned butter ice cream base and added honey and vanilla bean paste.  It was perfect in our little ice cream bowl.  The bread deserves a post of its own and don’t you worry – we’ll blog about it, soon.  Matt loves it too much and loved the process too much to only make it once.  He can’t wait to try it, again.  For now, enjoy a truly amazing bowl of browned butter ice cream:

Milk Toast with Brown Butter Ice Cream, Bananas and Honey

Browned Butter and Honey Ice Cream

for the base:
2 cups whole milk
1 tablespoon plus 1 teaspoon cornstarch
1.5 oz (3 tbs) softened cream cheese
1/8 tsp fine sea salt (I use kosher)
3/4 lb unsalted butter
1 1/4 cups heavy cream
2/3 cup sugar
2 tbs light corn syrup
1 tbs vanilla bean paste

Raw honey to fold into the ice cream


Mix about 2 tbs of the milk with the cornstarch in a small bowl to make a smooth slurry.  Whisk the cream cheese and salt in a large bowl until smooth.  Fill a large bowl with ice and water.

Melt the butter over medium heat in a 4 quart saucepan.  Bring to a boil and let bubble until the foam starts to subside and the butter is a rich dark brown (not black!).  Remove from the heat and let stand until the butter solids settle to the bottom of the pan, about 5 minutes.

Pour the clear butter oil into a storage container (once it solidifies you can use it as you normally would for cooking so it’s not a waste!) As you get closer to the butter solids in the bottom of the pan, use a teaspoon to remove as much liquid butter as you can.  You should have about 1 tablespoon of brown butter solids and a little bit of melted fat in the bottom of the pan (it’s impossible to remove all the fat).

Add the remaining milk, cream, sugar, vanilla bean paste and corn syrup to the butter solids, bring to a rolling boil over medium-high heat and boil for 4 minutes.  Remove from the heat and gradually whisk in the cornstarch slurry (you’ll need to stir it up again as it will settle and solidify some).  Bring the mixture back to a boil over medium high heat and cook, stirring with a heatproof spatula or whisk, until slightly thickened, about 1 minute.  Remove from the heat.

Gradually whisk the hot milk mixture into the cream cheese mixture until smooth.  Pour the mixture into a 1 gallon Ziploc freezer bag and submerge the sealed bag in the ice bath.  Let stand, adding more ice as necessary, until cold, about 30 minutes.

Pour the ice cream base into the frozen canister of your ice cream maker and spin until thick and creamy.  Pack the ice cream into a storage container, folding in drizzles of raw honey as you go.  Press a sheet of parchment directly against the surface of the ice cream (this is important to avoid freezer burn and maintain a good consistency) and seal with an airtight lid.  Freeze until firm, at least 4 hours.

Layer ice cream with sliced bananas and serve in boring porcelain bowls, or sweet bread bowls.  It’s up to you.  🙂  (recipe for bread bowls coming soon!)


Vegetable Puff Pastry Pizza

Vegetable Pizza on Puff Pastry
This was lunch for me and Olive, today.  I LOVED it.  We had a random selection of leftover veg in the fridge and my mind always goes the leftover route of omelet or fritatta, but not today.  We had puff pastry in the fridge and a tiny bit of leftover Romesco sauce and so I knew I had a pizza in there, somewhere.  The flavors were amazing and the whole thing took 20 minutes to make (minus the time it took to let the puff pastry thaw out.)  Super winner in my book.

Olive took two bites of one tiny square and declared herself done, not hungry, anymore.  Okay!  I have to roll with things like that.  Inside my head, I think, “What could I offer her that I know she’d eat? Crackers?  Pasta?  Something without kale and asparagus on it?”  But no.  I can not get into that habit or I’ll have the toughest time getting out of it.  In the last few months, I’ve seen Olive eat potatoes of all colors (those purple things on the pizza are potatoes), tomatoes, asparagus, kale, carrots and cheese.  So in my head, I knew that this wasn’t a challenging meal for her.  She’s had a tough week with food, though, and I knew before I even made it that it would probably tank.  I asked her later how she liked lunch and she said, “It was good! I tried two bites!”  So there you go.  To her it wasn’t a failure.  To me it was because she didn’t inhale it like she would’ve a pizza with just pepperoni and cheese.  Quantity doesn’t always mean quality.  I have to remember that exposure and consistency are the major keys to training up good eaters.  Mere exposure is helpful because then you don’t have the kid that cries at the sight of vegetables on their plate and familiarity breeds comfort, eventually.  Eventually.  Eventually is the result of patience and to be honest, it’s not my strongest attribute.  But I’m learning and I’m trying and I will tell myself on days when my little half-pint only eats four bites all day that she will be okay.  She’ll learn.  Eventually.

unbaked Veggie Pizza
Here’s the pizza raw so you can see better what I found in my fridge to add:  kale rubbed with a bit of olive oil, leftover roasted root vegetables, leftover grilled asparagus and half a tomato.  The sauce was our leftover Romesco sauce and I put all this on top of one sheet of frozen puff pastry.  Puff pastry is flawless.  Super fancy-seeming lunch in 20 minutes.  I’ll take it!

Veggie Pizza


Vegetable Puff Pastry Pizza
serves two as a main or 4 as an appetizer

One sheet frozen puff pastry, thawed
2 TBS tomato sauce or Romesco sauce
Any toppings you like.  I used:
1/2 cup chopped kale
1/2 cup chopped (already cooked) asparagus
Half a tomato, cut into wedges
1/2 cup (already roasted) potatoes and carrots
1/2 cup shredded Italian blend cheese

On a rimmed baking sheet, spray with oil and lay out your puff pastry to thaw.  When thawed enough to unfold, spread it out and roll it out bigger on each side to be about 1″ longer all the way around.  Spread your sauce and then sprinkle the cheese to cover it well.  Arrange your vegetables and coat the kale in a little bit of olive oil and rub it into the leaves to soften them up.  Bake in a 400F oven for 15-20 minutes until golden brown.

Leftover Veggie Pizza

Triple Layer Coconut Cake

Thomas Keller's Coconut Cake
Amazingly dense, rich, saturated with coconut flavor with a light, fluffy, creamy frosting that only compliments and doesn’t overpower the rich, dense and super-moist cake.  Yes, of course, this was the best coconut cake we’ve ever had.  And why, is that? Because it’s Thomas Keller’s recipe, and as anyone who has ever heard of or seen one of his cookbooks will know, everything he touches is gold.  This recipe, however, is not found in any of his cookbooks, but was featured in an article on Saveur magazine online.  It was a recipe that took him back to his childhood, to having a cake very similar to this in a small town diner.  We had this recipe bookmarked for months and finally gave it a go.  While you can tell from the pictures that my layering techniques leave something to be desired, the flavors were amazing.  Spot on.  I even took it to a picnic in 80 degree weather and it held up (barely).  This cake needs to be chilled the adequate time recommended, for sure.  Even with my missteps and imperfect execution, it was one of the best cakes I’ve had in years.

Go forth!  Be bold!  Make this cake!  We changed nothing – this is just one of those “I made it, so can you” kind of posts,  so I’ll simply copy the recipe for you, here!  Happy Weekend!

Keller's Coconut Cake

Triple Layer Coconut Cake

FOR THE CAKE:
Unsalted butter, for greasing
2 cups flour
1 cup desiccated coconut
1 tsp. baking powder
1 tsp. kosher salt
1½ cups sugar
eggs, separated
1¼ cup mayonnaise
¾ cup coconut milk
½ cup, plus 1 tbsp. buttermilk
2 tsp. coconut extract
2 tsp. vanilla extract

FOR THE MERINGUE:
6 egg whites
1⅔ cups sugar
3 cups sweetened shredded coconut

INSTRUCTIONS

Make the cake: Heat oven to 325°. Grease three 9″ cake pans with butter and line with parchment paper; set aside. Whisk flour, desiccated coconut, baking powder, and salt in a bowl; set aside. Place sugar and egg yolks in the bowl of a stand mixer fitted with a paddle attachment; mix until fluffy. Add mayonnaise, coconut milk, buttermilk, coconut and vanilla extracts; mix until combined. With the motor running, slowly add dry ingredients until batter forms; transfer batter to a bowl and set aside. Clean stand mixer bowl and add egg whites; replace paddle with whisk attachment. Whip whites until soft peaks form; fold into cake batter. Divide batter between prepared pans, smoothing tops with a rubber spatula; drop pans lightly on a counter to expel large air bubbles. Bake until a toothpick inserted in middle comes out clean, about 25 minutes. Let cakes cool for 20 minutes in pans; invert onto wire racks and let cool.Make the meringue: Using an electric hand mixer, beat egg whites in a bowl until medium-stiff peaks form, 5–7 minutes; set aside. Bring sugar and ¼ cup water to a boil in a 2-qt. sauce pan fitted with a candy thermometer; cook, without stirring, until temperature reaches 250°, 4–5 minutes. With the mixer on low, slowly drizzle hot syrup into egg whites until combined. Increase speed to high; beat until meringue forms stiff peaks, about 3 minutes more.

Assemble the cake: Place one cake layer on a cake stand and spread 3 cups meringue over cake; sprinkle with ¼ cup coconut. Repeat with second layer. Place remaining layer on top; cover top and sides with remaining meringue and cover outside of cake with remaining coconut, pressing lightly to adhere. Chill cake 30 minutes to firm meringue; serve chilled or at room temperature.

copied from Saveur 
Coconut Cake

Buffalo Burgers with Rosemary Roasted Root Vegetables

Buffalo Burgers
Get your grill heated up this weekend – it’s supposed to be beautiful!  I actually don’t know that for sure, but I’m trying to stay positive.  I made these burgers for us this week after seeing a recipe for lamb burgers.  I couldn’t find ground lamb here and didn’t really want to pay to have some lamb loin ground up so I figured I’d go with something just as lean (the appeal of a lamb burger) and go with buffalo!  We have a very small section in our local grocery store and they have a few pounds of ground buffalo always available.  I know it’s really, really lean, so it can dry out really easily.  The trick is cooking it low and slow, so I’d suggest if you’re grilling, to keep it off the direct flame and give it some extra time.  I love chopped onion in my burgers, so I added some to these and also a little bit of grated Swiss cheese and a couple tablespoons of water – a trick I learned in making the best meatballs ever, that gives the meat that extra tender-juiciness without adding a bunch of fat.  We topped these burgers with sliced avocado, baby bell peppers, pickles and extra cheese – they were really wonderful and still juicy!

I served the burgers with some roasted carrots and potatoes.  I love roasting vegetables with rosemary and just a touch of olive oil, and had I had more root vegetables, I’d have added them right in!  I’ve done this before with beets, turnips and parsnips and I’ve loved them all!

roasted root vegetables

Buffalo Burgers with Roasted Root Vegetables

1 lb ground buffalo
1/2 cup diced white onion
1/2 cup shredded Swiss cheese
1 tsp kosher salt
1 tsp pepper
2 TBS water

In a large bowl, mix the buffalo and all the other ingredients until well incorporated and form into loose patties.  Salt and pepper both sides and cook on the stovetop over medium heat, or on the grill off direct heat for about 5 minutes per side, or until desired doneness is achieved.  I cooked mine until they were about 135F inside and that gave us a tiny bit of pink in the middle.  I served our burgers on toasted buns with mayo, sliced avocado, sliced baby bell peppers, sliced baby kosher pickles and extra Swiss cheese.  Top however you like!

For the root veggies:

A mix of carrots, potatoes, beets, turnips, etc (about 2-3 each)
2 TBS olive oil
2 TBS chopped fresh rosemary
salt and pepper

Heat your oven to 400F.  On a foil-lined baking sheet, toss the chopped vegetables with the olive oil and rosemary and sprinkle with salt and pepper.  Roast for about 30 minutes, or until the veggies start to get a little crispy along the edges.

Buffalo Burgers with Avocado and Swiss

Life Happens – Fire Up the Grill

image_1
The past few weeks have been a game of “just make it through this day.”  My grandpa was very ill and had cancer surgery, then spent the next two weeks rapidly going downhill till his body finally gave up the fight last Friday.  We were in and out of the ICU waiting room for a couple weeks, then there all day Friday, then I went to my hometown of Portales, NM for a couple days this week for the funeral, then Matt left for two and half days on a business trip.  In the midst of those three weeks, Olive was sick for two of them, I was sick for one week, we had crazy awful dirt storms and everything around the house just started taking a back seat to our little survival game.  In hindsight, it went about as well as it could and my family grew closer than ever before.  Needless to say, I didn’t blog much and while I really don’t want to neglect my regular posts, sometimes life just takes over.

image_2
So last Saturday, the day after my grandpa passed away and we were in the short calm of the storm, we decided to have a “normal” dinner at home and thought it sounded super relaxing to just grill almost every part of the meal and eat outside.
image
Matt made a pot of BBQ baked beans from Rancho Gordo (we are part of a Bean of the Month club.  No joke) And they were smoky and full of good texture and went perfectly with all the grilled components of the meal.  We grilled a sirloin tri-tip steak and made a really unique green chili and tomato salsa with worchestershire sauce for the salt and it was perfect with the BBQ flavors and our grilled bread.  Yes, grilled bread – it was awesome.  Kind of a hillbilly bruschetta, if you will.

photo 3


photo 4

photo 5
 I’d highly recommend this grilled bread.   We took a loaf of sourdough bread, cut it in half, spread vegetable oil and kosher salt on the cut sides and let it grill till crispy.  THEN we mixed a clove of smashed garlic in with a half stick of butter and seasoned it with salt and spread that on slices of the grilled bread.  I swear to you, you will never want another bread for an outdoor BBQ as long as you live!

This whole meal was so therapeutic.  The weather was good, we all sat outside and enjoyed the smell of the grill, the breeze was actually gentle instead of tornado-like, and even the kid was transfixed by her surroundings long enough to just SIT and eat.  I think everyone needs to take a break from time to time.  A break from all the performing we find ourselves doing.  I feel like I perform with my photography, with this blog, with just about everything that is broadcast on social media.  And maybe in times where we find it very hard to STOP performing for everyone, life throws us an unavoidable circumstance that forces us to simplify and slow down.  Only God could restore my energy at a time like this.  Only God could bring families closer out of death.  And only God would design food to be so comforting and satisfying that one meal would have the ability to inflate my entire family’s sails just a little bit more than before the meal began.

There will be a steadier stream of posts coming, now.  I THINK most of the drama is at a standstill for now.  Thank you for being patient!


Chicken and Waffles with Molasses Butter

chicken_waffles010
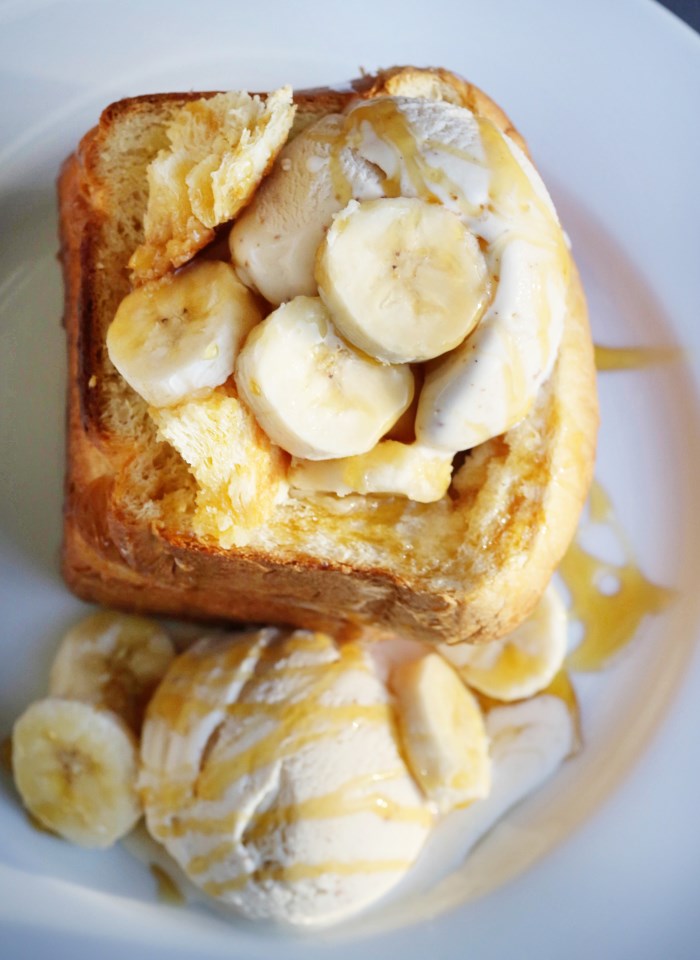
Easter Sunday was a bit low-key for us this year.  I had a wedding to shoot on Saturday so we couldn’t go out of town to be with family and we didn’t have time to prepare the feast we normally do.  We typically like to have brunch-type foods when we know it’s going to be just us because breakfast is usually easy to throw together in less than an hour after church and, well, who doesn’t like breakfast for lunch?!

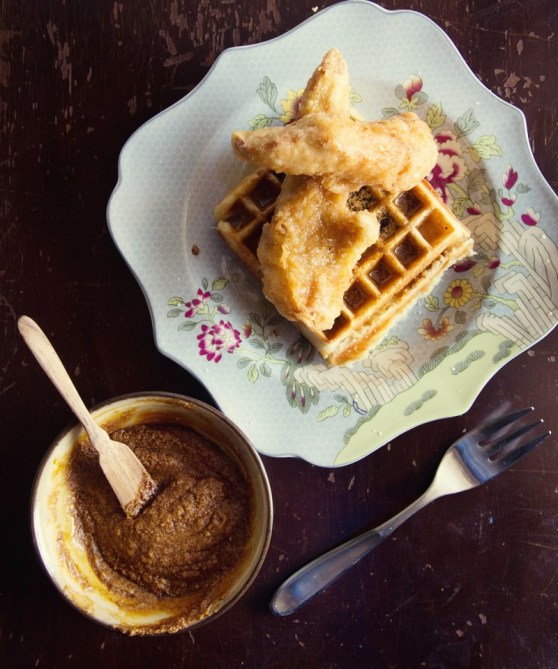
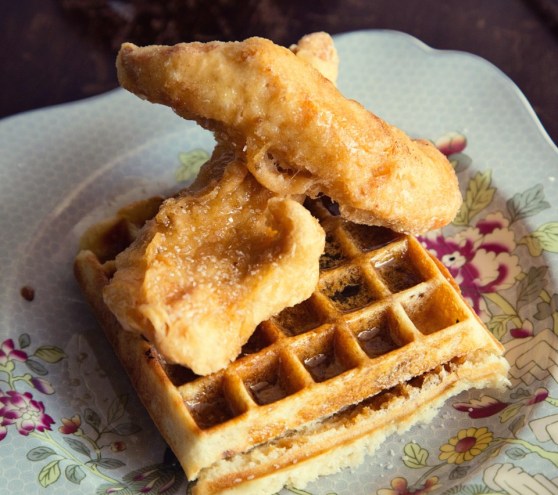
A few months ago I ran across a wonderful yeast waffle recipe that you mix up the night before and let it sit out on your counter to get all bubbly.  Sounds strange, but it imparts such an amazing sourdough, yeasty flavor to the waffles which helps balance the pure sugar you typically use to drown the waffle.  Matt and I have had a slight obsession with the Southern dish of chicken and waffles and every where we go where it’s on the menu, we always feel the dish falls a little short of the expectations in our mind.  The chicken should be juicy, super crispy, salty and flavorful on its own and the waffle shouldn’t be too heavy – it should be light, airy and buttery with just enough sweetness to give that perfect balance of flavors.  A lot of waffles are too heavy, too bland, too sweet or the chicken is an after-thought – dry or not seasoned.  So, taking matters into our own hands, we used the amazing recipe for Korean fried chicken that we did at the Super Bowl and paired it with a yeast waffle recipe and the combination was juuuuuust right.
chicken_waffles008
I added my own sentimental flair to the dish.  Growing up, I distinctly remember at family gatherings, often at Sunday lunches, my Pappaw would request molasses and then he’d take a large chunk of soft butter and whip the two together into a smooth paste for his biscuits.  I thought it was odd, but as far back as I can remember, there has never been a food strange enough that I wouldn’t try it.  I immediately began to imitate his method and loved the tangy sweetness of the molasses butter on my biscuits, too.

This Sunday as I was thinking about Easter and family, I had my Pappaw on my mind because just a few days ago, he underwent extremely intense cancer surgery and was, up until yesterday, still in pretty critical condition in ICU.  I thought about our family get-togethers when I was young and Pappaw’s love of biscuits, molasses and black coffee and thought for our brunch, what better accompaniment to our waffles, which beg for that salty/sweet balance, than his molasses butter?  It was an amazing addition to the waffles and it may be my new favorite topping instead of maple syrup.  Matt wasn’t convinced, but then again, he doesn’t have the memory to go along with it.  And food is so much more than just ingredients on a plate.  If you have a story or a face or a memory of light streaming in from the window across a little dinette set in your grandparents’ kitchen as you slather biscuits with creamy molasses, it’s bound to become your new favorite thing. 🙂

chicken_waffles006

Korean Fried Chicken Strips

Kosher salt
3/4 cups corn starch
1 teaspoon baking powder
2 pounds chicken strip tenders
2 quarts peanut oil or vegetable shortening
1/2 cup all-purpose flour
1/2 cup cold water
1/2 cup vodka

Combine 2 teaspoons kosher salt, 1/4 cup cornstarch, and 1/2 teaspoon baking powder in a large bowl and whisk until homogeneous. Add chicken strips and toss until every surface is coated. Transfer chicken to a wire rack set in a rimmed baking sheet, shaking vigorously as you go to get rid if excess coating. Transfer to refrigerator and let rest, uncovered, for at least 15 minutes and up to overnight.

When ready to fry, preheat oil to 350°F in a large wok, Dutch oven, or deep fryer.  We used a wok on the stove.

Combine remaining 1/2 cup cornstarch, 1/2 teaspoon baking powder, flour, and 2 teaspoons kosher salt in a large bowl and whisk until homogeneous. Add water and vodka and whisk until a smooth batter is formed, adding up to 2 tablespoons additional water if batter is too thick. It should have the consistency of thin paint and fall off of the whisk in thin ribbons that instantly disappear as they hit the surface of the batter in the bowl.

Add half of the chicken strips to the batter. Working one at a time, lift one strip and allow excess batter to drip off, using your finger to get rid of any large pockets or slicks of batter. Carefully lower chicken into hot oil. Repeat with remaining strips in the first batch. Fry, using a metal spider or slotted spatula to rotate and agitate strips as they cook until evenly golden brown and crisp all over, about 8 minutes. Transfer to a paper towel-lined plate and season immediately with kosher salt. Keep warm in a 175F oven while you fry the remaining chicken.

Yeast Waffles*

1 3/4 cups whole milk, at room temperature
1/2 cup unsalted butter, melted, plus more melted butter for the waffle iron
2 1/2 cups sifted all-purpose flour
1 tablespoon active dry yeast (from 2 envelopes)
2 large eggs, at room temperature
2 teaspoons agave nectar or honey
1 teaspoon salt

In a large bowl, combine the milk, 1/2 cup melted butter, flour, yeast, eggs, agave and salt and whisk until smooth. Cover with plastic wrap and let stand until the batter is very puffy, about 2 hours at room temperature (or refrigerate overnight, which is what we did since we wouldn’t be using it first thing in the morning).

Preheat the oven to 250°. Preheat a waffle iron and brush it with melted butter. Gently stir the batter to deflate it. For each batch, fill the waffle iron about two-thirds full (the batter will spread and rise); brush the waffle iron with melted butter as needed.

Cook the waffles until golden crisp.  Keep the waffles directly on your oven racks to keep warm and crispy until you’re done cooking them.  I find that using a traditional sized waffle iron works best than a Belgian waffle maker because sometimes the Belgian waffle irons are too deep for the batter to rise into every crevice. Also, from the two different yeast waffle recipes we’ve tried, I prefer cooking them from room temp if you leave the batter out on your counter, as opposed to keeping it in the fridge.  The batter seems lighter at room temp than cold, so you may want to test that out for yourself.  Both are delicious, but I felt the batter at room temp was thinner and more of that super crisp, light texture I wanted.

*from Food and Wine magazine but I think I prefer the recipe from Smitten Kitchen better.  They’re almost the same, but she uses a little less flour.

Molasses Butter

Dark Molasses
Unsalted Butter – room temp

Use equal parts butter and molasses and whip together until completely mixed.  Spread on waffles before topping with chicken strips.  I added a drizzle of maple syrup on the chicken and then salted it to make the salt stick better.

Palmiers for Palm Sunday

almond palmiers
Matt suggested I make Palmier cookies for Palm Sunday to take into our church class this morning.  I love word play and an excuse to make a cookie and I hadn’t tried making them before, so I figured I’d give it a shot!  Turns out – it’s the easiest cookie to make, looks refined and tastes amazing with a cup of coffee!  I’m a big fan of keeping a box or two of puff pastry in my freezer for various recipes, and now I have a new go-to cookie to make on the fly if someone is stopping by for coffee or just because!

Palmier

Palmiers
makes about 2 1/2 dozen cookies

1 box frozen puff pastry – sheets separated and thawed
1 cup of sugar
1/2 tsp almond extract

Spread a half cup of the sugar out on a clean surface evenly and lay both sheets of puff pastry out on top of the sugar.  With a rolling pin, roll the sheets a bit flatter in each direction until about an 1/8th of an inch thick. In a bowl with the remaining sugar, add the almond extract and stir with a fork until blended and the sugar resembles wet sand.  Spread the almond sugar over the surface of the puff pastry sheets.  From each end, start rolling up the pastry as you would a cinnamon roll.  It’s like rolling up a scroll!  When both sides almost meet in the middle, lay one side on top of the other, like shutting a book.  Press down slightly and lay on it’s side, cutting 1/4″ slices and placing the cookies on parchment lined baking sheets.
photo 1
(bad pic, but you get the visual)

It’s important to line your baking sheets with something because the sugar needs to caramelize to make these cookies what they are and you may have a hard time getting them off the sheets unless they are lined.

Bake cookies in a 450 degree oven for 6 minutes.  After 6 minutes, flip one and if it’s golden on the under side, flip them all and bake for another 5-6 minutes.  If they aren’t browned, yet, leave them in the oven for another 2-3 minutes.  You’re aiming for a good, golden caramelization on each side and each oven bakes different, so you may need to rotate your pans during the baking process.

Let the cookies cool completely before serving.  Have fun with the filling.  You could add lemon zest, orange zest, jam, vanilla – whatever you want to the sugar on the inside of the cookies.  Have fun with it!

Palmiers
riding in the car on the way to church this morning 🙂