Vegetable Puff Pastry Pizza

Vegetable Pizza on Puff Pastry
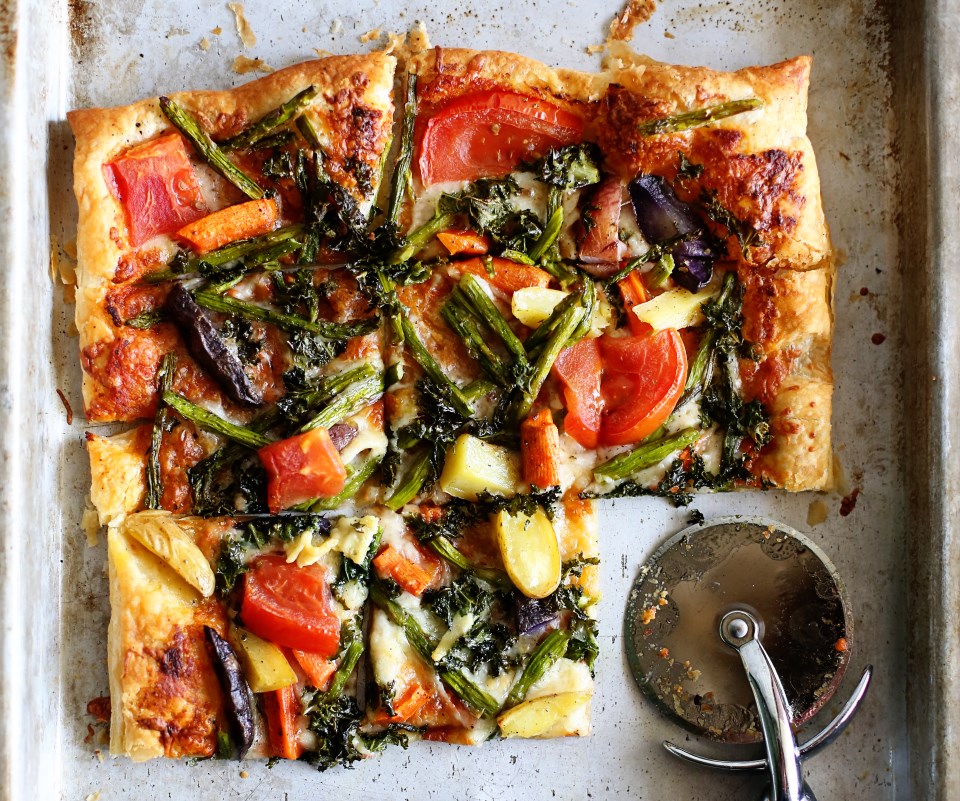
This was lunch for me and Olive, today.  I LOVED it.  We had a random selection of leftover veg in the fridge and my mind always goes the leftover route of omelet or fritatta, but not today.  We had puff pastry in the fridge and a tiny bit of leftover Romesco sauce and so I knew I had a pizza in there, somewhere.  The flavors were amazing and the whole thing took 20 minutes to make (minus the time it took to let the puff pastry thaw out.)  Super winner in my book.

Olive took two bites of one tiny square and declared herself done, not hungry, anymore.  Okay!  I have to roll with things like that.  Inside my head, I think, “What could I offer her that I know she’d eat? Crackers?  Pasta?  Something without kale and asparagus on it?”  But no.  I can not get into that habit or I’ll have the toughest time getting out of it.  In the last few months, I’ve seen Olive eat potatoes of all colors (those purple things on the pizza are potatoes), tomatoes, asparagus, kale, carrots and cheese.  So in my head, I knew that this wasn’t a challenging meal for her.  She’s had a tough week with food, though, and I knew before I even made it that it would probably tank.  I asked her later how she liked lunch and she said, “It was good! I tried two bites!”  So there you go.  To her it wasn’t a failure.  To me it was because she didn’t inhale it like she would’ve a pizza with just pepperoni and cheese.  Quantity doesn’t always mean quality.  I have to remember that exposure and consistency are the major keys to training up good eaters.  Mere exposure is helpful because then you don’t have the kid that cries at the sight of vegetables on their plate and familiarity breeds comfort, eventually.  Eventually.  Eventually is the result of patience and to be honest, it’s not my strongest attribute.  But I’m learning and I’m trying and I will tell myself on days when my little half-pint only eats four bites all day that she will be okay.  She’ll learn.  Eventually.

unbaked Veggie Pizza
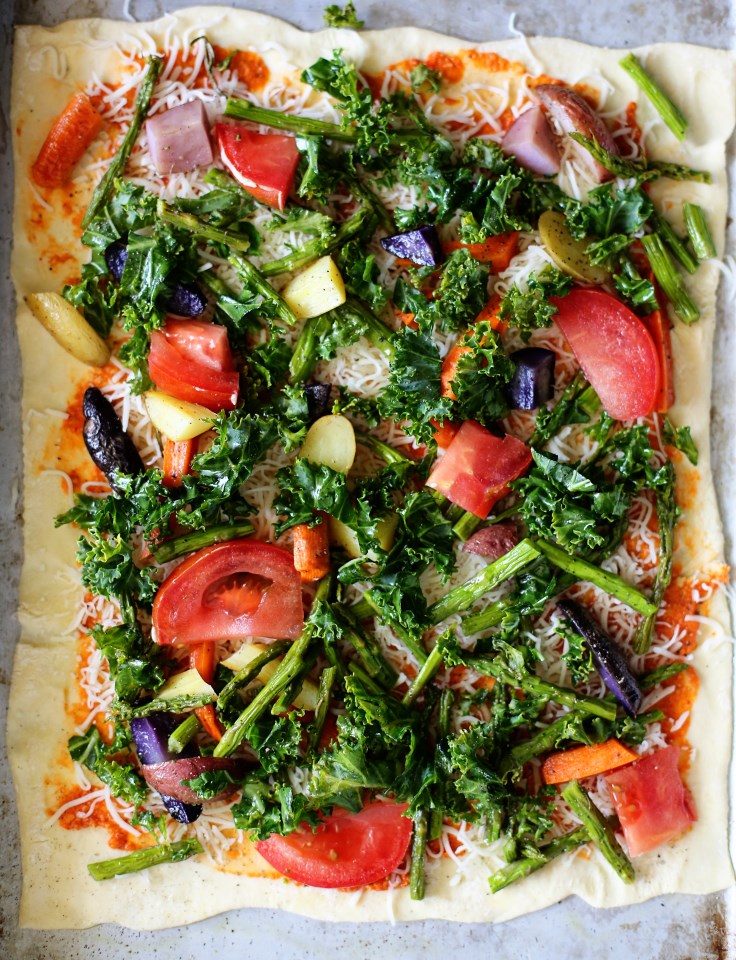
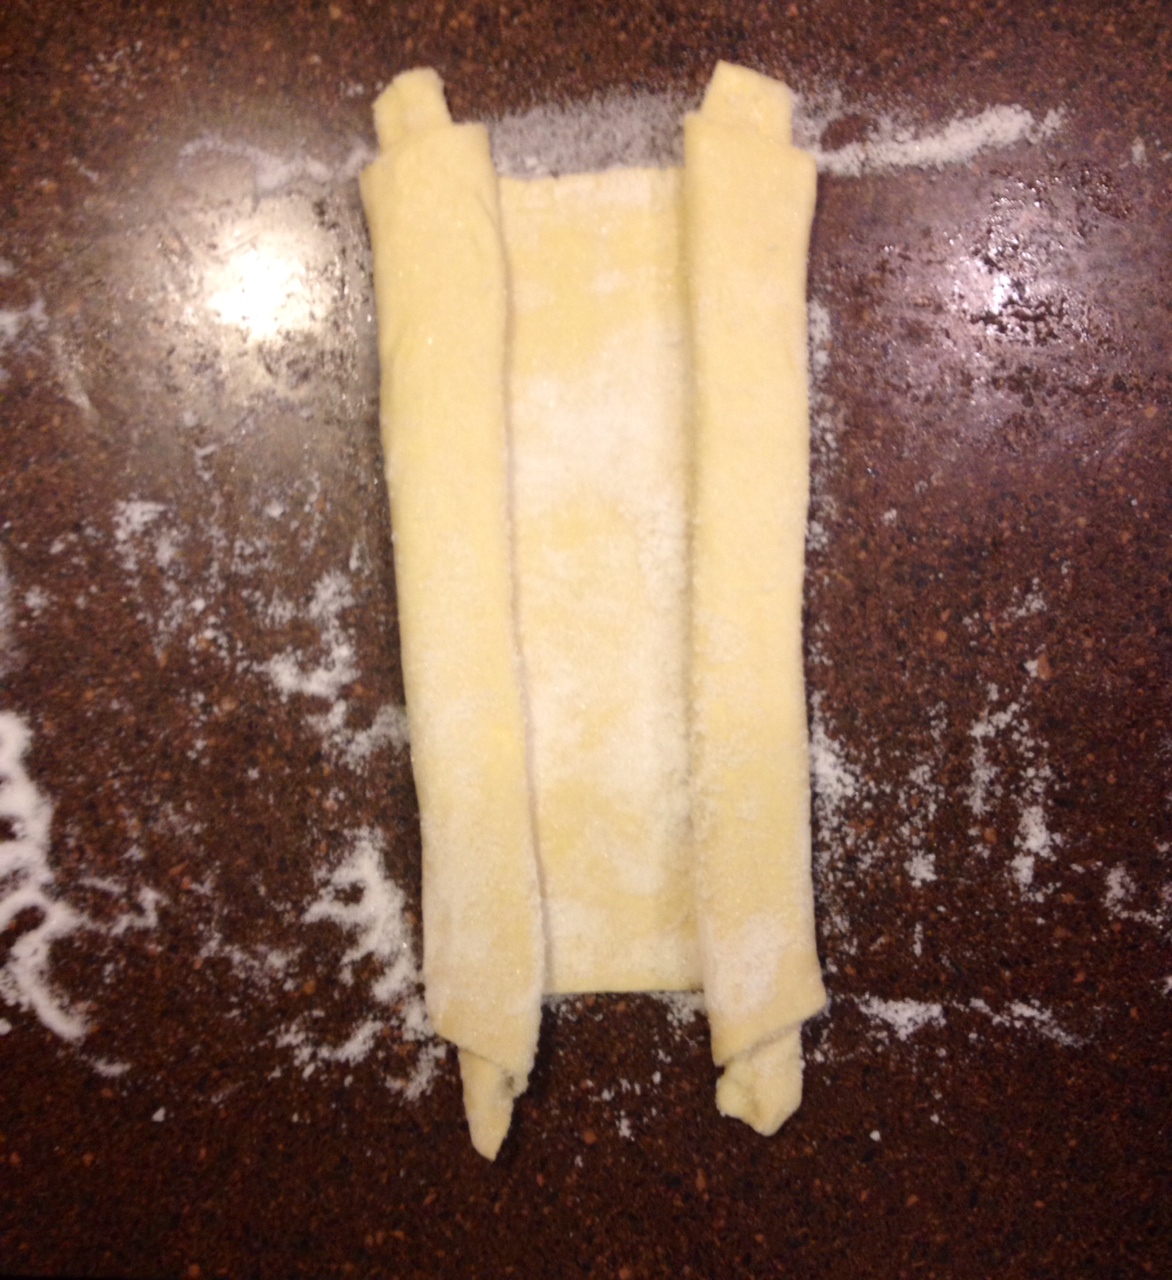
Here’s the pizza raw so you can see better what I found in my fridge to add:  kale rubbed with a bit of olive oil, leftover roasted root vegetables, leftover grilled asparagus and half a tomato.  The sauce was our leftover Romesco sauce and I put all this on top of one sheet of frozen puff pastry.  Puff pastry is flawless.  Super fancy-seeming lunch in 20 minutes.  I’ll take it!

Veggie Pizza


Vegetable Puff Pastry Pizza
serves two as a main or 4 as an appetizer

One sheet frozen puff pastry, thawed
2 TBS tomato sauce or Romesco sauce
Any toppings you like.  I used:
1/2 cup chopped kale
1/2 cup chopped (already cooked) asparagus
Half a tomato, cut into wedges
1/2 cup (already roasted) potatoes and carrots
1/2 cup shredded Italian blend cheese

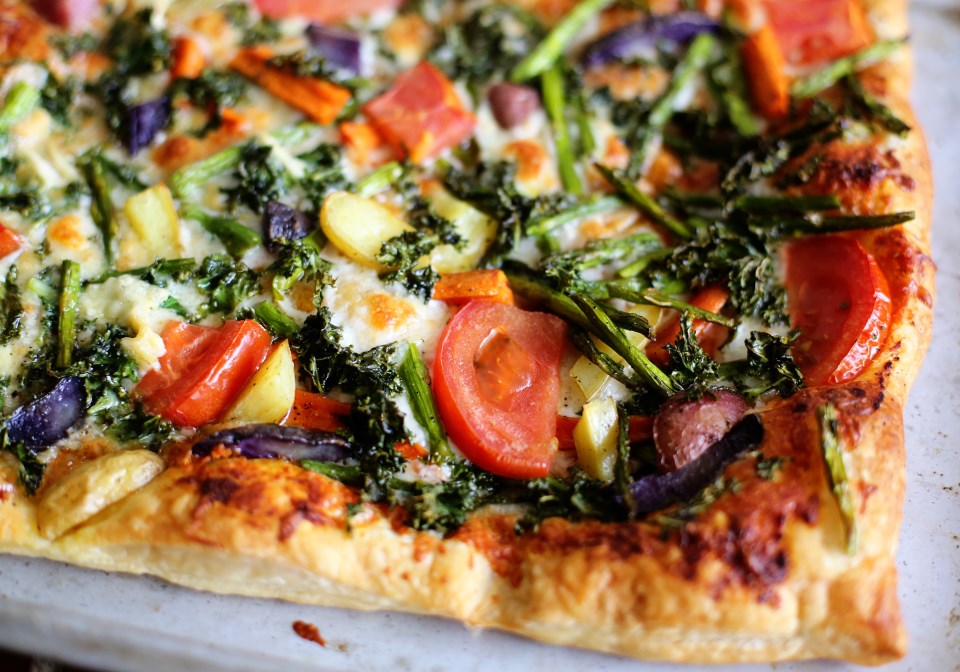
On a rimmed baking sheet, spray with oil and lay out your puff pastry to thaw.  When thawed enough to unfold, spread it out and roll it out bigger on each side to be about 1″ longer all the way around.  Spread your sauce and then sprinkle the cheese to cover it well.  Arrange your vegetables and coat the kale in a little bit of olive oil and rub it into the leaves to soften them up.  Bake in a 400F oven for 15-20 minutes until golden brown.

Leftover Veggie Pizza

Ginger Ale Poached Apricots over Warm Cinnamon Rice Pudding

Apricots Poached in Ginger Ale Poached Apricots with Cinnamon and Vanilla Bean
Simplicity.  I crave it, lately.  Maybe because I’m in a world filled with a bouncing-off-the-wall toddler and red-headed drama, or maybe it’s because the summer is heating up and I’m busy shooting weddings, all the while wondering who this little baby growing inside me will turn out to be.  I forget I’m pregnant most days.  Other than my sudden urge to rearrange all the furniture and the hair tie holding my pants together, it’s easy to forget while dealing with everything else.  That’s why I love cooking so much – it forces you to slow down and spend some time in thought.  Even if for just five minutes – there will be some point in meal prep where you must wait.  And in that waiting usually comes contemplation (if you can keep your phone out of reach).

Last week when I stood over my stove and smelled the tart sweetness of apricots stewing, I was transported back to the very first time I made jam.  It was about this time four years ago and the (now gone) huge, old apricot tree in our front yard decided to dump about 10 lbs of fruit on our lawn for a week straight.  I didn’t know what to do with all that fruit and I’d never made jam before, but I just started to create.  Took a base recipe and made all kinds of flavors: Vietnamese Cinnamon, Vanilla Bean, Red Pepper, Bourbon, Chinese 5 Spice – they were all amazing and I felt so good about not letting any of that fruit go to waste.  I also learned the simplicity of jamming.  The joy of tasting that fruit completely come ALIVE with just the addition of some sugar and a squeeze of lemon.  I never cared about apricots before that year, but since then, they’ve become one of my favorite fruits.
Poached Apricots in Ginger Syrup
I didn’t make jam with these store-bought apricots, but I did let them poach in some leftover ginger ale and a stick of cinnamon and vanilla bean.  The scent in my kitchen was as bright as the summer sun.  When the apricots were done poaching, I removed them from the liquid and let the ginger ale reduce until it was a syrup.  The apricots are sitting in that syrup in my fridge, now.  Waiting to be poured over ice cream or spooned over a warm biscuit with butter.  Or maybe just eaten straight out of the jar. Last week I made a cinnamon vanilla bean rice pudding for Olive’s snack time and added some poached apricots on top.  The combination was so comforting and for a few minutes, we both just ate and smiled at each other.

Coconut Milk Rice Pudding with Poached Apricots

Ginger Ale Poached Apricots with Cinnamon Rice Pudding

2 lbs of apricots, halved, pits removed
1 liter of ginger ale
two cinnamon sticks (or a tsp of ground cinnamon)
1 vanilla bean, split
1/4 cup sugar

Place the apricot halves in a large, non-reactive pot over medium-high heat.  Add the ginger ale, cinnamon, vanilla bean and sugar and let the mixture come to a boil.  After 10 minutes, remove the apricots with a slotted spoon and set them in a large bowl.  Allow the liquid to reduce to about 1-2 cups of liquid and pour over the apricots in the bowl.  Spoon apricots and syrup over rice pudding, ice cream, waffles, whatever you want!

Cinnamon Rice Pudding*
makes about 2 cups

1 cup coconut milk
1 1/2 cups whole milk
1/3 cup arborio rice (short grain rice)
1/4 cup dark brown sugar
1 tsp cinnamon
1 tsp vanilla bean paste
pinch of salt
1 egg

In a medium saucepan, heat the milks, rice and salt until the mixture boils.  Reduce heat and let the mixture cook about 20-25 minutes, stirring often, until the rice absorbs most of the liquid.  Remove from heat and in a smaller bowl, add the brown sugar, cinnamon, vanilla bean paste and egg and whip until smooth.  Add 1-2 tablespoons of the hot rice mixture to the egg mixture, stirring quickly to temper the egg.  Then, while whisking, add the egg/sugar mixture back into the pot of rice and let it cook over low heat until slightly thickened, about 10 more minutes.

Serve with poached apricots!

*adapted from this lovely recipe off Simply Recipes

Blueberry Granola and Cinnamon Vanilla Yogurt Parfaits

Blueberry Granola and Cinnamon Yogurt Parfaits Yogurt and Granola Parfaits
This is a very simple snack that you can make ahead of time and have it ready to pull out of the fridge at any time during the week!  I had some blueberries in the freezer that needed to be used and so I created a soft granola that could be good cut into bars, or crumbled up like I did here, to add to yogurt, cereal, ice cream, whatever!  I love these little jam jar parfaits – I used the small 4 oz. size for Olive and used the bigger 6 oz. size for us big kids.  Layered with plain, rich Greek yogurt that I mixed with some cinnamon and vanilla bean paste – these are ready for my fridge and ready for a week of snack time, pregnancy cravings or a quick breakfast!

Sweetening plain yogurt with cinnamon and vanilla bean paste (which is slightly sweet) adds enough sweetness without adding several teaspoons of honey or sugar, like we all feel compelled to do with plain yogurt.  You’re getting plenty of sugar from granola (never let anyone tell you granola is a diet food) and so there’s no need to add even more by buying a pre-sweetened yogurt (which can have over 20 grams of sugar in each serving!) This recipe makes a really large batch of granola that’ll last you a while and I hope you enjoy the smell of your entire house while you make it!

blueberry granola parfaits

Blueberry Granola Parfaits
makes about 3 cups of granola

2 1/2 cups rolled oats
1 cup steel cut oats
1 cup flour
1/3 cup brown sugar
1 tsp baking soda
1 TBS cinnamon
1 TBS vanilla bean paste
1/2 cup honey
1 stick melted butter
1 cup frozen or fresh blueberries
1 cup toasted pecans, chopped
1/2 cup dried currants, raisins, whatever you like

In a large mixing bowl, combine the rolled oats, flour, brown sugar, baking soda and cinnamon.  In a medium bowl, combine the steel cut oats and 1 cup boiling water and let them soak for 20 minutes.  Drain and add to the other oat mixture.  If you don’t want to do this, simply add 2 more cups of regular rolled oats.  I liked the steel cut chewiness, but I’ve done this recipe with all rolled oats before and it works fine either way!

Add to the oat mixture the vanilla bean paste (can sub regular vanilla extract), melted butter and honey and stir well to combine everything.  Gently fold in the blueberries, currants and pecans (or any trifecta you desire).  Spread mixture out on a greased, rimmed baking sheet and bake at 350 for 20 minutes.  Take it out and let it cool and then break it all up and spread it out on the sheet again and let it bake at 250 for about 30 more minutes until it’s all golden brown.  If you want to make granola bars, increase your first bake time to 30 minutes and let it cool completely before cutting into bars.  While it’s cooling and still hot, I’d spread some white chocolate chips over the top and let them melt and then spread them all over for a topping for your granola bars, if you’re gonna swing that way.

Cinnamon Yogurt

1 cup Greek yogurt, plain
1 tsp vanilla bean paste
1 tsp cinnamon

Mix all ingredients together and whip up until fully blended.  Layer in cute little jars with the granola and top with fresh berries for the snack pictured here!  Garnishing with mint adds a wonderful flavor addition and brightens everything up.

*this can easily be made gluten-free by substituting the flour for coconut flour and insuring that your oats are gluten free.  Check the box – a lot of brands are, nowadays!

Cinnamon Yogurt and Blueberry Granola Parfaits

Chicken Avocado Taquitos with Red Pepper Soup

chicken taquitos with green chili
These recipes jumped off the screen last Monday when I was looking for something quick, nutritious and slightly comforting to make for my family.  Both recipes come from the great world of Pinterest and they paired together like old friends.  The first was baked chicken taquitos and I improvised from the original recipe a bit and added avocado (because it improves nearly everything) and green chili powder instead of cayenne.  Both additions worked well and I’ll definitely make this recipe again!

The second recipe comes from a dear friend and fellow food blogger, Becky McGrew of Apronclad.com!  She made this roasted red pepper soup a while back and I have kept it in the back of my head as yet another wonderful soup to introduce new flavors to our little two-year old, Olive.  The soup made a wonderful dip for the taquitos and was obviously wonderful on its own as a starter/side dish for the meal.  It has some Italian herbs in it, which are awesome, but I think next time to match up a little better with the Mexican theme, I think I’d omit the basil and thyme and add in Mexican oregano and cilantro to finish.  Whatever you do, just make this soup.  It’s outstanding!  I didn’t mess with the recipe at all, so just go on over to Becky’s blog and get the recipe there, plus very nice step-by-step instructions!

chicken taquitos

Baked Chicken Avocado Taquitos*

2 boneless skinless chicken breasts, pounded to ½ inch thickness
½ teaspoon garlic salt
1 teaspoon green chili powder
½ teaspoon onion powder
1 teaspoon cumin
8 6-inch flour tortillas
1 cup shredded mexican blend or cheddar cheese
1 large, ripe avocado
Preheat oven to 450. Line a baking sheet with nonstick foil and spray heavily with cooking spray.

In a small bowl whisk together garlic salt, green chili powder, onion powder and cumin. Rub seasoning into both sides of chicken breasts. Spray a large pan or skillet with cooking spray and cook chicken over medium heat about 8-10 minutes or until cooked through. Chop chicken up into small cubes. Divide chicken evenly among all tortillas, spreading the chicken into a strip down the middle of each tortilla. Top chicken with about 2 tablespoons of shredded cheese and a few pieces of avocado. Tightly roll each tortilla into a taquito. Place end side down on prepared baking sheet. Spray taquitos heavily with cooking spray. Bake 10-15 minutes until tortilla edges begin to brown/blacken and cheese is melty. We dipped ours into the soup and also our favorite – Mexican crema!  Seriously, so much more flavor than sour cream!

*adapted from Creme de la Crumb

Zucchini Basil Soup with Stove Top Fritters

Zucchini Basil Soup
I’m happy to have resurrected this soup!  Matt and I made it a long time ago when we were still doing the 800 sq ft apartment thing and then again when a friend of ours invited her dad over and we needed to fix low sodium, low fat recipes since he had recently had heart surgery.   Matt’s father also has heart troubles, so it’s always refreshing to find healthy recipes to share that taste as decadent as a full-fat option.  This soup is so perfect for the coming zucchini-overload we all will have soon (as it’s the only vegetable that seems to have no trouble in our awful climate) and basil, the herb that’s also hard to kill.  It’s got all the depth of flavor of a soup that has been slowly cooked with butter and cream only – it has neither!  It isn’t even made with stock – just water!  So the sodium is only what you add for taste.  I bet in one batch, I added a little over a teaspoon of salt.  And it serves six!  Can you tell I’m excited about this soup?!
zucchini basil soup and stuffing fritters
One other merit of soups from a mother of a toddler’s perspective, is that they are a perfect way to get more variety of vegetables and flavors into our newly opinionated children.  Olive has eaten zucchini, pesto, fresh basil from the garden, etc, before, but suddenly, she’s on a suspicious, won’t-try-anything-green bender.  Drives me batty because I KNOW she would like most things if she’d just try them.  Sound familiar?  What does NOT work is forcing, tricking, cajoling, pleading, prodding or manipulating your kids to eat.  They can smell your tricks a mile away and they’ve come prepared with an iron will.  This is pretty natural and resistance is futile.  But soups.  Olive has willingly eaten this soup twice in the past 4 days.  It’s green!  It’s got darker green chunks in it!  Why will she try it?  My guess is texture.  No chunks – pureed and easy to sip from a cup so she has full control.  When Olive doesn’t want to try something, I ask her to just smell it.  If she smells it, 99% of the time she’ll try a bite.  And I’ve learned to be happy with One Happy Bite, as much as it flies against my need to control the situation.

So.  If you have a child who is resisting new textures/colors/flavors, try soups.  I know it seems like a regression back to the baby food days, but if that’s what it takes to keep the flavors and colors changing on your child’s plate, I say it’s worth it.  Children get used to variety if variety is the norm.

Without further babbling, here’s the recipe!  Also, I paired the soup with a not-so-saintly fritter made from leftover Stove Top Stuffing.  No kidding.  They were FABULOUS as a little crispy soup-companion!  I topped them with herbed goat cheese and they tasted downright fancy.  Happy Meatless Monday!

Zucchini Basil Soup with Stove Top Fritters
Zucchini Basil Soup with Stove Top Fritters*

serves 4-6

2 lbs zucchini, peeled, trimmed and cut crosswise into 2″ pieces
1 small onion, chopped (about 3/4 cup)
2 garlic cloves, chopped
1/4 cup olive oil
3 cups of water
1/3 cup packed basil leaves

Cook the onion and garlic in the olive oil over medium heat in a 3-4 quart stock pot until the onion starts to soften.  Add chopped zucchini and about a teaspoon of kosher salt and cook for about 5 minutes, stirring.  Cover with the water and let it come to a boil and cook for 15 minutes, until the zucchini is soft and easily pierced with a fork.

Add the basil and puree in two batches in a blender (watch out blending hot liquids and make sure it has a vent or you’ve got your hand firmly on that lid!) or, blend directly in the pot with an immersion blender, which is what I do.  Season to taste with salt and pepper and serve with fritters, toast, or as a starter for your three-course fancy-schmancy dinner! 🙂

*taken from Epicurious.com

Stuffing Fritters
Stove-Top Stuffing Fritters

2 cups leftover cornbread stuffing
1/4 cup water
1 large egg
olive oil for frying

In a medium bowl, combine the stuffing, water and egg and if the mixture won’t come together after a bit of stirring, add a little more water until you can form the stuffing into small patties.  I used a medium sized cookie scoop and it worked well.  Heat about 4 tablespoons of olive oil (or any vegetable oil) over medium-high heat and fry the fritters about 3-5 minutes per side until golden brown.  Drain on paper towels and keep the cooked fritters in a 250 degree oven until the rest are done and you’re ready to serve.  This will keep them crispy and warm!


Palmiers for Palm Sunday

almond palmiers
Matt suggested I make Palmier cookies for Palm Sunday to take into our church class this morning.  I love word play and an excuse to make a cookie and I hadn’t tried making them before, so I figured I’d give it a shot!  Turns out – it’s the easiest cookie to make, looks refined and tastes amazing with a cup of coffee!  I’m a big fan of keeping a box or two of puff pastry in my freezer for various recipes, and now I have a new go-to cookie to make on the fly if someone is stopping by for coffee or just because!

Palmier

Palmiers
makes about 2 1/2 dozen cookies

1 box frozen puff pastry – sheets separated and thawed
1 cup of sugar
1/2 tsp almond extract

Spread a half cup of the sugar out on a clean surface evenly and lay both sheets of puff pastry out on top of the sugar.  With a rolling pin, roll the sheets a bit flatter in each direction until about an 1/8th of an inch thick. In a bowl with the remaining sugar, add the almond extract and stir with a fork until blended and the sugar resembles wet sand.  Spread the almond sugar over the surface of the puff pastry sheets.  From each end, start rolling up the pastry as you would a cinnamon roll.  It’s like rolling up a scroll!  When both sides almost meet in the middle, lay one side on top of the other, like shutting a book.  Press down slightly and lay on it’s side, cutting 1/4″ slices and placing the cookies on parchment lined baking sheets.
photo 1
(bad pic, but you get the visual)

It’s important to line your baking sheets with something because the sugar needs to caramelize to make these cookies what they are and you may have a hard time getting them off the sheets unless they are lined.

Bake cookies in a 450 degree oven for 6 minutes.  After 6 minutes, flip one and if it’s golden on the under side, flip them all and bake for another 5-6 minutes.  If they aren’t browned, yet, leave them in the oven for another 2-3 minutes.  You’re aiming for a good, golden caramelization on each side and each oven bakes different, so you may need to rotate your pans during the baking process.

Let the cookies cool completely before serving.  Have fun with the filling.  You could add lemon zest, orange zest, jam, vanilla – whatever you want to the sugar on the inside of the cookies.  Have fun with it!

Palmiers
riding in the car on the way to church this morning 🙂

The Ultimate Dark Chocolate Brownies

The Ultimate Brownie
Just look at them.  Super dense.  Fudgy.  Chewy.  Crisp around the very edges and topped with a square of caramel chocolate so it oozes out when it’s cut.  Simply put: the best brownies you will ever eat.

The Bread Man made these a few years ago when we decided to host a Brownie Battle and invite about 20 of our friends to all bring brownies to taste test and enter into the competition for the Golden Whisk.  Yes, there was a golden whisk trophy.  We are serious about our food battles.  Matt baked these brownies and topped his with dark chocolate toffee bars, which is his favorite combination.  They tied up with another contender for Best Traditional Brownie out of about 20 pans of brownies!  When I went to make them last week, I bought Ghiradelli bars – the individually wrapped ones.  And I bought sea salt caramel (as seen pictured) and sea salt soiree with almonds to place on top of the batter.  Check it out, sinking down into the glossy batter…
Ultimate Brownies
This recipe is super simple and I nearly have it memorized.  We’ve adapted it from a stunning UK recipe and put it in slightly easier steps and terms for everyone.  I hope you make these soon.  If for nothing else than to cry with happiness.  It’ll happen.  And be creative with the type of chocolate bars you put on top!  There’s so many to choose from!  I thought if I were in the mood, a dark chocolate mint bar on top would be good.  Or dark chocolate and strawberry!  The fun thing about going with the individually wrapped bars is that it’s instant perfect portioning for cutting!  Have fun and let me know how you like them!

The Ultimate Dark Chocolate Brownie

The Ultimate Dark Chocolate Brownies
makes about 16 depending on how to slice it 😉

8 oz unsalted butter
8 oz dark chocolate chips (I use Ghiradelli 60%)
10 oz superfine sugar (I used Baker’s Sugar)
2 tsp vanilla extract
4 eggs
pinch of salt
5 oz cake flour
Your favorite chocolate bars for topping (I used these two kinds)

Preheat your oven to 400F.

In a double boiler (or a medium saucepan over low heat filled a couple inches up with water with a big heatproof glass bowl setting on top) melt the butter and chocolate together and stir with a rubber spatula until completely incorporated.  Gently stream in the sugar and whisk constantly until fully incorporated and smooth.  Whisk in the vanilla.  In a separate bowl, crack your eggs and lightly whip them up with a pinch of salt.  Take the bowl off the double boiler (if you haven’t already) and whisk in the eggs until smooth and then add the flour in two batches, stirring well to smooth out as many lumps as possible.

Line a 9×13″ pan with foil and spray with cooking spray.  Pour the brownie batter in the pan and smooth out the surface.  Dot the entire surface with chocolate bars and bake for 20 minutes.  It’s not going to look done, but take that sucker OUT and let it cool COMPLETELY before cutting.  Restrain yourself.  Plan ahead.  Gently lift the foil out of the pan and place the sheet of brownies on a cutting board and cut into squares.  Enjoy your life more than you ever have before. You’re welcome.

Double Dark Chocolate Brownies


Homemade Sweet, White Sandwich Bread

Two Loaves of Sweet, White Sandwich Bread Sandwich Bread
This is home.  To smell this bread baking is to realize that everything is going to be alright. One of the blessings of being married to The Bread Man is that he bakes stuff like this.  He started baking this bread a few months ago. The recipe makes two loaves at a time and we can blaze through both in a week.  Perhaps we shouldn’t and in a better world, I’d give a loaf away.  But it makes the perfect toast in the morning, the perfect grilled cheese sandwich at lunch, the perfect cinnamon toast for a snack in the afternoon and the perfect toast with jam for dessert after dinner.  No, we don’t do all those things in one day.  I’m just telling you that you will NEVER tire of this bread.  It stays fresh for so long AND, unlike most homemade breads, this stuff doesn’t get mold for more than a week – on the counter!  It’s perfect.  Sweet, smooth, silky inner texture and a perfectly crisp crust when toasted – not too thick, not too thin.  Your kids won’t even tear off the crust.

Homemade Sandwich Bread
You can see my lack of restraint that in the thirty seconds it took me to cut the slice to put the slices in the toaster, I bit the corner of that cinnamon/sugar slice.  I could NOT help it.  You’ll see why.  This bread is what’s good about being a kid, again.  This bread sings of wholesome goodness and peace and harmony.

1375973_10152292138695169_2128879586_n
I may be going too far.  Just try it out. And start it the night before you want it because I don’t want you to get all fussy when you see that it has to rise in your fridge for 8 hours.  Suck it up – it’s worth it.

Sandwich Loaf

Homemade Sandwich Bread*
makes two, 8″ loaves

9 grams (1 tbs) instant yeast
425 grams (1 3/4 cups, plus 2 tbs) lukewarm whole milk
794 grams (6 1/4 cups) unbleached bread flour
14 grams (2 tsp) salt
78 grams (5 1/2 tbs) sugar
85 grams (6 tbs) vegetable oil or melted, unsalted butter
1 egg (50 grams)

Do Ahead:

Whisk the yeast into the lukewarm milk until dissolved.  Set aside for 1 to 5 minutes.  Combine the flour, salt, sugar, oil, and egg in a mixing bowl, then pour in the milk mixture.  If using a mixer, use the paddle attachment and mix on the lowest speed for 2 minutes.  If mixing by hand (go you) use a large spoon and stir for about 2 minutes.  The dough should be coarse and slightly sticky.

Switch to the dough hook and mix on medium-low speed for 4 to 5 minutes, or knead by hand on a lightly floured work surface for 4 to 5 minutes, until the dough is soft, supple, and tacky but not sticky.

Whichever mixing method you use, knead the dough by hand for 1 minute, then form it into a ball. Place the dough in a clean, lightly oiled bowl, cover the bowl tightly with plastic wrap, and refrigerate overnight or for up to 4 days. (You can bake the dough in batches over different days if you want and portion the dough into two or more oiled bowls at this stage.)

On Baking Day:

Remove the dough from the refrigerator about 2 1/2 hours before you plan to bake and divide it in half; each piece should weigh about 25 ounces (709 g) which is perfect for 4 1/2 x 8 inch loaf pans.  For a 5 x 9 inch pan, use 28 to 32 ounces of dough.  Shape into sandwich loaves (read method below), then place them in greased loaf pans to rise. Mist the dough with spray oil and cover the pans loosely with plastic wrap or a towel; then let the dough rise at room temperature for about 2 1/2 hours or longer, until it domes about 1 inch above the rims of the pans.

About 15 minutes before baking, preheat the oven to 350F.

Bake for 20 minutes, then rotate the pans and bake for another 20 to 30 minutes.  The bread is done when the top is a rich, golden brown, the sides are firm and the loaf sounds hollow if tapped on the bottom and the internal temperature is at least 185F in the center.

Remove from the pans and cool on a wire rack for at least 1 hour before slicing and serving.  I DID exercise restraint, here.  If you cut into them too early, you’ll have gummy bread.  Don’t say I didn’t warn you.

* from Peter Reinhart’s Artisan Breads Every Day – we love him


Shaping the Sandwich Loaves for baking:

To shape a sandwich loaf, flatten the dough into a 5 by 8 inch rectangle.  Working from the 5 inch side of the dough, roll up the length of the dough (like a fat cinnamon roll).  Pinch the final seam closed using your fingertips or the back edge of your hand.  Gently rock the loaf to even it out.  Don’t taper the ends; keep the top surface of the loaf even.  Place the loaf in a greased pan, seam side down, cover, and proof.

The Amazing Pea Puree

7G9A9851
This recipe is one of the most delicious things we’ve ever made in our kitchen.  I’m serious.  How can a pea puree be that good and be something adults want to eat, instead of just babies?  Because yes, I agree, it looks like baby food.  But let’s be honest with ourselves: any high-end restaurant is selling you baby food under the name “puree” and you LOVE it.  This stuff is creamy and almost like a really soft whipped mashed potato consistency.  I know I’m fighting an uphill battle trying to make this sound appealing, so I’ll stop.  Just make it.  Especially if you want something different in your week night repertoire.  You certainly have some frozen peas in your freezer.  You certainly have a head of garlic.  The only thing you may not have on hand is heavy cream.  This puree has been a simple accompaniment to our meals, the base sauce and flavor for seared scallops (as pictured) and every time Olive basically licks her bowl.  Heck, we all do.  Seriously, it’s that good.  And we have Nigella Lawson and her awesome book, How to Eat to thank for this gem.  In her book, this recipe didn’t even get it’s own title or section, but it was sandwiched in alongside a fish recipe and we felt so lucky to find it.  We’ve made it at least four or five times since!

If you’re looking for a great baby food, toddler-friendly food or high class side dish for a dinner party, this is it!

Pea Puree*
serves 4 as a side dish

2 1/2 cups frozen peas
6 cloves garlic, left whole
4 TBS butter
1/4 cup heavy cream
salt and pepper

In a medium pot, bring salted water to boil with the garlic cloves.  Boil for about 5 minutes and then add the peas.  Boil the peas till they are very tender and then transfer the peas and garlic cloves to a food processor.  Add the butter and a sprinkle of salt and pepper to the peas and garlic and pulse until smooth.  Drizzle in the heavy cream while the processor is running.  Taste to see if it needs more salt and then serve immediately!  Easy peasy!  Har har.

*adapted from How to Eat

Chewy Mexican Chocolate Cookies

Mexican Chocolate Cookies 3
This is one of my most favorite cookie recipes.  I found it a few years ago in a baking issue of Cooking Light magazine.  I’ve made it several times and I always get requests for the recipe.  The original recipe is soft out of the oven but then it hardens up pretty fast and becomes sort of like a short bread or pecan sandy texture.  I love the original, crunchy, good-with-coffee version, but I’m a soft and chewy cookie kinda gal.  So I adapted the recipe a bit to make the cookies more flat and chewy and I LOVED the results!  Crispy along the edges, soft in the middle – with a bite from the pepper and cinnamon!  As you can tell, I’m a fan of the Mexican chocolate flavor and I hope, within my life, to incorporate it into as many baked goods as possible.

Chewy Mexican Chocolate Cookies
I hope you try this recipe out!  If you’d like the cookies to be the original crunchy style, leave out the extra egg and cut back to 4 TBS butter.  But I don’t think you will want that after you taste these 🙂

Chewy Mexican Chocolate Cookies
makes about 30 cookies

5 oz bittersweet chocolate, coarsely chopped (I use Ghirardelli 60% chips and skip the chopping)
3.4 oz AP flour (about 3/4 cup)
1/2 tsp ground cinnamon
1/4 tsp baking powder
1/4 tsp salt
a few grinds of black pepper
a pinch of cayenne
1 1/4 cups sugar
6 TBS butter, softened
2 eggs
1 tsp vanilla extract

Preheat the oven to 350F. Place the chocolate in a small glass bowl and microwave for one minute, stir and microwave 30 seconds more to fully melt.  Stir with a rubber spatula to full incorporate and ensure it’s all melted and set aside to cool.

Combine the flour, cinnamon, baking powder, salt, cayenne and black pepper and stir well with a whisk.

Combine sugar and softened butter in a large bowl and beat with a mixer or by hand until well blended.  Add the eggs and beat well.  Add the cooled chocolate and vanilla and beat until just blended.  Fold in the flour mixture until fully incorporated.

Drop by level tablespoons 2 inches apart on a baking sheet lined with parchment paper (I’ve tried it without and they will come off a regular sheet pan if you spray it with enough oil.) Bake at 350F for 12 minutes or until cracked on top and almost set.  Let the cookies cool on the pan for a couple minutes and then transfer to a wire rack until cooled completely.  Dust with powdered sugar if desired!

Mexican Chocolate Cookies 2

*recipe adapted from Cooking Light magazine, 2010